Messenger allows emails to be sent to parents, students, and staff members. If your district purchased Messenger with Voice or Text Messenger, voice and text messages can be sent as well.
Messenger is used to send general messages, but there are other tools for sending specific messages for attendance, behavior, emergencies and staff.
Messenger 2.0
Messenger 2.0 is currently in Open Beta. These tools are subject to change as new features are released.
Overview/Getting Started
Tool Search: Messenger 2.0
| What can I do? | What Do I need to know? |
|---|---|
Messenger 2.0 Feature Comparison
| Feature | Messenger 1.0 | Messenger 2.0 |
|---|---|---|
|
Send messages to students and their messenger contacts (Parents, guardians, etc.) |
X |
X |
|
Enforce a messaging limit (regulates how many messages a parent with multiple students in the school receives) |
X |
X |
|
Include Ad hoc filter options |
X |
X |
|
Option to review before sending |
X |
X |
|
Create and schedule a message to send at a later date and time |
X |
X |
|
Navigation buttons to move back and forth through the process |
|
X |
|
Total recipient count tracking |
|
X |
|
Option to view recipients before completing the entire message |
|
X |
|
Option to send message to student AND parents AND staff from one place |
|
X |
|
Create and send messages from a mobile device |
|
X |
|
Option to provide suggestions and feedback to our developers during the development process |
|
X |
| One-time scheduled messages generate recipient lists at time of delivery |
|
X |
| Recurring messages can be scheduled to send to multiple calendars in a single campaign |
|
X |
| Edit a one-time scheduled message |
|
X |
| Conveniently view and manage scheduled messages |
|
X |
Access Messenger 2.0
Messenger 2.0 is available in the Communications area of Campus and is mobile device friendly.
All Messenger 1.0 functionality remains available and DOES NOT include any added functionality. Messenger 2.0 and its features function separately from Messenger 1.0.
Email Settings
Be sure to check the Email Settings tool to configure general settings for email messages.
Recipient Requirements
The following requirements must be established for recipients to receive a message.
| Recipient | Requirements |
|---|---|
| Students |
|
| Parents/Other |
|
| Staff |
|
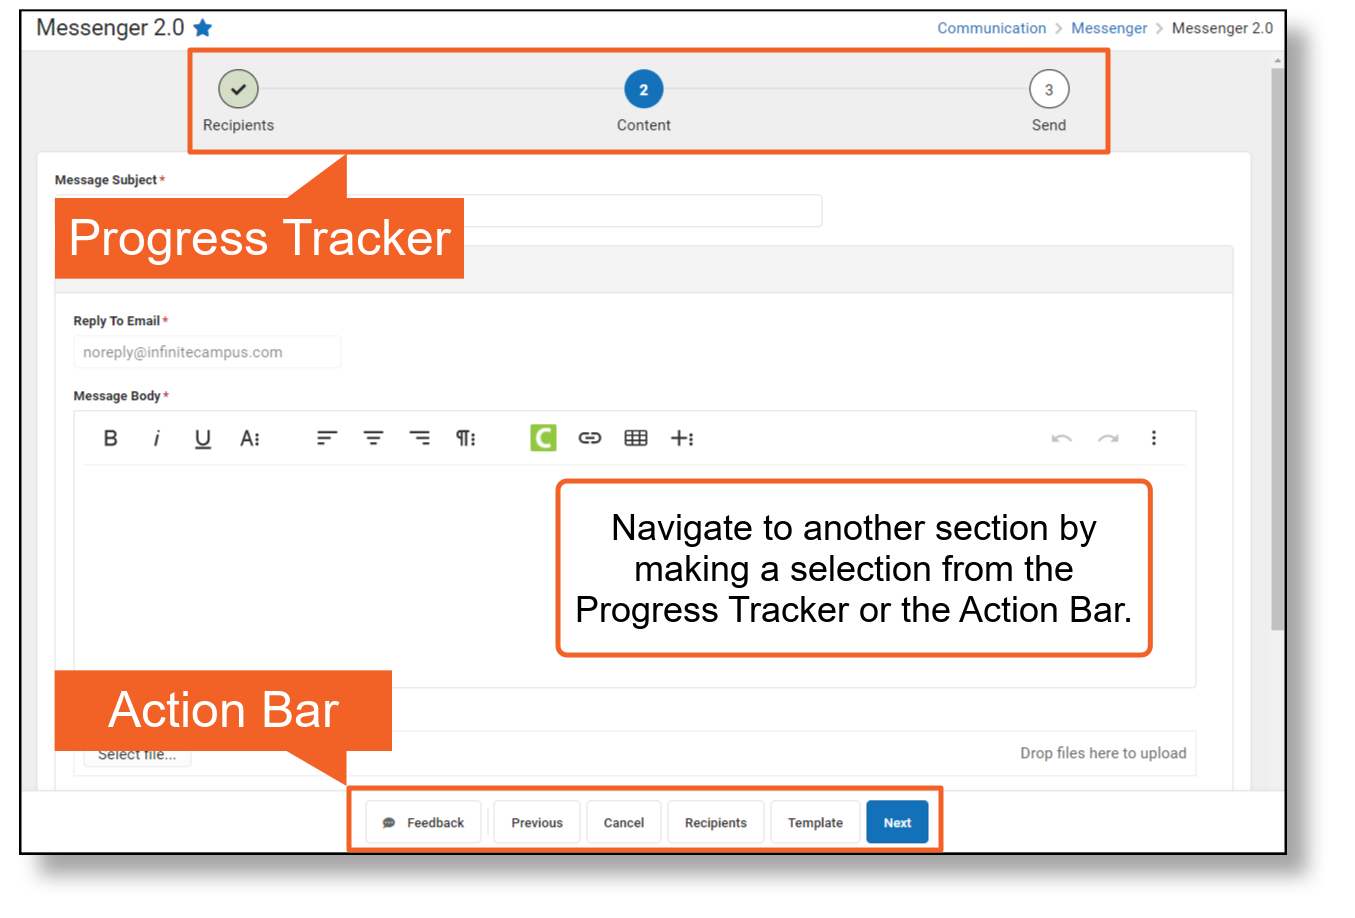
Navigate Messenger 2.0
|
Progress Tracker
| |
|---|---|
 |
An alert indicates there is missing information for required fields. |
 |
The green checkmark indicates all required fields are complete. |
 |
A white circle indicates the screen has not been viewed and no entries have been made. |
Submit Feedback
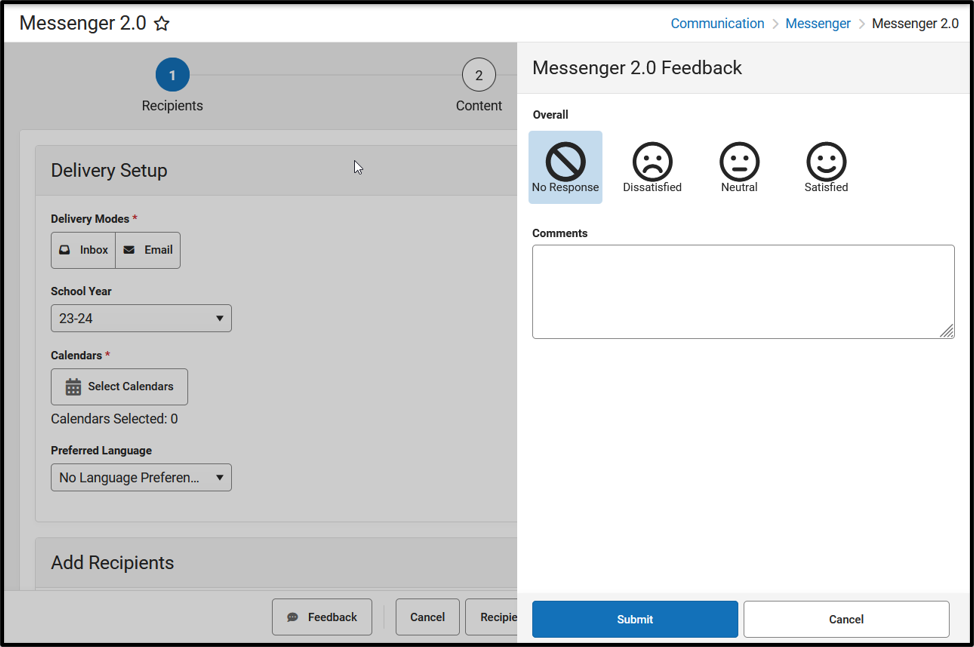
As we continue to enhance the Messenger 2.0 tools your feedback is critical to help us provide the best user experience possible.
The Feedback button is available on each step of the messenger workflow.
- Press the Feedback button on any step of the workflow and a side panel will open.
- Choose an Overall response (No Response, Dissatisfied, Neutral, Satisfied).
- Enter any comments you have regarding the tool. For example, features you like, features you dislike, questions you may have, enhancements you would like to see in the future, etc.
Create and Send a General or Priority Message
General messages in 2.0 may be sent to students, Messenger Contacts, and/or Staff.
Tool Search: Messenger
The procedures on this page describe how to send a general or priority message via inbox, email, voice or text to students, Messenger contacts, and/or staff.
General messages and Priority messages have identical workflows. They differ in that General messages will only contact email addresses and phone numbers that have been marked 'General' under Census > People > Demographics > Messenger Preferences Contact Reasons, and Priority messages will only contact email addresses and phone numbers that have been marked 'Priority' under Census > People > Demographics > Messenger Preferences Contact Reasons.
For detailed descriptions of each field in the message builder, see the Messenger Field Descriptions article.
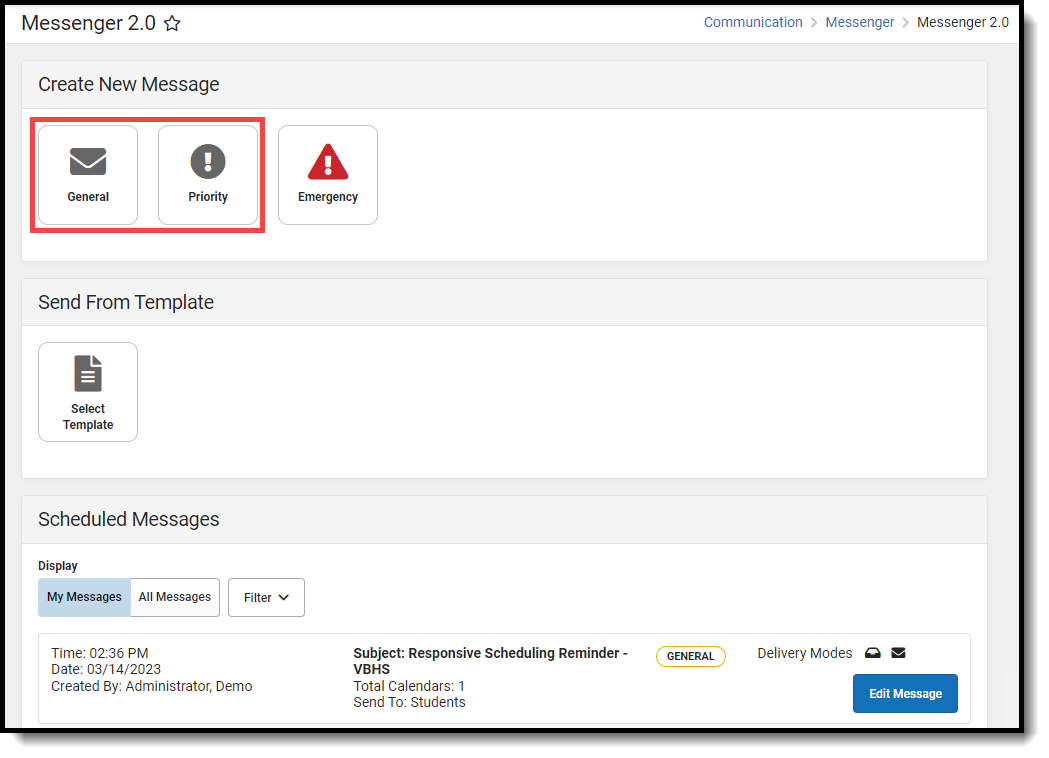
Send a General or Priority Message
Step 1. Recipients
- Select General or Priority.
Result: Step 1 Recipients displays. - Select the Delivery Mode: Inbox, Email, Voice, and/or Text.
- Select a School Year.
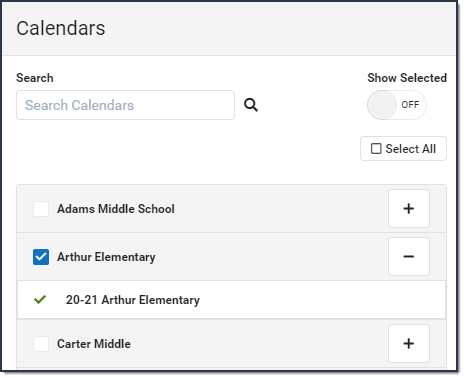
Tip: The default selection is the current school year. - Select Select Calendars.
Result: The Calendars panel displays. Use the + (plus) and - (minus) buttons to view or hide additional calendars.
- Select a Preferred Language preference. (Optional)
- Select at least one recipient group from Add Recipients:
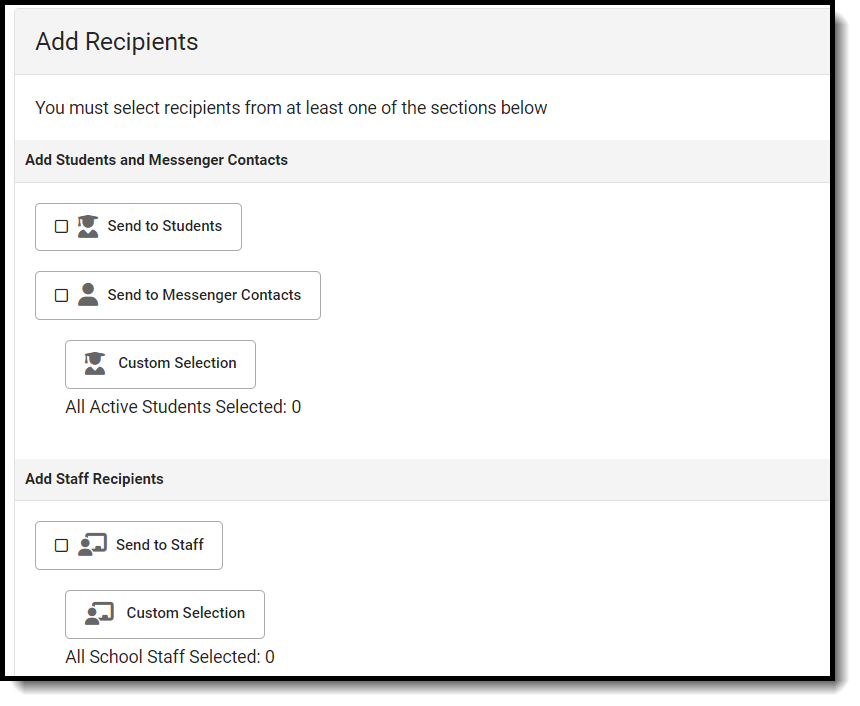
Messenger Contacts are filtered by the student list.
|
Option |
Description |
|
Send to Students |
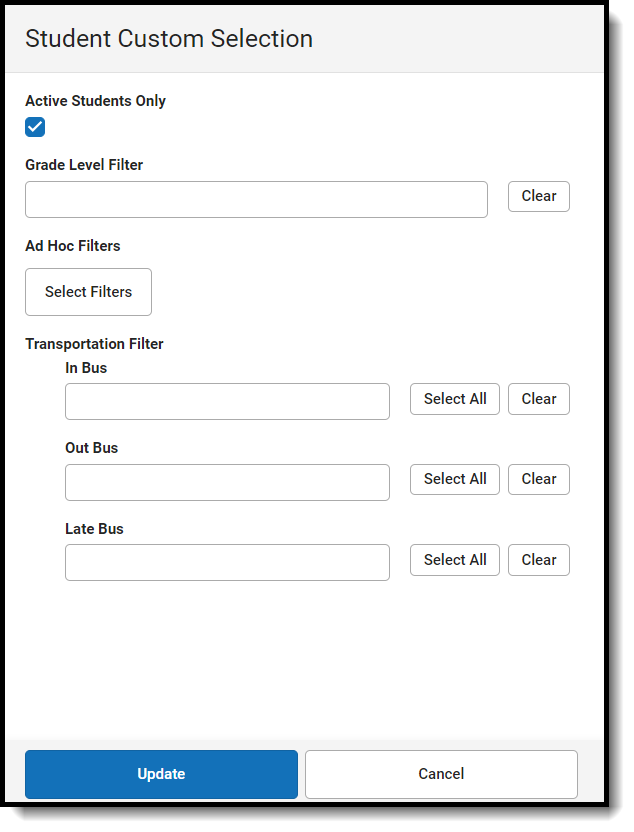
Includes students in the selected calendar(s). Student Custom Selection: Includes all active students by default with the ability to filter the student list with the following options: Grade Level, Ad Hoc, and Transportation Filter. The Transportation Filter allows for sending messages directly to students on buses and Messenger Contacts based on which bus the student rides. Click Update when you are done. Grade Level Filter will only show grade levels that exist in Calendars within the School Year selected.
|
|
Send to Messenger Contacts |
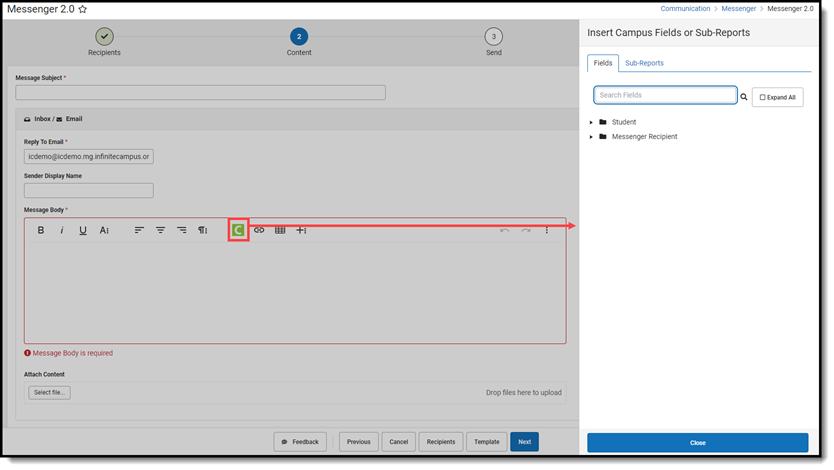
Messenger Contacts are filtered by the student list. If a Student Field and/or Student Sub-Report is added into any Message Body on Step 2, the Messenger Contact will receive one message per student with whom they have a Messenger relationship. If no Student Fields/Sub-Reports are present, the Messenger Contact will receive one message from this one message per delivery mode regardless of how many students with whom they have a Messenger relationship.
 |
|
Send to Staff |
Includes staff in the selected calendar(s).
Staff Custom Selection: Includes all current school staff, including those with a future start date, at schools of the selected calendar(s). From here you can select specific Staff Roles, mark the checkbox to Include District Staff, and/or select predefined Ad Hoc filters. Click Update when you are done. 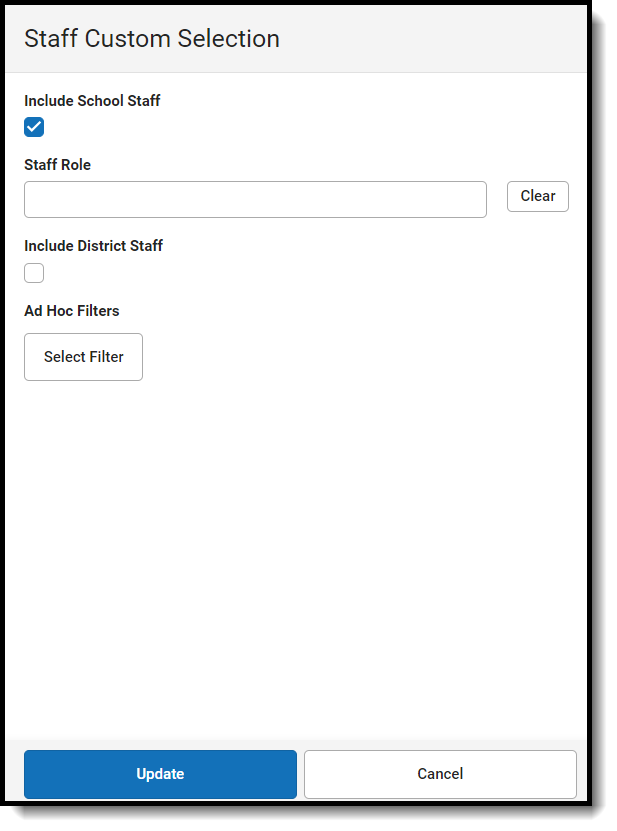 |
| Add Individual Recipients |
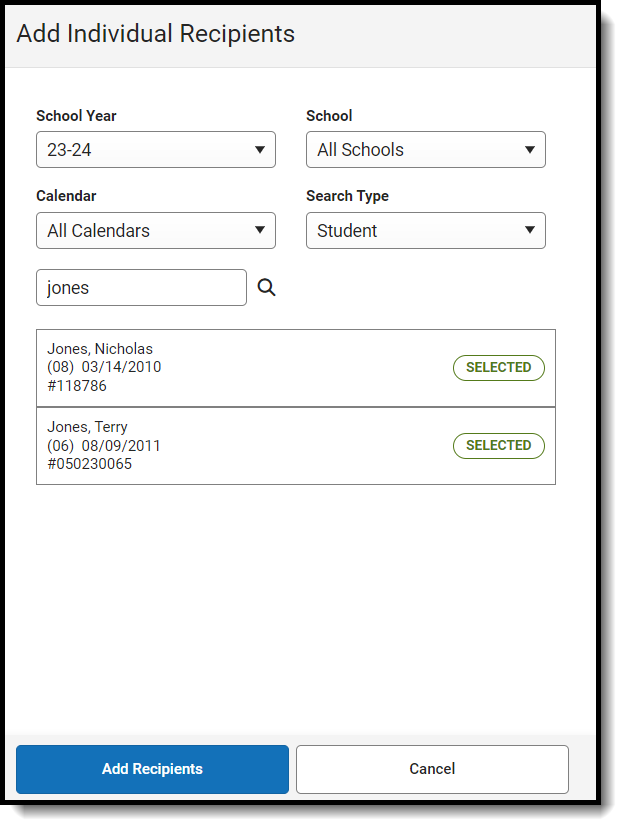
To add individuals who are not filtered by Calendars, School Year, or Preferred Language, click Add Individual Recipients. Choose from the available filters or enter a name. Select the desired recipients and click Add Recipients. Fields and/or Sub-Reports cannot to be added to the message bodies on Step 2 when using Add Individual Recipients.
|
| Add Non-Campus Recipients | Click the Add Non-Campus Recipients and enter one or more email addresses/phone numbers of non-Campus recipients. Click Add Recipients after they have been entered.
These email addresses and phone numbers will be contacted via the delivery mode selected between Email, Voice, and Text. Email addresses and phone numbers will be saved to Messenger Templates and Scheduled Messages, as well as recorded in the Sent Message Log. Fields and/or Sub-Reports cannot to be added to the message bodies on Step 2 when using Add Non-Campus Recipients. 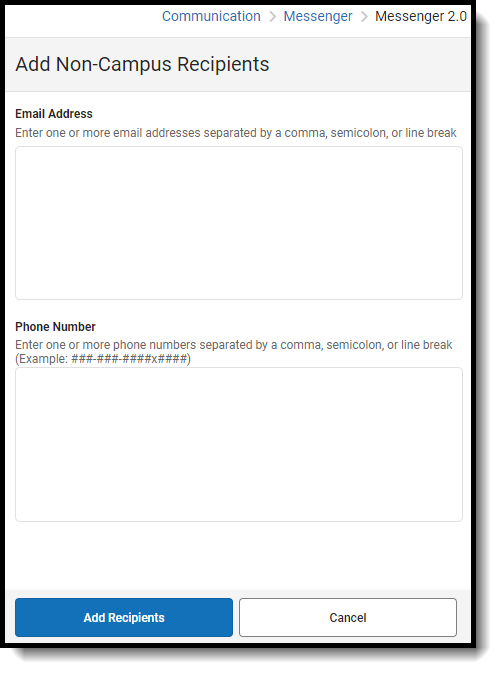 To remove non-Campus recipients: To remove non-Campus recipients:
|
- Click the Recipients button to display a side panel to review the recipient list. If necessary, exclude recipients and click the Update button on the panel when you are done. You may also click the down arrow next to Update to select Update and Generate CSV. This will create a CSV report that contains data related to the message and each of the recipients. For more information, review Recipient Report. (Optional)
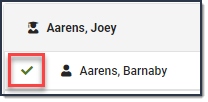
By default, all recipients are automatically selected to receive the message. Click the person's name to exclude them as a message recipient. A checkmark next to the person's name means they will receive the message. No checkmark next to the person's name means they will not receive the message. In the following example, the person will receive the message.
- Select Next.
Result: Step 2 Content displays.
Step 2. Content
- Enter the subject of the message in Message Subject.
- Complete the following Inbox, Email, Voice, and/or Text options.
Option Description Inbox Compose the body of the message in the Message Body.
Attachments are not sent with Inbox messages.
Email - Enter or confirm the correct email is showing in the Reply to Email field.
Tip: This Field is only editable if the Allow Custom Sender’s Email Address checkbox is marked in the Email Settings tab of Messenger Admin. - Enter a Sender Display Name. (Optional)
- Compose the body of the message in the Message Body.
- Click the Select File button to attach a file to the email. (Optional)
Voice Select one of the following options: - Upload - Use this option to attach a pre-recorded .WAV file.
- Text-to-Speech - Use this option to have Campus convert text from the Voice Message Body field on this screen to a voice message. If you are also sending an Email message the Voice Message Body field is not available and the Message Body from the Email card will be converted instead.
When using voice messaging, this call chain determines the order in which each recipient’s phone numbers are contacted:
- Household Phone
- Cell Phone
- Work Phone
- Other Phone
Text Compose the body of the message in Text Message Body. Hyperlinks for text messages must be written as full URLs (e.g., https://www.infinitecampus.com). - Enter or confirm the correct email is showing in the Reply to Email field.
- Optionally, follow one of two workflows within Preview/Test to view a message before sending it to recipients. Test messages will be sent in context of the recipient.
Option Description Preview 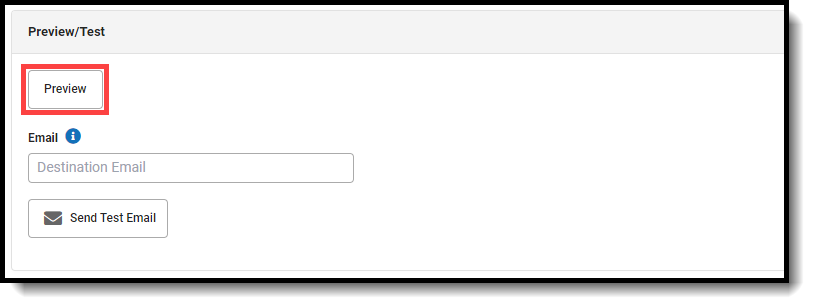
-
Click Preview after entering all the required fields.
-
Select a recipient you'd like to preview the message for from the Preview side panel. All selected message types will now appear the way it would to the individual who will receive it.
-
To send a test message in the context of the selected recipient, enter an email address and/or phone number in the appropriate field in the test area of the Preview side panel and click Send. The test message will send with populated fields and/or sub-reports, if they were included in the message.
-
Click Close when you have finished previewing the message.
Test 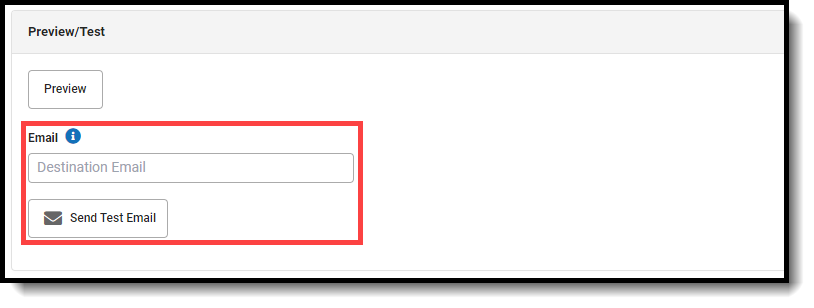
-
Enter a valid email address in the Email field.
-
Click Send Test Email. Up to five email addresses can be entered and email addresses must be separated by a comma.
Infinite Campus strongly recommends previewing or testing messages before delivering them. -
- Select Next.
Result: Step 3. Send displays.
Step 3. Send
- Select Send Now, Schedule One-Time, or Schedule Recurring.
Option Description Send Now Deliver the message as soon as the Send step is completed. The Send Now option is not available if you are trying to send a text/voice message outside of the district-wide dialing window.Schedule One-Time Schedule a message to be sent a single time in the future. The recipient list for this message will be generated at the time of delivery.
- Enter the Date the message will be sent.
- Enter the Inbox/Email Time the message will be sent.
- Enter the Voice/Text Message Time the message will be sent.
Schedule Recurring Schedule a message to be sent on a recurring basis. The recipient lists for these messages will be generated at the time of delivery.
- Enter the Inbox/Email Time the message will be sent.
- Enter the Voice/Text Message Time the message will be sent.
- Setup the Recurrence Pattern based on Day(s) of the Week or Custom Dates:
- Day(s) of the Week
- Click the Day(s) of the Week radio button.
- Select the days of the week the message will be sent.
- Select the Frequency the message will be sent.
- Select a Start and End Date for the message.
- Custom Dates
- Click the Custom Dates radio button.
- Click the day the message will be sent in the Select Dates calendar.
- Day(s) of the Week
- Confirm you would like to receive a confirmation email that the message was successfully processed by marking the Confirmation Email checkbox.
- Click Review. A pop-up will display the number of message recipients for each selected Delivery Mode. Use View Recipient Details to download the Recipient Report before sending the message.
- Click Send. After you initiate the send message process, you'll be taken back to the main Messenger 2.0 screen. The message then starts processing and shows up in the 'In Progress' tab of Upcoming Messages.
While the message is processing, you can leave the screen and return later to check your message details. A status label below the 'Created By' field shows the progress of the message in the sending process. After the message is fully processed, it leaves the 'In Progress' tab and moves to the Sent Message Log 2.0. For more information about In Progress messages and their statuses, read the Upcoming Messages documentation. A warning displays if you are scheduling a voice/text message to go out within 30 minutes of the dial window closing. If the dial window closes while this message campaign is in progress, all calls/texts are stopped at the dial window end time.
Recipient Report
After Students, Messenger Contacts, or Staff have been selected under Send To, a report can be generated to preview:
- Total and Distinct recipient counts.
- Full recipient list and the delivery modes they are eligible to be contacted at.
- A list of recipients who do not have an eligible delivery mode to be contacted at.
- A list of excluded recipients.
Generating Recipient Report
- Click the Recipients button.
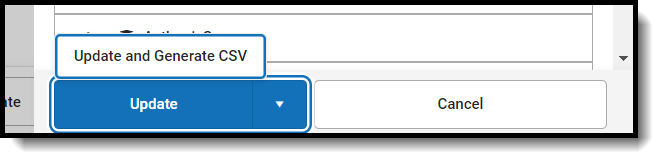
- Click the down arrow next to Update.
- Click Update and Generate CSV. The report will then download to your computer.
Recipient Report Definitions
| Term | Definition |
| Total People |
Total number of distinct people pulled into the recipient list. |
| Total Eligible Recipients | Total number of distinct people eligible to receive a message. Excludes: missing devices, contact preferences, excluded people. |
| Distinct Inbox | Total number of people eligible to receive a process inbox message. |
| Distinct Email | Total number of people eligible to receive email messages. |
| Distinct Voice | Total number of people eligible to receive a voice call. |
| Distinct Text | Total number of people eligible to receive a text message.
Note: If a recipient confirms the voice call they will not receive a text message |
| Excluded Recipients | Number of recipients that were excluded.
Note: Messenger contacts must be excluded from receiving a message from all students to be counted.
|
| No Device | Number of people who do not have an eligible device to receive a message. |
General or priority messages may be sent to students, student messenger contacts or staff at multiple schools using Messenger 2.0.
Create and Send an Emergency Message
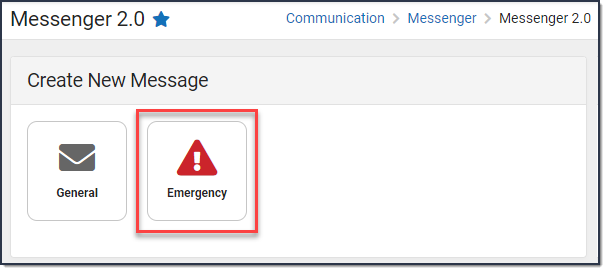
Emergency messages are designed to be sent immediately to Students, Messenger Contacts, and/or Staff.
You can send an emergency message if you need to quickly create and immediately deliver a message to students, messenger contacts, and/or staff.
| What can I do? | What do I need to know? |
|---|---|
Important Information about Emergency Messages
- Unlike other Campus messages, an emergency message does not have a scheduled delivery window. All messages are delivered immediately or as quickly as possible.
- Emergency messages are NOT limited to the dialing window established by the District Start Time and District End Time fields of the Voice Settings tool (System Administration > Messenger > Messenger Preferences > Voice Settings).
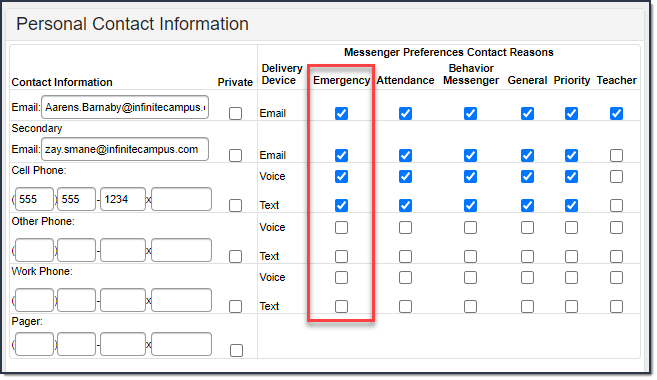
- The Emergency Messenger sends messages to contacts based on the contact phone numbers and email addresses marked to receive emergency messages on the Demographics tool. The Emergency checkbox on the Demographics tab must be marked by the phone number or email address. Phone numbers and email addresses that do not have the Emergency checkbox marked do not receive an emergency message.
- Emergency Messenger also relies on proper designation of a person as a Messenger contact on the Relationships tool.
-
Sending out MASS Emails using Freeware like Google as Your Email Server
- Emails exceeding the amount set by the email service provider may fail due to controls set by the provider to prevent SPAM.
- Free email service providers also typically set maximum allowed emails sent per day. After that limit is reached, usually in a 24 hour rolling period, additional emails won't be sent until the time passes.
- For more information about Google's sending limits, see the following articles:
Phone Recipient Confirmation
When voice messages are delivered, Shoutpoint may attempt to reach a recipient at multiple phone numbers. Shoutpoint continues to call recipient phone numbers until the recipient confirms message receipt or until the maximum number of redials is met as allowed by the district (configured in System Administration > Messenger > Messenger Preferences > Voice Settings).
For districts that have migrated to Voxology, Voxology performs redials but does not utilize the redial settings for a specific status. Instead, it will run through a person's phone numbers until they have confirmed contact or all devices have had a successful contact attempt (answering machine or picked up). Additional contact attempts will stop if confirmed.
To confirm delivery of a message, a recipient must press 0 at the end of a voice message. This cancels all additional delivery and/or redial attempts for recipients with non-shared numbers or non-extension numbers.
Confirming and cancelling calls to other phone numbers works in the following way:
- Recipients can confirm calls on any phone number, even those shared with any other recipient in Campus.
- If a phone number contains an extension, recipients are not be able to confirm the call.
- Confirming calls to phone numbers for the same recipient does not cancel calls to any phone numbers which contain extensions.
- If a multiple recipients share a phone number but have different Delivery Devices selected for the same Messenger tool (Voice/Text), Voice call confirmation cancels the Text message from going out for the other recipient.
To stop additional calls, a recipient should always press 0 to confirm receipt of messages. If a recipient listens to a message but does not confirm its receipt by pressing 0, they may continue to receive call and redial attempts.
Send an Emergency Message
The procedures in this section describe how to send an emergency message via inbox, email, voice or text to students, messenger contacts, and/or staff. For detailed descriptions of each field in the message builder, see the Messenger Field Descriptions article.
To begin, choose one of the following options.
| Option | Description |
|---|---|
| Create a new message | 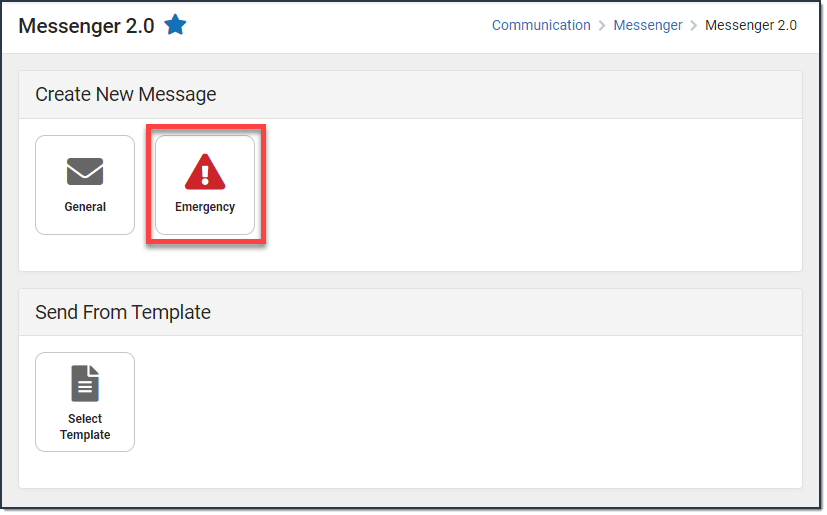 |
| Use an existing template | Click Select Template > Emergency then select the template you want to use. |
Step 1. Recipients
- Select General or Priority.
Result: Step 1 Recipients displays. - Select the Delivery Mode: Inbox, Email, Voice, and/or Text.
- Select a School Year.
Tip: The default selection is the current school year. - Select Select Calendars. By default, all Calendars a user has tool rights to are selected when an Emergency Message is created.
Result: The Calendars panel displays. Use the + (plus) and - (minus) buttons to view or hide additional calendars.
- Select a Preferred Language preference. (Optional)
- Select at least one recipient group from Add Recipients:
Messenger Contacts are filtered by the student list.
|
Option |
Description |
|
Send to Students |
Includes students in the selected calendar(s). Student Custom Selection: Includes all active students by default with the ability to filter the student list with the following options: Grade Level, Ad Hoc, and Transportation Filter. The Transportation Filter allows for sending messages directly to students on buses and Messenger Contacts based on which bus the student rides. Click Update when you are done.
|
|
Send to Messenger Contacts |
Messenger Contacts are filtered by the student list. |
|
Send to Staff |
Includes staff in the selected calendar(s).
Staff Custom Selection: Includes all current school staff, including those with a future start date, at schools of the selected calendar(s). From here you can select specific Staff Roles, mark the checkbox to Include District Staff, and/or select predefined Ad Hoc filters. Click Update when you are done. |
| Add Individual Recipients |
To add individuals who are not filtered by Calendars, School Year, or Preferred Language, click Add Individual Recipients. Choose from the available filters or enter a name. Select the desired recipients and click Add Recipients. Fields and/or Sub-Reports cannot to be added to the message bodies on Step 2 when using Add Individual Recipients.
|
| Add Non-Campus Recipients | Click the Add Non-Campus Recipients and enter one or more email addresses/phone numbers of non-Campus recipients. Click Add Recipients after they have been entered.
These email addresses and phone numbers will be contacted via the delivery mode selected between Email, Voice, and Text. Email addresses and phone numbers will be saved to Messenger Templates and Scheduled Messages, as well as recorded in the Sent Message Log. Fields and/or Sub-Reports cannot to be added to the message bodies on Step 2 when using Add Non-Campus Recipients. To remove non-Campus recipients:
|
- Click the Recipients button to display a side panel to review the recipient list. If necessary, exclude recipients and click the Update button on the panel when you are done. You may also click the down arrow next to Update to select Update and Generate CSV. This will create a CSV report that contains data related to the message and each of the recipients. For more information, review Recipient Report. (Optional)
By default, all recipients are automatically selected to receive the message. Click the person's name to exclude them as a message recipient. A checkmark next to the person's name means they will receive the message. No checkmark next to the person's name means they will not receive the message. In the following example, the person will receive the message.
- Select Next.
Result: Step 2 Content displays.
Step 2. Content
- Enter the subject of the message in Message Subject.
- Complete the following Inbox, Email, Voice, and/or Text options.
Option Description Inbox Compose the body of the message in the Message Body.
Attachments are not sent with Inbox messages.
Email - Enter or confirm the correct email is showing in the Reply to Email field.
Tip: This Field is only editable if the Allow Custom Sender’s Email Address checkbox is marked in the Email Settings tab of Messenger Admin. - Enter a Sender Display Name.(Optional)
- Compose the body of the message in the Message Body.
- Click the Select File button to attach a file to the email. (Optional)
Voice Select one of the following options: - Upload - Use this option to attach a pre-recorded .WAV file.
- Text-to-Speech - Use this option to have Campus convert text from the Voice Message Body field on this screen to a voice message. If you are also sending an Email message the Voice Message Body field is not available and the Message Body from the Email card will be converted instead.
When using voice messaging, this call chain determines the order in which each recipient’s phone numbers are contacted:
- Call/Text all eligible devices marked for Emergency.
- Calls and texts are sent at the same time to all devices, reaching everyone simultaneously.
- After the first round, if redials are initiated, we automatically revert to this call chain:
- Household Phone
- Cell Phone
- Work Phone
- Other Phone
Text Compose the body of the message in Text Message Body. Hyperlinks for text messages must be written as full URLs (e.g. https://www.infinitecampus.com). - Enter or confirm the correct email is showing in the Reply to Email field.
- Optional: To view a message in the manner it will be delivered to recipients, enter a valid email address in the Email field and click Send Test Email. Up to five email addresses can be entered and email addresses must be separated by a comma.
Infinite Campus strongly recommends testing messages before delivering them.
- Select Next.
Result: Step 3. Send displays.
Step 3. Send
- Select Send Now or Schedule One-Time.
Option Description Send Now Deliver the message as soon as the Send step is completed. Schedule One-Time Schedule a message to be sent in the future. Once created, these messages can be edited/viewed within Scheduled Messages in Messenger 2.0.
- Enter the Date the message will be sent.
- Enter the Send Time the message will be sent.
- Confirm you would like to receive a confirmation email that the message was successfully processed by marking the Confirmation Email checkbox.
- Click Review. A pop-up will display the number of message recipients for each selected Delivery Mode. Use View Recipient Details to download the Recipient Report before sending the message.
- Click Send. After you initiate the send message process, you'll be taken back to the main Messenger 2.0 screen. The message then starts processing and shows up in the 'In Progress' tab of Upcoming Messages.
While the message is processing, you can leave the screen and return later to check your message details. A status label below the 'Created By' field shows the progress of the message in the sending process. After the message is fully processed, it leaves the 'In Progress' tab and moves to the Sent Message Log 2.0. For more information about In Progress messages and their statuses, read the Upcoming Messages documentation.
Recipient Report
After Students, Messenger Contacts, or Staff have been selected under Send To, a report can be generated to preview:
- Total and Distinct recipient counts.
- Full recipient list and the delivery modes they are eligible to be contacted at.
- A list of recipients who do not have an eligible delivery mode to be contacted at.
- A list of excluded recipients.
Generating Recipient Report
- Click the Recipients button.
- Click the down arrow next to Update.
- Click Update and Generate CSV. The report will then download to your computer.
Recipient Report Definitions
| Term | Definition |
| Total People |
Total number of distinct people pulled into the recipient list. |
| Total Eligible Recipients | Total number of distinct people eligible to receive a message. Excludes: missing devices, contact preferences, excluded people. |
| Distinct Inbox | Total number of people eligible to receive a process inbox message. |
| Distinct Email | Total number of people eligible to receive email message. |
| Distinct Voice | Total number of people eligible to receive a voice call. |
| Distinct Text | Total number of people eligible to receive a text message.
Note: If a recipient confirms the voice call they will not receive a text message |
| Excluded Recipients | Number of recipients that were excluded.
Note: Messenger contacts must be excluded from receiving a message from all students to be counted.
|
| No Device | Number of people who do not have an eligible device to receive a message. |
Emergency messages can be sent to select recipients using Messenger 2.0.
End of Study Guide
Lorem ipsum
