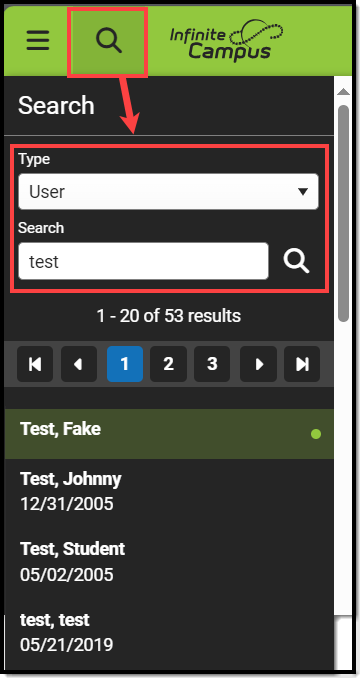
Tool Search: User Account
A person's user account controls all aspects of their tool, calendar, and Infinite Campus access. A person can exist within Infinite Campus without a user account, but they cannot log in to Infinite Campus or the Student/Parent Portals or access functionality without a user account.
Users are highly advised to create user accounts for students and staff en masse via the User Account Batch Wizard.
Only users with a Product Security Role can assign tool rights, calendar rights, and user groups. If you cannot see or access these areas of a user account, you do not have permission to view or change them.
Create a User Account for a Person
For a person to be assigned tool and calendar rights, join user groups, and have access to the SIS, Student Portal, or Parent Portal, they must first have a user account created for them.
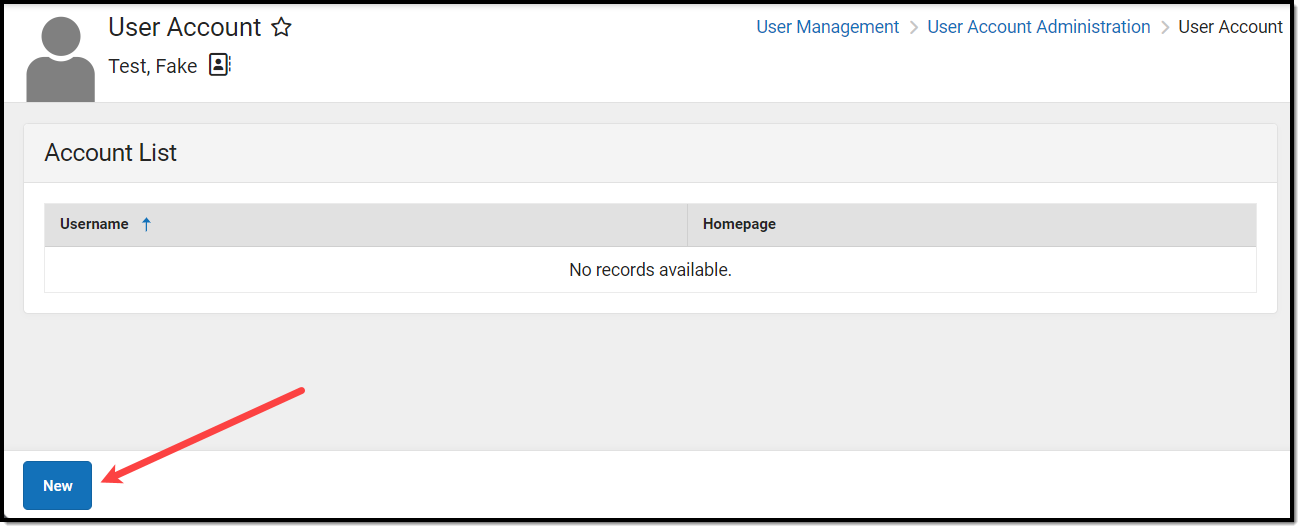
Before a user account can be created for someone, they must first exist as a person within Infinite Campus (click here for more information on adding a person to Infinite Campus).
To create a user account:
- Search for and select the person within the User search.
- Click the New button. The User Account Detail editor will appear.
- Use the table below to best fill out the User Credential fields:
Field Description Homepage This field indicates which interface the user name and password allow access to:
- Campus Application - for district employees
- Campus Parent Portal - for parents
- Campus Instruction - for teachers and staff
- Campus Student Portal - for students (enhanced features and optimized for mobile devices and tablets)
- Public Store - for Public Store customers who are not district employees, students, or staff. Infinite Campus does not recommend manually creating this type of account. When someone creates an account on the Public Store, their name and email address are saved in Campus in the Demographics tool and Campus creates and assigns the Public Store Homepage to their user account.
Authentication Type This field determines how the user is required to authenticate and log into Infinite Campus.
Users are forced to log in using the following:
- Their Campus ID and password (Allow Only Local Campus Authentication)
- Their SSO username and password (Allow Only SAML Authentication)
- Or their LDAP username and password (Allow Only LDAP Authentication)
The default value in this field is set via the Authentication Type Droplist Default preference found in System Preferences.
The value set in this field determines the method the user uses to log into Infinite Campus (click the image below).This field is only available if SAML SSO authentication and/or LDAP is enabled for your district. Please note that when setting a User Account to "Allow Only SAML Authentication", Cafeteria Serve only authenticates with a local Campus or LDAP account.
For more information about SAML SSO functionality, see the SAML Management article. For more information about LDAP, see the LDAP Authentication article.

Username The name they will use as their username when logging into Infinite Campus. Password The password the individual will use to log into Infinite Campus.
See the Managing User Account Passwords article for more information.
Verify Password The user must re-enter their password to ensure it matches the password entered in the Password field. This helps to catch typos or other issues the user didn't mean to enter in the Password field. Password Strength A visual indication of the password strength. A password must show green in order for it to be accepted. When creating a password, consider the following:
- Content - Use a short two or three-word sentence as your password.
- Length - Make your passwords long (8-10 characters minimum is usually sufficient).
- Combination - Include letters, punctuation, symbols, and numbers.
- Uniqueness - Do not use your username or words found in the dictionary.
Generate Password Automatically generates a password for the user account. This password is temporary and the user will be required to update it with a password of their own the first time they log into Infinite Campus. Show Password Shows the password in the Password field in plain text. - Review the following sections for more information on assigning authentication information, user groups, tool rights, etc:
- Once all user account values have been selected, click Save. The user account is now active within Infinite Campus and the user can log in and access functionality based on the permissions granted.


Authentication Information
The table below explains the Authentication Information fields and how they impact a user account.

| Field | Description |
|---|---|
| Exclude from Multi-Factor Authentication and new device notifications | This preference allows you to exclude individual user accounts from requiring time-based multi-factor authentication from a third-party app (when enabled) and prevents users from receiving notifications when logging in using a new device.
This option should only be used when necessary and only applied to the least amount of necessary accounts. This setting is not available for user accounts set with a Homepage of Campus Parent Portal, Campus Student Portal, or School Store as it does not apply to these types of accounts. |
| Time-based Multi-Factor Authentication |
As an increased layer of protection for Infinite Campus accounts, all non-Campus Portal user accounts can be enabled with time-based multi-factor authentication from a third party app. When enabled, users are provided a unique QR code and Text Code, which requires them to authenticate their account using a device and an authenticator application (such as Google Authenticator, Authy, LastPass, etc).
This setting is not available for user accounts set with a Homepage of Campus Parent Portal, Campus Student Portal, or School Store as it does not apply to these types of accounts. If you experience any issues authenticating, know that your device must be in sync with the actual time in order to authenticate. Compare the time showing on your device to the actual time (https://www.time.gov). If the time on your device is out of sync, you can correct this in your device's Date & Time settings. In your device settings, you will likely have the option to enable your device to sync the date and time automatically.
Alternatively, if you use Google Authenticator for Android, you can also try the Time Sync (https://support.google.com/accounts/answer/2653433) feature. To enable this feature:
Time-based multi-factor authentication from a third-party app is now enabled for this user account.
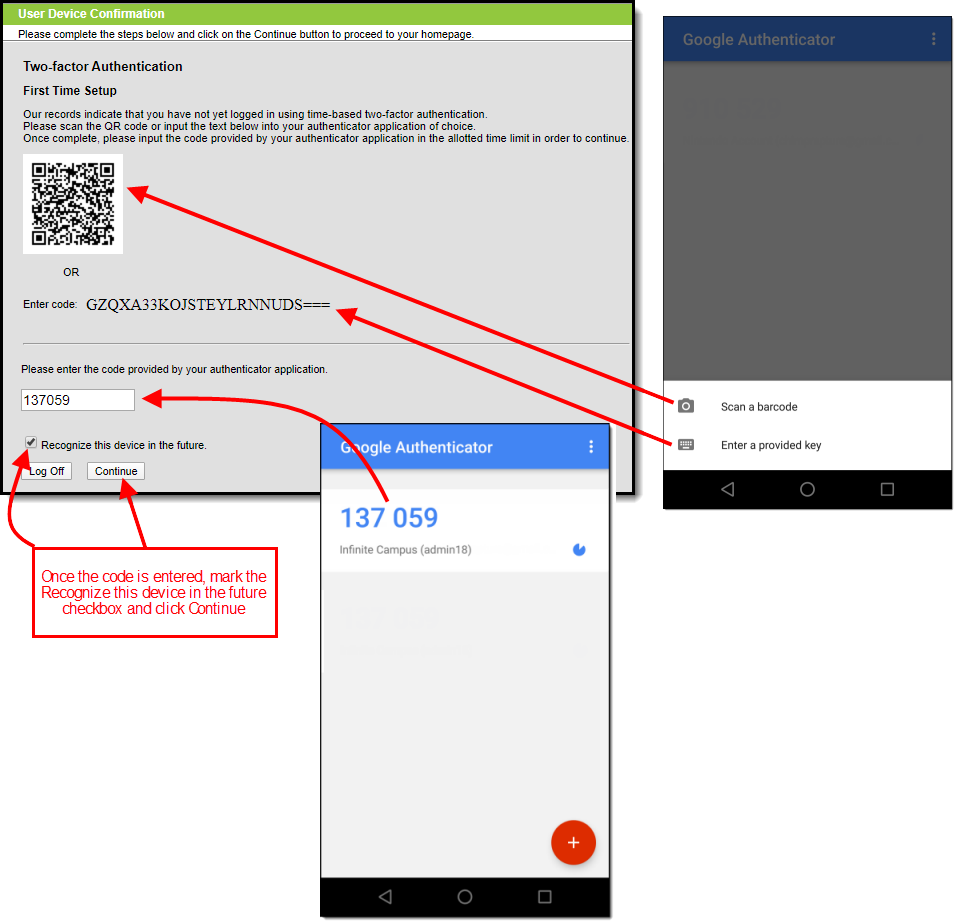
Once enabled, the next time the user attempts to log into Infinite Campus, they will see a screen displaying a unique QR Code and Text Code.
Using a device (such as a cell phone), the user must download an authenticator app (such as Google Authenticator, Authy, LastPass, etc) and use the app to scan the QR Code or enter the Text Code. This will register the device and tie it to their Campus account.
Once they have scanned the QR Code or entered the Text Code in the authenticator app, the app will display a code. Enter the code from the authenticator app into the field on the Campus login screen, mark the Recognize this device in the future checkbox, and click Continue (see image below). The user will be logged into Campus.
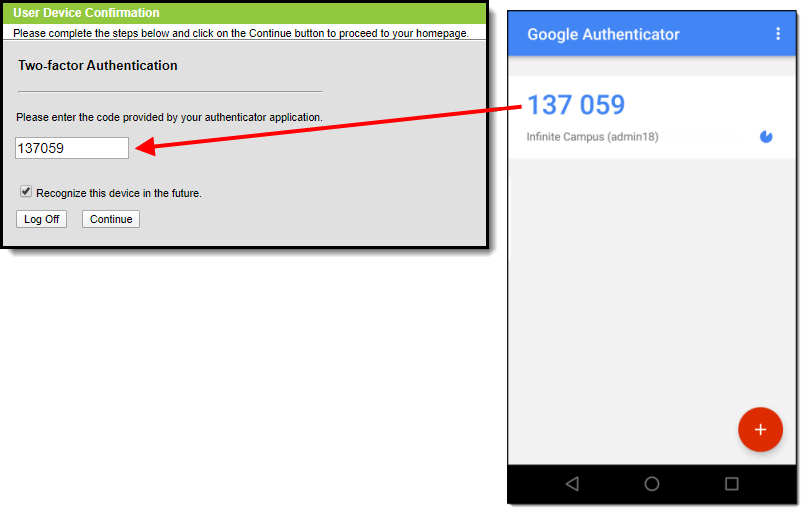
Based on the frequency of when they need to authenticate (30 minutes, Day, Week, Month), the user must access their authenticator app on their registered device and enter the code displayed in the authenticator app into the field on the Infinite Campus login screen. Users should mark the Recognize this device in the future checkbox and click Continue. If the code they entered is correct, they will be logged into Campus.
|
| PIV Card Authentication | The Enable PIV Authentication field enables or disables the ability for the user to register and use a PIV card to log into Infinite Campus.
This setting is not available for user accounts set with a Homepage of Campus Parent Portal, Campus Student Portal, or School Store as it does not apply to these types of accounts. Note: This field is only available if the Enable PIV Authentication field in Login Security Settings is set to Yes. For a walkthrough of the PIV Authentication registration process, see the following articles:
|
If multi-factor authentication is enabled for the user account, a red box will appear, stating, "MFA is enabled for this account."  This will occur when multi-factor authentication has been enabled via the following ways: This will occur when multi-factor authentication has been enabled via the following ways:
| |

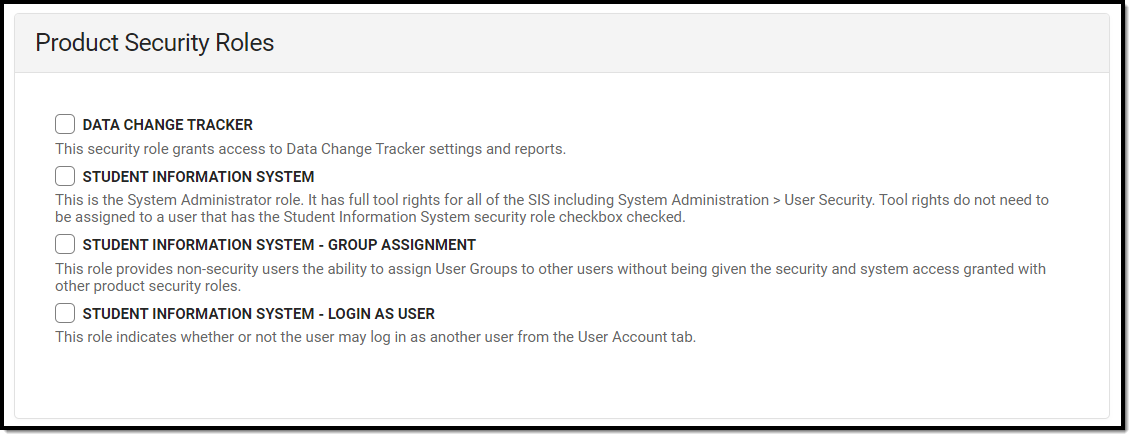
Product Security Roles
Product Security Roles grant system administrative-level access to Infinite Campus and well as access to specific premium products and functionality such as the ability to login in as other users.
For a detailed explanation of each role, see the following articles.
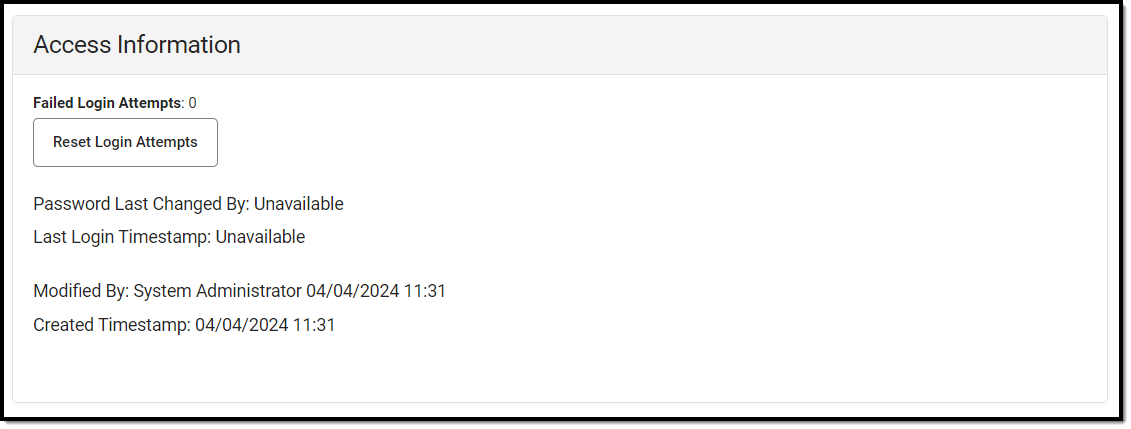
Access Information
Access Information details failed login attempts, the last time the account password was changed, the last time the user account logged into Infinite Campus, who was the last person to modify user account data, and the date and time the user account was created.
| Field | Description |
|---|---|
| Failed Login Attempts | This field indicates the number of consecutive times the user has failed to log into Infinite Campus.
Once a user successfully logs into their account, this count goes back to 0. |
| Reset Login Attempts | This allows you to reset the failed login attempts count. Resetting this value also resets the need for the user to log in via Captcha (which occurs at 5 consecutive failed login attempts). |
| Password Last Changed By | This field indicates who the last user was to change this user's password and the exact date and time in which the password change occurred. |
| Last Login Timestamp | This field indicates the exact date and time the user last logged into Infinite Campus.
This field is not impacted by Login as User functionality. It only registers when the user themselves log into Infinite Campus. |
| Modified By | This indicates the last person to modify the user's account and the date and time in which the change occurred. |
| Created Timestamp | This indicates when the user account was created. This date is populated by any method used to create the user account (e.g., student/staff automation, imported new user, Quartz job, etc). This field is also available within Ad Hoc Reporting. |
User Groups
User groups are an efficient and effective way to manage an individual's tool and calendar rights by assigning specific tool and calendar rights to a user group and then assigning people to the group. People assigned to a user group inherit the rights assigned to the group which greatly speeds up the process of assigning rights to each individual and provides an efficient way to modify these rights and have this change impact a large set of users.
For example, creating a user group for primary teachers would allow you to easily assign this group to a new teacher user account and skip the need to go through and individually assign the account specific tool and calendar rights. Later on, if it's decided primary teachers should be able to see and access a new tool, the administrator would simply need to add tool rights to the user group and all teachers assigned to the group would be given rights to the tool.
Users working with many user groups (in the thousands) may experience some system performance slow down when searching for and adding user groups.
To assign the user to a user group(s):
- Locate and select the user group within the Search and Add User Groups column on the left. You can narrow the user group list by entering search criteria within the search box. The field will continue to refine results as you enter more characters. Each user group selected will appear in the user group will appear in the Current Group Membership window.
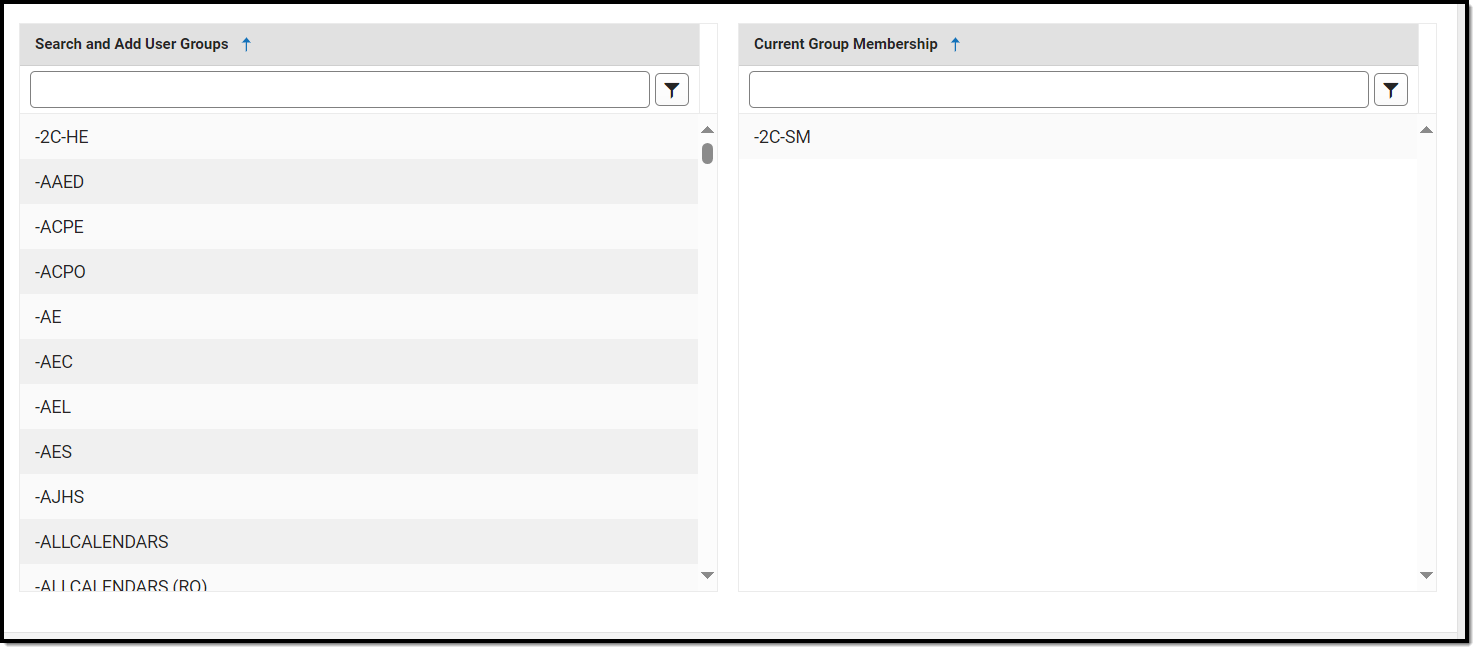
- Once all user groups have been selected, click the Save icon. The user is now a member of the selected user group(s) and has access to all of the tools assigned to said user groups.

If you are unsure of what calendar and tool rights were granted to a user via user groups, you can review a summary of a user account's calendar and tool rights in the Log and Summaries area.
Individual Tool Rights
Tool Rights determine the level of access users have to tools throughout Infinite Campus.
Only users assigned a Product Security Role may assign tool rights to users.
Due to the wide range of school-specific duties and policies, this article cannot make recommendations on how to assign tool rights to particular types of users. District administrators will need to determine the appropriate amount of access for each user/group based on that user/group’s needs.
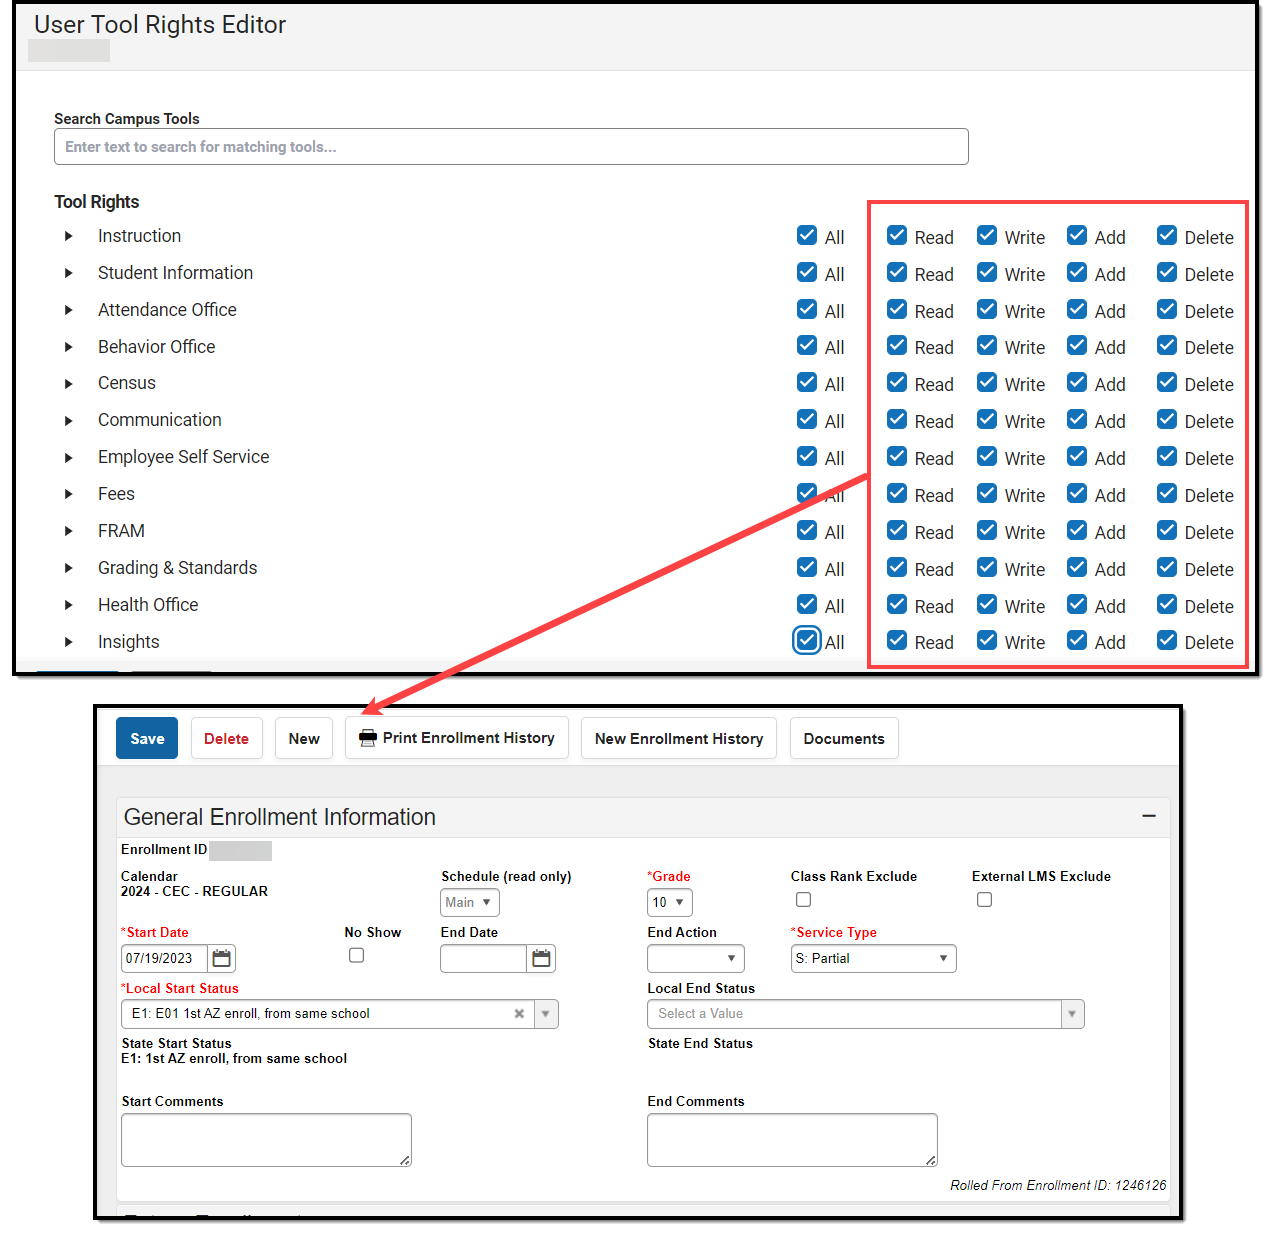
To assign tool rights:
- Click the Modify Tool Rights button. The User Tool Rights Editor will appear.
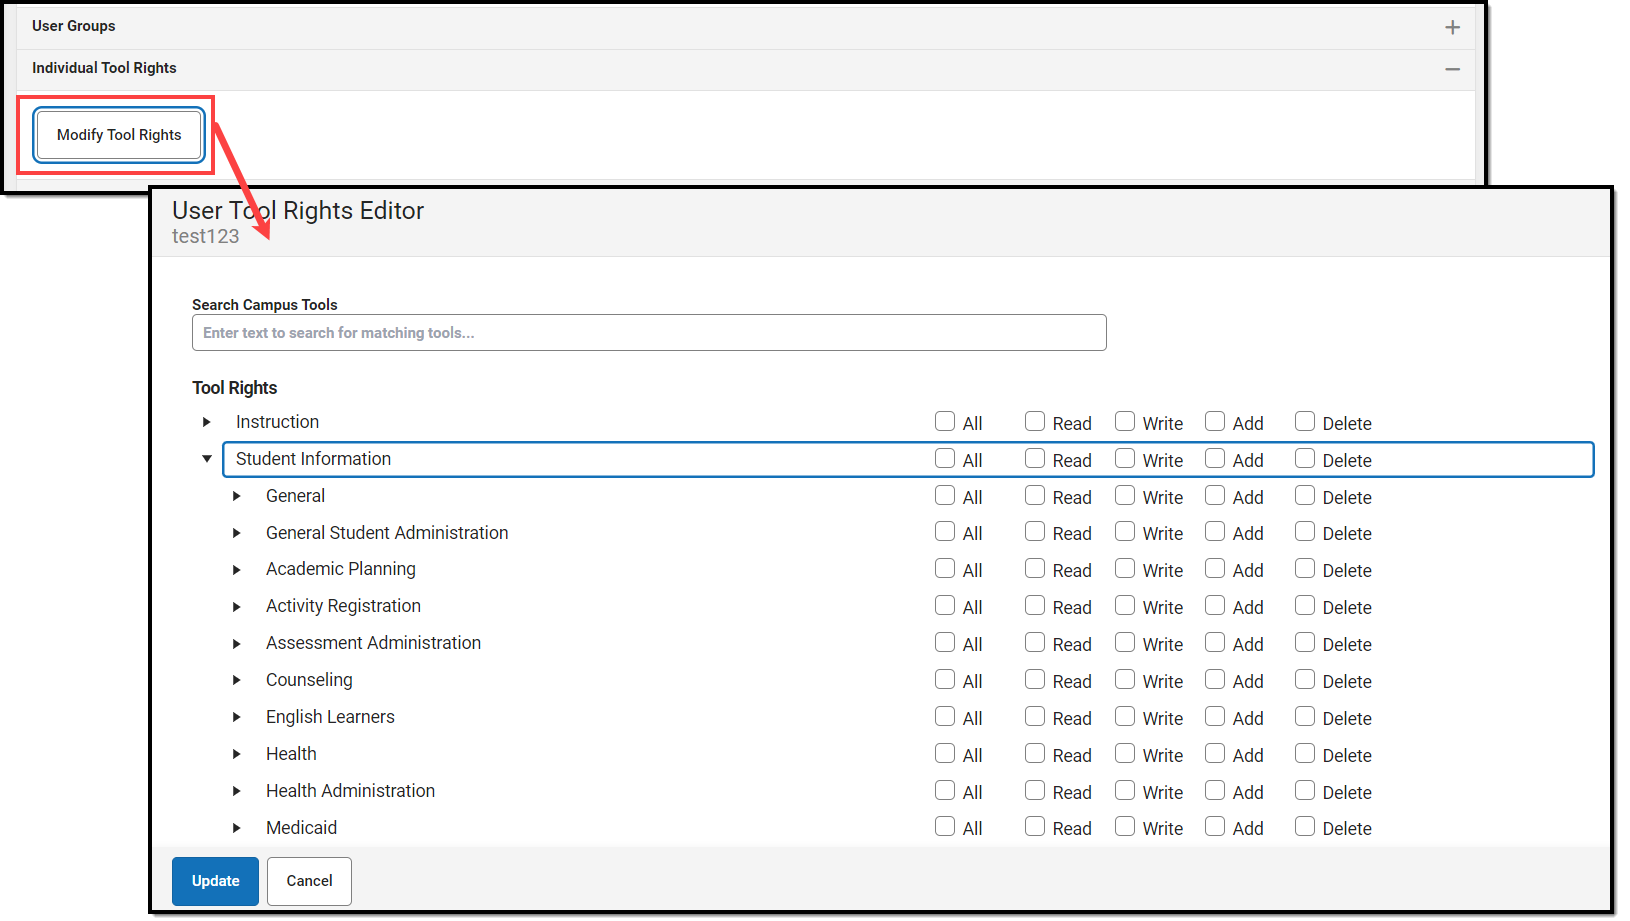
- Navigate to each tool you wish to grant the user rights to access and determine the level of access they should receive (Read, Write, Add, Delete). See the section below for more information about these levels of access and how they impact using Infinite Campus.
- Once all tool rights have been selected, click Update. The user will now have access to the tools marked.

Understand Tool Rights Access Levels
This section will explain the four different access levels that can be assigned for each tool within Infinite Campus.
A partially checked indicator  has been added to the New Look of Infinite Campus, appearing in the RWAD checkboxes of tools/menu items where the user does not have tool rights to the tool/menu item but does have rights to tools or sub-rights contained within the tool/menu-item.
Expand the link below for an example of this indication.
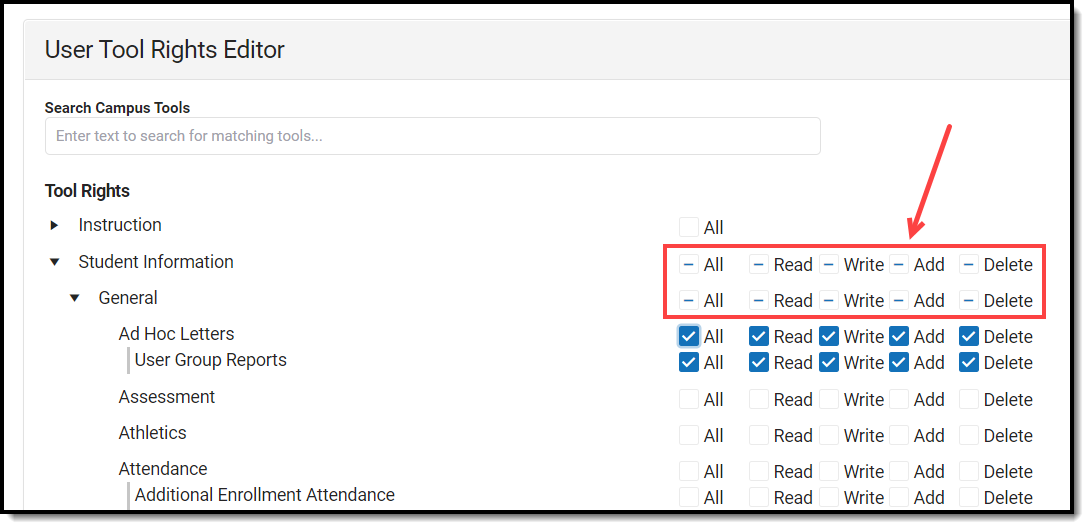
Read
Read indicates the user may view the information in the applicable interface area. When only R rights are applied, the user cannot access the action bar's Save, Add, or Delete icons. Reports need only the R right for full access to viewing and generating results. In addition, R rights allow the printing of information, when applicable. Many wizards require only the R right to have complete access.
Write
Write indicates that the information on the applicable interface area may be viewed and modified by the user. When this right is applied, the Save icon in the action bar will be functional. This right allows the user to modify only existing data in the area (adding new data is controlled by the A right). This right includes the ability to modify data from a specific field.
Add
Add indicates the information on the applicable interface area may be viewed, modified, and added to. When this right is applied, the New or Add icons in the action bar will be functional. This right allows the user to add new data/records.
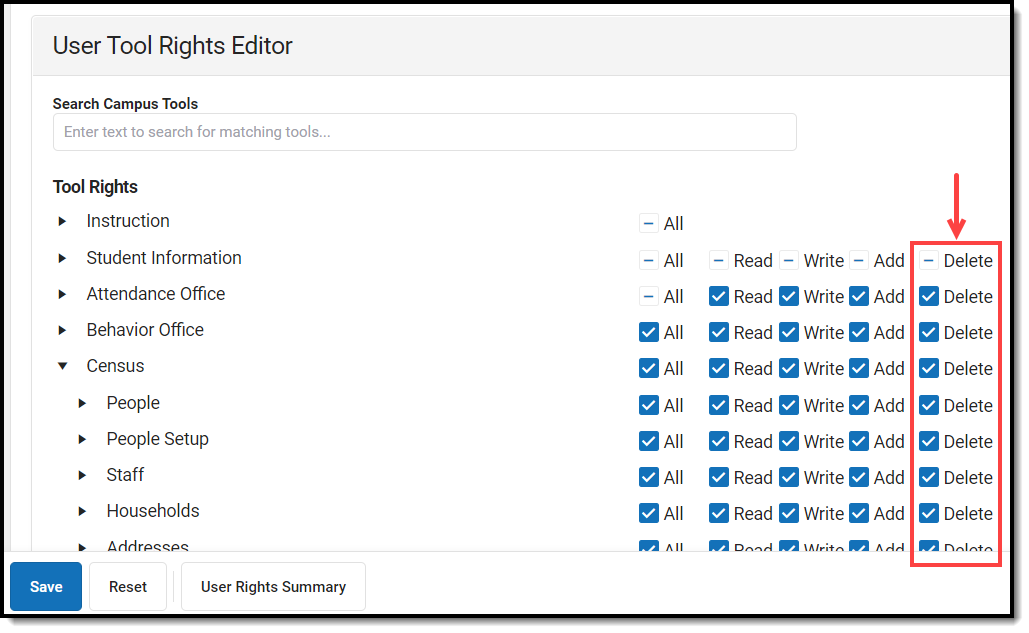
Delete
Delete indicates the information on the applicable interface area may be deleted. When this right is applied, the Delete icon in the action bar will be functional. This right provides the ability to completely remove an existing record, including all data contained within the record. The ability to change/remove data from a field is controlled through Write. A user generally has RWA rights if he/she has D rights.
Users should assign this right with caution.
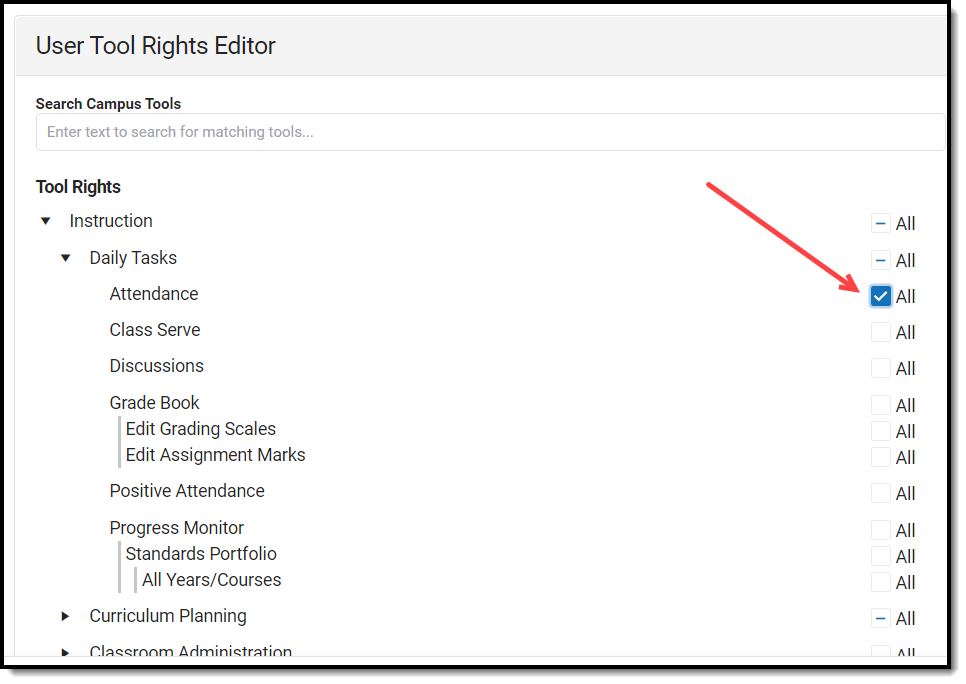
Campus Instruction Tool Rights
Compared to the RWAD rights structure for Campus Tools, rights to Campus Instruction are currently all or nothing. Each Instruction tool can have All rights for a tool or not.
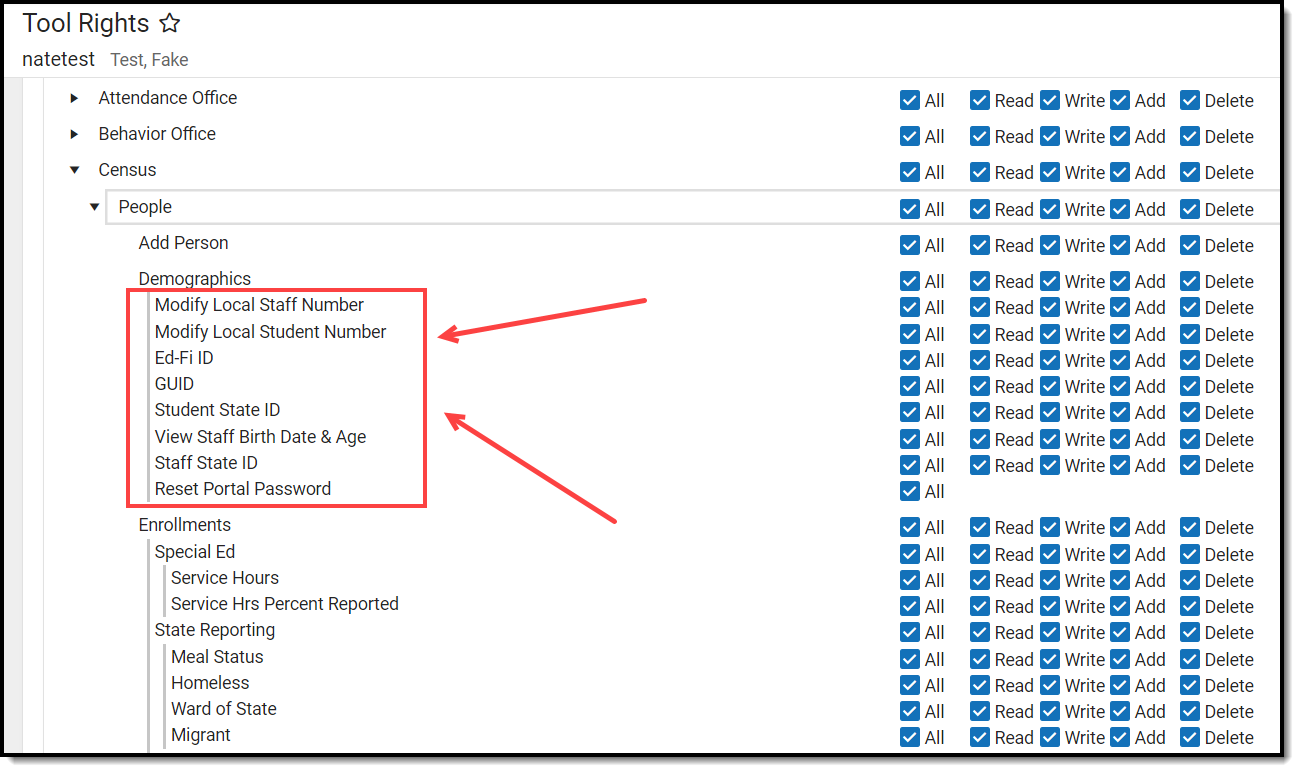
Identifying Sub-Rights
Sub-rights are used to control specific functions or gatekeep certain data within a tool. Sub-rights are also found under the tool it applies to and have a | to the left of the sub-right, delineating it as a sub-right.
Example of Tool Rights
The following are examples of how tool rights affect how users are able to view and access tools throughout Campus.
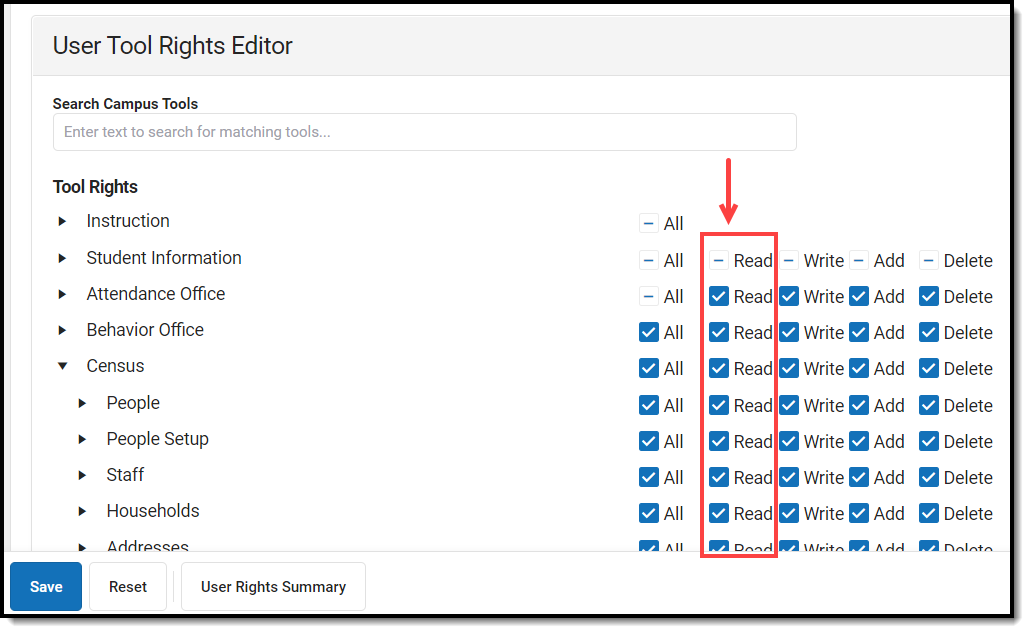
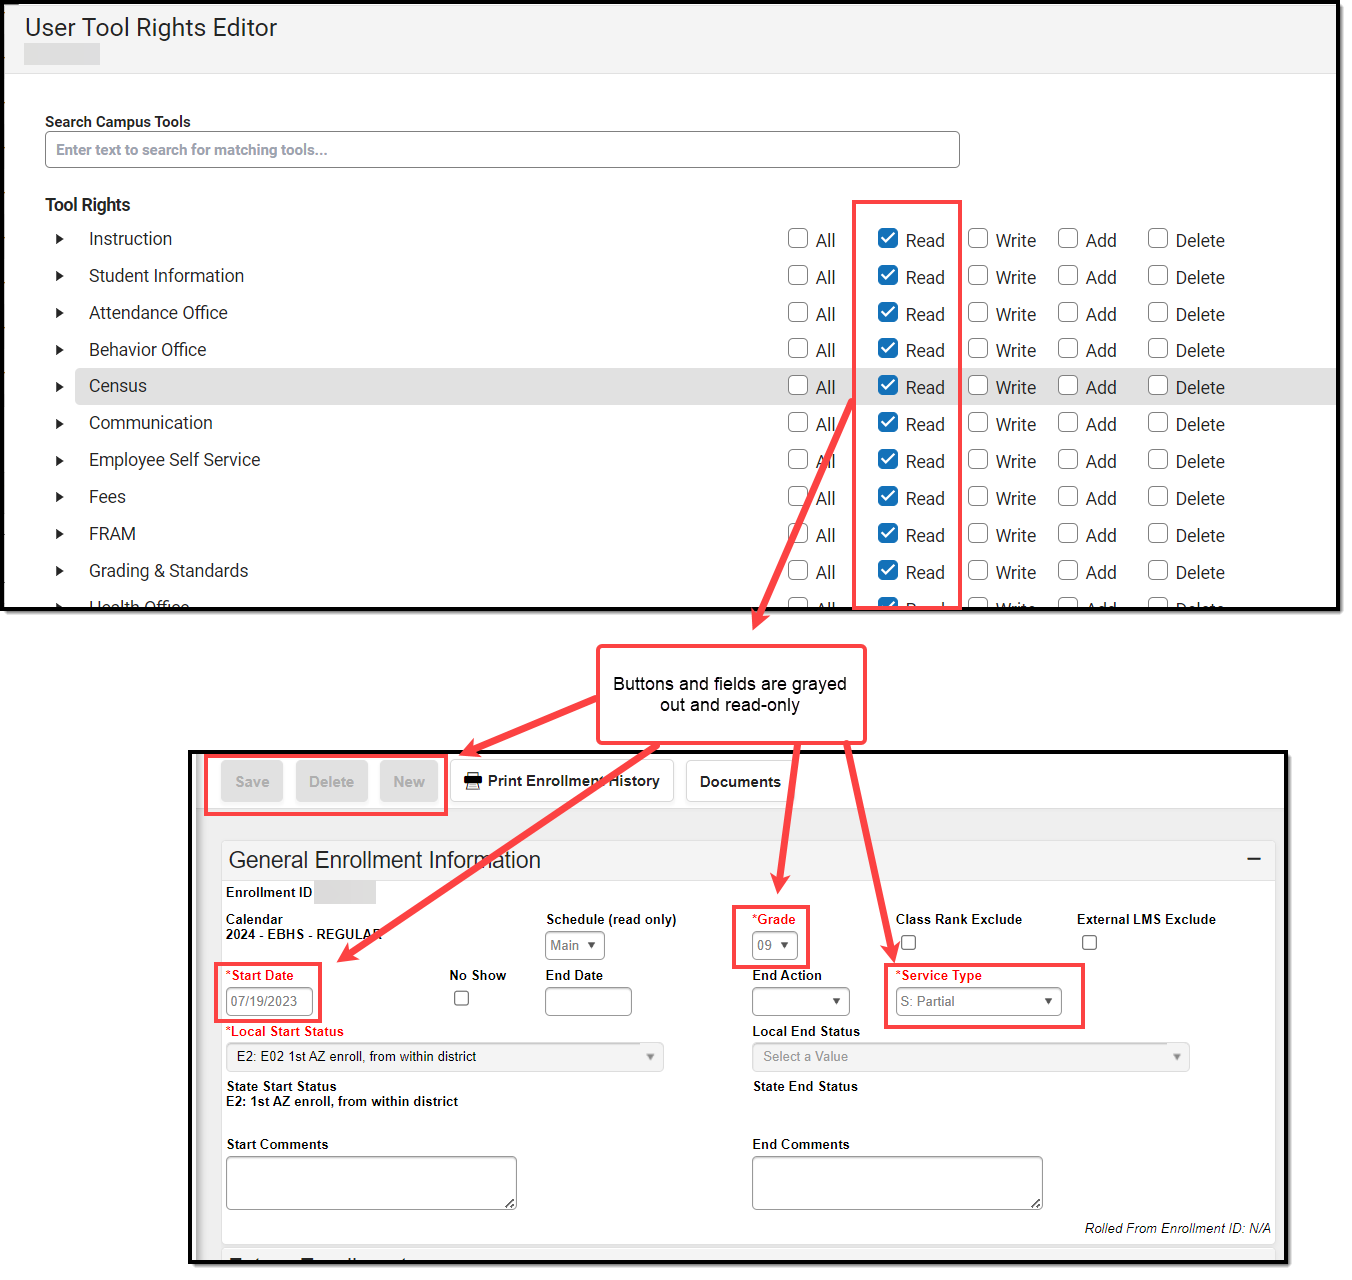
Limited Tool Rights (Read Only)
Limiting a user's tool rights affects how they are able to interact with a tool. In the example below, the user is given only Read rights to the Student Information module. Because the user only has Read rights, all of the fields within each Student Information tool are read-only and the Save, Delete, and New buttons are unable to be used.
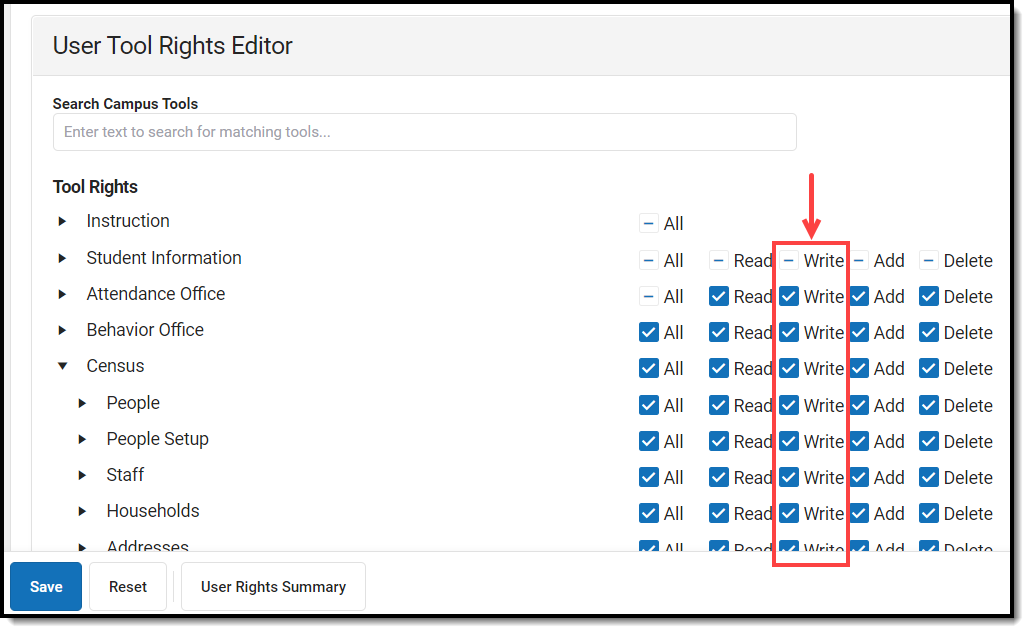
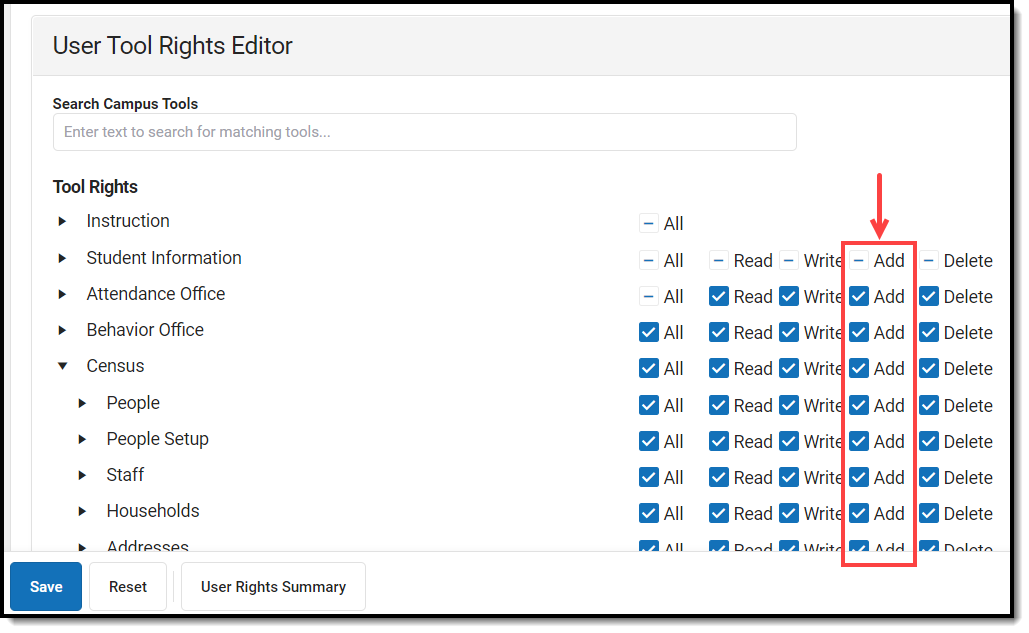
Full Tool Rights (RWAD)
Providing RWAD tool rights to a user means the user has full access to modifying data with the tool. In the example below, a user with RWAD tool rights to the Student Information module is able to modify all data within any Student Information tool.
Compare this example with the example above for a better understanding of how user groups are provided different tool access based on tool rights.
Privacy Law Compliance
To ensure that unauthorized users do not violate federal FERPA and HIPAA privacy laws, unauthorized users should NOT be allowed access to certain, federally protected areas in Infinite Campus.
The following fields/areas of student data are federally protected:
- FRAM > Eligibility > Eligibility
- Enrollments > State Reporting > Ward of State
- Demographics > Enrollments > State Reporting > Ward of State
- Enrollments > State Reporting > Homeless
- Enrollments > State Reporting > Migrant
- Enrollments > Special Ed > Service Hours
- Enrollments > Special Ed > Service Hrs Percent Reported
- Program Participation > English Learners (EL)
- Enrollments > Enrollment History
- Census > People > Demographics > Enrollments > Enrollment History
- Health Office > Conditions
This is not a comprehensive list. System Administrators should use caution and follow district guidelines for what users and user groups should be given access to Federally protected data. System Administrators must specifically deny unauthorized users and user groups access to these fields; otherwise, these users may be able to access this data when pulling Ad hoc filters.
Individual Calendar Rights
Calendar Rights determine what school(s), year(s), and calendar(s) the user has access to view and modify. Calendar rights work in tandem with Tool Rights, where Tool Rights determine which tools the user can access and Calendar Rights determine which calendars the user is allowed to view and modify via tools.
System administrators are highly encouraged to provide calendar rights to users by assigning them to an appropriate user group(s). Providing individual calendar rights is not recommended.
District system administrators should be the ONLY members with full rights to access all calendars and all tools. District system administrator rights should not be assigned on this tab.
To assign calendar rights:
- Select the Add Row button.
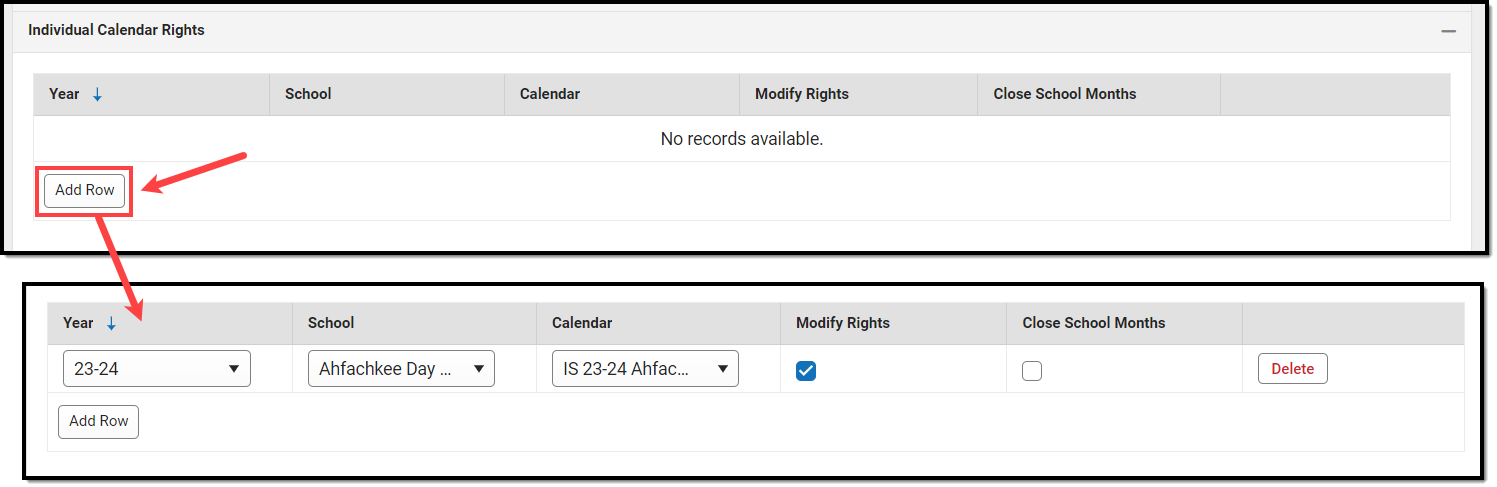
- Select the Year, School, and Calendar the user is allowed to access.
- If the user should be allowed to modify data in the selected Calendar, mark the Modify Rights checkbox.
Assigning Modify Rights to historical calendars is not recommended.
Marking the Modify Rights checkbox means the user is allowed to modify data within the calendar (in conjunction with their assigned tool rights).
If the Modify Rights checkbox is not marked, the calendar will be read-only. This user will not be allowed to modify any data, regardless of whether or not the user has specific tool rights to modify tools.
If the user should be allowed to modify attendance data for closed school months, mark the Close School Months checkbox.
School Months are only used in some states and are assigned the System Administration > Calendar area. If your state does not use school months, this tab is not displayed in Calendar and this field should not be used.
- Select the Save icon. The user is now allowed to modify data within the year, school, and calendar selected. If the user should have calendar rights to additional years, school, and/or calendars, repeat steps 1-5.

Calendar Rights Scenarios
Expand the section below to view examples of different ways to set up calendar rights.
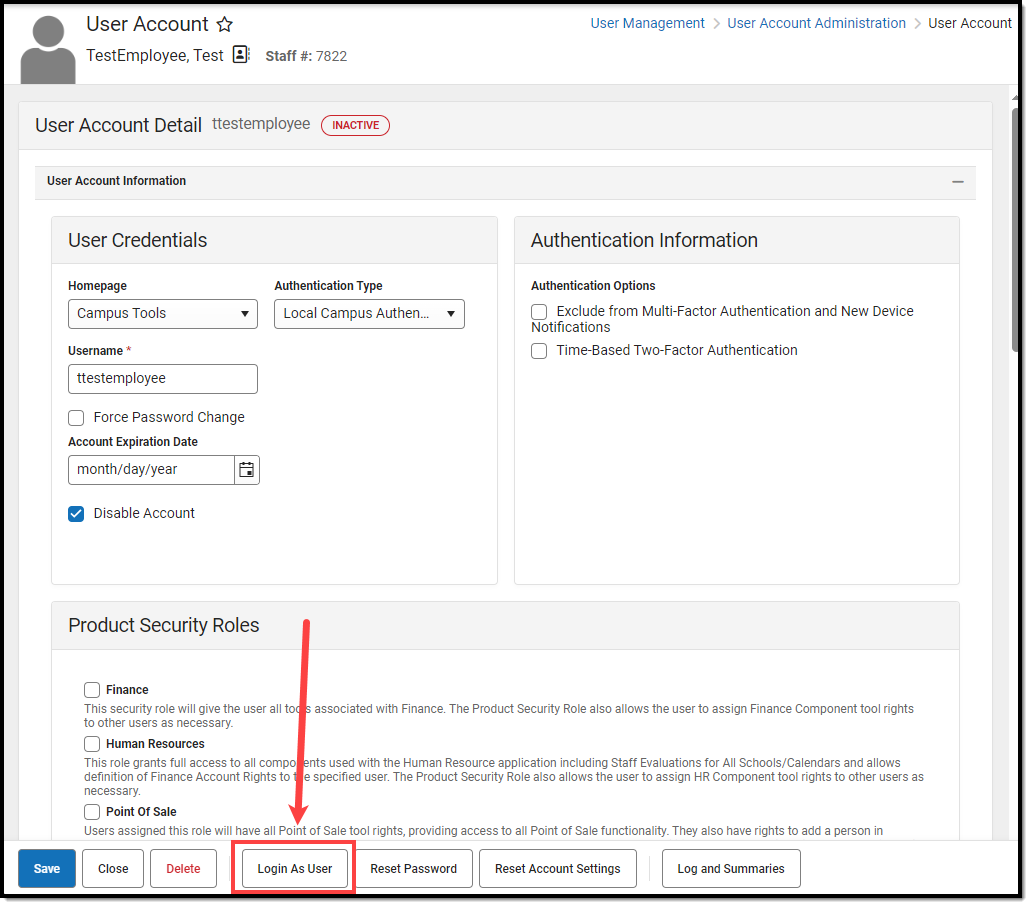
Login as User
The Login As User button only appears for users who have equivalent or greater tool rights than the user they want to log in to, and it is only available with an SIS or Login as User Product Security role. When logging in as another user, users cannot gain access to tools for which they currently do not have tool rights.
Expand the link below to learn more.
This feature is unavailable for users only assigned the Student Information System - Group Assignment role.
See Allowing Non-Product Security Users to Log In as Other Users for more information on how this feature functions for users only assigned the Student Information System - Login as User role.
The Student Information System - Login As User role is prohibited from logging in as another user with the Student Information System - Login As User role. Users assigned this role are only allowed to log in as another user once per Campus session. This behavior was put in place to ensure users do not jump from one user account to another.
The Administrator selecting this button MUST have calendar rights for the school listed on the other user's (person being logged into) District Assignment page.
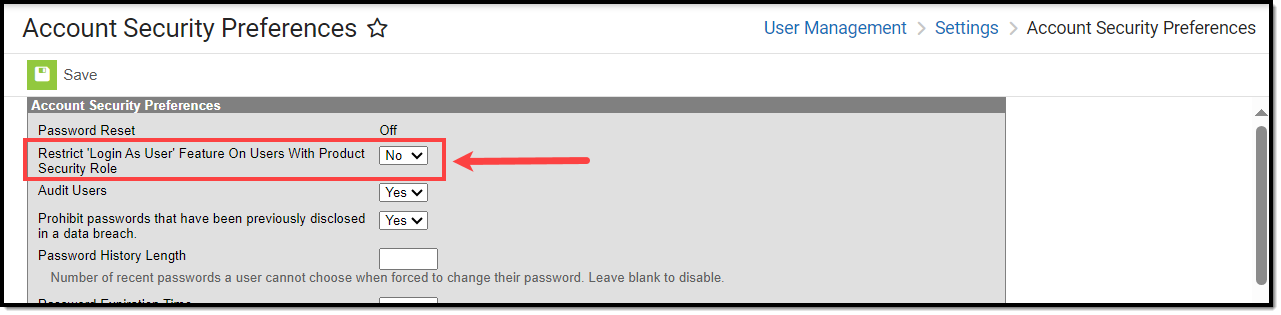
A system preference called Restrict Login As User Feature On Users With Product Security Role controls whether Product Security users may log in as another user with a Product Security role. This preference is found within the Account Security Preferences tool. The default value for this preference is No which allows Product Security roles to log on as each other.
Every Campus login is stored by the system on the user's Access Log. The Third Party Admin column indicates that another user has used the Login As User button to log into Campus as this user. This column reports the other user's name, user ID and username.

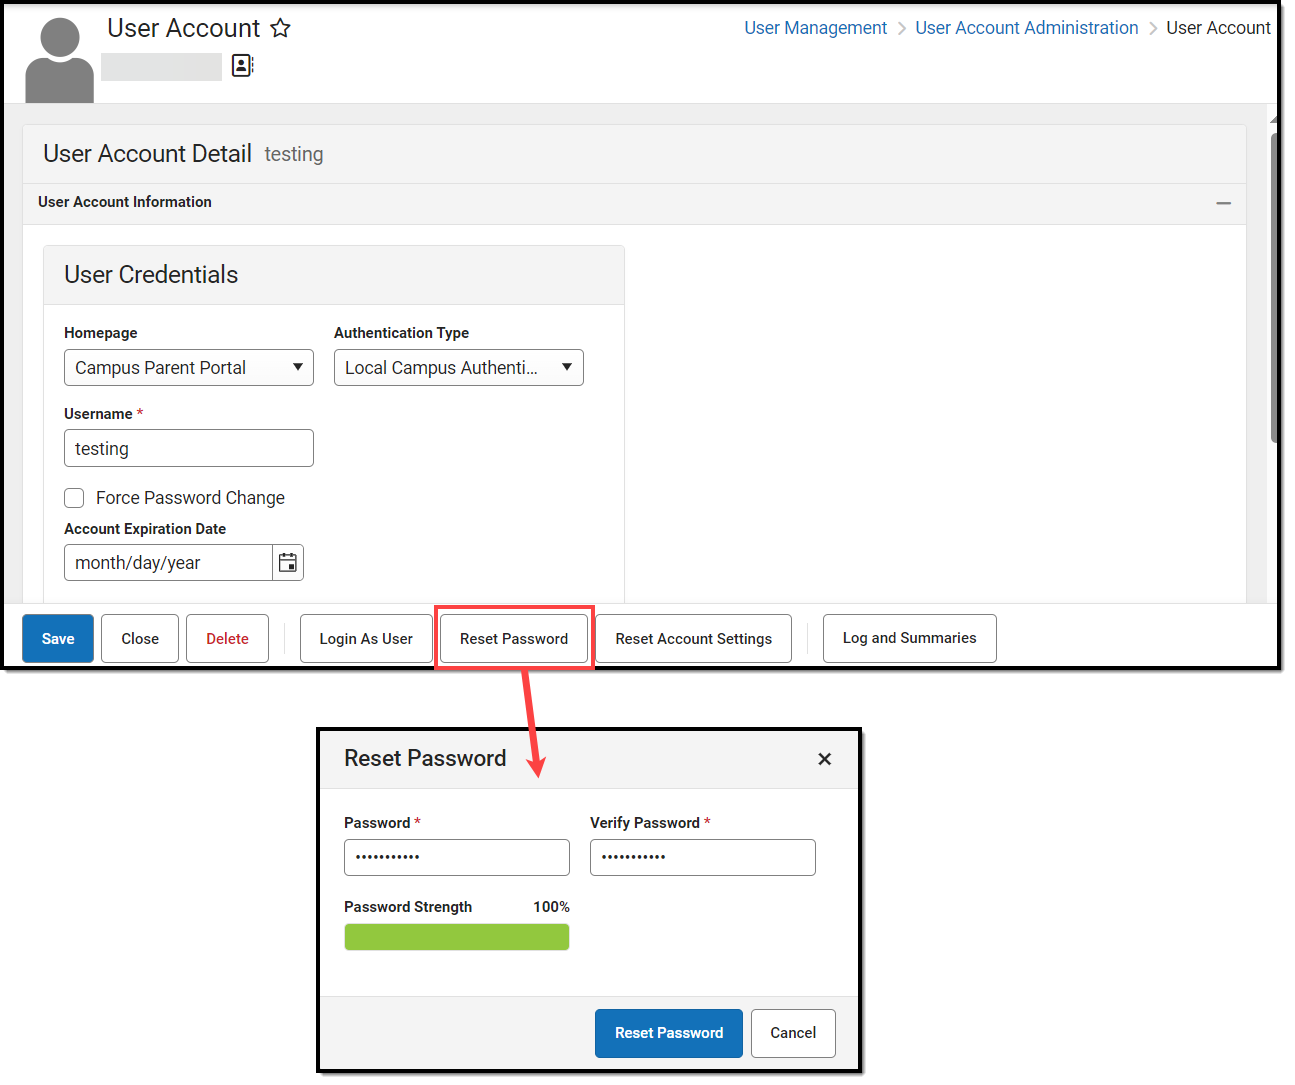
Reset Password
To change the user account password, select the Reset Password button, enter a New Password, and Verify the Password. The box beneath the first password field indicates the new password's strength with red meaning weak, yellow meaning medium, and green meaning strong. Users will not be allowed to save weak or medium passwords.
Please see the Managing User Account Passwords article for detailed information about passwords and ways to manage them within Infinite Campus.
Reset Account Settings
Selecting the Reset Account Settings button will clear all trusted devices tied to the person's account, requiring the user to re-establish each device as a trusted device when logging into Infinite Campus.
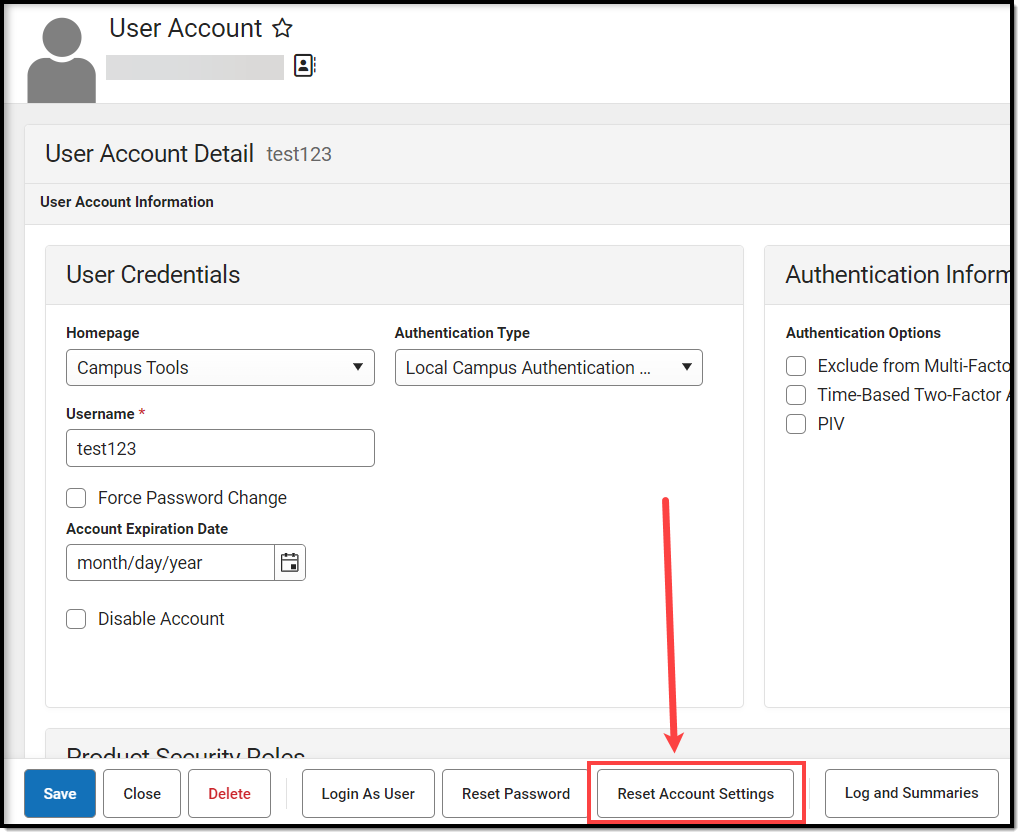
For districts using multi-factor authentication, selecting this button will reset the user's multi-factor authentication configuration, requiring them to establish a new trusted device and log in using an Authentication app. For information about multi-factor authentication, see the Login Security Settings article.
This button will also reset the user's account recovery email address, requiring them to enter a new recovery email address the first time they log into Campus after selecting this button.
This button will only appear for user accounts that have an Account Security Email address established in Infinite Campus and/or the Parent Portal.
A person's Account Security Email is used to recover a forgotten username or reset their password via the Forgot password? or Forgot username? options on the Infinite Campus login screen.
Log and Summaries
The Log and Summaries area contains reports for reviewing user account access, tool rights, and calendar rights.
Access Log
Every attempt to log into a specific user's Infinite Campus account is stored and displayed in the user's Access Log. You will only see login information for the account you are currently logged into and using to access this tool.

Data captured for each user login attempt is as follows:
Field |
Description |
|---|---|
Timestamp |
Login date and time.
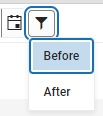
You can filter this column by a specific date or see all data before or after a specific date.
|
Success |
Indicates whether or not the user was successful in logging into their account. |
Remote IP |
Source IP address. |
| Balancer Header | Indicates the load balancer the user used to log into Campus. |
Remote Browser |
Operating system and browser combination used. |
App Server |
The application server of the login attempt. |
Third Party Admin |
Indicates that another user (with equivalent or greater administrative rights) has used the Login As User button to log into Campus as this user. This column reports the other user's name, user ID, and username. |
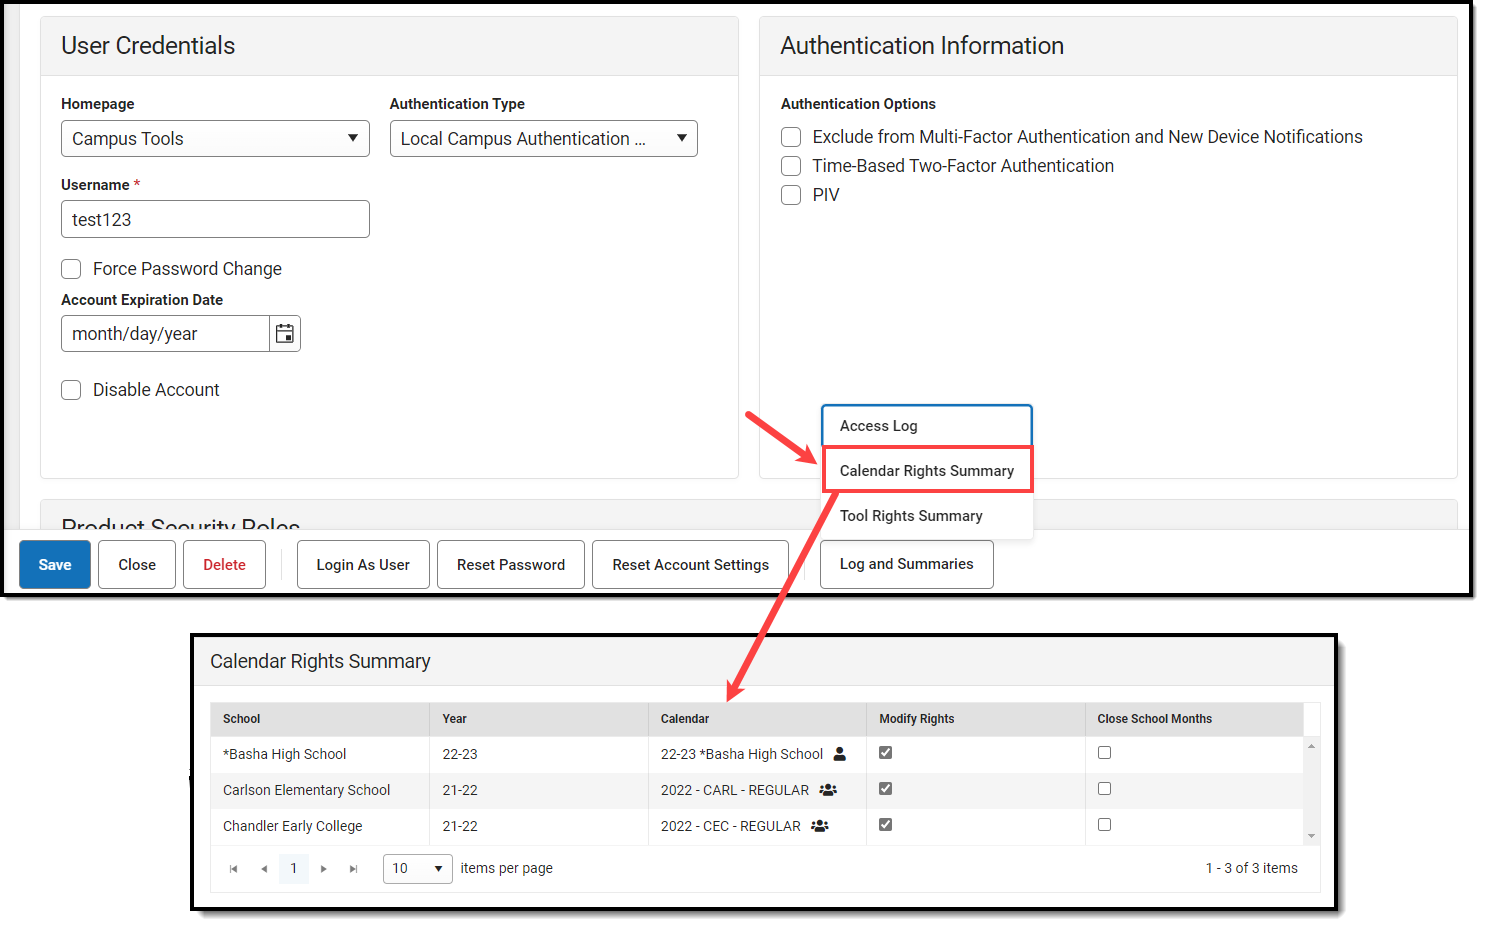
Calendar Rights Summary
The Calendar Rights Summary details which calendars in which years a specific user has rights to access and how this access was granted.
 A single-person icon
  indicates access to that calendar was granted via individual user Calendar Rights.
A group icon  indicates calendar access was granted by the user being a part of a specific user group. Hovering your cursor over the group icon will indicate which user group(s) granted the user rights to the calendar.
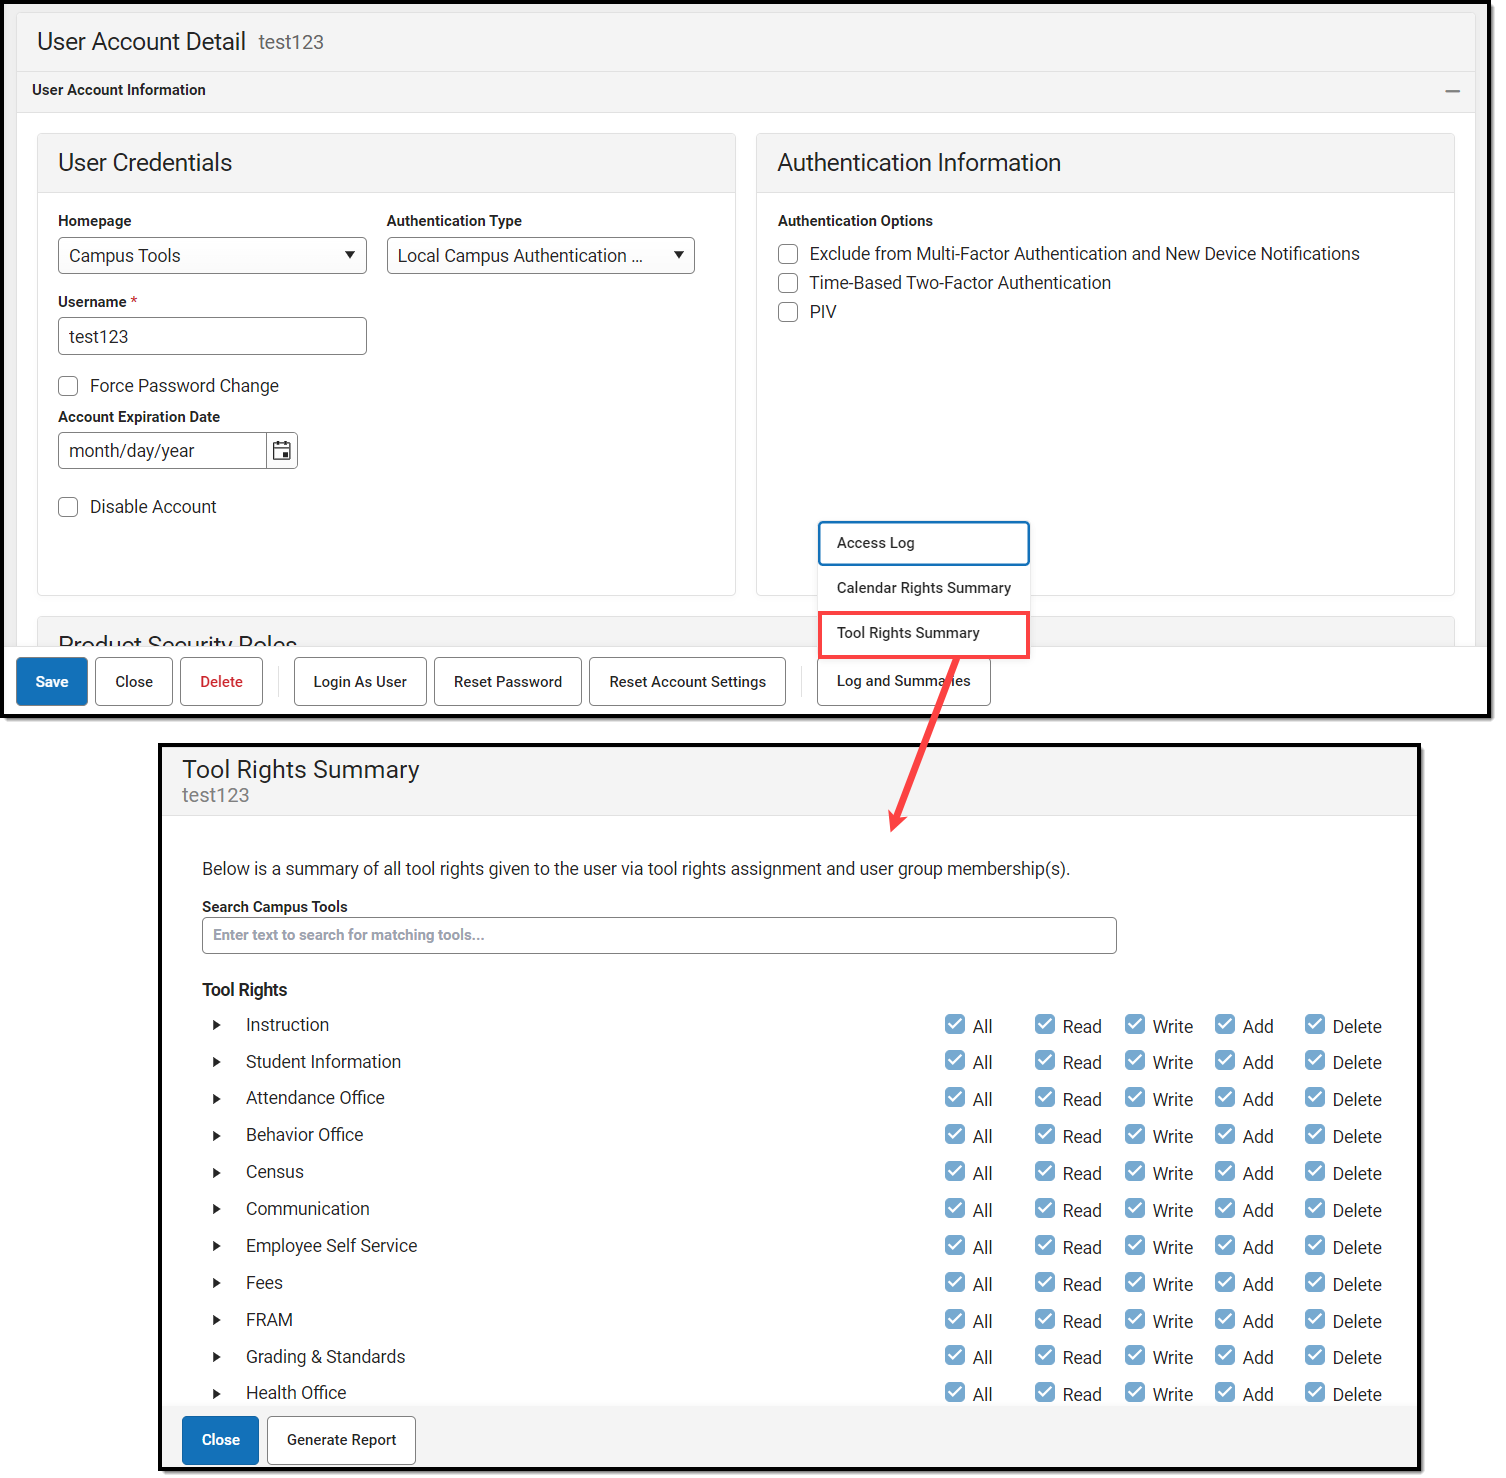
Tool Rights Summary
To access a comprehensive view of the user's tool rights within Infinite Campus (including tool rights granted via User Groups), click the User Rights Summary button. You can also view this information in a report by clicking Generate Report.
You can expand tools to view additional tool rights and sub-rights. You can also hover the mouse cursor over a tool to see exactly how the user was granted rights to the tool (granted by tool rights or granted by a group).
Account Expiration Date
The Account Expiration Date field is the date on which (at 12:01 A.M.) the account will be disabled. This is useful when setting up an account for a person you know should not have access to Infinite Campus after a specific date (such as the day after their last day of working in the district). The User Account Batch Import Tool may have automatically populated this date if set during the import process.

Disable an Account
You can disable a person's user account by marking the Disable Account checkbox and clicking Save. The user will no longer be able to log into their Infinite Campus account but will remain within the system (including all associated records and data).

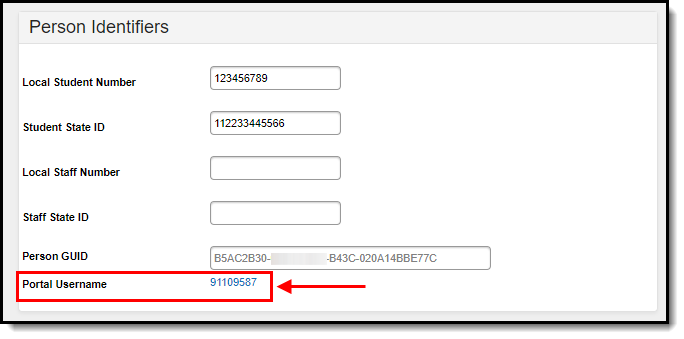
Identifying a Person's Campus Portal Username
You can look up a person's Campus Portal username by going to Census > Person > Demographics > Person Identifiers > Portal Username. This may help troubleshoot issues such as assisting someone who forgot their username.
Best Practice for Users Who Are Staff and Parents
For a person who is both a staff member and a parent to a student(s) in the district, Infinite Campus recommends you create 2 user accounts for them. One user account serves as their staff account and has a Homepage set to Campus Application or Campus Instruction. The second user account serves as their parent account and has a Homepage set to Parent Portal.
Although this requires the person to log into Infinite Campus using two different usernames, it allows Infinite Campus to keep this data separate and ensure the user can successfully log into the proper product they are trying to access (the Campus Application or their Parent Portal).
Related Tools
| Tool | Description |
|---|---|
| Account Security Preferences | This tool allows you to control various functionalities, such as resetting passwords, restricting the ability of Product Security Users to log in as other people, auditing users, and automatically creating/disabling student and staff accounts. |
| User Account Batch Wizard | This tool allows you to batch-create student and staff user accounts using the census email address or a username pattern, enable student and staff user accounts, disable student and staff user accounts, or force a password reset for student and staff user accounts. |
| User Account Automation Log | This tool lets you view detailed information about user account username modifications, user account creation failures, and accounts automatically disabled via preferences set in the Account Security Preferences tool. |
| User Group Report | This tool provides high-level and detailed information about which user groups exist, all tool rights and calendar rights assigned to each user group, and which user groups are assigned to which Staff Account Automation rules. |
| Product Security Role Report | The Product Security Role Report provides a list of all users who have been granted specific Product Security Roles. |
