This study guide shows administrative personnel how to set up and manage Food Service.
Review Setup for Food Service
The topics below are review items to confirm people, flags, dropdown lists, SBP and NSLP options, and zones are set up correctly.
Test Right TOC Snippet
Added
Classic View: Census > Add Person
Search Terms: Add Person
The Add Person tool allows the creation of new persons - staff members, students, parents/guardians, etc. - in Infinite Campus.
- When creating a new person as part of a census record, use the Census Wizard.
- When reviewing or modifying an existing person's information, use Demographics or Identities.
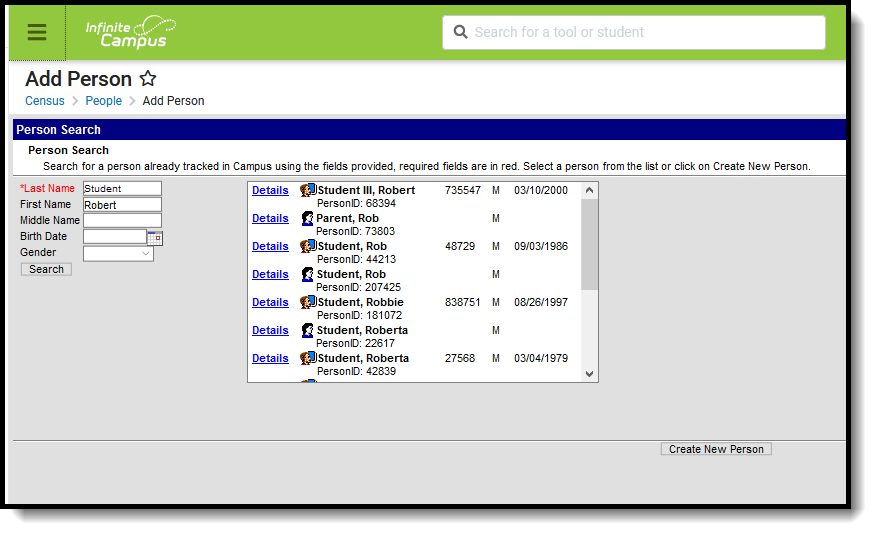 Add Person Tool Like students and parents/guardians, staff members are entered in Campus as a person record. That person record does not become a staff record until a District Employment record is created and they have a Staff ID number.
Staff members can be created by using the Add Person tool or by using the Staff Locator tool. The Staff Locator find sstaff members already entered into Campus throughout the state (in State Edition installations) or the district (in District Edition installations). With both tools, a search needs to be done before the user can create a new person or a new district staff member.
To eliminate the possibility of duplicate persons, this tool forces the user to search prior to adding new persons. The last name must be entered before the Search button becomes active.
Add Person Tool Rights
Full access to Add Person in Census requires RWA rights to Census > Add Person.
- R rights allows searching for individuals in Add Person.
- W rights allows searching for and creating new persons in Add Person.
- A rights allows the saving of the new person.
Additional tool rights to Census may also be required. See the complete Census Tool Rights article for a complete listing of available tool rights. Separate tool rights are necessary to see a person's Social Security number.
 Add Person Tool Rights
Use the Add Person Wizard to Create a New Person
When entering Information in the Last Name, First Name or Middle Name fields, apostrophes and parentheses are NOT allowed.
- Enter the Last Name of the person who needs to be entered into Campus. This is a required field. Additional search criteria may be entered – First Name, Middle Name, Birth Date and Gender.
- Click the Search button. Matching search results, if any, display in the box to the right. It is recommended that the results be thoroughly reviewed before creating a new person. To review in more detail the search results of the persons, click the Details link next to the person’s name. This displays a Person Summary Report of that person’s demographic data, contact information and relational information.
- If the search results do not match the information that needs to be entered, select the Create New Person button. The Person Creation and Person Identifiers editor screen displays. Enter as much of the information that is known at this time.
- In the Person Creation fields, enter the Last Name, First Name and Gender of the person. These are required fields. There may be district specifications for entering this information.
- Enter additional person information where known and follow recommended district procedures for creating new persons.
- In the Person Identifiers area, enter the Staff State ID and Staff Number, if applicable. Sites tied to a State Edition may have Staff State ID generation enabled. In that case, the Staff State ID field is not available for editing and an ID automatically generates when the person is given an employment record.
- Click the Save button at the bottom of the screen. Once the information is saved, the tool displays the new person entered in a search box. To review or to enter additional Census items (household memberships, relationships, enrollments), select the person’s name.
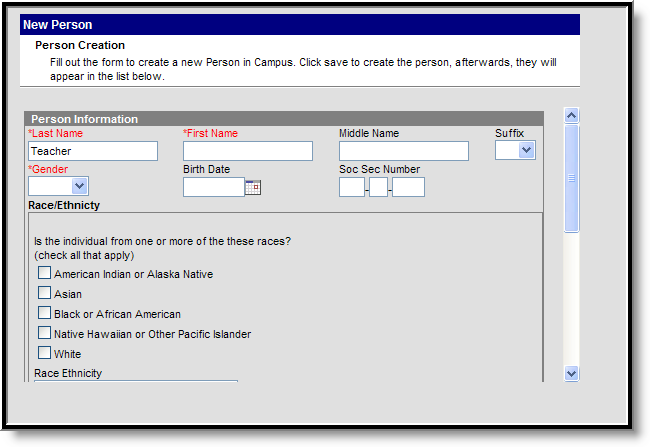 Create New Person Editor
To create another person, click the Add Another Person button. This returns the user to the search fields where another person can be created following the steps above.
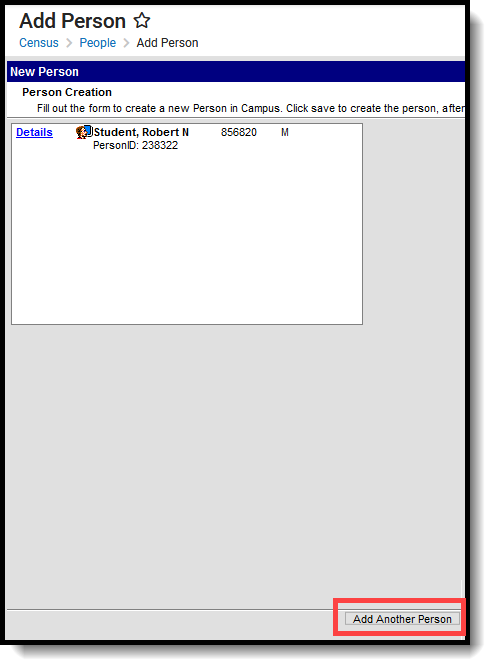 Add Another Person
Use the Add Person Wizard to Find a Person
When entering Information in the Last Name, First Name or Middle Name fields, apostrophes and parentheses are NOT allowed.
- Enter the Last Name. This is a required field. Additional search criteria may be entered – First Name, Middle Name, Birth Date and Gender.
- Click the Search button when finished entering criteria. Matching search results, if any, display in the box to the right. To review in more detail the search results of the persons, click the Details link next to the person’s name. This displays a Person Summary Report of that person’s demographic data, contact information and relationship information. It is recommended that the results be thoroughly reviewed before creating a new person.
- Select the correct person from the list of results by clicking on the Person icon, the name or the person ID. The Demographics tool displays.
- Review the entered information for accuracy and district policy for entering Census information.
- Click the Save button at the bottom of the screen. The person information updates accordingly.
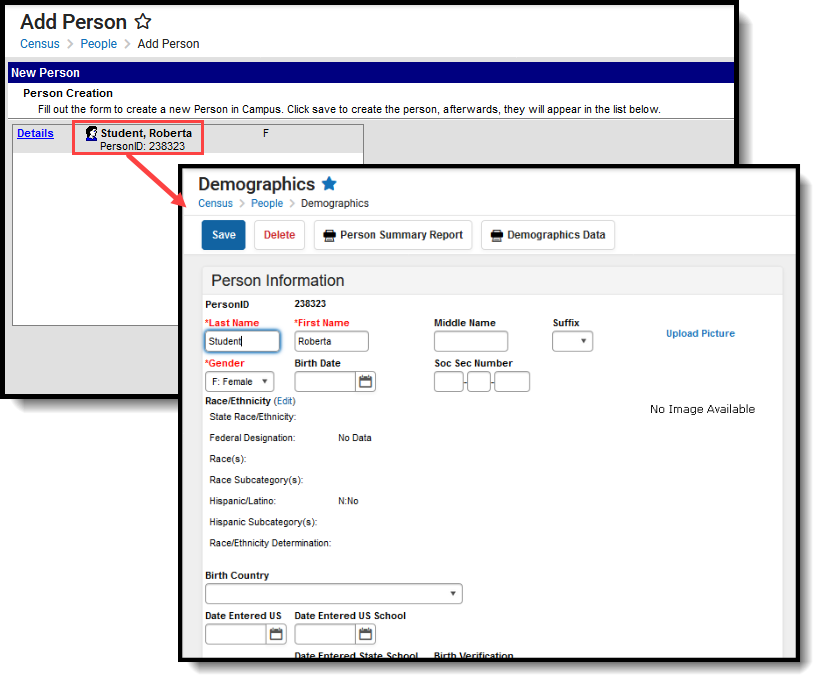 Add Person, Demographics Editor
Add a Person to Census
Before a food service account can be created, the patron must exist in Campus. Use the Add Person tool to create the patron.
Tool Search: Add Person
The Add Person tool allows the creation of new persons - staff members, students, parents/guardians, etc. - in Infinite Campus.
- When creating a new person as part of a census record, use the Census Wizard.
- When reviewing or modifying an existing person's information, use Demographics or Identities.
 Add Person Tool
See the Add Person Tool Rights article for information about rights needed to use this tool.
Like students and parents/guardians, staff members are entered in Campus as a person record. That person record does not become a staff record until a District Employment record is created and they have a Staff ID number.
Staff members can be created by using the Add Person tool or by using the Staff Locator tool. The Staff Locator find staff members already entered into Campus throughout the state (in State Edition installations) or the district (in District Edition installations). With both tools, a search needs to be done before the user can create a new person or a new district staff member.
To eliminate the possibility of duplicate persons, this tool forces the user to search prior to adding new persons. The last name must be entered before the Search button becomes active.
Use the Add Person Wizard to Create a New Person
When entering Information in the Last Name, First Name or Middle Name fields, double quotation marks and parentheses are NOT allowed.
- Enter the Last Name of the person who needs to be entered into Campus. This is a required field. Additional search criteria may be entered – First Name, Middle Name, Birth Date and Gender.
- Click the Search button. Matching search results, if any, display in the box to the right. It is recommended that the results be thoroughly reviewed before creating a new person. To review in more detail the search results of the persons, click the Details link next to the person’s name. This displays a Person Summary Report of that person’s demographic data, contact information and relational information.
- If the search results do not match the information that needs to be entered, select the Create New Person button. The Person Creation and Person Identifiers editor screen displays. Enter as much of the information that is known at this time.
- In the Person Creation fields, enter the Last Name, First Name and Gender of the person. These are required fields. There may be district specifications for entering this information.
- Enter additional person information where known and follow recommended district procedures for creating new persons.
- In the Person Identifiers area, enter the Staff State ID and Staff Number, if applicable. Sites tied to a State Edition may have Staff State ID generation enabled. In that case, the Staff State ID field is not available for editing and an ID automatically generates when the person is given an employment record.
- Click the Save button at the bottom of the screen. Once the information is saved, the tool displays the new person entered in a search box. To review or to enter additional Census items (household memberships, relationships, enrollments), select the person’s name.
 Create New Person Editor
To create another person, click the Add Another Person button. This returns the user to the search fields where another person can be created following the steps above.
 Add Another Person
Use the Add Person Wizard to Find a Person
When entering Information in the Last Name, First Name or Middle Name fields, apostrophes and parentheses are NOT allowed.
- Enter the Last Name. This is a required field. Additional search criteria may be entered – First Name, Middle Name, Birth Date and Gender.
- Click the Search button when finished entering criteria. Matching search results, if any, display in the box to the right. To review in more detail the search results of the persons, click the Details link next to the person’s name. This displays a Person Summary Report of that person’s demographic data, contact information and relationship information. It is recommended that the results be thoroughly reviewed before creating a new person.
- Select the correct person from the list of results by clicking on the Person icon, the name or the person ID. The Demographics tool displays.
- Review the entered information for accuracy and district policy for entering Census information.
- Click the Save button at the bottom of the screen. The person information updates accordingly.
 Add Person, Demographics Editor
Use the Add Person tool to create a record for an individual for whom data will be tracked in Campus.
Creates Alerts to Display on POS Terminals
Flags provide a way of labeling students for things such as food allergies. Any number of flags can be created for a school or district, and any number of flags can be assigned to a student.
Tool Search: Flags Setup
The Flags Setup tool allows schools and districts to assign indicators to a student for particular programs, alerts, or notices that may assist with the student's success in school. Any number of flags can be created for a school or district, and any number of flags can be assigned to a student.
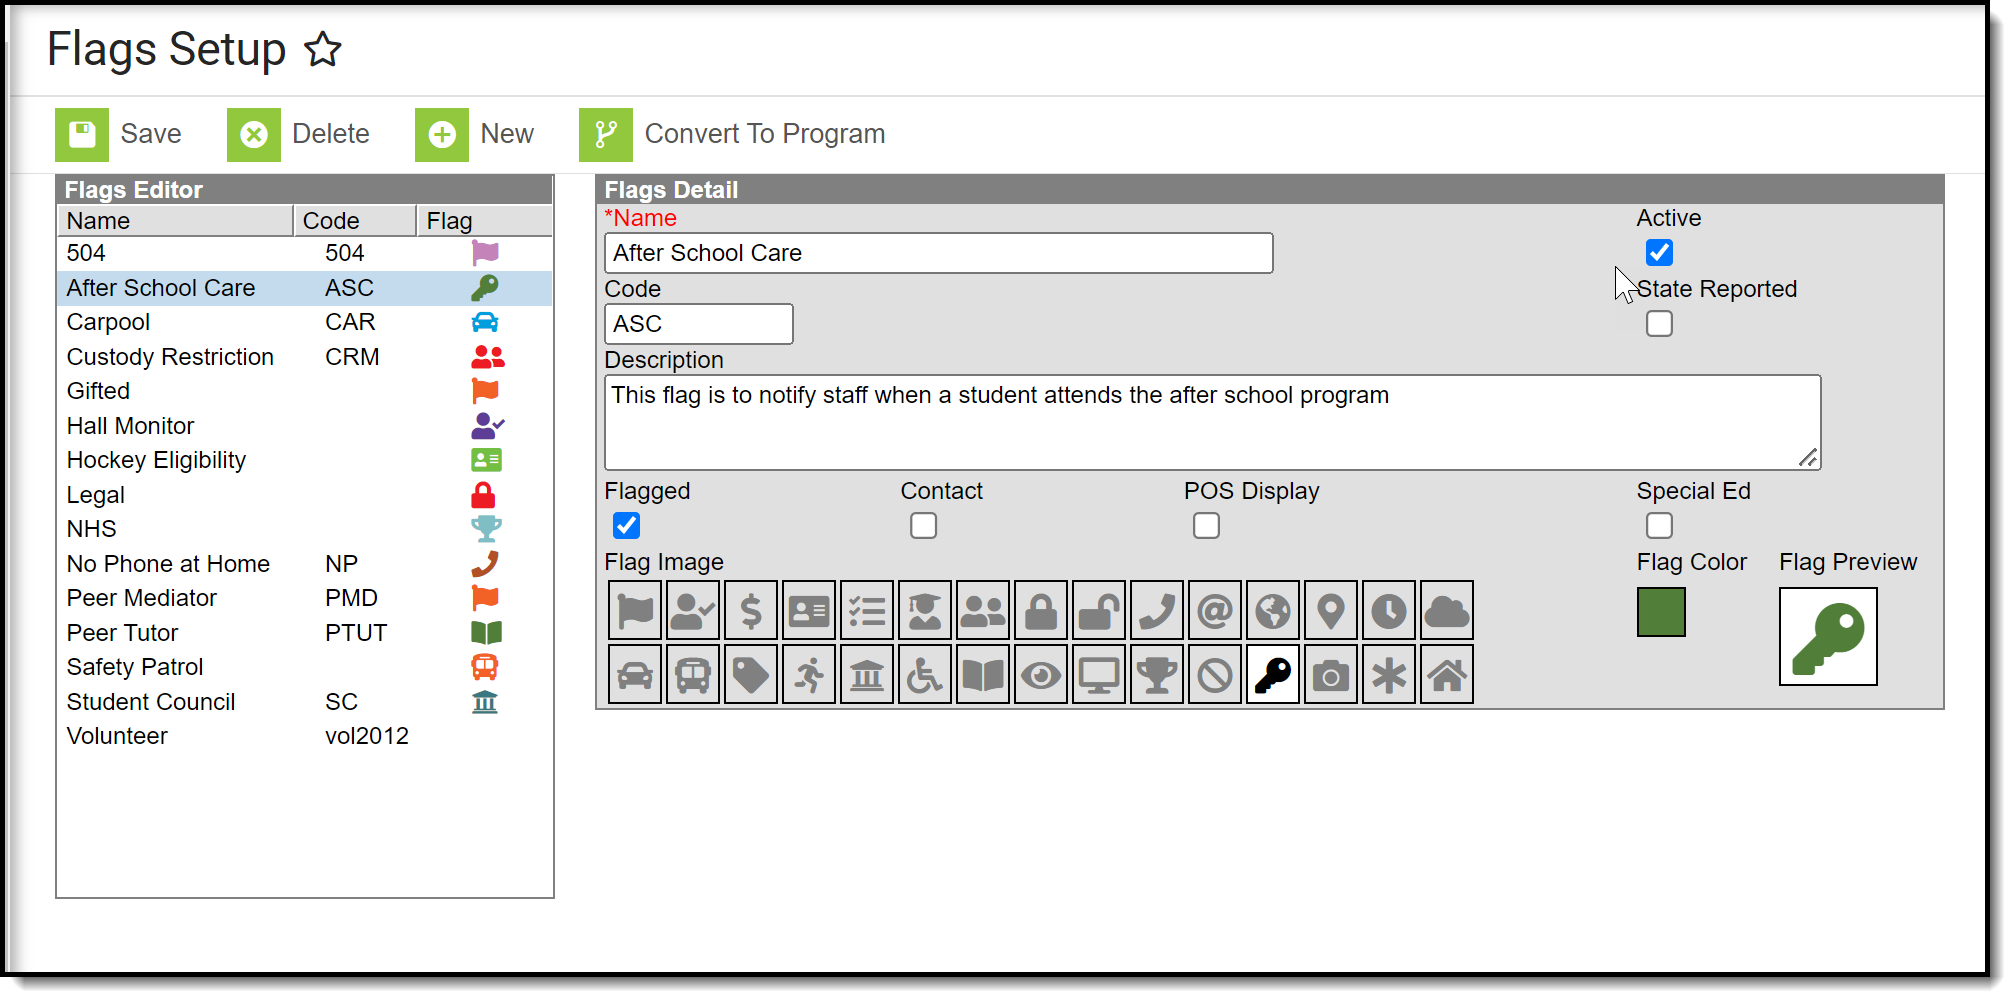 Flags Setup Tool
Create Flags
- Select the New icon. A Flag Detail editor will appear to the right.
- Enter the Name of the flag.
- Enter a Code for the flag. This code can be a district-defined code or a state-defined code.
- Enter a Description of the flag.
- Mark the Flagged checkbox if this flag should display next to the student's name. If yes, then select a Flag Image and a Flag Color. There are 30 images and 12 colors to choose from.
- Mark the other checkboxes (Contact, POS Display, Special Ed, State Reported) if applicable to this flag.
- Select a Flag Image to appear next to a student's name when this flag is assigned. This image will only display if flagged is selected.
- Click the Save button when finished. The new flag will appear in the Flags Editor tree.
Flags are assigned to students either manually on the Student Flags tool or using the Batch Assignment Tool.
Convert To Program
If there are flags that would be better suited to be programs, use Convert to Program. This option requires the user to have full tool rights to (RWAD) to Program Admin > Flags.
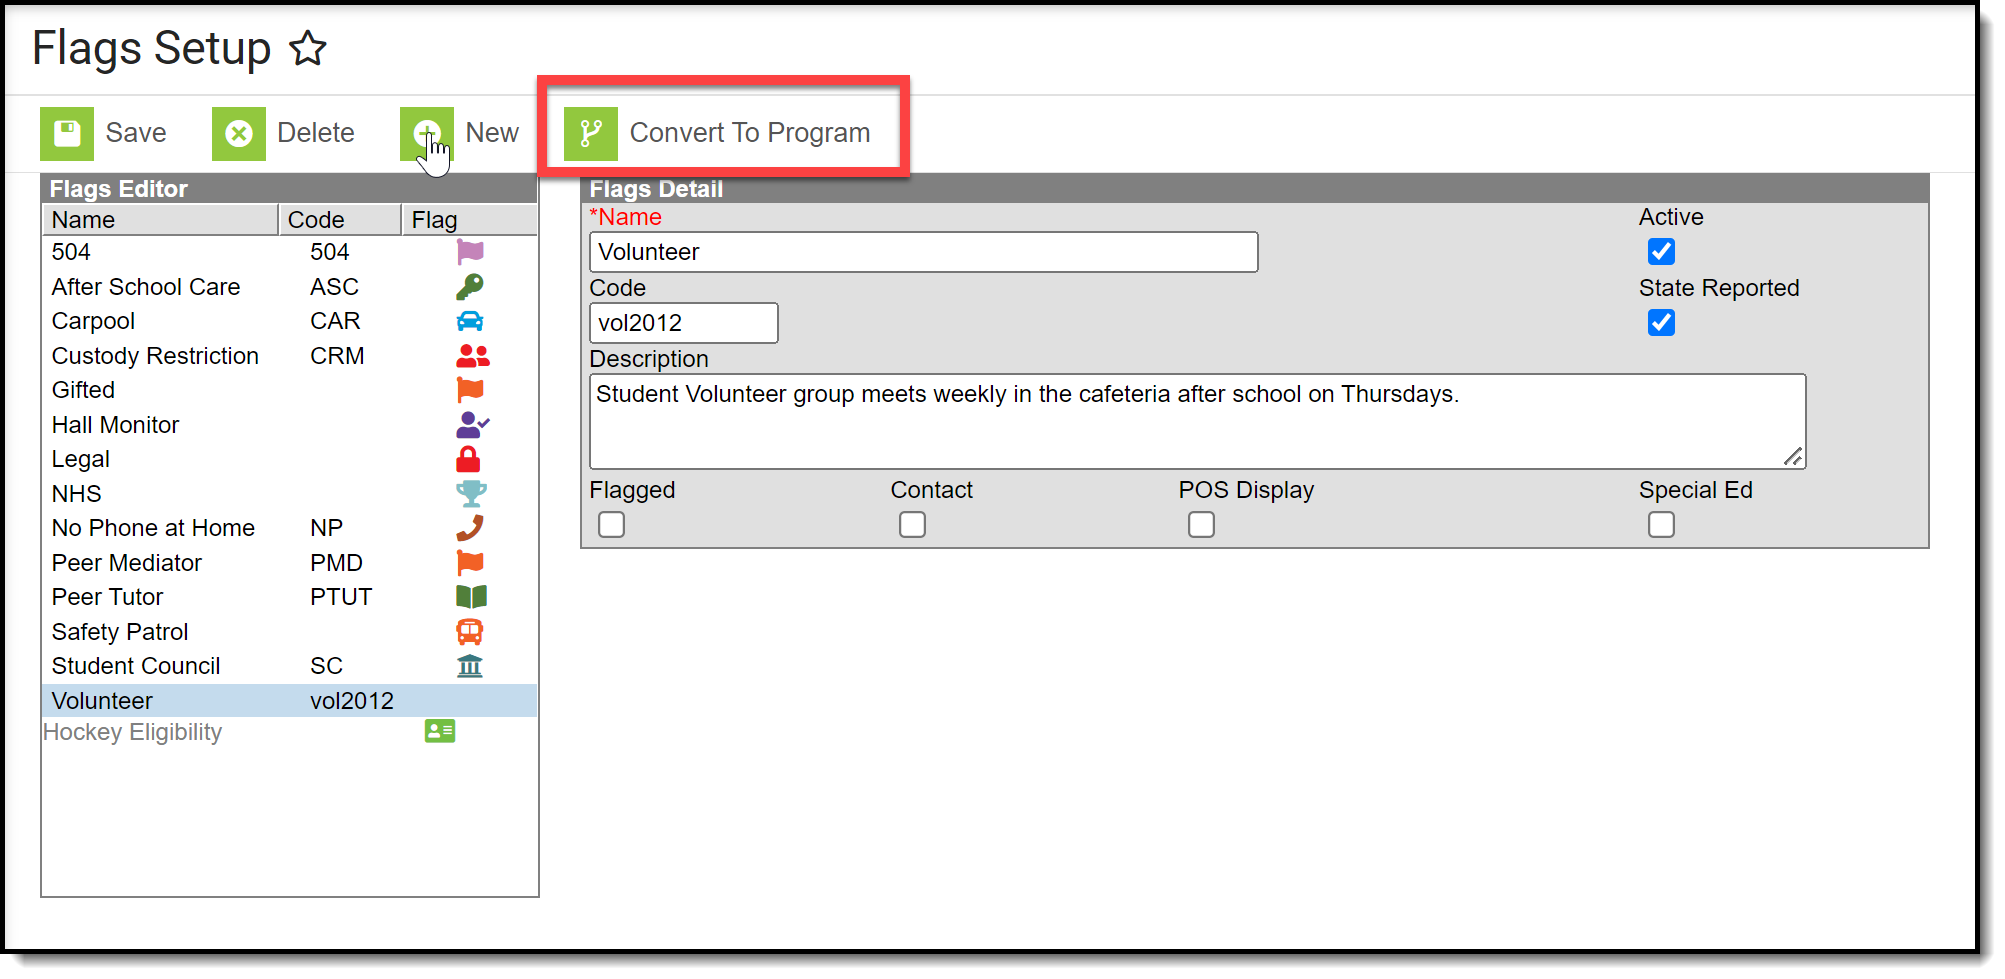 Convert to Program
NOTE: When a flag is converted to a program, the Sessions checkbox cannot be added.
- Click the Convert to Program button. A warning message displays explaining what happens, as follows:
- The image associated with the flag no longer displays next to the student's name.
- User warnings associated with the student are erased.
- Participation details move to the Program Participation > Programs tool.
- Click OK to continue the conversion process. A confirmation message displays. The flag that was converted no longer displays in the Flags Editor; it is visible in the Programs editor.
After the conversion, if there was a flag image associated with the flag that is now a program the image no longer displays next to the student's name. The program is listed in the Program Participation Programs editor. All other data entered as part of the flag converts to the equivalent program data fields.
Assign Food Service Alert to a Student
The Flags tool informs a user that a student has special information on file in the office, or may have a food allergy. This topic shows how to assign a Food Service alert to a student.
Tool Search: Flags Setup
The Flags Setup tool allows schools and districts to assign indicators to a student for particular programs, alerts, or notices that may assist with the student's success in school. Any number of flags can be created for a school or district, and any number of flags can be assigned to a student.
 Flags Setup Tool
Create Flags
- Select the New icon. A Flag Detail editor will appear to the right.
- Enter the Name of the flag.
- Enter a Code for the flag. This code can be a district-defined code or a state-defined code.
- Enter a Description of the flag.
- Mark the Flagged checkbox if this flag should display next to the student's name. If yes, then select a Flag Image and a Flag Color. There are 30 images and 12 colors to choose from.
- Mark the other checkboxes (Contact, POS Display, Special Ed, State Reported) if applicable to this flag.
- Select a Flag Image to appear next to a student's name when this flag is assigned. This image will only display if flagged is selected.
- Click the Save button when finished. The new flag will appear in the Flags Editor tree.
Flags are assigned to students either manually on the Student Flags tool or using the Batch Assignment Tool.
Convert To Program
If there are flags that would be better suited to be programs, use Convert to Program. This option requires the user to have full tool rights to (RWAD) to Program Admin > Flags.
 Convert to Program
NOTE: When a flag is converted to a program, the Sessions checkbox cannot be added.
- Click the Convert to Program button. A warning message displays explaining what happens, as follows:
- The image associated with the flag no longer displays next to the student's name.
- User warnings associated with the student are erased.
- Participation details move to the Program Participation > Programs tool.
- Click OK to continue the conversion process. A confirmation message displays. The flag that was converted no longer displays in the Flags Editor; it is visible in the Programs editor.
After the conversion, if there was a flag image associated with the flag that is now a program the image no longer displays next to the student's name. The program is listed in the Program Participation Programs editor. All other data entered as part of the flag converts to the equivalent program data fields.
Add Options to Dropdown Lists
The Campus administrator for your district can use the Attribute/Dictionary tool to add options to dropdown lists pertaining to Food Service.
The Attribute Dictionary tool allows users to view and modify data attributes and elements used throughout Campus. This video demonstrates how to customize data element options.
Settings for School Breakfast and National School Lunch Programs
This topic provides information about USDA Program Settings.
Tool Search: School Information
When you create a school, you must select options that indicate whether the school participates in the School Breakfast Program (SBP), National School Lunch Program (NSLP) and/or Title III. Provision fields are also provided to help identify whether a school has a Provision 1, 2, 3, 4 or CEP status and identify if Provision Type is SBP, NSLP, or both.
The School Breakfast Program (SBP) and National School Lunch Program (NSLP) checkboxes above the Provision Type are utilized for other reports. A school can participate in SBP and NSLP, but the school may not have Provision status in both programs.
If a Provision is selected, the Provision Type, Provision Base Year and Provision End Year must be selected to save the record.
At this time, state reporting and food service functionality is not affected by the Provision fields. However, if Provision fields are entered for schools with the Educational Benefits Applications Processed FRAM Preference set, Educational Benefits Applications will appear for the Provision Base and End Year entered.
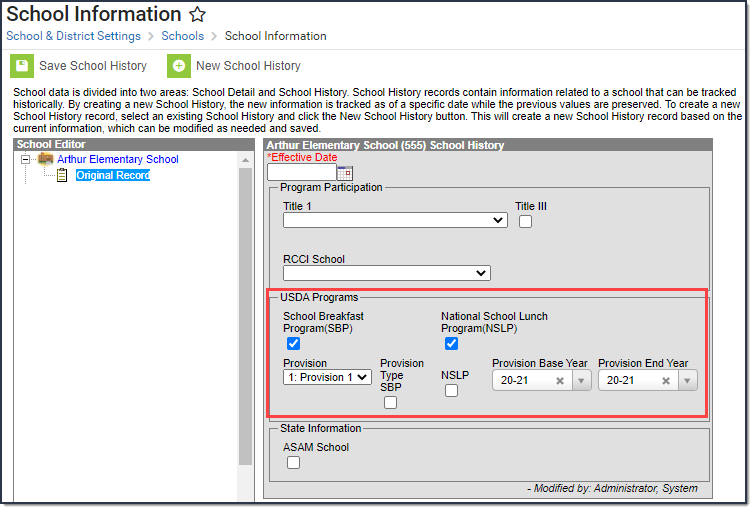 USDA Programs
USDA Programs
Field | Description |
|---|---|
School Breakfast Program (SBP) | This checkbox indicates whether the school participates in the School Breakfast Program. This field must be selected for some state reports and for the FRAM Verification Final Summary Report. |
National School Lunch Program (NSLP) | This checkbox indicates whether the school participates in the National School Lunch Program. This field must be selected for some state reports and for the FRAM Verification Final Summary Report. |
Provision | This field indicates the Provision in which the school is participating. The National School Lunch program includes the following provisions.
|
Provision Type | These checkboxes indicate if the Provision is for the School Breakfast Program (SBP), the National School Lunch Program (NSLP), or both. |
Provision Base Year | Indicates the base year in which the Provision began. |
Provision End Year | Indicates the year in which the Provision will end. If the year entered in this field is a current or future school year, the Educational Benefits Applications preference becomes available for selection on the FRAM Preferences tab. |
For information on these programs, see the following:
United States Department of Agriculture
United State Department of Education
Zones
This article talks about the Allow HTTP option within the Zones tool. The Zones tool is available if your district is using Point of Sale functionality.
Tool Search: Zone Setup
A zone is an area specifically configured for data exchange and message communication between Agents representing different applications (e.g., Campus student system, SIF, POS, state/district).
This tool does not appear in all versions of Campus. It only applies to certain districts/states, including: district/states/regions operating as part of an Infinite Campus State or Regional Edition, districts using National Records Exchange functionality and/or districts using Point-of-Sale functionality. For SIF zones, please refer to the Setup SIF Zone information.
Zones as Part of Data Communication
Zones are an integral part of Data Interchange Services (DIS), which allows data to transfer and synchronize between separate instances of Campus.
A zone is an area specifically configured for message communication between Agents. A zone exists as a specific URL location where assigned Agents exchange XML data messages. Data exchanged within a zone can be "scoped," or limited to certain data objects and parameters, to prevent excessive data transfer. All zones existing within Campus are managed by the built-in Campus ZIS (Zone Integration Server).
Campus ZIS and Data Communication
Campus comes with a built-in Zone Integration Server (ZIS) that directs data messages between sending and receiving agents.
The Campus ZIS acts as the communication hub and manager of zones used for data messaging. The ZIS controls the access, routing and security of data messages from various types of Agents operating within its zones (e.g., SIF agents, district/state-level agents, POS agents, DIS agents).
The ZIS allows zones to be scoped to specific years, schools and/or calendars, which eliminates the transfer of excess data. Messages are routed through the ZIS based on the Data Access Rights configured for the data objects allowed to exchange within each zone.
Zones
The Zones tool displays the zones currently established for communication and data messaging, as managed by the ZIS. Infinite Campus configures the zones necessary for messaging between Campus applications. Settings for Campus zones can be viewed, but not edited, on the Zones tool. In the event the agent table is blank, the state will recreate zones for each district when the application server reboots.
The Zones and Zone Options tabs do not share the same tool rights. In order to apply SIF Zone Options to zones, users with tool rights to the Zones tab must also be given tool rights to the SIF Zone Options tab.

The Campus ZIS allows the existence of multiple zones, so that several applications may share data in a central location. For example, the district-level student application may share data with the state-level student application in one zone, while the same district-level student application also shares data with the POS application in another zone. Several zones may appear on the Zones tool, depending on the district/state.
Examples of Campus zones include:
- Standard District Zone - KYStateZone - This zone represents the district-level view of the zone used for messaging between the district and state agents within the current school year. Though named differently, this is the same zone as the Standard State Zone.
- Standard State Zone - This zone represents the state-level view of the zone used for messaging between the district and state agents within the current school year. Though named differently, this is the same zone as the Standard District Zone.
SIF Zone - Name varies, entered by user- In certain scenarios, third-party/external applications are configured for use with the Infinite Campus system. A SIF zone represents the area in which the Campus student information system communicates with an external (non-Campus) application agent/ZIS for data exchange purposes.
Please refer to the SIF Data Exchange and Setup SIF Zone articles for more information.
- POS Zone - POS - This zone is used for messaging between the Campus student information system (client) and POS application (server) agents. This zone may allow editing via the Zones tool.
- National Records Exchange Zone - InfiniteRouter - This zone is used for messaging between the district and the Infinite Campus router used to allow National Records Exchange between participating Campus districts.
- Future Year Sync/Scope Zone - KY003ZoneP1 - This zone is used for messaging between the district and state agents for a future school year.
- Prior Year Sync/Scope Zone -KY003ZoneM1- This zone is used for messaging between the district and state agents for a prior school year.
See the Data Interchange Setup Tool Rights article for information about related tool rights.
Zone Fields
Most zones and zone fields will be locked from editing.
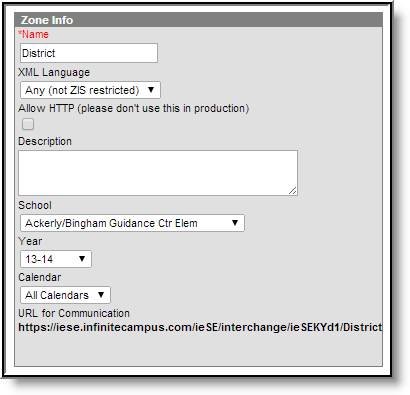 Zone Info Editor and Data Filtering Options
The following table defines the fields/settings of the Zone Info editor:
Setting | Description |
|---|---|
Name | Name of the zone. |
XML Language | Language used for message communication. |
Allow HTTP | Generally, this checkbox should NOT be marked for live production sites. When the box is checked, HTTPS encryption of data messages is disabled, allowing HTTP, a much less secure data transfer method. However, the use of HTTP may be acceptable in the following scenarios when another form of encryption is used:
This checkbox allows incoming connections via unencrypted HTTP. It should only be used when encryption is offloaded to a separate device, like a load balancer or proxy. Given the internal architecture of our Cloud hosting, this box should be checked for Campus Cloud and Campus Clout Choice customers. |
Description | Comments related to the zone. |
School | Data from schools selected in this field will be available for exchange. |
Year | Data from years selected in this field will be available for exchange. |
Calendar | Data from calendars selected in this field will be available for exchange. |
| URL for Communication | The specific location of the zone. The URL is automatically created and will only display after a zone has been saved. SIF Note: |
Zone Scopes
The zone settings, or scopes, between syncing Campus applications must match to allow data interchange features like syncing, records transfers, meal processing, etc. For example, the zones set up for data exchange between a linked Campus district/state, two records-exchanging Campus districts, or when using the Campus POS meal processing must be set to the same data scope on the zone existing for that purpose within application.
Example
If the School, Year and Calendar fields selected for a zone at the state level are set to “All Schools,” “09-10” and no selected calendar (respectively), the district-level School, Year and Calendar fields are also set to the same values for the same zone.
Consider the following screenshots:

The district and state-level zones will be named differently, but the zone settings will be the same. At the district level, the naming convention indicates data exchange with the state zone, while the state level, the naming convention indicates the specific district from which data will be received.
Sync Data from Multiple School Years
In some states, data is allowed to sync for the current school year, as well as the prior and/or next school year. This is a process that requires a zone to be created, configured and scoped for each year that it should sync (prior, current, future). For more information, please refer to information on Syncing Data from Multiple School Years.
Related Information
For more information on tools and processes using Campus/DIS Zones, please refer to the following areas:
- Student Records Transfer
- National Records Exchange
- Point-of-Sale
- Resync State Data Tool
- Synching Data from Multiple School Years
- SIF Zone Options
Food Service Administration Setup
When setting up for Food Service, the following needs to be done: create purchasable items, set up POS terminals, build service layouts (menus), set up Class Serve, and manage the POS terminals remotely.
Point of Sale Best Practices
This document summarizes the set up for Point of Sale.
Item Categories
Item Categories are used for reporting and processing purposes. Item Categories created on this tool populate the required Item Category field of the Purchasable Items tool and apply to all schools within the district.
Tool Search: Item Categories
This functionality is only available to customers who have purchased Campus Point of Sale as add-on functionality.
Item Categories are used for reporting and processing purposes. Item Categories created on this tool populate the required Item Category field of the Purchasable Items tool and apply to all schools within the district.
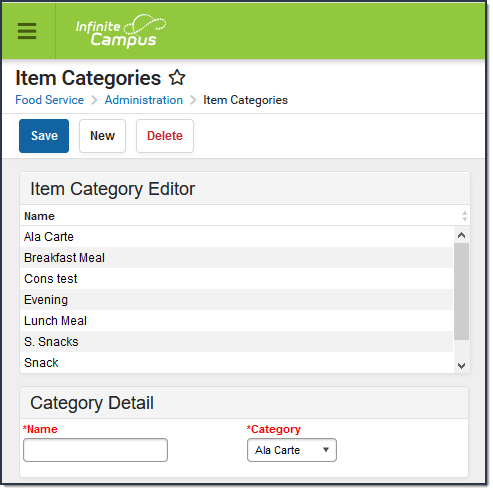 Item Categories Example
Create New Item Categories
- Click the New icon from the Campus action bar.
- Select the Category to which purchasable items will be assigned. These three item categories are hard-coded by Campus and available for selection:
- Ala Carte -- An Ala Carte category should be created if additional purchasable items are sold as supplements or alternatives to standard meals (e.g., extra milk, side items, snacks, alternate meal items).
- Concession -- A Concession category should be created if schools offer additional purchasable items completely unrelated to school meals or snacks. This category is often used for purchasable items that are event-based (e.g., items sold for extracurricular activities).
Meal -- Meal categories should be created for each standard meal offered in schools (i.e., if both breakfast and lunch are offered, they should be created as separate entries both assigned to this category).
If the category qualifies for meal reimbursement, the Meal category MUST be selected to ensure proper cost processing for free/reduced students. In some situations, snack items may be reimbursable but should not be assigned to the Meal category.
Enter a Name for each type of serving category to which purchasable items will be sold (e.g., breakfast meal, lunch meal, AM snack, ala carte, concessions). The value entered in this field will be populated in the required Item Category field of the Purchasable Items tool.
Infinite Campus recommends including the word "meal" in the Name field of any Category where the "Meal" option is selected. This will assist in the setup of purchasable items on the Purchasable Items tool.
Click Save.
After Item Categories are established, purchasable items should be created with the Purchasable Items tool.
Delete Item Categories
To delete an item category, select the item from the Item Category Editor and click the Delete icon. If there are transactions associated with purchasable items related to the category, Campus does not allow deletion.
Purchasable Items
The Purchasable Items tool lists all food items available for purchase in a district, including meal items, à la carte items, snacks and concessions. Purchasable items existing on this tool are available for selection in service layouts/menus in the Application Manager tool.
Tool Search: Purchasable Items
This functionality is only available to customers who have purchased Campus Point of Sale as add-on functionality.
The Purchasable Items tool lists all food items available for purchase in a district, including meal items, à la carte items, snacks and concessions. Purchasable items existing on this tool are available for selection in service layouts/menus in the Application Manager tool.
Infinite Campus recommends creating purchasable items for all meals and items served, as it allows for detailed tracking and reporting. Before purchasable items can be created, Item Categories must be established.
Item Setup
If an item is sold for the same price throughout the district, it only needs to be created once and assigned to the applicable service layouts (menus). There is no need to create the same item for specific schools/serving locations. For example, if milk is sold for .50 cents throughout the district, only one milk item needs to be created.
Purchasable Item Editor
The Purchasable Item Editor allows users to create new purchasable items and view a list of existing items in Campus. The Action column includes a Details button for each item, enabling users to edit its fields.

| Field | Description |
|---|---|
Filter by Name |
Filter the Purchasable Item Editor by the name of the items. To remove a filter, click the X on the filter and click Apply. |
| Filter by Item Category | Filter the Purchasable Item Editor by the item category. To remove a filter, click the X on the filter and click Apply. |
| Apply | The button used to initiate the filters entered. |
| Display Inactive | Toggle that displays inactive items when turned on. |
| Details | Allows users to edit any of the details established when the item was created, as well as update items with new prices after they have been purchased. |
Create Purchasable Items
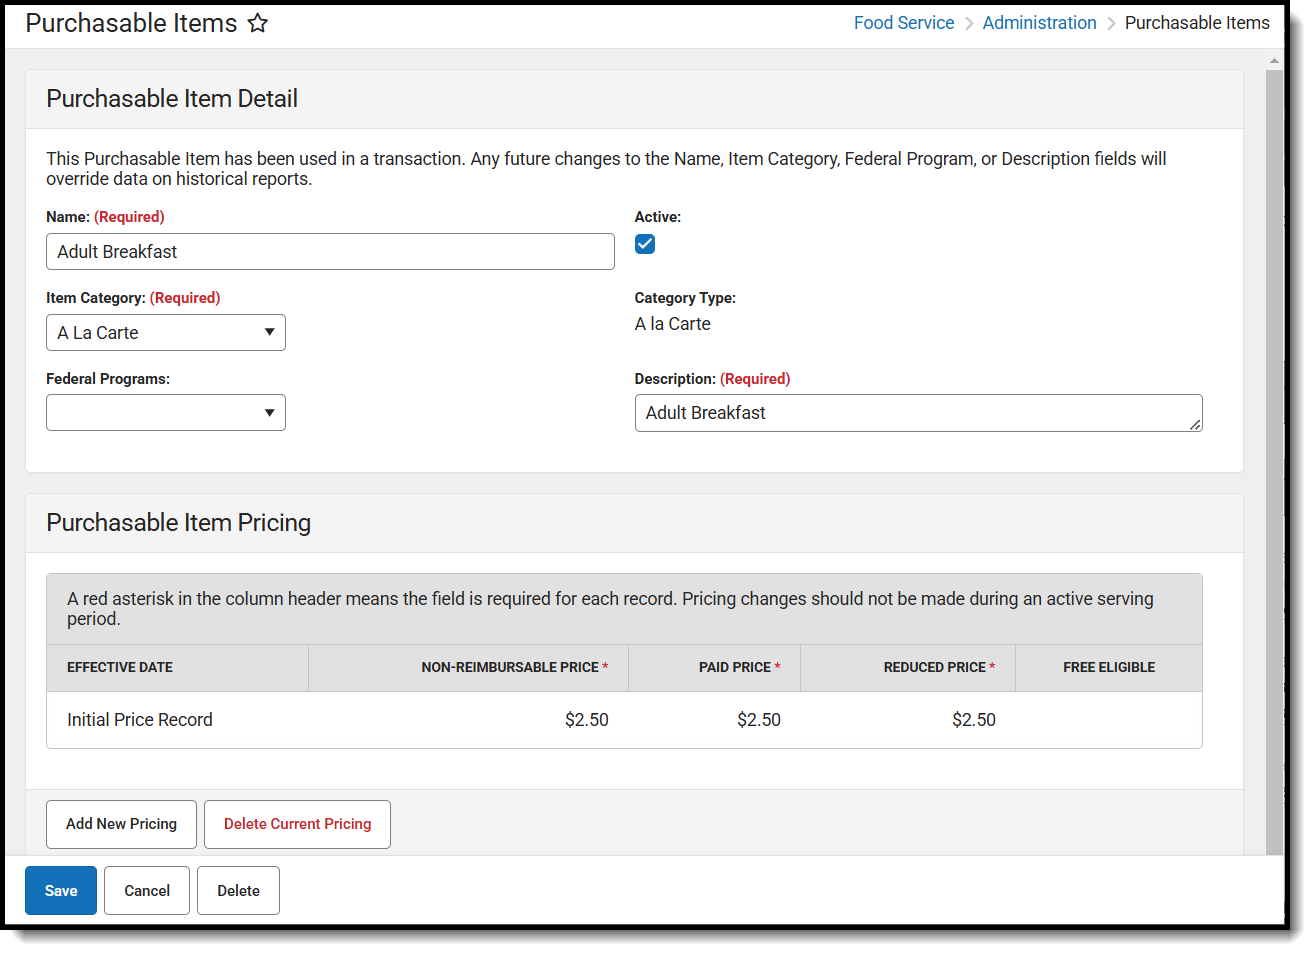
Use this tool to track purchasable food items and add them to service layout menus. To create a new item, click New, fill out the Purchasable Item Detail fields using the descriptions provided, and click Save when finished.
If a Purchasable Item has been used in a transaction, an informational message will appear:
"This Purchasable Item has been used in a transaction. Any future changes to the Name, Item Category, Federal Program, or Description fields will override data on historical reports."
This message indicates that the item record has a transaction history, limiting certain edits. If the message does not appear, users can freely edit any field. However, once an item has been used in a transaction:
- Editing the Name, Item Category, Federal Program, or Description will trigger a warning, as changes will override historical report data.
- The Item Category can only be changed to another category with the same Category Type. For example, if a Breakfast Meal item with a Meal category has been used, it can only be reassigned to other categories classified as Meal.
| Field | Description |
|---|---|
Name |
The name, price or combination of name/price used to represent a purchasable food items on service layouts/menus, reports and patron transaction histories.
Infinite Campus recommends abbreviating item names in this field to prevent them from getting cut off on service layouts/menus. The Description field, which does not display on service layouts/menus can be used to explain the abbreviation in more detail. |
| Active | If marked, the Active check box indicates the purchasable item is available for selection in service layout/menu planning and can be used in processing patron transactions. |
Item Category |
This is the category with which the purchasable item should be associated. Options available in this list are populated by entries created on the Item Categories tool. Reimbursable items MUST be mapped to a "meal" option. To verify that the selected option is actually considered a "meal," refer to Category field of the Item Categories tool. |
| Category Type | The Category selected in the Category Detail of Item Categories. |
| Federal Program | A Federal Program should be selected for all reimbursable meals to be included on the Edit Check report. Concessions and à la carte items are generally not mapped to a Federal Program. Items with a Federal Program selected will be used for reporting purposes and the following codes are available:
|
Description |
The Description of the item may be the same value entered in the Name field, or it may provide additional details on the purchasable item (e.g., Description field might be the full version of an abbreviation in Name field or additional details on a price entered in the Name field). |
Non-Reimbursable Price |
The Non-Reimbursable Price applies to purchasable items for which a school is not reimbursed and is the price a student will pay for any subsequent meal after they have received their allotted reimbursable meal for lunch or breakfast.
|
Paid Price |
The Paid Price is the full/regular price of a purchasable item.
|
Reduced Price |
The Reduced price is the price a student will pay for a reimbursable meal if they are eligible for reduced meal status.
|
Free Eligible |
If marked, the Free check box indicates the purchasable item is available at no cost to students who are eligible for free meals.
|
Change the Price of an Existing Item
Prices for existing purchasable items can be updated from the Purchasable Item Pricing. If the current pricing has not been used, the pricing fields will be editable. However, once the pricing record has been used, it will be read-only and Add New Pricing must be used.
The price to charge for an item is based on the effective date timestamp. Terminals check for updated prices when the software is launched. After a price is updated, the price will change the next time the terminal software is started.

- Click Details of the item that will be changed.
- Click Add New Pricing in Purchasable Item Pricing.
- Enter new prices for Non-Reimbursable Price, Paid Price, Reduced Price, and select if it is Free Eligible.
- Click Save. The new prices will appear in the Purchasable Item Editor.
Changes should not be made during active serving periods.
Delete Current Pricing
If pricing has been updated for an item and no purchases have occurred at that price, then the price can be deleted by clicking Delete Current Pricing. The price will then revert to the previous pricing. Once a purchase has occurred at a price, it can no longer be deleted and a new price must be added to change the cost.

CEP Purchasable Item Setup Tips
| Setup Type | Description |
| District-wide |
|
| Individual schools |
|
Application Manager: Application Setup for POS Terminals
The Application Manager lists the sites of food service (schools) and the types of service (food options/menus) available at that location. An application can be created for each school in the district, or it can be one cafeteria serving multiple schools.
Point of Sale 1.0 has been deprecated as of 7/1/2023. Please see the Migration Checklist (POS 2.0).
Classic View: Point of Sale > Administration > Application Manager
Search Terms: Application Manager
The Application Manager lists the sites of food service (schools) and the types of service (food options/menus) available at that location. New schools will need to build the list of applications.
This article covers Point of Sale 1.0 applications and terminals, which use the Java applet to build service layouts. For information on Point of Sale 2.0, see Application Manager (POS 2.0)
Application Manager
Food Service administrators can create new applications and services at any time. Refer to the Point of Sale Best Practices article for detailed setup of the Application Manager.
The application (the name of the school) for the POS service needs to be created before the Services (POS menu layouts) can be created.
 Application Manager
Create a New Application
- From the Application Manager, select the New Application icon. The Application Detail screen will appear to the right of the Application Tree.
- Enter a Name for the application.
If desired, check the box to have system warnings appear in the Reminder Enable checkbox. This box will turn the reminder levels on for all students in the selected school if the reminder checkbox and reminder levels have been set for the student on the student account.
Be aware that setting this will cause the cashier to have an extra step by clicking the pop-up box on the POS screen.
- Click the Save icon when finished. The new application will be listed in the Application Tree in alphabetical order and services can be attached to the application.
Create Services
![]() Creating Services
Creating Services
- From the Application Manager, select the Application for which to assign services from the Application Tree.
- Select the New Services icon. A Service Detail table will appear.
- Enter the Name of the service.
- Select the Serving Period.
- If desired, enter a Description of the service.
- Select the appropriate schools using this service from the list of schools. Multiple schools can be selected by using the CTRL and SHIFT keys.
- Click the Save icon when finished. The new service will be listed under the Application to which it is assigned in the Application Tree.
- Repeat this process for as many services or menu tabs there are for the application.
The menu is not based on rotating menus. This is the menu for ALL items that will be served.
Only Serving Periods marked Active within the Attribute Dictionary are allowed to be assigned to services. If you inactivate a Serving Period, you must complete the following tasks:
- Reselect an active Serving Period for all Services assigned to the inactive Serving Period.
- Reload POS data and reboot the POS to remove the Serving Period from appearing on the POS for use by a cashier during login.
- Do NOT inactivate a Serving Period during school hours when meals are being served or during the school year.
After creating the application and all desired services, the Service Layout can be viewed and adjusted as necessary.
Create Service Layouts for POS Terminals
The Service Layout provides a way to customize what the POS terminal screen will look like as the students go through the lunch line. Users can increase and decrease the size of the graphic, add color and change the font type and size.
When creating a new Service Layout, it is best to organize the layout on paper before it is entered as the Service Layout.
Service Layout functionality requires the use of Java and is only supported in a Windows environment.
 Service Layout
Access the Service Layout
- Select the Service from the Application Manager screen. This is the only way the icon will be viewable in the service layout.
- Select the Service Layout icon. A new window will open. Two tabs are available: Item Style and Item Color.
- To change the appearance of a menu item, first select the item from the layout view.
This option uses a Java applet to open. It is best to have the Java application already downloaded on the local machine.
Define Item Styles
- Select the desired item from the dropdown list.
- To change the Width of the item, use the Decrease and Increase buttons.
- To change the Height of the item, use the Decrease and Increase buttons.
- To change the Font Type, select the desired option from the dropdown list. These fonts are available from the Java applet.
- To change the Font Size, use the Decrease and Increase buttons.
- To display the text in bold or italics, use the B or I buttons.
Define Item Colors
- To change the color of the text, select the Foreground radio button and selection the desired color from the matrix.
- To change the background color of the item, select the Background radio button and select the desired color from the matrix.
- The Recent Colors grid will list the colors that have been most recently used.
- Click the Save button on the Item Style tab to save any modifications.
To quit using the Service Layout feature, click the Quit button on the Item Style tab.
Class Serve Applications
The Class Serve option may be used when a meal, snack or milk is served in the classroom during the school day.
This topic discusses Applications. Applications provide a central location for grouping services based on location or types of service.
Point of Sale 1.0 has been deprecated as of 7/1/2023. Please see the Migration Checklist (POS 2.0).
Classic View: Point of Sale > Administration > Application Manager
Search Terms: Application Manager
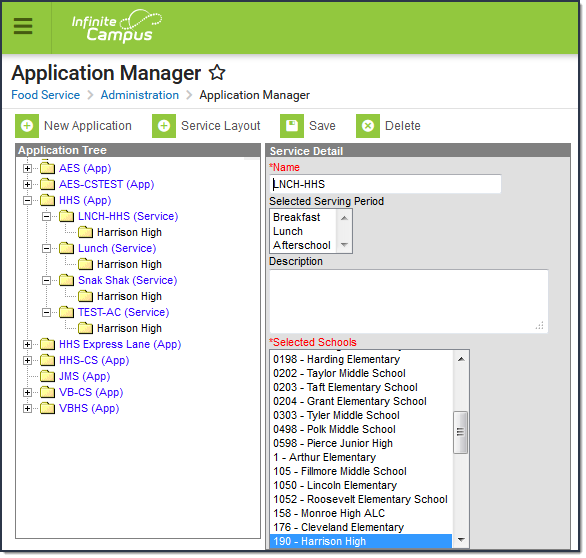
The Class Serve option may be used when a meal, snack or milk is served in the classroom during the school day. The teacher of that course may then record the students who received the item and have the cost of the item deducted from the student’s POS Account balance. The following information describes the setup required in order to implement a class serve option.
 Application Manager
Create a New Application
Applications provide a central location for grouping services based on location or types of service.
If the district is also using POS Terminals, they may choose to add a Class Serve service to an existing Application.
Before applications and services can be created, Item Categories and Purchasable Items must first be defined.
 New Application
- Select the New Application button. The Application Detail editor will appear to the right of the Application Tree.
- Enter a Name for the application.
- DO NOT mark the Reminder Enable or Cafeteria Serve checkboxes. These fields are not used as part of Class Serve.
- Select the Save icon. The application will appear in the Application Tree in alphabetical order.
Once the application is created, services need to be created for the application.
Create New Services
Services define what item(s) are being served during what serving period(s) and within what school(s).
Before services can be created, Item Categories and Purchasable Items must first be defined.
![]() Adding Services to an Application
Adding Services to an Application
- Select the application for which to assign service from the Application Tree.
- Click the New Service icon. The Service Detail editor will appear to the right of the Application Tree.
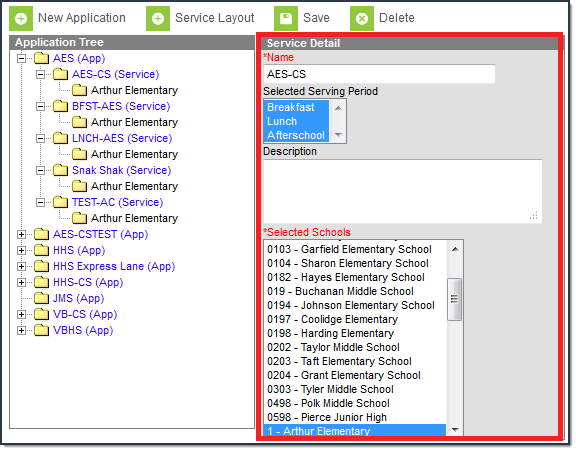
- Enter the Name of the service.
- Select the Serving Period(s).
- Enter a Description about the service.
- Select which Schools are allowed to use this service.
- Click the Save button. The service and assigned schools will appear below the corresponding application in the Application Tree.
- Repeat this process for as many services or menu tabs needed for the application.
Create Service Layouts for Class Serve
Once services are created for an application, the Service Layout should be defined and saved. The service layout for Class Serve determines which items are available for teachers to check off during a Class Serve period. The menu screen will NOT be seen by teachers at that time, they will only see a list of items.
Service Layout uses a Java applet to open. Users must install the Java application in order to use this feature.
![]() Service Layout Button
Service Layout Button
- Select the service from the Application Tree and click the Service Layout button. If this is the first time running the Service Layout tool, a separate window will appear asking the user to download a java-specific file.
- Ensure a current version of Java is installed on the computer and open the java file provided by the Application Manager tool.
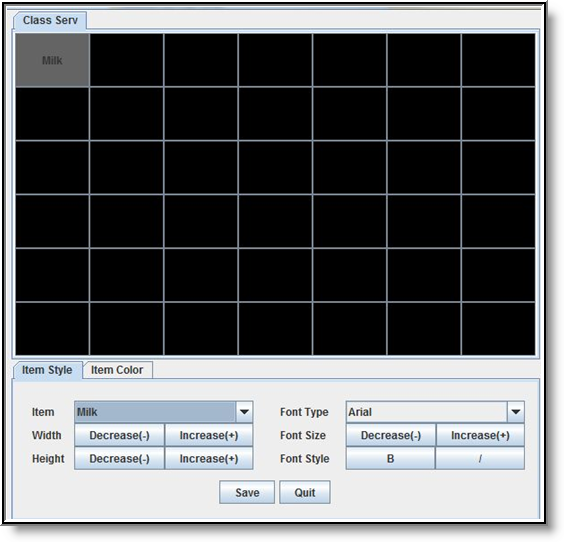
To set up the Service Layout, select each open square and complete the following steps.
- Assign an Item to the square.
- Increase(+) or Decrease(-) the width of the item square selected.
- Increase(+) or Decrease(-) the height of the item square selected.
- Determine the Font Type of the item text.
- Increase(+) or Decrease(-) the font size.
- Select the Font Style.
- Repeat Steps 1 - 6 until all appropriate items have been added to the Service Layout screen.
- Select Save.
Class Serve Services
Services define what item(s) are being served during what serving period(s) and within what school(s).
Point of Sale 1.0 has been deprecated as of 7/1/2023. Please see the Migration Checklist (POS 2.0).
Classic View: Point of Sale > Administration > Application Manager
Search Terms: Application Manager
The Class Serve option may be used when a meal, snack or milk is served in the classroom during the school day. The teacher of that course may then record the students who received the item and have the cost of the item deducted from the student’s POS Account balance. The following information describes the setup required in order to implement a class serve option.
 Application Manager
Create a New Application
Applications provide a central location for grouping services based on location or types of service.
If the district is also using POS Terminals, they may choose to add a Class Serve service to an existing Application.
Before applications and services can be created, Item Categories and Purchasable Items must first be defined.
 New Application
- Select the New Application button. The Application Detail editor will appear to the right of the Application Tree.
- Enter a Name for the application.
- DO NOT mark the Reminder Enable or Cafeteria Serve checkboxes. These fields are not used as part of Class Serve.
- Select the Save icon. The application will appear in the Application Tree in alphabetical order.
Once the application is created, services need to be created for the application.
Create New Services
Services define what item(s) are being served during what serving period(s) and within what school(s).
Before services can be created, Item Categories and Purchasable Items must first be defined.
![]() Adding Services to an Application
Adding Services to an Application
- Select the application for which to assign service from the Application Tree.
- Click the New Service icon. The Service Detail editor will appear to the right of the Application Tree.

- Enter the Name of the service.
- Select the Serving Period(s).
- Enter a Description about the service.
- Select which Schools are allowed to use this service.
- Click the Save button. The service and assigned schools will appear below the corresponding application in the Application Tree.
- Repeat this process for as many services or menu tabs needed for the application.
Create Service Layouts for Class Serve
Once services are created for an application, the Service Layout should be defined and saved. The service layout for Class Serve determines which items are available for teachers to check off during a Class Serve period. The menu screen will NOT be seen by teachers at that time, they will only see a list of items.
Service Layout uses a Java applet to open. Users must install the Java application in order to use this feature.
![]() Service Layout Button
Service Layout Button
- Select the service from the Application Tree and click the Service Layout button. If this is the first time running the Service Layout tool, a separate window will appear asking the user to download a java-specific file.
- Ensure a current version of Java is installed on the computer and open the java file provided by the Application Manager tool.

To set up the Service Layout, select each open square and complete the following steps.
- Assign an Item to the square.
- Increase(+) or Decrease(-) the width of the item square selected.
- Increase(+) or Decrease(-) the height of the item square selected.
- Determine the Font Type of the item text.
- Increase(+) or Decrease(-) the font size.
- Select the Font Style.
- Repeat Steps 1 - 6 until all appropriate items have been added to the Service Layout screen.
- Select Save.
Class Serve Services Layouts
Once services are created for an application, the Service Layout should be defined and saved. The service layout for Class Serve determines which items are available for teachers to check off during a Class Serve period. The menu screen will NOT be seen by teachers at that time, they will only see a list of items.
Point of Sale 1.0 has been deprecated as of 7/1/2023. Please see the Migration Checklist (POS 2.0).
Classic View: Point of Sale > Administration > Application Manager
Search Terms: Application Manager
The Class Serve option may be used when a meal, snack or milk is served in the classroom during the school day. The teacher of that course may then record the students who received the item and have the cost of the item deducted from the student’s POS Account balance. The following information describes the setup required in order to implement a class serve option.
 Application Manager
Create a New Application
Applications provide a central location for grouping services based on location or types of service.
If the district is also using POS Terminals, they may choose to add a Class Serve service to an existing Application.
Before applications and services can be created, Item Categories and Purchasable Items must first be defined.
 New Application
- Select the New Application button. The Application Detail editor will appear to the right of the Application Tree.
- Enter a Name for the application.
- DO NOT mark the Reminder Enable or Cafeteria Serve checkboxes. These fields are not used as part of Class Serve.
- Select the Save icon. The application will appear in the Application Tree in alphabetical order.
Once the application is created, services need to be created for the application.
Create New Services
Services define what item(s) are being served during what serving period(s) and within what school(s).
Before services can be created, Item Categories and Purchasable Items must first be defined.
![]() Adding Services to an Application
Adding Services to an Application
- Select the application for which to assign service from the Application Tree.
- Click the New Service icon. The Service Detail editor will appear to the right of the Application Tree.

- Enter the Name of the service.
- Select the Serving Period(s).
- Enter a Description about the service.
- Select which Schools are allowed to use this service.
- Click the Save button. The service and assigned schools will appear below the corresponding application in the Application Tree.
- Repeat this process for as many services or menu tabs needed for the application.
Create Service Layouts for Class Serve
Once services are created for an application, the Service Layout should be defined and saved. The service layout for Class Serve determines which items are available for teachers to check off during a Class Serve period. The menu screen will NOT be seen by teachers at that time, they will only see a list of items.
Service Layout uses a Java applet to open. Users must install the Java application in order to use this feature.
![]() Service Layout Button
Service Layout Button
- Select the service from the Application Tree and click the Service Layout button. If this is the first time running the Service Layout tool, a separate window will appear asking the user to download a java-specific file.
- Ensure a current version of Java is installed on the computer and open the java file provided by the Application Manager tool.

To set up the Service Layout, select each open square and complete the following steps.
- Assign an Item to the square.
- Increase(+) or Decrease(-) the width of the item square selected.
- Increase(+) or Decrease(-) the height of the item square selected.
- Determine the Font Type of the item text.
- Increase(+) or Decrease(-) the font size.
- Select the Font Style.
- Repeat Steps 1 - 6 until all appropriate items have been added to the Service Layout screen.
- Select Save.
Class Serve Preferences
In order for teachers/staff to use the Class Serve tool within their classroom, Class Serve Preferences must be established.
This functionality is only available to customers who have purchased Campus Point of Sale as add-on functionality.
Tool Search: Class Serve
In order for teachers to use the Class Serve tool in their classroom, Class Serve Preferences must be established.
To ensure proper recording and reporting for meal claims, Class Serve should only be used in districts where qualifying meals or snacks are being served to eligible students in a classroom by a teacher.
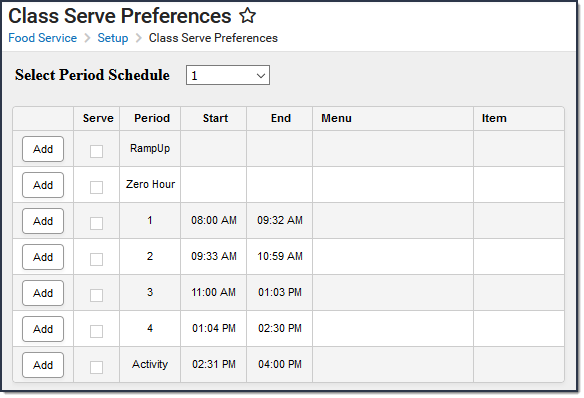
Before setting up Class Serve Preferences:
- Purchasable Items must be created and associated with the proper Federal Programs.
- Applications and Services must be created for Class Serve.
- Periods must be established within Period Schedules.
Establishing Class Serve Preferences
Class Serve Preferences allow users to tie a menu and purchasable items to periods within period schedules.
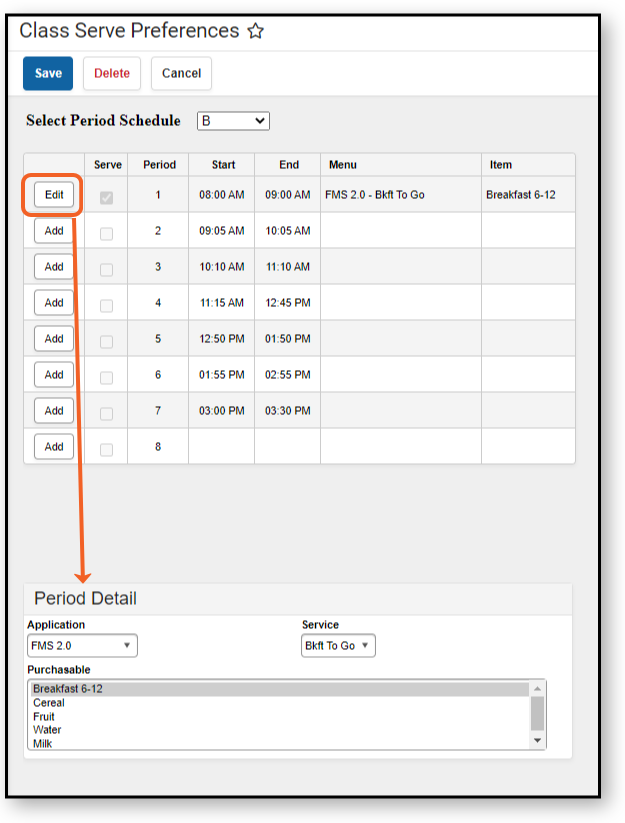
- Select the Period Schedule. Period schedules are defined in the Periods tool. Available options are displayed based on the Year and School values selected in the Campus toolbar at the top.
- Click the Add button for the Period requiring Class Serve functionality. The Period Detail editor appears.
- Select the Application. Applications are established within the Application Manager tool.
- Select the Service. Services are established within the Application Manager tool.
- Select the Purchasable(s) that will be served as the meal option in Class Serve. Hold the Ctrl key to select multiple purchasable items for inclusion.
If multiple purchasable items are selected in the Period Detail on Class Serve Preferences, students will be charged for each item selected when the teacher indicates the student was served a meal. The purchasable item(s) will list at the top of Class Serve. If students can select other items, teachers can record these by clicking the Add Items button.
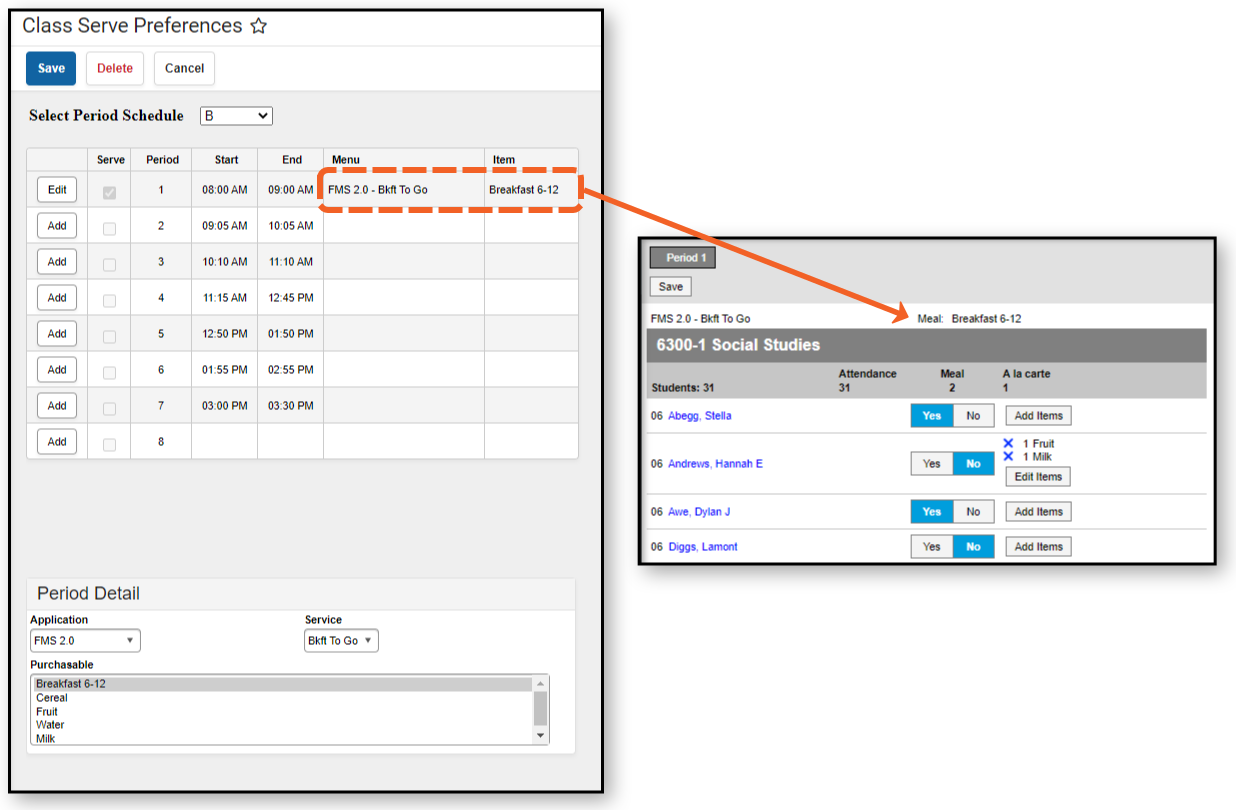
- Click the Save button. The Menu (Application + Service) and Item (Purchasable(s) selected) appear with the corresponding Period.
Class Serve Used by Teachers
Teachers can use Class Serve to record meals or snacks distributed to students so that items can be deducted from students' food service accounts.
This functionality is only available to customers who have purchased Campus Point-of-Sale as add-on functionality.
Tool Search: Class Serve
Use the Class Serve tab to record meals or snacks distributed to students so that items can be deducted from students' food service accounts.
You'll only be able to use this tool if your district has purchased Point of Sale and has set up the necessary prerequisites:
- Class Serve Preferences established for period schedules.
- Purchasable Items created and associated with the proper Federal Programs
- Applications and Services created for Class Serve.
- Students must have food service accounts.
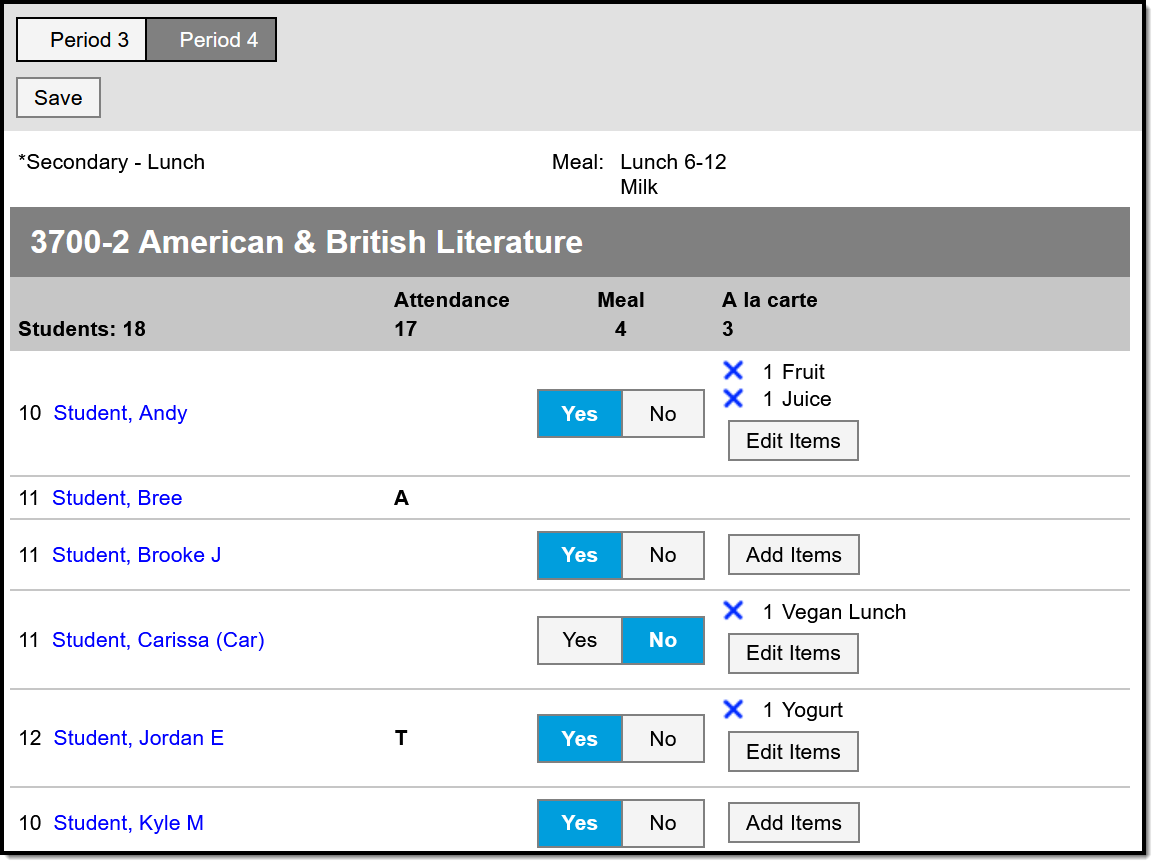
Recording Meals Served with Class Serve
See the Instruction Tool Rights article for information on available tool rights.
You can use Class Serve to record both Meals and a la Carte items distributed to students. Totals of students in the section, students who are present today, and the number of meals and a la Carte items distributed calculate at the top. Students who are absent have an indicator in the Attendance column, as with Bree Student in the image above. Meals and items cannot be recorded for absent students.
To record a Meal for a student click Yes in the Meal column. Leave as No if the student did not have a meal.
To record a la Carte items click Add Items and select the items, changing the quantity if needed. Once items are added, click Edit Items to add more or the blue X to remove items.
Click Save when finished.
 A la Carte Options
If a student does not have a food service account, No Account displays below their name. Meals and items cannot be recorded for students who do not have food service accounts.
Blended Learning
If your school is using Blended Learning, Class Serve will be divided by students who are physically in class and those who attending virtually.
The Class Serve tool allows teachers to enter food service items that were served to students in their classroom. This video demonstrates how to use the Class Serve tool.
Service Layout Copy Wizard
To save time and effort, the Service Layout Copy Wizard can be used to copy existing services and service layouts (menus) between schools/applications.
Tool Search: Service Layout
This functionality is only available to customers who have purchased Campus Point of Sale as add-on functionality.
To save time and effort, the Service Layout Copy Wizard can be used to copy existing services and service layouts (menus) between schools/applications.
Applications are not copied by this tool. They must be created in the Application Manager before this tool may be used.
Using the Wizard
The Service Layout Copy Wizard allows existing services and service layouts (menus) to be assigned to one or more existing applications.
This tool is designed for convenience. Modifications to newly copied services/service layouts (menus) may be necessary in adjusting for a specific food service location and/or its available purchasable items.
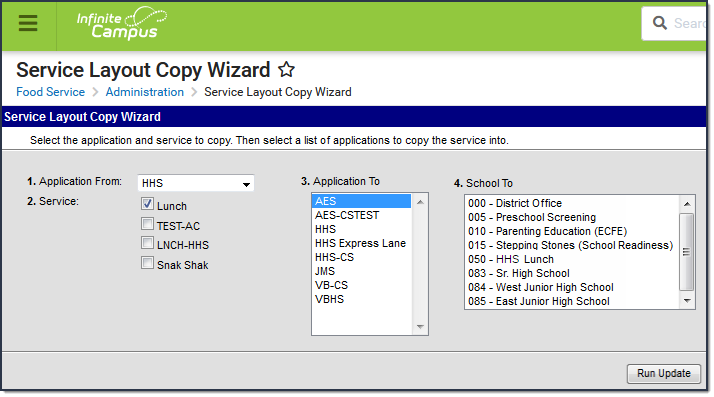 Running the Service Layout Copy Wizard
When you copy a single service to more than one application and school, each service is assigned to all schools. You must deselect any schools you do not want loaded onto the terminal through the Point of Sale Application Manager.
- Select the application that contains the service(s) and service layouts (menus) to be copied from the Application From dropdown field.
Result
The Service(s) related to that application will appear. - Mark the checkbox next to the Service(s) you want to copy.
- Select the applications into which Campus will copy the services in the Application To field.
- Select the school(s) to which you want to assign the service(s) in the School To field.
- Click the Run Update button. A confirmation message displays when the process is complete.
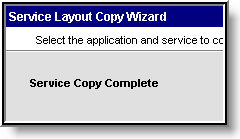
Verifying Copied Services
After using the Service Layout Copy Wizard, verify that the services were copied as intended within the Application Manager tool, and make adjustments, as necessary:
- Expand the application to which services and service layouts (menus) were copied.
- Select the copied service.
- Edit fields in the Service Detail side panel as necessary.
After copying a service, you need to assign a Selected Serving Period. For more information, please refer to the Application Manager tool.
Verifying Service Layouts
Service layouts (menus) will be copied for the services to which they are attached. They can be modified for the new services as necessary.

- Expand the application to which services and service layouts (menus) were copied.
- Select the copied service.
- Click the Service Layout button.
- Edit the service layout (menu) as necessary.
For more information, please refer to the Application Manager tool.
Payment Location
The Payment Location list provides a way to display where a payment to a Point of Sale account was made. This can be used for deposits and sorting reports.
This functionality is only available to customers who have purchased Campus Point of Sale as add-on functionality.
Tool Search: Payment Location
The Payment Location list provides a way to list where a payment to a Point of Sale account was made. This can be used for deposits and sorting reports.
The Payment Location list is used in the sorting of reports and reviewing purchase transactions on the student account. Payment locations appear in the Payment Location dropdown of POS Deposit and are required when making a deposit.
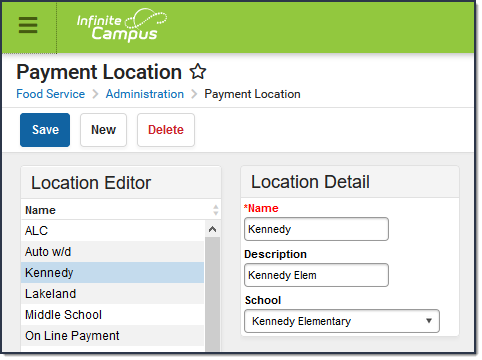 Payment Location Example
Create POS Payment Locations
- Click the New button.
Result
A Location Detail table appears to the right of the Location Editor. - Enter a Name for the location.
- Enter a Description for the location.
- Select the School from the dropdown list for this location.
You can select “None,” indicating the payment does not have a specific location. - Click the Save icon when finished.
Result
The new location is listed in the Location Editor in alphabetical order and available for selection when payments are being entered.
Delete POS Payment Locations
To delete a payment location, select the item from the Location Editor and click the Delete icon. The Payment Location will no longer appear in a dropdown in the POS Deposit screen which is required when making a deposit.
Campus does not allow a deletion if deposits are recorded for the location.
Terminals Setup
The Terminals tool contains system information and settings for all Point of Sale terminals within a district. It also contains system information related to Cafeteria Serve and Class Serve functionality.
This functionality is only available to customers who have purchased Campus Point of Sale as an add-on functionality.
Tool Search: Terminals
The Terminals tool contains system information and settings for all Point of Sale terminals within a district. It also includes system information related to Cafeteria Serve and Class Serve functionality.
| What can I do? | What do I need to know? |
|---|---|
If a Campus Point of Sale has not communicated with the server for three weeks, it will be inactivated and all pending messages from Infinite Campus will be deleted to improve server performance.
Users can reactivate the terminal and update POS data by performing a Data Reload one of two ways:
- From the POS Terminal app: Perform a Data Reload from the POS Terminal Admin screen. This will auto-activate the terminal on the Terminal List and update all data on it.
- From Campus SIS: Click Active on the Terminal Detail (Food Service > Administration > Terminals) and then perform a data reload using the Terminal Manager screen (Food Service > Administration > Terminal Manager) to update all data on the terminal.
Campus Point of Sale can still be used before the reload, but data will not be sent from Infinite Campus to the POS terminal app until the terminal is reactivated.
Terminal List Filters
Filters can be used to limit the terminals that appear within the Terminal List. Terminals can be filtered by Terminal Name and School. Additionally, the Show Inactive switch can be turned ON to have terminals that are not Active appear.

Terminal List Column Descriptions
The Terminal List displays system information for each terminal within a district and a terminal's current operating status.
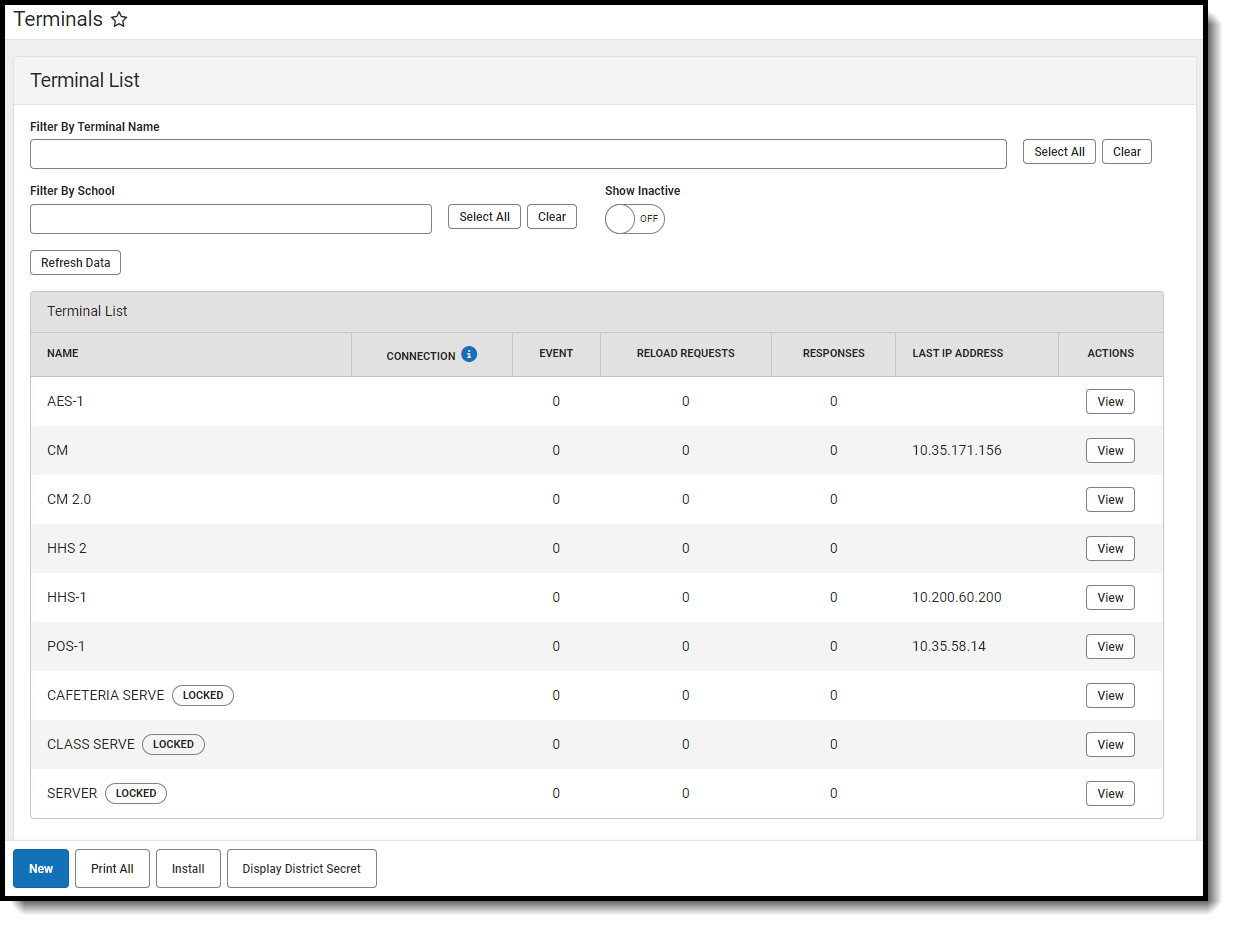 Terminal List
The Refresh Data button above the Terminal List can update the data displayed within Connection, Event, Reload Requests, and Responses without resetting the filters.
Column | Description |
|---|---|
Name | The Name column displays the POS terminal name and indicates whether it is active. Inactive terminals will show an "Inactive" status in the name column. Active terminals are set by marking the Active checkbox in the Terminal Detail panel. |
| Connection | Indicates if a terminal is online. Online terminals will show "Online" in the Connection column, while offline terminals will not display any status. Connection messages from the terminal are sent at the same rate as the Disconnected Status Time set in General Preferences. Click the Refresh Data button periodically to see updated data and connection statuses. There may be up to a 30 second delay. |
| Events | Messages waiting to be sent to the terminal from the Campus application server, such as enrollment updates and account changes. |
| Reload Requests | Tracks Reload Requests made from this terminal that are currently not complete. |
| Responses | Messages to be sent to the Campus application from the terminal, such as POS Data Reload command. |
Last IP Address | IP address of the terminal as last reported to Campus. |
Actions | Upon clicking the View button, the Terminal Detail panel opens. This panel allows users to edit the terminal name and active status, add or remove selected schools, print terminal information, delete the terminal, or review terminal reloads requests. |
Types of Terminals
All terminals listed in the Terminals tool are used in reporting, allowing reports to indicate where/how a transaction occurred. Reports indicate whether a transaction occurred as part of Cafeteria/Class Serve functionality, through a manual adjustment on a patron's Journal tab (indicated by the Server terminal), or through an actual POS terminal.
The following types of terminals are displayed in the Terminal List.
| Terminal Type | Description |
|---|---|
| POS | Most terminals are standard POS terminals that represent actual physical terminals used to process food service transactions. The district creates these terminals. |
| Class Serve | This terminal represents Class Serve functionality, although an actual physical terminal is not used. This terminal is built-in by Infinite Campus and cannot be changed or deleted. |
| Server | This terminal represents the Campus application, although an actual physical terminal is not used. This terminal is built-in by Infinite Campus and cannot be changed or deleted. |
Best Practices for Terminal Setup
The best practices described here are the preferred setup recommended by Infinite Campus.
- Create terminal(s) for each cafeteria.
- Keep the terminal name short or use an abbreviated form. Terminal names should be under eight (8) characters.
- If there is one school type and one terminal at each site (Main High School, Main Middle School, Main Elementary), the terminal names should be abbreviated to the school type. For example, HS_01, MS_01, EL_01. If another terminal is added in the future, additions should be named HS_02, MS_02, EL_02, etc.
- If there are two or more school types and only one terminal at each site, such as East Elementary and West Elementary, the terminal names could be East_01 and West_01.
- If there is only one school type and more than one terminal at that site, the terminal names could be HSPizza, HSGrill, HSAC, MSGrill, MSPizza, which would indicate the physical location of the terminal within the cafeteria.
| Option | Cafeteria Structure | Terminal Structure |
|---|---|---|
| A | This options is best for the following cafeteria structure:
|
|
| B | This option is best for the following cafeteria structure:
|
If more than one school is assigned to a terminal, each school's enrollments will appear on the terminal. This also allow students to be charged at their correct eligibility. |
Add a New Terminal
- Click the New button.
Result: The Terminal Detail area displays.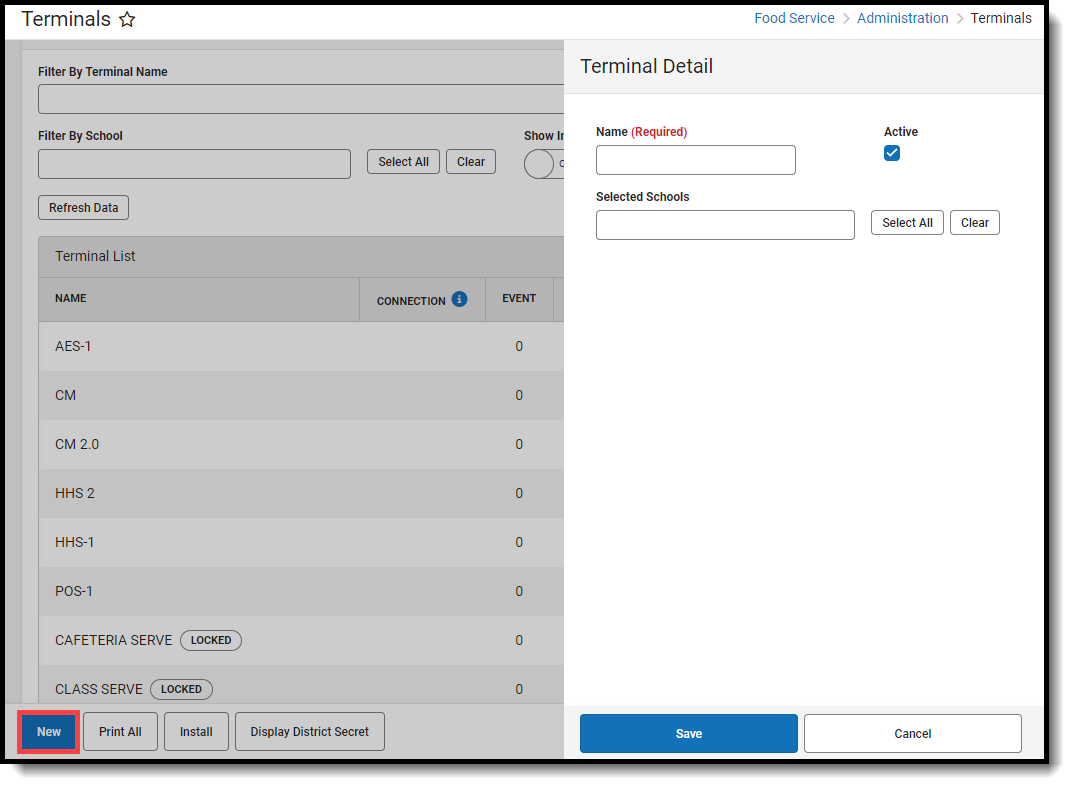 Add a New Terminal
 - Enter a unique Name for the terminal (duplication is not allowed).
- Select the Selected School(s) for which the terminal will be used.The School selected in this field determines the patrons who appear for processing on the terminal. The School also appears on reports.
- The Active checkbox is active by default. Uncheck that field to make it inactive.A terminal should not be made active until it is configured and is ready to receive/load student data from Infinite Campus.
Delete a Terminal
- Click the View button of the terminal you want to delete. The Terminal Detail panel will open.
- Click the Delete button. A Confirm Delete prompt will appear.
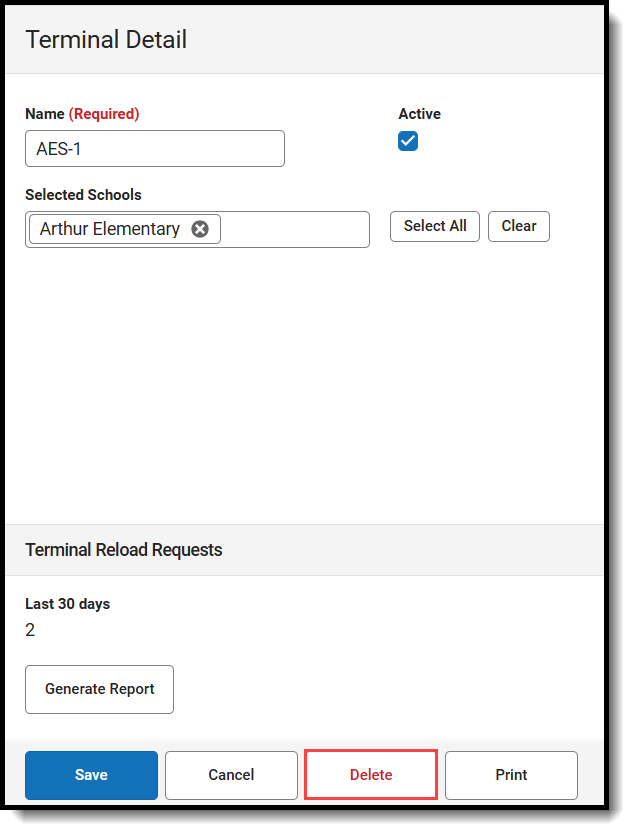
- Click Delete. The Terminal is deleted and removed from the Terminal List.
Generating a Terminal Reload Request Report
The Terminal Reload Requests section shows how many terminal reloads have been initiated in the last 30 days. This is done by reloading a terminal from the Terminal Manager tool or by loading data in the POS Terminal Admin. A report of any reloads for that specific terminal over the last 30 days, and if the request was made via the POS Terminal Admin or Terminal Manager, can be generated by clicking Generate Report.

Install a Terminal
| To install a... | See... |
|---|---|
| POS Terminal | Terminal Installation and Configuration |
Display District Secret
The District Secret authorizes the terminal to pull data from Campus and prevents users from using the URL from another district to load district data on the terminal.
- Click the Display District Secret button to display the Authenticate POS with District Secret screen.
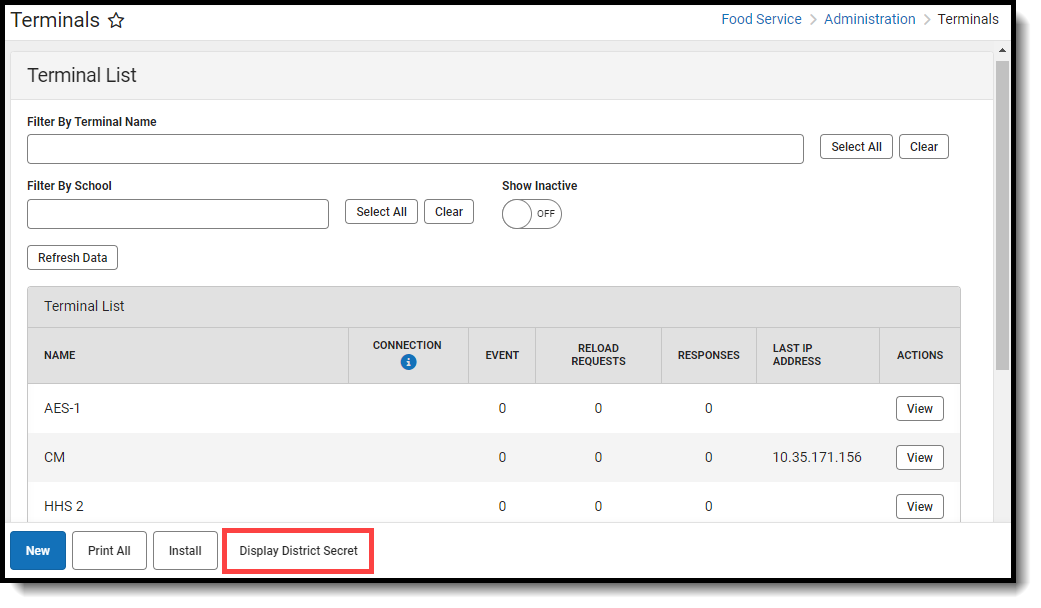 Display District Secret
 - Click the copy icon
 to copy the District Secret.
 - Paste the District Secret in the District Secret field on the POS Terminal Admin.
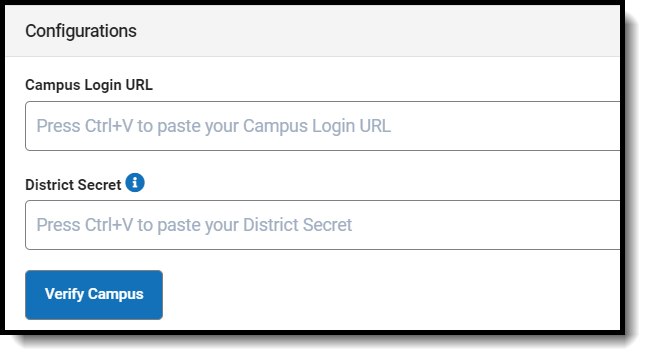 District Secret Field
See the Terminal Installation and Configuration article for more information about the POS Terminal Admin.
Terminals Best Practice
The Point of Sale Best Practices describe the preferred setup of Point of Sale tools as they relate to Campus Food Service. There are two options for Terminal Setup.
Terminal Manager
The Terminal Manager tool allows administrators to remotely manage all terminals within the district.
This functionality is only available to customers who have purchased Campus Point of Sale as add-on functionality.
The Terminal Manager tool allows administrators to remotely manage all terminals within the district.
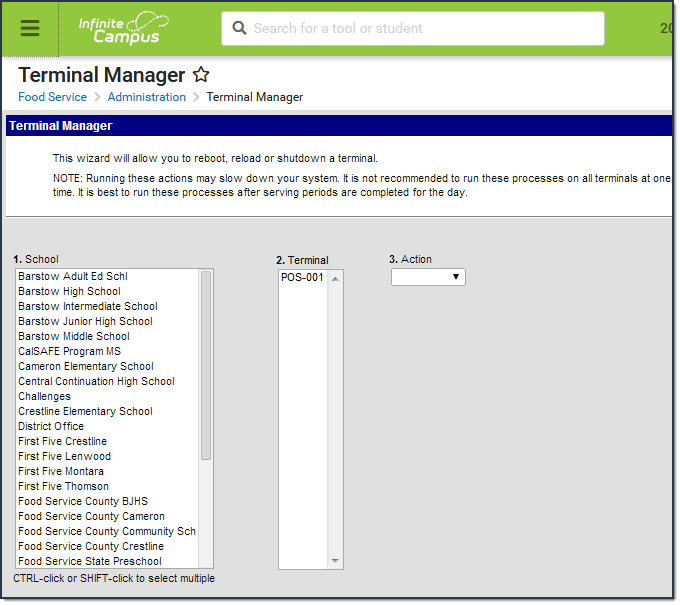 Terminal Manager
Remotely Reboot Terminals
Administrators can remotely reboot any POS terminal in the district using the Reboot Action.
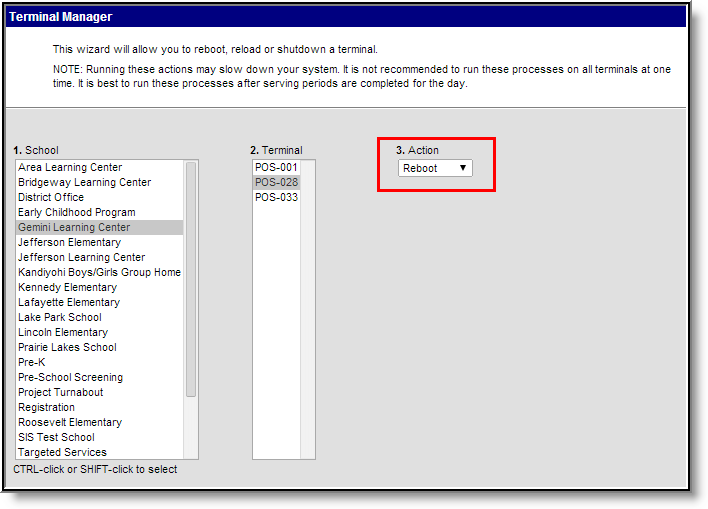 Rebooting Terminals
- Select the School(s) where the terminal(s) exist.
- Select which Terminal(s) to reboot.
- Select Reboot from the Action dropdown list.
- Click the Run button.
A reboot request is sent to the terminal. If the terminal is currently online, an alert message appears on the terminal screen. The operator may choose to immediately reboot the terminal, delay the reboot for five minutes, or cancel the reboot process. If no manual action is taken by the operator within 30 seconds, the reboot begins automatically.
If the message is sent when the terminal is offline and the terminal does not connect to the network within the next 10 minutes, the reboot request is cancelled.
Remotely Reload Terminals
Administrators can remotely reload data for any POS terminal in the district using the Reload Action.
Infinite Campus recommends performing a data reload after serving periods have been completed for a day and during a time of minimal system usage as reloading may reduce network speed.
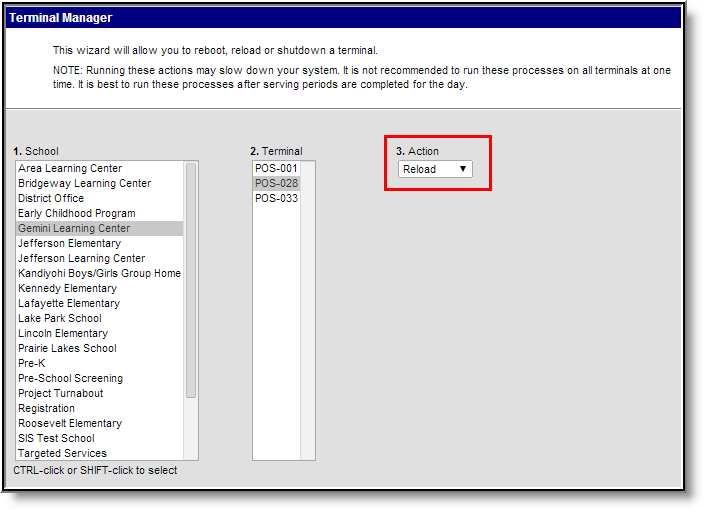 Reloading Terminals
- Select the School(s) where the terminal(s) exist.
- Select which Terminal(s) to reload.
- Select Reload from the Action dropdown list.
- Click the Run button.
A reload request is sent to the terminal. If the terminal is currently online, an alert message appears on the terminal screen. The operator may choose to immediately reload the terminal, delay the reload for five minutes, or cancel the reload process. If no manual action is taken by the operator within 30 seconds, the reload begins automatically.
If the message is sent when the terminal is offline, the reload occurs the next time it connects to the network. Reload request do not time out.
Remotely Shut Down Terminals
Administrators can remotely shutdown any POS terminal in the district using the Shutdown Action.
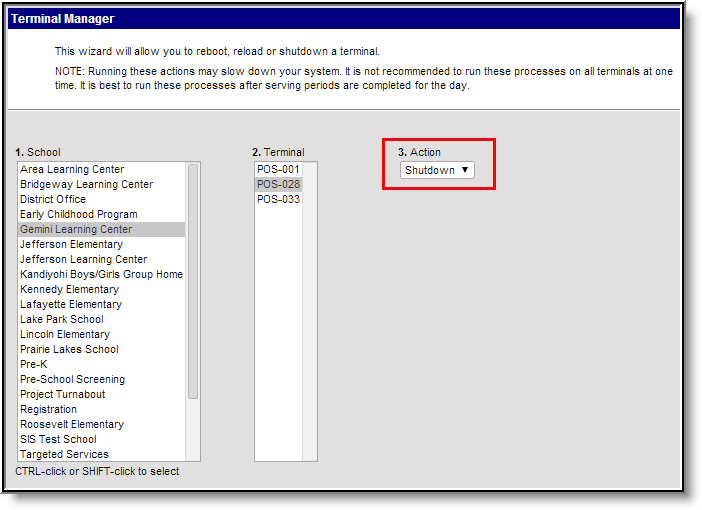 Shutting Down Terminals
- Select the School(s) where the terminal(s) exist.
- Select which Terminal(s) to shutdown.
- Select Shutdown from the Action dropdown list.
- Click the Run button.
A shutdown request is sent to the terminal. If the terminal is currently online, an alert message appears on the terminal screen. The operator may choose to immediately shutdown the terminal, delay the shutdown for five minutes, or cancel the shutdown process. If no manual action is taken by the operator within 30 seconds, the shutdown process begins automatically.
If the message is sent when the terminal is offline and the terminal does not connect to the network within the next ten minutes, the shutdown is cancelled.
Remotely View Terminal Logs
To verify the reception of remote-management requests, the Terminal Manager log may be viewed.
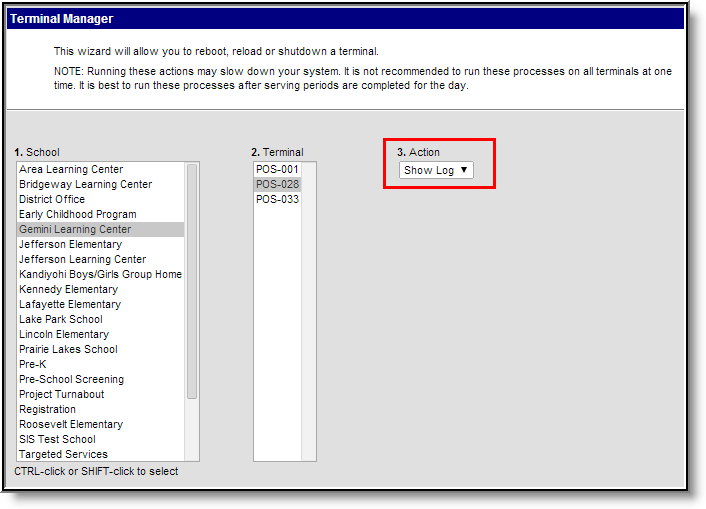 Viewing Terminal Logs
- Select Show Log from the Action dropdown list.
- Click the Run button.
A summary report generates, showing the details of specific remote-management requests.
The log is shown for all schools and all terminals, despite selections made in the School or Terminal editors.
 Terminal Log
The following table describes each Terminal Log column.
| Field | Description |
|---|---|
Timestamp | Date and time the remote request was sent from the Terminal Manager tool. |
Processed Timestamp | Date and time the remote request was received by the Point of Sale terminal. If the remote request has not yet been received by the Point of Sale, this column reports "Not yet processed". This is merely an indication that the terminal received the request message. It is not an indication of whether or not the requested action was completed. |
Source | The origin of the remote request. |
Destination | The name of the terminal that received the request. |
Event Message | The type of remote-management task requested. |
Clear Remotely Requested Terminal Logs
Administrators can clear records/entries from the Terminal Log using the Clear Log Action.
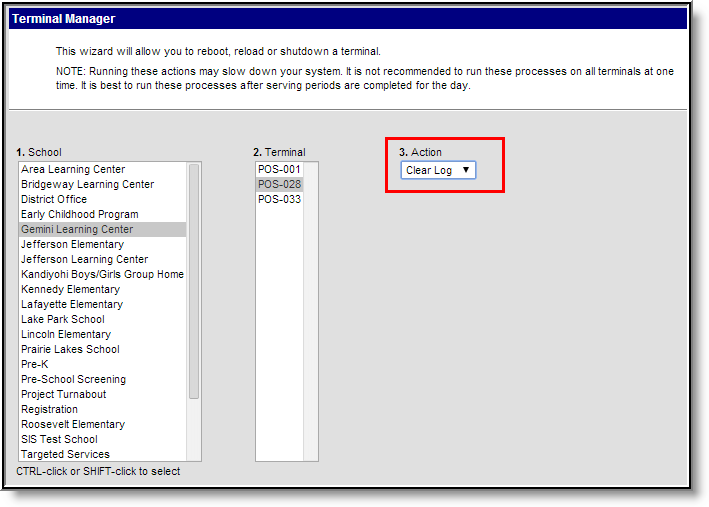 Clearing Terminal Log Requests
- Select Clear Log from the Action dropdown list.
- Click the Run button.
The log is cleared for all schools and all terminals, despite selections made in the School or Terminal editors.
Account Maintenance Setup and Review
Learn the options for POS Preferences, create Food Service family accounts, generate PINs for accounts, and create a single or group of food service accounts.
POS Preferences: General
The General POS Preference tool allows a school and/or district to set preferences for the POS system.
Tool Search: General Preferences
The General POS Preference tool allows a school and/or district to set preferences for the POS system. POS Preferences should be set before using a Point of Sale terminal and creating Point of Sale accounts. Options on this tool determine how accounts are created, how PINs are controlled and if eligibility information is viewable.

Description of POS Preferences
|
Preference |
Description |
|---|---|
|
Default Family Account |
When this checkbox is marked, Campus only creates family accounts and not individual patron accounts. This preference only applies when:
When both preferences are selected and an existing household has a new family member enrollment entered, Campus adds the new family member to the existing account for patrons in the same household. |
|
Show Eligibility in Deposit |
When this checkbox is marked, Campus displays the student’s eligibility on the Census > Household > FS Deposit screen. |
| Autocorrect Transactions for Backdated Applications |
Marking this checkbox allows Infinite Campus to automatically update eligible meals when the Effective Date on a Household Application or Online Application is earlier than the day the application is processed. This feature gives students access to free/reduced lunches on the date the application was received. When this checkbox is marked, Campus automatically compares the eligibility date to the student's transactions, voids the old transaction(s), and re-enters the transactions using the correct eligibility. This preference also applies when amending household applications. Example
This feature does not apply to applications uploaded via the Eligibility Import Wizard or manually entered eligibility records. |
| Disconnected Status Time in minutes | Indicates how often Campus will ping POS terminals to verify the POS is still communicating with Campus. This affects the refresh rate of the Connection column displayed on the Terminals tool. |
|
Auto Creation of Account With New Enrollment |
When this checkbox is marked, Campus automatically creates a POS account for each new student who enrolls at the school when their enrollment record is created. It will not create duplicate accounts for students who have two enrollments or for students rolled into the next school year. This logic includes support for the use of this preference in combination with the Default Family Account preference.
|
|
Auto Creation of PIN With New Enrollment |
When this checkbox is marked, Campus generates a PIN when a new student is enrolled. |
| Set Student Number as PIN |
When this checkbox is marked, Campus automatically uses the student number to create a PIN when a new enrollment record is added. If Campus cannot set the Student Number as PIN on a new enrollment, Campus assigns a new PIN according to the PIN preferences set on the PIN Auto Gen tool and sends a Process Inbox message to the POS Admin. To avoid creating PINs that conflict with student IDs, the generated PIN should not equal the same number of digits as a student ID. Be sure to check your settings in the Pin Auto Gen tool. If a student was previously enrolled in a district and had a PIN, left the district, and then comes back, the student's old PIN does not get updated. As a best practice, remove PINs from inactive students. Doing this tells Infinite Campus to assign their student number as their PIN when they are enrolled again. The option Allow access to Student Number as PIN must be enabled in System Preferences to edit this field. |
| Allow Student PIN to Show on Printed Student Schedules |
When this checkbox is marked, the student's PIN is displayed on student schedules. This requires the Lunch PIN option to also be marked on the Schedule Report Preferences. This number prints below the schedule grid. When this checkbox is not marked, the student's PIN does not display on student schedules, regardless of whether that option is marked on the Schedule Report Preferences. |
|
POS Account Messenger Scheduler Preferences |
This section includes preference settings that determine how the POS Account Messenger Scheduler tool sends scheduled messages.
|
| Only Include Accounts With Activity Since Last Scheduled essage | Marking this checkbox limits message delivery to accounts that show activity since the last scheduled message task was created.
Account activity is any credits or debits to the account balance, including voided transactions. Account activity does not include:
|
| MinimumDays Between POS Scheduler Messages |
Entering a number in this field limits message delivery to accounts last contacted after the minimum days entered in this field. Decimal points are not allowed. For example, if you enter 3 in this field and set up an hourly Messenger schedule, accounts will receive one message every 3rd day as long as the account meets the filter criteria on the message template. |
| POS Display Flag and Comments Auto Open | Selecting General Serve and/or Continuous Serve will enable the POS display flag information to automatically be open when a patron with a flag is loaded onto the terminal.
The POS application must be closed and relaunched to register changes to POS Display Flag Auto Open fields.
|
| Patron Preference Portal Display Controls | These preference settings allow districts to configure preferences that allow guardians to manage selected Food Service account restrictions in Campus Parent and to provide a view-only preference in Campus Student.
 |
| Block Concessions | If marked, this checkbox indicates that the patron is not supposed to purchase concessions. If the patron attempts to purchase concessions, a warning message will appear to the cashier.
|
| Single Purchase Restriction | If marked, this checkbox indicates the patron cannot purchase more than one of the same item, regardless of whether it is a meal or an à la carte item. If the patron attempts to purchase multiple quantities of the same item, a warning message will appear to the cashier.
|
| Daily Limit |
The amount (dollar.cent) entered in this field is the maximum amount the patron is supposed to spend in one day. If the patron attempts a purchase exceeding this amount, a warning message will appear to the cashier. If the Actual Purchasable Cost option is not enabled on the terminal, the Daily Limit will include the paid price of the purchasable meal regardless of eligibility and the actual cost of the item. |
| Block a la Carte Purchases | Based on the selection made, it determines if the patron can purchase a la carte items. If the patron attempts an a la carte item purchase, a warning message will appear to the cashier.
|
| Portal Instructions | This message accompanies the Patron Preference Controls to help users understand how to interact with and configure their preferences.
|
POS Preferences: PIN Auto Gen
The PIN Auto Generate tool allows users to set constraints for how PIN numbers are automatically generated for food service administrators, cashiers and student/staff members.
Tool Search: PIN
The PIN Auto Generate tool allows users to set constraints for how PINs are automatically generated for food service administrators, cashiers and student/staff members. Manually entered PINs on a patron's Account Info tool are not required to follow these settings and will not be overwritten unless the PIN field is cleared out first. Account PINs are not duplicated if they currently exist in the district.
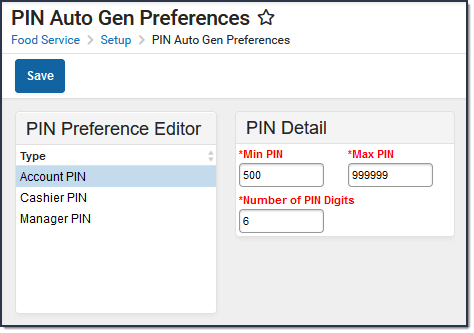
Setting PIN Preferences
- Select the PIN Type. See the table below for more information about each option.
- Enter the Min PIN.
- Enter the Max PIN.
- Enter the Number of PIN Digits.
- Select the Save button.
Field/Column | Description |
|---|---|
Type | The type of PIN being created. Options include:
|
Min PIN | The minimum value allowed for use in generated PINs. |
Max PIN | The maximum value allowed for use in generated PINs. |
Number of PIN Digits | The amount of digits used when generating PINs. If your district has the Auto creation of PIN - Use Student Number as PIN POS Preference enabled, to avoid creating PINs that conflict with student IDs the Number of PIN Digits should not equal the same number of digits as a student ID. If the Min PIN value set is less than the number of PIN Digits set, the tool will allow PINs to be created with one or more leading zeros for PINs to have the correct amount of digits (i.e., Min PIN set to 500 with the Number of PIN Digits set to 5 would generate 00500, 00501, etc). |
Add Account
The Add Account wizard allows districts to add POS accounts for new students and families moving to the district. Accounts can be added by household or by person.
This functionality is only available to customers who have purchased Campus Point of Sale as add-on functionality.
Tool Search: Add Account
The Add Account wizard allows districts to add POS accounts for new students and families moving to the district. Accounts can be added by household or by person. The household or person must already exist in Campus before a POS account can be added for them.
| What can I do? |
|---|
| Create POS Accounts for a Person
Create POS Accounts for a Household |
Users wanting to create person and family POS accounts en masse should use the Mass Account Creation Wizard.
 Add Account
Create POS Accounts for a Person
Before an account can be created for a person, a search must be done to assist in locating the correct person as well as ensuring the person exists within Campus.
 Searching for a Person
To search and begin creating an account for a person:
- Select the Person radio button.
- Enter at least the Last Name of the person. Additional search criteria may be entered within the available search fields.
- Select the Search button. People matching search criteria will appear in a window on the right.
- Select the person being assigned a new account.
Result
The Account Creation screen displays.
-
Mark the checkbox next to person's name and select the Save button.
Result
If an account already exists for the person, the following error displays: Unable to create accounts, because one or more of the selected individual already has a valid account.
Otherwise, if an account did not already exists, the Account Details tool displays. A new account has been created for the person and additional account information can be entered by selecting the Account and name of the user within the Account info window. See the Account Details article for more information about using the Account Details tool.An Account PIN must be established before a patron can use a Point of Sale terminal.

Create POS Accounts for a Household
If your district uses Household Food Service accounts and Online Payments, only set up one Food Service Fund account. This allows Campus to identify the correct Fund Account when there are multiple enrollments associated with an account.
Before family or individual accounts can be created for a household, a search must be done to locate the household and ensure the household exists within Campus.
 Searching for a Household
- Select the Household radio button.
- Enter search criteria in at least one available search field.
- Select the Search button. Search results will appear in a window on the right.
- Select the household to create a household account. You will be directed to a new editor.
 Terminal Manager
If individual accounts should be created for each selected person:
- Check the checkbox next to each person that should have an account created.
- Select the Individual radio button.
- Select the Save icon.
If a Family account should be created for the household:
- Check the checkbox next to each person who should be be tied to the household account.
- Select the Family radio button.
- Select the Save icon.
You will be directed to the Account Details tool.
 New Family Account
A new account has been created for each person (or a Family Account has been created) and additional account information can be entered by selecting the Account and name of the user within the Account info window. See the Account Details article for more information about using the Account Details tool.
Mass Account Creation
The Mass Account Creation Wizard creates POS accounts for individuals en masse.
This functionality is only available to customers who have purchased Campus Point of Sale as add-on functionality.
Tool Search: Mass Account
The Mass Account Creation Wizard will create POS accounts for individuals en masse. Once an account is created, students/staff members can purchase food items during food service times. Existing accounts will not be overwritten when using this tool. Only students/staff members who do not currently have a POS account will have POS accounts created.
| What can I do? | What do I need to know? |
|---|---|
| Important information about this Tool |
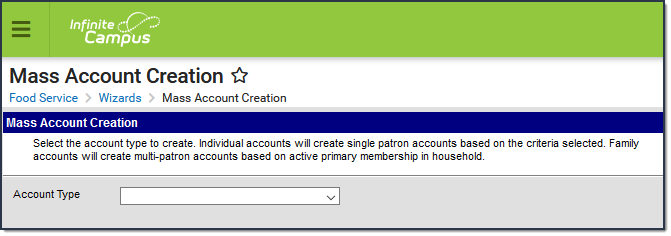 Mass Account Creation
Important Information about this Tool
When using this tool, the following MUST be considered:
- Large districts (10,000+ accounts) may experience time out and/or account processing issues if running the tool under less than optimal conditions.
- For new districts running this tool for the first time where 8,000 or more new accounts will be created, users are encouraged to select the CSV Report Format option to ensure the report will generate without producing a time out error.
- During generation of the Mass Account Creation Report, users will receive a separate window stating "The system is generating the Mass Account Creation Detail Report for you. Please wait..." Do not click Back or Refresh during this message. The CSV format will generate the same screen but download locally as a CSV file. This screen may be closed once the CSV file is generated.
- The number of PINs this tool is able to create (if the Generate PIN checkbox is marked) is limited to the number of PIN digits allowed to be entered via the PIN Auto Gen Preferences tool. Users will encounter an error if attempting to create more accounts than what is possible with the number of PIN digits allowed.
- If your district used the Set Student Number as PIN Wizard or has the Auto creation of PIN - Use Student Number as PIN POS Preference turned on, you must clear the Generate PIN checkbox because PINs already exist.
Family Accounts
The following logic is used when determining creation of family accounts:
- Student/staff with an end dated household membership will have an individual account assigned.
- If a household has an existing family account, a newly enrolled student or new staff member in the same household with an active primary membership will be included in the existing family account if the Add new patrons to existing accounts? box is marked prior to creating accounts.
- If a student or staff is a primary member of one household and a secondary member of another household, the student/staff will be assigned to the family account where the primary membership exists.
- If a student or staff is a primary member of two households, the student/staff will be added to the family account with the highest memberID (the household where they were most recently assigned as a member).
- Students or staff who are not a member of any household (have an end dated membership in the household or are not in any household) or are only secondary members of any household at the time the tool is run will be assigned an individual account. This includes future dated Household Member Start Dates and future dated Household Member End Dates.
Create Individual Accounts
Accounts can be created for individual students and staff members en masse.
This tool is most effective for creating new accounts for the next school year for new incoming students and staff. If this tool is used for a past school year, accounts could be created for students who are no longer enrolled in the district (if the district has failed to include an End Date on their enrollment record(s)).
The user responsible for creating accounts for patrons in the district should have at least RWA tool rights for the Mass Account Creation tool.
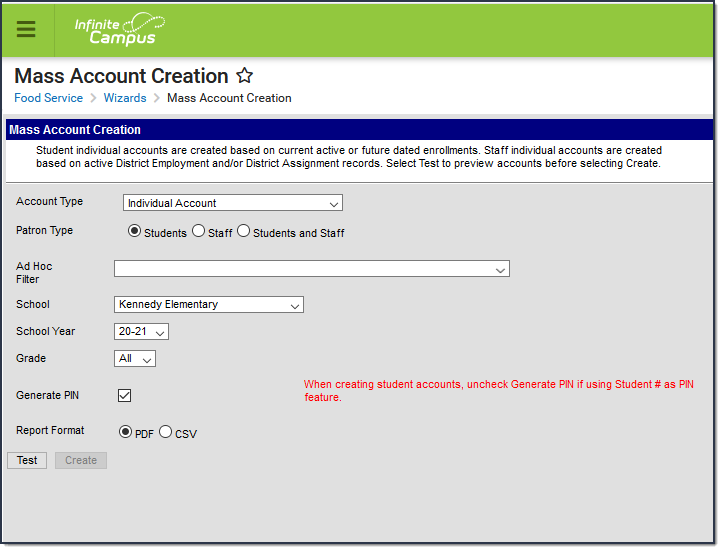 Mass Account Creation - Individual Account
- Select an Account Type of Individual Account.
- Select the Patron Type.
- Mark the Include District Only Staff checkbox to create accounts for staff members with District Employment records where no End Date is present.
- Select an Ad Hoc Filter to create accounts for a specific list of people (if desired). Ad Hoc filters should be reviewed for accuracy prior to use.
- Select the School for which to create accounts. Only people in the school with an active enrollment or District Assignment record are included. This field defaults to the school selected in the Campus toolbar.
- Select the School Year for which to create accounts. Only people with an enrollment record in this year (or a subsequent year with no End Date entered) are included. This field defaults to the year selected in the Campus toolbar.
- Select the Grade level of the student for which to create accounts.
Mark the Generate PIN checkbox to have PINs created and assigned to created accounts. This option is limited based on preferences set in the PIN Auto Gen Preferences tool.
If your district used the Set Student Number as PIN Wizard or has the Auto creation of PIN - Use Student Number as PIN POS Preference turned on, you must clear the Generate PIN checkbox because PINs already exist.
When the Generate PIN checkbox is not marked, the PIN column on the report will be blank even if these students have their Student number as PIN already set from running the Student ID as PIN wizard.
- Select the Report Format.
- Select the Test button. The Mass Account Creation Detail Report will appear in a separate window in the designated format. This report will describe all changes that will be made to the database if/when accounts are created.
- Once the Mass Account Creation Detail Report has been reviewed and verified, select the Create button to initiate creation of accounts. The Mass Account Detail Report will appear again, describing all changes made within Campus.
Mass Account Creation Fields - Individual Accounts
The following table defines each available field.
Field | Description |
|---|---|
Account Type | The type of POS account created. To create individual accounts, select the Individual option. |
Patron Type |
|
Include District Only Staff | This option will create accounts for staff members with District Employment records where no End Date is present. This option is only available if a Patron Type of Staff or Students and Staff is selected. |
Ad Hoc Filter | Selection of an Ad hoc filter limits the eligible patrons to those listed in the filter results based on current enrollment or current active employment records (where no End Date is entered). This option overrides the Patron Type selected. |
School | Only people in the School with an active enrollment or District Assignment record are included. This field defaults to the school selected in the Campus toolbar. |
School Year | Only people with an enrollment record in this year (or a subsequent year with no End Date entered) are included. This field defaults to the year selected in the Campus toolbar. |
Grade | The grade level of the students for which to create accounts. |
Generate PIN | If marked, PINs are created and assigned to created accounts. This option is limited based on preferences set in the PIN Auto Gen Preferences tool. |
Report Format | Designates the format for the Mass Account Creation Detail Report. Users are encouraged to use the CSV format when creating a large amount of accounts. |
Test | Initiates a test view of the Mass Account Creation Detail Report, allowing users to view all database changes that will occur. The test version of the Mass Account Creation Detail Report must be run prior to creating accounts. |
Create | Initiates creation of POS accounts and generates the Mass Account Creation Detail Report, detailing all changes made to the Campus database. |
Mass Account Creation Detail Report - Individual Accounts Example
The Mass Account Creation Detail Report for individual accounts lists all POS accounts created (or will be created) via criteria entered in the Mass Account Creation tool.
 Mass Account Creation Detail Report - Test Report
Report Section | Description |
|---|---|
Summary | Describes how many new POS accounts were created. |
New Accounts | Lists all new POS accounts created and corresponding patron information. |
Create Family Accounts
Family accounts can be created for students and staff members en masse. This tool will also add patrons to existing family accounts. Family accounts are created and assigned based on active primary Household membership for students with an active enrollment record and active staff members.
This tool is most effective for creating new accounts for the next school year for new incoming students and staff. If this tool is used for a past school year, accounts could be created for students who are no longer enrolled in the district (if the district has failed to include an End Date on their enrollment record(s)).
The user responsible for creating accounts for patrons in the district should have at least RWA tool rights for the Mass Account Creation tool.
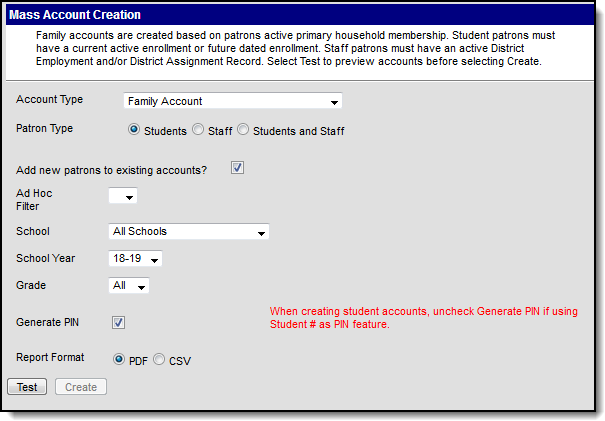 Mass Account Creation - Family Account
- Select an Account Type of Family Account.
- Select the Patron Type.
- Mark the Include District Only Staff checkbox to create accounts for staff members with District Employment records where no End Date is present.
- Mark the Add new patrons to existing accounts checkbox to have patrons added to their household's family account (if the person is within a household which has a family account).
- Select an Ad Hoc Filter to create accounts for a specific demographic of people (if desired). Ad Hoc filters should be reviewed for accuracy prior to use.
- Select the School for which to create accounts. Only people in the school with an active enrollment or District Assignment record are included. This field defaults to the school selected in the Campus toolbar.
- Select the School Year for which to create accounts. Only people with an enrollment record in this year (or a subsequent year with no End Date entered) are included. This field defaults to the year selected in the Campus toolbar.
- Select the Grade level of the student for which to create accounts.
Mark the Generate PIN checkbox to have PINs created and assigned to created accounts.
If your district used the Set Student Number as PIN Wizard or has the Auto creation of PIN - Use Student Number as PIN POS Preference turned on, you must clear the Generate PIN checkbox because PINs already exist.
- Select the Report Format.
- Select the Test button. The Mass Account Creation Detail Report will appear in a separate window in the designated format. This report will describe all changes that will be made to the database if/when accounts are created.
- Once the Mass Account Creation Detail Report has been reviewed and verified, select the Create button to initiate creation of accounts. The Mass Account Detail Report will appear again, describing all changes made within Campus.
Mass Account Creation Fields - Family Account
The following table defines each available field.
Field | Description |
|---|---|
Account Type | The type of POS account created. To create family accounts, select the Family Account option. |
Patron Type |
|
Include District Only Staff | This option will create accounts for staff members with District Employment records where no End Date is present. This option is only available if a Patron Type of Staff or Students and Staff is selected. |
Add new patrons to existing accounts | If marked, the tool will look at the patron's primary household membership and any existing accounts where other primary members of the same household have an existing account and add the patron into that account. If a scenario exists where more than one family account is tied to a household, the tool will look for the latest (most recent) account created and assign the patron to that account (based on accountID). |
Ad Hoc Filter | Selection of an Ad hoc filter limits the eligible patrons to those listed in the filter results based on current enrollment or current active employment records (where no End Date is entered). This option overrides the Patron Type selected. |
School | Only people in the School with an active enrollment or District Assignment record are included. This field defaults to the school selected in the Campus toolbar. |
School Year | Only people with an enrollment or District Assignment record in this year (or a subsequent year with no End Date entered) are included. This field defaults to the year selected in the Campus toolbar. |
Grade | The grade level of the students for which to create accounts. |
Generate PIN | If marked, PINs are created and assigned to created accounts. This option is limited based on preferences set in the PIN Auto Gen Preferences tool. |
Report Format | Designates the format for the Mass Account Creation Detail Report. Users are encouraged to use the CSV format when creating a large amount of accounts. |
Test | Initiates a test view of the Mass Account Creation Detail Report, allowing users to view all database changes that will occur. The test version of the Mass Account Creation Detail Report must be run prior to creating accounts. |
Create | Initiates creation of POS accounts and generates the Mass Account Creation Detail Report, detailing all changes made to the Campus database. |
Mass Account Creation Detail Report - Family Account Example
The Mass Account Creation Detail Report for family accounts lists all new family accounts created, all patrons added to existing family accounts and any patrons who have issues with their household membership and/or POS account.
 Mass Account Creation Detail Report Example
Report Section | Description |
|---|---|
Summary | Describes how many new family accounts were created, how many patrons were added to new accounts, how many patrons were added to existing accounts and how many patrons have issues with their household memberships and/or POS account. |
New Accounts | Lists all patrons assigned new POS accounts.
|
Patrons Added to Existing Accounts | Lists all patrons added to existing family accounts.
|
Patrons with Household Primary Member/Account Issues | Lists all patrons who have issues with their household membership and/or POS account. This section of the report should be reviewed thoroughly when the Test report is generated. This information should be used to make corrections to Households before creating accounts.
|
Food service staff can use the Mass Account Creation Wizard to create individual and family accounts en masse.


