The Health Module is used to document student health information. This study guide demonstrates how to set up lists used to record and track vaccine exemptions and compliance, health conditions and treatments, medication types and forms, and information recorded during a health office visit.
For an overview of all available videos related to Health administration set up, see the Health Administration Tools Video Series directory.
Vaccination Tracking
Vaccine Exemptions
Districts may create a list of acceptable reasons for waiving immunization requirements.
Tool Search: Vaccine Exemption Setup
The Vaccine Exemption Setup tool allows entry of acceptable reasons to waive a student's immunization requirement. The most common forms of vaccine exemptions include medical and religious waivers, though other exemptions may be created.
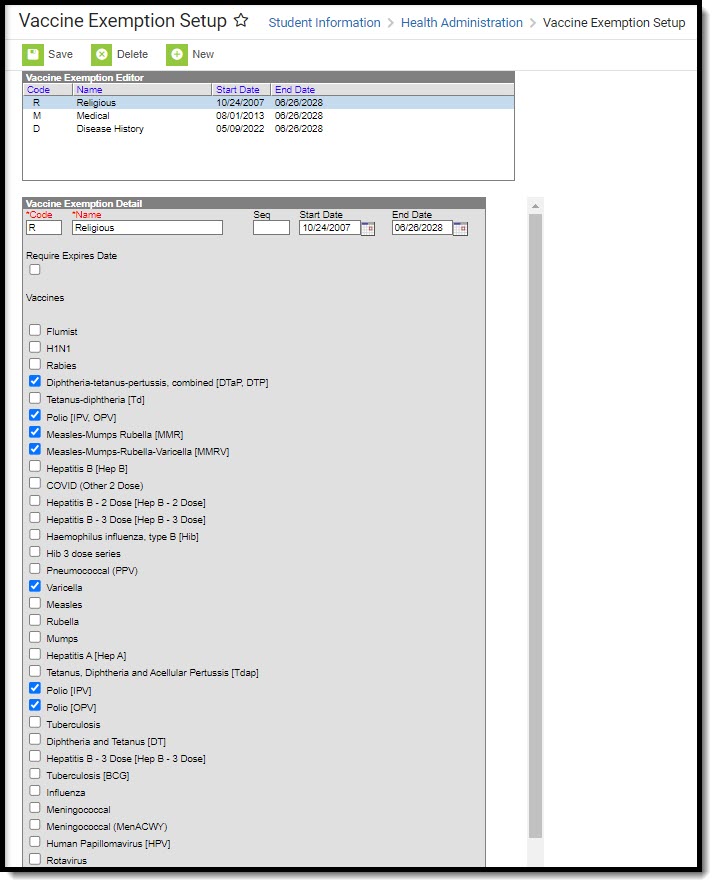 Vaccine Exemptions Setup
See the Health Administration Tool Rights article for information about rights needed to use this tool.
A district may define its own exemptions, but those exemptions may affect state reporting. Some states have a State Exemption code field that must be mapped to each Exemption created to ensure proper reporting.
Exemptions displays in health reports and on a student’s Immunizations tool. Exemptions may be added to any existing vaccine. When the vaccine is not required, it does not need an exemption assigned to it.
Add New Exemptions
- Select the New button from the action bar. The Vaccine Exemption Detail editor displays.
- Enter a Code for the exemption.
- Enter a Name for the exemption.
- Enter a Seq(uence) to specify the order in which this exemption displays in the list of exemptions. This is the order on the Vaccine Exemption editor and in the Waiver dropdown field of the student’s Immunization tool.
- Optional: Enter a Start and End Date for the exemption.
- Optional: Mark the Require Expires Date checkbox to make the exemption expiration date required on the student's Immunizations tool.
- Flag the checkboxes of the vaccines for which the exemption may apply.
- Click the Save button when finished.
When an end date has been entered for a vaccine exemption, that option displays in red text when the exemption end date is past when Entering a Vaccine Waiver for a student. When a student already has a waiver assigned to them and an exemption end date is added and past, the name of the waiver and the date of the waiver display in red on the student's Immunizations tool.
 Expired Waiver Exemption
State-Specific Information
Fields may vary by state:
Compliance Labels
Compliance labels are used to indicate whether or not a student's immunization status is considered compliant.
Tool Search: Compliance Labels
Compliance labels are state-specific and are pre-populated by Infinite Campus. If a district must add new compliance labels, it should do so before creating actual immunization rules and conditions.
The Compliance Label tool does not set or calculate compliancy results; it merely populates the list of compliance labels available for selection when creating immunization rules.
 Compliance Label Setup
See the Health Administration Tool Rights article for information about rights needed to use this tool.
Create a New Compliance Label
- Click the New icon on the action bar.
- Enter a Name for the compliance label. This will be the status available for selection in the Compliance Label field of the Immunization Rule Detail editor of the Vaccines tab. It will also display as a label on a student’s Immunizations tab.
- Enter the Seq(uence), or the order of this item, as it should display in the Compliance Label dropdown field of the Immunization Rule Detail editor of the Vaccines tab.
- If the compliance label is a non-compliant status, flag the Non-Compliant checkbox.
- Any compliance label with this checkbox marked will display in red font (indicating a warning, commonly used for non-compliance) on a student’s Immunizations tool. Otherwise, if this checkbox is NOT marked, the compliance label will display in green font (commonly used to indicate compliance, exemptions, grace periods or no requirements). See the Student Compliance section of this document for more information.
Compliance Labels Assigned to Rules
Existing compliance labels populate the Compliance Label dropdown field of the Immunization Rule Detail editor. Each rule requires a compliance label to be selected from the dropdown list to indicate how the rule and its conditions should be applied to students.
 Compliance Label Field on the Vaccine Setup Tool
Student Compliance
Compliance labels provide a visual indication of a student’s compliance status related to a vaccine. The label that displays for a student is determined by the compliance calculation and the compliance label assigned to the rule.
Compliance labels are displayed for the required vaccines listed in the student’s Immunization Summary editor.
 Student Immunizations Compliance Display
Compliance labels listed in the editor will display in red or green font.
- Red font indicates the student is NOT compliant with a vaccine requirement.
- Green font indicates the student is any status other than non-compliant, as indicated (e.g., "Compliant," "No Requirement," "Exempt," "In Grace Period").
Compliance labels will also display in Health reports (not color-coded).
Conditions And Treatments
Health Conditions
Health conditions are conditions or diseases students may have that a school may be tracking. Health conditions can be linked to approved medications and treatment that are also being tracked in Campus.
Treatments
Districts may maintain a coded list of treatments students receive for heath conditions.
Tool Search: Treatment Setup
The Treatment Setup tool allows users to enter treatments for students when they visit the Health Office. This list contains the treatment name and a code. This code can be a district-defined listing or based on state-approved treatments.
 Treatment List
See the Health Administration Tool Rights article for information about rights needed to use this tool.
Workflow of Treatments
After Conditions and Treatments are entered in System Administration, and Conditions are assigned to students on their Conditions tool, Treatments are assigned to those conditions. For students who receive treatments on a regular basis for ongoing conditions, treatment Health Office Visits can be scheduled. All active treatments for a student are available for selection on a Health Office Visit.
Create Health Treatments
- Select the New button. The Health Treatment List Detail editor will appear below.
- Enter a code for the treatment within the Code field. This code can be a state code for a certain treatment, a district code, or a number that comes from a health dictionary. It can be alphanumeric up to 10 characters.
- Mark the Active checkbox to make the treatment available to link to conditions.
- Enter a description of the treatment in the Description field. This description can be up to 50 characters. It cannot contain special characters like quotation marks or question marks.
- Select the Save button when finished. The new treatment displays in the Health Treatment List table.
Referring Providers
Health Referring Providers are those individuals who provide medical services for the student. This tool is used to track and collect data for medical referring providers and those providers setup using this tool are used to populate provider information on a student's Health Conditions tool.
Tool Search: Referring Provider Setup
Health Referring Providers are those individuals who provide medical services for the student. This tool is used to track and collect data for medical referring providers and those providers setup using this tool are used to populate provider information on a student's Health Conditions tool.
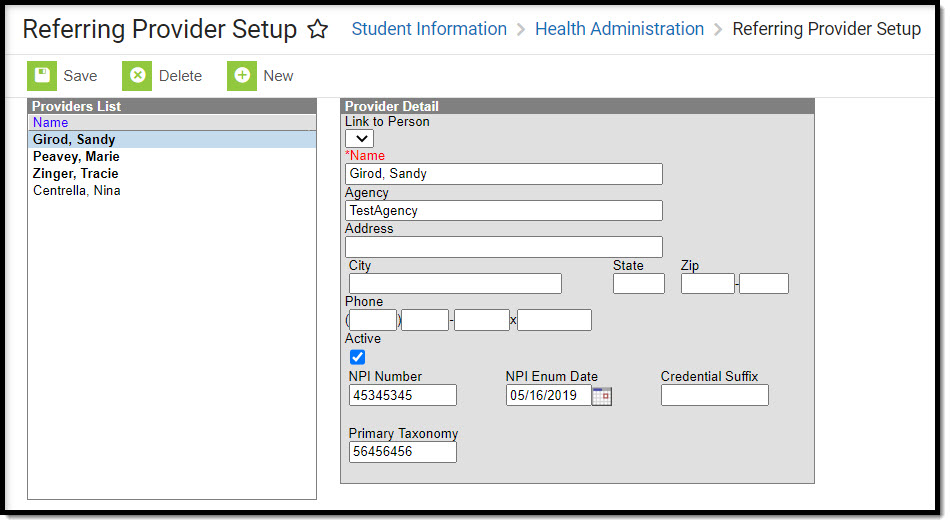 Referring Provider Setup
See the Health Administration Tool Rights article for information about rights needed to use this tool.
Referring Provider Fields
| Field | Description |
|---|---|
| Link to Person | This dropdown is used to connect the manually entered person to a Census record. The Name field auto-populates with the person's name after selection in this dropdown. |
| Name Required | The first and last name of the person. Names can be manually entered and/or modified after auto-population. |
| Agency | The agency of the person. |
| Address | The street and number of the person's address. |
| City | The city portion of the person's address. |
| State | The state portion of the person's address. |
| Zip | The zip code portion of the person's address. |
| Phone | The phone number for the person. |
| Active | Indicates the person is an active service provider. |
| NPI Number | The person's National Provider ID. This is a unique 10-digit number for every medical provider across the nation. |
| NPI Enum Date | The date the NPI was assigned. |
| Credential Suffix | An abbreviated name of the provider's health credential. |
| Primary Taxonomy | The code that identifies the provider's specialty. |
Add New Referring Provider
- Select the New button from the Referring Provider tool. A Provider Detail screen displays to the right of the Providers List.
- When the person is currently a district employee and has the Health checkbox marked on the District Assignment tool, select the person's name from the Link to Person dropdown list. The information associated with that person auto-populates.
- When the person is not currently a district employee, enter the Name of the provider.
- Enter the Agency Name of this provider.
- Enter the Address, City, State, Zip code and Phone number of the person.
- Mark the Active checkbox. This selection indicates the provider is currently active and can be selected as a Medicaid provider.
- Enter the NPI Number.
- Enter the NPI Enum Date in mmddyy format, or click the calendar icon to select a date.
- Enter the Credential Suffix.
- Enter the Primary Taxonomy.
- Click the Save button when finished. The service providers displays in the Provider list.
Medications
Medication Names
Districts can create a list of medication names that appear for use in dropdown lists when staff record student health information.
Tool Search: Medication Name Setup
The Medication Name Setup tool allows districts to create medication names that populate dropdown lists used by the health staff when recording student health information. A medication is recorded by health staff when students or parents/guardians bring medication to the school’s health office for disbursement during school hours. Any medication that is prescribed to students must be entered here in order for the health office to properly manage the medications.
 Medication Name tool
See the Health Administration Tool Rights article for information about rights needed to use this tool.
Medication Names are chosen when adding a medication record to the student's Medications tool and then available for selection when adding a record to the Health Office Visits tool.
Add Medication Names
- Select the New button. The Medication Name Detail editor will appear below the Health Medication Name Editor.
- Enter the Medication Name in the Detail editor. This can be the generic name or the actual name of the drug, whichever pattern is best understood and used by the Health Office Staff.
- Select the medication category from the Classification dropdown (optional).
- Mark the Medication as Active, so it can be entered on the student's Medications tool.
- Select the Save button when finished. The new medication displays within the Health Medication Name Editor.
Delete Medication Names
- Select the Medication Name from the Health Medication Name Editor. The Medication Name Detail editor will appear below the Health Medication Name Editor.
- Click the Delete button.
- A prompt will appear asking to confirm deletion of the medication name. Select OK. The medication will be deleted.
If a medication has been recorded for a student, the record cannot be deleted. Instead, mark the medication option as Inactive.
Mark a Medication Name as Inactive
- Select the Medication Name from the Health Medication Name Editor. The Medication Name Detail editor displays below the Health Medication Name Editor.
- Unmark the Medication as Active.
- Click the Save button when finished. The new medication will still be in the list of medications for possible re-activation at a later time, but will appear not bolded and at the end of the list of active medication names.
A medication assigned to a student that is now marked Inactive will not be removed from the student's Medications tool.
 Medication Name Editor - Active Checkbox
Medication Forms
Medication Forms are physical forms in which a medication can be administered.
Tool Search: Medication Form
The Medication Form Setup tool allows districts to define the physical forms of medications given to students. Because medication can come in several forms, this tool allows a district to specify the form in which the medication was provided. This information is recorded by health staff and can be viewed from a student’s Medications tool.
 Medication Form Tool
See the Health Administration Tool Rights article for information about rights needed to use this tool.
Create New Medication Forms
- Select the New button. The Medication Form Detail field will appear below the Health Medication Form Editor.
- Enter the Medication Form Name. All forms of a medication should be entered. It is possible a medication may come in liquid, caplet or capsule.
- Mark the Medication as Active, so it can be entered on the student's tool.
- Select the Save button when finished. The new medication form will appear within the Health Medication Form Editor.
Delete a Medication Form
- Select the Medication Name from the Health Medication Name Editor. The Medication Name Detail editor will appear below the Health Medication Name Editor.
- Select the Delete button.
- A prompt will appear asking to confirm deletion of the medication form. Select OK. The medication form will be deleted.
If a medication form has been recorded for a student, the record cannot be deleted. Instead, mark the medication option as Inactive.
Mark a Medication Form as Inactive
- Select the New button. The Medication Form Detail editor will appear below the Health Medication Form Editor.
- Unmark the Medication Form as Active.
- Select the Save button when finished. The medication form will still be in the list of medication forms for possible re-activation at a later time, but will appear not bolded and at the end of the list of active medication forms.
A medication form assigned to a student that is now marked Inactive will not remove the medication record from the Medications tab.
 Inactive Medication Form
Health Office Visits
Several different types of information can be recorded when documenting student visits to the Health Office.
Complaint Types
Complaint Types are used to describe the reason a student has come into the health office.
Tool Search: Health Complaint Type Setup
The Health Complaint Type Setup tool allows the entry of complaints a student might have when coming to the health office, as part of the triage of events. Health complaints can be associated with a health intervention and observation.
This editor also allows districts to link observation and intervention types to specific complaints. When the health office staff selects a complaint on the Health Office Visits, a list of Observation Types and Intervention Types also display.
 Health Complaint Type tool
See the Health Administration Tool Rights article for information about rights needed to use this tool.
Health Complaint Workflow
When entering a Health Office Visits record, health office staff can select the Add Complaint icon. This opens a complaint editor where the staff can select the student's complaint and enter comments. Based on the selected complaint, health staff observations and interventions associated with it are available when selecting the Add Observation or Add Intervention icon.
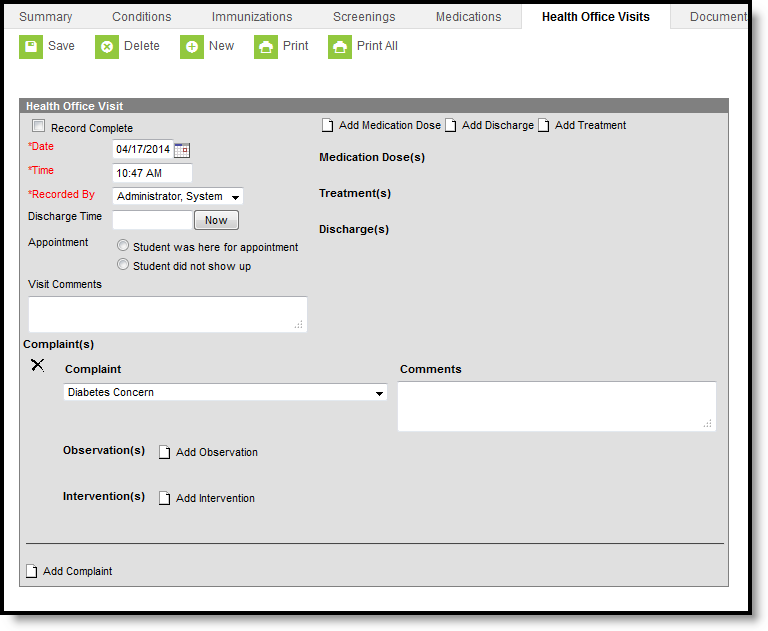 Health Office Visits Complaint View
Add a New Complaint Type
- Select the New icon near the top of the tab. The Complaint Type Detail, Observation Types, and Intervention Types boxes will appear to the right of the Health Complaint Type Editor window.
- Enter the Name of the complaint type.
- Mark the Active checkbox to have the complaint type populate dropdown lists used for student health records. If a user decides not to mark the Active checkbox, the complaint type will still exist within the system; however, it will not populate on student health dropdown lists. This option is useful when editing existing complaint types and choosing to remove them from dropdown lists without removing the information from the system.
- Observations may be linked to the complaint type by selecting the dropdown list and choosing the appropriate type. To link additional observation types to the complaint type, click the Add Observation Type button. To remove an observation type, select the X, located to the left of the dropdown list.
- Interventions can also be linked to the complaint type by selecting the dropdown list and choosing the appropriate type. To link additional intervention types, click the Add Intervention Type button. To remove an intervention type, select the X, located to the left of the dropdown list.
- Once finished, select the Save icon. The complaint type will appear within the Health Complaint Type Editor window.
Observation Types
Health observation types are used to note symptoms or other details observed in relation to a student's health complaint.
Tool Search: Observation Type Setup
The Observation Type Setup tool allows the creation of pre-defined observations used for student health complaints. These observations are assigned to a student through the Health Office Visits tool and are used in directing nurses to document specific observations during a health office visit.
 Health Observation Types
See the Health Administration Tool Rights article for information about rights needed to use this tool.
Health Observation Types Detail and Items
When adding a new observation type, two editors display. The first, Health Observation Detail, is like a group to which the Health Observation Type Items belong. In the image above, wheezing is part of the Allergy detail. A student may arrive at the health office with wheezing. Wheezing can occur for several ailments and may be a symptom of many different conditions. The Observation Type items help the nurse in determining the reason for the symptom.
Add a Health Observation Type
- Select the New Observation Type icon. The Health Observation Type Detail and Health Observation Type Items editors will appear.
- Enter the Name of the observation type detail.
- Mark the Active checkbox to have the observation type appear on dropdown lists found within the Health Office Visits. This allows the type to be chosen in the Health Office Visits tool.
- Mark the Display for Unlinked Complaints checkbox if the observation type is meant to be available for Complaints that have no Observations linked to them.
- Enter the name of the observation type item within the Name field. This field is used to further specify options for an observation. To add additional observation type items, click the Add Observation Type Item button.
- Mark the Active checkbox to have the item appear on dropdown lists found within the Health Office Visits.
- Select the Save icon when finished. The new observation will appear within the Health Observation Type editor.
Intervention Types
Intervention types are used to indicate action taken to address a student's health complaint.
Tool Search: Intervention Type Setup
The Intervention Type Setup tool is used by districts to enter a health intervention for student health conditions. These interventions are assigned to students through the Health Office Visits and are useful in directing nurses in appropriate care.
 Health Intervention Type
See the Health Administration Tool Rights article for information about rights needed to use this tool.
Intervention Type Workflow
After adding the Complaint to the Health Office Visit entry for a student, add an Observation or just add an Intervention. The Item type item is displayed after the intervention name.
 Health Intervention Selection on Health Office Visits
Add an Intervention Type
- Select the New Intervention Type icon. The Health Intervention Type Detail and Health Intervention Type Items editors will appear.
- Enter the Name of the intervention type detail.
- Mark the Active checkbox to have the intervention type appear in dropdown lists found within the Health Office Visits tool.
- Mark the Display for Unlinked Complaints checkbox if the intervention type is meant to be available for Complaints that have no Interventions linked to them.
- Enter the Name of the intervention type item. This field is used to enter supplies, treatments and other items used to complete the intervention. To add additional intervention type items, click the Add Intervention Type Item button.
- Click the Active checkbox to have the item appear on dropdown lists found within the Health Office Visits tab.
- Select the Save icon when finished. The intervention type will appear within the Health Intervention Types editor.
Discharge Types
Discharge Types describe where a student went when they left the Health Office.
Tool Search: Health Discharge Type Setup
The Health Discharge Type Setup tool allows districts to enter reasons why a student was discharged from the health office. The discharge types created here will populate dropdown lists used by health staff when reporting student health information.
 Health Discharge Type Tool
See the Health Administration Tool Rights article for information about rights needed to use this tool.
Add a New Discharge Type
- Select the New icon. The Discharge Type Detail field will appear below the Health Discharge Type Editor.
- Enter the Name of the discharge type within the Name field.
- Mark the Active checkbox to have the discharge populate dropdown lists used for student health records. If the Active checkbox is unmarked, the discharge type will still exist within the system; however, it will not populate on any student health dropdown lists.
- Select the Save icon. The discharge will appear within the Health Discharge Type Editor window.
Active discharge types will populate the Discharge(s) dropdown list found when creating a new health office visit within the Health Office Visits tab.
 Student Health Office Visits Discharge View
Delete Discharge Types
- Select the Discharge Type from the Health Discharge Type Editor. The Discharge Type Detail field will appear below the Health Discharge Type Editor.
- Select the Delete icon.
- A prompt will appear asking to confirm deletion of the discharge type. Select OK. The discharge type will be deleted.
If a discharge type has been recorded for a student, the record cannot be deleted. Instead, mark that option as Inactive.
Mark a Discharge Type as Inactive
- Select the New icon. The Discharge Type Detail field will appear below the Health Discharge Type Editor.
- Unmark the Discharge Type as Active.
- Select the Save icon when finished. The discharge type will still be in the list of options for possible re-activation at a later time, but will appear not bolded and at the end of the list of active types.
 Inactive Discharge Type
