Districts can use Course Masters to define and even lock down elements of courses (e.g. course numbers and names) so they can't be changed at the school level. These masters are added to Course Catalogs, which are then assigned to the schools that are to use them. Elements can be changed at the district level and pushed down to the schools, increasing efficiency, uniformity and accuracy.
Districts that would benefit from being able to centrally manage course configurations for their district (e.g. districts with several high schools offering the same courses under the same course numbers, or growing districts that are adding schools) may consider using Course Catalogs and Course Masters.
Overview Information - Course Catalogs And Course Masters
This video provides general information that will help you understand how Course Masters and Course Catalogs are used.
Create Catalogs and Masters
A Course Catalog contains a collection of Course Masters that can be assigned to one or more schools. After a Course Catalog has been created, Course Masters can be created and assigned to it. The catalog is then assigned to the school(s) that will be using it.
Create Course Catalog(s)
First, create the course catalog or catalogs that will hold course masters.
Tool Search: Course Catalogs
A Course Catalog is a high-level organization of all course masters in a specific school. A high school might have a different course master for each grade level. Those course masters make up the catalog. Fields marked with a checkbox on this editor cannot be changed on the course and MUST be managed through the Course Master.
Review the Course Masters Overview article for information on Course Masters best practices and a Course Master Workflow.
 Course Catalogs
Administrators can lock certain settings when creating a course catalog. This reduces differences across the district and provides a more uniform approach to curriculum.
When a field is locked on the Course Catalog, it is immediately locked for all courses linked to a Course Master in that Course Catalog, but Course Master data is NOT pushed to that field until the individual Course Master is saved.
See the Course Catalog Tool Rights article for information on rights needed to use this tool.
Create a New Course Catalog
- Select the New icon.
- Enter the Name of the Course Catalog. Note that Course Catalogs must have unique names.
- Mark the Select All/None checkbox to mark ALL checkboxes on the Course Information, NCES Data and Description editors as locked. Or, leave unmarked to choose which fields are locked.
- Click the Save icon. The new catalog appears in the Course Catalog tree.
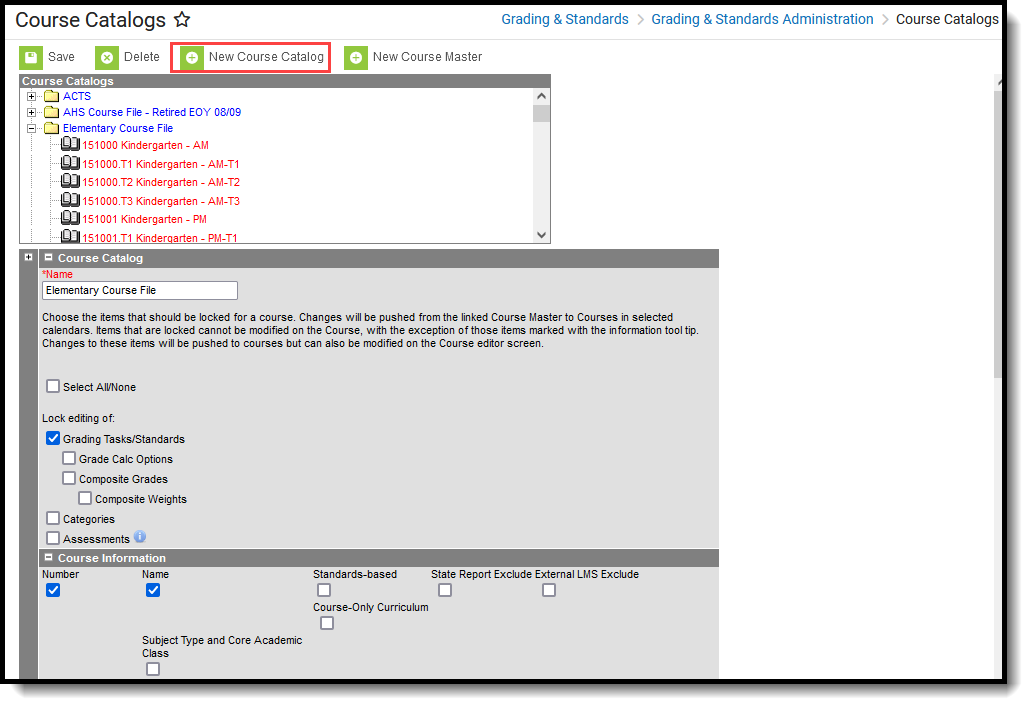 New Course Catalog
Lock Fields on a Course Catalog
When an item is marked to be locked, changes made to the Course Master are pushed to the courses in the selected calendars. The locked items cannot be modified on the Course except for the following. Behavior for locking these fields is noted below:
- Assessments - when locked, information copies forward and is pushed, but changes can be made to assessments at the course level.
- Terms - when locked, information from the Course Master is pushed to courses, but changes can be made at the course level.
- Schedules - when locked, information from the Course Master is pushed to courses, but changes can be made at the course level.
- Period - when locked, information from the Course Master is pushed to courses, but changes can be made at the course level.
Lock Fields
- Select which catalog to set lock properties.
- Mark the Select All/None checkbox to lock ALL fields. You can also mark each field individually (see step 5).
- If editing of grading tasks and grading standards needs to be limited, mark the (Lock editing of) Grading Tasks/Standards checkbox.
- If editing of categories needs to be limited, mark the (Lock editing of) Categories checkbox.
- If editing assessments needs to be limited, mark the (Lock editing of) Assessments checkbox.
- If editing grade calculation options needs to be limited, mark the (Lock editing of) Grade Calc Options checkbox.
- Composite Grades can be locked separately from the rest of Grade Calc Options.
- If not all of the listed fields need to be locked, mark the fields that need to be locked through each available editor.
- Click the Save icon when finished. The changes are saved.
Locked data displays in gray text on the Course editor, and changes can only be made through the Course Master. There is also a note on the Course editor that indicates it is linked to a Course Master.
In this example, the Number, Name, State Code, and Subject Type/Core Academic Class fields are marked as locked on the Course Catalog Editor.
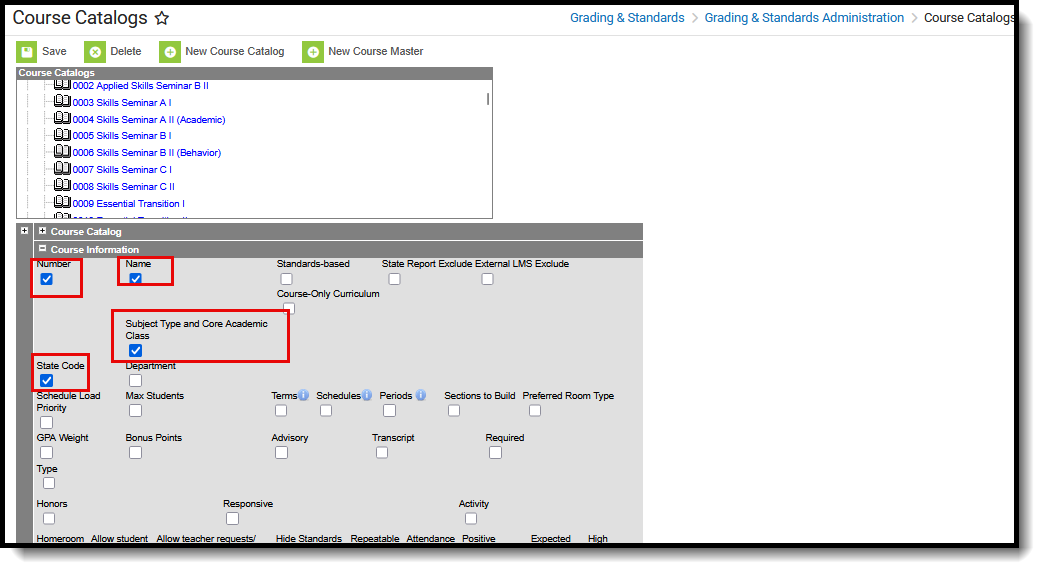 Course Catalog - Fields Locked for Editing
Changes can be made to those fields on the Course Master Detail (lef image below), but once they are pushed to courses, those fields CANNOT be modified on the Course Information editor (right image below).
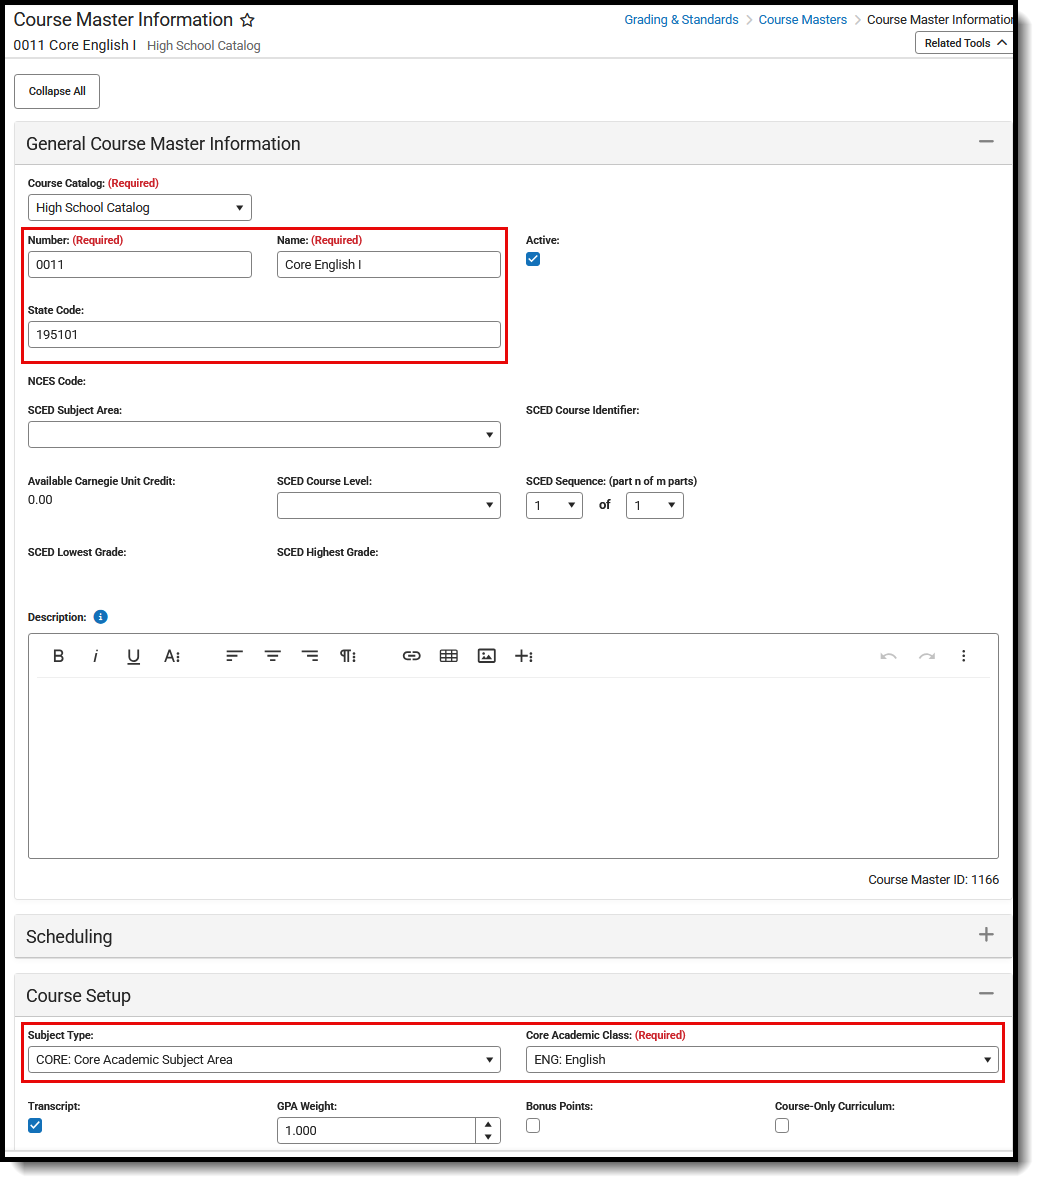 Course Master - Fields Locked on Catalog can be Modified |
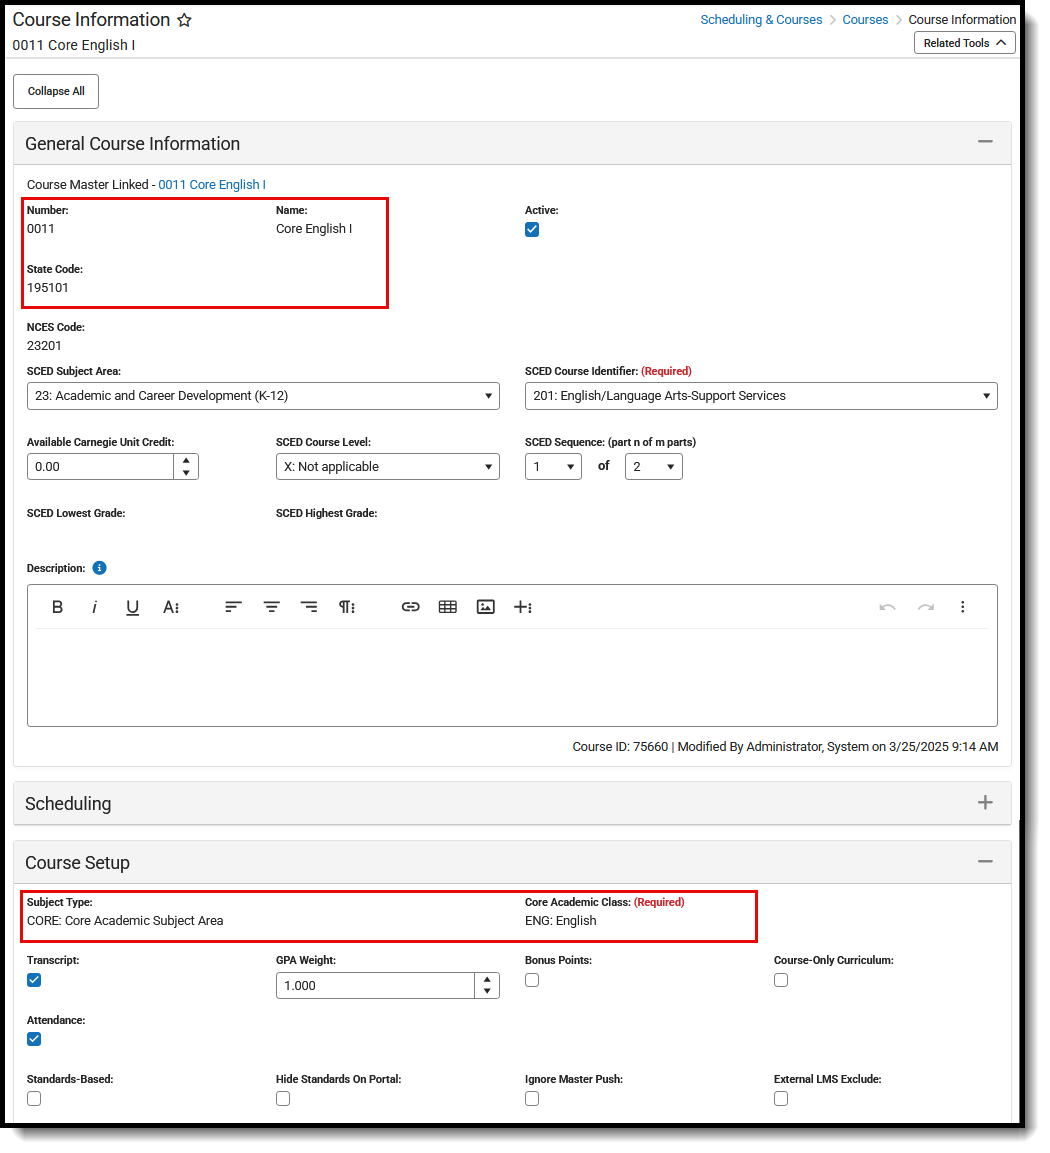 Course Information - Fields Locked for Editing Cannot be Modified |
Locked Fields on Course Information and Section Information
Some Section Information fields that share a name with Course Information fields - same options, same functionality, etc. The Section fields act as an OVERRIDE to the values selected at the Course level.
When pushing data from the Course Master to Course, and from Course to Section, the values populated at the Section level are NOT updated to match the data at the Course level, nor are they locked from editing at the Section level.
In the following example, the Instruction Method field on the Course Master is set to AN: Applied Instruction. That Course Master was pushed to the Course, and the same value is assigned and cannot be modified on the Course Information editor.
 Course Master, Course Information - Push Data Displays Same Value
On the Section Information, a different value for this field is needed for just one section of the course, while the other sections don't. For that section, the field is populated at the Section level.
 Section Information Override Value Selection
When future updates are made to the Course Master and pushed to the Course and then to the Section, the values selected in the Override fields are NOT UPDATED.
Course information is the core reporting information unless the Section is populated. This means:
- Values populated in the Section Information fields take precedence over the values populated in the Course Information fields.
- Section Information fields appear blank unless they are populated manually.
- Section Information fields should only be populated when the values need to differ from the Course Information fields.
Create a New Course Master from the Course Catalog
Course Masters can be created from the Course Catalog view. However, adding Grading Tasks, Standards, and Assessments must be done in the Course Masters toolset.
- Select the New icon.
- Select the Course Catalog to which this new course master belongs.
- Enter the Number of the Course Master.
- Enter values for the remaining fields on the editor.
- Click the Save icon when finished.
Information can be saved at any time. Users can enter values for one editor at a time and save after each one or enter all values at once and save at the very end.
See the Course Masters article for detailed information on adding data to course masters.
Add a Course Catalog to a School
Tool Search: School Information
This is Step 2 in the Course Master Workflow.
After creating the Course Catalog, the School editor must be updated to recognize that the school uses one.
- Navigate to School Information and select the applicable school.
- Select the Course Catalog from the dropdown list.
- Click the Save School icon.
 School Detail - Course Catalog Selection
A course catalog holds a collection of course masters that is maintained by the district and shared by schools. This simulation demonstrates how to create a course catalog.
Create A New Course Master
Course Masters can be used to define elements such as course names, course numbers and grading setup from a district level. Course Masters are added to a Course Catalog which is then attached to one or more schools.
Note: The district determines which of these elements to set up, as well as whether to define additional elements for a course master (e.g. grading tasks, standards, categories, grade calc options and/or assessments).
Tool Search: Course Masters
A Course Master defines elements of courses from a district level, so all schools in the district for the same grade levels (elementary schools, middle schools, high schools, ALCs, etc.) use the same course numbering and course naming conventions, use the same grading setup Grading Tasks, Standards, Grade Calc Options), and are assigned the same assessments. The grading setup tools can then be pushed to course sections, which eliminates individual course maintenance.
Districts with multiple schools, particularly growing districts, may wish to consider using Course Catalogs and Course Masters. Having a consistent setup of courses throughout the entire districts provides a more efficient Scheduling process.
Course Catalogs need to be created first before creating Course Masters. A Course Catalog is a collection of Course Masters that is associated with the school. Changes made to the Course Master are also applied to the courses at the schools, if fields have been locked.
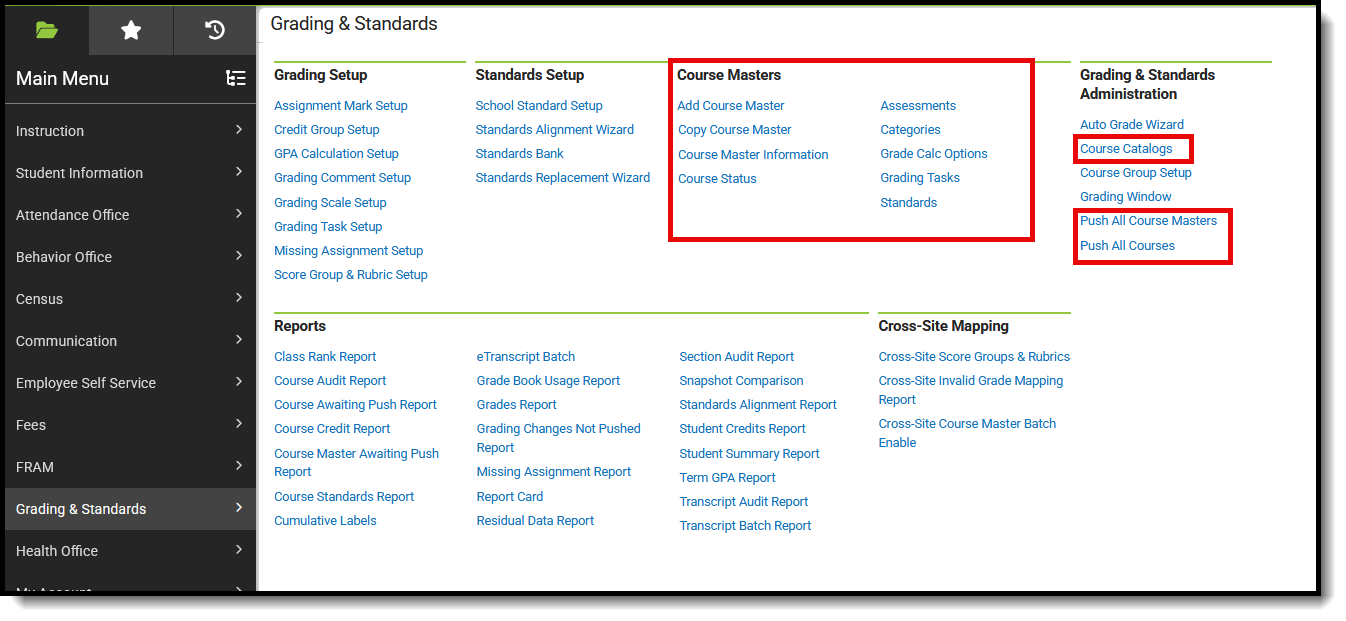 Available Course Master Tools
Best Practices for Course Masters
When using Academic Planning functionality:
- When a calendar is assigned a Course Master, the Credit Overflow Override field must be set on the Grading Task tab of the course in the course master.
- When a calendar is not assigned a Course Master, and courses are maintained at each school, the Credit Overflow Override field must be set on the grading task tab of the course.
For districts that have more than one high school and multi-year academic planning is used, it is recommended that Course Masters be created. This reduces the amount of individual course maintenance that needs to be performed.
Course Master Workflow
| Step | Location | |
|---|---|---|
| 1. | Create a Course Catalogs for the district. | Grading and Standards Administration > Course Catalogs |
| 2. | Assign the Course Catalog to the school. | School and District Settings > Schools > School Information > Course Catalog - Master List |
| 3. | Add new Course Masters for the school. | Grading and Standards > Course Masters > Add Course Master |
| 4. | Add Grading Tasks to the Course Master. | Grading and Standards > Course Masters > Grading Tasks |
| 5. | Add Standards to the Course Master. | Grading and Standards > Course Masters > Standards |
| 6. | Add Categories to the Course Master. | Grading and Standards > Course Masters > Categories |
| 7. | Add Assessments to the Course Master. | Grading and Standards > Course Masters > Assessments |
| 8. | Establish Grade Calc Options for the Course Master. | Grading and Standards > Course Masters > Grade Calc Options |
| 9. | Push the Course Master to the Courses. | Grading and Standards > Course Masters > Course Master Info > Push to Courses |
| 10. | Copy Course Master information to other Course Masters. | Grading and Standards > Course Masters > Copy course Master |
| 11. | Use the Push ALL Course Masters tool to update the Course Catalog with the latest Course Master data. | Grading and Standards Administration > Push All Course Masters |
| 12. | Use the Course Master Awaiting Push Report to review grading setup changes that have not been pushed to courses before using this tool. | Grading & Standards > Repots > Course Master Awaiting Push Report |
| 13. | Use the Push ALL Courses tool to update all courses in the selected calendar with the latest Course data. | Grading and Standards Administration > Push All Courses |
| 14. | Use the Course Status tool to view all courses associated with a course master in the selected school and manage the grading setup of those courses. | Grading and Standards > Course Masters > Course Status |
Save
Course Master Information in Ad hoc Query Wizard
Course Course Master information is available in the Query Wizard for Course/Section Data Type filters. Fields can be selected from the following folders:
- Course > Course Information
- Course > Course Information > Assessments > Course
- Course > Course Information > Scheduling Rules > Course
- Course > Course Information > Planning Rules > Course
Fields available on the Course Information tool are noted in the Course Information section below.
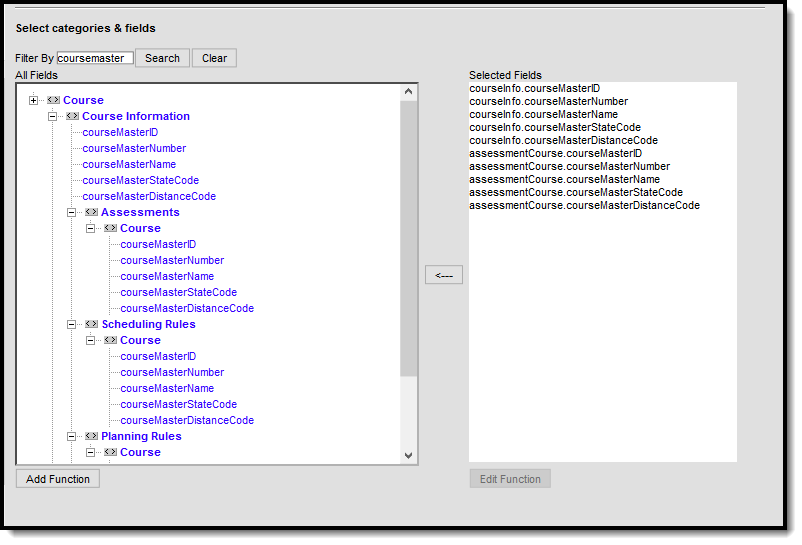 Course Information Fields in Ad hoc
Define Grading Tasks on a Course Master
Grading Tasks represent types of grades reported for students, such as Progress, Term, Semester or Final. The Grading Tasks tab is used to assign grading tasks to courses and define when they will be used. Grading tasks can be copied from a source course master to other course masters.
Tool Search: Grading Tasks
The Grading Tasks tab lists the items the teachers grade as part of the grading process. These tasks include mid-term grades, quarter grades, semester grades, etc. These grading tasks are created in the Grading Tasks tool in the Grading and Standards area.
Review the Course Masters Overview article for information on Course Masters best practices and a Course Master Workflow.
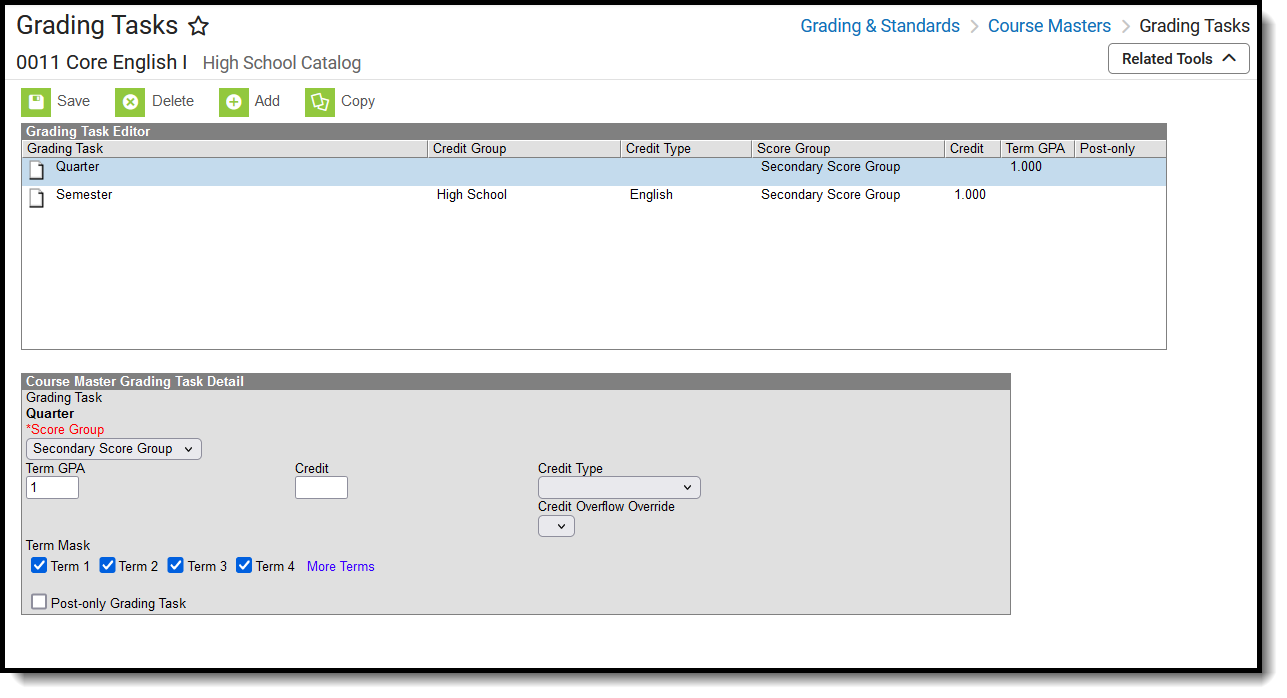 Course Masters Grading Tasks Editor
Visit the Course Status tool to view a list of all courses associated with a given course master, see the status of grading setup for each course, and relink courses as needed.
See the Grading Tasks Tool Rights article to learn about rights needed to use this tool.
Grading Task Information in Ad hoc Query Wizard
Course Grading Task fields are available in the Query Wizard when using the Course/Section Data type in the Course > Course Information > Grading Task Credit folder.
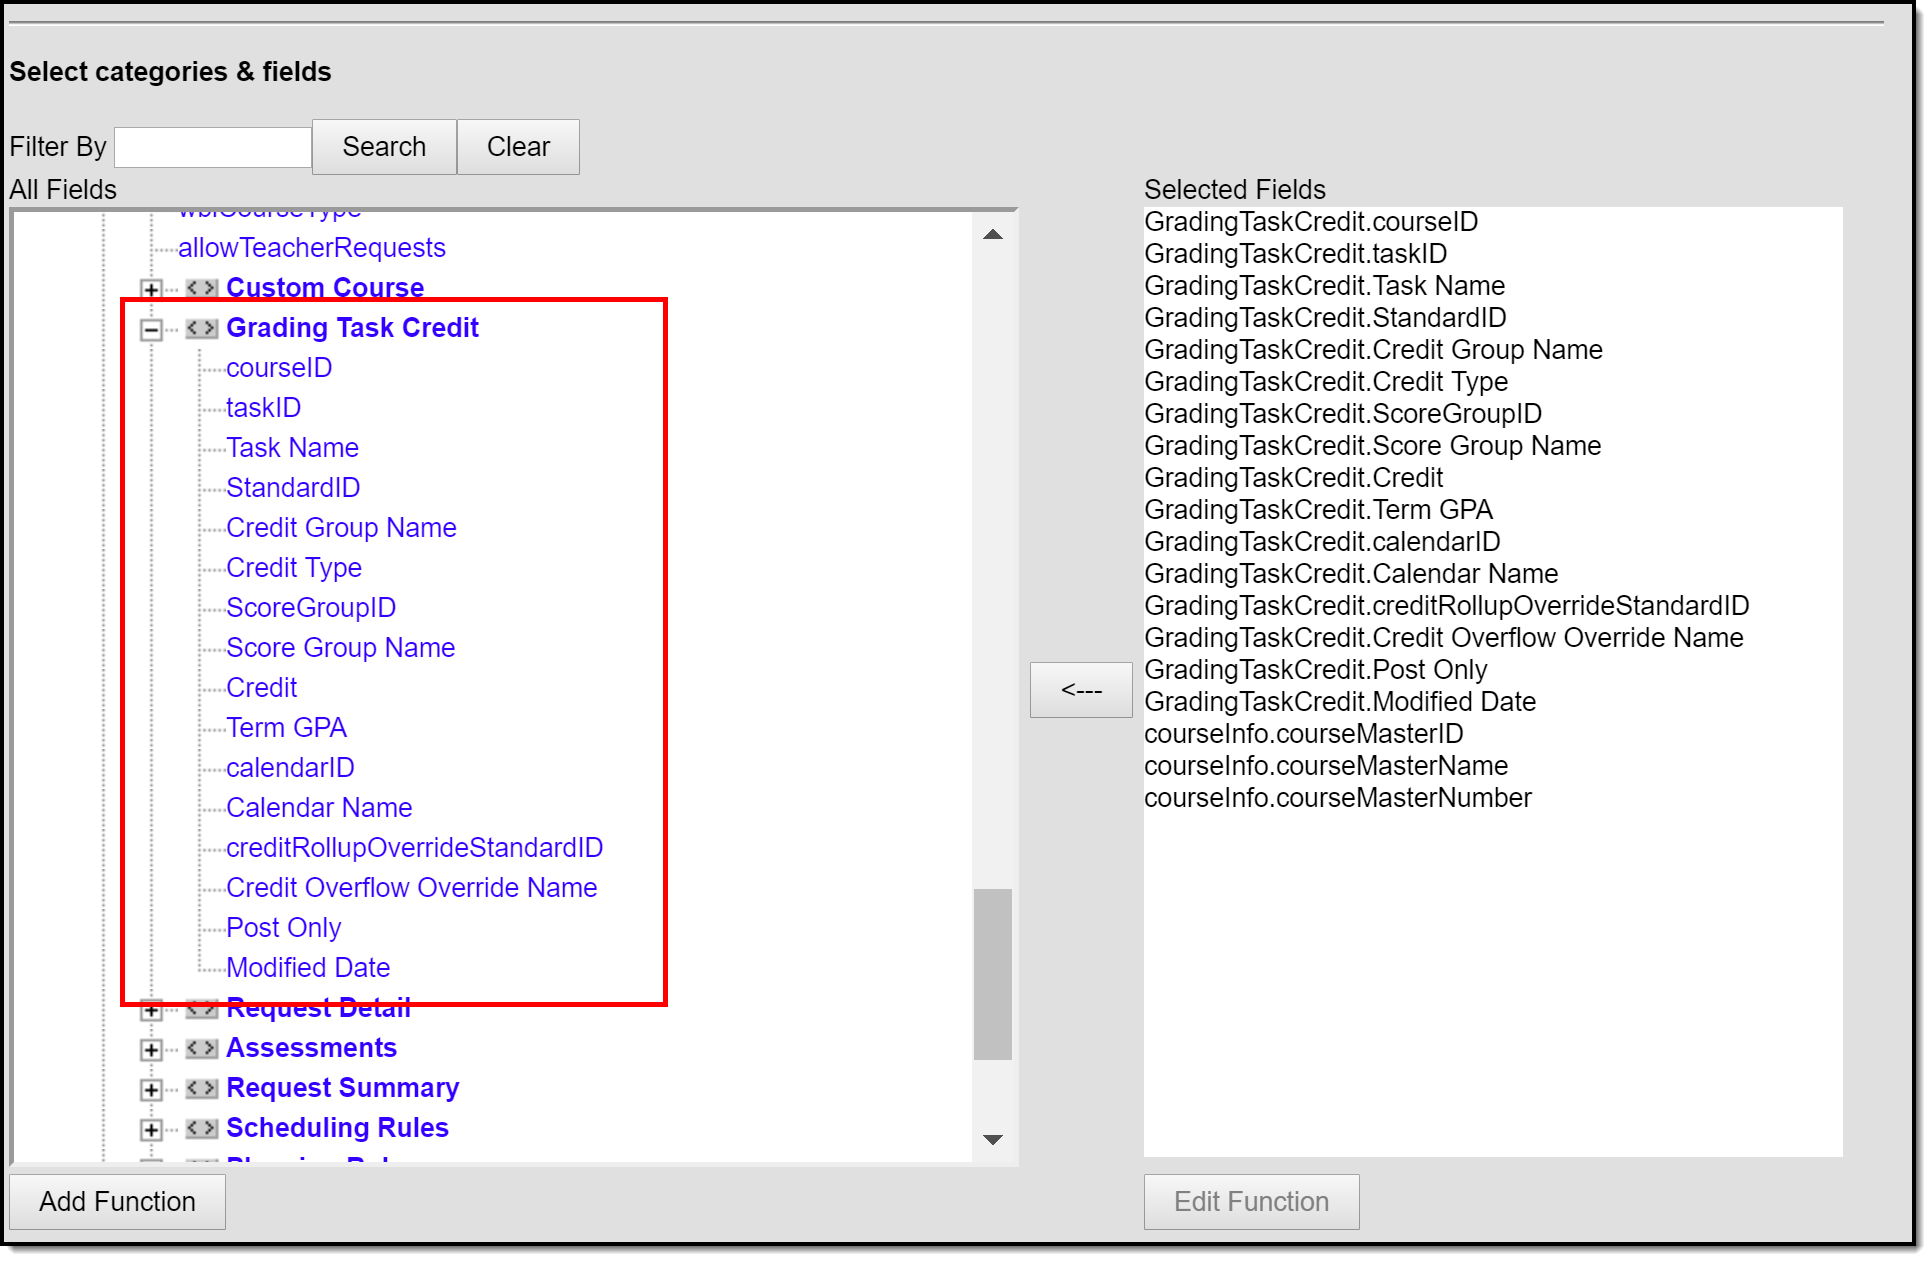 Grading Task Ad hoc Fields
Course Master Grading Task Editor
Before assigning grading tasks to courses, verify the following:
- Grading Tasks have been created in the Grading and Standards area.
- Score Groups have been created in the Grading and Standards area.
- Credit Types have been created in the Grading and Standards area.
The Grading Task editor provides a list of grading tasks and a detail editor showing specific elements of the selected grading task. The following provides a description of the fields on the Course Master Grading Task editor.
|
Field |
Description |
Ad hoc Fields |
|---|---|---|
|
Score Group |
Determines the points and/or letter grades that will be used when scoring the grading task. |
GradingTaskCredit.ScoreGroupName |
|
Term GPA |
Indicates the weight used when calculating the grade of the student. Refer to the GPA Calculations in Campus article for detailed explanations. |
GradingTaskCredit.TermGPA |
|
Credit |
Indicates the amount of credit the student receives upon completion of the course or when the course is posted on a transcript. This value depends on the setup of courses. This is usually only populated on those tasks that are posted to transcripts. |
GradingTaskCredit.Credit |
|
Credit Type |
Indicates the group of credit the student receives when credit is given. This is used in Academic Planning when tracking the progress of the student towards graduation. |
GradingTaskCredit.CreditType |
| Credit Overflow Override |
This field is set for a single course Grading Task and is used to roll credits when the current credit type has met its credit requirements.
The credits from the course will first try to roll up to the override credit type. If that credit type has met its requirements, it will then look at the overflow setup for the course's credit type.
A particular course may be able to count towards more than one credit type. For example a particular CTE course may fulfill a science credit or a math credit. This course would be set up with its default credit type of Math and an override rollup credit type of Science. If the student has completed their math requirement, this course would then be counted as a science credit (only if a science credit was still needed). If both credit requirements were met, then the default rollup would occur, likely going from math to elective credit. |
GradingTaskCredit.CreditOverflowName |
|
Term Mask |
Selection indicates when the task is graded. Term masks are always selected when the task is needing to be graded.
|
This field is not available in Ad hoc Reporting. |
| Post-only Grading Task |
Indicates a grading task cannot be aligned to assignments and categories in the teacher's Grade Book. Post-only Grading Tasks are for posting grades only, not for aligning student work. |
GradingTaskCredit.PostOnly
Reports a value of 1 if the checkbox is marked; reports a value of 0 if the checkbox is not mark. |
Add Grading Tasks to Course Masters
- Click the Add icon. A Course Master Grading Task Detail will display.
- Select the Grading Task to add to the Course Masters from the dropdown list.
- Select the Score Group from the dropdown list.
- Enter the Term GPA weight the student receives.
- Enter the Credit value the student receives.
- If desired, select the appropriate Credit Overflow Override option from the dropdown list.
- Select the Credit Type from the dropdown list.
- Mark the appropriate Term Mask for the grading task.
- If desired, mark the Post-only Grading Task checkbox.
- Click the Save icon when finished.
Any changes made to the Grading Tasks or any other Course Master tab require a push process to the courses. This option is available on the Course Master Info tab.
Delete a Grading Task from a Course Master
- Select the Grading Task to delete from a course from the Grading Task table.
- Click the Delete icon. A warning message will appear indicating the Grading Task is about to be deleted. If the Grading Task is used in a composite grade calculation, that calculation must be edited to not use the Grading Task that's being deleted.
- Click OK to continue or click Cancel.
Copy a Grading Task to Another Course Master
The entire Course Master can be copied from one school to another using the Copy button on the Course Master Info tab.
Use the Copy icon to easily add the Grading Tasks associated with one Course Master (called the Source Course Master) to one or more other Course Masters in the same Course Catalog (called Destination Course Masters). The Copy icon displays when proper tool rights are assigned.
When copying a grading task from one course master to another:
- The Course Catalogs must be the same for the source course master and the destination course master.
- Grading tasks that already exist in the destination course master will not be copied again. This means when five grading tasks are selected to be copied in the source course master, but three of those already exist in the destination course master, only the two that do not exist in the course master will be copied.
- When a Course Catalog is locked for grading tasks, the copy process pushes the grading task to destination courses.
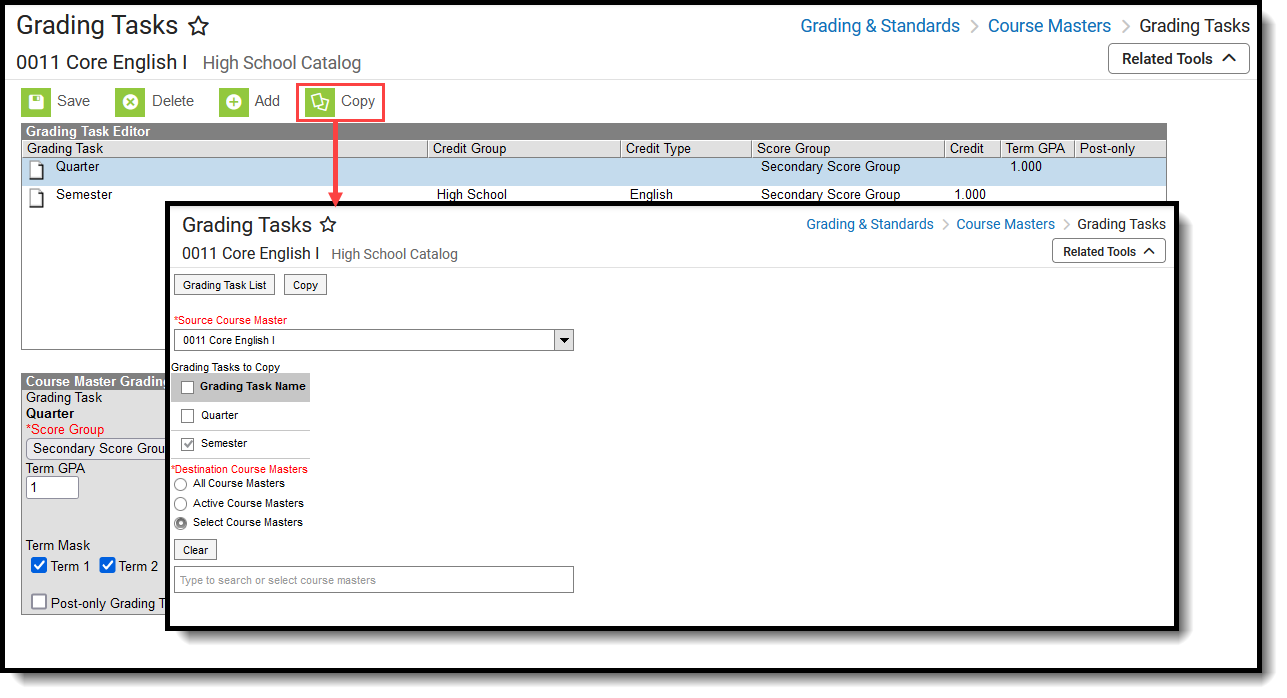 Copy Grading Tasks
- Select a specific grading task to copy or just click the Copy icon without selecting a grading task. When a specific grading task is selected to copy, that grading task is the only one selected to copy; when no grading tasks are selected to copy, all of the grading tasks in that Course Master are automatically selected to copy.
- Select the Source Course Master from the dropdown list. This displays the currently selected course master. To change this selection, begin typing in the dropdown field.
- Mark the Grading Tasks to Copy. Or, clear the selections by clicking the checkbox in the gray Grading Task Name header.
- Select the Destination Course Master:
- All Course Masters: copies task(s) to all course masters in the course catalog.
- Active Course Masters: copies task(s) to all course masters in the course catalog that currently have the Active flag marked.
- Select Course Masters: copies task(s) to the selected course masters. To select a master, type the Number or Name in the search field. Multiple masters can be selected. Click Clear to remove all masters from the list.
- Click the Save button to copy the selected grading tasks to the destination course master. This action saves the selection; the grading tasks are not copied until a school year is selected (see the information below).
When the copy is complete, and the catalog is locked, an alert displays asking to which calendar years the information should be pushed. Select the school year from the dropdown and click OK.
A confirmation displays indicating the selected grading tasks from the Source Course Master have been copied to the Destination Course Masters. At this point, the grading tasks are copied and are displayed on the Course Master Grading Task tab of the Destination Course Master.
If there are no grading tasks to copy, an alert displays indicating all selected grading tasks already exist in the destination course master.
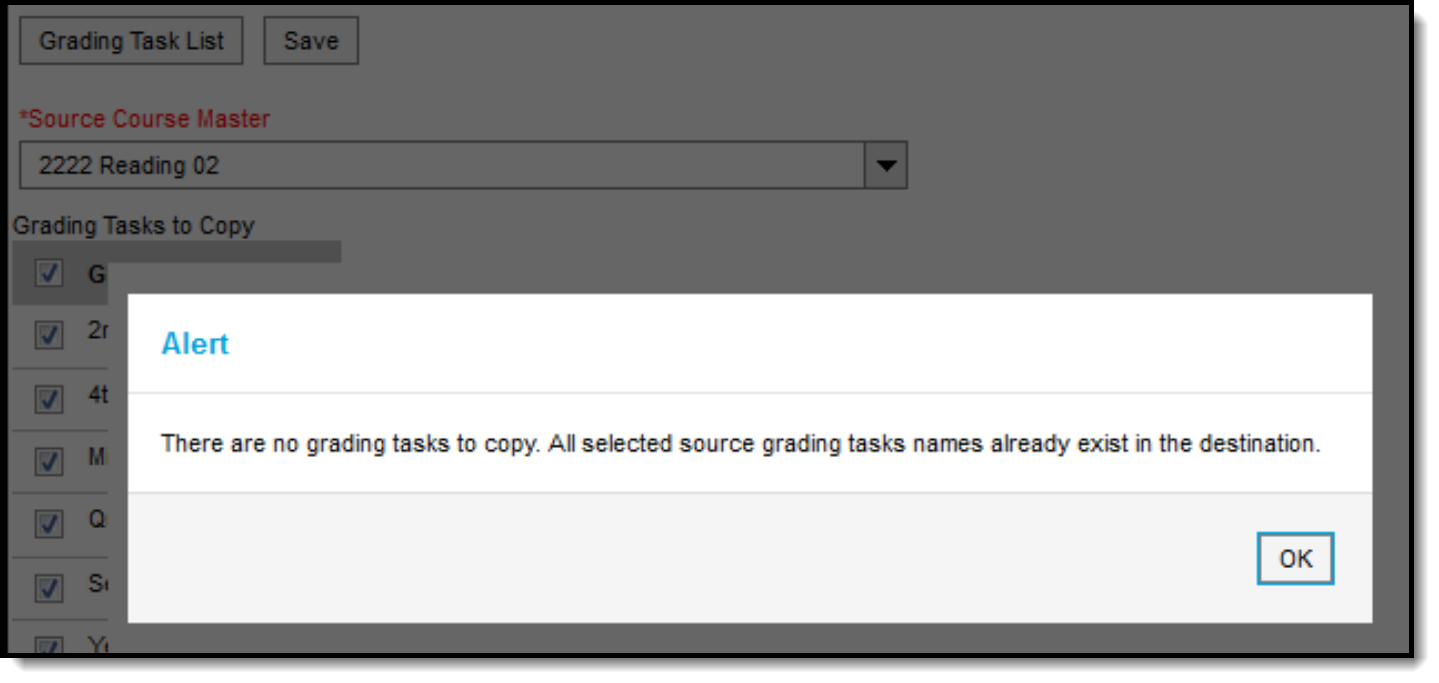 Alert Indicating No Grading Tasks were Copied
To return to the main view of Course Master Grading Task, click the Grading Task List button.
Define Standards on a Course Master
The Standards tab is used to attach the standards that are to be graded for the selected course. Standards can be copied fom a source course master to other course masters.
Tool Search: Course Master Standards
The Standards tool lists the standards which the school must administer and/or grade for the selected course. To add standards to a Course Master, standards must be created first in the Standards Bank.
Any changes made to the Standards or any other Course Master tool require a push process to the courses. This option is available on the Course Master Info tool.
Review the Course Masters Overview article for information on Course Masters best practices and a Course Master Workflow.
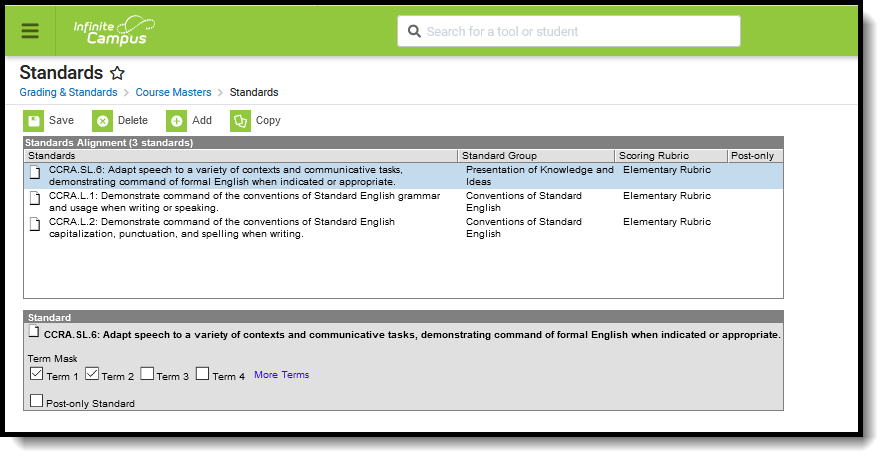 Course Master Standards
See the Standards Tool Rights article for information about rights needed to use this tool.
Standard Information in Ad hoc Query Wizard
Course Master Standard fields are available in the Query Wizard when using the Course/Section Data type in the Course > Course Information > Grading Task Credit folder.
 Standards Fields in Filter Designer
Add Standards
Select Add from the Action Bar. A Standard Detail window appears with a Search field and the expanded list of Standards. The search engine searches based on Abbreviation and standard Display Name. Only standards attached to the selected school on the School Standards tool appears in the selection list.
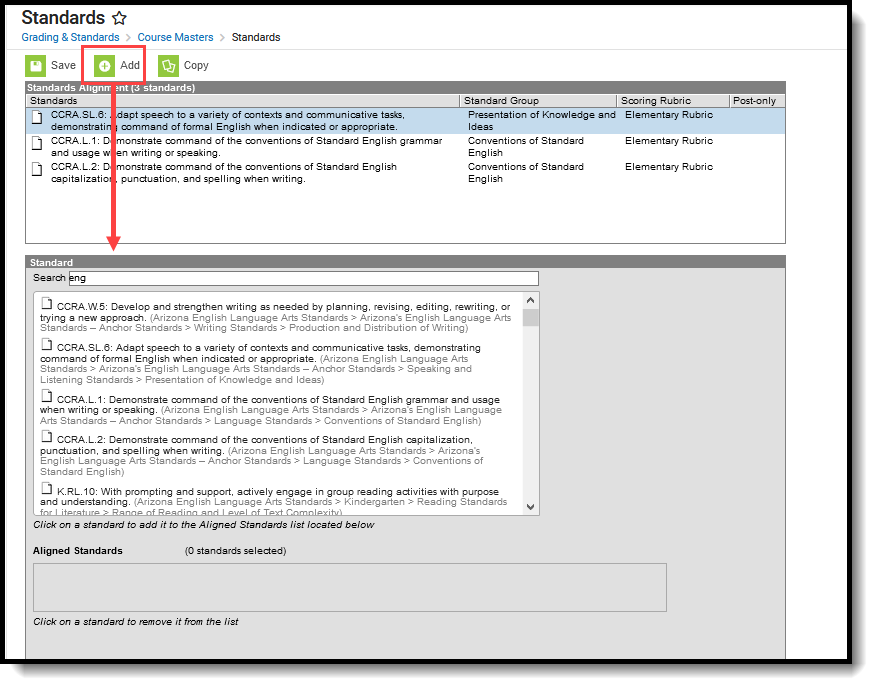 Searching for a Standard
The results window lists the full Standards Bank in expanded form. Users can manually scroll through this list if desired. Standards are listed as follows: Abbreviation: Display Name (Location). After selecting a standard, a blue checkmark icon appears next to the name of the standard in the search results and the standard is added to the Aligned Standards section.
Multiple standards can be added to a course within one save action. A checkmark icon appears next to each selected Standard in the search list. Users can then mark the appropriate Term Mask, which determines when the standard is assessed.
Users can also mark the Post-only Standard checkbox. This checkbox indicates teachers cannot align assignments or categories to the standard. Post-only standards are only used for posting scores, not for tracking student progress. When the checkbox is marked, an X displays in the Standards Alignment table in the Post-only column.
Standards that are assessed multiple times can be added, as well as standards that are assessed once (called One-Time Standards). See the Standards Bank article for more information on One-Time Standards and general Standards setup.
It is recommended that users add standards to courses by term in order to utilize en masse updating options on Term Mask.
To remove a Standard, click the Standard in the Aligned list or in the search results.
Click Save to add the selected standard(s) to the course.
If a school has not added a Standard in the School Standards tool, a message appears when a user attempts to add a standard to a course.
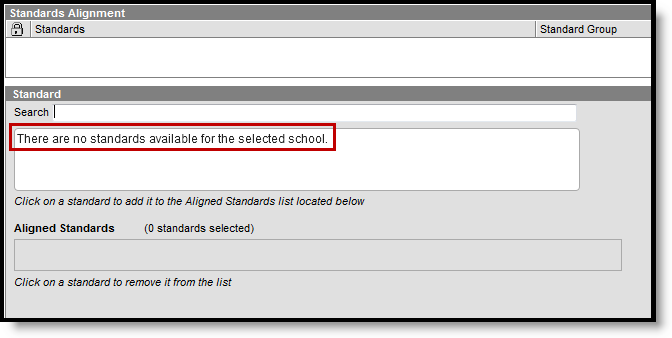 No School Standards Selected
Delete a Standard from a Course Master
- Select the Standard to delete from a course from the Standards Alignment table.
- Click the Delete icon. A warning message appears indicating the standard is about to be deleted. A warning message appears indicating the Standard is about to be deleted. If the Grading Task is used in a composite grade calculation, that calculation must be edited to not use the Standard that's being deleted.
- Click OK to continue or click Cancel.
Users cannot delete a standard if scores have been entered for it.
Copy a Standard to Another Course Master
The entire Course Master can be copied from one school to another using the Copy button on the Course Master Info tool.
Use the Copy icon to easily add the Standards associated with one Course Master (called the Source Course Master) to one or more other Course Masters in the same Course Catalog (called Destination Course Masters). The Copy icon displays when proper tool rights are assigned.
When copying standards from one course master to another:
- The Course Catalogs must be the same for the source course master and the destination course master.
- Standards that already exist in the destination course master are not copied again. This means when five standards are selected to be copied in the source course master, but three of those already exist in the destination course master, only the two that do not exist in the course master are copied.
- When a Course Catalog is locked for standards, the copy process pushes the standard to the destination courses.
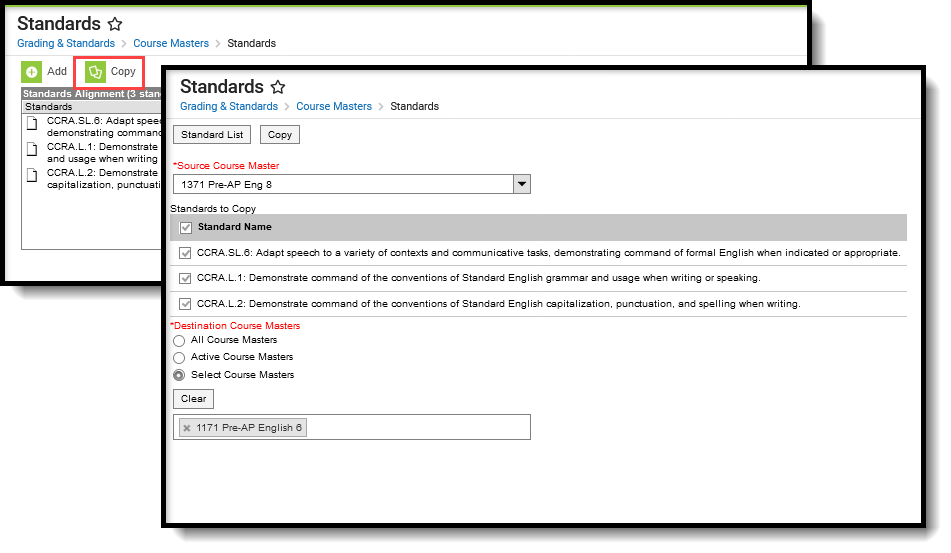 Copy Course Master Standards
- Select a specific standard to copy or just click the Copy icon without selecting a standard. When a specific standard is selected to copy, that standard is the only one selected to copy; when no standards are selected to copy, all of the standards in that Course Master are automatically selected to copy.
- Select the Source Course Master from the dropdown list. This displays the course master to which the current standards are assigned. To change this selection, begin typing in the dropdown field.
- Mark the Standardsto Copy. Or, clear the selections by clicking the checkbox in the gray Standard Name header.
- Select the Destination Course Master:
- All Course Masters: copies standard(s) to all course masters in the course catalog.
- Active Course Masters: copies standards(s) to all course masters in the course catalog that currently have the Active flag marked.
- Select Course Masters: copies standards(s) to the selected course masters. To select a master, type the Number or Name in the search field. Multiple masters can be selected. Click Clear to remove all masters from the list.
- Click the Save button to copy the selected standards to the destination course master. This action saves the selection; the standards are not copied until a school year is selected (see the information below).
When the copy is complete, and the catalog is locked, an alert displays asking to which calendar years the information should be pushed. Select the school year from the dropdown and click OK.
A confirmation displays indicating the selected standards from the Source Course Master have been copied to the Destination Course Masters. At this point, the standards are copied and are displayed on the Course Master Standards tool of the Destination Course Master(s).
If there are no standards to copy, an alert displays indicating all selected standards already exist in the destination course master.
To return to the main view of Course Master Standards, click the Standards List button.
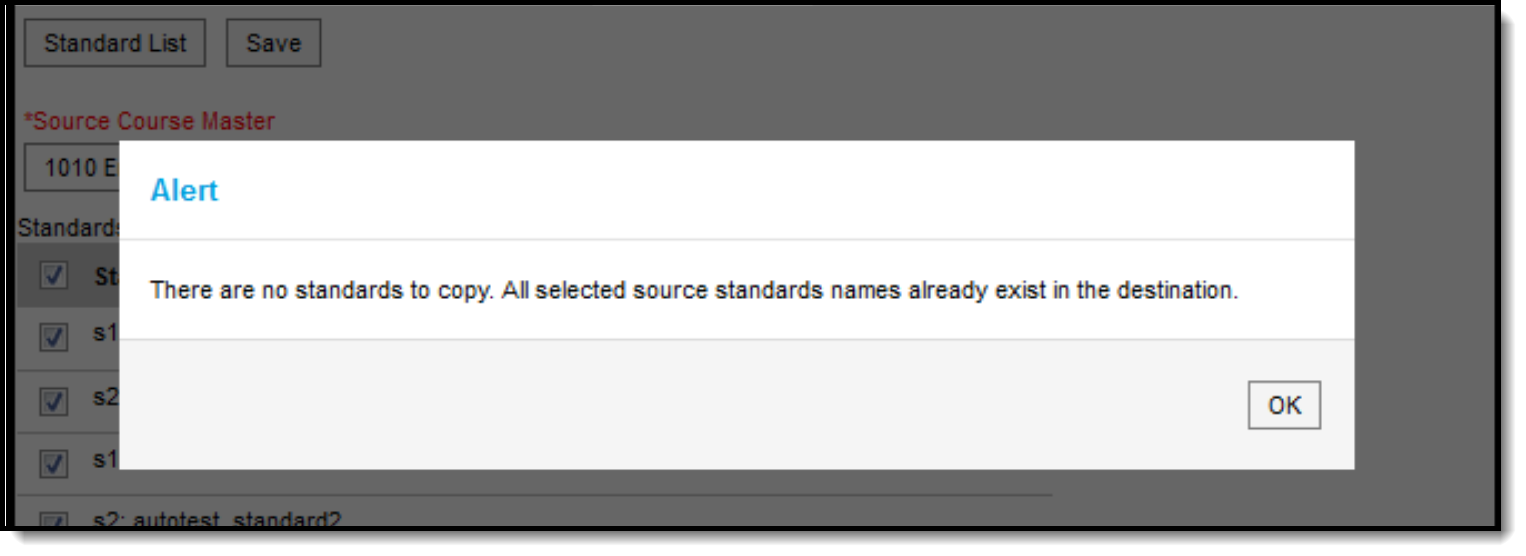 Alert Indicating No Standards were Copies
Standards can be defined for course masters to ensure consistency in how courses are graded across schools. This video demonstrates how to define a standard for a course master.
Define Categories on a Course Master
Categories are used in Campus Instruction to sort assignments into groups. Categories need to be created before assignments can be created. Districts can choose to set categories up on Course Masters to ensure that all sections of a course use the same categories and calculations. Categories can easily be copied from a source course master to one or more destination course masters.
Tool Search: Categories
Categories are used in Campus Instruction to sort assignments into groups. Categories need to be created before assignments can be created.
When categories are assigned at the Course Master level, every teacher who teaches a course in that Course Master uses the same categories. This ensures all assignments in a category have the same weight and calculations are all done the same way.
Categories created at the Course Master level must be pushed to courses. Use the Push to Courses option to push categories for multiple masters using the Push All Course Masters tool.
Review the Course Masters Overview article for information on Course Masters best practices and a Course Master Workflow.
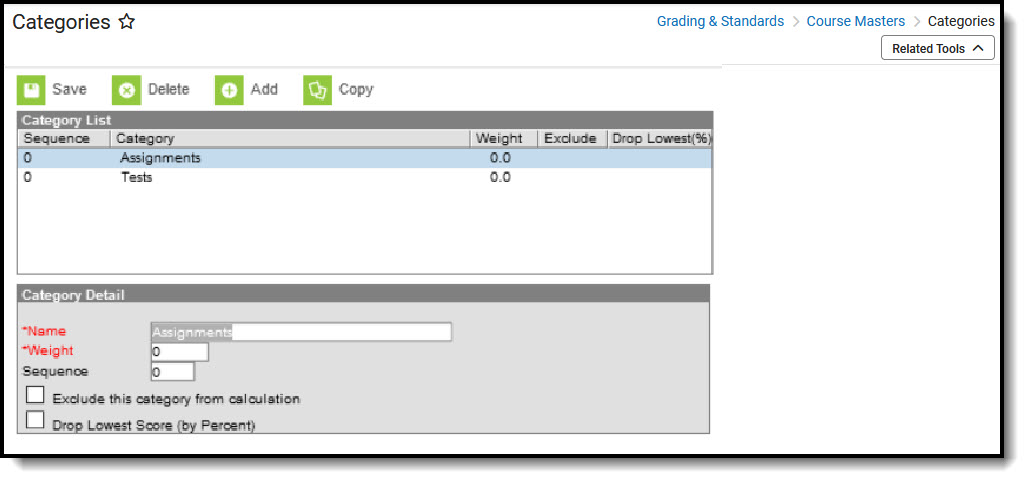 Course Master Categories
If a teacher has already set up categories in their Grade Book, Planner or Assignment Overview, Categories aligned to a Course Master ARE NOT reflected in Campus Instruction. This is to ensure any existing assignments and grades are not modified.
The best time to implement district-level categories is at the beginning of the school year.
See the Categories Tool Rights article for information about the rights needed to use this tool.
Add New Categories
- Click the Add icon. A Category Detail section displays.
- Enter the category Name. This name displays on assignments and in the Grade Book. Names should be unique (as in, categories cannot be named the same as another category).
- Enter the category Weight. The weight of a category determines the effect of each category on the final grade, in relation to other categories. Weights are calculated as a ratio based on the other weights entered. Weights only influence calculation if the Weight Categories option is selected in the Grade Calculation Options in the teacher's Grade Book.
- Enter the category Sequence. Categories display in sequence order.
- If the category should be excluded from calculations, mark the checkbox accordingly.
- If the lowest score from any assignment should be dropped from the calculation, mark the checkbox accordingly. See the Drop Lowest Score Logic for more information.
- Click the Save icon when finished. The new category displays in Sequence order in the Category List section.
When the Course Catalog is marked to lock the editing of Categories, the Course Categories displays the categories with lock icons, indicating changes to those cannot be made. In the Grade Book, those same categories display automatically for the teacher if the data from the Course Master has been pushed to the courses.
If teachers have tool rights to Categories, they can create their own categories and edit categories pushed to the section. If a course is linked to a course master, the Categories field must also be unlocked on the Course Catalog for teachers to edit pushed categories.
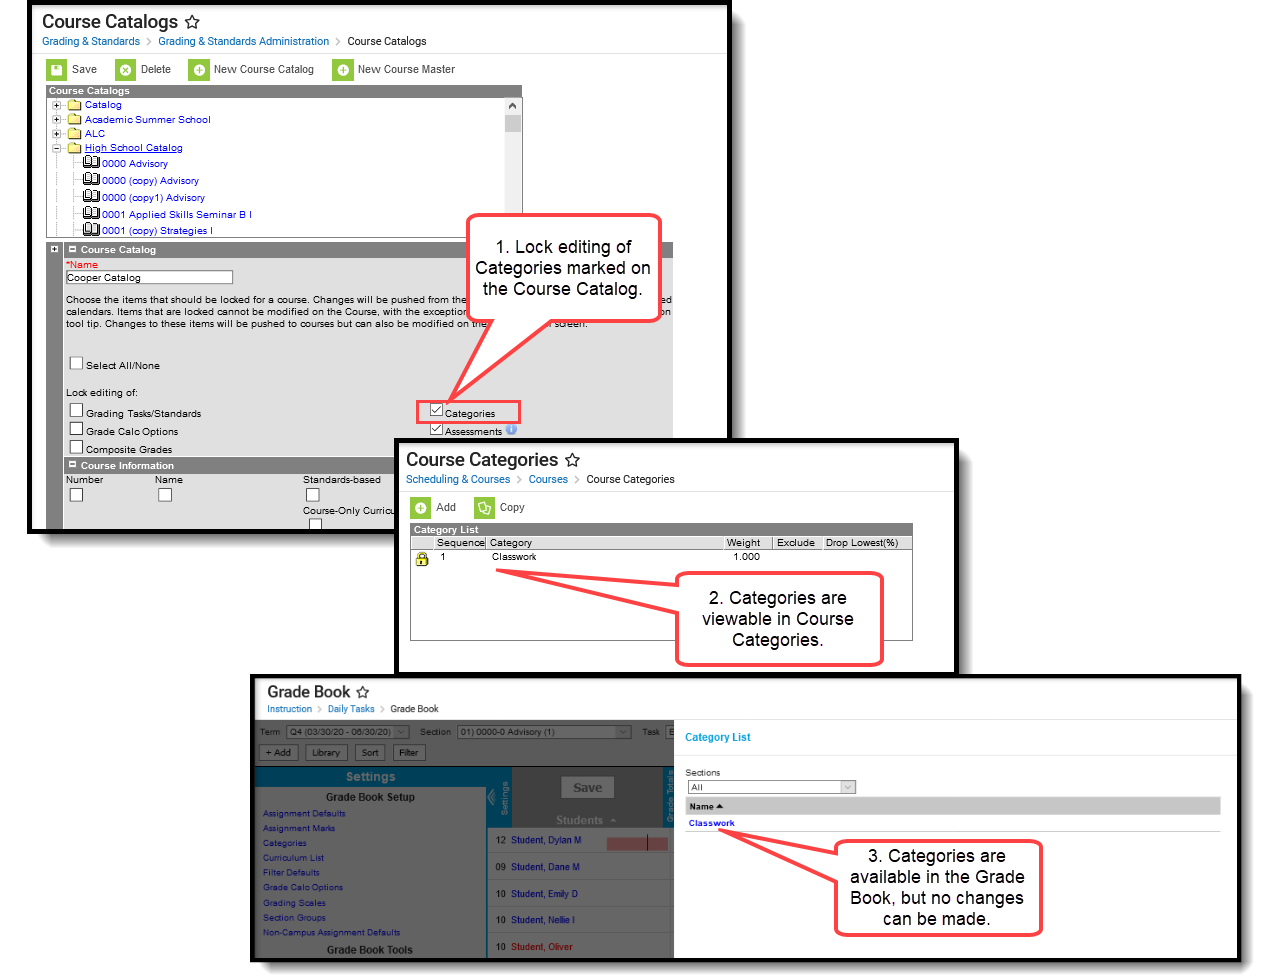
Category Display
Modify Categories
Users with proper tool rights have the ability to modify categories at the Course Master level. Edits can be made to the entered Categories by selecting it from the Category List, making the necessary changes and saving the changes.
Categories can also be deleted completely by clicking the Delete icon. This removes the category completely from the Course Master. After a Category is deleted from a Course Master and was locked on the Course Section, that category is unlocked at the Course Section level.
If a category that has been pushed to sections is deleted, instances of the category that have assignments will be converted to section-owned categories. These categories function the same as any created by the teacher and are no longer tied to a category at the course level.
Categories that display at the course level can be edited by school administrators if they have proper tool rights. Categories that display at the section level can be edited by the teacher if they have proper tool rights.
Drop Lowest Score Logic
The Drop Lowest Score feature marks as dropped the lowest scored assignment (by percentage) for a category for each student.
The dropped score is determined through a series of steps:
First, the feature creates a list of possible scores to drop for each student based on the following characteristics:
- The assignment must be active.
- The score field must be not null; in other words, some kind of score must be entered, including an entered shortcut such as M: Missing.
- The score must not be flagged as exempt.
Next, the feature assigns a percentage value to each acceptable score based on the following logic:
- If the Score Type is Assignment Marks and the score does not equal a valid mark score, or if the Score Type is Points and the score is not a shortcut key or number, the score will not be considered among those to be dropped because it is not in a valid format that the calculation can consider.
- Assignments with valid scores entered will calculate as a percentage of points possible.
Assignments scored as M or Ch will be assigned a percentage of 0. Scores flagged as missing or cheated using the Context Menu will not be considered in the calculation because the score is Null. Keep this in mind when using this feature. For example, if the score of a "cheated" assignment should not be among those considered to be dropped, mark it using the checkboxes in the context menu rather than the "ch" keyboard shortcut.
Finally, the feature marks the score with the lowest percentage value as "dropped" and removes the dropped flag from any other score for that student. As long as the Drop Lowest Score checkbox is marked, this calculation will run each time an assignment score is changed.
In the event of a tie between multiple assignments, the score with the highest points possible is dropped.
Copy Categories to Another Course Master
The entire Course Master can be copied from one school to another using the Copy button on the Course Master Information tool.
Use the Copy icon to easily add the Categories associated with one Course Master (called the Source Course Master) to one or more other Course Masters in the same Course Catalog (called Destination Course Masters). The Copy icon displays when proper tool rights are assigned.
When copying a category from one course master to another:
- The Course Catalog must be the same for the source course master and the destination course master.
- Categories that already exist in the destination course master will not be copied again. This means when five categories are selected to be copied in the source course master, but three of those already exist in the destination course master, only the two that do not exist in the course master will be copied.
- When a course catalog is locked for categories, the copy process pushes the categories to the destination courses. Categories pushed to sections are locked from editing by teachers.
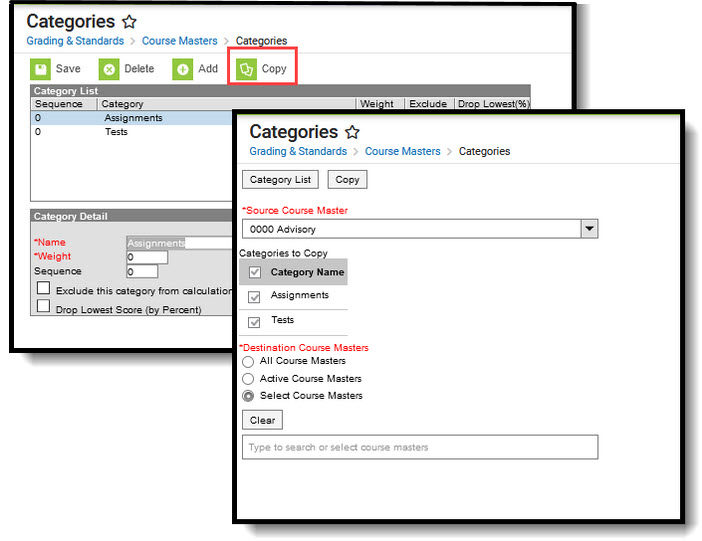
- Select a specific category to copy or just click the Copy icon. When a specific category is selected to copy, that category is the only one selected to copy; when no categories are selected to copy, all of the categories in that Course Master are automatically selected to copy.
- Select the Source Course Master from the dropdown list. This displays the currently selected course master. To change this selection, begin typing in the dropdown field.
- Mark the Categories to Copy. Or, clear the selections by clicking the checkbox in the gray Category Name header.
- Select the Destination Course Master:
- All Course Masters: copies categories to all course masters in the course catalog.
- Active Course Masters: copies categories to all course masters in the course catalog that currently have the Active flag marked.
- Select Course Masters: copies categories to the selected course masters. To select a master, type the Number or Name in the search field. Multiple masters can be selected. Click Clear to remove all masters from the list.
- Click the Next button.
- Click the Save button to copy the selected categories to the destination course master.
A confirmation displays indicating the selected categories from the Source Course Master have been copied to the Destination Course Masters. At this point, the categories are copied and are displayed on the Course Master Categories tab of the Destination Course Master.
If there are no categories to copy, an alert displays indicating all selected categories already exist in the destination course master.
Save
Save
Define Grade Calculation on a Course Master
After Grading Tasks and/or Standards have been assigned to a course master, the district may wish to set the calculation options for grading the course.
Tool Search: Grade Calc Options
Grade Calculation Options determine how In Progress Grades for Grading Tasks and Standards calculate in the Grade Book.
Before setting Grade Calculation Options, Grading Tasks and Standards must be assigned to the Course Master.
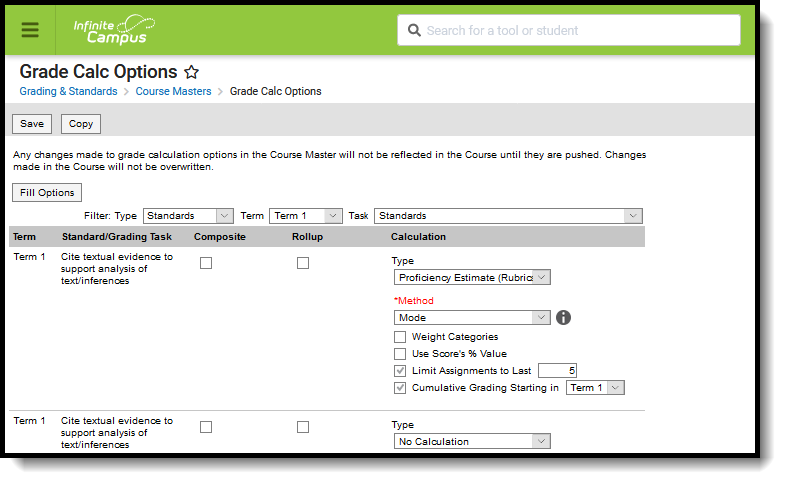 Grade Calc Options determine how grades are calculated for standards and tasks aligned to a course master.
Review the Course Masters Overview article for information on Course Masters best practices and a Course Master Workflow.
See the Grade Calc Options Tool Rights article to learn about the rights needed to use this tool.
Fill and Filter Options
To apply a specific grading setup to multiple tasks or standards, select Fill Options. From there, filter using the Type, Term, and Task dropdown lists and then select the Calculation Type and other options to apply to all standards or tasks that fit the filter criteria. For example, in the image below, I'm setting the Term Grade task to calculate the same way in all terms.

Use the Fill and Filter options to apply grade calculation options to multiple standards or tasks.
Additionally, the filter options are available in the main Grade Calc Options screen to filter the individual standards and tasks displayed.
Grade Calculation Options for Standards
Establish calculation preferences for multiple standards using the Fill options or for each Term/Standard combination individually.

Select calculation options for standards
The following table describes the Types for Standards:
| Option | Description |
|---|---|
| No Calculation | Select this option to exclude the standard from calculation of students' In Progress proficiency estimate in the Grade Book. This option is pre-selected and cannot be modified when a standard is marked as Post-only on the Course Standards tool or the Course Masters Standards tab. No assignments or categories can be assigned to this standard. |
| In Progress Grade | Select this option to calculate an In Progress grade for this standard using a Grading Scale. Use this option if scoring for the standard is done with Points or Marks. Additional options appear when this option is selected:
|
| Proficiency Estimate (Rubrics) | Select this option if the standard is scored using a rubric. Rubrics are used to described quality of work, rather than a numerical score. Choose a Method to calculate grades:
In the grade book, hover over a student's proficiency estimate to see each of these values calculated. |
Assign Grade Calculation Options of Standards
- Select the desired Calculation Type for each Standard assigned to the Course Master, choosing to mass-assign the same calculation type using the Fill Down option or assigning the calculation type for each standard one at a time.
- If any standard needs to be a Composite standard, set those options.
- Click the Save icon when finished.
Grade Calculation Options for Grading Tasks
Establish calculation preferences for multiple tasks using the Fill options or for each Term/Task combination individually.

Select calculation options for tasks
The following table describes the Types for Grading Tasks:
| Option | Description |
|---|---|
| No Calculation | Select this option to exclude the task from calculation of students' In Progress grades in the Grade Book. |
| In Progress Grade | Select this option to calculate an In Progress grade for this task. Additional options appear when this option is selected:
|
Post-only Tasks
Categories and assignments cannot be aligned to tasks marked as Post-only on the Course > Grading Tasks or Course Masters > Grading Tasks tabs. However, calculation options can be set up for these tasks to allow a Grade to be calculated in the Posted column when a Percent is entered for a student.
Assign Grade Calculation Options for Grading Tasks
- Select the desired Calculation Type for each Grading Task assigned to the Course Master, choosing to mass-assign the same calculation type using the Fill Down option or assigning the calculation type for each standard one at a time.
- If any standard needs to be a Composite standard, set those options.
- Click the Save icon when finished.
Additional Options in Grade Calc Options
The following options are available for standards and tasks:
| Option | Description |
|---|---|
| Composite | A composite task or standard is a parent task that is grade based on the child tasks that make it up. For example, a semester task may be a composite of two quarter tasks. See the Composite Grading article for more information. |
| Rollup | A parent standard or task can be calculated by "rolling up" child tasks. See the Rollup Grade Calculations article for more information. |
| Limit Assignments to Last ___ | This option limits the grade calculation to only include the most recent x number of assignments. For example, proficiency in a standard may be calculated as the mode of the most recent 5 assignments. |
| Cumulative Grading Starting in | This option allows teachers to set a starting term for calculating grading across multiple terms. See the Cumulative Grading article for more information. |
Composite Grading
For Grading Tasks that are calculated together with other Grading Tasks to have a composite grade (like a Semester Grade or End of Year Grade), mark the Composite checkbox. This displays a Child Task/Standard editor within the grading task window where the Grading Tasks and Standards can be set to properly calculate the composite grade.
In the example below, the Final Grade is marked as Composite and combines the student's Term 3 and Term 4 grades together. Each of the term grades are worth 50% of the Final grade.
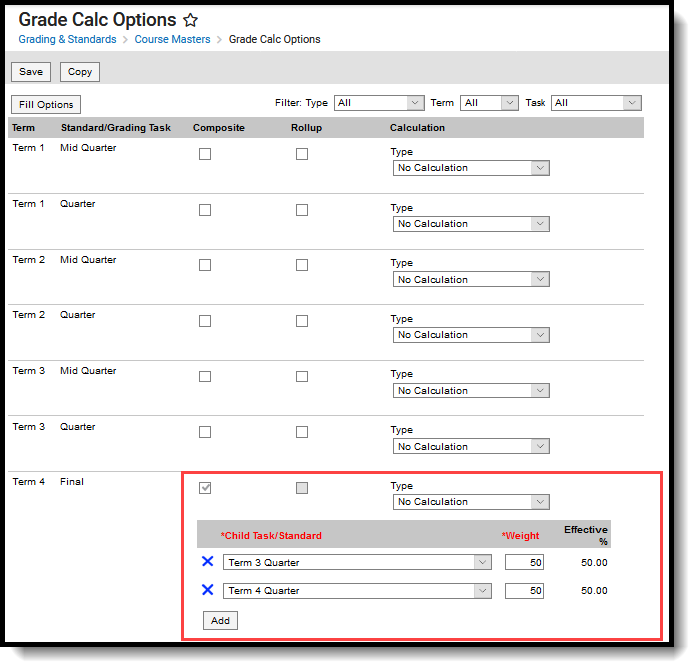 Mark the Composite checkbox to display the Child Task/Standard dropdown lists.
Note the following:
- Grading Tasks and Standards need to be assigned to the Course Master.
- Active Terms need to be set properly before setting the composite grade.
- The Weight field value can be entered as a decimal or as a whole number, but the total Effective Percentage of all of the child tasks entered here cannot be more than 100%.
- A task/standard can only be selected once. Previously chosen tasks/Standards display in gray and cannot be chosen again.
- In the Progress Monitor, composite grading setup is represented visually by displaying child alignments nested under the parent, unless the section has more than 50 standard/task alignments.
Assign a Composite Calculation
- Locate the Grading Task or Standard to set as a Composite.
- Mark the Composite checkbox. The Child Task/Standard editor displays.
- Select the Grading Tasks that are to be used in the composite calculation.
- Enter the Weight value for each of the child tasks.
- If desired, mark the Lock Composites checkbox. When this is marked, teachers would not be able to modify the composite grading setup (add more child tasks or change entered weight values), even if they have the tool rights to modify composite grading information.
Rollup Grade Calculation
Rollup calculations allow users to grade a parent standard based on the scores a student has received for child standards, rather than having to manually estimate the grade. Alternately, child standards can be selected to rollup to a grading task, with the rubric scores converted to numeric values and then into items in the score group selected for the task.
These calculations display in the Grade Book and Post Grades tool. Rollup calculation preferences are set up on this tool or in the Grade Calc Options tool for Courses.
Standards can only be selected to contribute to a rollup calculation if they are graded using the same rubric. In the Progress Monitor, rollup grading setup is represented visually by displaying child alignments nested under the parent, unless the section has more than 50 standard/task alignments.
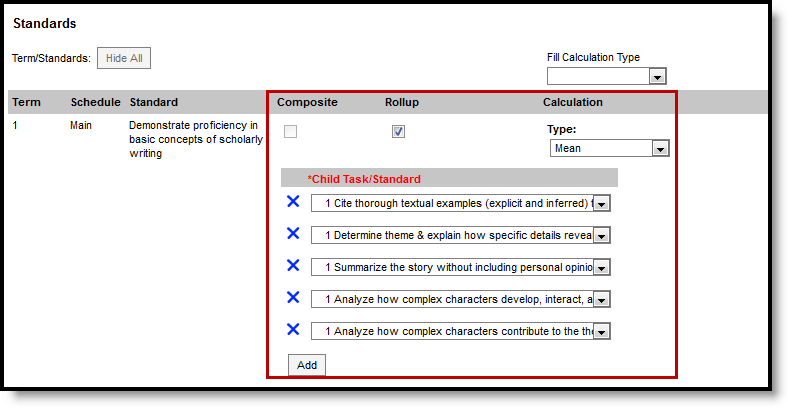
Rollup Grade Calculation
Setup Rollup Grade Calculation
- Mark the Rollup checkbox for the parent standard. The grade for this standard or task is calculated based on the child standards and Calculation Type.
- Select the Calculation Type to determine how grades in child tasks contribute to the rolled up grade. See the descriptions of each type in the table following.
- Select the Child Tasks/Standards to be included in the rollup calculation. Add rows for additional children as needed. Available standards are those entered as children of the parent standard in the Standards Bank.
- Click Save when finished.
Calculation Types
| Type | Description |
|---|---|
| Manual | Provides no rollup calculation. |
| Mean | Rollup calculation is the average of the grade for each child standard, based on the Rollup % Values entered on the Rubric. When the parent is a task, numeric rubric values are converted based on the selected Score Group. Rollup value, Minimum Value, and Mean Value should be populated for the rubric. |
| Weighted Mean | When this type is selected, a weight field displays for each child standard, with an Effective % value calculating as weights are entered. Rollup calculation is the average of the grade for each child standard, based on the Rollup % Values entered on the Rubric, weighted based on the values entered for each child. Similar to Composite Grading, weight values can be entered as percentages (such as 25%, 25%, and 50%) or as proportions (such as 1, 1, 2). Rollup value, Minimum Value, and Mean Value should be populated for the rubric. |
| Median | Rollup calculation displays as the grade at the middle of the grade distribution. For example, if the child standards have grades of U, U, P, P, HP, the median value is P. |
| Mode | Rollup calculation displays as the most common grade received across child standards. For example, if the child standards have grades of U, P, P, P, HP, the mode is P. If there is no mode in the entered scores, a rollup value is not reported. |
| Highest | Rollup calculation displays the highest grade achieved. |
Copy Grade Calculation Options to Another Course Master
The entire Course Master can be copied from one school to another using the Copy button on the Course Master Info tab.
Use the Copy icon to easily add Grade Calculation Options associated with one Course Master (called the Source Course Master) to one or more other Course Masters in the same Course Catalog (called Destination Course Masters). The Copy icon displays when proper tool rights are assigned.
When copying grading calc options from one course master to another:
- The Course Catalogs must be the same for the source course master and the destination course master.
- Grade calculation options only copy to courses/course masters that do not have any grade calc options set up. This means courses/course masters that already have grade calc options assigned are not searchable in the destination course master.
- When a Course Catalog is locked for grade calc options, the copy process pushes the grade calc options to destination courses.
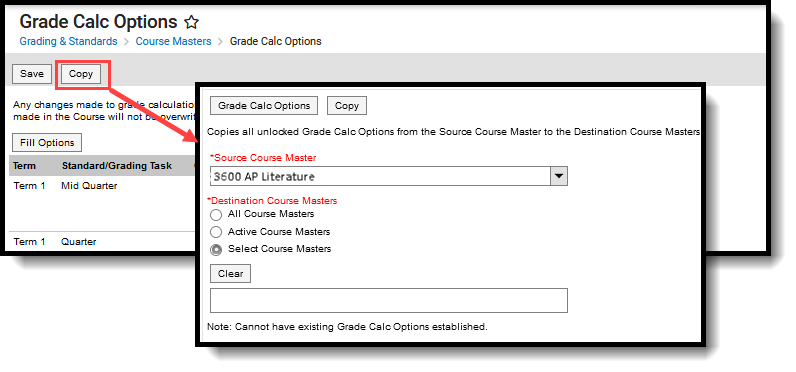
Copy Grade Calc Options
- Select a specific grade calc option to copy or just click the Copy icon without selecting a grade calc option.
- Click the Copy icon.
- Select the Source Course Master from the dropdown list. This displays the currently selected course master. To change this selection, begin typing in the dropdown field.
- Select the Destination Course Master:
- All Course Masters: copies options to all course masters in the course catalog.
- Active Course Masters: copies options to all course masters in the course catalog that currently have the Active flag marked.
- Select Course Masters: copies options to the selected course masters. To select a master, type the Number or Name in the search field. Multiple masters can be selected. Click Clear to remove all masters from the list. Only Course Masters that do not already have Grade Calc Options established are available to be selected.
- Click the Copy button again to copy the grade calculation options to the destination course master.
When the copy is completed, an alert displays indicating the copy has been saved.
Save
Configure Cumulative Grading for a Course Master
Grade Calculation Options can be used to set up cumulative grading for standards and tasks aligned to a course master so that grades can be calculated consistently.
Define Assessments Aligned to a Course Master
Districts can choose to align standard tests, district tests or teacher scored tests to a course master.
Tool Search: Assessments
The Course Master Assessments tool lists the names of the assessments that are marked as teacher-scored tests and read-only tests. A teacher-scored text is determined by the Test Structure. Tests display as Teacher-scored or Read-only test.
Review the Course Masters Overview article for information on Course Masters best practices and a Course Master Workflow.
In order for a test to be selected and assigned to a Course Master, the test must be created in the Test Setup structure.
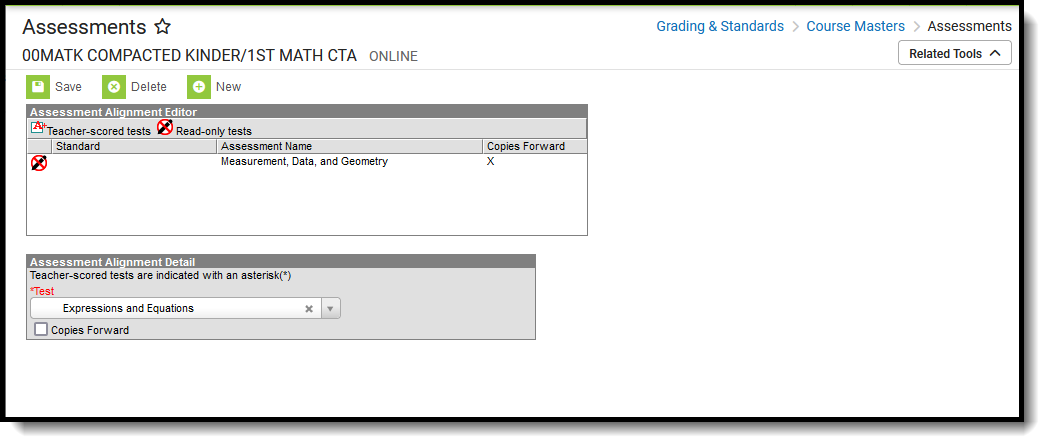 Course Master Assessments
There may be several assessments from which to choose. The Test dropdown list is searchable; enter a start of a test name or a part of a test name and matching results display.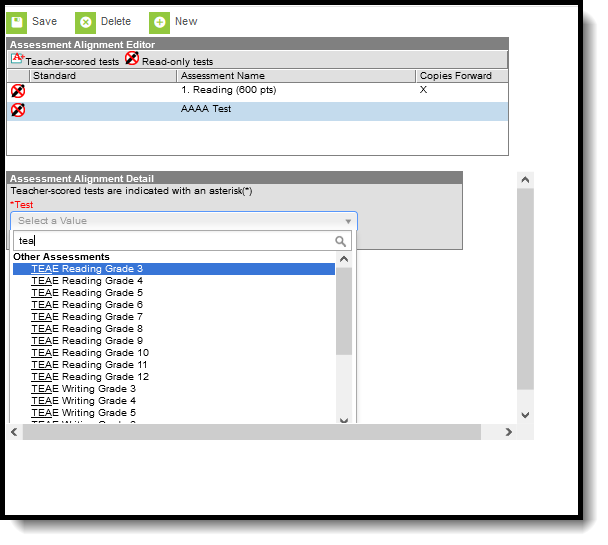 Searchable Field for locating test
Course Master Assessments Options
The following fields are populated when adding an assessment to a course.
| Field | Description |
|---|---|
| Standard | Displays the name of the standard aligned to the selected assessment. This column is populated only when the chosen assessment has a standard aligned to it (done in the Standards Bank). |
| Assessment Name | Displays the name of the assessment. |
| Copies Forward | Displays an X when the assessment is marked to copy forward into future calendars. |
Course Master Aligned Courses and Assessments
When the course is linked to a Course Master, and editing of Assessments is marked as Locked on the Course Catalog, a lock icon displays next to the test when viewing Assessment aligned to a Course. Any changes to these locked tests must be done on the Course Master.
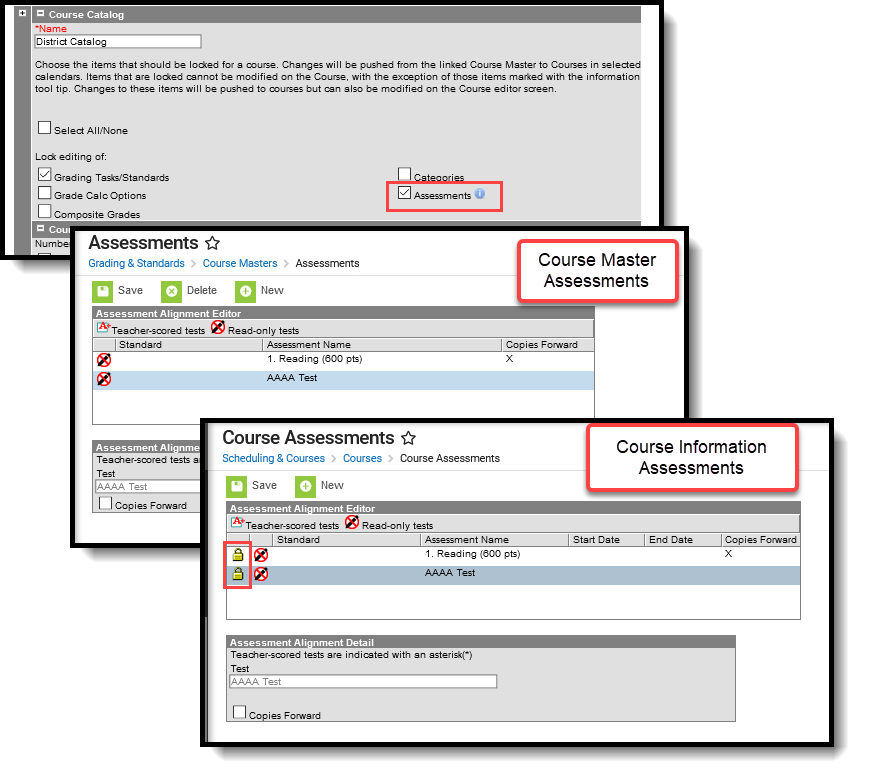 Locked Assessment on Course
Assign an Assessment to a Course Master
- Select the New icon. An Assessment Alignment Detail editor displays.
- Type in the Test dropdown field to find the test to assign to the course. Or, scroll through the list of tests available.
- Determine if the test should follow the course as it moves forward into future calendars. If yes, mark the Copies Forward checkbox.
- When finished, click the Save icon.
The test displays in the Assessment Alignment Editor.
Any changes made to Assessment or any other Course Master tab require a push process to the courses. This option is available on the Course Master Information tool.
Assessments cannot be added more than once, but multiple assessments may be added for any Course Master. For example, a teacher-scored test named Reading - Teacher Scored is selected and added. The user cannot add the Reading - Teacher Scored test again. But any other test that hasn't been added that needs to be added can be without error.
Assign a Teacher-Scored Assessment to a Course Master
Teacher-scored assessments are preceded with an asterisk.
- Click the New icon. An Assessment Alignment Detail editor displays.
- Type in the Test dropdown field to find the test to assign to the course. Or, scroll through the list of tests available.
- Click the Save icon.
Teacher-scored assessments cannot be copied forward, as they require a start and end date.
Assign a Standard to a Course Master
The Standard column in the Assessment Alignment editor will display a standard if the test has been aligned to a standard in the Standards Bank (as part of aligning assessments with assignments). Only one teacher-scored test is allowed per course. Teacher-scored assessments are preceded with an asterisk.
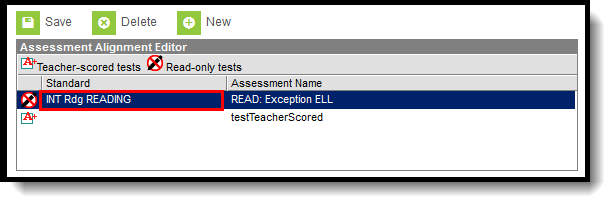 Standards Aligned to Assessments
Manage Changes To Course Masters
From time to time a district may wish to update course masters and push those changes to schools where those course masters are being used. The district may also wish to copy a course master to another catalog. Detailed information regarding setup of course masters and associated elements is located in the Course Master Creation section of this study guide.
Push Course Master Data to All Linked Courses in a Calendar
The Push All Course Masters tool is used to push locked grading setup and course master attributes from all course masters in a selected catalog to associated courses.
Tool Search: Push All Course Masters
The Push All Course Masters tool pushes grading setup and course master attributes to linked courses. This tool pushes data from all course masters in the selected Course Catalog. To push data for an individual course master, use the Push to Courses button on the Course Master Information tool. Districts who do not use Course Masters can use the Push All Courses tool to push setup from courses to sections.
When using this tool, users have the option of pushing data that is locked at the Course Catalog, or overwriting existing data at the course and section levels. When data at the section level already has assignments, grades, scores, or comments, that data is not overwritten. Use the Residual Data Report to evaluate what grading setup was not overwritten.
Review the Course Masters Overview article for information on Course Masters best practices and a Course Master Workflow.
Push attempts fail for courses that have become unsynced from their course master. The link may be broken as a result of changes made to the course while the catalog was unlocked, or by a district running its own scripts to make changes to the database.
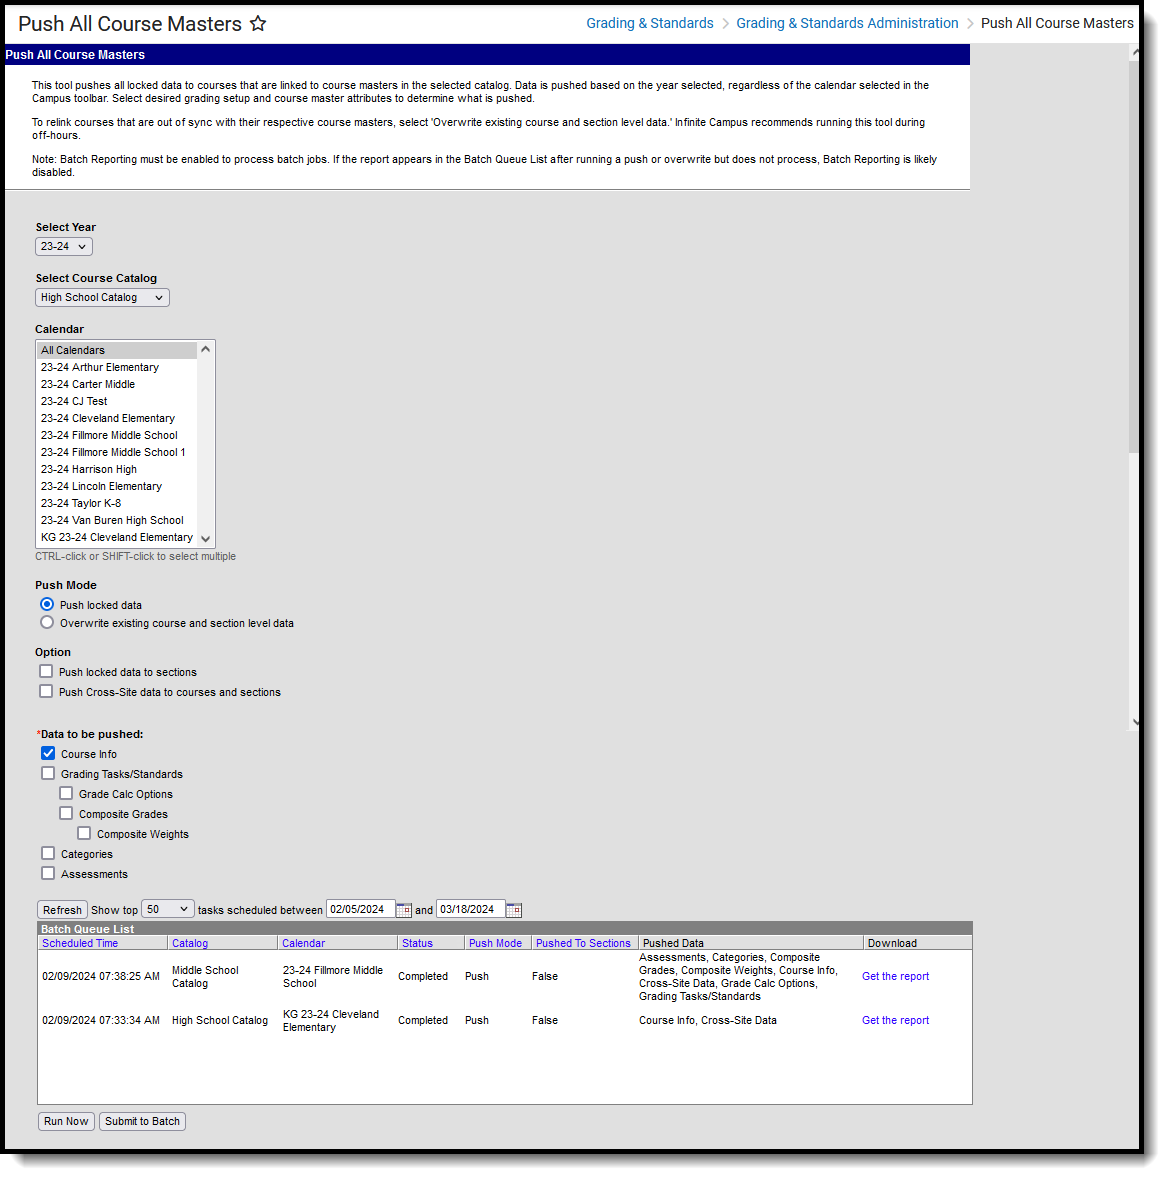 The Push All Course Masters tool pushes course master attributes and grading setup to linked courses.
 Use the Course Master Awaiting Push Report to review grading setup changes that have not been pushed to courses prior to using this tool. That report covers grading setup changes only; course master attribute changes also need to be pushed to courses.
See the Push All Course Masters Tool Rights article to learn about rights needed to use this tool.
Push All Course Masters
- Select a Year to filter the list of available catalogs.
- Select a Course Catalog. Data is pushed for all course masters in the selected catalog.
- Indicate which Calendars should have data pushed.
- Select a Push Mode:
- Push locked data: This option pushes data that is locked on the Course Master record to linked courses. Teacher-created grading setup is retained.
- Overwrite existing course and section level data: This option pushes data that is locked on the Course Master record to linked courses, and it overwrites most teacher-created grading setup. Teacher-created setup is NOT overwritten if it has associated posted grades or assignments. See the Considerations for Overwriting Data section following for more information.
- If desired, mark the Push locked data to sections checkbox to push data from courses to sections as well. Alternately, data can be pushed from courses to sections using the Push All Courses tool or individually on the Courses tool.
- If desired, mark the Push Cross-Site data to courses and sections checkbox to push data from Cross-Site courses to the related Cross-Site sections as well. Alternately, data can be pushed from Cross-Site courses to related Cross-Site sections using the Push All Courses tool or individually on the Courses tool.
- Indicate which types of Data to be pushed. Users can leave all options selected or unmark checkboxes to exclude those types of data from being pushed.
- Click Submit to Batch to schedule when the push runs. Because these push requests often involve a large amount of data and can be resource intensive, submitting requests to the batch queue allows the request to be processed in the background without interrupting system performance. When updating a small amount of data or when school is not in session, click Run Now. Records of completed requests are available in the Batch Queue List. A notification is sent when the request is completed.
- Click Get the report in the Batch Queue List to view a report of data that could not be pushed.
After pushing data from course masters:
- Use the Residual Data Report to determine whether there is any residual grading setup left on courses or sections. Residual data results if grading setup at the course or section level has existing grades and/or assignments.
- Use the Course Master Awaiting Push Report to see which grading changes may not have been pushed and why.
Considerations for Overwriting Data
- Think of this option as starting over with a clean slate - any data set up at the course or section level is wiped out.
- Do not use the Overwrite mode when your school is currently maintaining grading and category setup at the course level - all course level data that does not yet have grades or scores is overwritten with course master-level data.
- Pushing data in overwrite mode DOES NOT delete any grades and/or scores that teachers have already entered. When grades or scores existing for records that are not present at the course master level, that grading setup remains after pushing the overwrite with a status of "course managed" in the Grade Calc Options.
- Campus recommends using Overwrite mode only for future years; overwriting data for the current school year may require manually moving grades and scores.
Scenarios
I updated the State Code on multiple course masters and want to update associated courses.
-
Select a mode of Push locked data and select only Course Info in the Data to be pushed section.
How do I push several changes made to a single course master?
How do I push several changes from a course master to all of its linked courses, except for one course that is managed by its school?
-
Mark Ignore Master Push on that specific Course to exclude that course from receiving data pushed from the course master. Then use this Push All Course Master tool push data to the remaining courses.
I want to start next year from scratch using existing course masters.
-
After rolling the calendar forward from the previous year, use the mode of Overwrite to push all course master data to the future calendar.
How do I let schools and teachers control their own grading setup and categories.
-
Don't use this tool in Overwrite mode - doing so would overwrite all course and section-level setup and replace it with the course master setup.
I'm attempting to push from a course master, but it's not working.
-
It is possible that the course master's courses have become desynced. Use the Course Audit Report to determine which courses have become desynced.
After pushing all course masters, there is still data that didn't get pushed.
After overwriting courses with course master data, there are still residual grading setup records on courses that didn't come from the course master.
-
Grading setup at the course level that already has grades or assignments is not overwritten. Use the Residual Data Report to locate these records. grades and assignments must be realigned or deleted for the residual grading setup to be removed.
How do I know if grading setup pushed properly?
-
After running the push all tool, a report generates automatically. Click Get the Report in the Batch Queue List to view results.
Grading setup for some courses are managed at the course level and some are managed at the course master level, but all courses are linked to course masters. How do I get all courses managed at the course master level again?
-
For a future year: Push data in Overwrite mode to resync all courses to their respective course masters.
For the current year: Data can be pushed using Overwrite mode, but be careful of grades and scores entered by teachers already. Any section-level grading setup with grades and/or scores is not overwritten.
I pushed grading setup in overwrite mode and removed a task/standard at the course master level that was being used by teachers and had assignments and grades already. How do I restore that task/standard at the course master level and relink it so that future changes to that task/standard are pushed properly?
I removed a task/standard from a course master and pushed data in Overwrite mode that resulted in residual data at the course level. Now, section-level Grade Calc Options are set to 'No Calculation' and are grayed out. What should teachers do?
-
There are two ways to solve this problem:Set up Grade Calc Options at the course level and push that setup to sections using the Push locked data to sections option in this tool.
Instruct teachers to realign assignments and grades to a different task/standard by updating the Task/Standard selected in the Grading section of the assignment
I need to relink all grading setup for a catalog, but teachers manage their own Categories and have already created them. How do I relink all grading setup except Categories?
-
Push data in Overwrite mode but unmark the Categories checkbox in the Data to be pushed section of the tool.
Using the Push All Course Masters tool, administrators can push locked data to courses that are linked to course masters in a selected catalog. In this video, you will learn how to push grading setup and course master attributes to linked courses.
The Push All Course Masters tool pushes grading setup and course master attributes to associated courses. In this lesson, an administrator would like to push updated grading setup data on all course masters down to their linked courses.
Push Course Grading Setup To Sections
Push To Sections is used to push selected grading setups from a course to its associated sections.
The Push to Sections option pushes grading setup from a course to its sections.
Districts should use caution pushing changes to sections once classes are in session as changes may affect grade calculations.
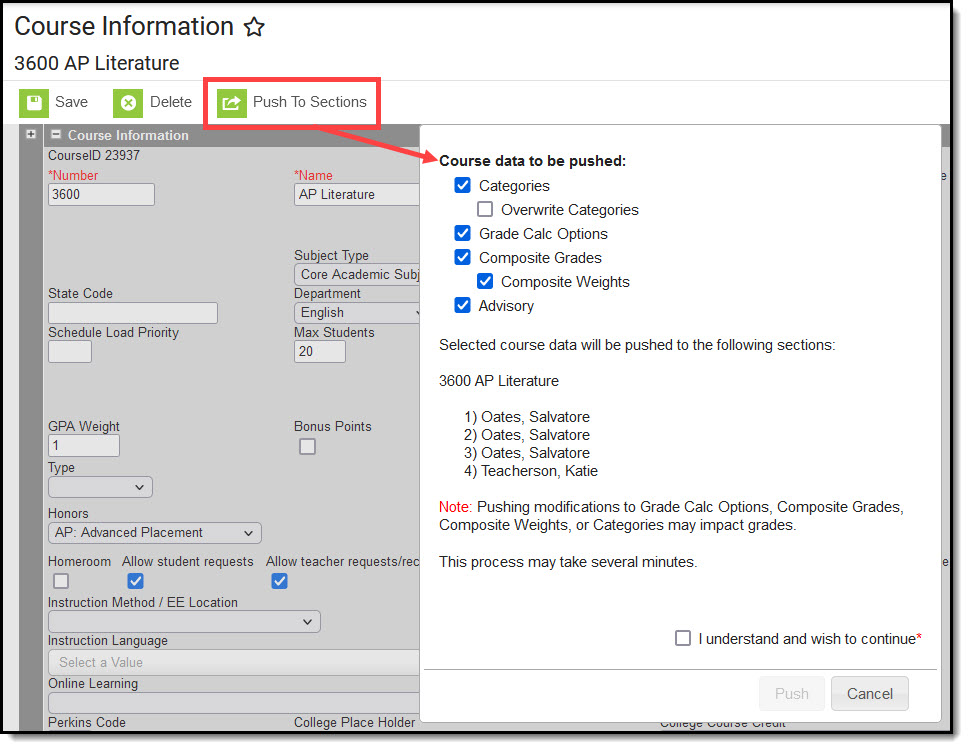 Use the Push to Section option to push grading setup data to a course's sections.
Access to this option is governed by a specific Push to Section tool right. Rights are granted by user or user groups and are found in Scheduling > Courses > Course > Push to Section.
Pushing Grading Setup Data
- Click Push to Sections.
- In the pop-up that opens, Categories, Grade Calc Options, Composite Grades and Weights, and Advisory are selected by default. Unselect any course data you don't want to push. Also, mark Overwrite Categories if any categories at the section level should be overwritten with course-level data.
- Sections to be updated are listed in the pop-up with their teachers.
- Mark the I understand and wish to continue. checkbox to indicate that the changes have been reviewed.
- Click Push to update sections with grading data from the course.
Additional Information
- If a category pushed from a course and a category created by the teacher in the section have the same name, the teacher's category is appended with (1) to distinguish it from the category from the course.
- Categories pushed to sections are locked from editing by teachers.
- Be aware that changes to calculations in Grade Calc Options and Composite grading may result in changes to students' grades once classes are in session.
Previous Version
Push Course Grading Setup Data to All Sections in a Calendar
The Push All Courses tool pushes grading setup from all courses in the selected calendar to their associated sections.
Tool Search: Push All Courses
The Push All Courses tool pushes grading setup to all course sections in the calendar selected in the Campus toolbar. To push data for an individual course, use the Push to Sections option on the Course Information tool.
Districts should use caution pushing changes to sections once classes are in session as changes may affect grade calculations.
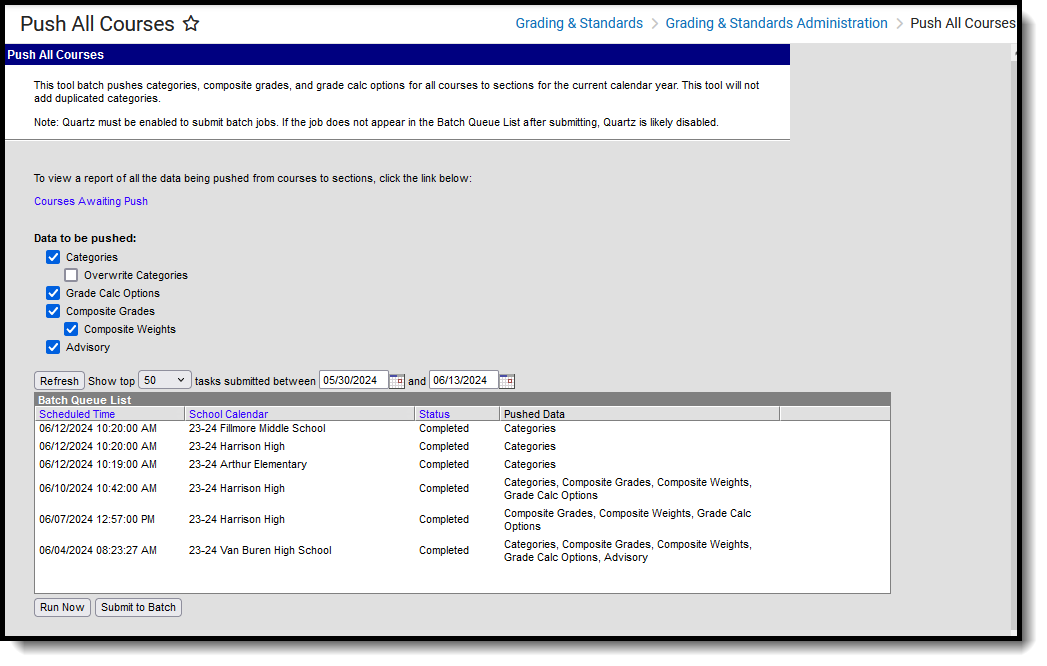
Use the Course Awaiting Push Report, linked in the push tool, to review grading setup changes that have not been pushed to sections prior to using this tool.
See the Push All Courses Tool Rights article to learn about rights needed to use this tool.
Course Master Workflow
Expand to view how this tool fits into the workflow for managing Course Masters (step 12):
| Step | Campus Location | |
|---|---|---|
| 1. | Create Course Catalogs for the district. | Grading & Standards > Grading and Standards Administration > Course Catalogs |
| 2. | Assign the Course Catalog to the school. | School & District Settings > Schools > School Information |
| 3. | Create Course Masters for the district. | Grading & Standards > Course Masters > Add Course Master |
| 4. | Add Grading Tasks to the Course Master. | Grading & Standards > Course Masters > Grading Tasks |
| 5. | Add Standards to the Course Master. | Grading & Standards > Course Masters > Standards |
| 6. | Add Categories to the Course Master. | Grading & Standards > Course Masters > Categories |
| 7. | Add Assessments to the Course Master. | Grading & Standards > Course Masters > Assessments |
| 8. | Establish Grade Calc Options for the Course Master. | Grading & Standards > Course Masters > Grade Calc Options |
| 9. | Push the Course Master to the Courses. | Grading & Standards > Grading & Standards Administration > Push All Courses |
| 10. | Copy Course Master information to other Course Masters. | Grading and Standards > Course Masters > Copy Course Master |
| 11. | Use the Push All Course Masters tool to update all Courses aligned to Course Masters in the Catalog with the current Course Master grading setup. If desired, mark the option to Push locked data to Sections to push data all the way from the Course Master to the Section-level. Or use the Push All Courses tool to push data from Courses to Sections. | Grading & Standards > Grading & Standards Administration > Push All Course Masters |
Push All Courses
A calendar must be selected in the Campus toolbar prior to making a push request. Data is pushed for all courses in the selected. calendar.
- By default, Categories, Grade Calc Options, Composite Grades and Weights, and Advisory are selected to be pushed to sections. Unmark any items to remove them from the push request. Additionally, mark Overwrite Categories to replace section-level categories with course-level ones.
- Click Submit to Batch. Because these push requests often involve a large amount of data, submitting requests to the batch queue allows the request to be processed in the background without interrupting system performance. Records of completed requests are available in the Batch Queue List. A notification is sent when the request is completed.
Additional Information
- Be aware that changes to calculations in Grade Calc Options and Composite grading may result in changes to students' grades once classes are in session.
- If a category pushed from a course and a category created by the teacher in the section have the same name, the teacher's category is appended with (1) to distinguish it from the category from the course.
- Categories pushed to sections are locked from editing by teachers.
The Push All Courses tool can be used to batch push grading setup data for all courses in the selected calendar year to their respective sections. In this lesson, an administrator needs to push all grading setup data from courses to their sections.
Reports
Course Audit
The Course Audit report is used to identify any differences between Course Masters and their associated courses.
Tool Search: Course Audit
The Course Audit report compares the grading setup between course masters and their associated courses to identify differences. These differences could result from unpushed changes at the course master level or changes to unlocked elements of individual courses.
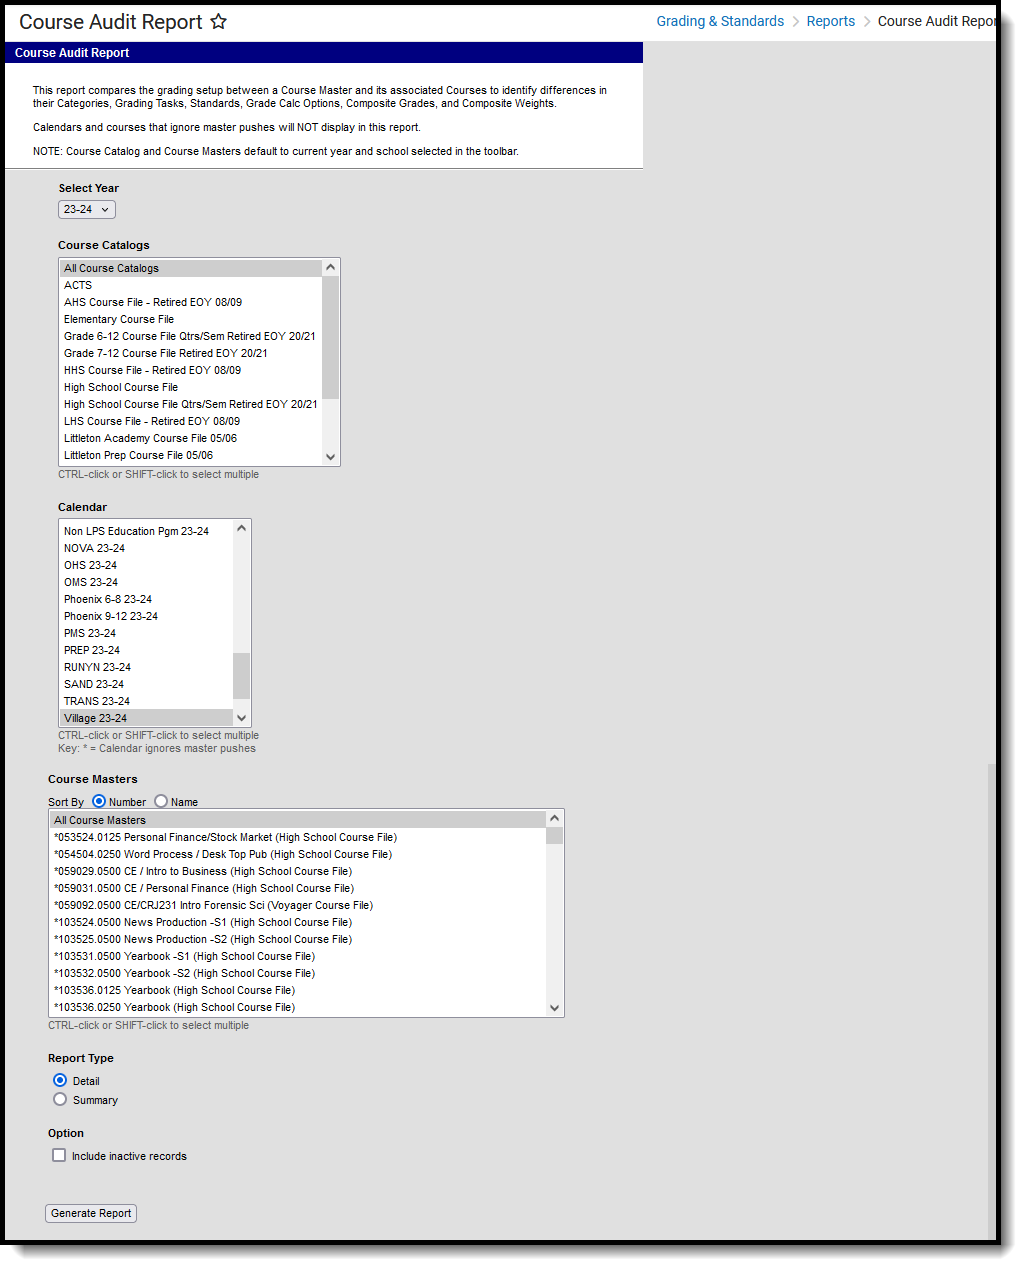 Course Audit Report
See the Grading & Standards Reports Tool Rights article for the tool right needed to generate this report.
Report Logic
This report looks at differences between the course master and associated courses in the following areas:
| Course Master | Course |
|---|---|
| Categories | Categories |
The report can be generated in Detail or Summary versions.
- The Detail report lists each difference between courses and course masters.
- The Summary report
Generate the Course Audit Report
- Select the Course Catalog to display a list of Course Masters. Options display based on the Calendar selected in the Campus toolbar.
- Select the Course Master(s) to include in the report. The list can be sorted by number or alphabetically by name.
- Indicate if the report should be the Detail version or the Summary.
- Leave the Exclude inactive courses checkbox marked to not report courses not flagged as Active.
- Click the Generate Report button. The report displays in CSV format.
 Detail Report Example
The Course Master Data and Course Data columns of the report indicate the details of the differences in grading setup.
Course Master Awaiting Push
The Course Master Awaiting Push report is used to identify grading setups that still need to be pushed from course masters down to the courses that use them.
Tool Search: Course Master Awaiting Push
The Course Course Master Awaiting Push Report collects all grading setup existing at the course master level that has not been pushed to the course level. Grading setup is displayed for Grading Tasks, Standards, Categories, and Grade Calc Options. The course catalog list is based on the options selected in the Campus toolbar.
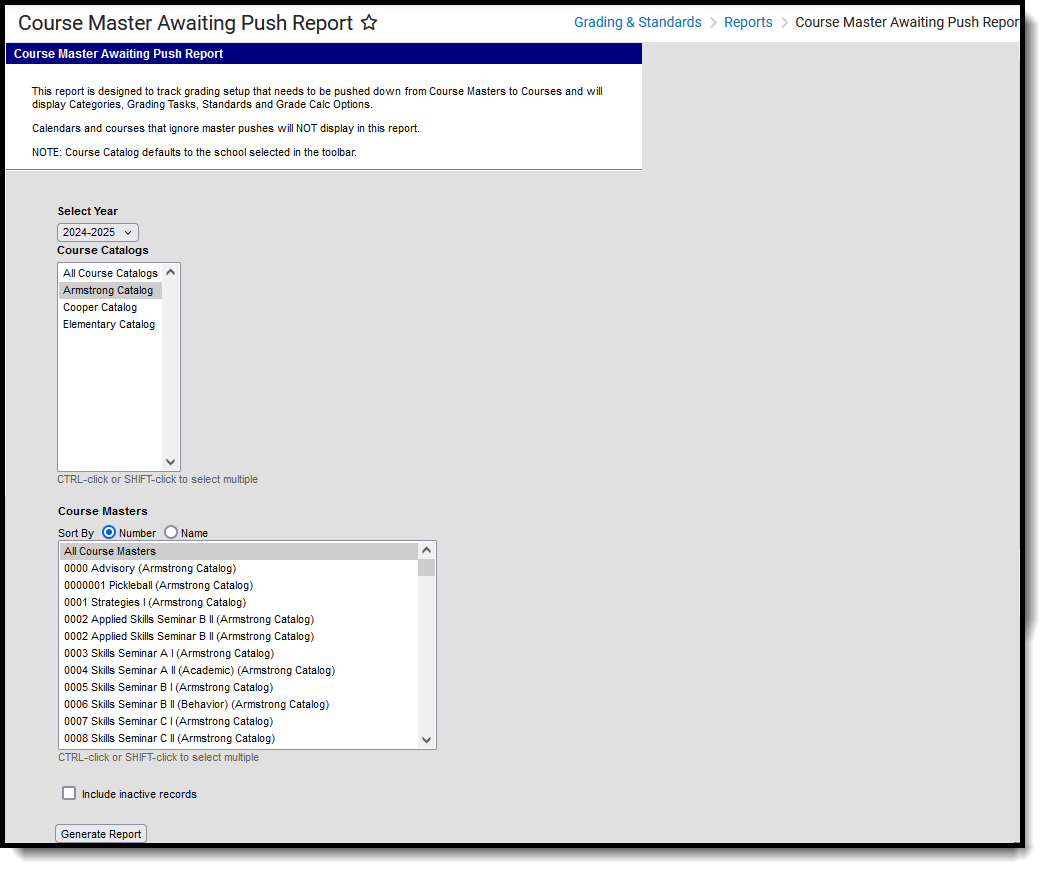 Course Master Awaiting Push Report
See the Grading & Standards Reports Tool Rights article for the tool right needed to generate this report.
Generate the Course Master Awaiting Push Report
- Select the Course Catalog to display a list of Course Masters. Options display based on the options selected in the Campus toolbar.
- Select the Course Master(s) to include in the report. The list can be sorted by number or alphabetically by name.
- Leave the Exclude inactive courses checkbox marked to not report courses not flagged as Active.
- Click the Generate Report button. The report displays in CSV format.
The Course Master Data column shows the grading setup that has not been pushed to courses.
 Course Master Awaiting Push Report - CSV Format
Grading Changes Not Pushed
The Grading Changes Not Pushed report identifies courses with grading setups that could not be pushed from course master to course. Reasons the setups could not be pushed are also identified on this report.
Tool Search: Grading Changes
The Grading Changes Not Pushed report lists changes to grading setup that could not be pushed from the course master to the course for various reasons. These reasons include:
- Assignments and scores aligned to tasks, standards, or grade calc options that were removed or marked as post-only at the course master level.
- Differences in composite grading setup that would affect scores.
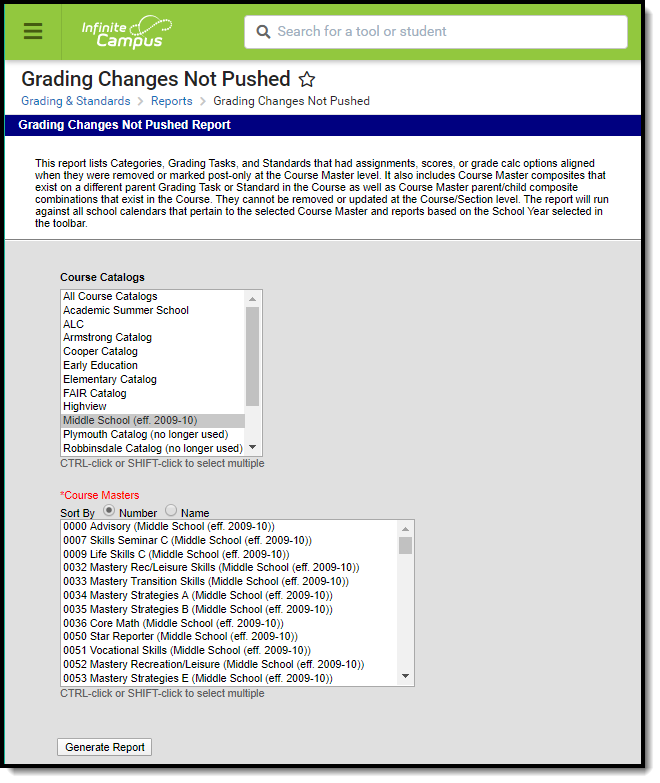 Image 1: Grading Changes Not Pushed Report
See the Grading & Standards Reports Tool Rights article for the tool right needed to generate this report.
Generate the Grading Changes Not Pushed Report
- Select the Course Catalog to display a list of Course Masters. Options display based on the options selected in the Campus toolbar.
- Select the Course Master(s) to include in the report. The list can be sorted by number or alphabetically by name.
- Click the Generate Report button. The report displays in CSV format.
 Image 2: CSV Example
The Reason column lists why the grading changes could not be pushed. Reasons include:
- Assignment - the modified item already has an assignment aligned at the section level.
- Scores - the modified item already has scores or grades aligned at the section level.
- Exists as a composite - the modified grading task has been selected as a child task in composite grading setup.

