Flags and Programs provide ways to add visual alerts to students. Flags appear in the header to the right of the student's name. Graduation Programs, which are part of academic planning and not covered in this lesson, can be flagged when they are assigned to students. Other types of Programs do not appear in the header and can have sessions attached to them indicating the date, time and location students assigned to the program will be participating in it.
Use this Study Guide to learn how to:
- Create and manage Flags and flag assignments for students
- Use Ad Hoc to extract Flag-related information
- Create and manage general Programs and Program Sessions
Flags
Create and Manage Flags
Schools can use the tools found at Program Admin > Flags to create any number of flags which can then be used to add labels to student headers. Some examples of flags include food allergies and contact restrictions.
Tool Search: Flags Setup
The Flags Setup tool allows schools and districts to assign indicators to a student for particular programs, alerts, or notices that may assist with the student's success in school. Any number of flags can be created for a school or district, and any number of flags can be assigned to a student.
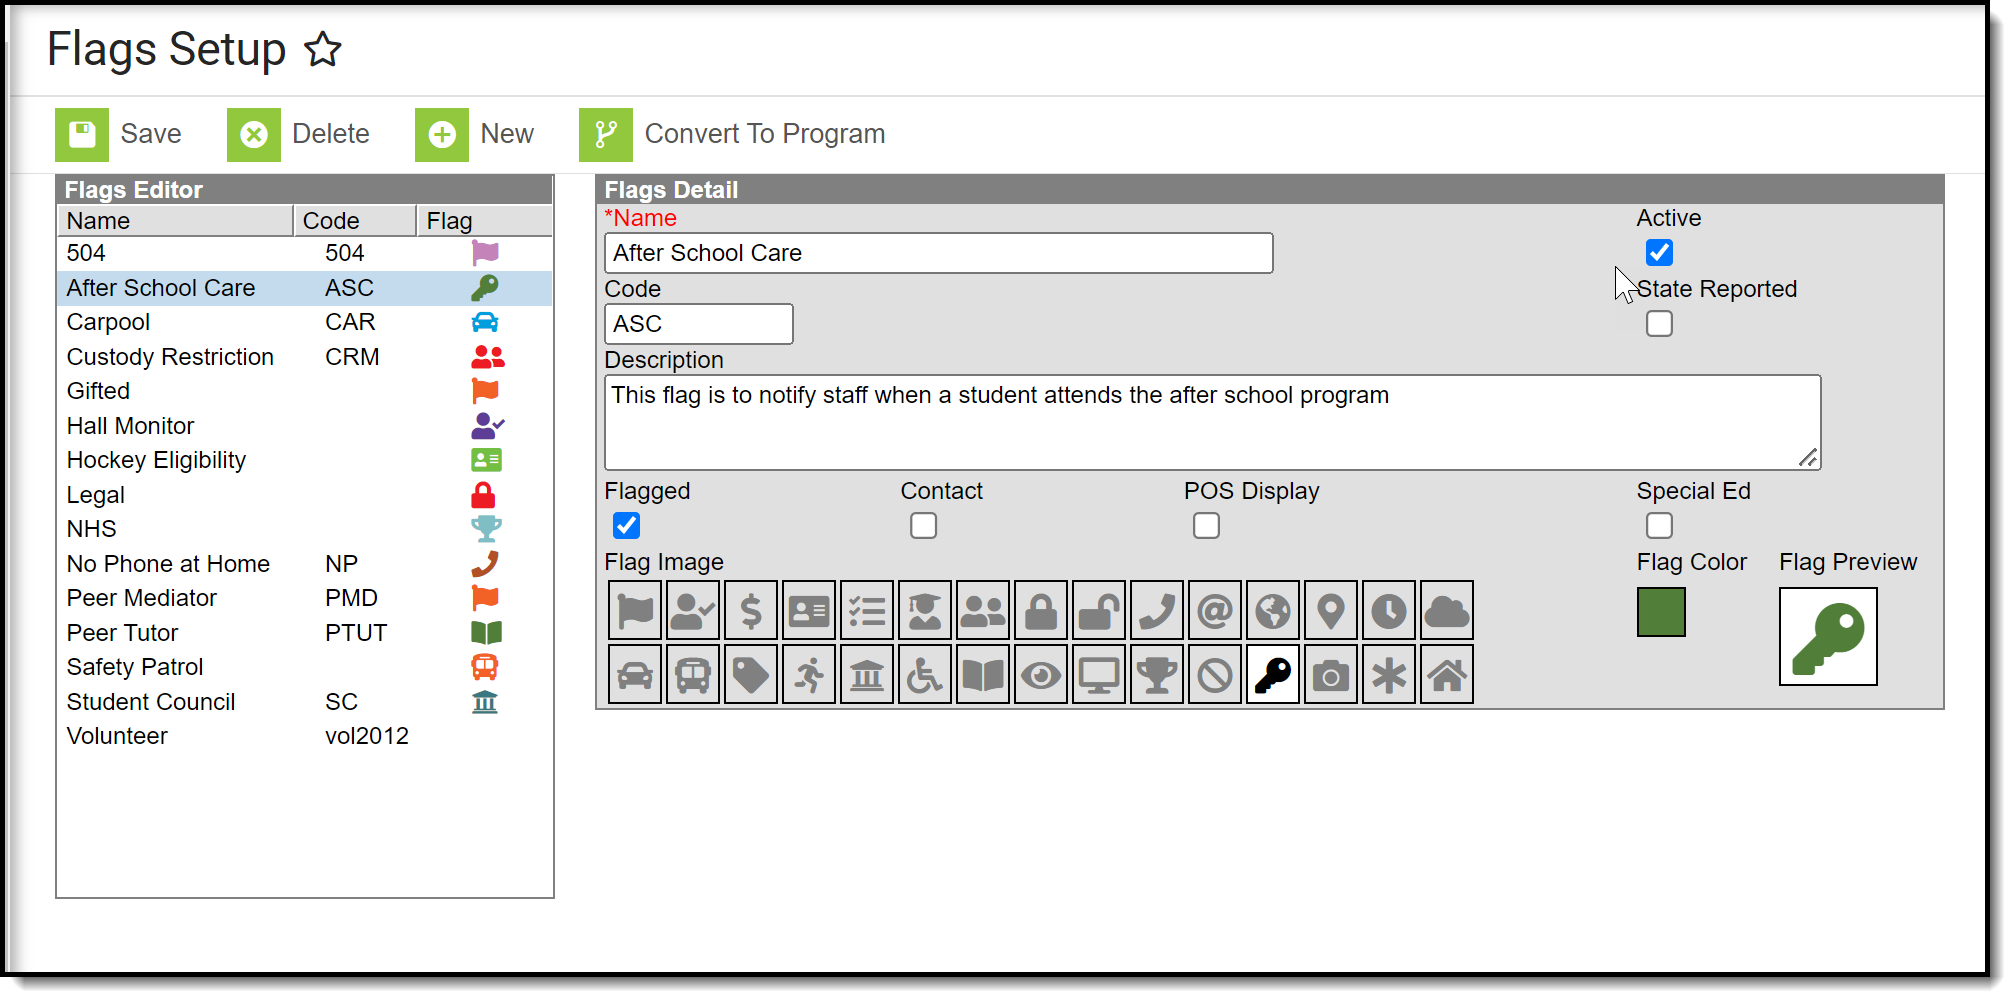 Flags Setup Tool
Create Flags
- Select the New icon. A Flag Detail editor will appear to the right.
- Enter the Name of the flag.
- Enter a Code for the flag. This code can be a district-defined code or a state-defined code.
- Enter a Description of the flag.
- Mark the Flagged checkbox if this flag should display next to the student's name. If yes, then select a Flag Image and a Flag Color. There are 30 images and 12 colors to choose from.
- Mark the other checkboxes (Contact, POS Display, Special Ed, State Reported) if applicable to this flag.
- Select a Flag Image to appear next to a student's name when this flag is assigned. This image will only display if flagged is selected.
- Click the Save button when finished. The new flag will appear in the Flags Editor tree.
Flags are assigned to students either manually on the Student Flags tool or using the Batch Assignment Tool.
Convert To Program
If there are flags that would be better suited to be programs, use Convert to Program. This option requires the user to have full tool rights to (RWAD) to Program Admin > Flags.
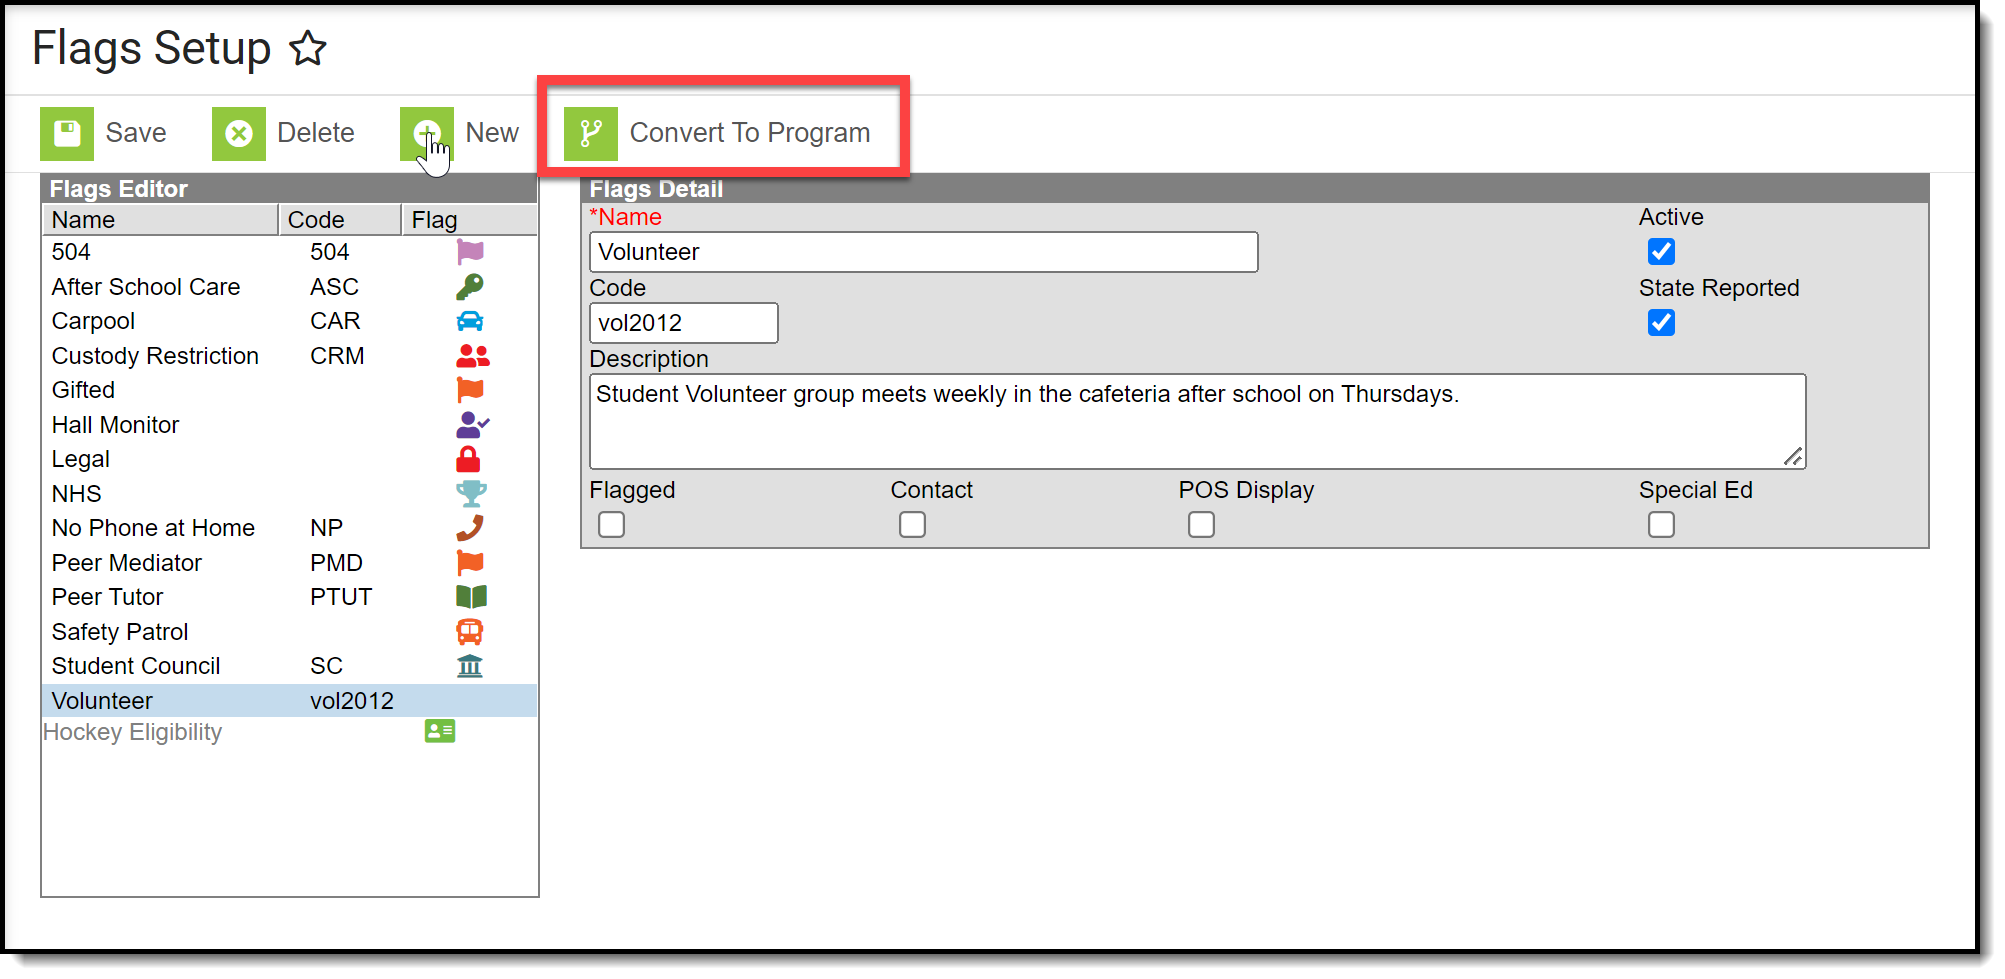 Convert to Program
NOTE: When a flag is converted to a program, the Sessions checkbox cannot be added.
- Click the Convert to Program button. A warning message displays explaining what happens, as follows:
- The image associated with the flag no longer displays next to the student's name.
- User warnings associated with the student are erased.
- Participation details move to the Program Participation > Programs tool.
- Click OK to continue the conversion process. A confirmation message displays. The flag that was converted no longer displays in the Flags Editor; it is visible in the Programs editor.
After the conversion, if there was a flag image associated with the flag that is now a program the image no longer displays next to the student's name. The program is listed in the Program Participation Programs editor. All other data entered as part of the flag converts to the equivalent program data fields.
Manage Flags for Individual Students
Flags are associated with images and are used to add alerts to specific students.
Tool Search: Flags
Flags can be used to display information alerts for a student. For example, flags may be created for special information on file in the office, student medical conditions, or that the student is participating in a school-related program or activity of some kind. There is no limit to the number of flags that can be assigned to a student.
General Information
Flags related to general information (demographics, contact, etc.) are created in the Flags tool in the Program Administration area and display in the student header. Flags can be set up to display for medical conditions assigned as Health Conditions, Graduation Programs that are assigned and managed in the Graduation Programs tool, and Blended Learning flags that display when a student is assigned to a Blended Learning Group.
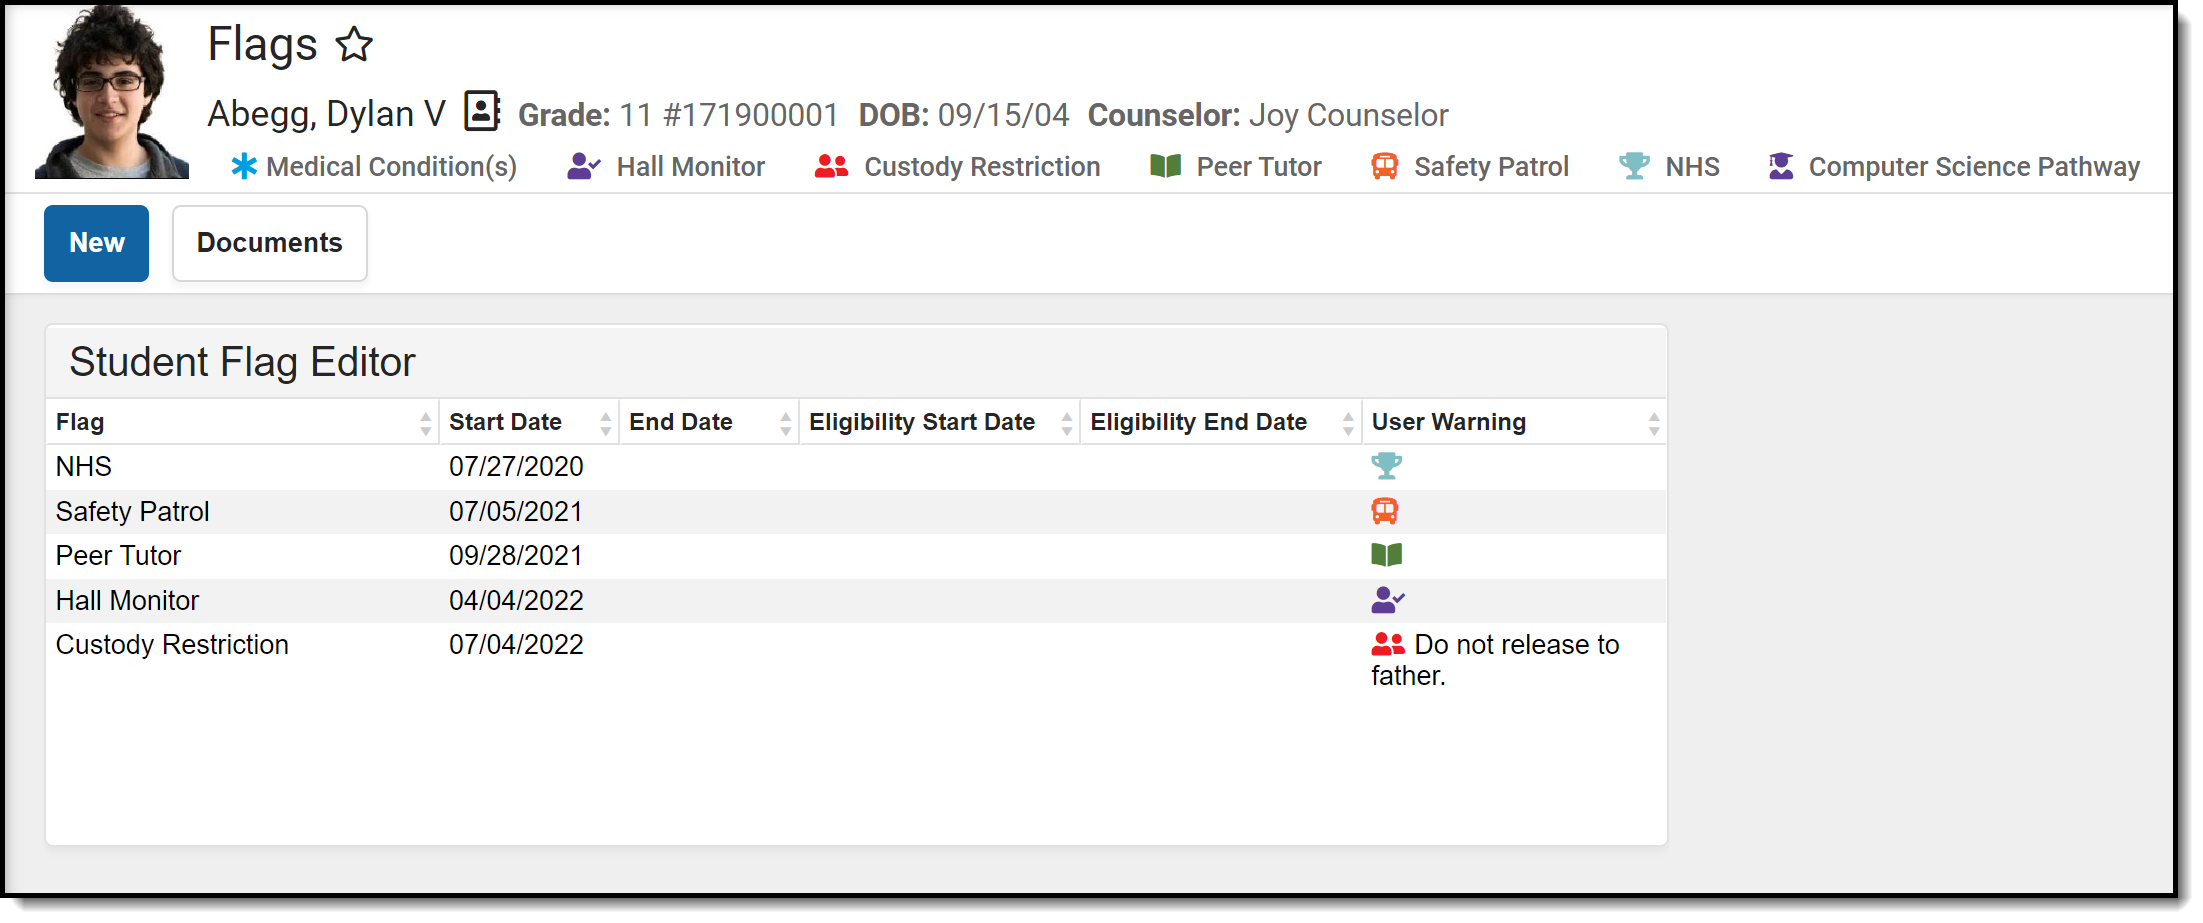 Student Flags
Not all flags display an image next to the student's name. The display is determined by the settings assigned to the flag when it is created in Program Admin. When an image is displayed, it appears below to the student's name.
 Student Flag Display
When a User Warning is entered for the flag, that text displays when hovering over the flag. The text that displays when hovering over a student flag is limited to 100 characters. The whole message of a User Warning can be viewed by clicking on the corresponding flag.
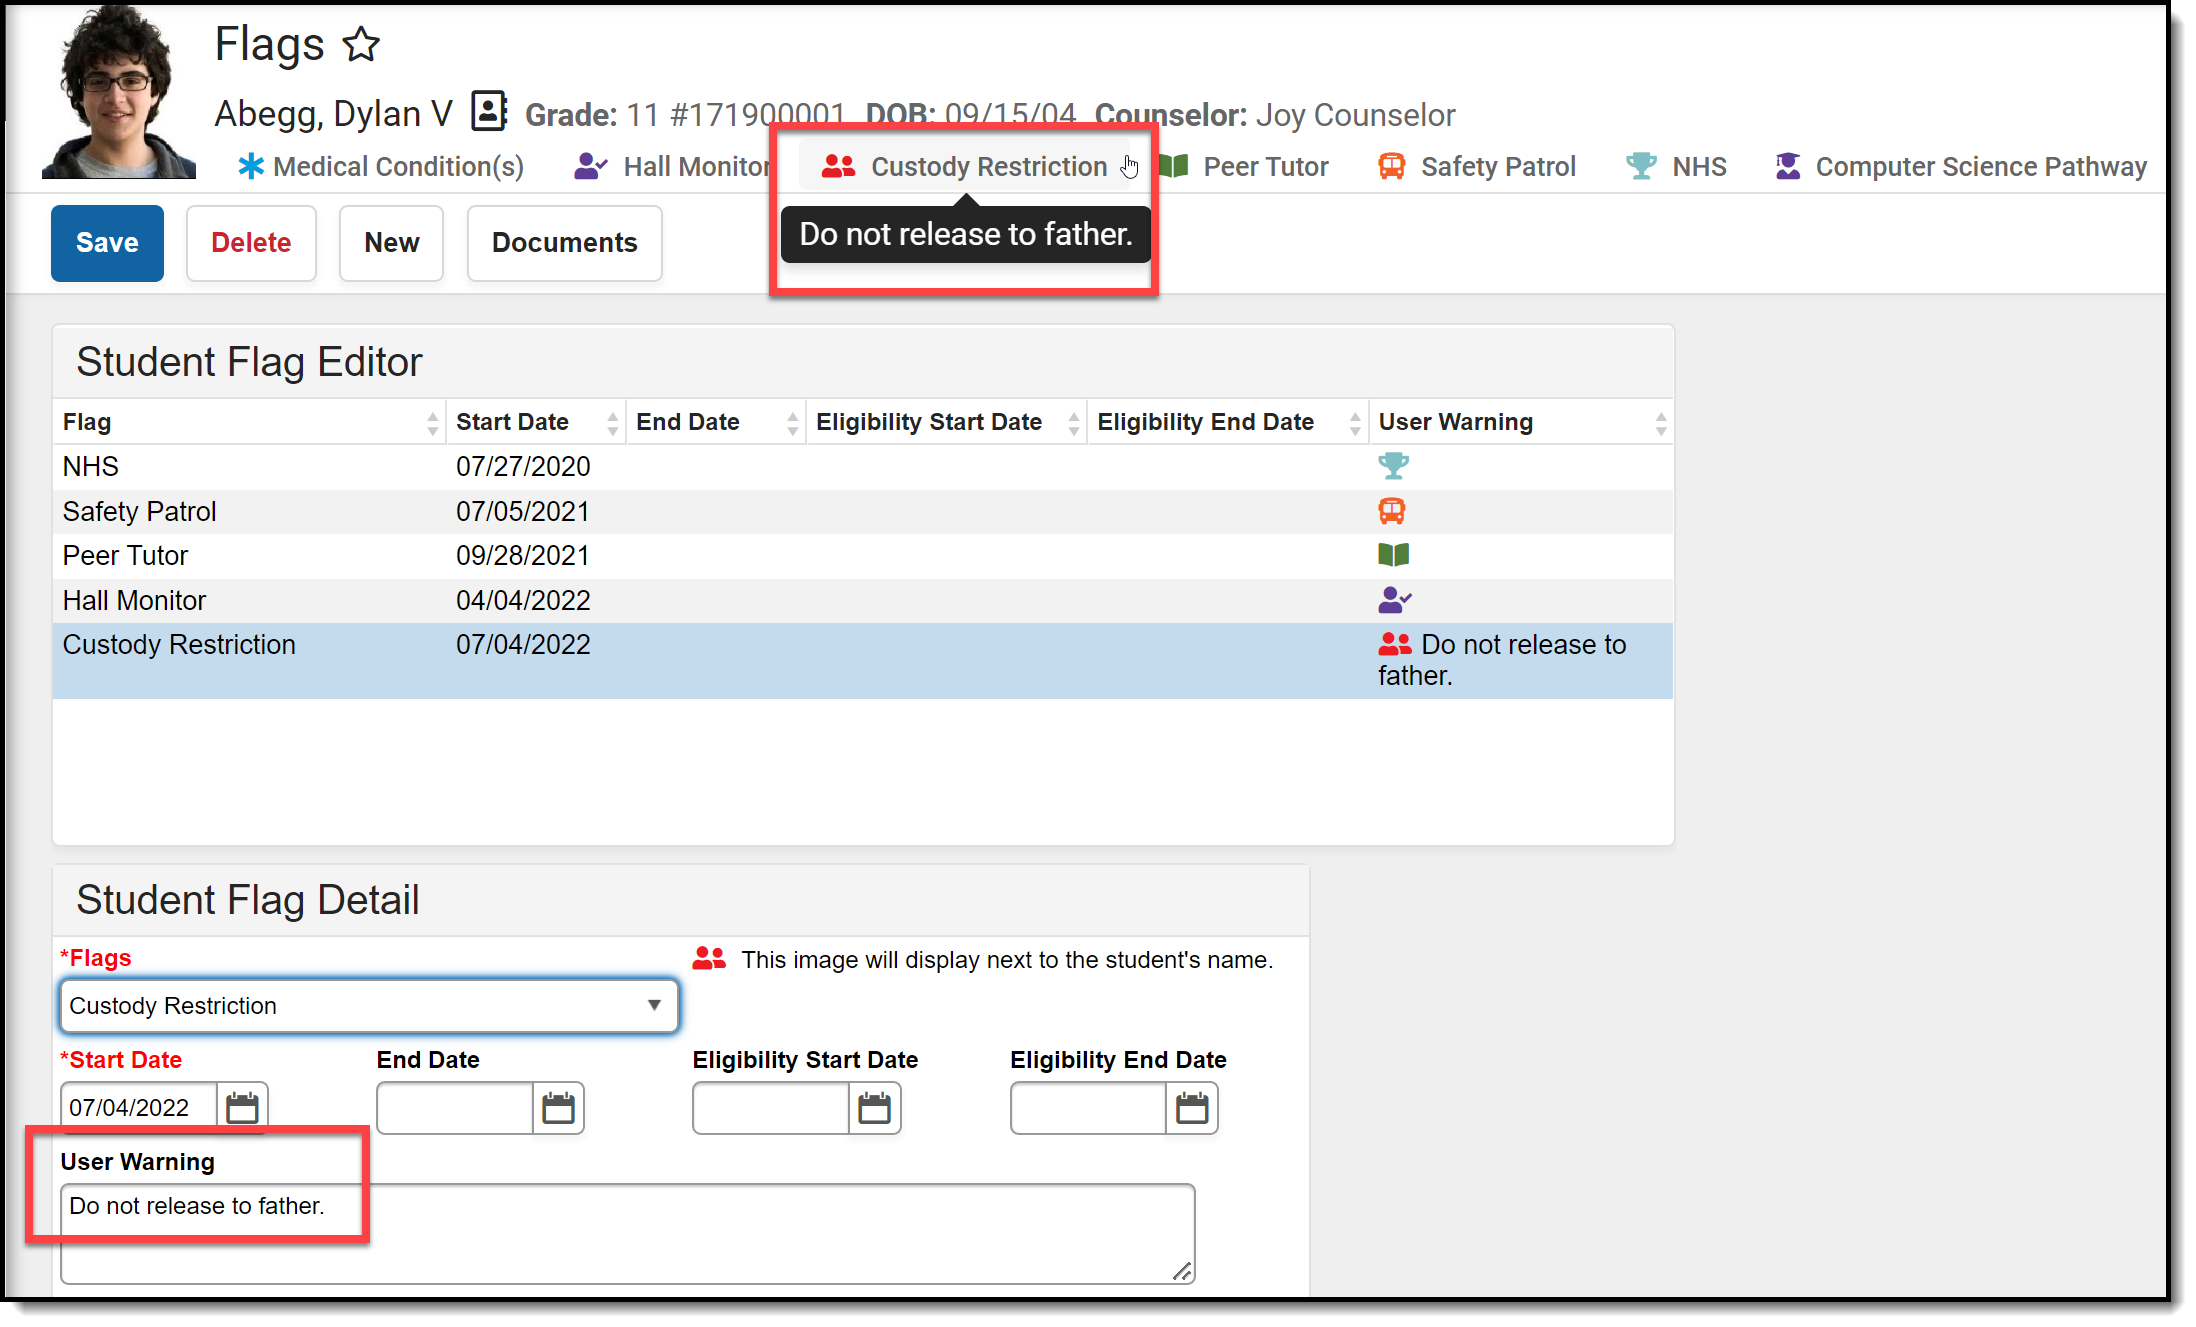 User Warning
See the Flags Tool Rights article for information about rights needed to use this tool.
Multiple Flag Assignment
A student may be assigned the same type of flag multiple times. These are entered as separate instances of the flag. Only one instance of a flag image displays next to the student's name. The User Warnings entered for the individual flags display in one hover text box separated by a semi-colon, as seen for the two active Hall Monitor flags in the screenshot below.
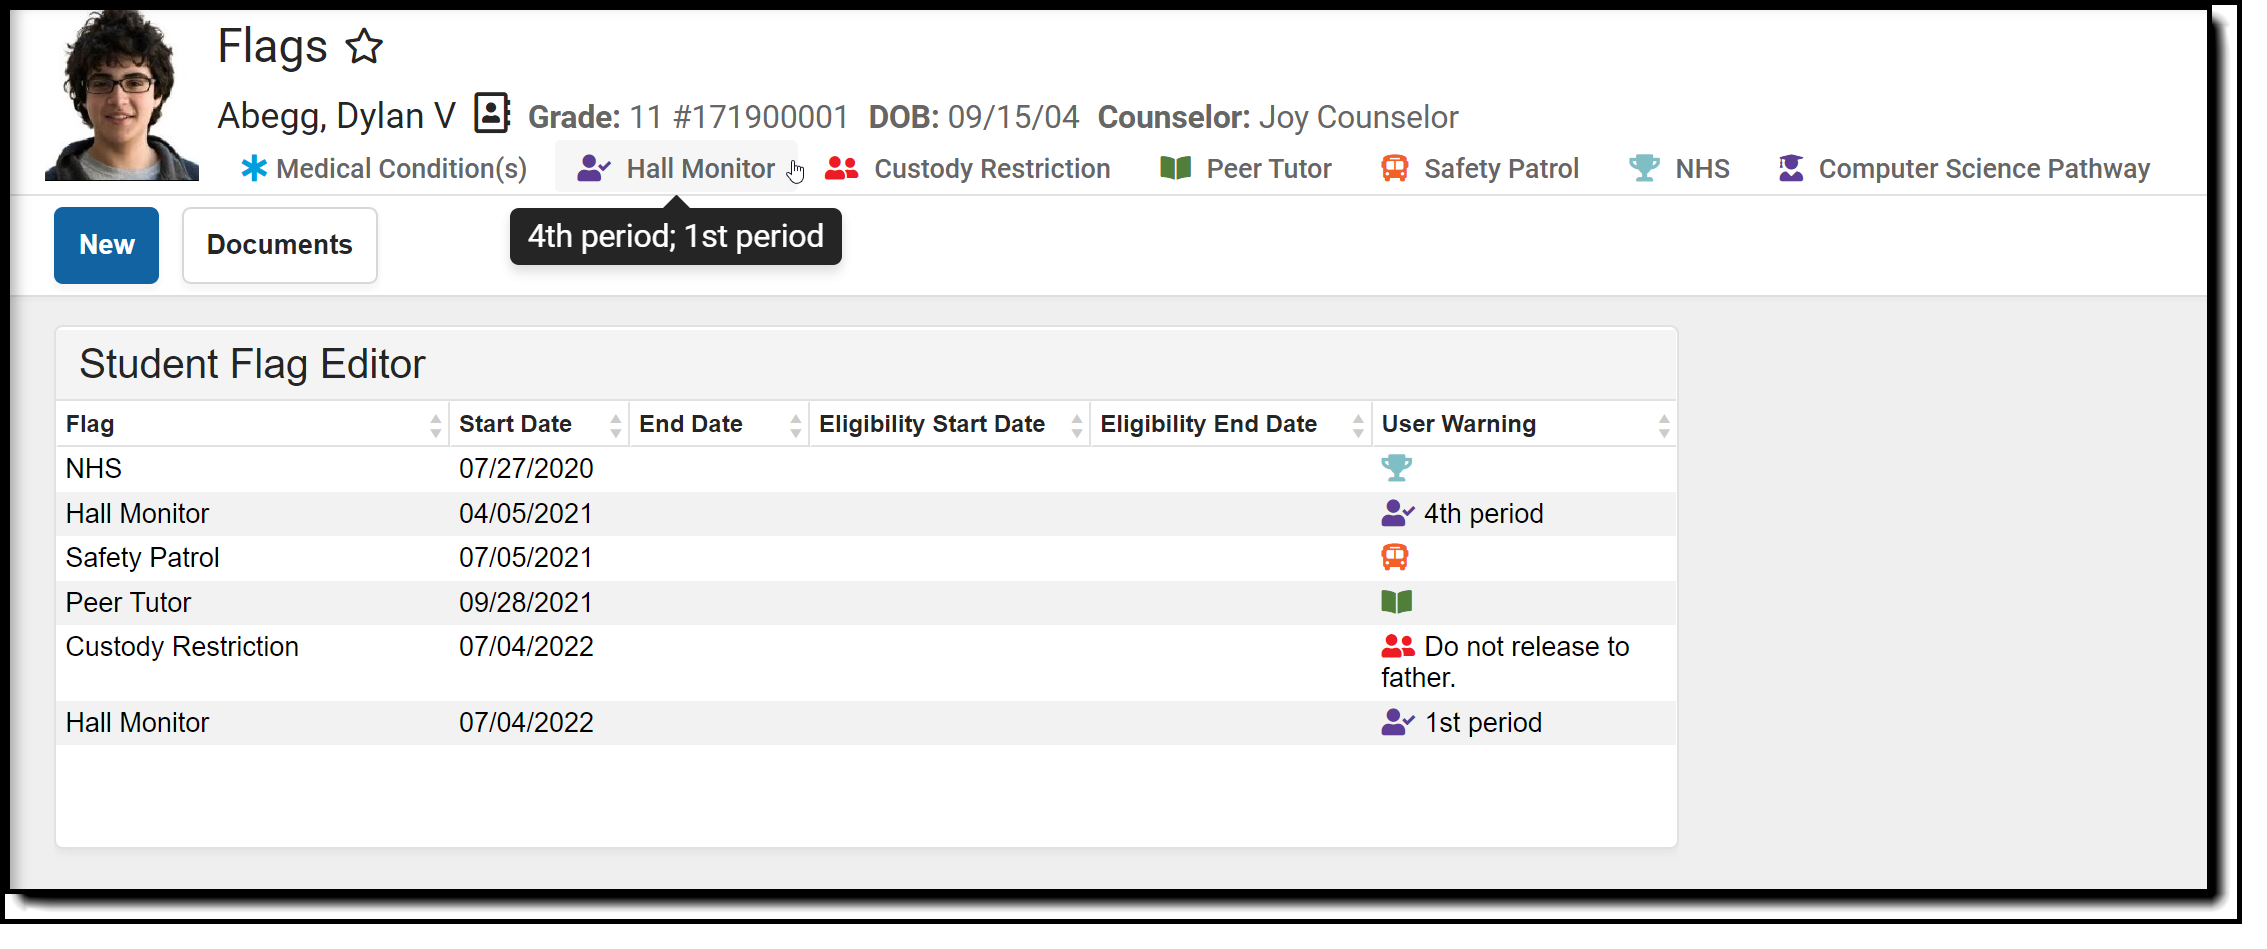 Multiple Flag Display
Assign Flag to Student
- Select the New icon. The Student Flag Detail editor displays below the Student Flag Editor.
- Select the Flag to assign to the student from the dropdown list. If the item chosen is designated to display an image, a note to the right of that dropdown list will appear, indicating the image will display next to the student's name.
- Enter the Start Date for the flag.
- Enter an Eligibility Start Date, if applicable.
- Enter a User Warning for the flag.
- Enter Participation Details for the flag.
- Enter a Description for the flag.
- Click the Save icon when finished. The new flag is listed in the Student Flag Detail table, and if indicated in Program Admin, an image displays next to the student's name.
It may be necessary to refresh the page to see the newly assigned flag and its accompanying image.
End Flag Assignment
- Select the Flag that needs to be ended from the Student Flag Editor.
- In the Student Flag Detail area, enter an End Date for the program.
- Click the Save icon when finished. The entered End Date displays in the Student Flag Editor.
Images display through the entered End Date. For example, if the flag is ended as of Sept. 30, the flag displays on Sept. 30 but is removed after midnight on Oct. 1.
Delete Flag Assignment and Inactive Flags
To delete a flag, select the entry to be deleted from the Student Flag Detail area and click the Delete icon. This permanently removes the flag from the student’s record. This should only be done if the flag was originally assigned in error.
Flags that have been deactivated in the Program Admin Flags editor but are still assigned to a student display in red.
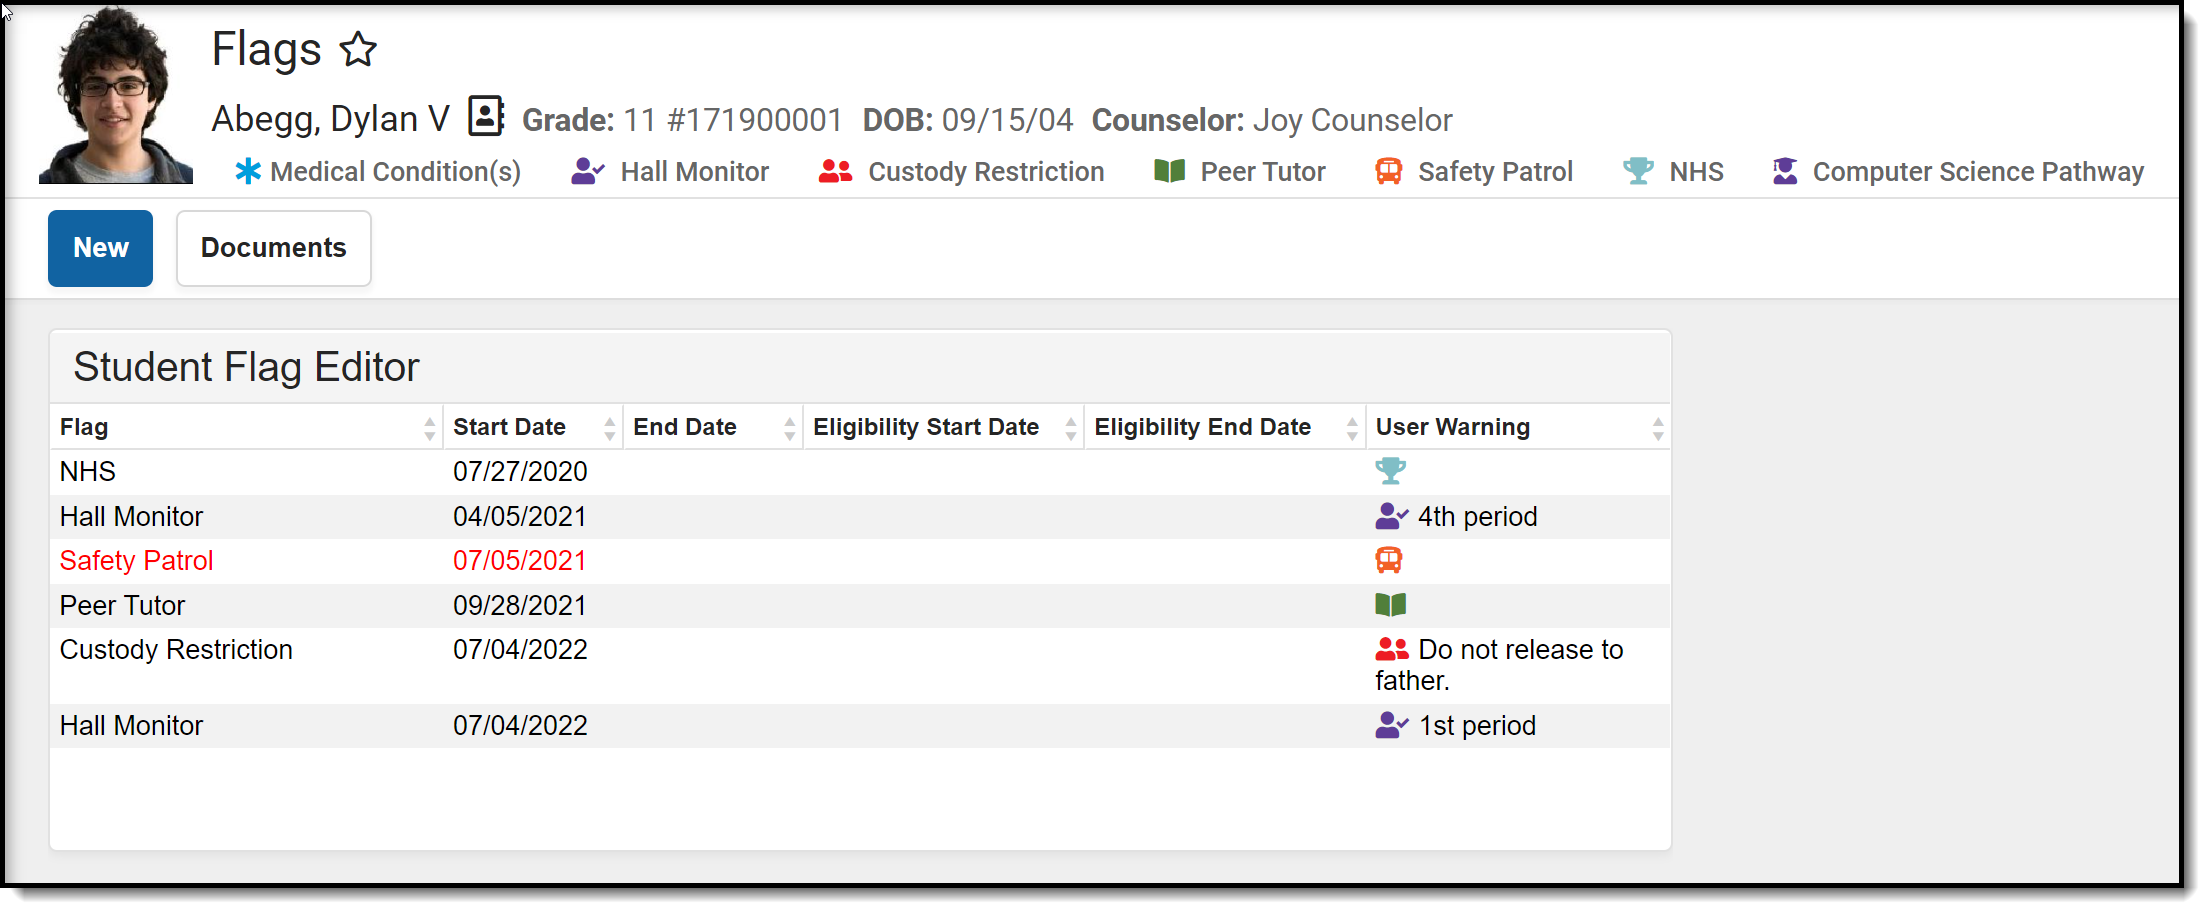 Inactive Flag
Blended Learning Group Flags
Blended Learning Groups allow districts to identify the attendance setting for students who are on-site in a building for learning, for students who are virtually attending classes or a combination of both.
When a student is assigned to a Learning Group, that flag displays in the header along with other assigned flags. This flag cannot be modified from the Student Flags tool.
See the Blended Learning Groups article for an overview of the entire Blended Learning Group process.
Documents
To view documents, click the Documents button on the action bar. See the Student Person Documents article for more information.
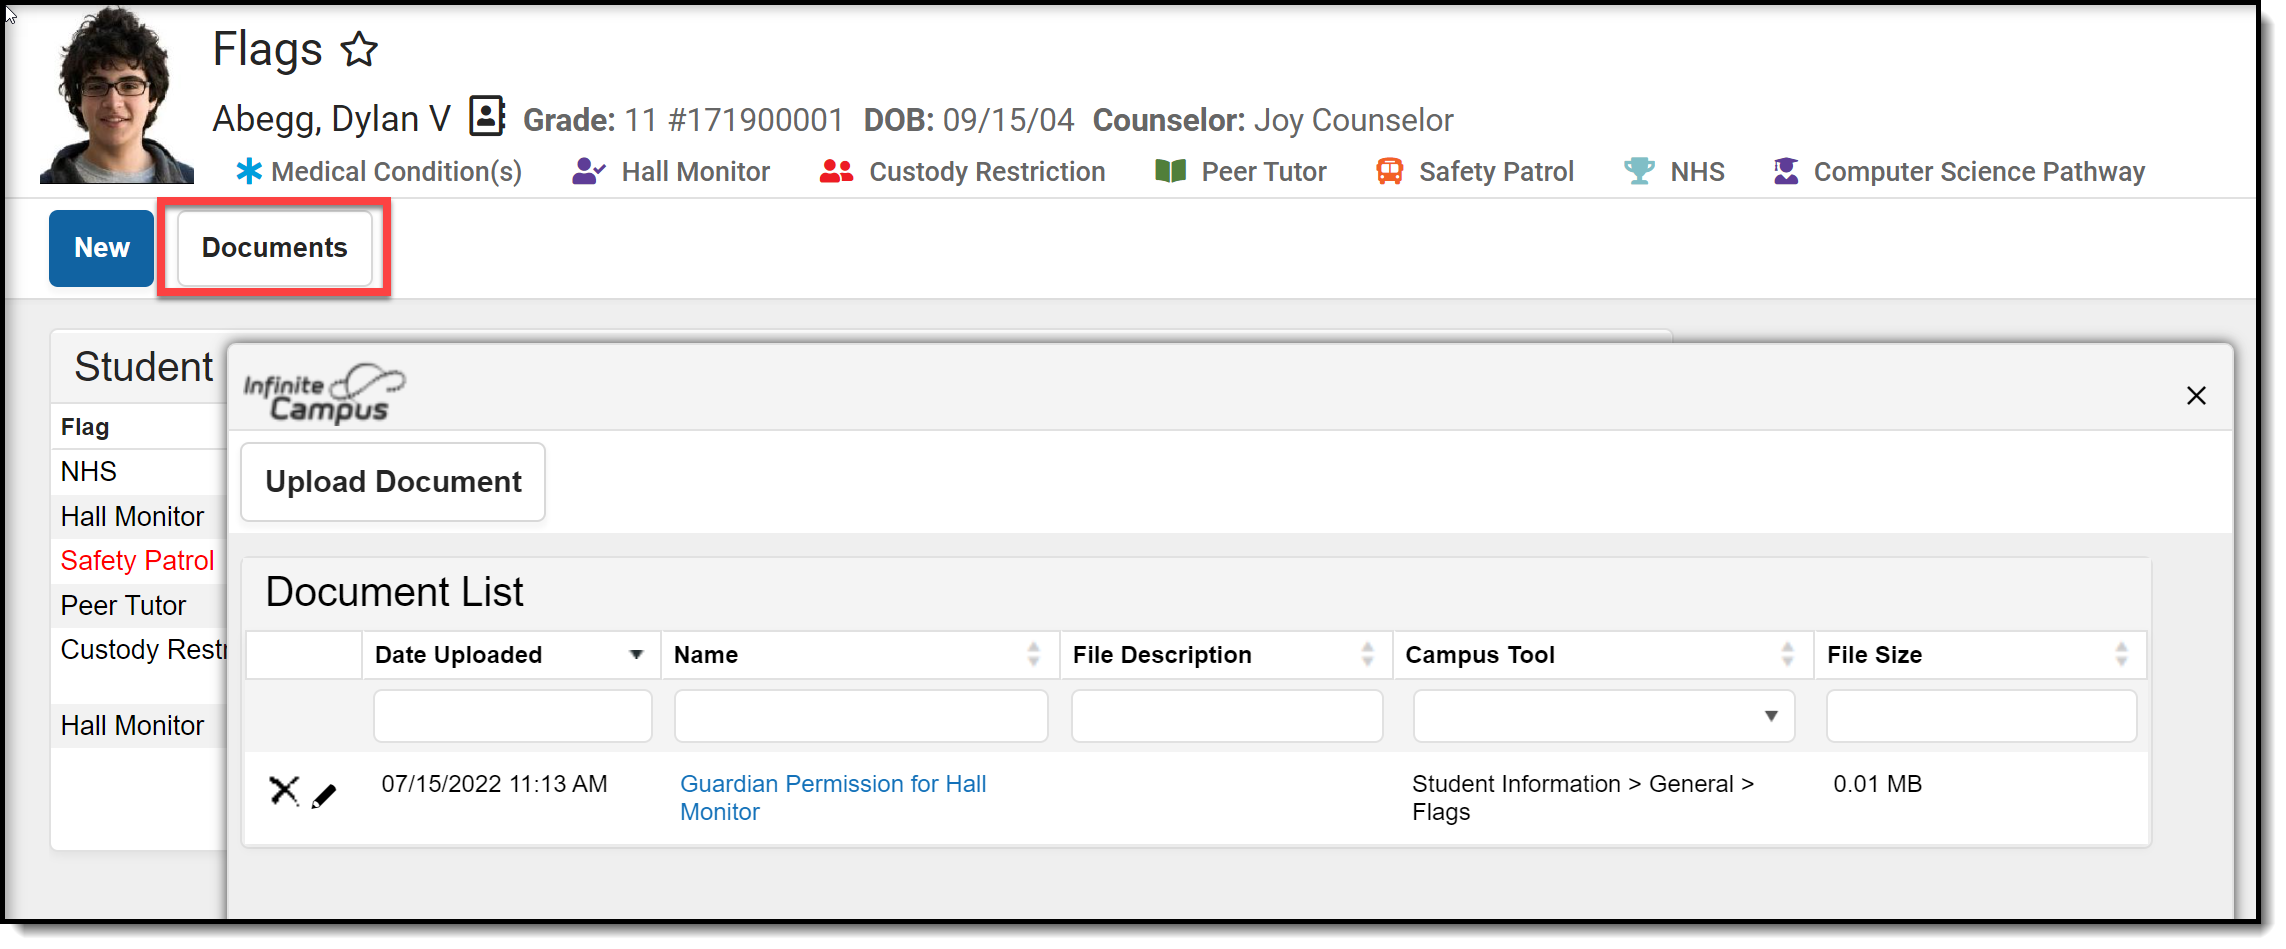 Flags Documents
State-Specific Information
Fields vary by state. Follow the link to view Flag information for your state.
Use Ad Hoc to Extract Flag Related Information
This lesson provides a general overview of how to use Ad Hoc.
Programs and Sessions
Create and Maintain Programs
Programs can have Sessions attached to them to indicate the date, place and time the program is taking place.
Tool Search: Program Setup
The Programs tool lists every program offered at the district or school. These programs may be after school clubs, intramural sports, community education, or anything else the district deems is a program.
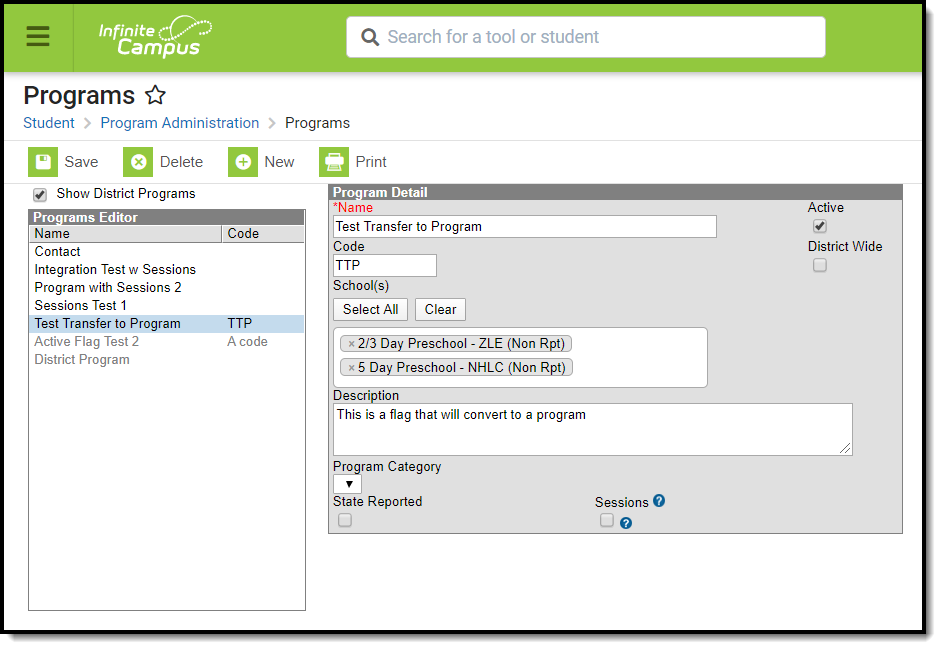 Programs Detail Editor
See the Program Setup Tool Rights article for information on necessary tool rights.
Programs vs. Flags
Programs and Flags Are Not the Same
Campus allows the tracking of Flags and Programs. There is little difference between these two. A district may have a flag called After School Club; a program could also be created with this name.
Flags are only flags because a flag image can be associated with them. For example, a non-contact indicator is a flag that appears next to the student's name.
Programs cannot have flag images associated with them. Like flags, programs can be state reported.
Program Detail Editor
| Field | Description |
|---|---|
Name Required | Indicates the name of the program. This displays in the Programs Editor, in program related reports, and when viewing Programs assigned to students and other people. It should be descriptive enough for the program to be easily recognized. |
| Active | When marked, indicates the Program can be assigned to students and other census people. When not marked, it is considered inactive and displays in a light gray color. Inactive programs can still be assigned to students or other census people using the Batch Assignment Tool or by manually assigning the program to a student. These inactive programs on the Program Participation Editor in gray text and on the Batch Assignment Tool in red text. |
| District Wide | When marked, indicates the Program is available at all schools in the district. Once marked, School(s) Select All and Clear buttons and the field to select schools are disabled, and the field to select schools displays the words This is a district-wide program. |
| Code | Lists an identifying abbreviation or school-designated identifier associated with the program. |
| School(s) | Lists the schools in which the program is available. Add schools by clicking in the field and selecting the appropriate schools from the drop-down or by typing the first few letters of the school name to display matching results. To add all schools from the list, press Select All. NOTE: If only a few schools in the district should be excluded from this program, it is often easier to click the Select All button and then remove the appropriate schools rather than scrolling through the list to exclude them one by one. NOTE: If ALL schools should have access to the program, mark it as District-wide instead. Press Clear to remove all schools from the field. |
| Description | This field provides detailed information on the program, where it meets, etc. |
| Program Category | Use this field to organize programs into the selected category (e.g., After School, Music, Community Ed, etc.). Categories must be added to the Attribute Dictionary before being assigned to a program (Programs > Program Category). |
| State Reported | When marked, this option indicates the program is reported in available state reports. |
| Sessions | When marked, a session can be created for the selected program on the Program Sessions tool. Sessions track a time and place for a specific set of students (helpful when the district manages community education programs or many after-school programs with rotating meeting times throughout the year). Once the Session checkbox is marked and the Program is saved, the Session checkbox CANNOT be removed. |
| Program Session List | When at least one session has been assigned to a program, a list of associated sessions displays that can be sorted. If a program is marked for sessions but no sessions exist, the Program Session List does not display. When it does display, the Session Name, Max Participants, Total Participants, Start Date, and End Date are listed (see the image at the beginning of this article). Only active students are counted in the Total Participants count. |
Before a program can be saved, the District Wide check box must be marked, or at least one school must be selected. If the District Wide check box is not marked and no school has been selected, an alert message displays when trying to save.
Create New Programs
- Click the New icon. A Program Detail editor displays.
- Enter the Name of the Program.
- Mark (or remove) the Active checkbox as needed.
- Enter a Code for the Program, if desired.
- Select the Schools in which the Program is available.
- Enter a Description for the Program.
- Select a Program Category, if desired.
- Mark the State Reported checkbox, if applicable.
- Mark the Sessions checkbox, if applicable.
- Click the Save icon when finished. The new Program is listed in the Programs Editor Programs are listed in alphabetical order by name.
Print Program Information
Click the Print icon to generate a Program Detail Report (PDF Format). This lists the Program Name, location, and the students assigned to the program (includes Student Name, Student Number, Grade Level, Start Date and Eligibility Start Date). A total program participation count (total count of students who have an active program participation record) and overall total participation (total count of students per school who have an active program participation record per program) prints on the last page of the report.
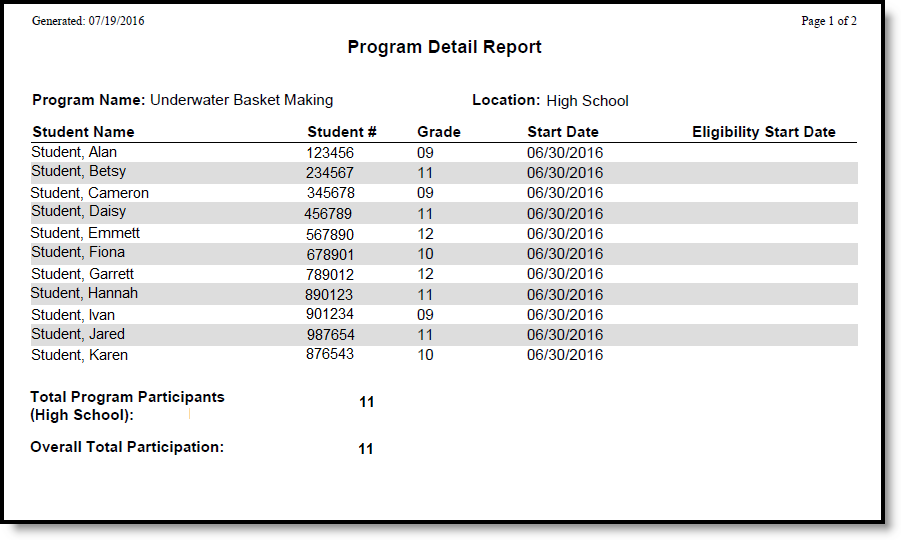 Print Program Information
For programs that have sessions, the program name and location print, as well as the session name, the session dates and the session instructor. There is also a total participation count that prints at the end of each session section (total count of students who have an active program participation record per program session). An overall total prints at the end of the report (last page) that lists the total program participants (total count of students who have an active program participation record per school) and the overall total participation (total count of students per school who have an active program participation record per program and per program session).
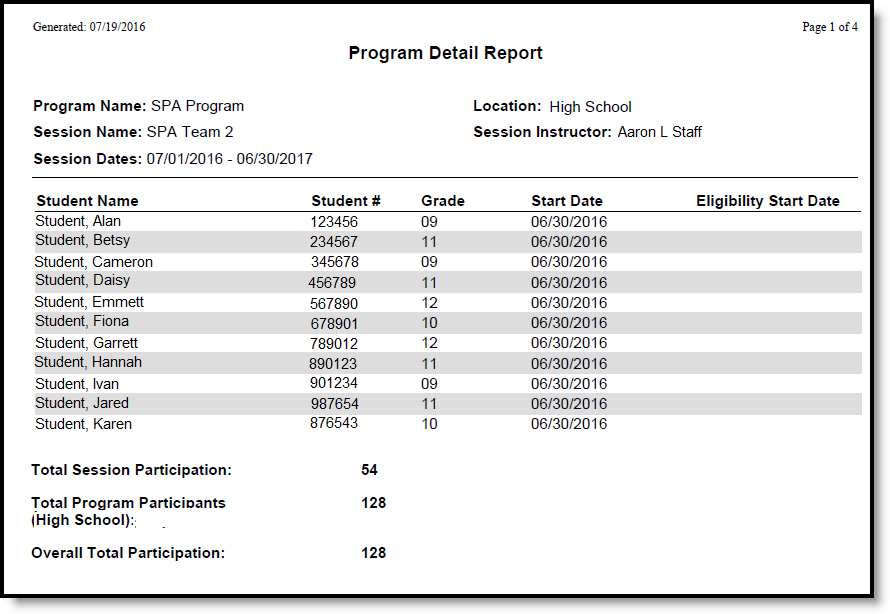 Print Program with Session Information
Next Steps
- If the Program has Sessions, create Program Sessions associated with the Program.
- Assign the Program to Students.
- Use the Batch Assignment Tool to add the Program to a list of students.
The Programs tool is used to create a record for all programs a district or the schools within it offer. These can be school clubs, intramural sports, community education or anything else the district deems is a program.
Create and Maintain Program Sessions
Program Sessions can be created and assigned to a Program when there is a need to track a specific date, time and location of a program.
Tool Search: Program Sessions
Program Sessions track a specific date, time and location of a Program. Program Sessions are only assigned to a Program when needed.
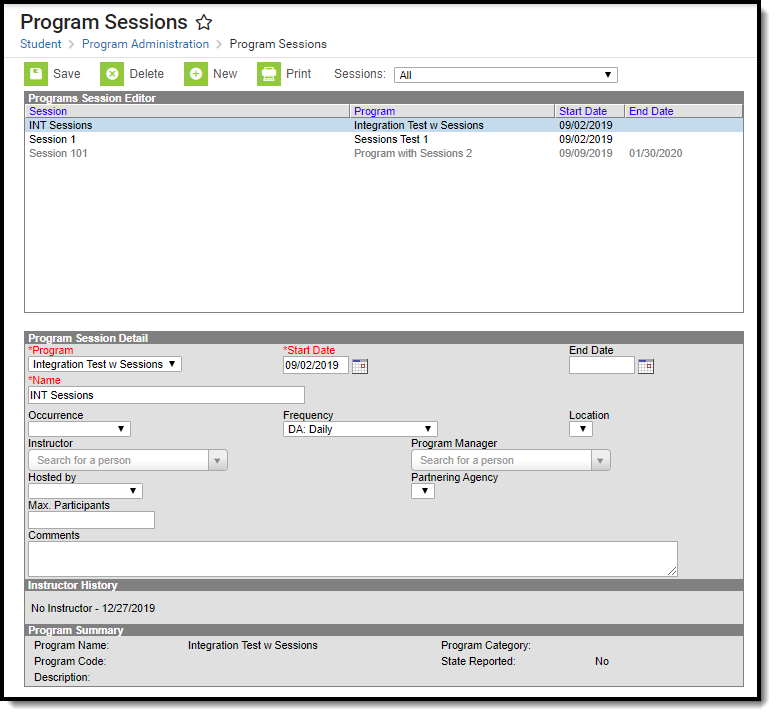 Program Sessions
See the Program Sessions Setup Tool Rights article for information on available tool rights.
For example, a Program is available for AM Tutoring, where a set of students arrives in a zero period or some designated time to be tutored in a certain subject. Because AM Tutoring could cover a variety of course subjects, a Program Session for Math is created. The Program Session record contains information about one specific offering of a program.
Program Sessions could be used for community education programs that meet at a school or to track the time or instructor for programs such as National Honor Society, if desired.
A Program marked to include Program Sessions must be created first before adding Program Sessions. The option to use Program Sessions cannot be added to an existing Program nor can it be deleted from an existing Program.
When viewing sessions, users can view sessions from across the district or from the selected calendar by making a selection in the Session dropdown. When All is selected from the dropdown, all available sessions (both active and inactive) are listed in the Program Sessions editor. When Active within selected calendar date range is selected, only program sessions that occur during the date range of the selected calendar in the Campus toolbar are available. These program sessions display if:
- The Program Session has a Start Date on or before the Start Date of the selected calendar.
- The Program Session has an End Date that is blank (null), within, or after the End Date of the Selected Calendar.
The Sessions dropdown list does NOT display if the Campus Toolbar fields are set to All Calendars or All Years.
 Program Sessions Selection
Programs Sessions Information in Ad hoc Query Wizard
Program Sessions information is available in the Filter Designer Query Wizard for Student data types. The fields are available in the Learner > Programs/Flags > Program Session and Learner > Programs/Flags > Programs > Programs Sessions folders.
See the Staff History Editor section below for the related Ad hoc field and information on how that field returns data.
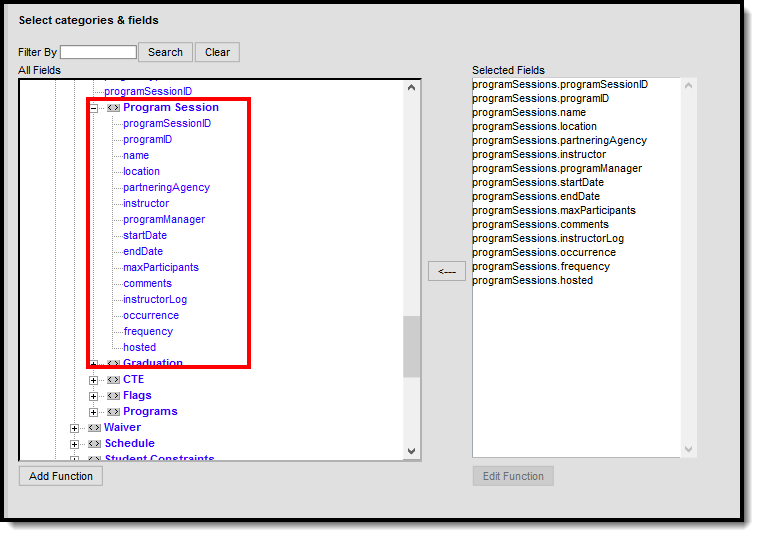 Program Sessions Fields in Filter Designer
The following Ad hoc fields are also available for Program Sessions, and return the following information:
- programSessions.instructorLog - This reports from the Instructor History section, and reports the Last Name, First Name of previous instructors and the dates of instruction.
- programSessions.programSessionID - Returns the numeric value of the Program Session, and is used as an internal database identifier (not visible in the product).
- programSessions.programID - Returns the numeric value of the Program associated with the Program Session, and is used as an internal database identifier (not visible in the product).
Program Sessions Editor
The Program Sessions editor lists active sessions first. Click the column headers to re-sort as desired. All Program Sessions display when the Campus Toolbar fields are set to All Calendars or All Years.
| Field | Description | Ad hoc Field name and Returned Value |
|---|---|---|
Program Required | Indicates the program to which the session is associated. Only the programs marked for Sessions are listed. | spProgram.name Reports the entered name of the program to which the session is associated. |
Start Date Required | Indicates when the session starts. A program could have many sessions associated with it, like an AM September Session, a PM September Session, etc. The date provides parameters around the many sessions for the program. This date displays in the Programs Sessions editor. Program sessions with a date in the past and no past end date display in black text; Program sessions with a date in the future, with or without an end date, display in gray text. Dates are entered in mmddyy format, or can be selected by clicking the calendar icon. | programSessions.startDate Returns the start date of the session, in mmddyy format. |
| End Date | Indicates when the session ends. This date displays in the Programs Sessions editor. Program sessions with an end date in the future display in black text; programs with an end date in the past display in gray text. Dates are entered in mmddyy format, or can be selected by clicking the calendar icon. | programSessions.endDate Returns the end date of the session, in mmddyy format. |
Name Required | Indicates the name of the session. This name should be descriptive so those responsible for assigning students to the program can easily locate the correct session. | programSessions.name Reports the entered name of the program session. |
| Occurrence | Indicates the time of day the program is scheduled (before school, after school, etc.). Districts manage the options available for this field in the Attribute Dictionary. | programSessions.occurrence Reports the value of the selected option. If the selection is A: After School, the query returns the value of After School. |
| Frequency | Indicates how often the program is scheduled (daily, weekly, etc.). Districts manage the options available for this field in the Attribute Dictionary. | programSessions.frequency |
| Location | Indicates where the session meets. Options for this field need to be created in the Attribute Dictionary (ProgramSession > Location) before they can be assigned to a session. | programsSessions.location Reports the value of the selected option. If the selection is HS: Home School, the query returns the value of Home School. |
| Instructor | Lists the person who leads the session. This does not need to be a staff person; it can be anyone available for selection in Census (staff, parent/guardian, students, other community member). Click in the dropdown field and enter the first few letters of the person's name. Matching results display. | programSessions.instructor Reports the name of the assigned instructor in Last Name, First Name format. |
| Program Manager | Lists the person who manages the session. This does not need to be a staff person; it can be anyone available for selection in Census (staff, parent/guardian, students, other community member). Click in the dropdown field and enter the first few letters of the person's name. Matching results display. | programSessions.programManger |
| Hosted by | Indicates which entity manages the program (school, district, external partner). Districts manage the options available for this field in the Attribute Dictionary. | programSessions.hosted Reports the value of the selected option. If the selection is S: School, the query returns the value of School. |
| Partnering Agency | Indicates any agency that partners with the school or district for this session. Options for this field need to be created in the Attribute Dictionary (ProgramSession > Partnering Agency) before they can be assigned to a session. | programSessions.partneringAgency Reports the value of the selected option. If the selection is BS: Boy Scouts, the query returns the value of Boy Scouts. |
| Max Participants | Indicates the total number of participants that can be assigned to this session. There is no logic associated with this field (unlike the max students field on a Course). It is simply a numeric value. | programSessions.maxParticipants Reports the entered numeric value. |
| Comments | Provides more information about the session - what the session covers, what changes have been made, etc. | programSessions.comments Reports the entered value. |
Create Program Sessions
- Click the New button. A Program Session Detail editor displays.
- Select the Program associated with the session from the dropdown list.
- Enter the Start Date of the session, and the End Date if applicable.
- Enter the Name of the session.
- Select the Occurrence of the program.
- Select the Frequency of the program.
- Select a meeting Location for the session.
- Enter the name of the Instructor for the session.
- Select a Program Manager for the session.
- Select the Hosted by entity for the session.
- Select the Partnering Agency, if applicable.
- Enter the Max Participants number.
- Enter Comments related to the session.
- Click the Save icon when finished.
Instructor History and Program Summary
Upon saving, the Instructor History and Program Summary sections populate with information about the session. These are read-only sections and provide a quick view of the session details.
- The Instructor History lists the instructors that have been assigned to the session and the dates of that assignment.
- The Program Summary information also displays when the program is assigned to a student.
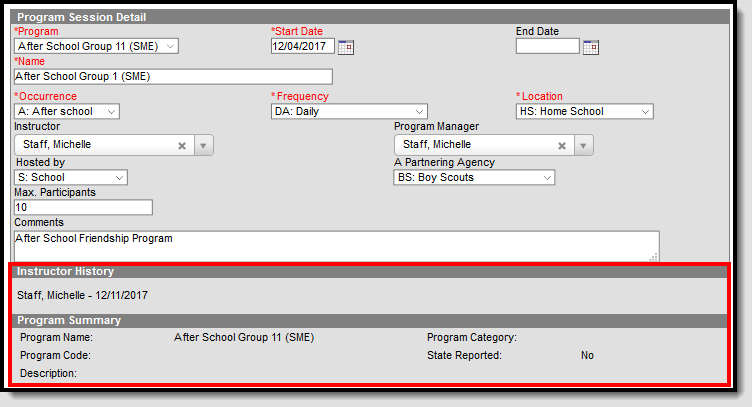 Program Session Instructor History and Program Summary
Print Program Session Information
Click the Print icon to print a Program Session Detail Report (PDF format). This lists the program and session name, session dates, instructor information, and any students assigned to the session. Only students active in the program session are included on the report, based on the program participation start and end dates of the students.
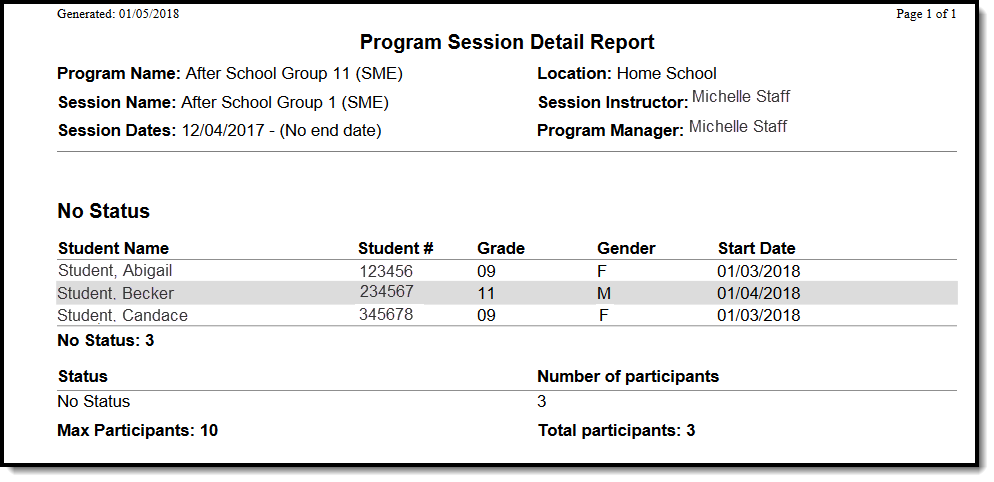 Program Session Detail Report
Program Session Detail Report
Next Steps
- Assign the Program to Students
- Use the Batch Assignment Tool to add the Program to a list of students.
This video explains how to set up Program Sessions.
Assign a Program to a Student
Programs are assigned to and managed for an individual selected student.
Tool Search: Programs
The Programs tool lists the programs in which the student is involved. This only includes Programs created in the Program Admin toolset, and does not include Flags assigned to the student (which are assigned on the student's Flags tool).
A student can only be assigned to Program Sessions that are active within the date range of the currently selected calendar (in the Campus toolbar). These are Program Sessions that have a Start Date on or before the Start Date of the selected calendar, and/or Program Sessions that have an End Date that is bank (null), within, or after the End Date of the selected calendar.
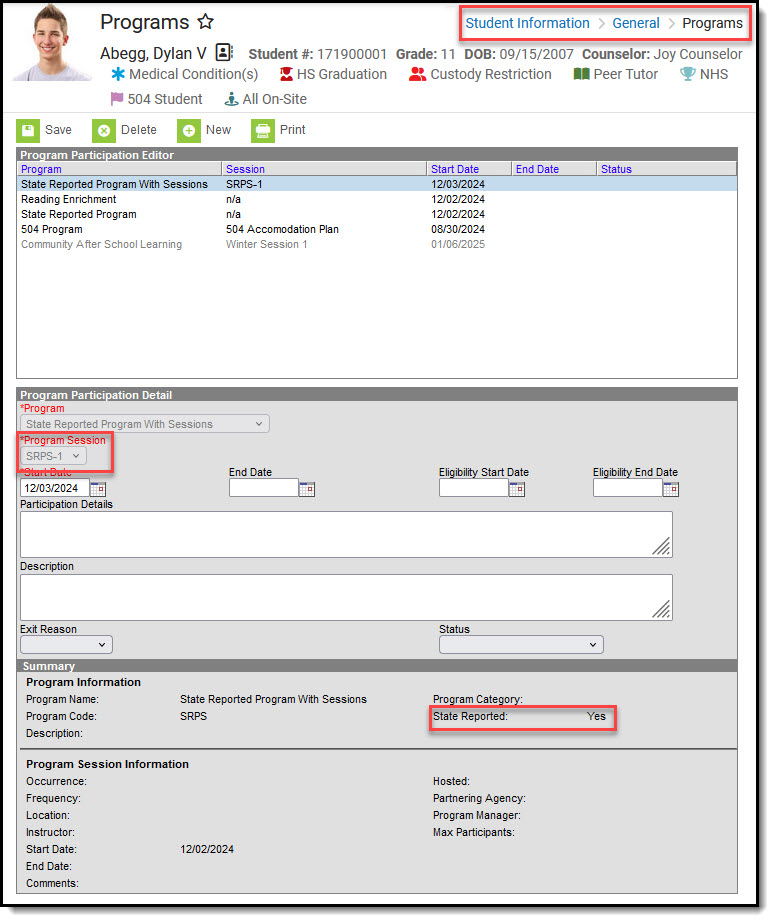 Student Program Assignment
There are several areas in Campus that deal with Programs. This Program Participation tool is used for tracking a student's participation in school clubs, intramural sports, community education participation, etc. See the following areas for other program areas.
See the Programs (Student) Tool Rights article for information about rights needed to use this tool.
Program Participation Detail Editor
| Field | Description |
|---|---|
Program Required | Indicates the name of the program being assigned to the student. These programs are created in the Programs tool. Active programs and inactive programs are available for selection (inactive programs display in gray text). More than one program can be assigned to a student at one time (unlike Graduation Programs). |
Program Session Required | Indicates the session of the program to which the student is assigned. This field only displays when the selected Program contains a Program Session. Sessions provide a date range of participation (like an after school sports program for the fall or a community education program). |
Start Date Required | Indicates the date the student was first involved in the program. Dates are entered in mmddyy format or can be entered by using the calendar icon. |
| End Date | Indicates the date the student stopped participation in the program. Dates are entered in mmddyy format or can be entered by using the calendar icon. |
| Eligibility Start Date | Indicates the date the student was eligible for the program. Dates are entered in mmddyy format or can be entered by using the calendar icon. |
| Eligibility End Date | Indicates the date the student was no longer eligible for the program. Dates are entered in mmddyy format or can be entered by using the calendar icon. |
| Participation Details | Provides information on the student's involvement in the program. |
| Description | Provides further information on the student's involvement in the program. |
| Exit Reason | Indicates the reason the student stopped participation in the program. Options for this field need to be created in the Attribute/Dictionary (ProgramParticipation > Exit Reason). |
| Status | Indicates the student's status in the program. This field only displays when the selected Program contains a Program Session. Options for this field need to be created in the Attribute/Dictionary (ProgramParticipation > Status). |
Program Participation Summary
The Summary section of the Editor is a read-only view of the selected program. It lists the program, any associated sessions, the assigned program category, staff leading the program session and participation dates. Information displays as soon as a Program is selected, and updates as more information is selected.
All of these fields are populated when the Program and the Program Session are created.
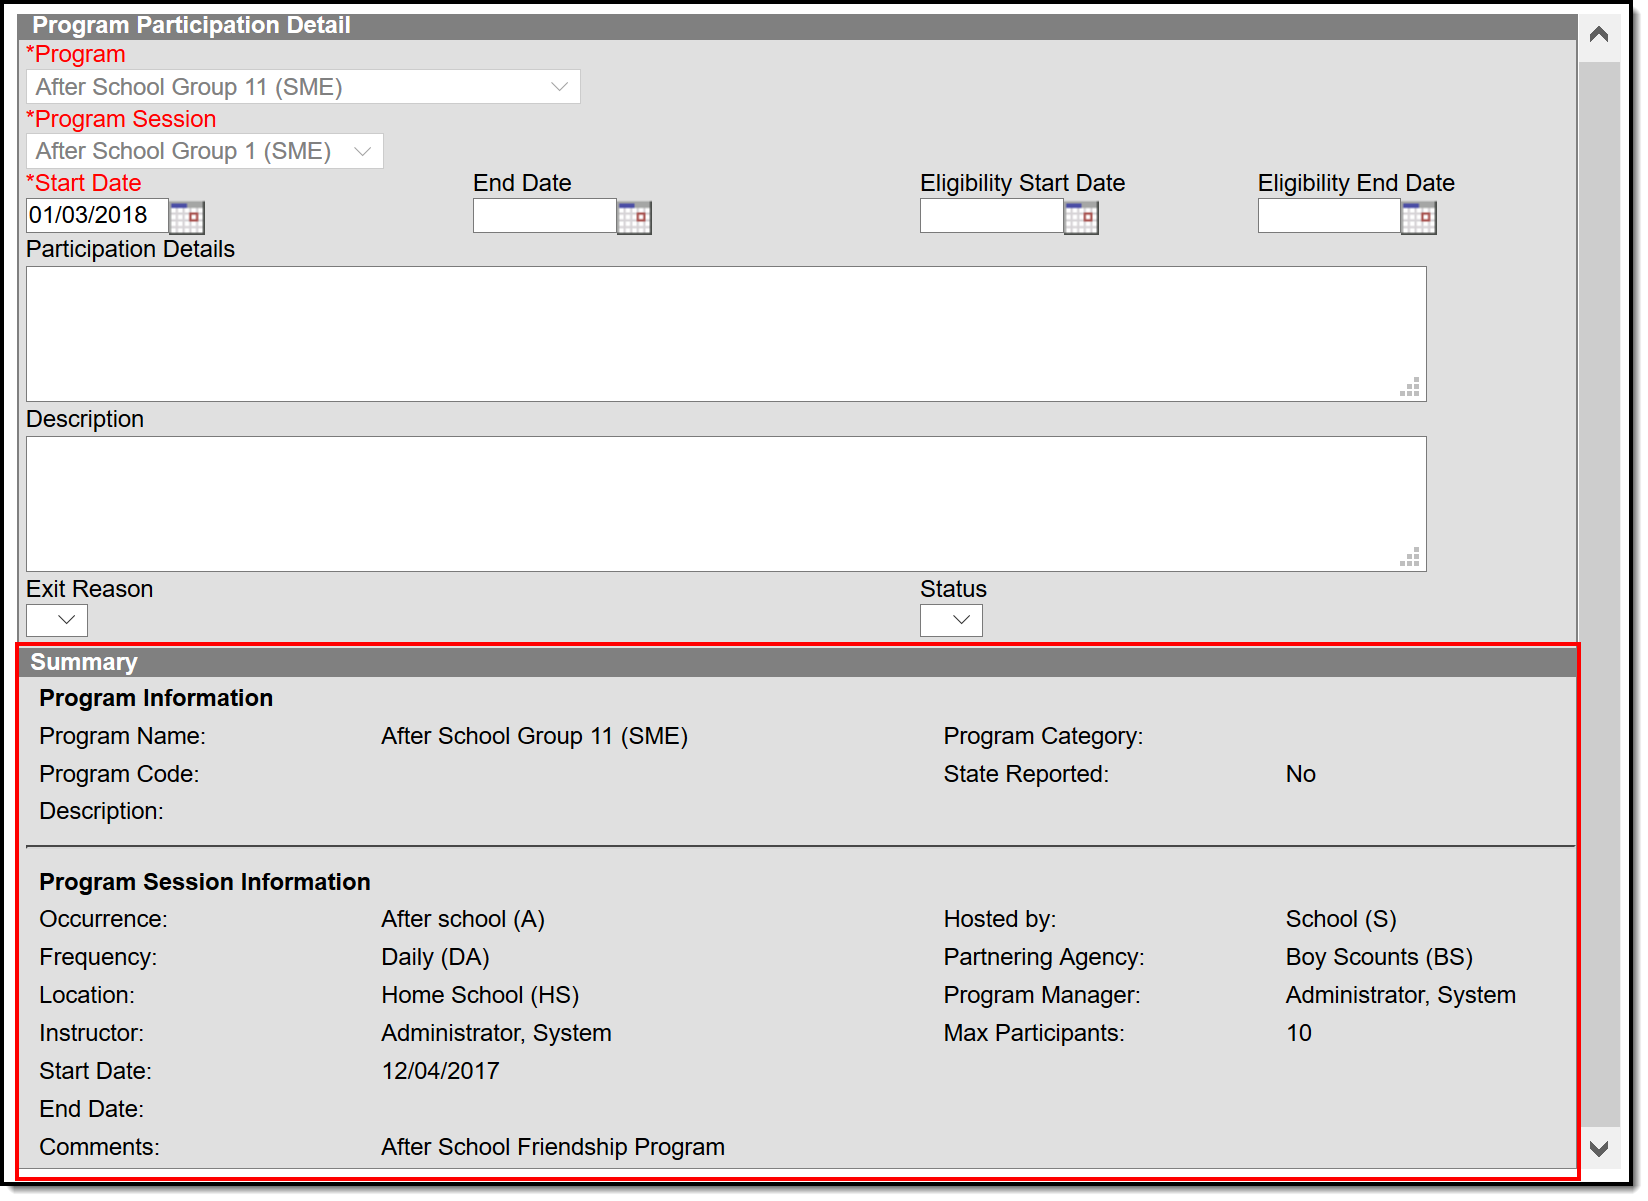 Student Program Participation - Summary Details
Assign Student to a Program
- Click the New icon. A Program Participation Detail editor displays.
- Select the appropriate Program from the dropdown list.
- If applicable, select a Program Session from the dropdown list.
- Enter the Start Date.
- Enter information on the Participation Details and the Description of the program.
- Click the Save icon when finished.
For example, a program session has a start date of October 1 and an end date of November 25. The student must be assigned start and end dates for that program session within those dates. A start date for the student in the program session of September 30 cannot be entered, nor can an end date of December 1.
The same date logic applies to the Eligibility Start and End Dates.
Edit and Delete Student Program Assignments
To modify details of the student's assigned program, select the Program from the Program Participation Editor and make the necessary changes. If a program start date was entered incorrectly, editing the program assignment is fine. When a student has participated for even one day but has decided to no longer continue, edit the program and enter appropriate end dates.
If the assigned program was incorrect, it is best to delete the program (click the Delete icon) and assign the correct program. This completely removes any record of the student being involved in the Program.
Print Student Program Assignments
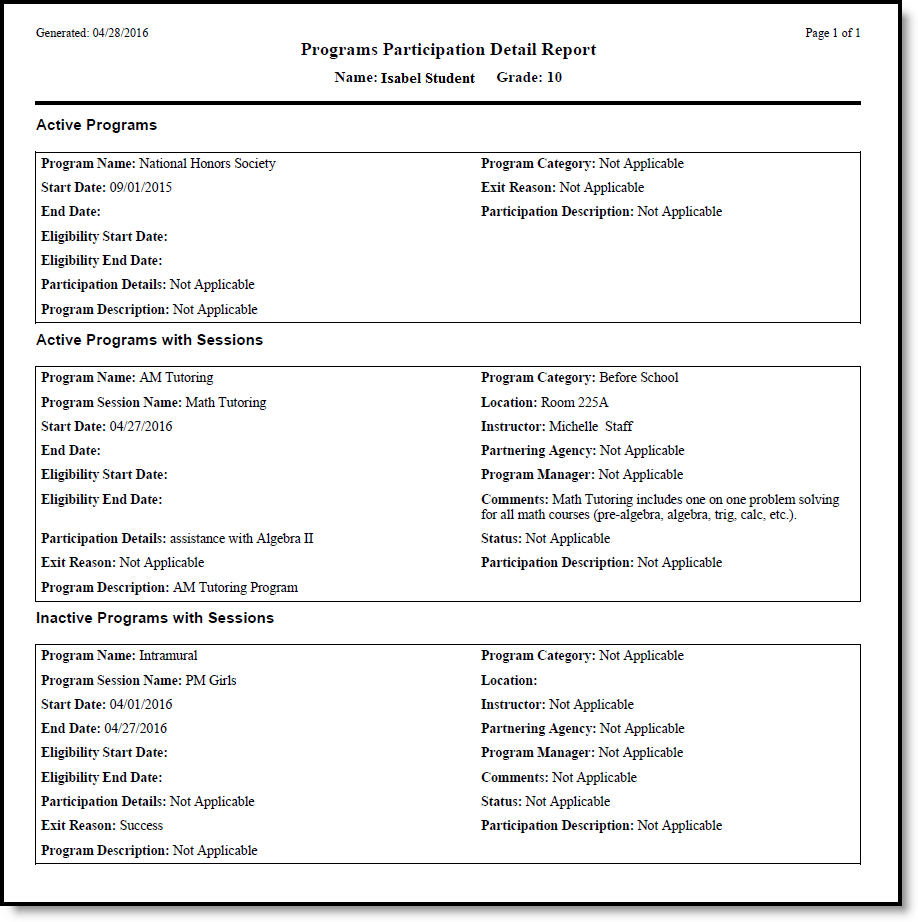
The Print icon generates a Programs Participation Detail Report (in PDF format) that lists the programs assigned to the student. Active programs and active programs with sessions display first, then inactive programs and inactive programs with sessions. Programs that have a future end date are considered active (until the date has passed).
 Programs Participation Detail Report
Batch Assign Flags and Programs to Students
Programs and flags can be mass-assigned to students.
Tool Search: Batch Program Assignment Wizard
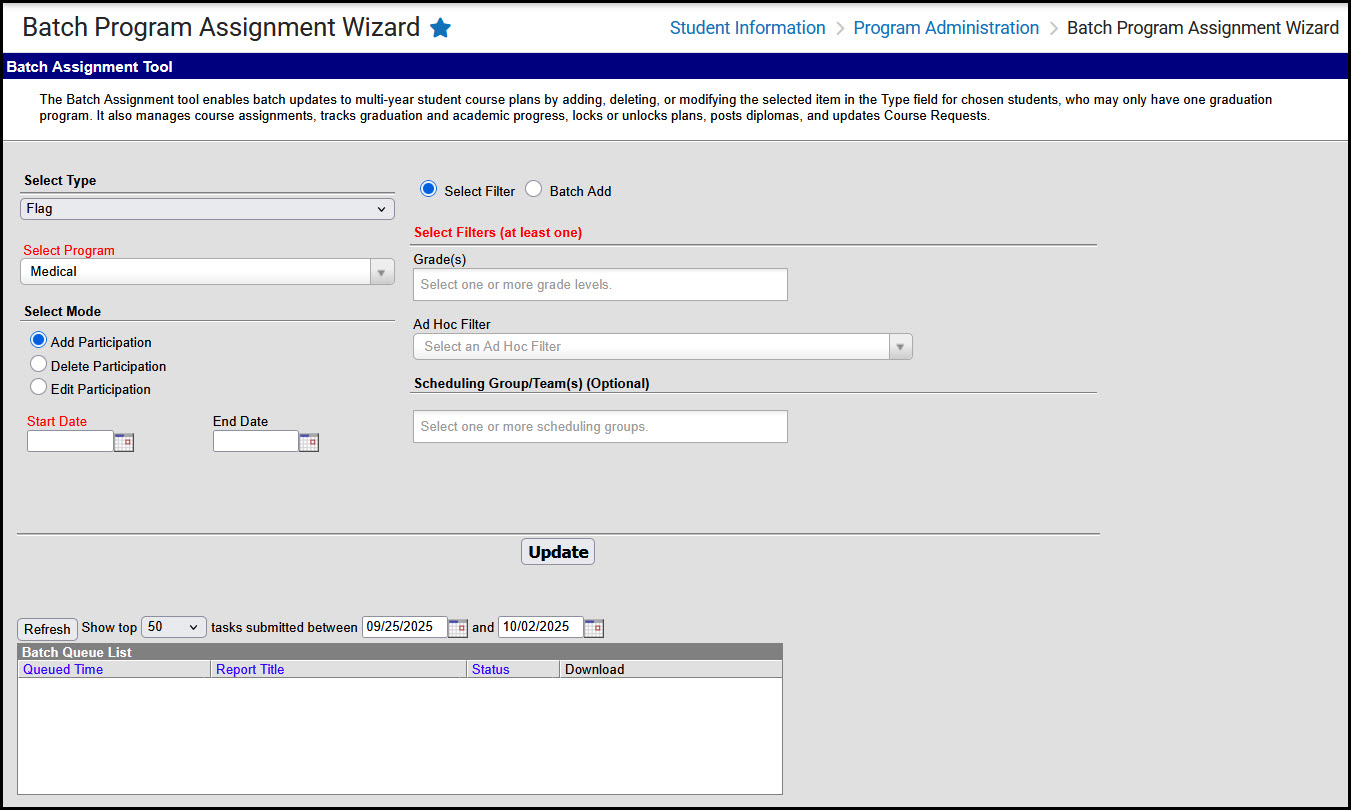
The Batch Program Assignment Wizard adds, deletes, or modifies assignment of the selected flag, graduation program, academic program, program or program with sessions on the selected students’ Flags, Programs (General), or Programs (Academic Planning) tools. It also manages course assignments, tracks graduation and academic progress, locks or unlocks plans, posts diplomas, and updates Course Requests.
 Batch Program Assignment Wizard
See the Batch Program Assignment Wizard Tool Rights article for information about rights needed to use this tool.
General Information
- Select a school and calendar from the Context Switcher before selecting a program type to batch assign. Depending on the selected program type, users may see programs that can be assigned district-wide, programs that apply only to their school, and inactive programs (red text).
- A student can have multiple assignments of any program type other than graduation. Students are allowed only one graduation program assignment. If the student already has a graduation program assigned to them, it is overwritten when a new assignment is made.
- Some programs are created with requirements or conditions students must meet in order to be assigned to them. For example, students assigned to a graduation program must have the appropriate cohort start and end year if that information is associated with the selected graduation program.
Batch Assignment By Type
Academic Program
Academic Programs define a course of study. The Progress tool displays a selected student's progress toward meeting requirements for completing the program(s) to which they are assigned, such as course requirements, assessments, and certificates. Not every state uses Academic Programs, and those that do may use them differently.
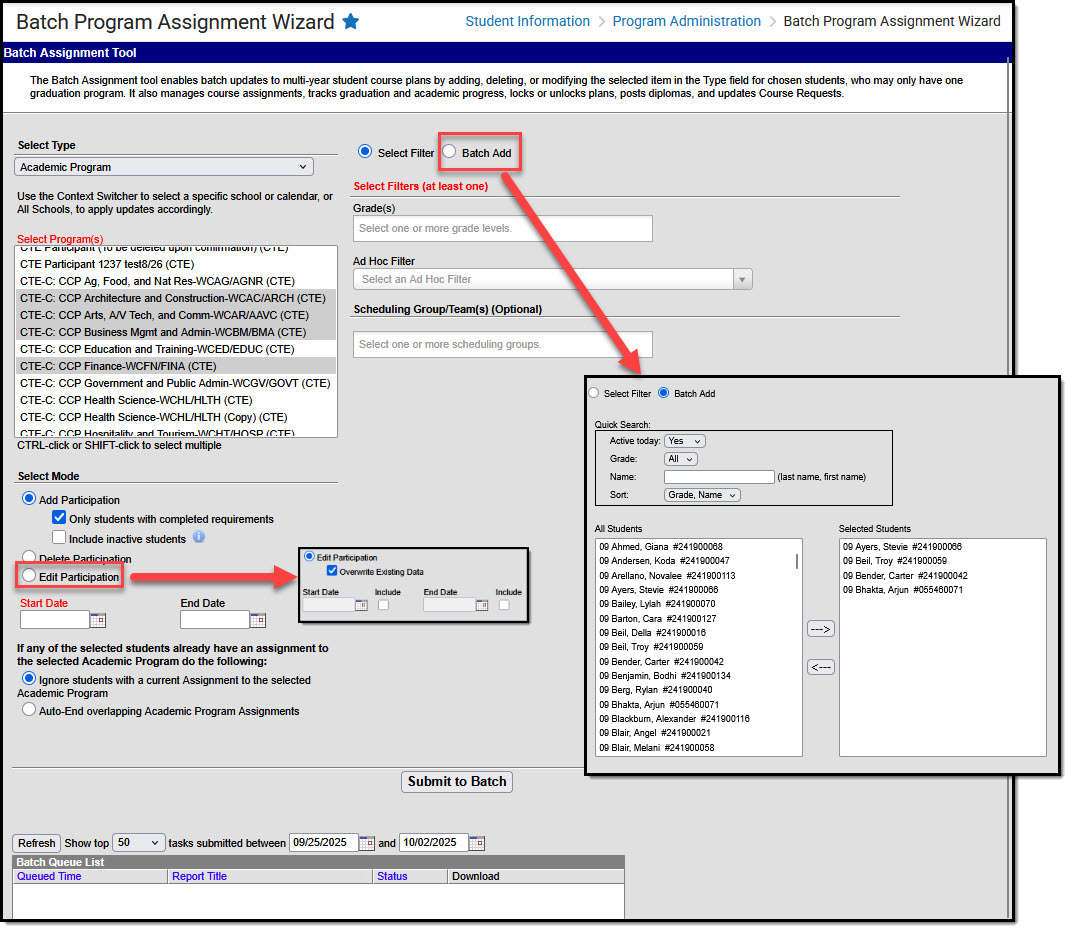 Batch Program Assignment Wizard - Academic Program
- From the Context Switcher, select either one school or All Schools.
- Select Type: Academic Program
- Select Programs: select one or more programs to update
- Choose Students to update (Select Filter OR Batch Add)
- Select Filter: Select at least one filter type. (Example: Selecting Grade(s)=09 and Ad Hoc Filter=Honor Roll Students would return only 9th grade students included in the Honor Roll Students filter).
- Batch Add: use quick search or manual select options to locate and select students to which the update will apply.
- Select Mode (choose one)
- Add Participation
- Only students with completed requirements: select to align program to students who aren't currently assigned to it but have already completed the program's requirements
- Include inactive students: appears when "Only students with completed requirements" is selected, allows inclusion of students who completed requirements but are not actively enrolled
- Delete Participation: remove participation records for selected program
- Note for CTE Programs: CTE Program Participation Records are only deleted when the end date is NULL or occurs in the future.
- Edit Participation: choose to edit participation by entering a Start and/or End Date. If you wish to override or remove existing dates, select Override Existing Data, indicate which dates to include, and either enter dates or leave the fields blank as appropriate.
- Add Participation
- Start/End End Date: you must enter a date if the field is red (e.g. Start Date on Add Participation), otherwise enter dates or leave dates blank as appropriate
- Note for CTE Programs: CTE Program Participation Records are only deleted when the end date is NULL or occurs in the future.
- Select Ignore to skip students already assigned to the program(s) or select Auto-End to end date existing overlapping assignments.
- Submit to Batch. Select options for when the batch job should run (e.g. off-peak hours for large amounts of data), then select OK.
Academic Program (Automated)
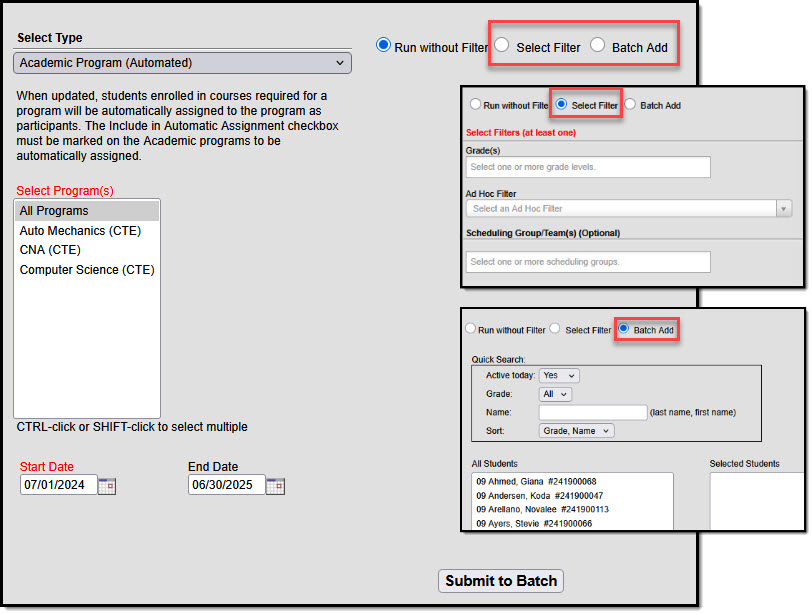
Academic Programs that have been marked Include in Automatic Assignment appear in the list of programs that can be selected for automated assignment. Some schools follow this process at the beginning of every year, using first and last instructional day dates, expecting that students may be assigned to one or more new programs annually based on courses they take.
 Batch Program Assignment - Academic Program (Automated)
 Program Marked for Automatic Assignment
- Select Type: Academic Program (Automated)
- Select Programs: select one or more programs to update
- Choose Students to update (Select Filter OR Batch Add)
- Run without Filter: This selection runs for all students, is resource-intensive, and should be run during off-peak hours.
- Select Filter: Select at least one filter type. (Example: Selecting Grade(s)=09 and Ad Hoc Filter=Honor Roll Students would return only 9th grade students included in the Honor Roll Students filter).
- Batch Add: use quick search or manual select options to locate and select students to which the update will apply.
- Enter a Start Date and, optionally, an End Date.
- Submit to Batch: Select options for when the batch job should run (e.g. off-peak hours for large amounts of data), then select OK.
- Students enrolled in courses required for a program will be assigned to the program as participants. Assignments are not duplicated.
Flag
Flags are alerts that schools can create and assign to students to indicate things such as participation in a program, or if a student has a contact or medical alert. Start and End Dates set the date range during which the flag's icon, if it has one, appears next to the student's name in Campus.
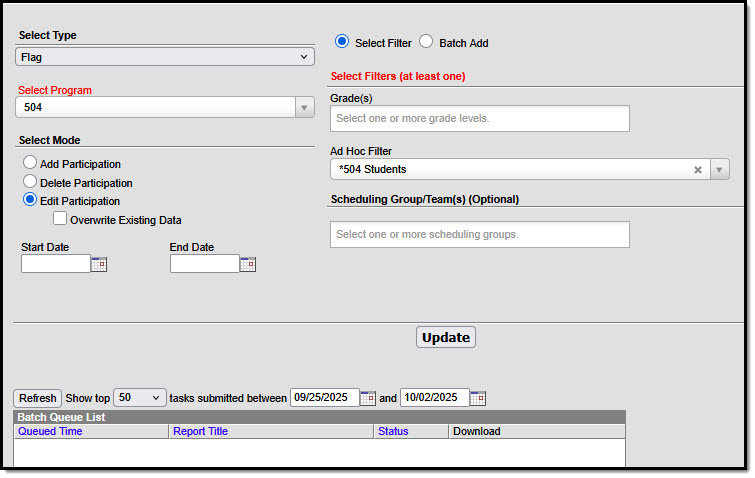 Batch Program Assignment - Flag
- Select Type: Flag
- Select Program: choose one program from the list
- Choose Students to update (Select Filter OR Batch Add)
- Select Filter: Select at least one filter type. (Example: Selecting Grade(s)=09 and Ad Hoc Filter=Honor Roll Students would return only 9th grade students included in the Honor Roll Students filter).
- Batch Add: use quick search or manual select options to locate and select students to which the update will apply.
- Select Mode (choose one):
- Add Participation: add flag to selected students that do not already have one
- Delete Participation: remove flag from selected students
- Edit Participation: choose to edit participation by entering a Start and/or End Date. If you wish to override or remove existing dates, select Override Existing Data, indicate which dates to include, and either enter dates or leave the fields blank as appropriate.
- Select Update to apply selections, then select OK to close the confirmation message that appears.
Graduation
Graduation Programs define all the academic requirements necessary for a student to graduate, such as courses to be taken and GPA to be earned.
- A student may only be assigned to one graduation program at a time.
- Changing the student's graduation program doesn't change recorded data regarding things such as classes taken and grades earned.
- The student's Progress toward meeting graduation standards could change based on the requirements defined for whatever graduation program they're currently assigned to.
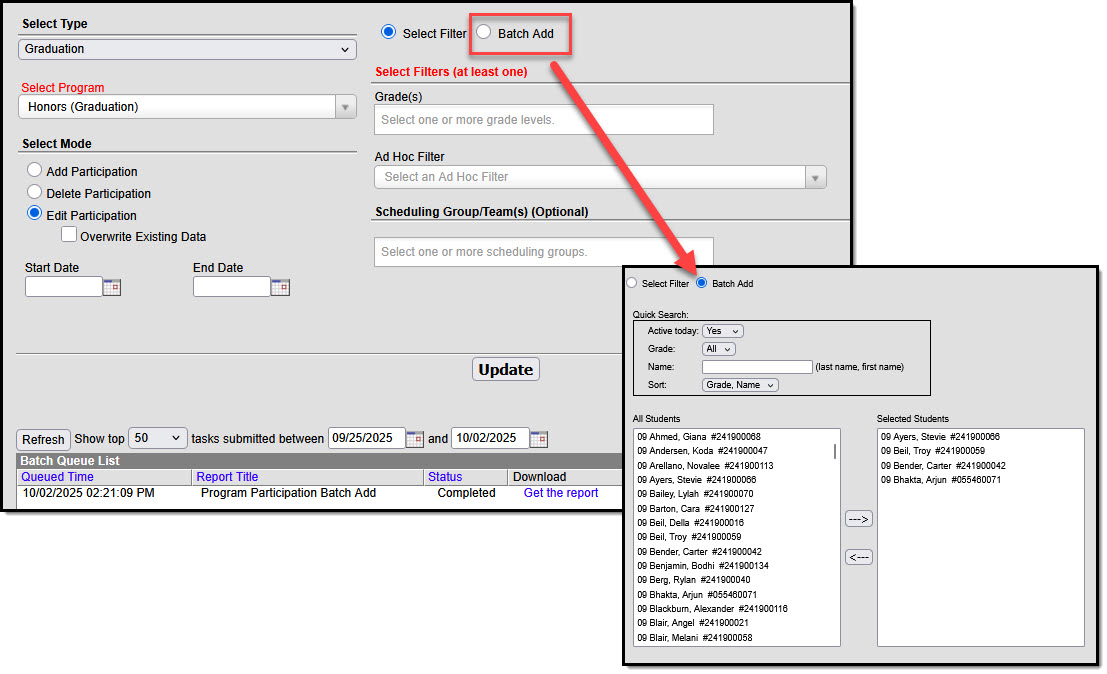 Batch Program Assignment - Graduation
- Select Type: Graduation
- Select Program students will be assigned to
- Choose Students to update (Select Filter OR Batch Add)
- Select Filter: Select at least one filter type. (Example: Selecting Grade(s)=09 and Ad Hoc Filter=Honor Roll Students would return only 9th grade students included in the Honor Roll Students filter).
- Batch Add: use quick search or manual select options to locate and select students to which the update will apply.
- Select Mode (choose one):
- Add Participation: add program for selected students
- Delete Participation: remove program for selected students
- Edit Participation: choose to edit participation by entering a Start and/or End Date. If you wish to override or remove existing dates, select Override Existing Data, indicate which dates to include, and either enter dates or leave the fields blank as appropriate.
- Select Update to apply selections, then select OK to close the confirmation message that appears.
Program
Programs can be used to indicate student participation in whatever a district defines as a program. Examples include after school clubs, intramural sports, or community education. When you select a program a summary of program information appears just beneath the Update button.
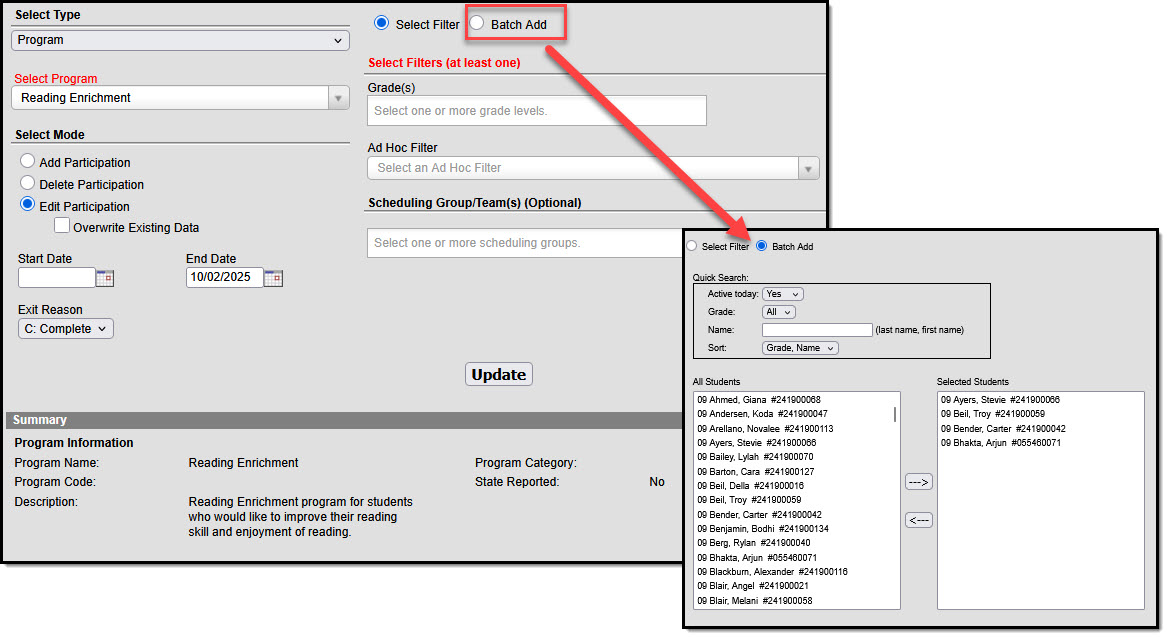 Batch Program Assignment - Program
- Select Type: Program
- Select Program students will be assigned to
- Choose Students to update (Select Filter OR Batch Add)
- Select Filter: Select at least one filter type. (Example: Selecting Grade(s)=09 and Ad Hoc Filter=Honor Roll Students would return only 9th grade students included in the Honor Roll Students filter).
- Batch Add: use quick search or manual select options to locate and select students to which the update will apply.
- Select Mode (choose one):
- Add Participation: add program for selected students
- Delete Participation: remove program for selected students
- Edit Participation: choose to edit participation by entering a Start and/or End Date. If you wish to override or remove existing dates, select Override Existing Data, indicate which dates to include, and either enter dates or leave the fields blank as appropriate.
- Exit Reason: select an exit reason if students are leaving the program and you need to indicate why.
- Select Update to apply selections, then select OK to close the confirmation message that appears.
Program Session
Program Sessions track the date, time, and location that an instance of a program is taking place. This option only displays programs for which sessions or instances of a program that can be tied to specific dates, times, and locations have been created.
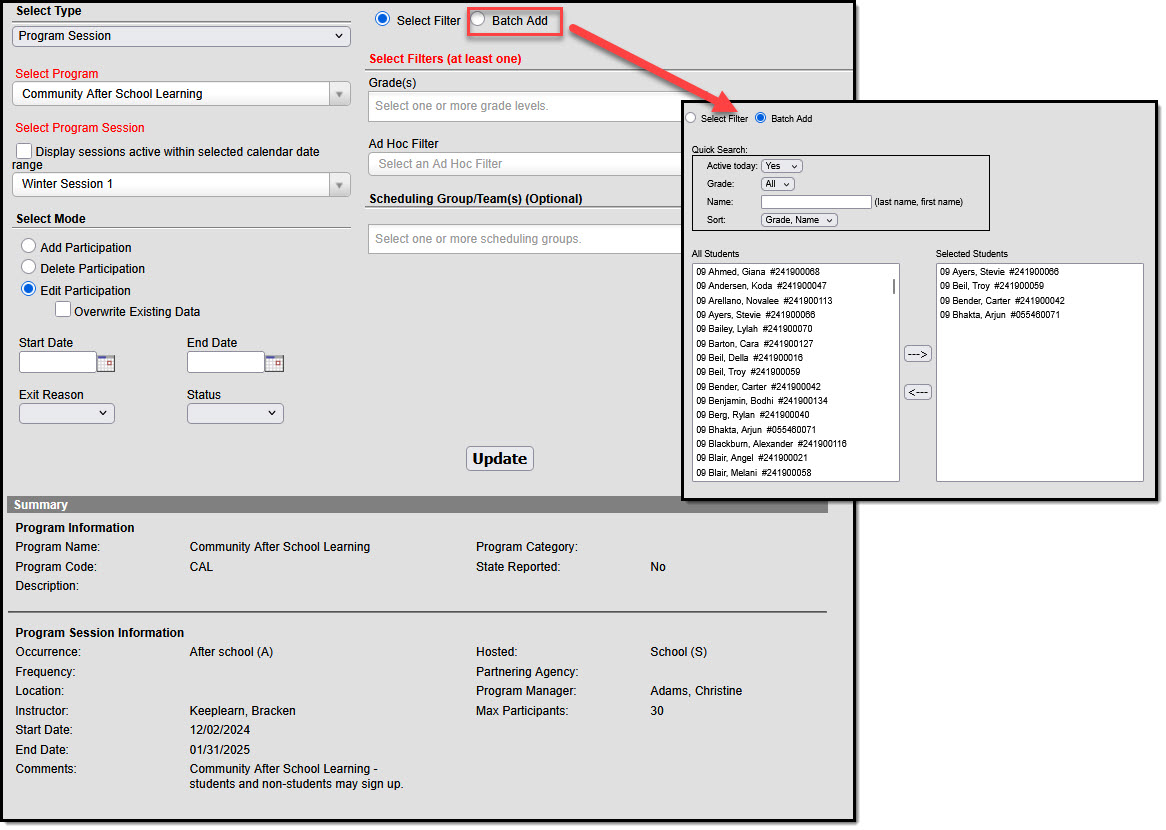 Batch Program Assignment - Program Session
- Select Type: Program Session
- Select Program students will be assigned to
- Select Program Session: Select "display sessions active within selected calendar date range" to limit selection options to sessions active within the calendar selected in the Context Switcher. Choose a session from the droplist.
- Choose Students to update (Select Filter OR Batch Add)
- Select Filter: Select at least one filter type. (Example: Selecting Grade(s)=09 and Ad Hoc Filter=Honor Roll Students would return only 9th grade students included in the Honor Roll Students filter).
- Batch Add: use quick search or manual select options to locate and select students to which the update will apply.
- Do not exceed Max Participants indicated in Program Session Inrformation
- Select Mode (choose one):
- Add Participation: add program for selected students
- Delete Participation: remove program for selected students
- Edit Participation: choose to edit participation by entering a Start and/or End Date. If you wish to override or remove existing dates, select Override Existing Data, indicate which dates to include, and either enter dates or leave the fields blank as appropriate.
- Exit Reason: select an exit reason if students are leaving the program and you need to indicate why.
- Status: indicate a status to be applied, if appropriate
- Select Update to apply selections, then select OK to close the confirmation message that appears.
Program Session Dates: When assigning program sessions, the entered start and end dates must be within the selected program session start and end dates.
Max Participants: When enrollment in a program session meets the entered Max Participant number, a pop-up message displays. Additional students can still be added to the program session, but be aware the enrollment has exceeded the entered value.
