Tool Search: Messenger
The procedures on this page describe how to send a general message via inbox, email, voice or text to students, Messenger contacts, and/or staff. For detailed descriptions of each field in the message builder, see the Messenger Field Descriptions article.

| What can I do? | What do I need to know? |
|---|---|
Send a General Message to Students and/or Messenger Contacts
| Step 1. Recipients |
- Select General.
Result: Step 1 Recipients displays. - Select the Delivery Mode: Inbox, Email, Voice, and/or Text.
- Select a School Year.
Tip: The default selection is the current school year. - Select Select Calendars.
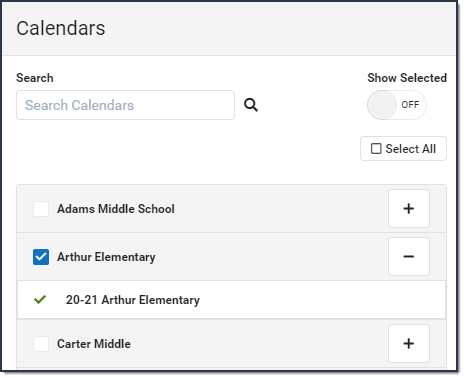
Result: The Calendars panel displays. Use the + (plus) and - (minus) buttons to view or hide additional calendars.
- Select a recipient group from Send To.
- Students
- Messenger Contacts
- Select a filter option from the Student Selection.
- All Active Students: Includes all students in the selected calendar(s) who have an active enrollment in the current school year or who have a future enrollment but have not started yet.
- All Students: Includes all students in the selected calendar(s) regardless of enrollment status.
- Filter Students: Includes all active students by default with the ability to filter the student list with the following options: Grade Level and Ad Hoc.
- If Messenger Contacts is selected, select an option from Contacts Message Limit. (Optional)
- One Message Total: Limits the Messenger Contact recipient to receive one message from this email campaign regardless of how many students with whom they have a Messenger relationship. If the message contains any Campus Fields, only one student’s information will display.
- Message For Each Student: For the current email campaign, the Messenger Contact will receive one message per student with whom they have a Messenger relationship.
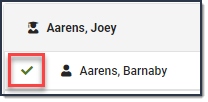
- Click the Recipients button to display a side panel to review the recipient list. If necessary, remove recipients and click the Update button on the panel when you are done. (Optional)By default, all recipients are automatically selected to receive the message. Click the person's name to remove them as a message recipient. A checkmark next to the person's name means they will receive the message. No checkmark next to the person's name means they will not receive the message. In the following example, the person will receive the message.

- Select a Preferred Language preference. (Optional)
- Select Next.
Result: Step 2 Content displays.
| Step 2. Content |
- Enter the subject of the message in Message Subject.
- Complete the following Inbox, Email, Voice, and/or Text options.
Option Description Inbox Compose the body of the message in the Message Body.
Attachments are not sent with Inbox messages.
Email - Enter or confirm the correct email is showing in the Reply to Email field.
Tip: This Field is only editable if the Allow Custom Sender’s Email Address checkbox is marked in the Email Settings tab of Messenger Admin. - Enter a Sender Display Name. (Optional)
- Compose the body of the message in the Message Body.
- Click the Select File button to attach a file to the email. (Optional)
Voice Select one of the following options: - Upload - Use this option to attach a pre-recorded .WAV file.
- Text-to-Speech - Use this option to have Campus convert text from the Voice Message Body field on this screen to a voice message. If you are also sending an Email message the Voice Message Body field is not available and the Message Body from the Email card will be converted instead.
Text Compose the body of the message in Text Message Body. - Enter or confirm the correct email is showing in the Reply to Email field.
- Select Next.
Result: Step 3. Send displays.
| Step 3 - Send |
- Select Send Now or Schedule.The Send Now option is not available if you are trying to send a text/voice message outside of the district-wide dialing window.
- If you select Schedule, enter a value into the Date and time fields to send the message in the future.
- Confirm you would like to receive a confirmation email that the message was successfully sent by marking the Confirmation Email checkbox. Clear the checkbox if you do not want to receive a message sent successfully email.
- Select Send.
ResultA warning displays if you are scheduling a voice/text message to go out within 30 minutes of the dial window closing. If the dial window closes while this message campaign is in progress, all calls/texts are stopped at the dial window end time.A confirmation appears and the Message Processing Results display. From here you can see how many messages were sent and you have the option to send the message again.
Send a General Message to Staff
Step 1. Recipients |
- Select New Message.
Result: Step 1 Recipients displays. - Select the Delivery Mode: Inbox, Email, Voice, and/or Text.
- Select a School Year.
Tip: The default selection is the current school year. - Select Select Calendars.
Result: The Calendars panel displays. Use the + (plus) and - (minus) buttons to view or hide additional calendars.
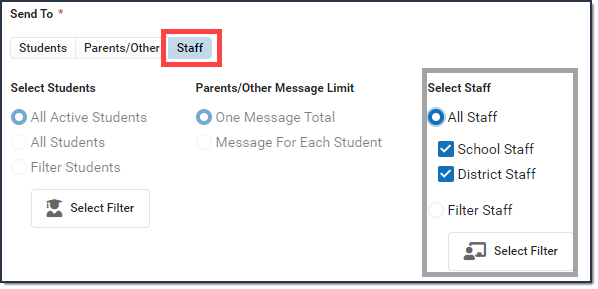
Use expand/collapse to add or remove calendars. - Select Staff under Send To.

- Select All Staff or Filter Staff under the Select Staff.
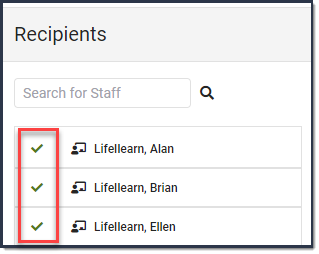
If you select... Then... All Staff mark the School Staff and/or District Staff checkbox. Filter Staff click the Select Filter button to display the Filter Staff panel. From here you can select specific Staff Roles, mark the checkbox to Include District Staff, and/or select predefined Ad Hoc filters. Click Update when you are done. - Click the Recipients button to display a side panel to review the recipient list. If necessary, remove recipients and click the Update button on the panel when you are done. (Optional)By default, all recipients are automatically selected to receive the message. Click the person's name to remove them as a recipient of the message. A checkmark next to the person's name means they will receive the message. No checkmark next to the person's name means they will not receive the message. In the following example, these people will receive the message.

- Select a Preferred Language preference. (Optional)
- Select Next.
| Step 2. Content |
- Enter the subject of the message in Message Subject.
- Complete the following Inbox, Email, Voice, and/or Text options.
Option Description Inbox Compose the body of the message in the Message Body. Attachments are not sent with Inbox messagesEmail - Enter or confirm the correct email is showing in the Reply to Email field.
Tip: This Field is only editable if the Allow Custom Sender’s Email Address checkbox is marked in the Email Settings tab of Messenger Admin. - Enter a Sender Display Name (Optional).
- Compose the body of the message in Email Message Body.
- Click the Select File button to attach a file to the email. (Optional)
Voice Select one of the following options: - Upload - Use this option to attach a pre-recorded .WAV file.
- Text-to-Speech - Use this option to have Campus convert text from the Voice Message Body field on this screen to a voice message. If you are also sending an Email message the Voice Message Body field is not available and the Message Body from the Email card will be converted instead.
Text Compose the body of the message in Text Message Body. - Enter or confirm the correct email is showing in the Reply to Email field.
- Select Next.
Result: Step 3. Send displays.
| Step 3. Send |
- Select Send Now or Schedule.The Send Now option is not available if you are trying to send a text/voice message outside of the district-wide dialing window.
- If you select Schedule, enter a value into the Date and time fields to send the message in the future.
- Confirm you would like to receive a confirmation email that the message was successfully sent by marking the Confirmation Email checkbox. Clear the checkbox if you do not want to receive a message sent successfully email.
- Select Send.A warning displays if you are scheduling a voice/text message to go out within 30 minutes of the dial window closing. If the dial window closes while this message campaign is in progress, all calls/texts are stopped at the dial window end time.
A confirmation appears and the Message Processing Results display. From here you can see how many messages were sent and you have the option to send the message again.


