The Student Thriving Index is a tool for the formative assessment of student social, emotional, academic, and physical well-being. This survey was developed by Dr. Angela Duckworth, CEO of Character Labs with support from researchers in their research network and feedback from Character Lab school partners.
Repeated participation in the Student Thriving Index allows schools and organizations to monitor student well-being topics such as sleep habits, social media use, and sense of belonging. School staff, district leaders, or organizational leaders can act on the results by identifying areas for improvement and sharing relevant resources to support their students. This input from educators and students helps to encourage student participation and create content aligned with their needs.
To learn more about the Character Labs and the research that went into creating the Student Thriving Index, see here:
- Character Lab - About Character Lab
- Published Research - Students Attending School Remotely Suffer Socially, Emotionally, and Academically (aera.net)
- Additional Information - Study Finds “Thriving Gap” Between Students Who Attended High School Remotely Versus in Person (aera.net)
What Kinds of Questions Will Students Answer?
The Student Thriving Index asks students about their interests, habits, feelings, and beliefs. It is structured in three sections: How are you doing?; How is school going?; and A Day in Your Life. The survey gauges student well being across four categories: social thriving, emotional thriving, academic thriving, and physical thriving.
Currently, this survey is only offered in English and Spanish.
How Has Student Thriving Index Data Been Used?
Character Lab school partners have reported sharing and reviewing Student Thriving Index data to foster discussion about what the data means for their specific school. Some school partners use it to develop lesson plans and curricula or post-planning at the end of the school year. Other school partners reported using the snapshot in discussion with their students and parents during conferences.
Prerequisites
In order to access the Student Thriving Index Survey within the Survey Designer, you must be assigned a Student Information System product security role (System Administration > User Security > Users > User Account).

Sending the Survey to Students
Classic View: Surveys > Survey Designer
Search Terms: Survey Designer
This section will walk you through the steps necessary to send the Student Thriving Index survey to students.
Step 1. Make a Copy of the Survey
The first step is to make a copy of the survey by marking the checkbox next to Character Lab Student Thriving Index and clicking the Copy button.
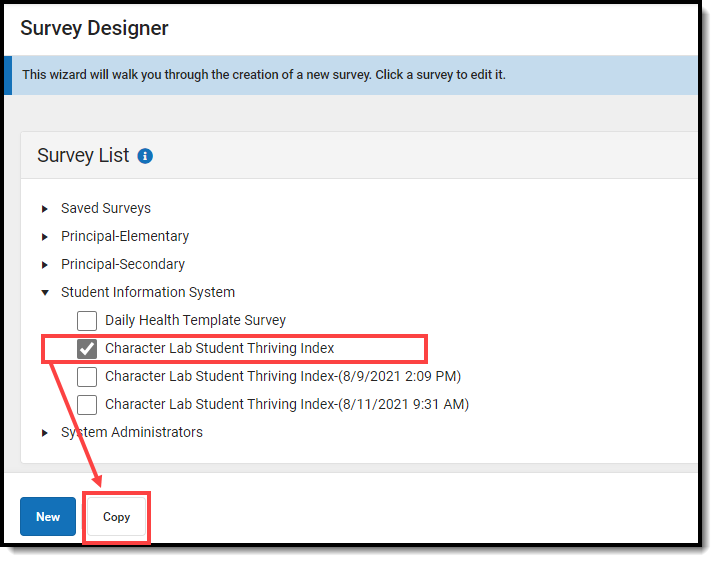
Once selected, your copy will appear below with the survey name indicating the time stamp of when clicked the Copy button.
Making copies allows you to do a comparison between snapshots and make determinations on areas in need of improvement.
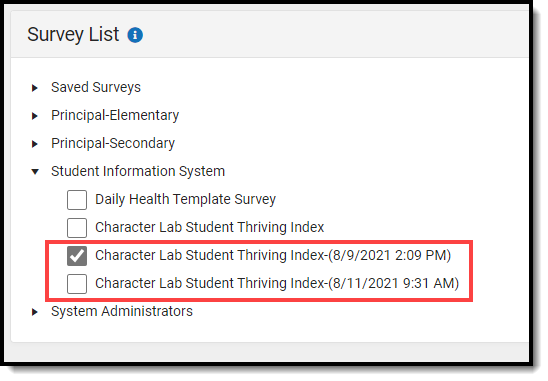
This step is important because it allows you to create a snapshot of data without this data being overwritten once the Character Lab Student Thriving Index is sent out again in the future.
If you do not make a copy, each time you send out the Character Lab Student Thriving Index the previous data will be replaced with current data.
Step 2. Enter Survey Details
Click on Character Lab Student Thriving Index or a copy of the survey (as discussed in Step 1) in the Survey List. A Survey Detail editor displays.
The survey name and questions within cannot be changed to preserve the psychrometric properties and stress-tested validation of the survey instrument to ensure data consistency.
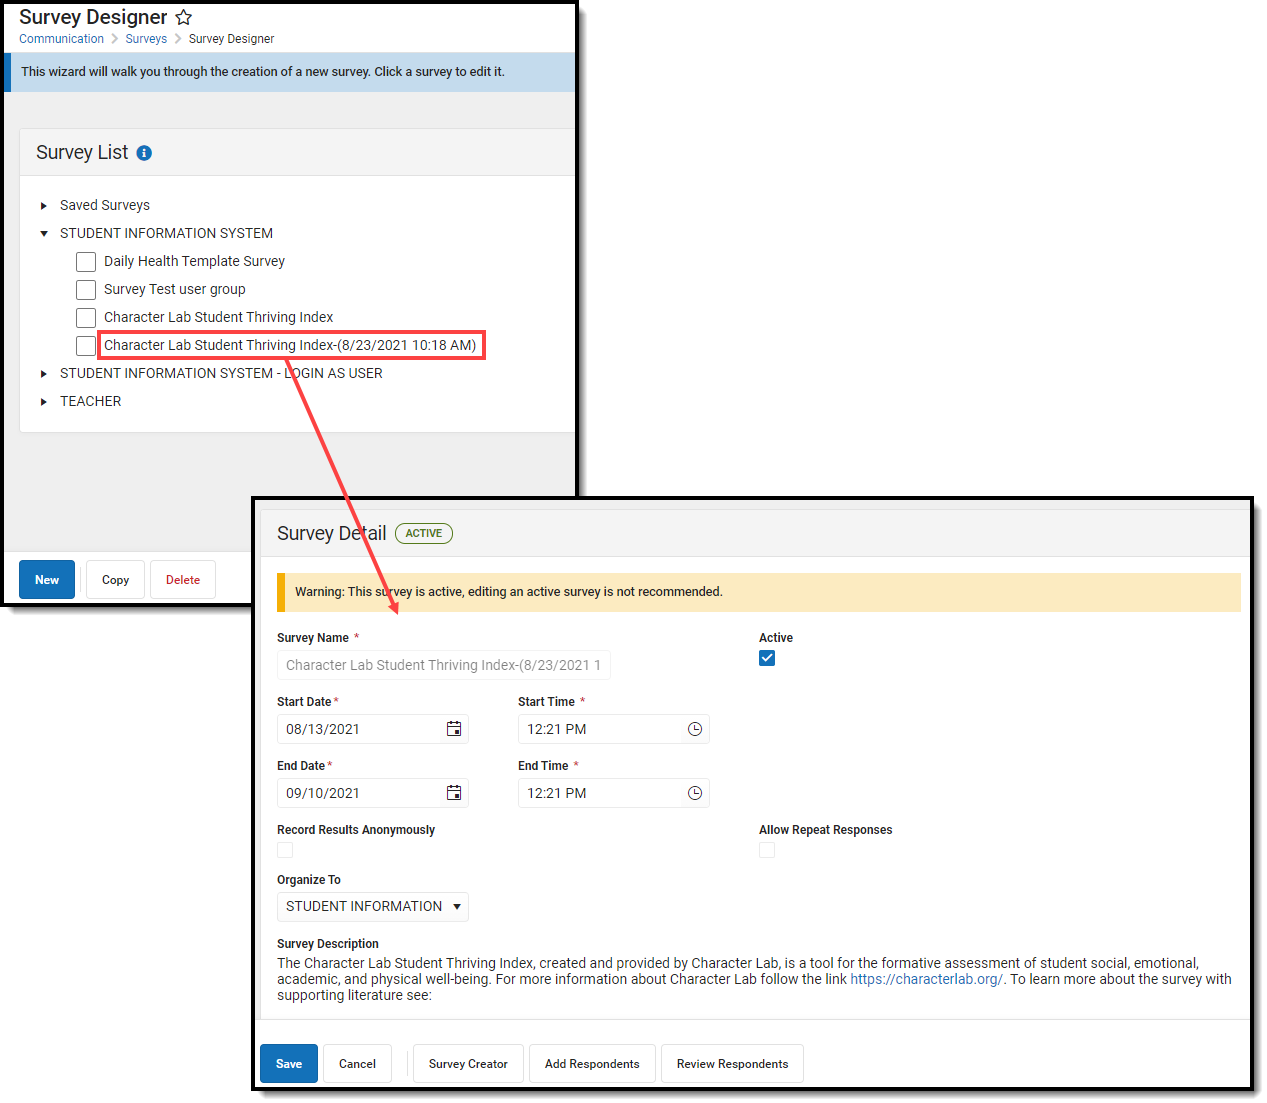
See the table below for information on these fields.
- Determine if the Survey is Active.
- Enter the Start Date/Time.
- Enter the End Date/Time.
- Mark the Record Results Anonymously, if desired.
- Mark the Allow Repeat Responses, if desired.
- In the Organize To dropdown field, select which user group has access to this survey template.
- Click the Save icon when finished. The Survey Detail will be saved. Move on to Step 2.
The table below describes each Survey Detail field:
Field | Description |
|---|---|
Survey Name | This is preset to Character Lab Student Thriving Index and cannot be modified. |
Active | When marked, the survey is active. Respondents may access, complete and return the survey. |
Start Date/Time | The day and time the survey is available for respondents. Dates are entered in mmddyy format or can be entered using the calendar icon to select a date. Time is entered in HH:MM AM/PM format or in HH:MM Military format. |
End Date/Time | The day and time the survey is no longer available for respondents. Dates are entered in mmddyy format or can be entered using the calendar icon to select a date. Time is entered in HH:MM AM/PM format or in HH:MM Military format. |
Record Results Anonymously | When marked, surveys will be submitted anonymously, without any identifying respondent information (personID). Respondents are alerted when surveys are recording anonymous results. The option to Allow Repeat Responses is not available as no identifying person information is retained after the survey is completed. |
Allow Repeat Responses | When marked, the survey allows respondents to submit more than one response, should they decide to repeat the survey. Reports and extracts will display only the most recent submission. |
Organize To | The user account/user group(s) to which the survey is assigned. If a survey should only be accessible to the main survey staff member(s) and the district administration, this field should be set to User Account. |
Step 3. Add Respondents
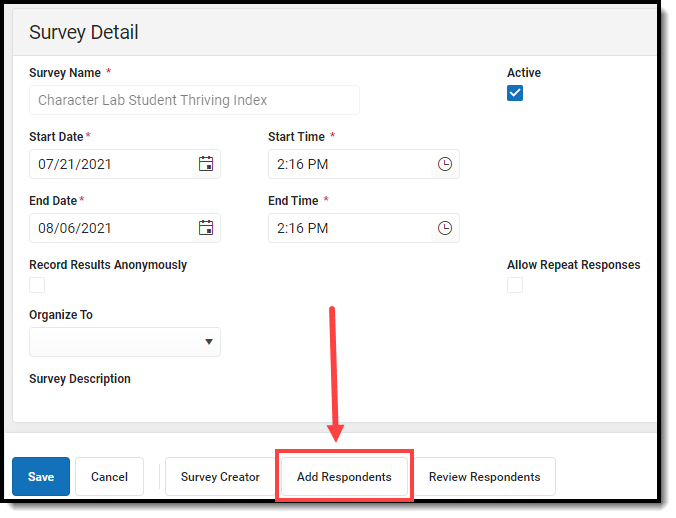
Now that Survey Details have been entered, it is time to send it to students. To add survey respondents, click the Add Respondents button (see image below).
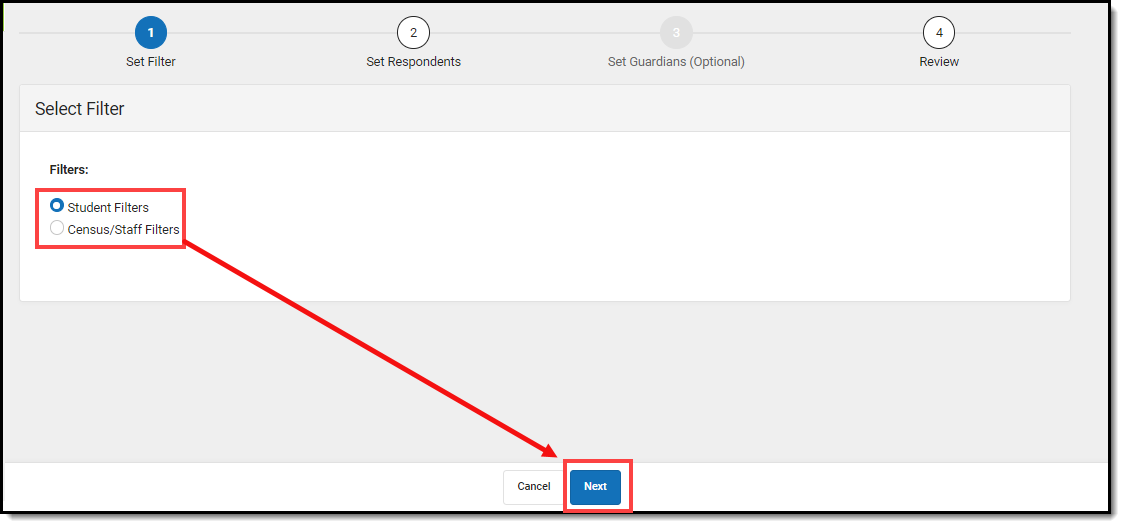
The Select Filter editor appears, asking if the respondent list will be comprised from a student or census/staff Ad Hoc filter.
Select Student Filters and then click Next.
Ad hoc filters are created within the Filter Designer tool. For a guide on how to create filters, see the Filter Designer article.
The Add Respondents editor will appear, displaying a list of existing Ad Hoc filters in the Saved Filters window.
- Select which filter(s) should be used to determine the respondent list by selecting the filter in the Saved Filters window and clicking the
 button. The filter will now appear in the Selected Filters window.
 - Select the Operation:
- Union - All respondents in all filters selected (depending on the invite value) will receive the survey.
- Intersection - Only students who appear on all selected filters will receive the survey.
- To limit respondents to only those who have a user account within Infinite Campus, mark the Only add respondents with user accounts checkbox. Surveys are accessed via the Portal and in order to have Portal access you must have a user account.
- Mark the Let guardians take the survey on behalf of the students checkbox if you would like to allow student legal guardians to take the survey on behalf of a student. See the section below for more information about this process.
- Click Next.
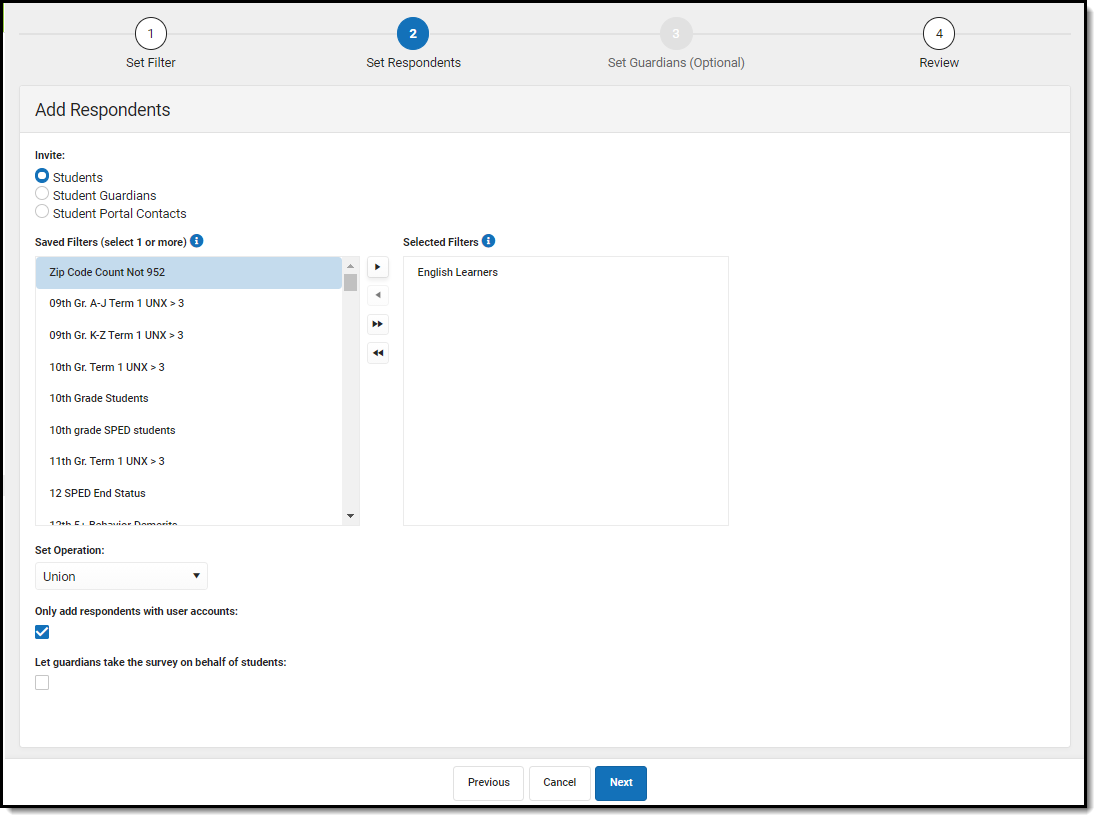
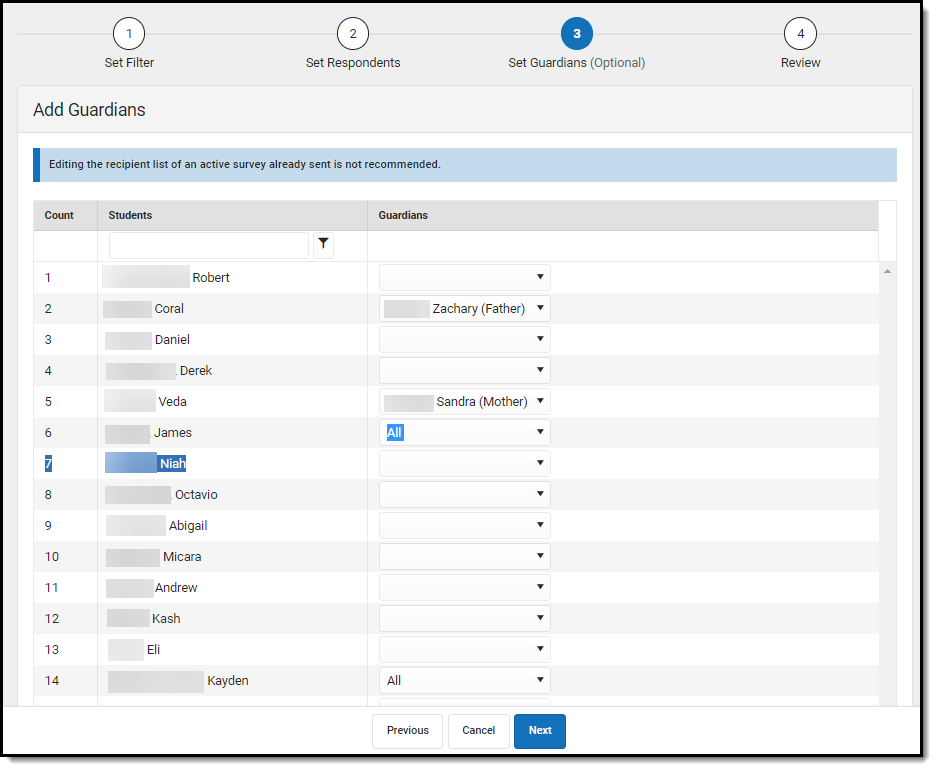
If the Let guardians take the survey on behalf of students checkbox is marked and you select Next, the Add Guardians editor will appear (see image below). Here, you can designate student by student which legal guardian is allowed to take the survey on behalf of the student.
Once guardians are selected, click Next.
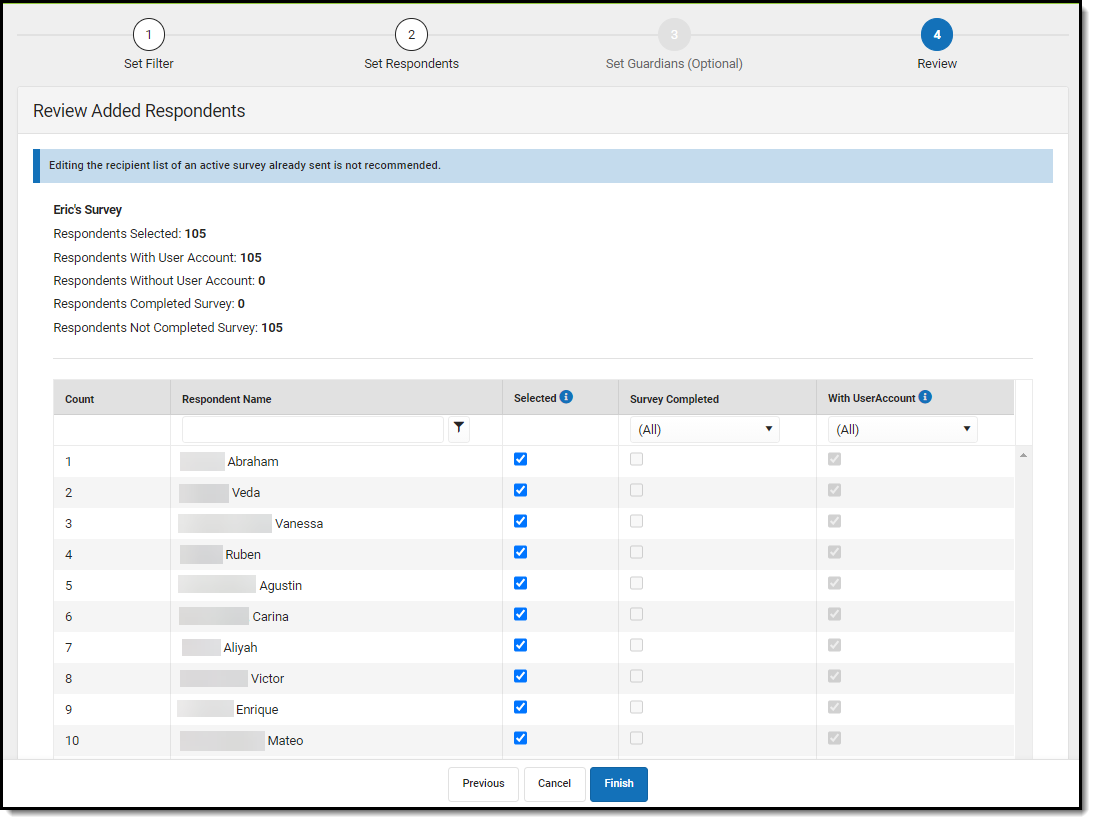
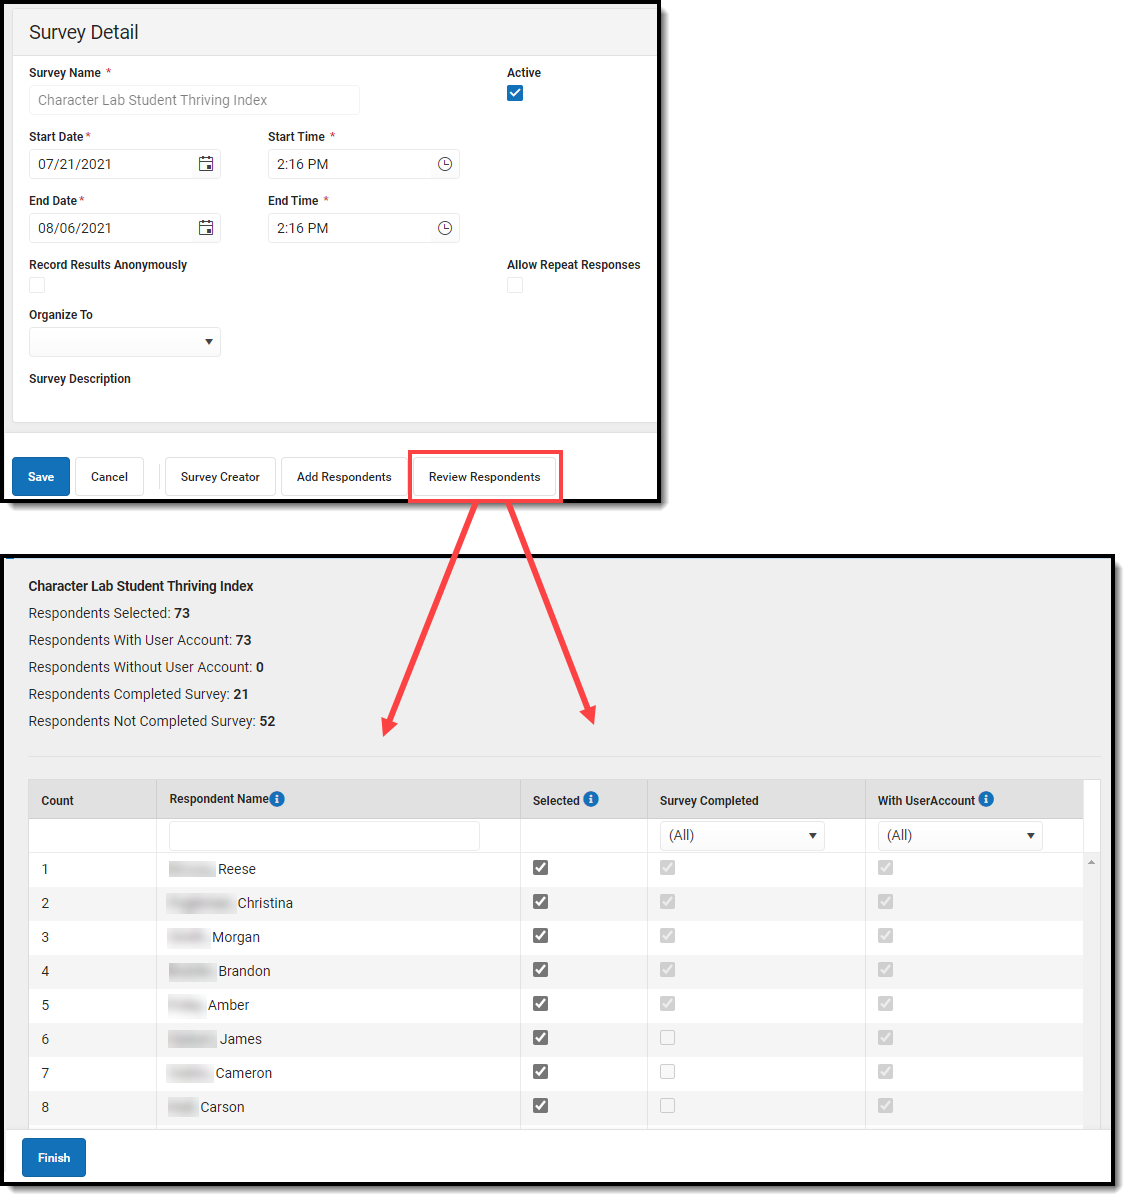
The Review Added Respondents editor appears, detailing now many respondents were selected, how many of them had a user account, how many did not have a user account, how many have already completed the survey, how many have yet to complete the survey, and a detailed breakdown of all people who received the survey.
If you have reviewed this information and feel the survey is ready to be sent out, click Finish. The survey has now been sent out to all respondents with a user account.
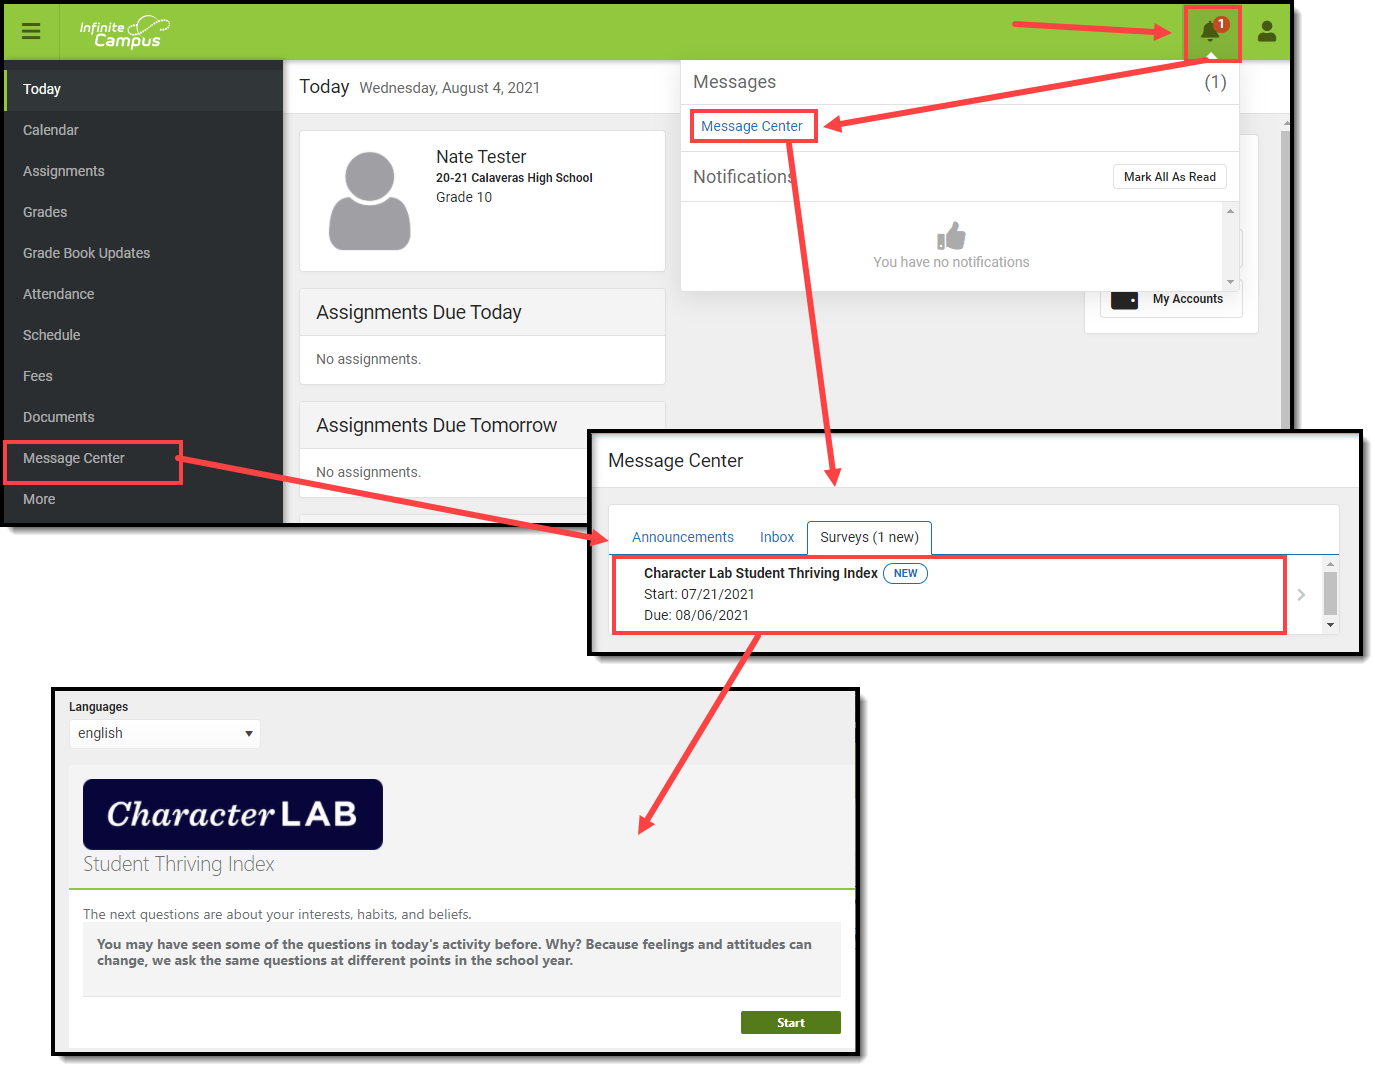
Respondents will receive a message about the survey in the Message Center under the Survey tab. From here, they can click on the survey and begin filling it out.
Review Respondents
To review how many students have or have not responded to the survey, select Student Thriving Index in the Survey Designer and click the Review Respondents button (see below).
Report and View Survey Responses
Classic View: Surveys > Reports > Response Extract
Search Terms: Response Extract
Once all respondents have completed the survey, the survey active window has closed, or you would like to see what answers you have received so far, navigate to the Response Extract.
Generate Survey Responses in a Table
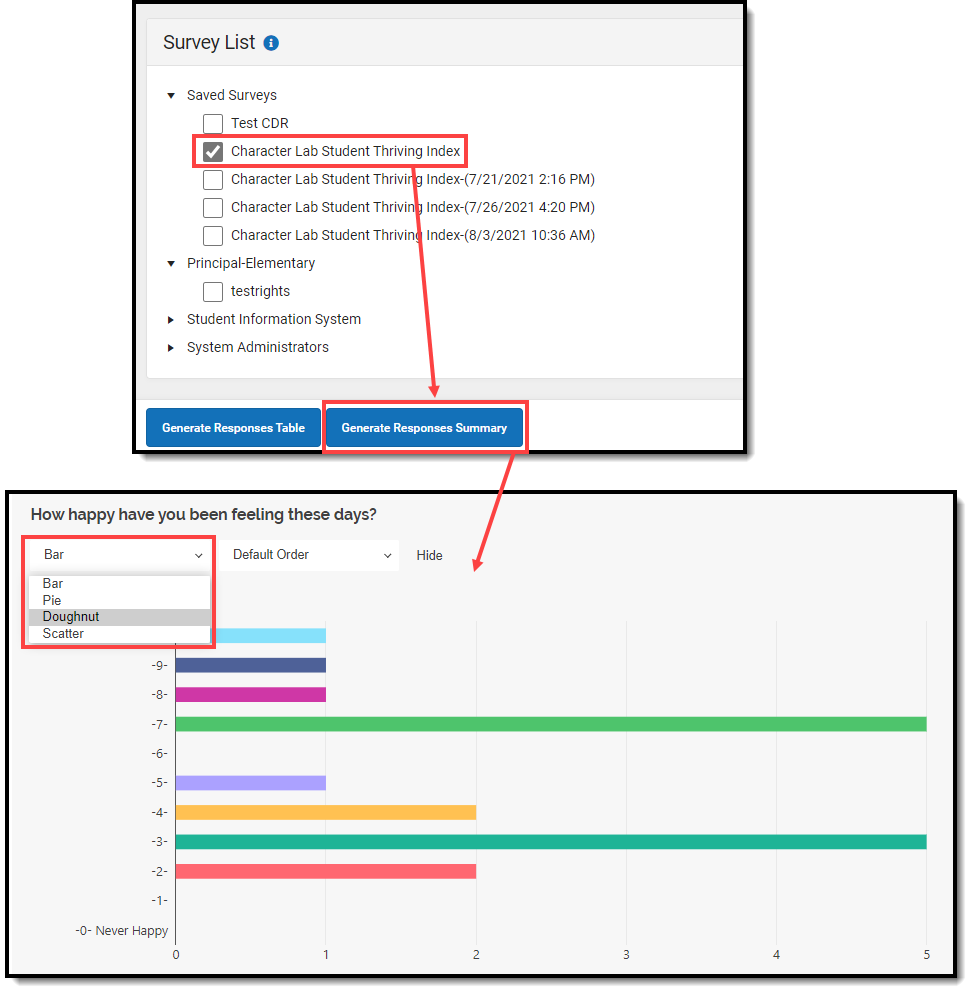
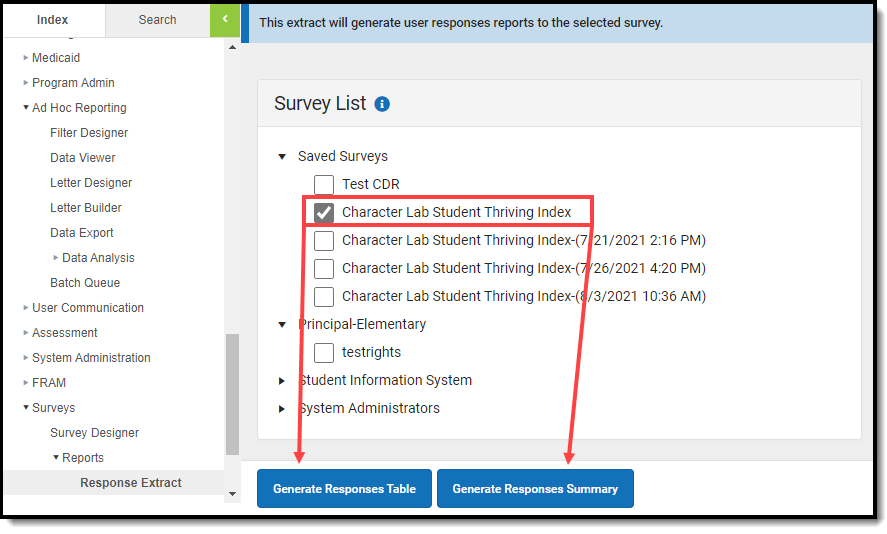
To view survey responses, mark the checkbox next to Character Lab Student Thriving Index and click the Generate Responses Table button. The selected survey's responses will appear in a new table editor.
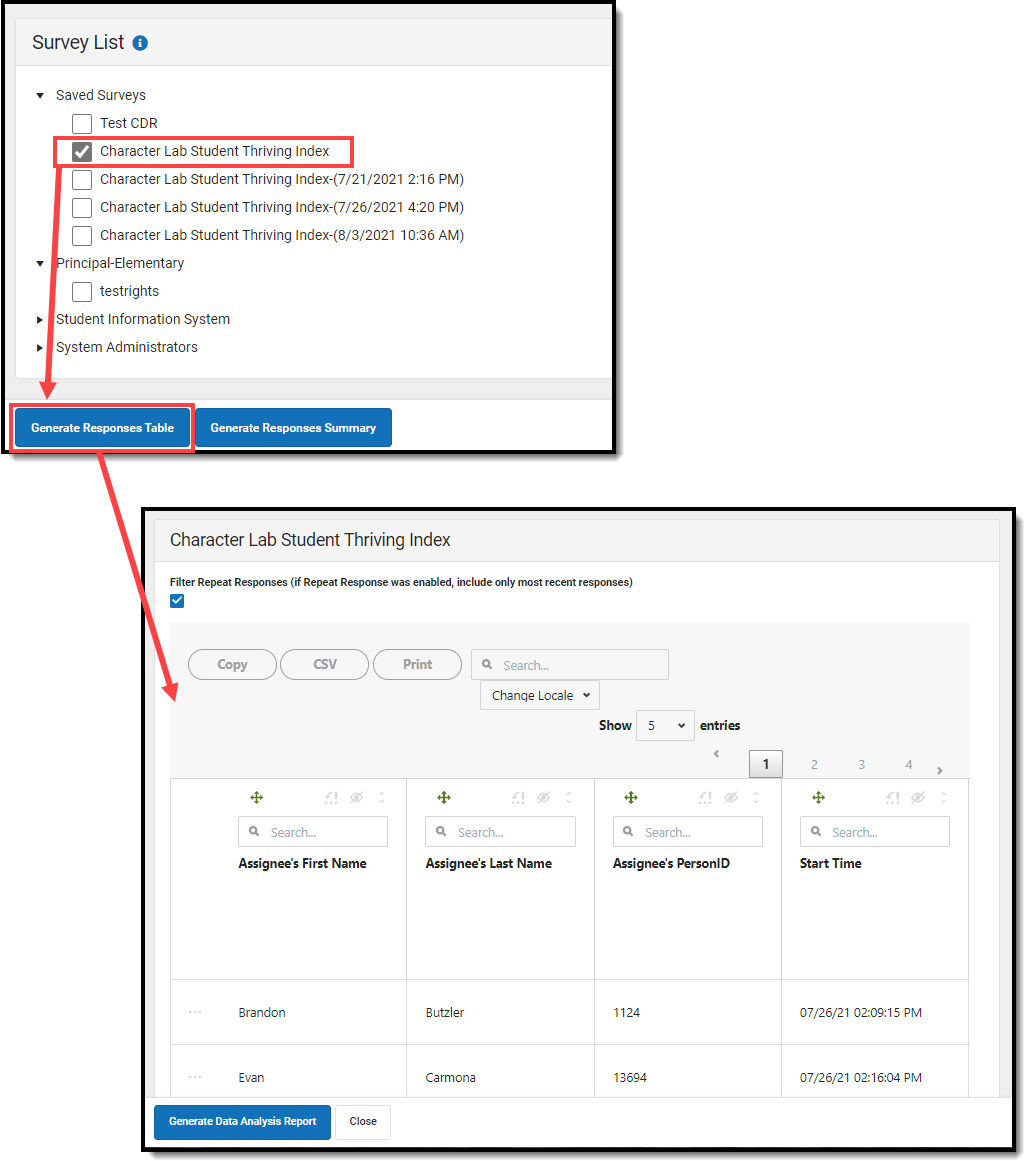
Using this editor, you can copy the data, download the data into a CSV, print the data, and search/filter the data using various features. The table below describes each available option.
Generate a Responses Summary
To view a summary of survey responses, mark the checkbox next to Character Lab Student Thriving Index and click the Generate Responses Summary button.
Survey responses will appear in a summary with each question and corresponding answers displayed in a format best suited for each question type:
- Select-type questions display as charts (bar, pie, doughnut, line)
- Range-type questions display as a gauge
- Text questions display as word clouds or a table
To modify the format of a question's responses, select a value in the dropdown lists found under each question.
