Messenger allows emails to be sent to parents, students, and staff members. If your district purchased Messenger with Voice or Text Messenger, voice and text messages can be sent to recipients.
Before messages can be sent, system setup is required. The type of messages to be sent, such as Attendance and Behavior, needs to be established for the contacts. The type of delivery devices needs to be assigned to the contacts as well.
Reports can be run to check the status of a message, and to see which contacts received it.
Census Overview for Messenger
This section goes over the steps to set up contacts for Messenger.
Contact Preferences
Email messages can be sent to parents, students and district staff members. A person must have an email address entered on the Demographics tab to receive email messages.
If your district uses Messenger with Voice, phone numbers must be established on the Demographics tab as well.
To send messages to student contacts/guardians, setup is required.
Messages can be sent to parents, students and district staff members. A person must have an email address entered on the Demographics tab to receive email messages. To send messages to student contacts/guardians, additional setup is required.
| Contact | Description |
|---|---|
| Students | If a student has an email address entered (in the Email field of the Personal Contact Information editor of the Demographics tab), he/she can receive emails for messages designated as "student" messages. Tools such as Message Builder, Class Messages, Survey Designer, etc., allow a message to be specifically designated for delivery to students. |
| Student Contacts/Guardians | If a student messenger contact or guardian wishes to receive email messages related to the student, he/she must have an email address entered in the Email field of the Demographics tab's Personal Contact Information editor. In addition, the types of emails the contact/guardian wishes to receive via email should be indicated by marking the checkboxes of relevant message types in the Messenger Preferences area of the Personal Contact Information editor. Each student must have at least one contact with whom a messenger contact relationship has been established. Otherwise, messages may not reach the necessary recipients. A messenger contact relationship is established by marking the Messenger checkbox for one or more people listed on a student's Relationships tab. Most email messaging tools, including Behavior Messenger, Attendance Messenger, Failing Grades Messenger, Class Messages, Missing Assignments Messenger, Message Builder, Survey Designer, etc., are dependent on this established messenger contact relationship. |
| District Staff Members | If a staff member has an email address entered and the Email message checkbox(es) marked (per the the Personal Contact Information editor of the Demographics tab), he/she will receive emails for messages designated as "staff" messages. Tools such as the Staff Messenger and Survey Designer allow an email message to be specifically delivered to current staff members. |
Tools for Setting Contact Preferences
There are a variety of options for establishing/updating a contact's preferences for receiving messages.
A Campus administrator may configure messenger contact preferences for students, student messenger contacts (usually a parent/guardian) and/or other staff members through either of the following tools:
- Tool Search: Demographics
An administrator may specify email as a contact preferences for any individual on his/her Demographics tab. The Personal Contact Information editor allows the administrator to enter an email address and mark the Email checkbox to indicate which types of messages should be delivered in that manner. Tool Search: Contact Preferences
An administrator may create and/or override messenger contact preferences for a group of users through the Contact Preferences tool.Tool Search: My Demographics
A district staff member may request updates to his/her own messenger contact preferences through this tool.Tool Search: Campus Student, Campus Parent
A student or student messenger contact (usually a parent/guardian) with an existing Campus Student or Campus Parent account may configure his/her own messenger contact preferences. The Change Contact Info area allows contacts to specify which phone numbers they would like used for each type of messages.
Campus Student and Campus Parent must be used in the district, and the Contact Information checkbox of the Portal Display Options must be marked for each school that wishes to allow Campus Portal users the ability to set their own messenger contact preferences.
Contact Preferences
The Contact Preferences Batch tool allows districts to set up messenger contact preferences en masse. Districts can use the wizard to refresh contact preferences; however, if parents have made their own preferences through the Campus Portal, this wizard may overwrite those settings.
Household phone preferences apply to all active members of this household. When using this tool, changes to the Household Phone affect all members of the household, regardless of which Mode you choose.
You cannot use this tool to set up text messaging preferences en masse since some cell phone users could potentially be charged for text messages they do not want to receive.
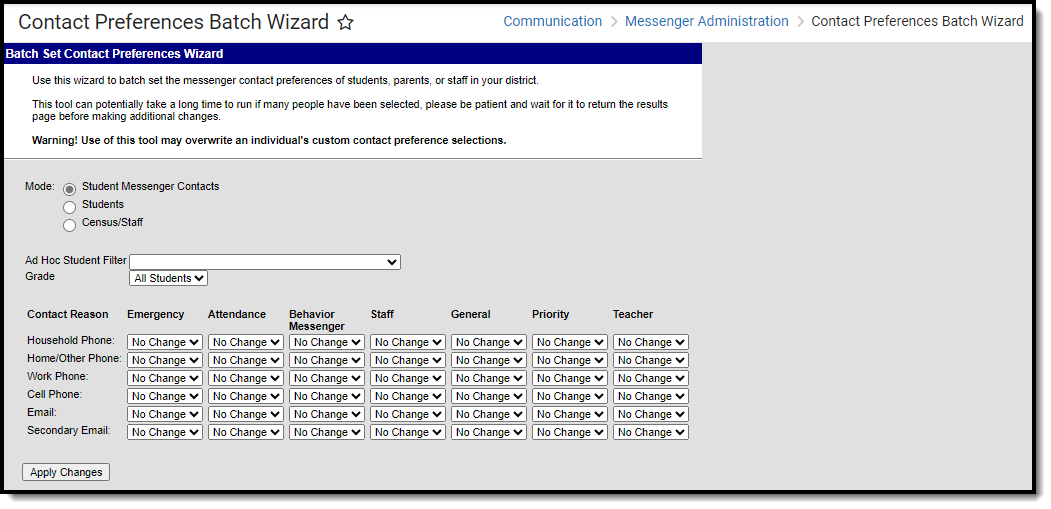 Contact Preferences Wizard
The Batch Tool updates based on the Campus Toolbar selection. The tool looks for Enrollments for the school/calendar selected to determine the pool of guardians that get updated. The guardians must also have a phone number or email address saved in order for the Contact Reason option(s) to be enabled. When updating Census/Staff, staff members must have a district assignment.
Preferences can be set for the following contact reasons.
Contact Reason | Description |
|---|---|
| Emergency | Emergency messages are sent to contacts based on the contact phone numbers and email addresses marked to receive emergency messages on Demographics. |
Attendance | Attendance messages notify guardians when students are absent or tardy from class. |
Behavior Messenger | Behavior messages notify guardians when a student is involved in a behavior incident. |
| Staff | Staff messages notify staff marked to receive notice of a resolution being added to a behavior event for Behavior Referrals. This is applicable only to those individuals who have a District Assignments record. In the Campus.1937 Release Pack (September 2019), the Behavior Referral Messenger Preferences was renamed to Staff. Functionality of this preference has not changed. At this time, the Staff Messenger Preference is only used in Behavior Referral to notify staff. |
General | General messages are any messages labeled as general by the district or school. |
| Food Service | Food Service messages notify guardians of current account balances and when food service accounts have low or negative balances. |
| Priority | Priority messages are messages that are labeled "High Priority" by the person who created the message. |
Teacher | If given rights by the district or school, teachers can send messages to guardians regarding failing grades and missing assignments. They can also send general announcements. |
Use the Contact Preferences Wizard
Select the Mode in which you want to run the wizard.
Household phone preferences apply to all active members of this household. When using this tool, changes to the Household Phone affect all members of the household, regardless of which Mode you choose.
- Student Messenger Contacts
- Students
- Census/Staff
Select an Ad Hoc Student Filter (optional). This field does not appear in Census/Staff Mode.
Select a Grade (optional). This field does not appear in Census/Staff Mode.
- Select one of the following options for the Contact Reason you are updating.
- No Change. This option leaves the setting that is currently active.
- On. This option means that contacts with the phone/email type on record in Campus will receive messages for the contact reason listed above.
- Off. This option means that no messages will be sent to that contact type for the contact reason listed above.
Click the Apply Changes button.
Campus updates the messenger contact preferences and reports the number of updated preferences.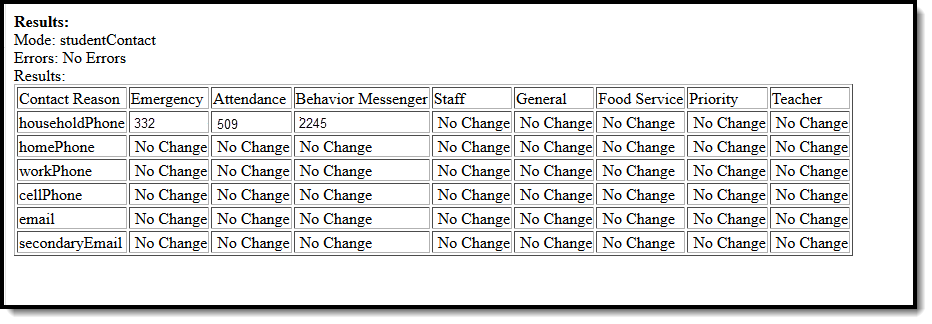 Example Results Page
Contact Preferences Batch Tool
The Contact Preferences Batch tool allows districts to set up messenger contact preferences en masse. Districts can use the wizard to refresh contact preferences; however, if parents have made their own preferences through the Campus Portal, this wizard may overwrite those settings.
Tool Search: Contact Preferences Batch Wizard
The Contact Preferences Batch tool allows districts to set or update messenger contact preferences en masse. If parents have set preferences through the Campus Portal, this wizard may overwrite those settings.
Text message preferences cannot be set in the Contact Preferences Batch, as recipients could potentially be charged for text messages they do not want to receive.
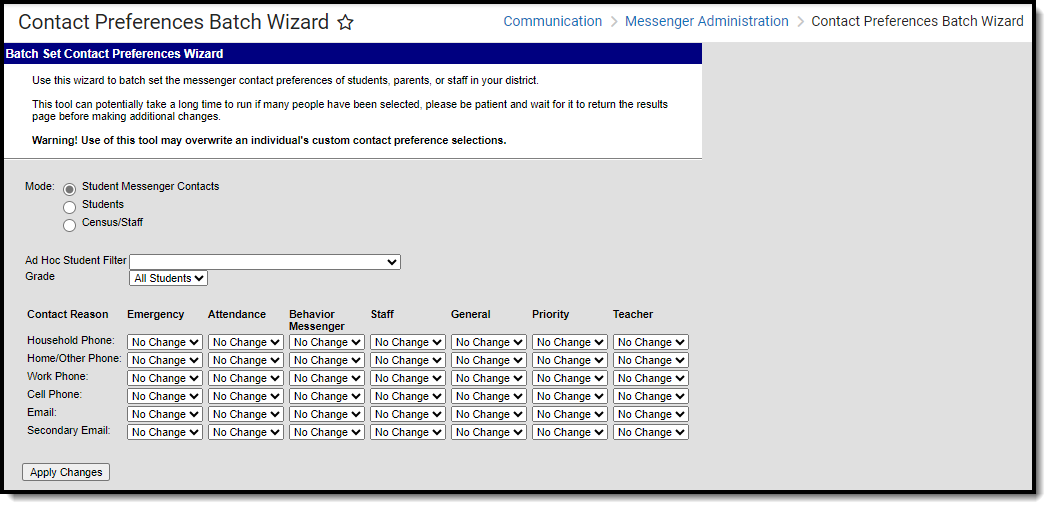 Contact Preferences Batch Wizard
See the Contact Preferences Batch Wizard Tool Rights article for information on available tool rights.
Preferences can be set for the following contact reasons.
Contact Reason | Description |
|---|---|
| Emergency | Emergency messages (See this page for Emergency Messenger 2.0) are sent to contacts based on the contact phone numbers and email addresses marked to receive emergency messages on Demographics. |
Attendance | Attendance messages notify guardians when students are absent or tardy from class. |
Behavior Messenger | Behavior messages notify guardians when a student is involved in a behavior incident. |
| Staff | Staff messages notify staff marked to receive notice of a resolution being added to a behavior event for Behavior Referrals. This is applicable only to those individuals who have a District Assignments record. |
General | General messages are any messages labeled as general by the district or school. |
| Food Service | Food Service messages notify guardians of current account balances and when food service accounts have low or negative balances. |
| Priority | Priority messages are messages that are labeled "High Priority" by the person who created the message. |
Teacher | If given rights by the district or school, teachers can send messages to guardians regarding grades and missing assignments. They can also send general announcements. |
Use the Contact Preferences Wizard
Select the Mode in which you want to run the wizard.
Household phone preferences apply to all active members of this household. When using this tool, changes to the Household Phone affect all members of the household, regardless of the mode selected.
- Student Messenger Contacts
- Students
- Census/Staff
Select an Ad Hoc Student Filter (optional) for modes 'Student Messenger Contacts' and 'Students'.
A filter is required in the Ad Hoc Census Filter dropdown list when the Census/Staff mode is selected- Select one of the following options for the Contact Reason you are updating.
- No Change. This option leaves the setting that is currently active.
- On. This option means that contacts with the phone/email type on record in Campus will receive messages for the contact reason listed above.
- Off. This option means that no messages will be sent to that contact type for the contact reason listed above.
Click the Apply Changes button. Campus updates the messenger contact preferences and reports the number of updated preferences.
Example Results Page
System Setup for Messenger
Learn to set the options needed to send email and voicemail messages.
Email Settings
The Email Settings tab allows a system administrator to configure general settings for email messages.
Tool Search: Email Settings
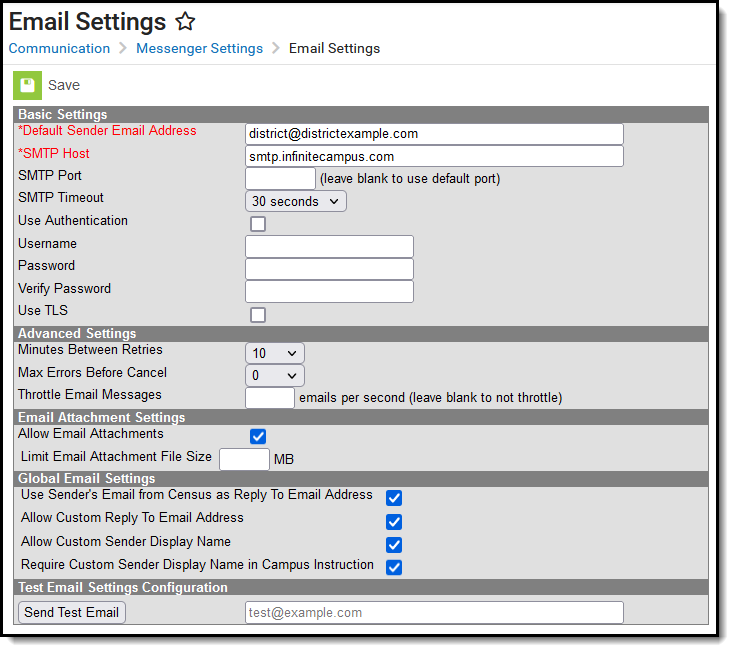
The Email Settings tab allows a user to configure general settings for email messages. The initial setup of this tab should be completed before email messaging is attempted.
Google and Yahoo now require enhanced email authentication, specifically through DMARC, SPF, and DKIM starting February 1st, 2024. Please review Email Authentication for DMARC, SPF, and DKIM for more information.
Tool Rights
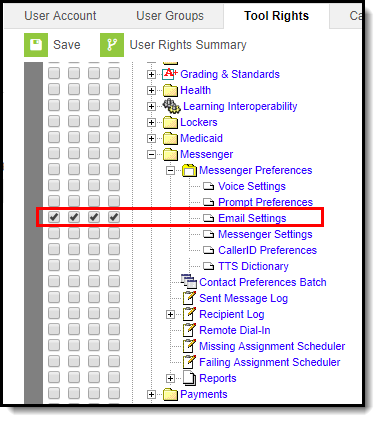
Users must have at least A(dd) tool rights to configure Email Settings.
SMTP Server Configuration
The sections below will describe how to configure your email depending on whether or not you will use TLS encryption:
- Non-TLS Configuration
- TLS Configuration
- Field Descriptions (SMTP)
Non-TLS Configuration
To configure the Email Settings for email messaging from an internal school/district server, or other email service that does not use TLS encryption:
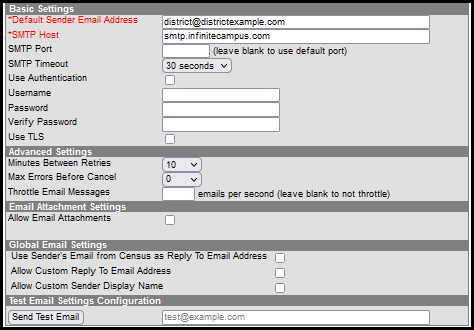
The following steps are required for standard setup:
- Enter the Default Sender Email Address.
- Enter the SMTP Host address.
- Enter the SMTP Port.
- Choose the number of Minutes Between Retries (optional).
- Select the allowed Max Errors Before Cancel (optional).
- Click the Save icon.
Users are highly advised to enter and Send a Test Email to ensure entered values are correct.
TLS Configuration
To configure the Email Settings to allow emails from email services and SMTP servers that require TLS encryption of transferred messages:
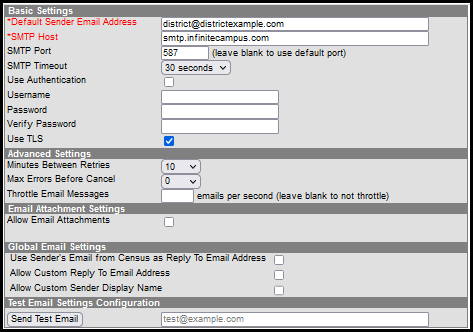
The following steps are required for standard setup:
- Enter the Default Sender Email Address.
- Enter the SMTP Host address.
- Enter the SMTP Port.
- Mark the Use TLS checkbox.
Users are highly advised to enter and Send a Test Email to ensure entered values are correct.
-
Click the Save icon.
Optional Configuration Steps
The following steps are optional for standard setup:
- Mark the Use Authentication checkbox and enter values in the authentication fields:
- Username
- Password
- Choose the number of Minutes Between Retries.
- Select the allowed Max Errors Before Cancel.
Field Descriptions (SMTP)
The table below describes each field available:
| Field | Description |
|---|---|
| Default Sender Email Address |
The default email address that appears as the "sent from" address on sent email messages. This field is required. The Default Sender Email Address must be a real email address so that the recipient’s email server does not view the message as SPAM. A real email address also allows bounce-back messages to be delivered to an actual mailbox even if the mailbox is not monitored. Do not include “infinitecampus” in the email address as this incorrectly gives the impression that emails are being delivered by the company Infinite Campus.
To reduce the chance an email is flagged as spam, avoid using "noreply" or "donotreply" in the Default Sender Email Address. |
| Use SMTP Server | Select this radio button to begin configuring email settings for an SMTP server. |
| SMTP Host | The Simple Mail Transfer Protocol (SMTP) host name used to transfer emails. SMTP is the only protocol supported in Campus. |
| SMTP Port | The specific port allowing SMTP and email exchange. To use the default SMTP port, leave blank. Otherwise, if a specific port number is required by a service, enter it in this field. |
| SMTP Timeout |
The amount of time that Campus will wait for the SMTP server to respond. If the SMTP server does not respond in the specified amount of time, the message will timeout and Campus will resend the message according the preferences set in the Advanced Settings group on this screen.
|
| Use Authentication | If a username and password are required for SMTP authentication, this box should be checked. When checked, the Username and Password fields will be unlocked for editing. |
| Username |
The username required for server authentication, if required by SMTP server setup. This field is available for editing when the Use Authentication field is set to a value of "Yes." |
| Password |
The password required for server authentication, if required by SMTP server setup. This field is available for editing when the Use Authentication field is set to a value of "Yes." |
| Use TLS | Checkbox indicates whether or not Transport Layer Security (TLS) should be used to encrypt email transfer on the server. Some services require this encryption. |
| Minutes Between Retries | The number of minutes to wait between a failed message delivery attempt and the next message delivery attempt. |
| Max Errors Before Cancel | The maximum number of failed message delivery attempts, to the email relay, for each individual email address before all attempts to deliver to the email address are canceled. The default value for this field is "10." |
| Throttle Email Messages | This option determines the number of email messages the application server will process per second. You may enter any number from 1 to 999. |
| Allow Email Attachments |
This option allows users to add email attachments to messages. When this option is checked, all Messenger tools display the option to send email attachments. When this option is not checked, no tools display the option to send email attachments. If there are template email attachments and this checkbox is cleared so that the option to upload an attachment is removed, the templates will NOT send the attachments. |
| Limit Email Attachment File Size |
This option allows you to set size limits for email attachments. If a user tries to attach a file that is larger than the limit set in this field, an error message will display explaining that their file is too large. The maximum file size is 100 MB and is set in the Campus XML file. Districts using Campus' SMTP Host are limited to 1.3 MB regardless of what is entered in this field. Large email attachments of several MBs will take several minutes to upload. If there are templates with email attachments and this field is changed to a limit lower than what exists on the saved templates, the templates WILL send the saved email attachment. If the template is changed and saved, you will not be able to save the large email attachment. |
| User Sender's Email from Census as Reply to Email Address |
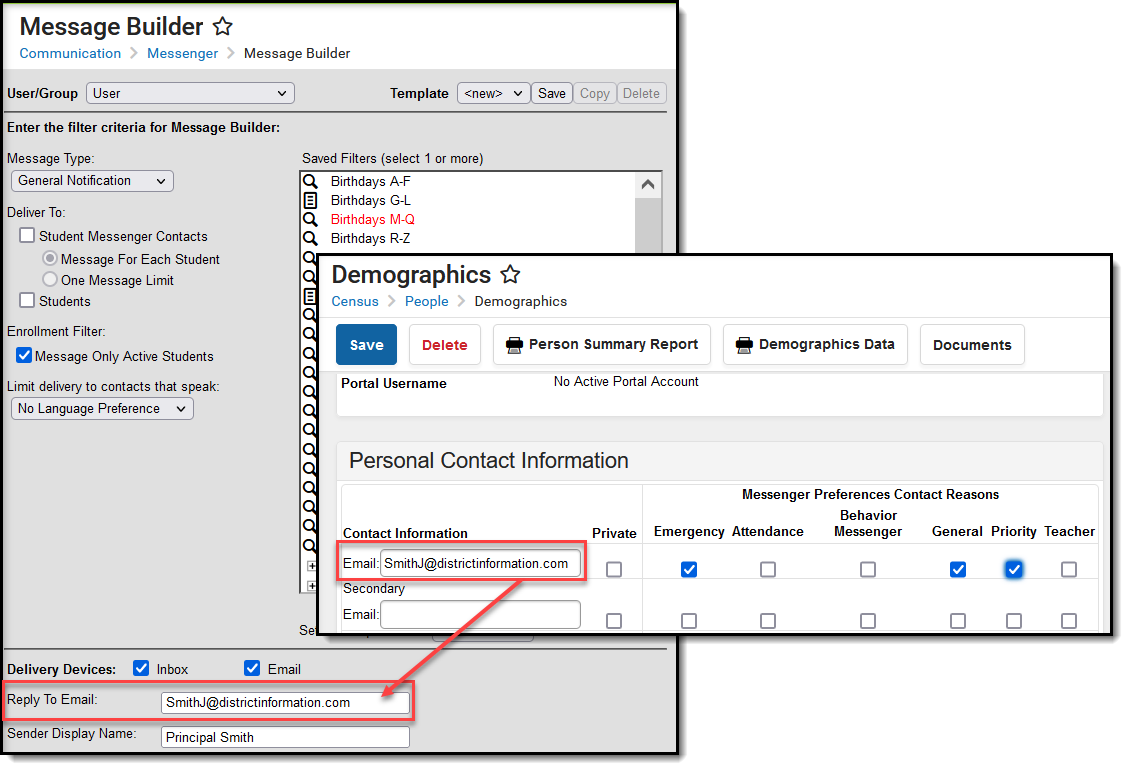
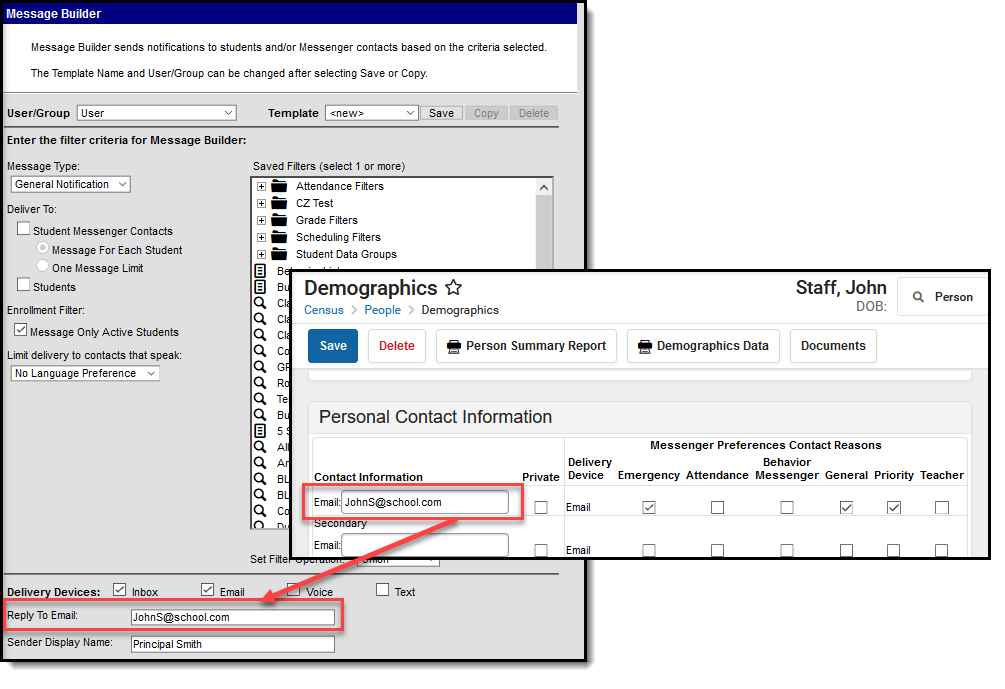
Mark this checkbox to have the sender's email address (Census > People > Demographics > Email) auto-populate the Reply To Email field in the Message Builder and Staff Messenger tools.
If the default language en_US is removed from Attribute Dictionary > Contact > Pref. Language, the option to User Sender's Email from Census will not work. Districts can add/edit other languages within the Attribute Dictionary, but should never edit or delete en_US.
This option does not apply to Emergency Messenger. Emergency Messenger uses the Email Address from the Default Sender Email Address on this screen. |
| Allow Custom Reply to Email Address |
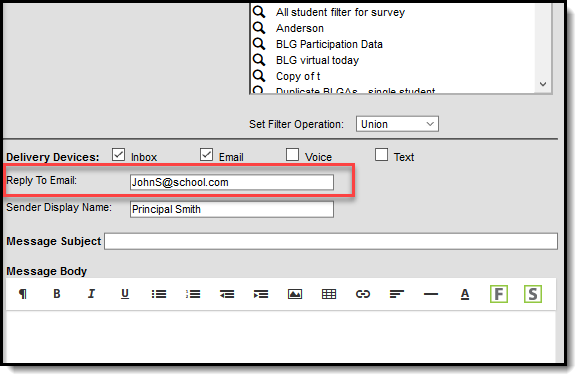
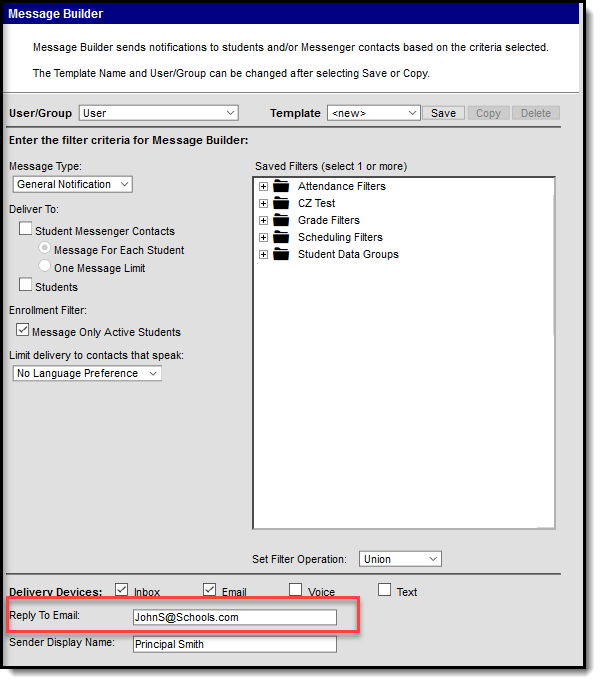
Mark this checkbox to have the Reply to Email field in the Message Builder and Staff Messenger tools unlocked and able to be edited.
If you check both the User Sender's Email from Census as Reply to Email Address and Allow Custom Reply to Email Address checkboxes, the Reply to Email field will auto-populate with the sender's email address but remain unlocked and able to be edited. This option does not apply to Emergency Messenger. Emergency Messenger uses the Email Address from the Default Sender Email Address on this screen. |
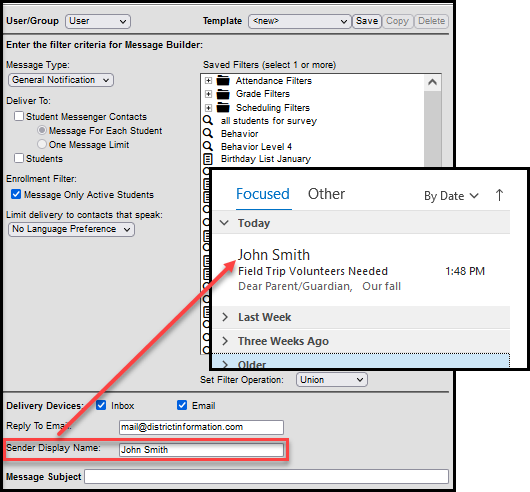
| Allow Custom Sender Display Name | Mark this checkbox to have the Sender Display Name field display in the Message Builder, Staff Messenger and Emergency Messenger tools. If enabled, the field will display only when Email is selected from the Delivery Devices options. This field allows the sender to customize the name they would like displayed in the recipient's email inbox for easier identification purposes.
 |
| Require Custom Sender Display Name in Campus Instruction | Mark this checkbox to display the Sender Display Name field in Campus Instruction messenger tools. When marked, an entry is required before the message can be sent.
This checkbox is available only when the Allow Custom Sender Display Name checkbox is marked.
|
| Send Test Email | Enter a valid email address and select the Send Test Email button to test whether the Email Settings entered above this field are correct. If you receive the test email in your inbox, your Email Settings are configured properly. If you do not receive the test email, this indicates one or more of the fields above is incorrect or invalid. |
Mailgun Configuration
Mailgun is a third party email relay system Campus uses to distribute emails out to service providers. Campus provides Mailgun to Campus Cloud (CC) or Campus Cloud Choice (CCC) hosted districts. Non-CC/CCC hosted districts can obtain an account directly from Mailgun if desired. This section will walk you through configuring Campus to send email messages using Mailgun.
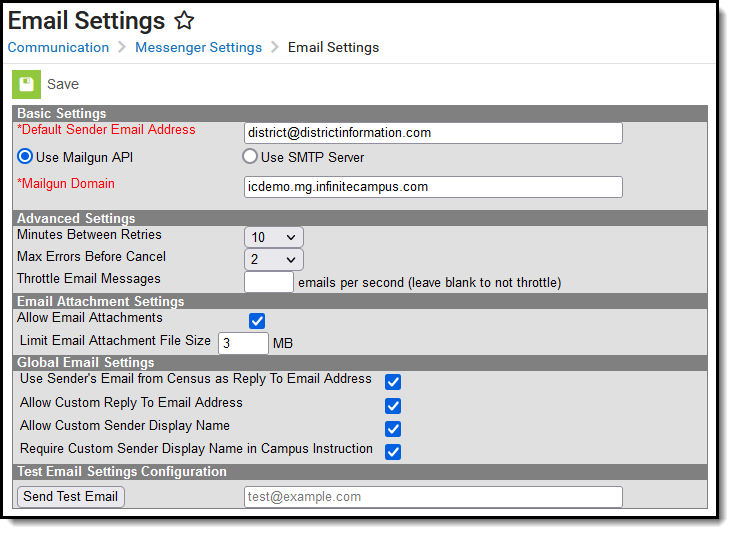
The following steps are required for a Mailgun setup:
- Enter the Default Sender Email Address.
- Select the Use Mailgun API radio button.
- Enter your Mailgun Domain.
- Enter an email address in the Test Email Setting Configuration section and click the Send Test Email button. This test email allows you to ensure the settings you have entered are correct.
- Click the Save icon.
Optional Configuration Steps
See the table below for more information about remaining optional fields found in the editor.
Field Descriptions (Mailgun)
The table below describes each available field.
| Field | Description |
|---|---|
| Default Sender Email Address |
The default email address that appears as the "sent from" address on sent email messages. This field is required. The Default Sender Email Address must be a real email address so that the recipient’s email server does not view the message as SPAM. A real email address also allows bounce-back messages to be delivered to an actual mailbox even if the mailbox is not monitored. Do not include “infinitecampus” in the email address as this incorrectly gives the impression that emails are being delivered by the company Infinite Campus.
To reduce the chance an email is flagged as spam, avoid using "noreply" or "donotreply" in the Default Sender Email Address. |
|
Use Mailgun API |
Mark this radio button if you use Mailgun as your email delivery service. This feature is only relevant for users who use Mailgun as their email delivery service. This functionality is only available for Campus Cloud and Cloud Choice customers. |
| Mailgun Domain | The domain tied to your Mailgun account. |
| Minutes Between Retries | The number of minutes to wait between a failed message delivery attempt and the next message delivery attempt. |
| Max Errors Before Cancel |
The maximum number of failed message delivery attempts allowed before all attempts to deliver the message are canceled. The default value for this field is "10." |
| Throttle Email Messages | This option determines the number of email messages the application server will process per second. You may enter any number from 1 to 999. |
| Allow Email Attachments |
This option allows users to add email attachments to messages. When this option is checked, all Messenger tools display the option to send email attachments. When this option is not checked, no tools display the option to send email attachments. If there are template email attachments and this checkbox is cleared so that the option to upload an attachment is removed, the templates will NOT send the attachments. |
| Limit Email Attachment File Size |
This option allows you to set size limits for email attachments. If a user tries to attach a file that is larger than the limit set in this field, an error message will display explaining that their file is too large. The maximum file size is 100 MB and is set in the Campus XML file. Districts using Campus' SMTP Host are limited to 1.3 MB regardless of what is entered in this field. Large email attachments of several MBs will take several minutes to upload. If there are templates with email attachments and this field is changed to a limit lower than what exists on the saved templates, the templates WILL send the saved email attachment. If the template is changed and saved, you will not be able to save the large email attachment. |
| Use Sender's Email from Census as Reply to Email Address |
Mark this checkbox to have the sender's email address (Census > People > Demographics > Email) auto-populate the Reply To Email field in the Message Builder and Staff Messenger tools.
If the default language en_US is removed from Attribute Dictionary > Contact > Pref Language, the option to User Sender's Email from Census will not work. Districts can add/edit other languages within the Attribute Dictionary, but should refrain from editing or deleting en_US.
This option does not apply to Emergency Messenger. Emergency Messenger uses the Email Address from the Default Sender Email Address on this screen. |
| Allow Custom Reply to Email Address |
Mark this checkbox to have the Reply to Email field in the Message Builder and Staff Messenger tools unlocked and able to be edited.
If you check both the User Sender's Email from Census as Reply to Email Address and Allow Custom Reply to Email Address checkboxes, the Reply to Email field will auto-populate with the sender's email address but remain unlocked and able to be edited. This option does not apply to Emergency Messenger. Emergency Messenger uses the Email Address from the Default Sender Email Address on this screen. |
| Allow Custom Sender Display Name | Mark this checkbox to have the Sender Display Name field display in the Message Builder, Staff Messenger and Emergency Messenger tools. If enabled, the field will display only when Email is selected from the Delivery Devices options. This field allows the sender to customize the name they would like displayed in the recipient's email inbox for easier identification purposes.
 |
| Require Custom Sender Display Name in Campus Instruction | Mark this checkbox to display the Sender Display Name field in Campus Instruction messenger tools. When marked, an entry is required before the message can be sent.
This checkbox is available only when the Allow Custom Sender Display Name checkbox is marked.
|
| Send Test Email | Enter a valid email address and select the Send Test Email button to test whether the Email Settings entered above this field are correct. If you receive the test email in your inbox, your Email Settings are configured properly. If you do not receive the test email, this indicates one or more of the fields above is incorrect or invalid. |
Review Sent Messages via Mailgun API
The Mailgun Message Log allows you to review all messages sent in the last 30 days via the Mailgun API.
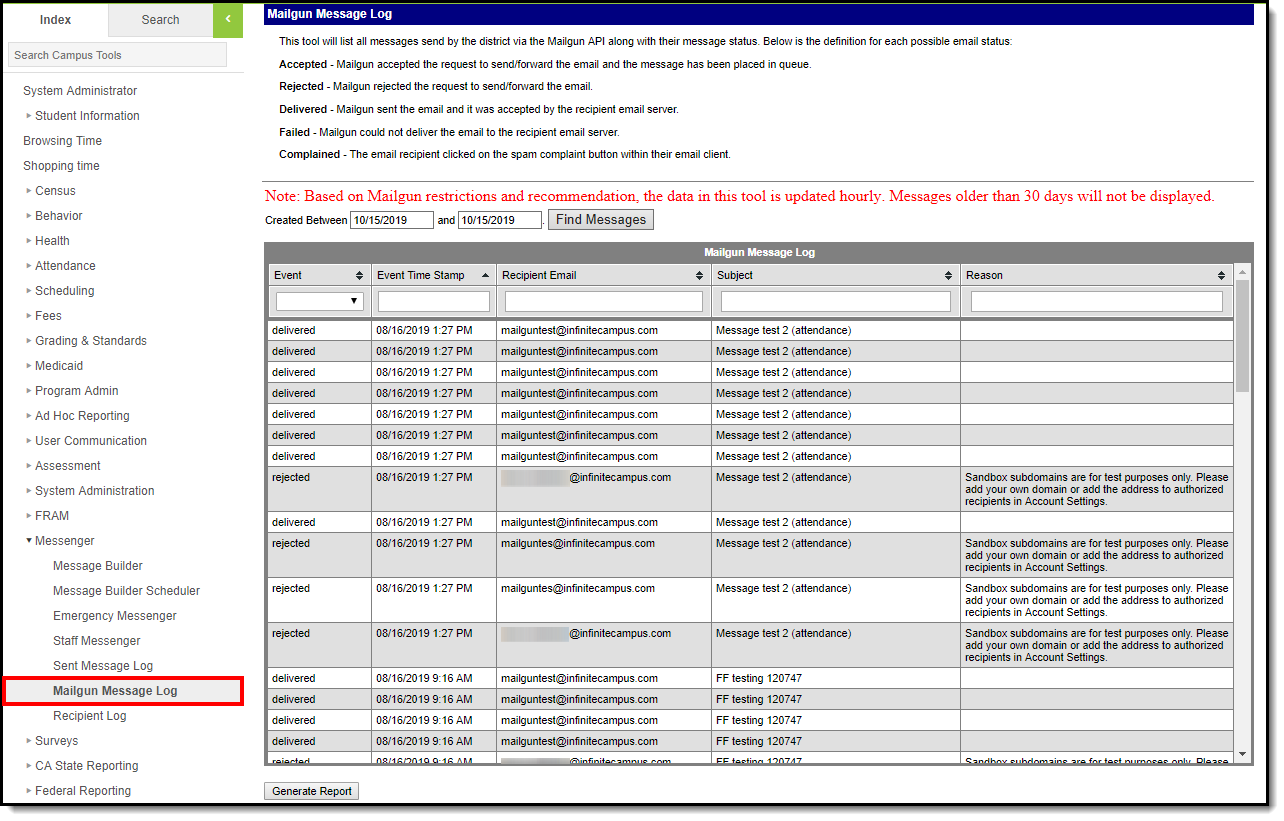
Google and Yahoo now require enhanced email authentication, specifically through DMARC, SPF, and DKIM starting February 1st, 2024.
Messenger with Voice Settings
This topic pertains to districts that use Campus Messenger with Voice.
Campus Messenger with Voice allows district staff the ability to create voice messages for delivery to parents, students and/or other district staff.
Campus Messenger with Voice allows district staff the ability to create voice messages for delivery to parents, students and/or other district staff. This article explains the basic concepts and setup of Campus Messenger with Voice.
Messenger with Voice Technical Details
Campus Messenger with Voice has merged with Shoutpoint, a third-party VoIP (Voice-over Internet Protocol) service designed to efficiently route a large volume of calls. Shoutpoint provides a voice-over internet protocol service that can deliver daily messages (e.g., student behavior, attendance, grades), high priority messages, general notifications from the school/district, internal staff messages, etc. In addition, Shoutpoint also allows for rapid delivery of messages through Emergency Messenger.
The following sections explain how Messenger with Voice and Shoutpoint make voice message delivery possible.
Shoutpoint Details
When a voice message is created in Campus and sent to Shoutpoint for delivery, Shoutpoint takes over. It dials the Campus-provided phone numbers and attempts to deliver the voice message. No phone or dialer hardware is necessary, as Shoutpoint handles the entire dialing and delivery process.
Shoutpoint has two domestic call centers, one in California and another in New York. Database servers dedicated entirely to Campus messaging exist at both locations. In the event that a Shoutpoint server goes offline during a vital messaging period, the dedicated servers allow fail-over protection and ensure message delivery.
Shoutpoint customer identification requires that the district enters credentials on the Voice Settings tab. Shoutpoint will then create a specific customerID that it will use for district recognition purposes.
Shoutpoint Credentials
Infinite Campus Hosting staff will provide districts using Shoutpoint a user name, password and end-point URL to be used for communication and authentication by Shoutpoint. These credentials are required for any type of voice-messaging.
A district will enter and save these credentials on the Voice Settings tab, which will also store them in the Campus database. When entered, a request is sent to Shoutpoint for customer verification. If the customer account cannot be validated, an error will be returned to the user and Shoutpoint messaging will not be enabled.
CustomerIDs
Each school and the district will be assigned a customerID by Shoutpoint. Each school has a customerID that is assigned the first time that particular school makes a call to the Shoutpoint server (to request message delivery). The district's customerID is assigned when Shoutpoint verifies user-entered credentials.
The customerID is stored in the Campus database but is not necessary for functionality or authentication operations. It is for Shoutpoint recognition purposes ONLY.
District Firewall Setup
The Campus application makes a call to Shoutpoint every time a messaging task is ready for delivery. Shoutpoint does not talk to the Campus application server. The Shoutpoint web service allows communication through HTTP/S, so special port configuration should not be necessary.
However, if a firewall is preventing outgoing communication (from the district to Shoutpoint), the district should verify that the Shoutpoint server is not being blocked. For more information or assistance, contact Campus Support.
Message Delivery Methods
Campus message jobs are transferred to Shoutpoint via a web service and SOAP messaging. SOAP (Simple Object Access Protocol) uses XML-based messaging protocol to encode information in a web service before it is sent over a network.
Shoutpoint has an end-point URL prepared to receive the SOAP messages. Shoutpoint returns a report to Campus to indicate whether or not the message was delivered. When Shoutpoint receives a job from Campus, it identifies the type of message (i.e., emergency or non-emergency) and delivers it accordingly.
The number of phone lines available for message delivery vary by district size.
Emergency Message Delivery
Messages created within the Emergency Messenger wizard are delivered instantly. Unlike other Campus messages, which rely on a date and time scheduled by a user through the Task Scheduler, an emergency message is sent immediately. It does not have a delivery window and is not confined to the district-allowed dialing window times set on the Voice Settings tab.
Emergency messages are delivered as quickly as possible and emergency jobs take priority over other scheduled message tasks. Shoutpoint dedicates a number of emergency phone lines to each district.
Non-Emergency Message Delivery
All non-emergency messages (i.e., attendance, behavior, staff) are scheduled for delivery through use of the Message Builder tool (which relies on Task Scheduler for the scheduling and triggering of message delivery).
Non-emergency messages can be delivered at any time specified by the message's specific dialing window, as long as the time falls within the district-allowed dialing window, defined by the District Start Time and District End Time fields of the Voice Settings tab.
Message Delivery Verification
Campus queries the Shoutpoint call log every 15 seconds to review the status of messages scheduled for delivery. It requests information about the recipient and the message delivery status, which indicates how the call was received.
Results are displayed in the Sent Message Log. For more information, please reference Sent Message Log articles.
About Call Chaining
Voice Messenger and Shoutpoint use a method called Call Chaining to distribute messages. Call Chaining increases the speed and efficiency by which messages are sent.
For example, there is a Family with Mom, Dad, Son and Daughter. A non-emergency message is sent from the school about Son and Daughter and both Mom and Dad have the Messenger checkbox marked on the Relationships in Census for each student.
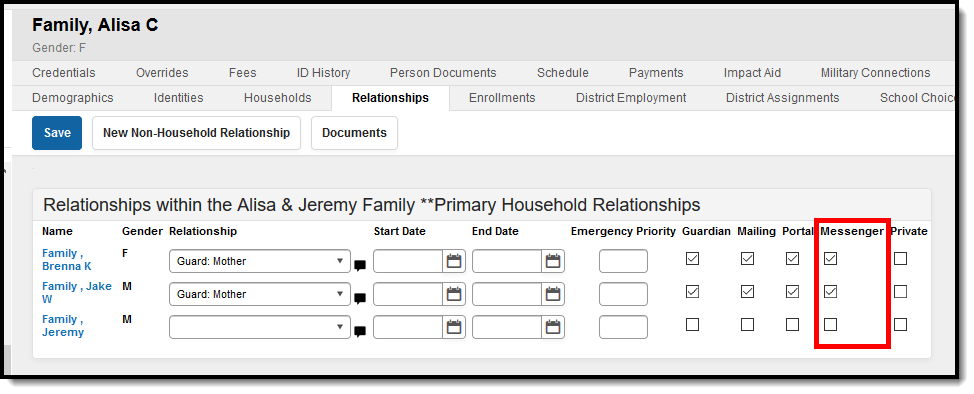 Guardian Messenger Settings
Contact preferences for the guardian may look like this:
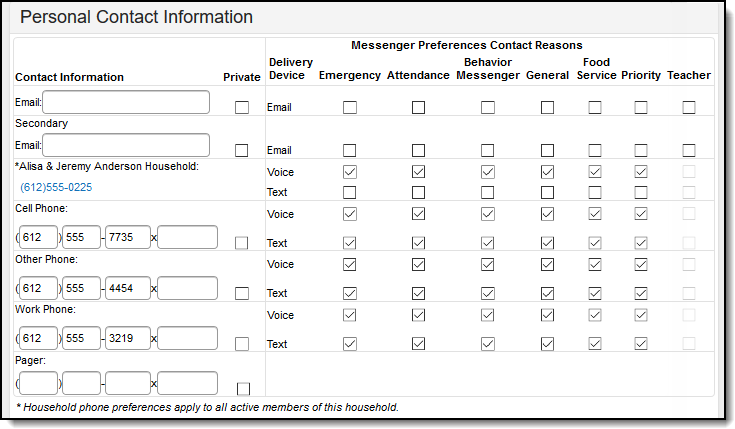 Guardian Contact Preferences
For this scenario, Voice messenger would create the following 6 default Call Chains. All 6 call chains would potentially start running simultaneously.
- Household Phone Number > Message about Son
- Household Phone Number > Message about Daughter
- Dad’s contact preferences (cell, work, other) > Message about Son
- Dad’s contact preferences (cell, work, other) > Message about Daughter
- Mom’s contact preferences (cell, work, other) > Message about Son
- Mom’s contact preferences (cell, work, other) > Message about Daughter
If the message was just pertaining to Daughter, there would only be three call chains:
- Household Phone Number > Message about Daughter
- Dad’s contact preferences (cell, work, other) > Message about Daughter
- Mom’s contact preferences (cell, work, other) > Message about Daughter
When a message recipient presses the confirmation key “0” on any of these chains, only THAT CHAIN is cancelled. The other chains are not affected. So, if Mom receives the message on the Household Number and presses 0, she will still be called on her cell, work or other number and will need to confirm and cancel that chain as well.
Messenger tools that can insert Campus Fields for recipient names (POS Account Messenger, Staff Messenger, or Survey Messenger) ignore unique recipients when the phone number is the same. When recipient names are inserted into the Messenger Templates and a phone number is shared among multiple recipients, then only one recipient name is selected for the bundled call.
Required Campus Application Setup
A district should verify/complete the following steps before use of voice messaging features is attempted.
1. Shoutpoint Credentials
PATH: System Administration > Messenger > Messenger Preferences > Voice Settings
Shoutpoint must have been enabled by Infinite Campus. After this is done, the district will receive credentials for Shoutpoint customer recognition/verification that must be entered in Campus.
Entering the Shoutpoint Credentials
When Campus provides the district with the Shoutpoint credentials (i.e., the User Name, Password and URL End Point), they should be entered on the Voice Settings tab.
2. Phone Number Format
PATH: Census > People > Demographics
All existing and new phone numbers must be entered in 10-digit format in the Personal Contact Information editor. Shoutpoint cannot deliver messages to phone numbers that do not have a specified area code.
Infinite Campus recommends always entering the full 10 digits in all phone number fields.
3. Establishing Messenger Contacts
Voice messages can be delivered to parents, students and district staff members. A person must have one or more phone numbers entered on his/her Demographics tab to receive voice messages. To deliver voice messages to student contacts/guardians, additional setup is required.
Message Delivery to Students
If a student has a phone number entered (in any of the phone number fields of the Personal Contact Information editor, he/she can receive phone messages designated as "student" messages. Tools such as Message Builder,Class Messages, Survey Designer, etc., allow a message to be specifically designated for delivery to students.
Message Delivery to Student Contacts / Guardians
If a student messenger contact or guardian wishes to receive voice messages related to the student, he/she must have at least one phone number entered in a phone field of the Personal Contact Information editor on the Demographics tab. In addition, the type of phone messages the contact/guardian wishes to receive should be indicated by marking the checkboxes of relevant message types in the Messenger Preferences area of the Personal Contact Information editor.
Most phone messaging tools, including Emergency Messenger, Behavior Messenger, Attendance Messenger, Failing Grades Messenger, Class Messages, Missing Assignments Messages, Message Builder, Survey Designer, etc., are dependent on this established messenger contact relationship.
Message Delivery to District Staff Members
If a staff member has at least one phone number entered and at least one voice message checkbox(es) marked (per the Personal Contact Information editor of the Demographics tab), he/she will receive phone calls for messages designated as "staff" messages. Tools such as the Emergency Messenger, Staff Messenger and Survey Designer allow a phone message to be specifically delivered to current staff members.
The Emergency Messenger tool also requires that a staff member have at least one Staff Type checkbox marked on his/her District Assignments tab that matches a selection made in the Staff Type(s) area of the created emergency message.
4. Contact Preferences
There are a variety of options for establishing/updating a contact's preferences for receiving messages.
A Campus administrator may configure messenger contact preferences for students, student messenger contacts (usually a parent/guardian) and/or other staff members through either of the following tools:
-
PATH: Census > People > Demographics
An administrator may specify contact preferences for any individual on his/her Demographics tab. The Personal Contact Information editor allows the administrator to enter phone numbers and indicate which types of messages should be delivered to each entered number. -
PATH: System Administration > Messenger > Contact Preferences Batch
An administrator may create and/or override messenger contact preferences for a group of users through this tool. -
PATH: Census > My Data > My Demographics
A district staff member may request updates to his/her own messenger contact preferences through this tool. -
PATH: Portal
A student or student messenger contact (usually a parent/guardian) with an existing Portal account may configure his/her own messenger contact preferences. The Change Contact Info area allows contacts to specify which phone numbers they would like used for each type of messages.The Portal must be used in the district, and the Contact Information checkbox of the Portal Options must be marked for each school that wishes to allow Portal users the ability to set their own messenger contact preferences.
5. Messenger Contact Preferences
PATH: System Administration > Messenger > Messenger Preferences
Configuration of Messenger Preferences is recommended before voice messaging is attempted. Each of the following tools should be configured:
6. Reviewing the Task Scheduler
PATH: System Administration > Preferences > Task Scheduler
The system administrator is advised to check the Task Scheduler tool when scheduling recurring Messenger activities. A message at the bottom of the Scheduled Task editor will indicate whether or not the tool is enabled. The user should verify that the times of scheduled Messenger tasks will not conflict with other tasks for system performance considerations.
Text Messaging
Users will receive a text confirming their opt-in or opt-out status whenever their 'text' contact preferences are updated.
Text messaging is an additional feature available to customers who already use Messenger with Voice.
The following setup is required to use text messaging:
- The district must already use Campus Messenger with Voice and complete the setup steps listed above.
- The district must request text messaging functionality and it must be enabled by Infinite Campus Hosting staff.
- Recipients who have indicated a desire to receive text messages must have the Text (SMS) checkbox marked in the Personal Contact Information editor of the Demographics tab to receive text messages.
Reception, carrier network, phone plan, and/or device variables may influence whether a user receives a text as expected.
Have your contacts complete the following steps to ensure they receive text messages from the district.
- Text the word START to 82290.
Result
A Shoutpoint for Schools Alert is sent as a reply. -
Text YES to confirm that you would like to receive text messages from the district.
Result
You should receive future text messages from the district.
If the user texts the word START to 82290 and never receives the response text despite having adequate reception, they must call their carrier to see whether Premium Messaging (short code) is blocked. If Premium Messaging is blocked, it must be unblocked to receive texts from the district.
Additional charges may apply to the delivery of text messages. Contacts who want to receive text messages should be aware that phone service providers may charge extra for texting services. Infinite Campus is not responsible for text message charges.
If users wish to stop receiving text messages, they can text STOP to the short code. This results in the user receiving no further text messages from Campus, even if the user has the Text option marked on their Contact Preferences. Users need to go through the opt in process again to start receiving texts at a later date.
Remote Dial-In
PATH: System Administration > Messenger > Remote Dial-In
The Remote Dial-In tool is available to customers who already use Messenger with Voice functionality. This tool allows an emergency message to be sent without using the Campus application. Instead, the person sending the message calls a Shoutpoint phone number and follows the telephone prompts to create and deliver the message.
The following setup is required for Remote Dial-In capabilities:
- Remote Dial-In functionality requires that the district already use Campus Messenger with Voice and complete the setup steps listed above.
- The district must request Remote Dial-In functionality and it must be enabled by Infinite Campus Hosting staff.
- The person sending the message must have access to a phone and have the Shoutpoint Remote Dial-In phone number/password readily available.
Save
Save
Messenger Reports and Canceling Messages
Messages that are in progress or are waiting to be sent can be canceled. Reports tell who the recipients of a message are, and when the message was sent.
Cancel Messages
You can use the Sent Message Log tool to cancel messages that are currently running (In-Progress) or messages that have been scheduled but have not completed (Waiting).
Tool Search: Sent Message Log
The Sent Message Log, within the System Administration module, allows a system administrator (or user with rights to this module) to review the process alert, email, voice, and text message sent by ANY user in the district.
OLR emails are exclusively on the OLR Email Log and not on the Sent Message Log.
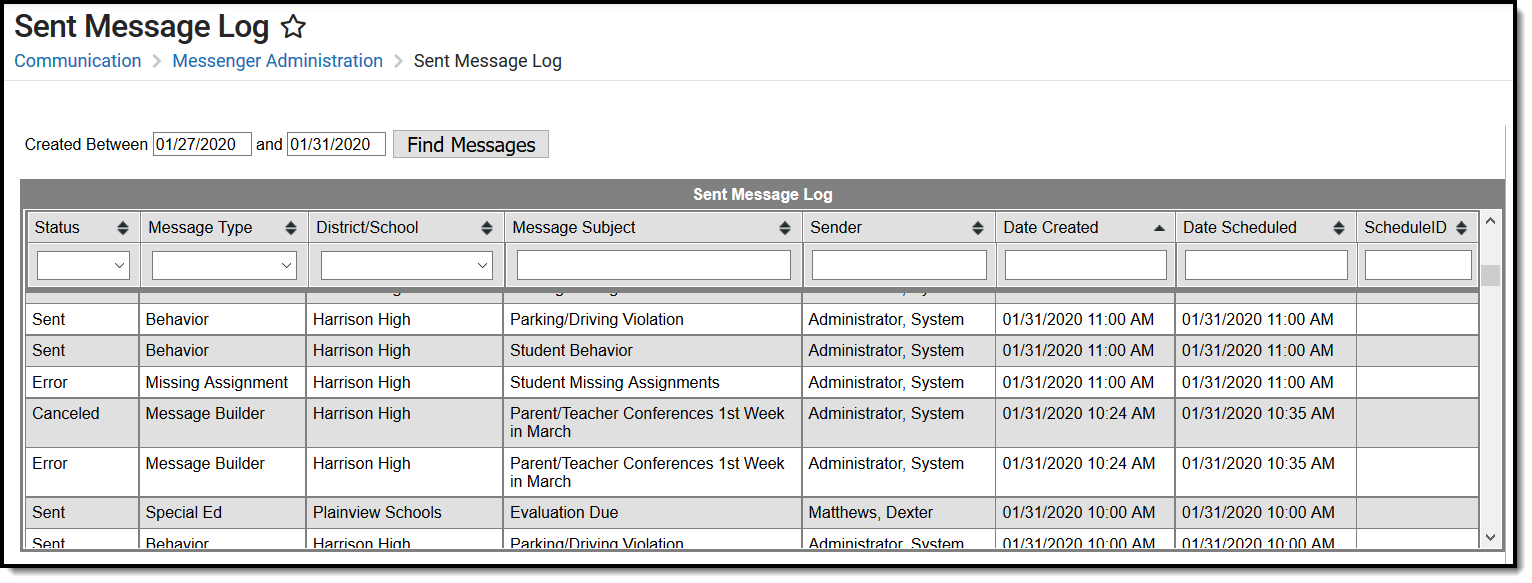
See the Messenger Administration Logs Tool Rights article for information on available tool rights.
Search for Messages in the Sent Message Log
- Enter the date range in which the message was created and click the Find Messages button. The Sent Message Log displays the messages that fall within the date range you entered. The first 4000 messages are included.
Filter the results by selecting an option in the column's dropdown list or sort the search results by clicking the column headers. (Optional)
To filter results using the Date Created or Date Scheduled fields, you must enter the date in the format in which it displays on the screen: MM/DD/YYYY HH:MM AM (or PM). For example, 01/01/2013 8:30 AM. If you do not know the full date or time, you can enter part of the date or time and the search tool will display dates/times that match the numbers you enter.
Select the message you want to view. The Delivery Summary, Sent Message Report Options, Filter Criteria Detail and Message Detail areas display. See the following Screen Examples and Field Descriptions for details about each area.
Cancel In-Progress or Waiting Messages
You can use the Sent Message Log tool to cancel messages that are currently running (In-Progress) or messages that have been scheduled but have not completed (Waiting). Canceled messages are NOT considered a failed delivery.
Messages sent from a template with a future Delivery Date appear immediately in the Sent Message Log. However, messages created using a Messenger Scheduler tool do not appear in the Sent Message Log until the Start Date/Time entered on the Scheduler.
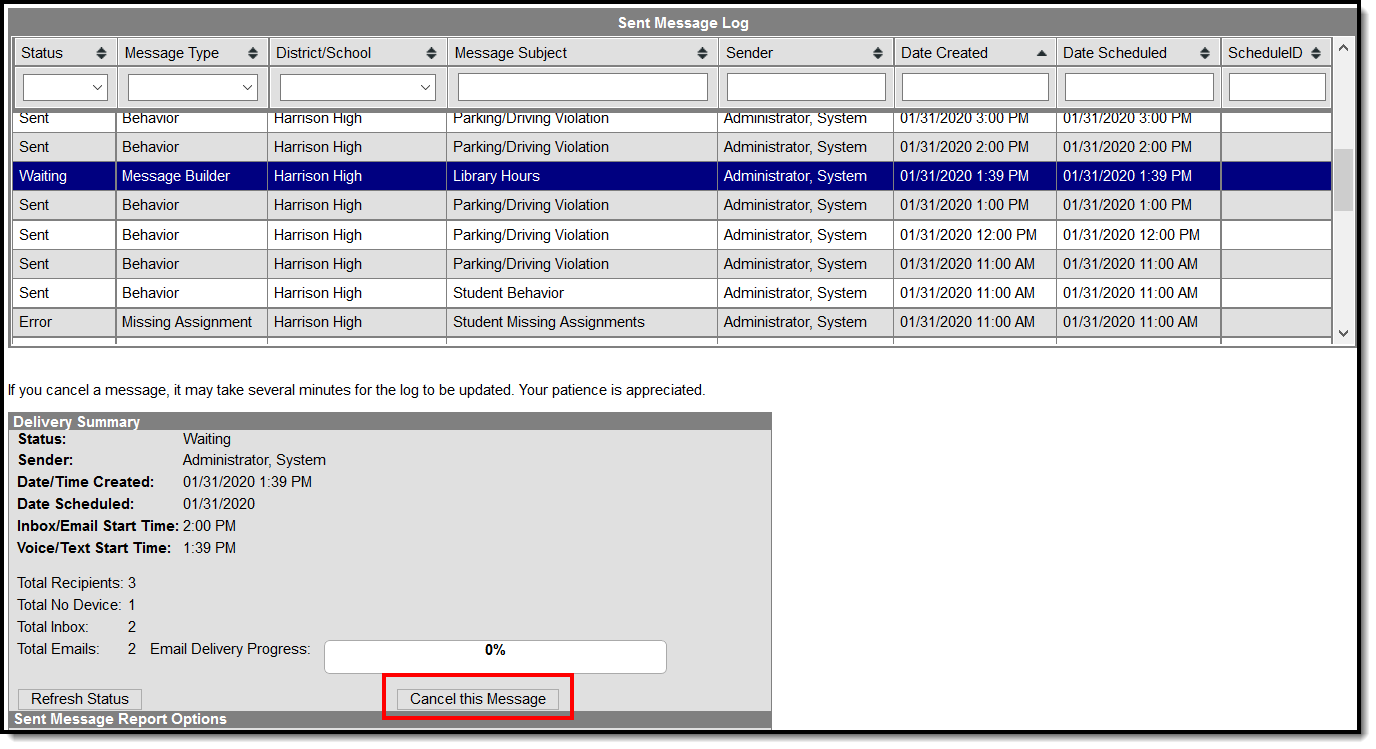
Example of a Waiting message that may be canceled.
How to Cancel a Message
Enter the date range in which the message was created and click the Find Messages button. The Sent Message Log displays the messages that fall within the date range you entered.
If you cannot see the message you want to cancel, sort the search results by clicking the column headers or filter the results by selecting an option in a column's dropdown list.
Select the message you want to cancel. The Delivery Summary displays.
Click the Cancel this Message button. A warning message displays.
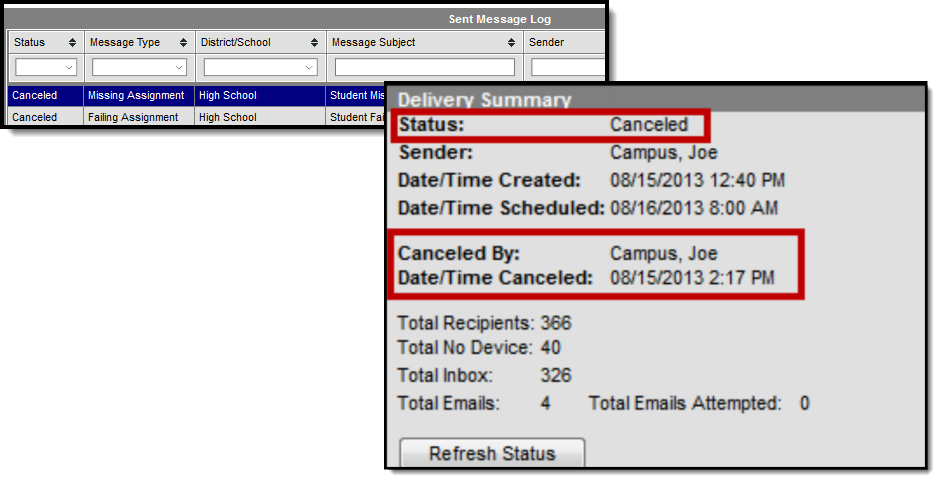
Click OK. Campus stops the delivery of any messages that have not been sent, updates the message status to Canceled and adds the cancel information to the Delivery Summary. This process may take several minutes to complete.
Print a Sent Message Report
The Sent Message Report is a report that provides additional details about the delivery of a specific message.
The report includes the following types of information:
- Summary statistics on message delivery.
- Filter Criteria used to send the message.
- Delivery status organized by recipients.
Phone Messages
The Sent Message Report includes summary information regarding the voice and text messages including a total for the number of recipients contacted successfully by phone. Phone messages are categorized by their delivery status as detected by Voxology.
A call is considered successful:
- If a live voice is detected.
- If an answering machine is detected (regardless of whether redials are allowed on the Voice Settings tool)
- If a recipient confirms reception of the message by pressing 0 (zero).
- If a text message is sent.
Even though a text message is successfully sent, Campus can not guarantee the recipient's successful retrieval of the text message. Retrieval depends on many things like the recipient's carrier reception and carrier account settings--all of which Campus can not control.
- If Preconnect for extension dialing is detected.
Recipients not contacted by phone display with an asterisk ( * ).
Duplicate email addresses and phone numbers in the same message are indicated with a cross (†) in the PDF and an ampersand (&) in the CSV file. When Campus calculates the totals for the Delivery Summary section of the report, these email addresses and phone numbers are NOT included in the totals.
In the Delivery Summary section of the report,
- email addresses without a cross are counted in the Total Email field.
- voice messages without a cross are counted in the Total Voice field.
- text messages without a cross are counted in the Total Text field.
Code | Status | Notes |
|---|---|---|
0 | No answer | Dialer detected no answer by called party. |
1 | Busy | Dialer detected a busy signal. |
2 | Operator | Automated operator answered - number issue, all circuits busy, etc. |
3 | Not In Service | Phone number not in service. |
4 | No Ring Back | Dialer dialed the number but did not hear a ring tone. |
5 | Live Person | Dialer detected a live person. |
6 | Answering Machine | Dialer detected an answering machine. |
7 | Fax | Received a fax carrier signal. |
8 | PBX | Call connected to destination telephone number. Extension dialing was used. |
9 | Unknown | Provider could not determine the call status. |
10 | Failed | Failed for any reason but most likely a failed because of a Messenger error. |
13 | Preconnect Done | Present when a phone number includes an extension to dial. This status indicates the call was made, connected to the primary number and attempted to dial the extension. |
14 | Fast-Busy | Received a Fast Busy signal. Usually this status is returned when the local company's phone lines are full (all circuits are busy). |
16 | Operator | Signalling or audio consistent with an out of service number was received. Privacy flag was set for this call. |
17 | Temporarily Unavailable | Destination telephone number temporarily unavailable. Will automatically attempt redial through alternate routes. |
-1 | N/S | An unknown error has occurred. |
-2 | Invalid Phone # | Destination telephone number is invalid. |
-3 | Do Not Call | Destination telephone number is on do not call list. |
| -4 | Duplicate | |
-5 | No Response from Dialer | Internal communication failure. Call may have been dialed but status is unknown. |
-7 | Local Operator | Destination telephone number is known to not be in service. |
-9 | Local Time Restricted | Local time if the destination telephone number is outside the allowed times for this campaign. |
-10 | State Restricted | All attempts to the destination telephone number were unsuccessful. The final route is state restricted. |
-11 | Call Expired | Call timed out prior to being placed. |
-12 | No Channel | Internal processing failure. Call was not dialed. |
-13 | Route Unavailable | All attempts to the destination telephone number were unsuccessful. |
-14 | Call Error | Call creation produced an error. See Call Log Detail Statistics lookup for more detail. Check the Call Error field. |
-15 | Wireless | Destination number identified as a wireless number. Scrub wireless has been enabled for this campaign. |
-18 | Origination Tollfree Restricted | All attempts to the destination telephone number were unsuccessful. The final route restricted toll free ANIs. Consider using an ANI that is not a tollfree number. |
-19 | Destination Tollfree Restricted | All attempts to the destination telephone number were unsuccessful. The final route restricts Toll Free destinations. |
-20 | Remote Dialer Did Not Set Call Progress | Internal communication failure. Call status is unknown. |
-21 | Local No Answer | Destination telephone number is known to not connect. |
-22 | Suppressed Phone # | Destination telephone number is on a suppression list. |
-23 | Local Fax | Destination telephone number is known to be a fax number. |
-24 | Low Resources | All attempts to the destination telephone number were unsuccessful. |
-25 | Sub-System Error | Internal sub-system failure. See Call Log Detail Statistics lookup for more detail. Check the Call Error field. |
-26 | All Routes Temporarily Unavailable to Destination | Call temporarily could not connect via any route. |
| -27 | SMS Sent | SMS delivered to destination telephone company |
| -28 | SMS Delivered | SMS successfully left Voxology's gateway and Voxology also received a status of “delivered” back from the destination phone service provider. |
| -29 | Email Sent | Email Sent. |
| -30 | Text Message Failed | Text message was not successfully sent by SMS provider OR there was an error in the SMS settings in Campus. |
| -31 | Origination International Restricted | All attempts to the destination telephone number were unsuccessful. The final route restricted international ANIs. Consider using an ANI that is not an international number. |
| -32 | Web Stream Connected | |
| -33 | SMS Opt Out | Destination telephone number has opted out of receiving SMS messages via STOP message. |
| -34 | Phone Quota Exceeded | |
| -35 | Script Ended Before Dialing | |
| -36 | Origination US Restricted | |
| -37 | Canada Intra Restricted | |
| -38 | Max Customer Minute Charge | |
| -39 | SMS Queued | Message is queued and waiting to be sent. |
| -40 | SMS Undelivered | Message was accepted by an upstream carrier, but could not be delivered to the destination number. |
How to Print a Sent Message Report
Enter the date range in which the message was created and click the Find Messages button. The Sent Message Log displays the messages that fall within the date range you entered.
If you cannot see the message for which you want a report, sort the search results by clicking the column headers or filter the results by selecting an option in a column's dropdown list.Select the message for which you want a report. The message details display.
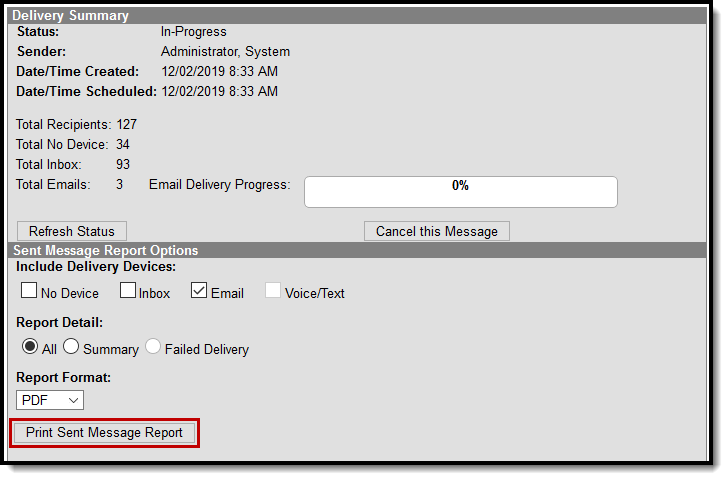
Configure the following Sent Message Report Options:Option Description Include Delivery Devices Mark the checkbox next to the device(s) on which you want to report. Marking No Device includes recipients who did not receive a message since they did not have a delivery device available or they did not have a delivery device selected for the message type.
Delivery Devices not included in the sent message are NOT available to select for the report.
Report Detail Select one of the following options:
Option Description All Prints Summary and detail information of message and recipients. Summary Prints Header and Delivery Summary sections. Failed Delivery Prints the complete Delivery Detail for recipients who had at least one device fail.
This option is not available for waiting or In-progress message campaigns.
Format Select whether you want the report to generate in PDF, CSV or DOCX format. Click the Print Sent Message Report button. The Sent Message Report displays in the format you selected.
Sent Message Report Example
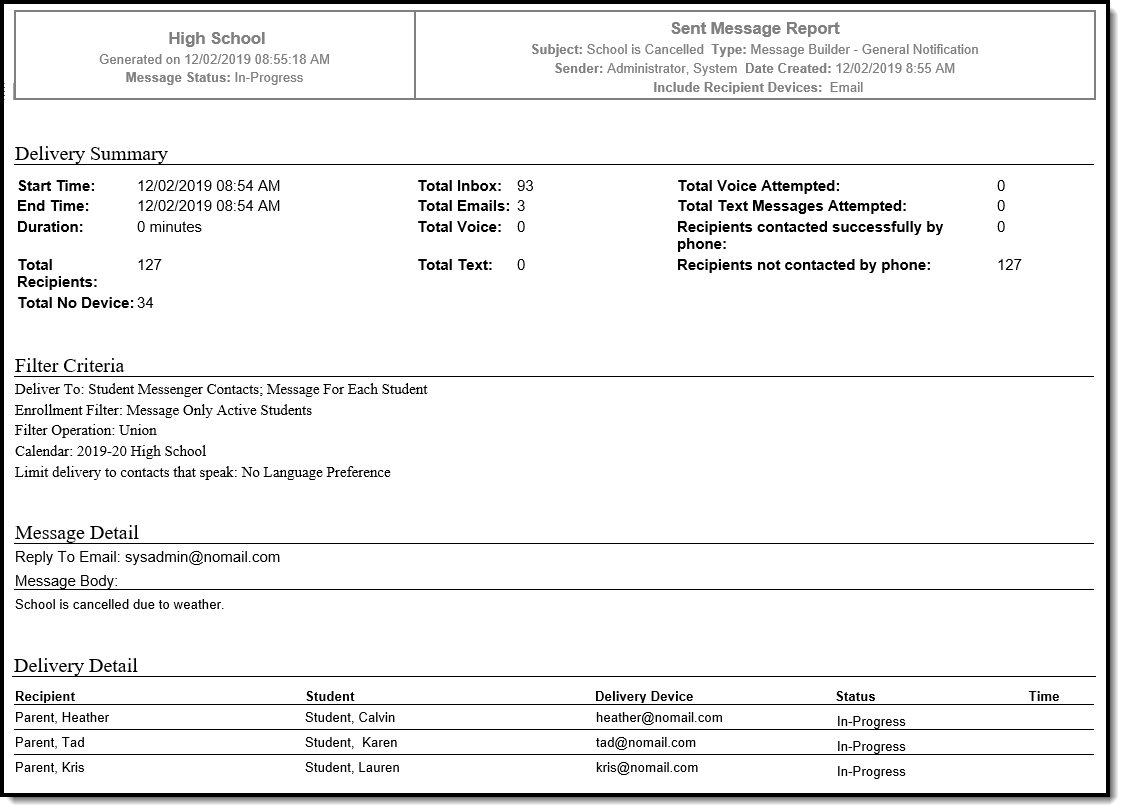 Example Sent Message Report DOCX format
Refer to the following table for a description of the fields used in the report.
| Field Name | Calculation Logic | Notes |
|---|---|---|
| Recipients contacted successfully by phone | Number of unique People who successfully received the text, or voice, calls. | If two users shared the same phone number, each user would be included in this count Only includes people who had at least one successfully completed statuses to at least one of their devices (Completed, Live Voice, etc) |
| Total Recipients | Number of unique People included in the recipient list | If two users shared the same phone number, they would each be included in this count. This doesn't necessarily mean each of these people were ultimately contacted, just that they were pulled into the recipient list of the message |
| Total No Device | Number of unique People included in the recipient list who had no device available to be contacted. | This only reports when No Device is marked in the report options. The field reports recipients who did not receive a message since they did not have a delivery device available or they did not have a delivery device selected for the message type. |
| Total Inbox | Number of unique Inboxes the message was delivered to | The details of which inboxes were contacted only report if the inbox delivery option is selected prior to printing the sent message log. |
| Total Emails | Number of unique Email Addresses in the recipient list | If two users shared the same email address, the email address would only be counted once. This includes all status types (i.e. failed, etc). |
| Total Voice | Number of unique Phone Numbers in the recipient list | If two users shared the same phone number, the phone number would only be counted once. This includes all status types (i.e. failed, cancelled, completed, etc.). |
| Total Text | Number of unique Phone Numbers in the recipient list | If two users shared the same phone number, the phone number would only be counted once. This includes all status types (i.e. failed, cancelled, completed, opted out, etc). |
| Total Voice Attempted: | Number of unique Phone Numbers the message was attempting to reach. | If two users shared the same phone number, the phone number would only be counted once. This does NOT include status types of Cancelled. |
| Total Text Messages Attempted | Number of unique Phone Numbers the message was attempting to reach | If two users shared the same phone number, the phone number would only be counted once. This does NOT include status types of Cancelled or opted out (Blank status). |
| Recipients contacted successfully by phone | Number of unique People who successfully received the text, or voice, calls. | If two users shared the same phone number, each user would be included in this count This only includes people who had at least one successfully completed statuses to at least one of their devices (Completed, Live Voice, etc). |
| Recipients not contacted by phone | Number of unique People who did not receive a call, or text, to one of their devices | If two users shared the same phone number, each user would be included in this count This only includes users who did not have at least one successfully completed status to at least one of their devices. (i.e. non-complete statuses = failed, cancelled, opted out, etc). |
Delivery Detail
The Delivery Detail section is specific to the device (portal account, phone number called, texted, or email contacted) for each recipient.
| Field | Description |
|---|---|
| Recipient | The person who received the message. |
| Student | The student who is enrolled at the school. |
| Delivery Device | The Delivery Mode that was selected when the message was created. |
| Status | The status is specific to the device (portal account, phone number called, texted, or email) contacted.
|
| Time | The time the message was received. |
Recipient Log
The Recipient Log allows a system administrator to review messages by any user to a recipient. It also provides detailed information about messages sent via email, voice, and text.
Sent Message Log
The Sent Message log allows you to review messages that have been sent.
Tool Search: Sent Message Log
The Sent Message Log, within the System Administration module, allows a system administrator (or user with rights to this module) to review the process alert, email, voice, and text message sent by ANY user in the district.
OLR emails are exclusively on the OLR Email Log and not on the Sent Message Log.

See the Messenger Administration Logs Tool Rights article for information on available tool rights.
Search for Messages in the Sent Message Log
- Enter the date range in which the message was created and click the Find Messages button. The Sent Message Log displays the messages that fall within the date range you entered. The first 4000 messages are included.
Filter the results by selecting an option in the column's dropdown list or sort the search results by clicking the column headers. (Optional)
To filter results using the Date Created or Date Scheduled fields, you must enter the date in the format in which it displays on the screen: MM/DD/YYYY HH:MM AM (or PM). For example, 01/01/2013 8:30 AM. If you do not know the full date or time, you can enter part of the date or time and the search tool will display dates/times that match the numbers you enter.
Select the message you want to view. The Delivery Summary, Sent Message Report Options, Filter Criteria Detail and Message Detail areas display. See the following Screen Examples and Field Descriptions for details about each area.
Cancel In-Progress or Waiting Messages
You can use the Sent Message Log tool to cancel messages that are currently running (In-Progress) or messages that have been scheduled but have not completed (Waiting). Canceled messages are NOT considered a failed delivery.
Messages sent from a template with a future Delivery Date appear immediately in the Sent Message Log. However, messages created using a Messenger Scheduler tool do not appear in the Sent Message Log until the Start Date/Time entered on the Scheduler.

Example of a Waiting message that may be canceled.
How to Cancel a Message
Enter the date range in which the message was created and click the Find Messages button. The Sent Message Log displays the messages that fall within the date range you entered.
If you cannot see the message you want to cancel, sort the search results by clicking the column headers or filter the results by selecting an option in a column's dropdown list.
Select the message you want to cancel. The Delivery Summary displays.
Click the Cancel this Message button. A warning message displays.
Click OK. Campus stops the delivery of any messages that have not been sent, updates the message status to Canceled and adds the cancel information to the Delivery Summary. This process may take several minutes to complete.

Print a Sent Message Report
The Sent Message Report is a report that provides additional details about the delivery of a specific message.
The report includes the following types of information:
- Summary statistics on message delivery.
- Filter Criteria used to send the message.
- Delivery status organized by recipients.
Phone Messages
The Sent Message Report includes summary information regarding the voice and text messages including a total for the number of recipients contacted successfully by phone. Phone messages are categorized by their delivery status as detected by Voxology.
A call is considered successful:
- If a live voice is detected.
- If an answering machine is detected (regardless of whether redials are allowed on the Voice Settings tool)
- If a recipient confirms reception of the message by pressing 0 (zero).
- If a text message is sent.
Even though a text message is successfully sent, Campus can not guarantee the recipient's successful retrieval of the text message. Retrieval depends on many things like the recipient's carrier reception and carrier account settings--all of which Campus can not control.
- If Preconnect for extension dialing is detected.
Recipients not contacted by phone display with an asterisk ( * ).
Duplicate email addresses and phone numbers in the same message are indicated with a cross (†) in the PDF and an ampersand (&) in the CSV file. When Campus calculates the totals for the Delivery Summary section of the report, these email addresses and phone numbers are NOT included in the totals.
In the Delivery Summary section of the report,
- email addresses without a cross are counted in the Total Email field.
- voice messages without a cross are counted in the Total Voice field.
- text messages without a cross are counted in the Total Text field.
Code | Status | Notes |
|---|---|---|
0 | No answer | Dialer detected no answer by called party. |
1 | Busy | Dialer detected a busy signal. |
2 | Operator | Automated operator answered - number issue, all circuits busy, etc. |
3 | Not In Service | Phone number not in service. |
4 | No Ring Back | Dialer dialed the number but did not hear a ring tone. |
5 | Live Person | Dialer detected a live person. |
6 | Answering Machine | Dialer detected an answering machine. |
7 | Fax | Received a fax carrier signal. |
8 | PBX | Call connected to destination telephone number. Extension dialing was used. |
9 | Unknown | Provider could not determine the call status. |
10 | Failed | Failed for any reason but most likely a failed because of a Messenger error. |
13 | Preconnect Done | Present when a phone number includes an extension to dial. This status indicates the call was made, connected to the primary number and attempted to dial the extension. |
14 | Fast-Busy | Received a Fast Busy signal. Usually this status is returned when the local company's phone lines are full (all circuits are busy). |
16 | Operator | Signalling or audio consistent with an out of service number was received. Privacy flag was set for this call. |
17 | Temporarily Unavailable | Destination telephone number temporarily unavailable. Will automatically attempt redial through alternate routes. |
-1 | N/S | An unknown error has occurred. |
-2 | Invalid Phone # | Destination telephone number is invalid. |
-3 | Do Not Call | Destination telephone number is on do not call list. |
| -4 | Duplicate | |
-5 | No Response from Dialer | Internal communication failure. Call may have been dialed but status is unknown. |
-7 | Local Operator | Destination telephone number is known to not be in service. |
-9 | Local Time Restricted | Local time if the destination telephone number is outside the allowed times for this campaign. |
-10 | State Restricted | All attempts to the destination telephone number were unsuccessful. The final route is state restricted. |
-11 | Call Expired | Call timed out prior to being placed. |
-12 | No Channel | Internal processing failure. Call was not dialed. |
-13 | Route Unavailable | All attempts to the destination telephone number were unsuccessful. |
-14 | Call Error | Call creation produced an error. See Call Log Detail Statistics lookup for more detail. Check the Call Error field. |
-15 | Wireless | Destination number identified as a wireless number. Scrub wireless has been enabled for this campaign. |
-18 | Origination Tollfree Restricted | All attempts to the destination telephone number were unsuccessful. The final route restricted toll free ANIs. Consider using an ANI that is not a tollfree number. |
-19 | Destination Tollfree Restricted | All attempts to the destination telephone number were unsuccessful. The final route restricts Toll Free destinations. |
-20 | Remote Dialer Did Not Set Call Progress | Internal communication failure. Call status is unknown. |
-21 | Local No Answer | Destination telephone number is known to not connect. |
-22 | Suppressed Phone # | Destination telephone number is on a suppression list. |
-23 | Local Fax | Destination telephone number is known to be a fax number. |
-24 | Low Resources | All attempts to the destination telephone number were unsuccessful. |
-25 | Sub-System Error | Internal sub-system failure. See Call Log Detail Statistics lookup for more detail. Check the Call Error field. |
-26 | All Routes Temporarily Unavailable to Destination | Call temporarily could not connect via any route. |
| -27 | SMS Sent | SMS delivered to destination telephone company |
| -28 | SMS Delivered | SMS successfully left Voxology's gateway and Voxology also received a status of “delivered” back from the destination phone service provider. |
| -29 | Email Sent | Email Sent. |
| -30 | Text Message Failed | Text message was not successfully sent by SMS provider OR there was an error in the SMS settings in Campus. |
| -31 | Origination International Restricted | All attempts to the destination telephone number were unsuccessful. The final route restricted international ANIs. Consider using an ANI that is not an international number. |
| -32 | Web Stream Connected | |
| -33 | SMS Opt Out | Destination telephone number has opted out of receiving SMS messages via STOP message. |
| -34 | Phone Quota Exceeded | |
| -35 | Script Ended Before Dialing | |
| -36 | Origination US Restricted | |
| -37 | Canada Intra Restricted | |
| -38 | Max Customer Minute Charge | |
| -39 | SMS Queued | Message is queued and waiting to be sent. |
| -40 | SMS Undelivered | Message was accepted by an upstream carrier, but could not be delivered to the destination number. |
How to Print a Sent Message Report
Enter the date range in which the message was created and click the Find Messages button. The Sent Message Log displays the messages that fall within the date range you entered.
If you cannot see the message for which you want a report, sort the search results by clicking the column headers or filter the results by selecting an option in a column's dropdown list.Select the message for which you want a report. The message details display.

Configure the following Sent Message Report Options:Option Description Include Delivery Devices Mark the checkbox next to the device(s) on which you want to report. Marking No Device includes recipients who did not receive a message since they did not have a delivery device available or they did not have a delivery device selected for the message type.
Delivery Devices not included in the sent message are NOT available to select for the report.
Report Detail Select one of the following options:
Option Description All Prints Summary and detail information of message and recipients. Summary Prints Header and Delivery Summary sections. Failed Delivery Prints the complete Delivery Detail for recipients who had at least one device fail.
This option is not available for waiting or In-progress message campaigns.
Format Select whether you want the report to generate in PDF, CSV or DOCX format. Click the Print Sent Message Report button. The Sent Message Report displays in the format you selected.
Sent Message Report Example
 Example Sent Message Report DOCX format
Refer to the following table for a description of the fields used in the report.
| Field Name | Calculation Logic | Notes |
|---|---|---|
| Recipients contacted successfully by phone | Number of unique People who successfully received the text, or voice, calls. | If two users shared the same phone number, each user would be included in this count Only includes people who had at least one successfully completed statuses to at least one of their devices (Completed, Live Voice, etc) |
| Total Recipients | Number of unique People included in the recipient list | If two users shared the same phone number, they would each be included in this count. This doesn't necessarily mean each of these people were ultimately contacted, just that they were pulled into the recipient list of the message |
| Total No Device | Number of unique People included in the recipient list who had no device available to be contacted. | This only reports when No Device is marked in the report options. The field reports recipients who did not receive a message since they did not have a delivery device available or they did not have a delivery device selected for the message type. |
| Total Inbox | Number of unique Inboxes the message was delivered to | The details of which inboxes were contacted only report if the inbox delivery option is selected prior to printing the sent message log. |
| Total Emails | Number of unique Email Addresses in the recipient list | If two users shared the same email address, the email address would only be counted once. This includes all status types (i.e. failed, etc). |
| Total Voice | Number of unique Phone Numbers in the recipient list | If two users shared the same phone number, the phone number would only be counted once. This includes all status types (i.e. failed, cancelled, completed, etc.). |
| Total Text | Number of unique Phone Numbers in the recipient list | If two users shared the same phone number, the phone number would only be counted once. This includes all status types (i.e. failed, cancelled, completed, opted out, etc). |
| Total Voice Attempted: | Number of unique Phone Numbers the message was attempting to reach. | If two users shared the same phone number, the phone number would only be counted once. This does NOT include status types of Cancelled. |
| Total Text Messages Attempted | Number of unique Phone Numbers the message was attempting to reach | If two users shared the same phone number, the phone number would only be counted once. This does NOT include status types of Cancelled or opted out (Blank status). |
| Recipients contacted successfully by phone | Number of unique People who successfully received the text, or voice, calls. | If two users shared the same phone number, each user would be included in this count This only includes people who had at least one successfully completed statuses to at least one of their devices (Completed, Live Voice, etc). |
| Recipients not contacted by phone | Number of unique People who did not receive a call, or text, to one of their devices | If two users shared the same phone number, each user would be included in this count This only includes users who did not have at least one successfully completed status to at least one of their devices. (i.e. non-complete statuses = failed, cancelled, opted out, etc). |
Delivery Detail
The Delivery Detail section is specific to the device (portal account, phone number called, texted, or email contacted) for each recipient.
| Field | Description |
|---|---|
| Recipient | The person who received the message. |
| Student | The student who is enrolled at the school. |
| Delivery Device | The Delivery Mode that was selected when the message was created. |
| Status | The status is specific to the device (portal account, phone number called, texted, or email) contacted.
|
| Time | The time the message was received. |
Mailgun
Mailgun is an email automation service for sending, receiving, and tracking email sent through Campus.
Configure Campus for Mailgun
To send email messages using Mailgun, it must be configured in Campus.
Tool Search: Email Settings
The Email Settings tab allows a user to configure general settings for email messages. The initial setup of this tab should be completed before email messaging is attempted.
Google and Yahoo now require enhanced email authentication, specifically through DMARC, SPF, and DKIM starting February 1st, 2024. Please review Email Authentication for DMARC, SPF, and DKIM for more information.

Tool Rights
Users must have at least A(dd) tool rights to configure Email Settings.

SMTP Server Configuration
The sections below will describe how to configure your email depending on whether or not you will use TLS encryption:
- Non-TLS Configuration
- TLS Configuration
- Field Descriptions (SMTP)
Non-TLS Configuration
To configure the Email Settings for email messaging from an internal school/district server, or other email service that does not use TLS encryption:

The following steps are required for standard setup:
- Enter the Default Sender Email Address.
- Enter the SMTP Host address.
- Enter the SMTP Port.
- Choose the number of Minutes Between Retries (optional).
- Select the allowed Max Errors Before Cancel (optional).
- Click the Save icon.
Users are highly advised to enter and Send a Test Email to ensure entered values are correct.
TLS Configuration
To configure the Email Settings to allow emails from email services and SMTP servers that require TLS encryption of transferred messages:

The following steps are required for standard setup:
- Enter the Default Sender Email Address.
- Enter the SMTP Host address.
- Enter the SMTP Port.
- Mark the Use TLS checkbox.
Users are highly advised to enter and Send a Test Email to ensure entered values are correct.
-
Click the Save icon.
Optional Configuration Steps
The following steps are optional for standard setup:
- Mark the Use Authentication checkbox and enter values in the authentication fields:
- Username
- Password
- Choose the number of Minutes Between Retries.
- Select the allowed Max Errors Before Cancel.
Field Descriptions (SMTP)
The table below describes each field available:
| Field | Description |
|---|---|
| Default Sender Email Address |
The default email address that appears as the "sent from" address on sent email messages. This field is required. The Default Sender Email Address must be a real email address so that the recipient’s email server does not view the message as SPAM. A real email address also allows bounce-back messages to be delivered to an actual mailbox even if the mailbox is not monitored. Do not include “infinitecampus” in the email address as this incorrectly gives the impression that emails are being delivered by the company Infinite Campus.
To reduce the chance an email is flagged as spam, avoid using "noreply" or "donotreply" in the Default Sender Email Address. |
| Use SMTP Server | Select this radio button to begin configuring email settings for an SMTP server. |
| SMTP Host | The Simple Mail Transfer Protocol (SMTP) host name used to transfer emails. SMTP is the only protocol supported in Campus. |
| SMTP Port | The specific port allowing SMTP and email exchange. To use the default SMTP port, leave blank. Otherwise, if a specific port number is required by a service, enter it in this field. |
| SMTP Timeout |
The amount of time that Campus will wait for the SMTP server to respond. If the SMTP server does not respond in the specified amount of time, the message will timeout and Campus will resend the message according the preferences set in the Advanced Settings group on this screen.
|
| Use Authentication | If a username and password are required for SMTP authentication, this box should be checked. When checked, the Username and Password fields will be unlocked for editing. |
| Username |
The username required for server authentication, if required by SMTP server setup. This field is available for editing when the Use Authentication field is set to a value of "Yes." |
| Password |
The password required for server authentication, if required by SMTP server setup. This field is available for editing when the Use Authentication field is set to a value of "Yes." |
| Use TLS | Checkbox indicates whether or not Transport Layer Security (TLS) should be used to encrypt email transfer on the server. Some services require this encryption. |
| Minutes Between Retries | The number of minutes to wait between a failed message delivery attempt and the next message delivery attempt. |
| Max Errors Before Cancel | The maximum number of failed message delivery attempts, to the email relay, for each individual email address before all attempts to deliver to the email address are canceled. The default value for this field is "10." |
| Throttle Email Messages | This option determines the number of email messages the application server will process per second. You may enter any number from 1 to 999. |
| Allow Email Attachments |
This option allows users to add email attachments to messages. When this option is checked, all Messenger tools display the option to send email attachments. When this option is not checked, no tools display the option to send email attachments. If there are template email attachments and this checkbox is cleared so that the option to upload an attachment is removed, the templates will NOT send the attachments. |
| Limit Email Attachment File Size |
This option allows you to set size limits for email attachments. If a user tries to attach a file that is larger than the limit set in this field, an error message will display explaining that their file is too large. The maximum file size is 100 MB and is set in the Campus XML file. Districts using Campus' SMTP Host are limited to 1.3 MB regardless of what is entered in this field. Large email attachments of several MBs will take several minutes to upload. If there are templates with email attachments and this field is changed to a limit lower than what exists on the saved templates, the templates WILL send the saved email attachment. If the template is changed and saved, you will not be able to save the large email attachment. |
| User Sender's Email from Census as Reply to Email Address |
Mark this checkbox to have the sender's email address (Census > People > Demographics > Email) auto-populate the Reply To Email field in the Message Builder and Staff Messenger tools.
If the default language en_US is removed from Attribute Dictionary > Contact > Pref. Language, the option to User Sender's Email from Census will not work. Districts can add/edit other languages within the Attribute Dictionary, but should never edit or delete en_US.
This option does not apply to Emergency Messenger. Emergency Messenger uses the Email Address from the Default Sender Email Address on this screen. |
| Allow Custom Reply to Email Address |
Mark this checkbox to have the Reply to Email field in the Message Builder and Staff Messenger tools unlocked and able to be edited.
If you check both the User Sender's Email from Census as Reply to Email Address and Allow Custom Reply to Email Address checkboxes, the Reply to Email field will auto-populate with the sender's email address but remain unlocked and able to be edited. This option does not apply to Emergency Messenger. Emergency Messenger uses the Email Address from the Default Sender Email Address on this screen. |
| Allow Custom Sender Display Name | Mark this checkbox to have the Sender Display Name field display in the Message Builder, Staff Messenger and Emergency Messenger tools. If enabled, the field will display only when Email is selected from the Delivery Devices options. This field allows the sender to customize the name they would like displayed in the recipient's email inbox for easier identification purposes.
 |
| Require Custom Sender Display Name in Campus Instruction | Mark this checkbox to display the Sender Display Name field in Campus Instruction messenger tools. When marked, an entry is required before the message can be sent.
This checkbox is available only when the Allow Custom Sender Display Name checkbox is marked.
|
| Send Test Email | Enter a valid email address and select the Send Test Email button to test whether the Email Settings entered above this field are correct. If you receive the test email in your inbox, your Email Settings are configured properly. If you do not receive the test email, this indicates one or more of the fields above is incorrect or invalid. |
Mailgun Configuration
Mailgun is a third party email relay system Campus uses to distribute emails out to service providers. Campus provides Mailgun to Campus Cloud (CC) or Campus Cloud Choice (CCC) hosted districts. Non-CC/CCC hosted districts can obtain an account directly from Mailgun if desired. This section will walk you through configuring Campus to send email messages using Mailgun.

The following steps are required for a Mailgun setup:
- Enter the Default Sender Email Address.
- Select the Use Mailgun API radio button.
- Enter your Mailgun Domain.
- Enter an email address in the Test Email Setting Configuration section and click the Send Test Email button. This test email allows you to ensure the settings you have entered are correct.
- Click the Save icon.
Optional Configuration Steps
See the table below for more information about remaining optional fields found in the editor.
Field Descriptions (Mailgun)
The table below describes each available field.
| Field | Description |
|---|---|
| Default Sender Email Address |
The default email address that appears as the "sent from" address on sent email messages. This field is required. The Default Sender Email Address must be a real email address so that the recipient’s email server does not view the message as SPAM. A real email address also allows bounce-back messages to be delivered to an actual mailbox even if the mailbox is not monitored. Do not include “infinitecampus” in the email address as this incorrectly gives the impression that emails are being delivered by the company Infinite Campus.
To reduce the chance an email is flagged as spam, avoid using "noreply" or "donotreply" in the Default Sender Email Address. |
|
Use Mailgun API |
Mark this radio button if you use Mailgun as your email delivery service. This feature is only relevant for users who use Mailgun as their email delivery service. This functionality is only available for Campus Cloud and Cloud Choice customers. |
| Mailgun Domain | The domain tied to your Mailgun account. |
| Minutes Between Retries | The number of minutes to wait between a failed message delivery attempt and the next message delivery attempt. |
| Max Errors Before Cancel |
The maximum number of failed message delivery attempts allowed before all attempts to deliver the message are canceled. The default value for this field is "10." |
| Throttle Email Messages | This option determines the number of email messages the application server will process per second. You may enter any number from 1 to 999. |
| Allow Email Attachments |
This option allows users to add email attachments to messages. When this option is checked, all Messenger tools display the option to send email attachments. When this option is not checked, no tools display the option to send email attachments. If there are template email attachments and this checkbox is cleared so that the option to upload an attachment is removed, the templates will NOT send the attachments. |
| Limit Email Attachment File Size |
This option allows you to set size limits for email attachments. If a user tries to attach a file that is larger than the limit set in this field, an error message will display explaining that their file is too large. The maximum file size is 100 MB and is set in the Campus XML file. Districts using Campus' SMTP Host are limited to 1.3 MB regardless of what is entered in this field. Large email attachments of several MBs will take several minutes to upload. If there are templates with email attachments and this field is changed to a limit lower than what exists on the saved templates, the templates WILL send the saved email attachment. If the template is changed and saved, you will not be able to save the large email attachment. |
| Use Sender's Email from Census as Reply to Email Address |
Mark this checkbox to have the sender's email address (Census > People > Demographics > Email) auto-populate the Reply To Email field in the Message Builder and Staff Messenger tools.
If the default language en_US is removed from Attribute Dictionary > Contact > Pref Language, the option to User Sender's Email from Census will not work. Districts can add/edit other languages within the Attribute Dictionary, but should refrain from editing or deleting en_US.
This option does not apply to Emergency Messenger. Emergency Messenger uses the Email Address from the Default Sender Email Address on this screen. |
| Allow Custom Reply to Email Address |
Mark this checkbox to have the Reply to Email field in the Message Builder and Staff Messenger tools unlocked and able to be edited.
If you check both the User Sender's Email from Census as Reply to Email Address and Allow Custom Reply to Email Address checkboxes, the Reply to Email field will auto-populate with the sender's email address but remain unlocked and able to be edited. This option does not apply to Emergency Messenger. Emergency Messenger uses the Email Address from the Default Sender Email Address on this screen. |
| Allow Custom Sender Display Name | Mark this checkbox to have the Sender Display Name field display in the Message Builder, Staff Messenger and Emergency Messenger tools. If enabled, the field will display only when Email is selected from the Delivery Devices options. This field allows the sender to customize the name they would like displayed in the recipient's email inbox for easier identification purposes.
 |
| Require Custom Sender Display Name in Campus Instruction | Mark this checkbox to display the Sender Display Name field in Campus Instruction messenger tools. When marked, an entry is required before the message can be sent.
This checkbox is available only when the Allow Custom Sender Display Name checkbox is marked.
|
| Send Test Email | Enter a valid email address and select the Send Test Email button to test whether the Email Settings entered above this field are correct. If you receive the test email in your inbox, your Email Settings are configured properly. If you do not receive the test email, this indicates one or more of the fields above is incorrect or invalid. |
Review Sent Messages via Mailgun API
The Mailgun Message Log allows you to review all messages sent in the last 30 days via the Mailgun API.

Google and Yahoo now require enhanced email authentication, specifically through DMARC, SPF, and DKIM starting February 1st, 2024.
View Messages Sent Via Mailgun
The Mailgun Message Log contains all of the messages sent by the district via the Mailgun API with an indication of each event status, who received the email, the subject of the email, and any potential errors which occurred.
Tool Search: Mailgun Message Log
When a message is sent from a Campus tool, the Sent Message Log displays the status of the delivery of the message to the Mailgun API. The Mailgun Message Log found in System Administration contains all of the messages sent by the district via the Mailgun API, including password reset emails, username reminders, and account security email confirmations. The event status, email recipient, subject of the email, and any errors that occurred are listed. The Mailgun Message Log found in the Messenger module contains all of the same information but limits the messages displayed to only those sent by the person accessing the tool within Infinite Campus.
The status that displays in the Sent Message Log is not the same as the Event status found in the Mailgun Message Log. For example: A message can have a status of 'Sent' in the Sent Message Log but an Event status of 'Failed' in the Mailgun Log. In this scenario the message was delivered to the Mailgun API, but failed in its delivery to the recipient.
- This tool is only available for users who have Mailgun functionality enabled in their district.
- Based on Mailgun restrictions and recommendation, the data in this tool is updated hourly.
- For information on setting up Mailgun within Campus, see the Email Settings article.
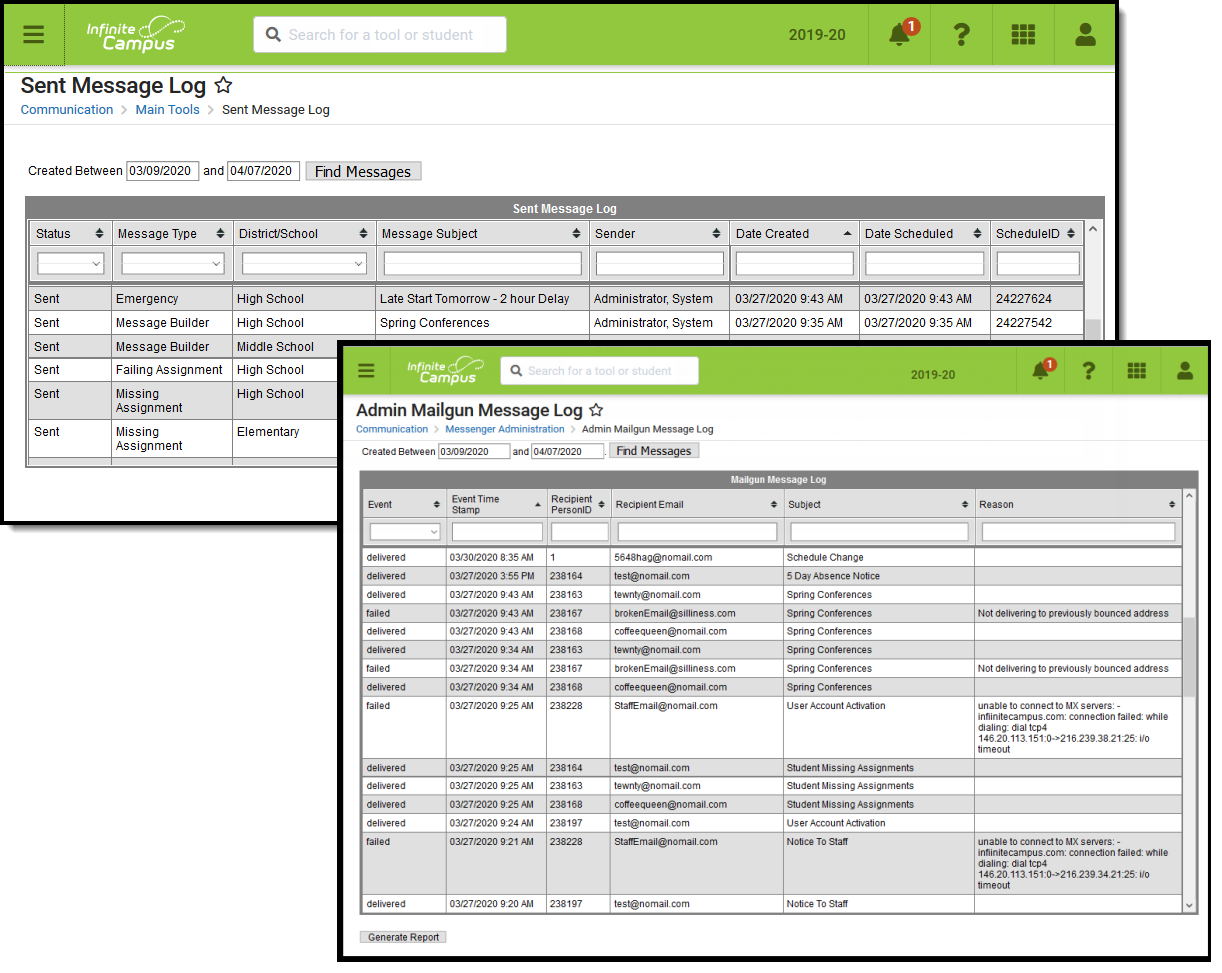 Mailgun Message Log
See the Mailgun Message Log Tool Rights article for information on available tool rights.
IMPORTANT:
Mailgun uses a suppression list as spam prevention, instead of sending limits. If an email message bounces (usually due to an invalid email address), Mailgun places that email address on the suppression list to prevent further attempts. To resolve this issue, users must correct the email address of the recipient and contact Campus Support. Only Campus Support is authorized to remove the email address from the suppression list in order for emails to begin sending to the recipient again.
Tool Rights
PATH: System Administration > User Security > Users > Tool Rights
Users must have at least R(ead) tool rights assigned for the Mailgun Message Log in order to access and view data.
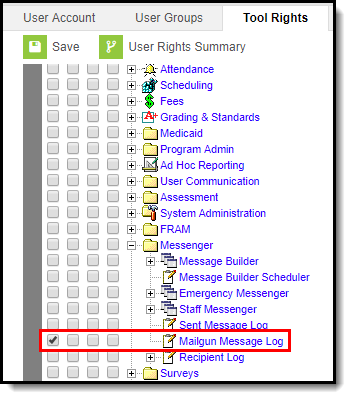
Mailgun Message Log Tool Rights
Reviewing Mailgun Messages
By default, the message log contains all messages sent by the district on the current day (System Administration > Messenger > Mailgun Message Log) or all messages sent by you on the current day (Messenger > Mailgun Message Log). This list can be populated with messages outside of the current date by entering a date range at the top and selecting Find Messages. You can also filter messages by entering criteria in the fields below each column.
The data in this tool updates frequently to include current day messages. Recently sent messages will not display immediately.
 Filtering Messages
For example, entering a Subject of 'Missing' filtered messages to only those with this text included in the email subject.
 Filtering Messages Based on Subject
You can also filter messages based on the Event which occurred, such as a failure to send the message. In the example below, messages are filtered by an Event of 'failed' and the Reason column describes why the message failed to send.
 Reviewing Failed Messages
Invalid emails can be updated by conducting a 'Person ID' search using the All People, Advanced Search tool.
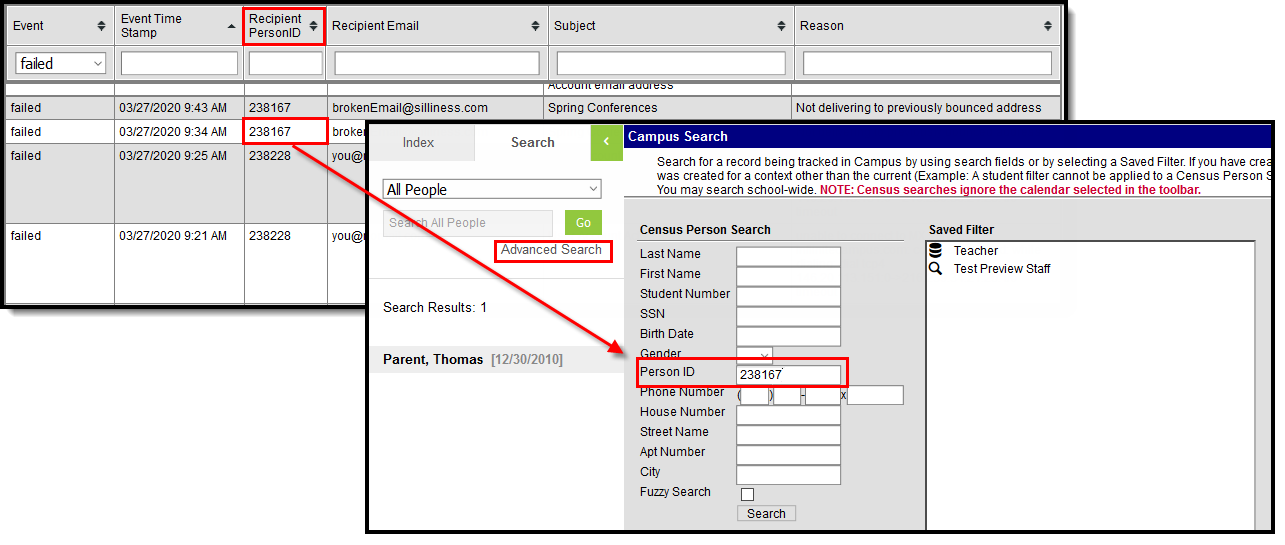 Recipient PersonID Advanced Search
Event status are defined as the following:
- Accepted - Mailgun accepted the request to send/forward the email and the message has been placed in the queue.
- Rejected - Mailgun rejected the request to send/forward the email. Review the Reason column for why this may have occurred.
- Delivered - Mailgun sent the email and it was accepted by the recipient email server.
- Failed - Mailgun could not deliver the email to the recipient email server. Review the Reason column for why this may have occurred.
- Complained - The email recipient clicked on the spam complaint button within their email client. This may impact your ability to reach this person in the future.
Generate the Report
You can generate a report of all messages sent through the Mailgun API during a specific date range by entering this date range in the Created Between date fields and clicking Generate Report at the bottom of the screen (Image 6).
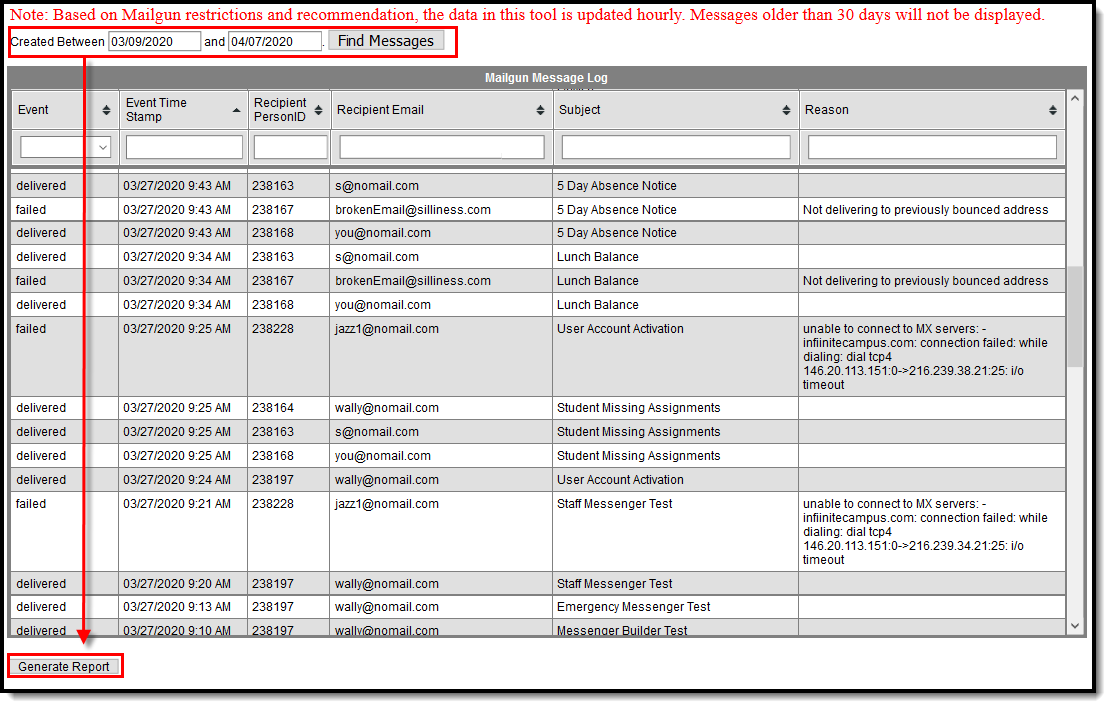 Generating the Mailgun Message Log Report
The report will appear in a separate window in CSV format.
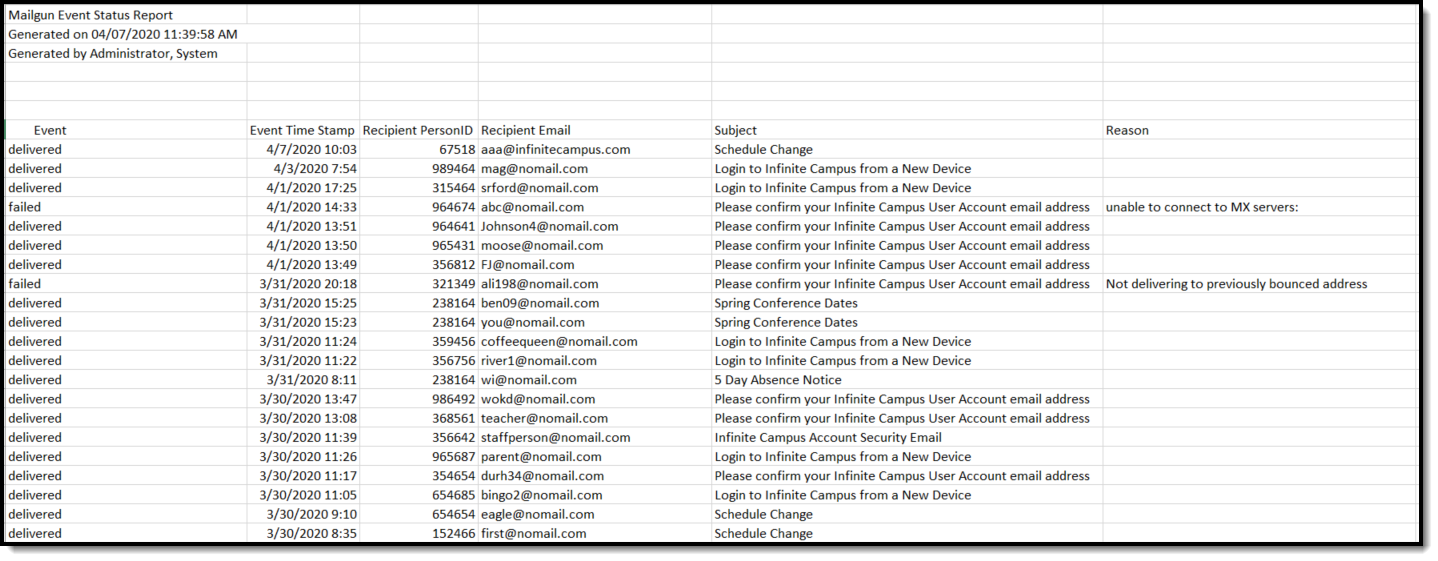 Example of Report
The Mailgun Message Log allows users to review all messages sent by the district via the Mailgun API.


