The Academic Planner allows schools to manage a student's academic plan through their entire school career. Academic Planning is a process that requires the use of several tools in Campus and several roles in a school.
Create Graduation Programs
Create Graduation Programs
Graduation Programs show a student's progress toward graduation based on the requirements entered for the program. Graduation programs can be created for a particular school or all schools, for a particular set of students (based on their cohort year), and can be set to display on Campus Parent and/or Campus Student. Any number of programs can be created.
.
Course Requirements
The Course Requirements tool determines the actual courses a student can take to meet the requirements of a graduation program.
Test Requirements
Specific tests that students are required to pass can be aligned to a Graduation Program through the Test Requirements tool.
Compound Requirements
Compound Requirements allow the entry of both Course and Test Requirements to evaluate the student on successful passing of a requirement. This is an AND/OR tool. For example, a requirement for passing could be Course 1 AND Course 2 OR Assessment 1.
GPA Requirements
The GPA Requirements editor indicates the minimum GPA and minimum GPA per course credit the student in this program needs to successfully complete the program's requirements.
Academic Program Requirements
Academic Program Requirements can be added for successful completion of a Graduation Program.
Course Plan Templates
The Course Plan template allows counselors/administrators to create course plans for graduation programs. When students are assigned to that program, the Academic Planner automatically adds the courses from the Course Plan Template into the student's Course Plan.
Course Planning Rules
Course Planning Rules
A Planning Rule defines relationships between courses across years and for a single year, allowing students to choose courses and to effectively develop their Academic Plan. This information is used in the Graduation Progress tool on the Portal and when students and counselors are determining an Academic Plan for the student.
Tool Search: Course Rules
Course rules are added to courses to assist with scheduling and planning across multiple years. When a rule is applied to a course, its complement is applied to the course’s pair. Rules should be used only when absolutely necessary to achieve the district's educational goals and to meet the students' needs.
This tool allows assigning both Scheduling Rules, used to build and load courses on the Scheduling Board and Walk-In Scheduler, and Planning Rules, used to map a student's progress toward graduation or completion of a program.
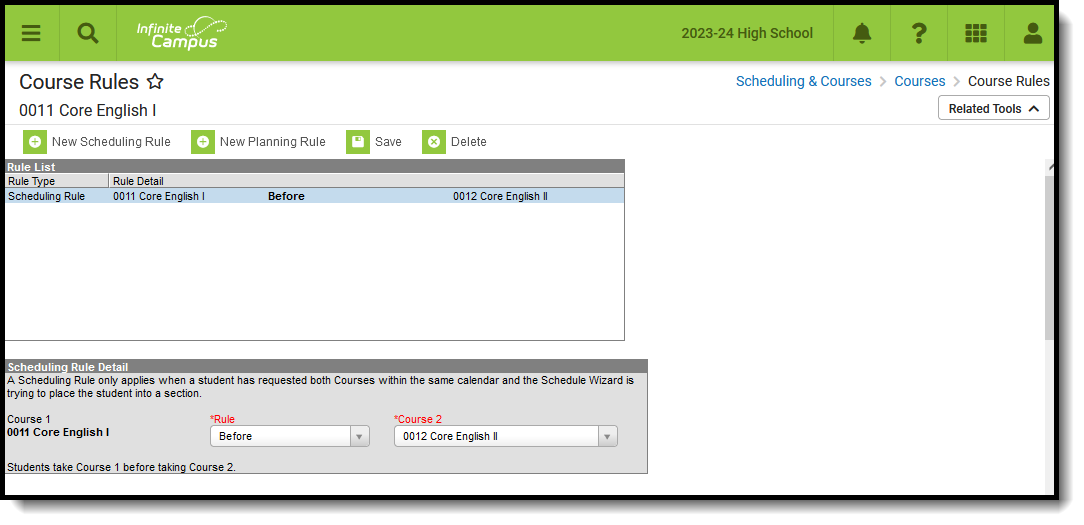 Course Rules
See the Course Rules Tool Rights article for information about rights needed to use this tool.
Scheduling Rules
The Scheduling Board approaches fulfilling student course requests in a very systematic manner. In most situations, the Board needs to understand the relationship between courses as they are created and defined. This is done using the scheduling rules.
Scheduling rules tie courses together in various ways, affecting the Scheduling Board's flexibility. The rule only takes effect when a student has requested both courses during the same scheduling year. When a rule is applied to a course, its complement is applied to the course’s pair. Rules should be used only when absolutely necessary to achieve the district's educational goals.
Scheduling Rules help ensure courses are scheduled appropriately. They are NOT used in the planning process.
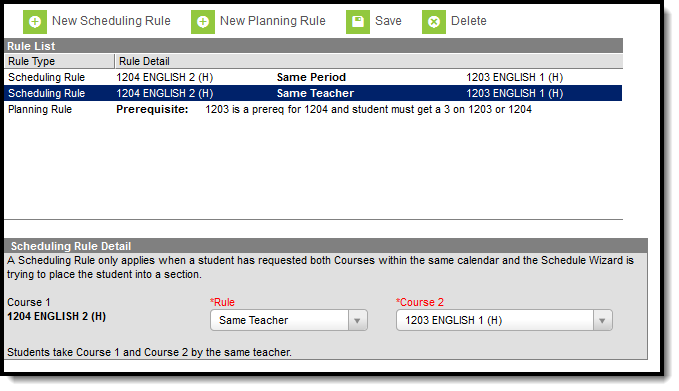 Scheduling Rules
Scheduling problems arise when scheduling rules are applied incorrectly or overused. When student requests are not being fulfilled for a course or a series of courses, analyze the scheduling rules for those courses to ensure they are not preventing the Scheduling Board from working efficiently. Scheduling rules may not operate as expected when a section spans multiple terms.
Things to Know
Build and Load Logic
When the Scheduling Board builds and loads courses, it attempts to place courses and students multiple times based on these rules.
Depending on the complexity of the period schedule, the number of rules associated with courses, the restrictions placed on staff and students, the course may not be placed in the desired manner.
For courses with more restrictive needs (many rules, staff restrictions, etc.), consider manually placing these courses first and locking them. Then use the Build and Load functionality on the Scheduling Board to build and load the remaining courses.
50% Request Requirement
Build only considers rules when:
- One paired course has been built where the number of sections must exactly equal the number of sections to build.
- There are requests for at least 50% of the possible seats for both paired courses.
Scheduling Rule Detail Editor
| Field | Description | Ad hoc Field Name |
|---|---|---|
Course 1 Required | The course that is currently selected. | schedRule.courseID1 |
Rule Required | Selection indicates the scheduling rule that is assigned to the course. See the descriptions and examples for more information. | schedRule.type schedRule.ruleID |
Course 2 Required | The course that is either the Parent course or the Child course, depending on which rule is being assigned. The inverse of the selection displays on the Course Rules detail of the selected course. | schedRule.courseID2 |
Add Scheduling Rules
See the Scheduling Rules Descriptions and Examples for details on the available rules.
- Select the New Scheduling Rule icon from the Action bar. A Scheduling Rule Detail appears below the Rule List.
- Verify the desired course appears as the Course 1.
- Select the correct Rule from the dropdown list.
- Select the correct Course2 option for which to apply the rule.
- Click the Save icon when finished.
Read the rule setting once selected. Additional rules can be added as needed.
Selected courses cannot have a rule tied to itself. The course currently selected DOES NOT display in the Course dropdown for rule selection.
Planning Rules
A Planning Rule defines relationships between courses across years and for a single year, allowing students to choose courses and to effectively plan their Academic Plan. This information is used when students and counselors are determining an Academic Plan for the student.
Create Planning Rules in future calendars.
Planning rules help ensure that students take courses in appropriate years and in the appropriate order. They are NOT used to place courses on a student schedule during the scheduling process.
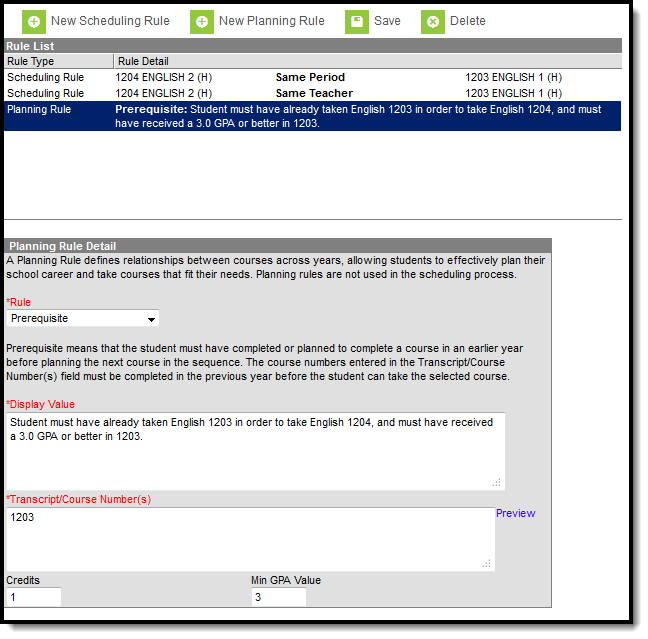 Planning Course Rules
Best Practices
When you are using Academic Planning functionality:
- When a year or semester long course is broken down into multiple courses for schedule flexibility, the Parent Of/Child Of rules should be used. Parent and child courses must have the same credit type. Prerequisites for this sort of setup only need to include or be defined on the Parent course.
- Rule alerts prevent a student from requesting a course without meeting the rule requirements from the transcript, in-progress courses or planned courses.
- Courses that require instructor approval need to have the Allow Student Requests checkbox not marked. Instructors use the Student Course Recommendations to recommend these courses.
- Always verify the Calendar/School selection before saving rules.
- Inactivation of courses requires adjustments to Course Planning Rules.
Planning Rules Detail Editor
Different fields display for different planning rules. Review the table below for details.
| Field | Description | Available Rules | Ad hoc Field Name |
|---|---|---|---|
Rule Required | Selection indicates the planning rule that is assigned to the course. See the descriptions and examples for more information. | All | planningRule.type |
Display Value Required | Text entered in this field displays on the Portal and should be descriptive enough for both students and counselors to know why the rule was added and what the student needs to do in order to take the course. For example, when the Prerequisite rule was chosen for a course, text should indicate what the prerequisite is (Course Name and Number, minimum grade/GPA received, etc.) and any other information that may be helpful for the student, parent/guardians and counselor. An entry might be "Must take 2221 Alg 2 before taking 2231 Trigonometry." | Prerequisite Concurrent Prerequisite or Concurrent Equivalent Grade Level Course Rotation | planningRule.displayValue |
Transcript/Course Number(s) Required | Values entered here can be course numbers from middle school courses, transcript courses, and transfer credit courses. Wildcard characters like percentage signs can be entered when the course numbers are similar (as in, all course numbers end in 2). Commas must be entered between courses numbers, as such: "2221,2223,2225" or "2221, 2223, 2225." When students plan courses through the Portal or a counselor adds the course to a student's academic plan, the entered course numbers are reviewed by the application to ensure the student has not previously taken the course and it does not display on the transcript. Clicking the Preview link displays an HTML view of the entered course numbers and is used to verify the correct courses are included from the current calendar and school. | Prerequisite Concurrent Prerequisite or Concurrent Equivalent | planningRule.transcript CourseNumberString |
| Credits | Enter the total amount of credits the student needs to earn for the course(s) entered in the Transcript/Courses field. | Prerequisite Concurrent Prerequisite or Concurrent | planningRule.credits |
| Minimum GPA Value | Enter the lowest GPA value the student can earn for the course(s) entered in the Transcript/Course Number(s) field. | Prerequisite Prerequisite or Concurrent | planningRule.gpaValue |
Course 2 Required | The course that is either the Parent course or the Child course, depending on which rule is being assigned. The inverse of the selection displays on the Course Rules detail of the selected course. Parent and child courses must have the same credit type. | Parent Of Child Of | planningRule.courseID2 |
Grade Level(s) Required | Indicates the grade level of enrollment the course applies. Only students in the assigned grade levels can add the course to their Course Plan for that grade level. | Grade Level | N/A |
Allow Course to be Planned Every __ Years Required | The entered value indicates the interval of years the course is available. The entered value must be greater than 1. | Course Rotation | N/A |
Starting in School Year Required | Select the year in which the rotation of the course begins. When the 2018-19 school year is selected and the entered Every __ Year value is 2, the course is available for planning in the 2018-19 school year and again in the 2020-2021 school year, but not in the 2019-2020 school year. | Course Rotation | N/A |
Add Planning Rules
See the Planning Rules Descriptions and Examples for details on the available rules.
- Select the New Planning Rule from the action bar.
- Select the Rule from the dropdown list.
- Enter the required information in the appropriate fields based on the descriptions above.
- For complete planning rule setup, enter the values for the non-required fields based on the descriptions above.
- Click the Save button when finished. The new planning rule displays on the Rule List.
Course Rules in Ad hoc Query Wizard
Scheduling Rules and Planning Rules assignments are available in the Query Wizard for Course/Section Data Type filters. Fields can be selected from the following folders:
- Course Information > Scheduling Rules
- Course Information > Planning Rules
Identifying course information should also be included in the filter. Choose these fields from the Course > Course Information section (courseInfo.courseNumber, courseInfo.courseName, for example). For clarity, also select identifying course information from the Scheduling Rules > Course section (courseInfo.courseNumber, courseInfo.courseName, for example).
Ad hoc field names are included in the tables below for each rule.
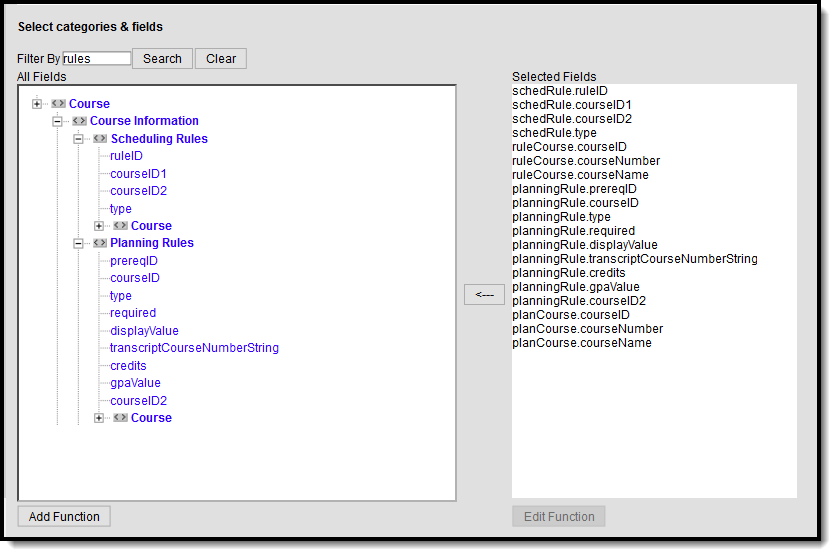 Course Rules Available in Ad hoc Reporting
There are two kinds of COURSE RULES that can be added to a course – Scheduling Rules and Planning Rules. This video describes the difference between the two and how they may be used in the Scheduling process and the Academic Planning process.
Configure Academic Programs
Create Academic Programs
Academic Programs show a student's progress toward completion based on course requirements along with any assessments that need to be completed, or certificates and/or seals that need to be awarded.
Course Requirements
The Course Requirements tool defines the courses a student can take to meet the course requirements of an Academic Program.
Test Requirements
Specific tests that students are required to pass can be aligned to an Academic Program using the Test Requirements tool.
Compound Requirements
Compound Requirements allow the entry of both Course and Test Requirements to evaluate the student on successful passing of a requirement. This is an AND/OR tool. For example, a requirement for passing could be Course 1 AND Course 2 OR Assessment 1.
GPA Requirements
The GPA Requirements editor indicates the minimum GPA and minimum GPA per course credit the student in this program needs to successfully complete the program's requirements.
Course Plan Templates
The Course Plan template allows counselors/administrators to create course plans for Academic Programs. When students are assigned to that program, the Academic Planner automatically adds the courses from the Course Plan Template into the student's Course Plan.
Batch Assignment Tool
Batch Assignment
The Batch Assignment Tool adds, deletes or modifies the selected flag or programs to (or from) the selected students’ Flags, Graduation Program, Academic Programs, Programs, and/or Program Session tab.
Path: Student Information > Program Administration > Batch Program Assignment Wizard
The Batch Program Assignment Wizard adds, deletes, or modifies assignment of the selected flag, graduation program, academic program, program or program with sessions on the selected students’ Flags, Programs (General), or Programs (Academic Planning) tools. It also manages course assignments, tracks graduation and academic progress, locks or unlocks plans, posts diplomas, and updates Course Requests.
See the Academic and Graduation Programs (State Edition) article for information specific to State Edition users that manage those programs at the State level and push them down to the District level.
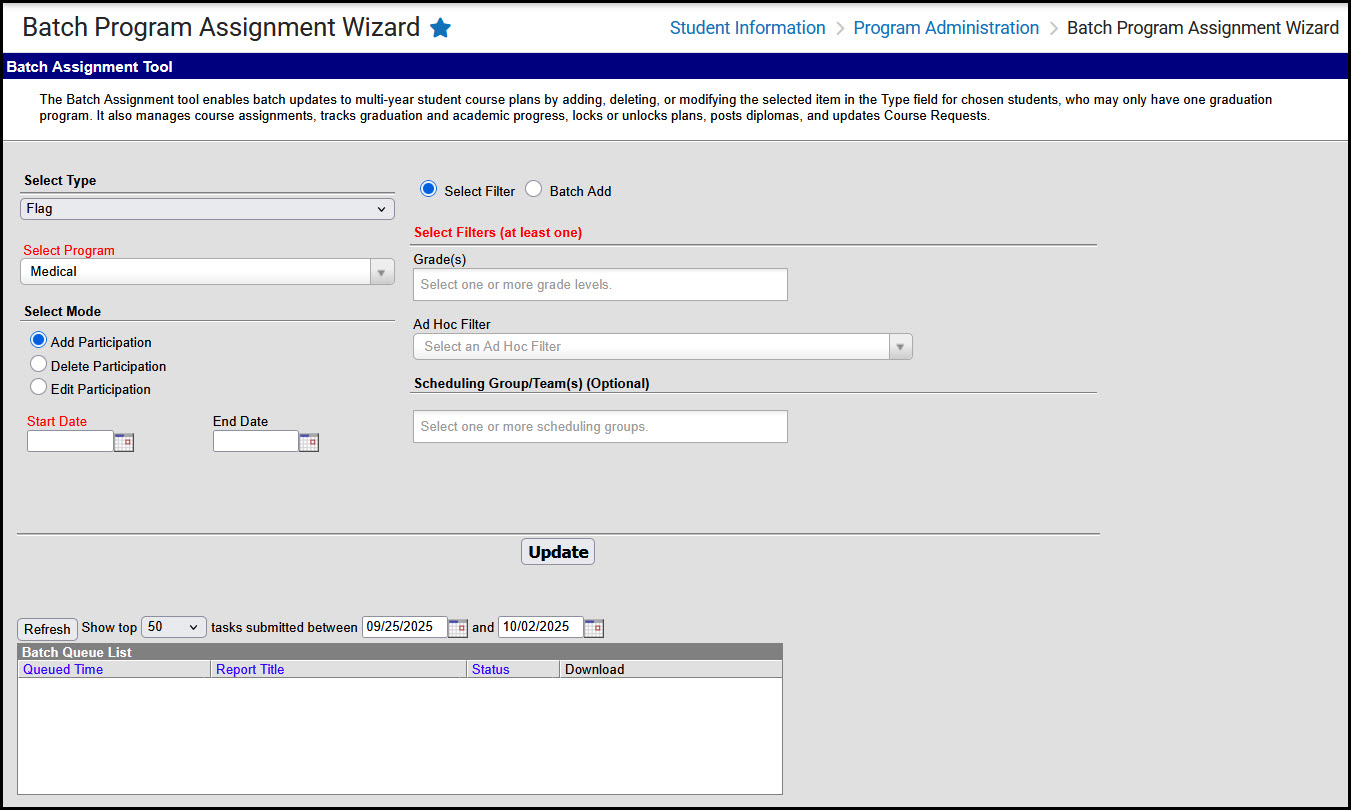 Batch Program Assignment Wizard
See the Batch Program Assignment Wizard Tool Rights article for information about rights needed to use this tool.
General information
- Select a school and calendar from the Context Switcher before selecting a program type to batch assign. Depending on the selected program type, users may see programs that can be assigned district-wide, programs that apply only to their school, and inactive programs (red text).
- A student can have multiple assignments of any program type other than graduation. Students are allowed only one graduation program assignment. If the student already has a graduation program assigned to them, it is overwritten when a new assignment is made.
- Some programs are created with requirements or conditions students must meet in order to be assigned to them. For example, students assigned to a graduation program must have the appropriate cohort start and end year if that information is associated with the selected graduation program.
Batch assignment by type
Academic Program
Academic Programs define a course of study. The Progress tool displays a selected student's progress toward meeting requirements for completing the program(s) to which they are assigned, such as course requirements, assessments, and certificates. Not every state uses Academic Programs, and those that do may use them differently.
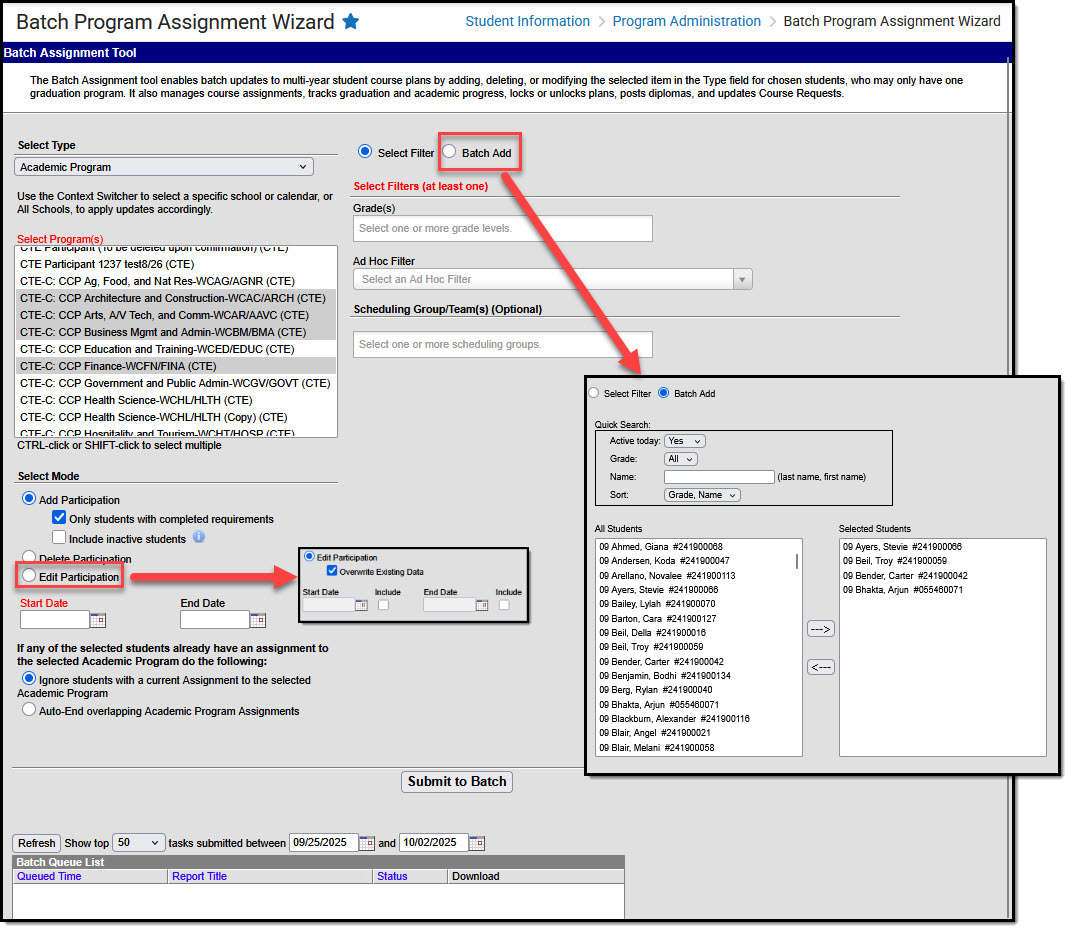 Batch add participation in an academic program.
- From the Context Switcher, select either one school or All Schools.
- Select Type: Academic Program
- Select Programs: select one or more programs to update
- Choose Students to update (Select Filter OR Batch Add)
- Select Filter: Select at least one filter type. (Example: Selecting Grade(s)=09 and Ad Hoc Filter=Honor Roll Students would return only 9th grade students included in the Honor Roll Students filter).
- Batch Add: use quick search or manual select options to locate and select students to which the update will apply.
- Select Mode (choose one)
- Add Participation
- Only students with completed requirements: select to align program to students who aren't currently assigned to it but have already completed the program's requirements
- Include inactive students: appears when "Only students with completed requirements" is selected, allows inclusion of students who completed requirements but are not actively enrolled
- Delete Participation: remove participation records for selected program
- Note for CTE Programs: CTE Program Participation Records are only deleted when the end date is NULL or occurs in the future.
- Edit Participation: choose to edit participation by entering a Start and/or End Date. If you wish to override or remove existing dates, select Override Existing Data, indicate which dates to include, and either enter dates or leave the fields blank as appropriate.
- Add Participation
- Start/End End Date: you must enter a date if the field is red (e.g. Start Date on Add Participation), otherwise enter dates or leave dates blank as appropriate
- Note for CTE Programs: CTE Program Participation Records are only deleted when the end date is NULL or occurs in the future.
- Select Ignore to skip students already assigned to the program(s) or select Auto-End to end date existing overlapping assignments.
- Submit to Batch. Select options for when the batch job should run (e.g. off-peak hours for large amounts of data), then select OK.
Academic Program (Automated)
Academic Programs that have been marked Include in Automatic Assignment appear in the list of programs that can be selected for automated assignment. Some schools follow this process at the beginning of every year, using first and last instructional day dates, expecting that students may be assigned to one or more new programs annually based on courses they take.
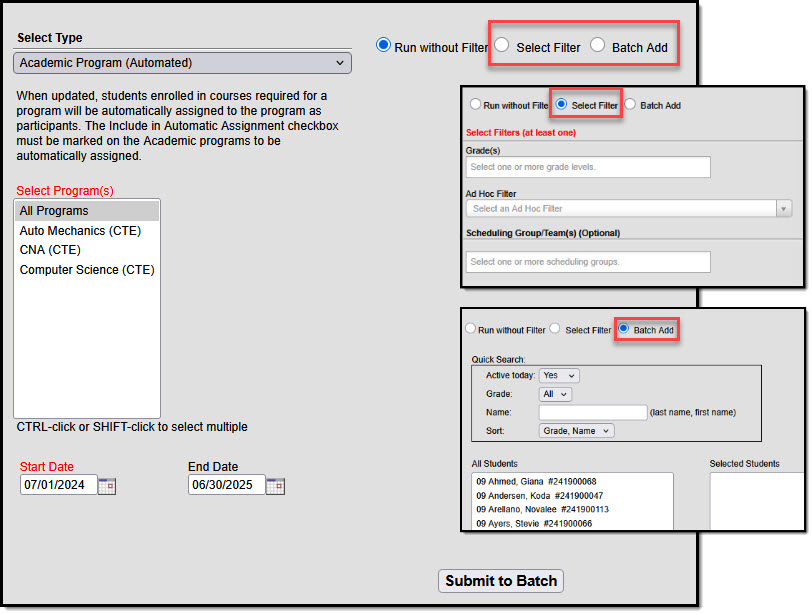 Perform an automatic batch program assignment.
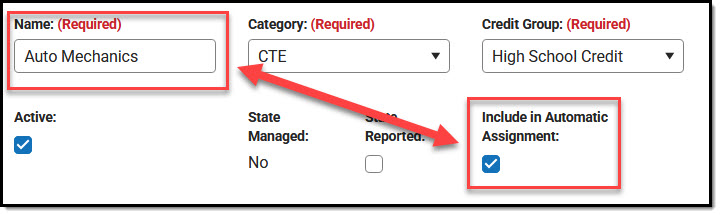 Programs must be marked to be included in automatic assignment.
- Select Type: Academic Program (Automated)
- Select Programs: select one or more programs to update
- Choose Students to update (Select Filter OR Batch Add)
- Run without Filter: This selection runs for all students, is resource-intensive, and should be run during off-peak hours.
- Select Filter: Select at least one filter type. (Example: Selecting Grade(s)=09 and Ad Hoc Filter=Honor Roll Students would return only 9th grade students included in the Honor Roll Students filter).
- Batch Add: use quick search or manual select options to locate and select students to which the update will apply.
- Enter a Start Date and, optionally, an End Date.
- Submit to Batch: Select options for when the batch job should run (e.g. off-peak hours for large amounts of data), then select OK.
- Students enrolled in courses required for a program will be assigned to the program as participants. Assignments are not duplicated.
Flag
Flags are alerts that schools can create and assign to students to indicate things such as participation in a program, or if a student has a contact or medical alert. Start and End Dates set the date range during which the flag's icon, if it has one, appears next to the student's name in Campus.
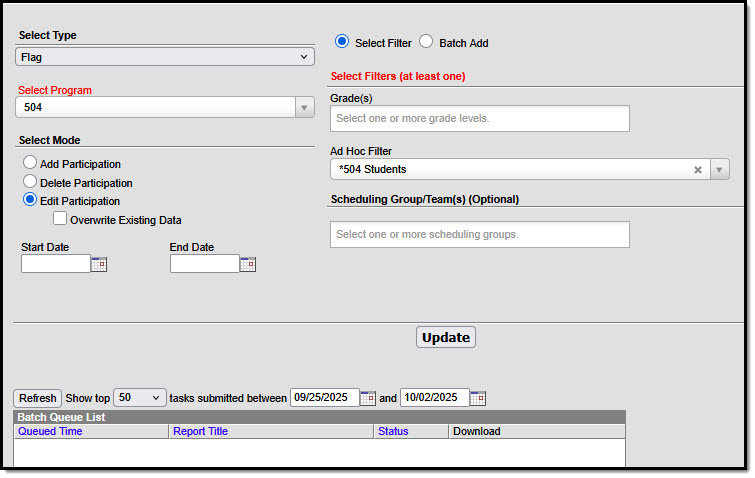 Flags can be batch assigned.
- Select Type: Flag
- Select Program: choose one program from the list
- Choose Students to update (Select Filter OR Batch Add)
- Select Filter: Select at least one filter type. (Example: Selecting Grade(s)=09 and Ad Hoc Filter=Honor Roll Students would return only 9th grade students included in the Honor Roll Students filter).
- Batch Add: use quick search or manual select options to locate and select students to which the update will apply.
- Select Mode (choose one):
- Add Participation: add flag to selected students that do not already have one
- Delete Participation: remove flag from selected students
- Edit Participation: choose to edit participation by entering a Start and/or End Date. If you wish to override or remove existing dates, select Override Existing Data, indicate which dates to include, and either enter dates or leave the fields blank as appropriate.
- Select Update to apply selections, then select OK to close the confirmation message that appears.
Graduation
Graduation Programs define all the academic requirements necessary for a student to graduate, such as courses to be taken and GPA to be earned.
- A student may only be assigned to one graduation program at a time.
- Changing the student's graduation program doesn't change recorded data regarding things such as classes taken and grades earned.
- The student's Progress toward meeting graduation standards could change based on the requirements defined for whatever graduation program they're currently assigned to.
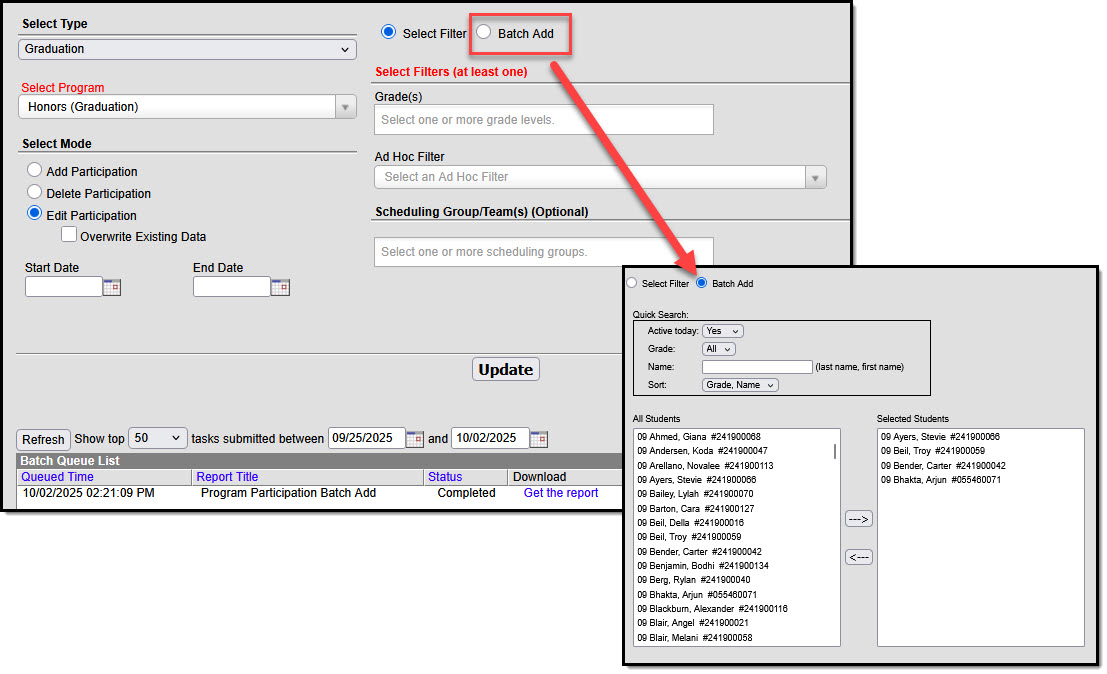 Graduation programs can be batch assigned.
- Select Type: Graduation
- Select Program students will be assigned to
- Choose Students to update (Select Filter OR Batch Add)
- Select Filter: Select at least one filter type. (Example: Selecting Grade(s)=09 and Ad Hoc Filter=Honor Roll Students would return only 9th grade students included in the Honor Roll Students filter).
- Batch Add: use quick search or manual select options to locate and select students to which the update will apply.
- Select Mode (choose one):
- Add Participation: add program for selected students
- Delete Participation: remove program for selected students
- Edit Participation: choose to edit participation by entering a Start and/or End Date. If you wish to override or remove existing dates, select Override Existing Data, indicate which dates to include, and either enter dates or leave the fields blank as appropriate.
- Select Update to apply selections, then select OK to close the confirmation message that appears.
Program
Programs can be used to indicate student participation in whatever a district defines as a program. Examples include after school clubs, intramural sports, or community education. When you select a program a summary of program information appears just beneath the Update button.
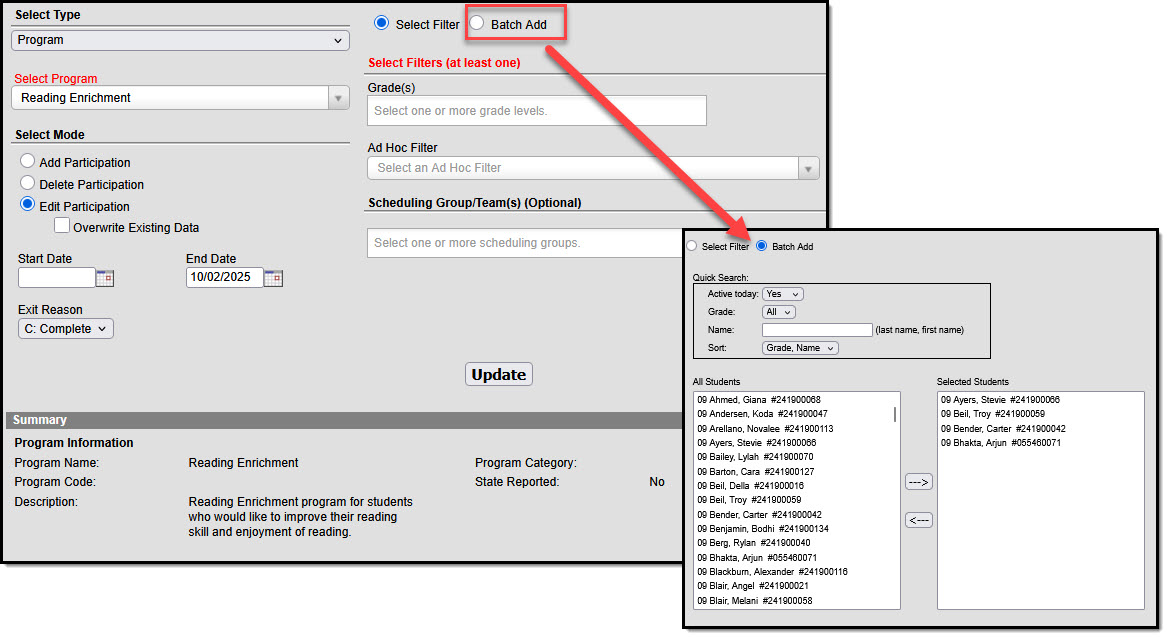 General programs can be batch assigned.
- Select Type: Program
- Select Program students will be assigned to
- Choose Students to update (Select Filter OR Batch Add)
- Select Filter: Select at least one filter type. (Example: Selecting Grade(s)=09 and Ad Hoc Filter=Honor Roll Students would return only 9th grade students included in the Honor Roll Students filter).
- Batch Add: use quick search or manual select options to locate and select students to which the update will apply.
- Select Mode (choose one):
- Add Participation: add program for selected students
- Delete Participation: remove program for selected students
- Edit Participation: choose to edit participation by entering a Start and/or End Date. If you wish to override or remove existing dates, select Override Existing Data, indicate which dates to include, and either enter dates or leave the fields blank as appropriate.
- Exit Reason: select an exit reason if students are leaving the program and you need to indicate why.
- Select Update to apply selections, then select OK to close the confirmation message that appears.
Program session
Program Sessions track the date, time, and location that an instance of a program is taking place. This option only displays programs for which sessions or instances of a program that can be tied to specific dates, times, and locations have been created.
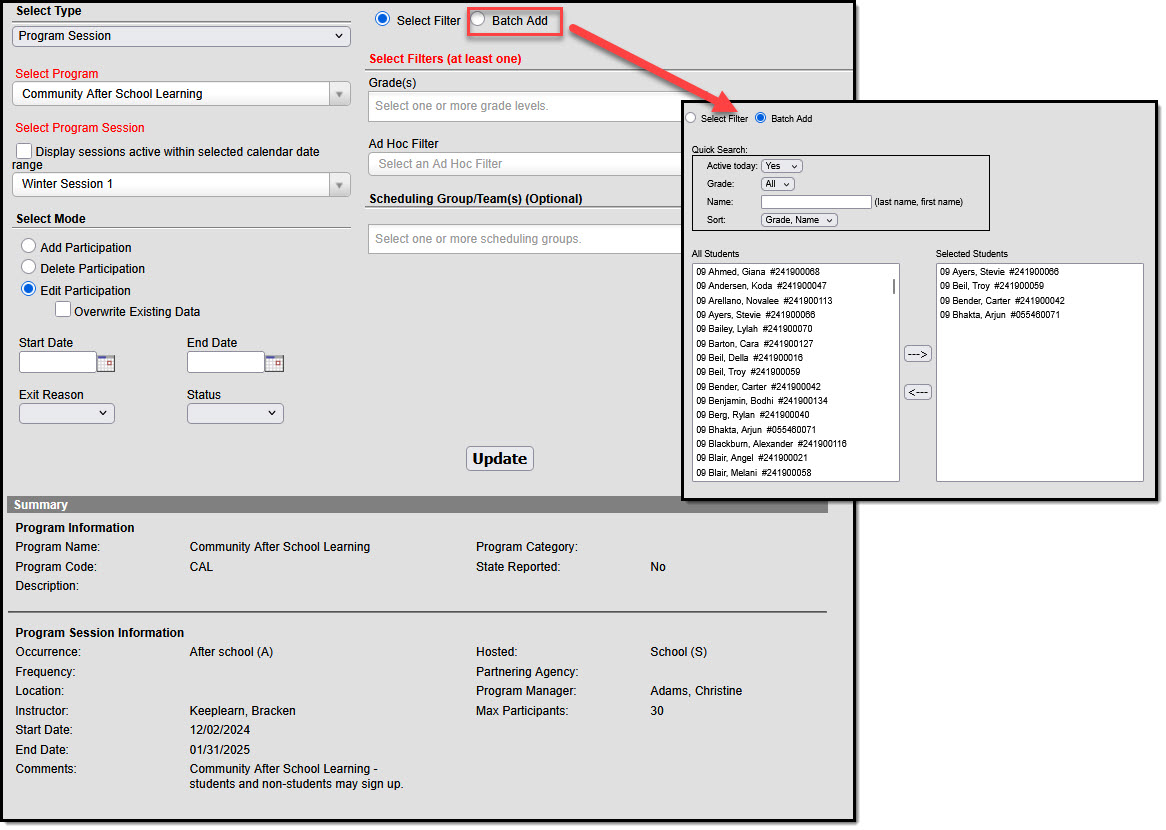 Program sessions can be batch assigned.
- Select Type: Program Session
- Select Program students will be assigned to
- Select Program Session: Select "display sessions active within selected calendar date range" to limit selection options to sessions active within the calendar selected in the Context Switcher. Choose a session from the droplist.
- Choose Students to update (Select Filter OR Batch Add)
- Select Filter: Select at least one filter type. (Example: Selecting Grade(s)=09 and Ad Hoc Filter=Honor Roll Students would return only 9th grade students included in the Honor Roll Students filter).
- Batch Add: use quick search or manual select options to locate and select students to which the update will apply.
- Do not exceed Max Participants indicated in Program Session Inrformation
- Select Mode (choose one):
- Add Participation: add program for selected students
- Delete Participation: remove program for selected students
- Edit Participation: choose to edit participation by entering a Start and/or End Date. If you wish to override or remove existing dates, select Override Existing Data, indicate which dates to include, and either enter dates or leave the fields blank as appropriate.
- Exit Reason: select an exit reason if students are leaving the program and you need to indicate why.
- Status: indicate a status to be applied, if appropriate
- Select Update to apply selections, then select OK to close the confirmation message that appears.
Program Session Dates: When assigning program sessions, the entered start and end dates must be within the selected program session start and end dates.
Max Participants: When enrollment in a program session meets the entered Max Participant number, a pop-up message displays. Additional students can still be added to the program session, but be aware the enrollment has exceeded the entered value.
Course Plan Admin Tool
Course Plan Admin
The Course Plan Admin tool performs operations to lock and unlock course plans, clear parent/guardian approval, calculate program on-track status, post diplomas, and post planned courses to Course Requests for multiple students at once. Use this tool after students have entered Course Plans and counselors have reviewed them.
Path: Student Information > Program Administration > Course Plan Administration
The Course Plan Administration tool performs operations to lock and unlock course plans, clear parent/guardian approval, calculate program on-track status, post diplomas and planned courses to Course Requests for scheduling for multiple students at once, post certifications and seals, and update student status. Minnesota districts also see a mode to calculate direct post secondary admission tier. Use this tool after students have entered Course Plans and counselors have reviewed course plans.
In the Context Switcher, select a specific calendar to update Course Plans for just that school, or select All Schools to update Course Plans for all modifiable calendars to which you have access in the district.
Choose different options by selecting the appropriate mode from the Select Mode dropdown list.
 Select a mode to perform batch operations on course plans.
See the Course Plan Admin Tool Rights article for information on available tool rights.
Calculate on-track status
This mode calculates each student's status towards successful completion of the assigned Academic Program. This process looks at each student's Progress or Course Plan tab and caches the calculation each time those tools are viewed or saved. This allows the status and corresponding error messages to be available in Ad hoc Reporting.
- Select the Calculate on-track status mode from the dropdown list.
- Click the Submit to Batch button. A Batch Queue Reporting Options window displays.
- Select the desired options of High Priority or Keep Until I Delete, and indicate the Start Date/Time.
- Click OK when finished.
- When the report has completed, click the Get the report link in the Batch Queue List. The report displays in PDF format, listing the operation performed, the calendar ID from the calendar selected in the Campus toolbar, and the number of calculations performed.
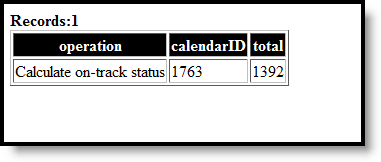 Review results.
Clear all parent/legal guardian approvals
The Course Plan tool contains a checkbox that indicates the parent/guardian approved the student’s plan based on the parent’s selection of the Approved by parent/legal guardian checkbox on the Portal Academic Planner screen.
Choosing the Clear all parent/legal guardian approvals mode removes these marks, allowing an annual review to be performed. This action should be done before course plans are modified for the next school year.
- Select the Clear all parent/legal guardian approvals mode from the dropdown list.
- Click the Run button when finished.
- A pop-up message indicating approvals have been cleared displays. Click OK to acknowledge this.
Create course requests
This mode takes the courses selected in the students' course plan for the next grade level and creates them as scheduling course requests. This should be done after calendars and enrollments are rolled forward for the next school year, and teachers have entered Course Recommendations for students.
Once planned courses have been created as course requests, those courses are considered a priority and display in bold on the Request Batch Report .
- Courses from a course plan replace all previously created course requests for that student.
- Students without a course plan will leave their existing course requests unchanged.
- Changes to course plans will not automatically update course requests.
Ensure that you are creating requests in the future calendar that you are planning to schedule.
- Select the Create Course Requests mode from the dropdown list.
- Click the Run button.
- A pop-up message indicating course requests were saved displays. Click OK to acknowledge this.
Lock course plans
This mode locks courses in the student's Course Plan for the selected calendar for the grade level in which they will be enrolled. Locked course plans can only be modified by a counselor. Future years will remain unlocked.
- Select the Lock Course Plans mode from the dropdown list.
- Click the Run button.
- A pop-up message indicating course plans have been locked. Click OK to acknowledge this.
Unlock course plans
This mode unlocks courses in the student's Course Plan for the selected calendar for the grade level in which the student is currently enrolled. When courses on a course plan are not locked, students have the ability to make changes using the Academic Planner tool in the Portal.
Plans that are locked can only be modified by a counselor.
- Select the Unlock Course Plans mode from the dropdown list.
- Click the Run button.
- A pop-up message indicating course plans have been unlocked. Click OK to acknowledge this.
Post Certifications
This mode will post certifications for students who have met the criteria previously set for an Academic Program.
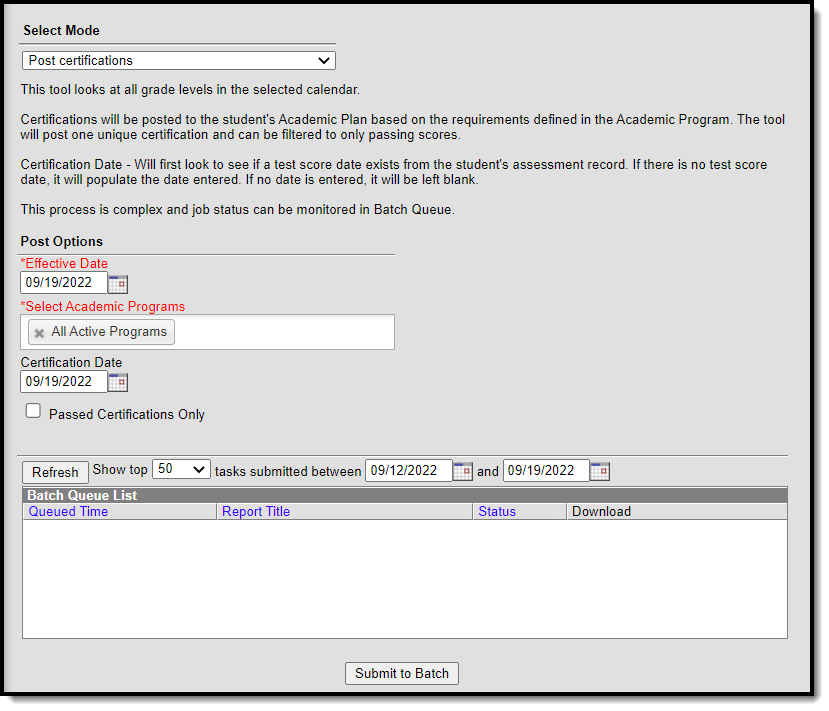 Choose options for post certifications mode.
- Select the Post certifications mode from the dropdown list.
- Change the Effective Date if needed. It defaults to the current date.
- Choose program(s) to post certifications for from the Select Academic Programs options. You will only see programs listed here that have certification criteria defined for them in Academic Program Setup.
- Add a Certification Date if desired. This is not a required field. If a date is entered here, it will only be added for assessments that do not already have a date associated with them.
- Mark the Passed Certifications Only checkbox if you do not want to record attempted certifications.
- Click the Submit to Batch button. A Batch Queue Reporting Options window displays.
- Select the desired options of High Priority or Keep Until I Delete, and indicate the Start Date/Time.
- Click OK when finished.
- When the report has completed, click the Get the report link in the Batch Queue List. The report displays in PDF format, listing student number, student name, program name, certification name and passed status.
Post diplomas
This option ONLY evaluates graduation plans for twelfth grade students.
This mode recalculates a 12th grade student's on-track status, and for those students who meet the requirements of their assigned graduation program, a diploma associated with their program is awarded to them.
- If a student's Graduation Diploma Type is already populated, the other Diploma fields and Enrollment fields will NOT be updated.
- If the student's on-track status is Yes and Diploma Type is empty, the Diploma Type field populates, along with the Diploma Date and Diploma Period (fall, spring, etc.).
- If the student's on-track status is No, none of the diploma fields will be updated.
To update the Enrollment End Date and End Status on the Enrollment record, the Enrollment End Date and End Status values must be entered on this tool. A student's enrollment record will only be updated if both of the enrollment fields are empty.
To end enrollments without populating the Diploma Type field on the Graduation record, use the Enrollment End Batch tool.
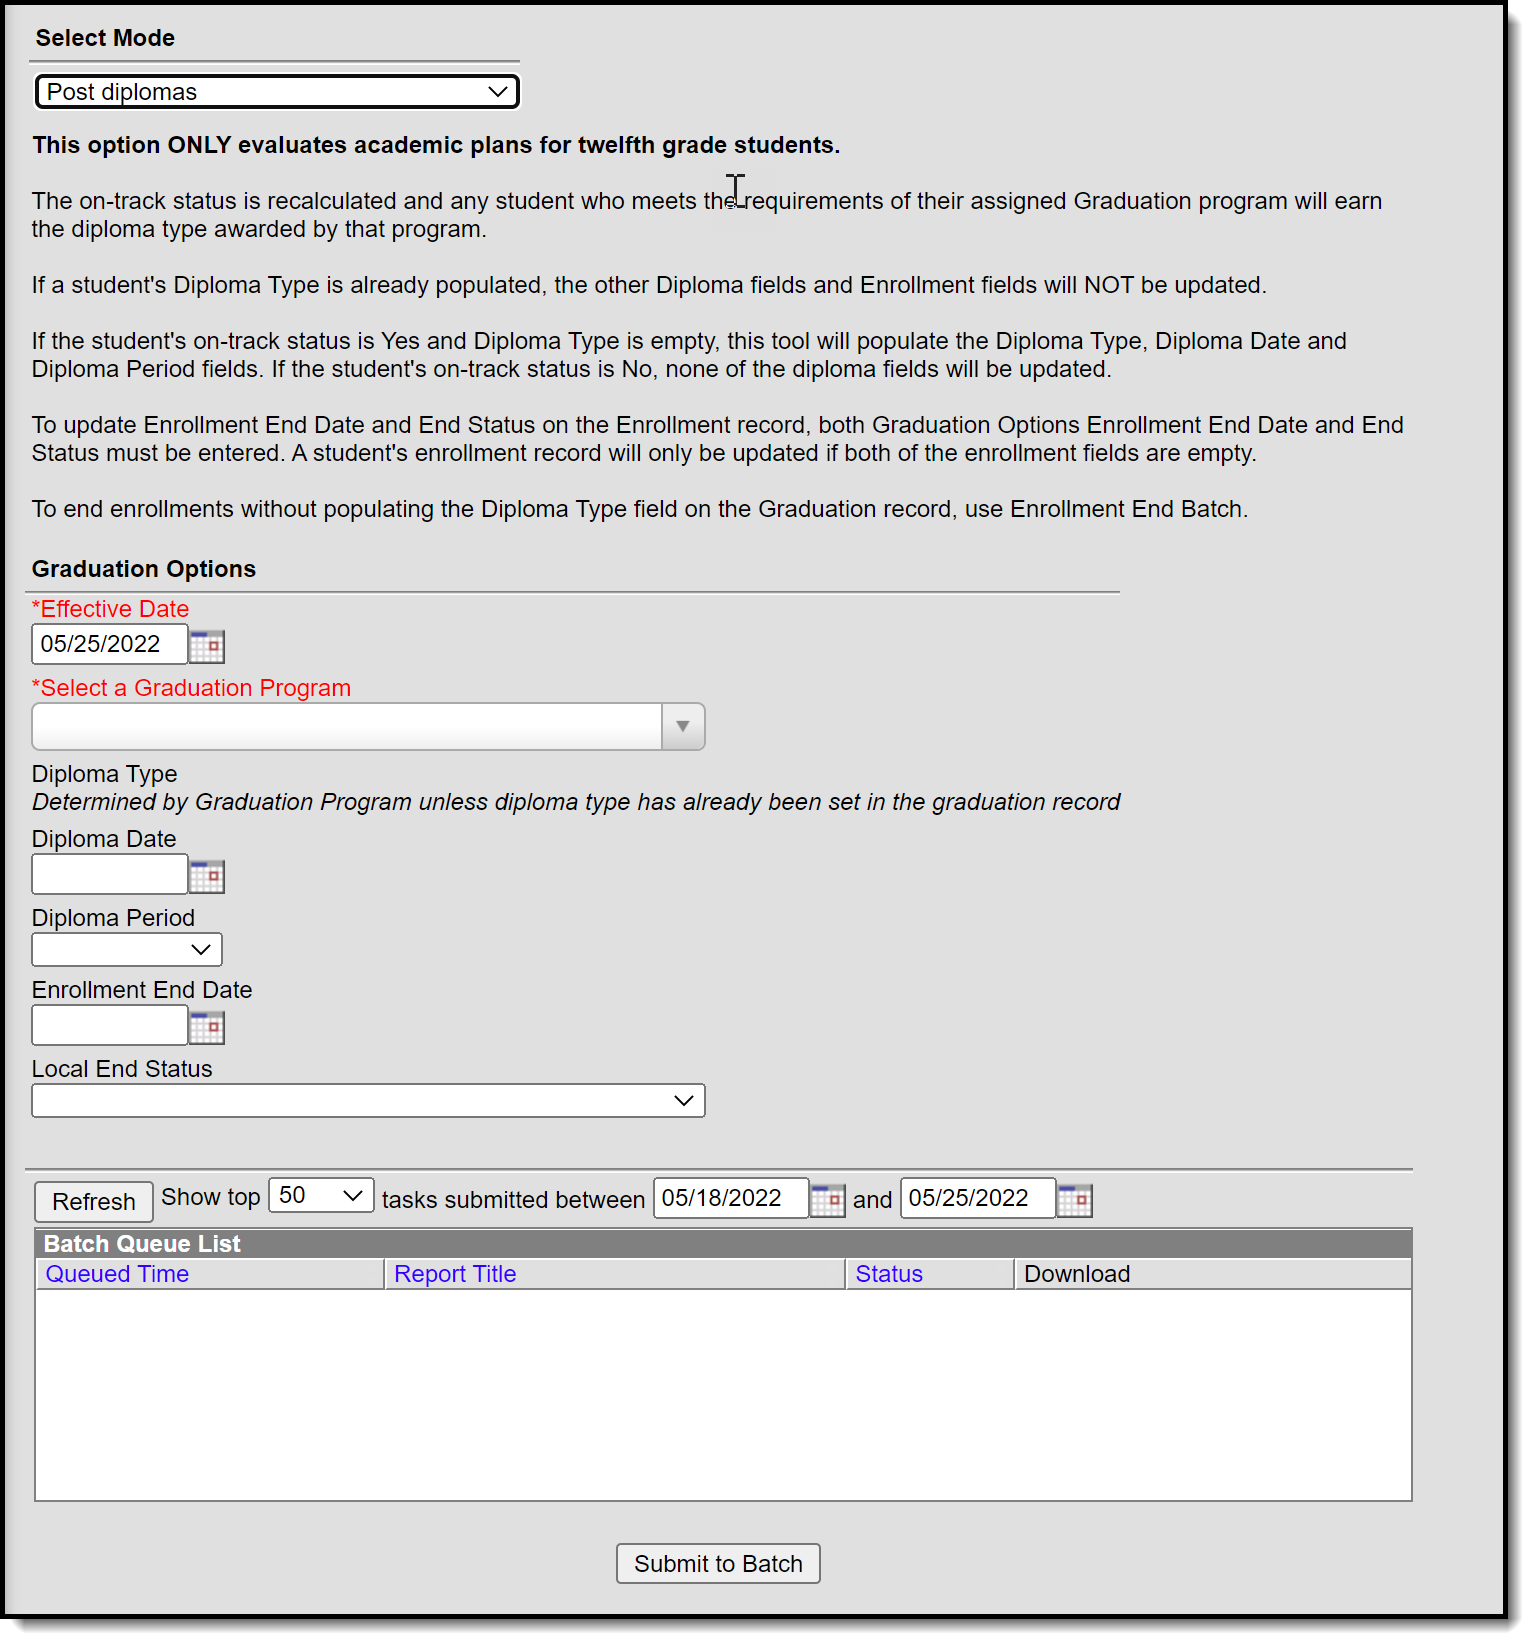 Select options for post diplomas mode.
Graduation options
The Post Diplomas mode contains the following fields that need to be populated before this mode is completed.
| Field | Description |
|---|---|
| Effective Date | Defaults to the current date. Students who do not have an active enrollment on the date entered will not have diplomas posted. |
| Select a Graduation Program | Selection indicates the program for which diplomas will be posted. All active graduation programs are available for selection. There is no logic associated with program hierarchy, meaning any program can be selected without adverse affects, as long as twelfth grade students are assigned to that program. |
| Diploma Type | The Diploma Type set on the Graduation Program is populated for the student on his graduation tab, unless this value has already been populated there. |
| Diploma Date | Indicates the date the diploma was received, usually the last day of school. This date is populated on the graduation tab. |
| Diploma Period | Indicates the time of year the student received the diploma. This date is populated on the graduation tab. |
| Enrollment End Date | Indicates the date the student's enrollment ended. This may be the same date the diploma was received or it could be a different date. It officially ends the student's enrollment, so ensure all grades and reporting have been completed before populating this information. |
| Local End Status | Indicates the reason the student's enrollment ended. For this purposes, use the reason most closely linked to student graduated. This value populates the student's Local End Status and State End Status fields on the enrollment record. |
- Do not run Post diplomas prior to final grading.
- Updating diploma fields and enrollment fields when the enrollment end date is before grading functions are completed will end each roster record before students have been graded. This causes the in-progress courses to be removed from the Grad Progress logic, and the Academic Plan Progress Report will show the student as not being on-track.
- Select the Post Diplomas mode from the dropdown list.
- Update the Effective Date if needed.
- Select a Graduation Program from the dropdown list.
- If necessary, enter a Diploma Date and Diploma Period.
- If necessary, enter an Enrollment End Date and Local End Status.
- Click the Submit to Batch button. A Batch Queue Reporting Options window displays.
- Select the desired options of High Priority or Keep Until I Delete, and indicate the Start Date/Time.
- Click OK when finished.
- When the report has completed, click the Get the report link in the Batch Queue List. The report displays in a new browser window, listing the operation performed, the calendar ID from the calendar selected in the Campus toolbar, and the number of diploma posted.
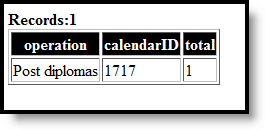 Review post results.
Post seals
The Post Seals mode is used to post seals for students who have met the requirements set for an academic program. A student must have a graduation record in order for seals to post. Seals will be posted to the Graduation tool.
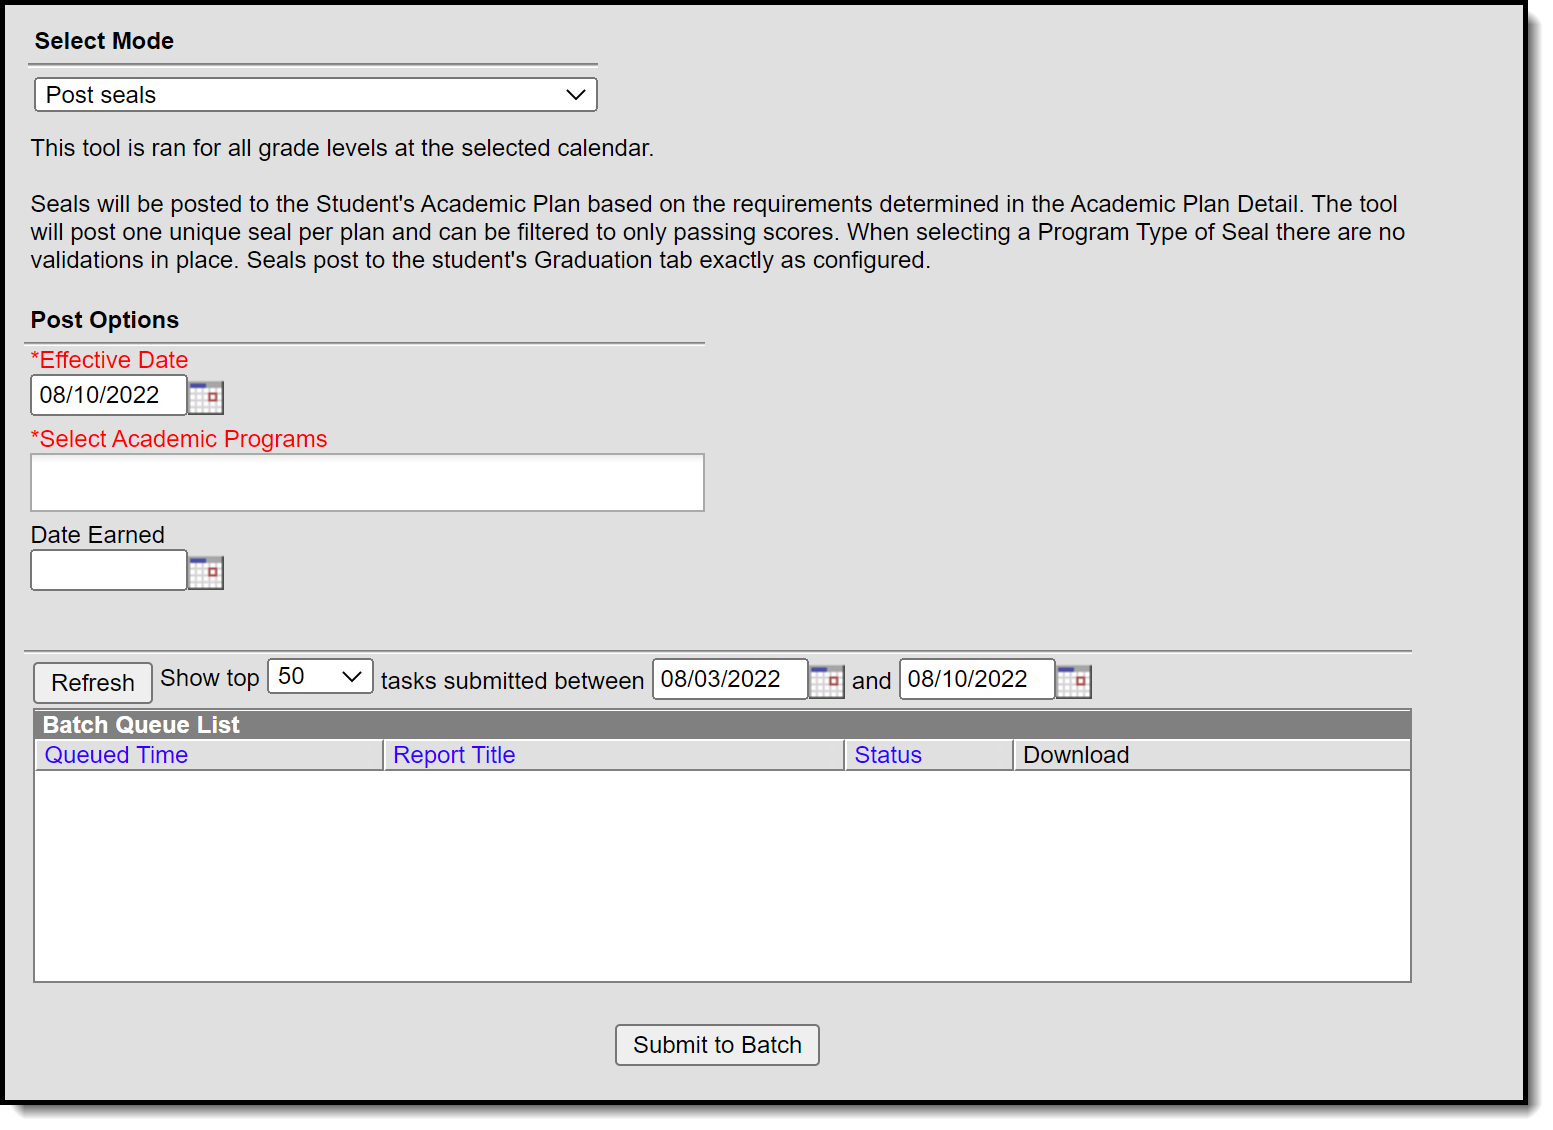 Select post seals options.
In order for seals to post for an academic program to the graduation tool, Seal must be selected as the Program Type when the academic program is created in Academic Program Setup.
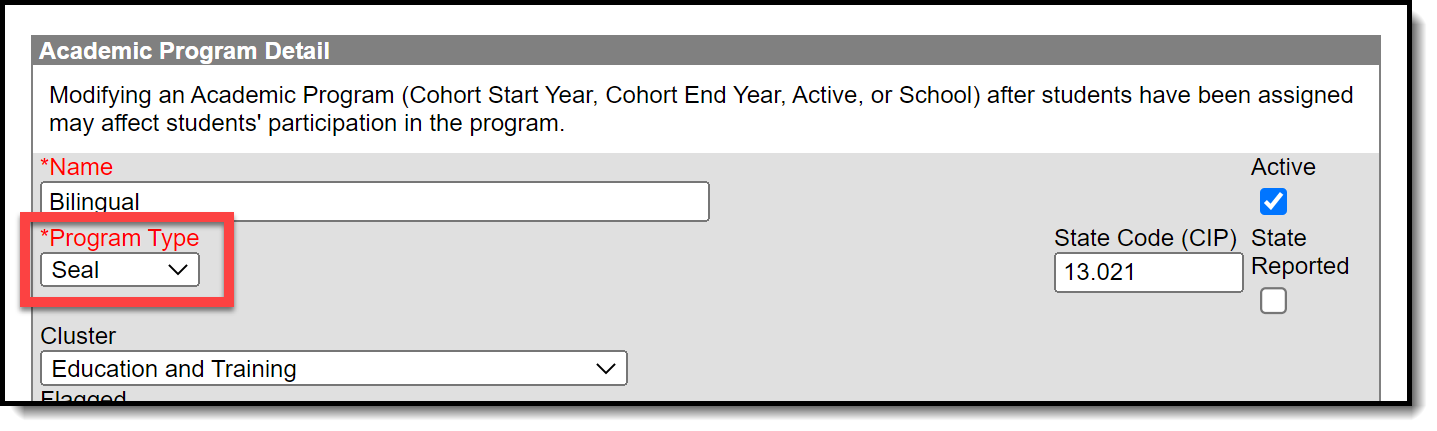 Ensure that the Academic Program is designated as a seal program type.
- Select the Post Seals mode from the dropdown list.
- Update the Effective Date if needed.
- Select the Academic Program(s) to post seals for.
- Enter a date in the Date Earned field.
- Click the Submit to Batch button. A Batch Queue Reporting Options window displays.
- Select the desired options of High Priority or Keep Until I Delete, and indicate the Start Date/Time.
- Click OK when finished.
- When the report has completed, click the Get the report link in the Batch Queue List. The report displays in a new browser window.
Calculate direct post secondary admission tier (MN & WI)
This mode will calculate a student's highest tier attained for Direct Post Secondary Admissions (DPSA). This Calculation will cycle through GRAD Programs that have been identified lowest to highest for use in DPSA calculation. This process will then post the highest calculated on track Grad Program to each 12th grade students enrollment for the following fields DPSA calculated Tier & DPSA Reported Tier. This calculation will be run on demand and write or overwrite the calculated value each time the process is run. Upon completion of the calculation there will be a detail report displaying each student and the tier they were set to.
- Select the Calculate Direct Post Secondary Admission Tier mode from the dropdown list.
- Click the Submit to Batch button. A Batch Queue Reporting Options window displays.
- Select the desired options of High Priority or Keep Until I Delete, and indicate the Start Date/Time.
- Click OK when finished.
- When the report has completed, click the Get the report link in the Batch Queue List. The report displays in a new browser window, listing the student name, student number, calendar name, and tier status.
If no graduation program has the DPSA Tier field set, the report will display an error message indicating 'No active Graduation Program has DPSA Tier value set.
For Minnesota users, please see the Minnesota Direct Admissions Extract article for more information.
Update student status
This mode updates student status based on requirements set in academic plans. Updates to status are dependent on completion of the requirements that have been defined in the Compound Requirements tool for an academic program.
 Choose options for updating student status.
- Select the Update Student Status mode from the dropdown list.
- Mark Include inactive Students if you wish to include students with an end date on their enrollment in the update.
- Mark Include end dated programs if you wish to include students who are no longer active in their assigned Academic Programs in the update.
- Click the Submit to Batch button. A Batch Queue Reporting Options window displays.
- Select the desired options of High Priority or Keep Until I Delete, and indicate the Start Date/Time.
- Click OK when finished.
- When the report has completed, click the Get the report link in the Batch Queue List. The report displays in a new browser window indicating the number of students whose status has been updated. For information related to which students are assigned which status, use the Ad hoc filter designer.
Reports
Academic Plan Progress Batch
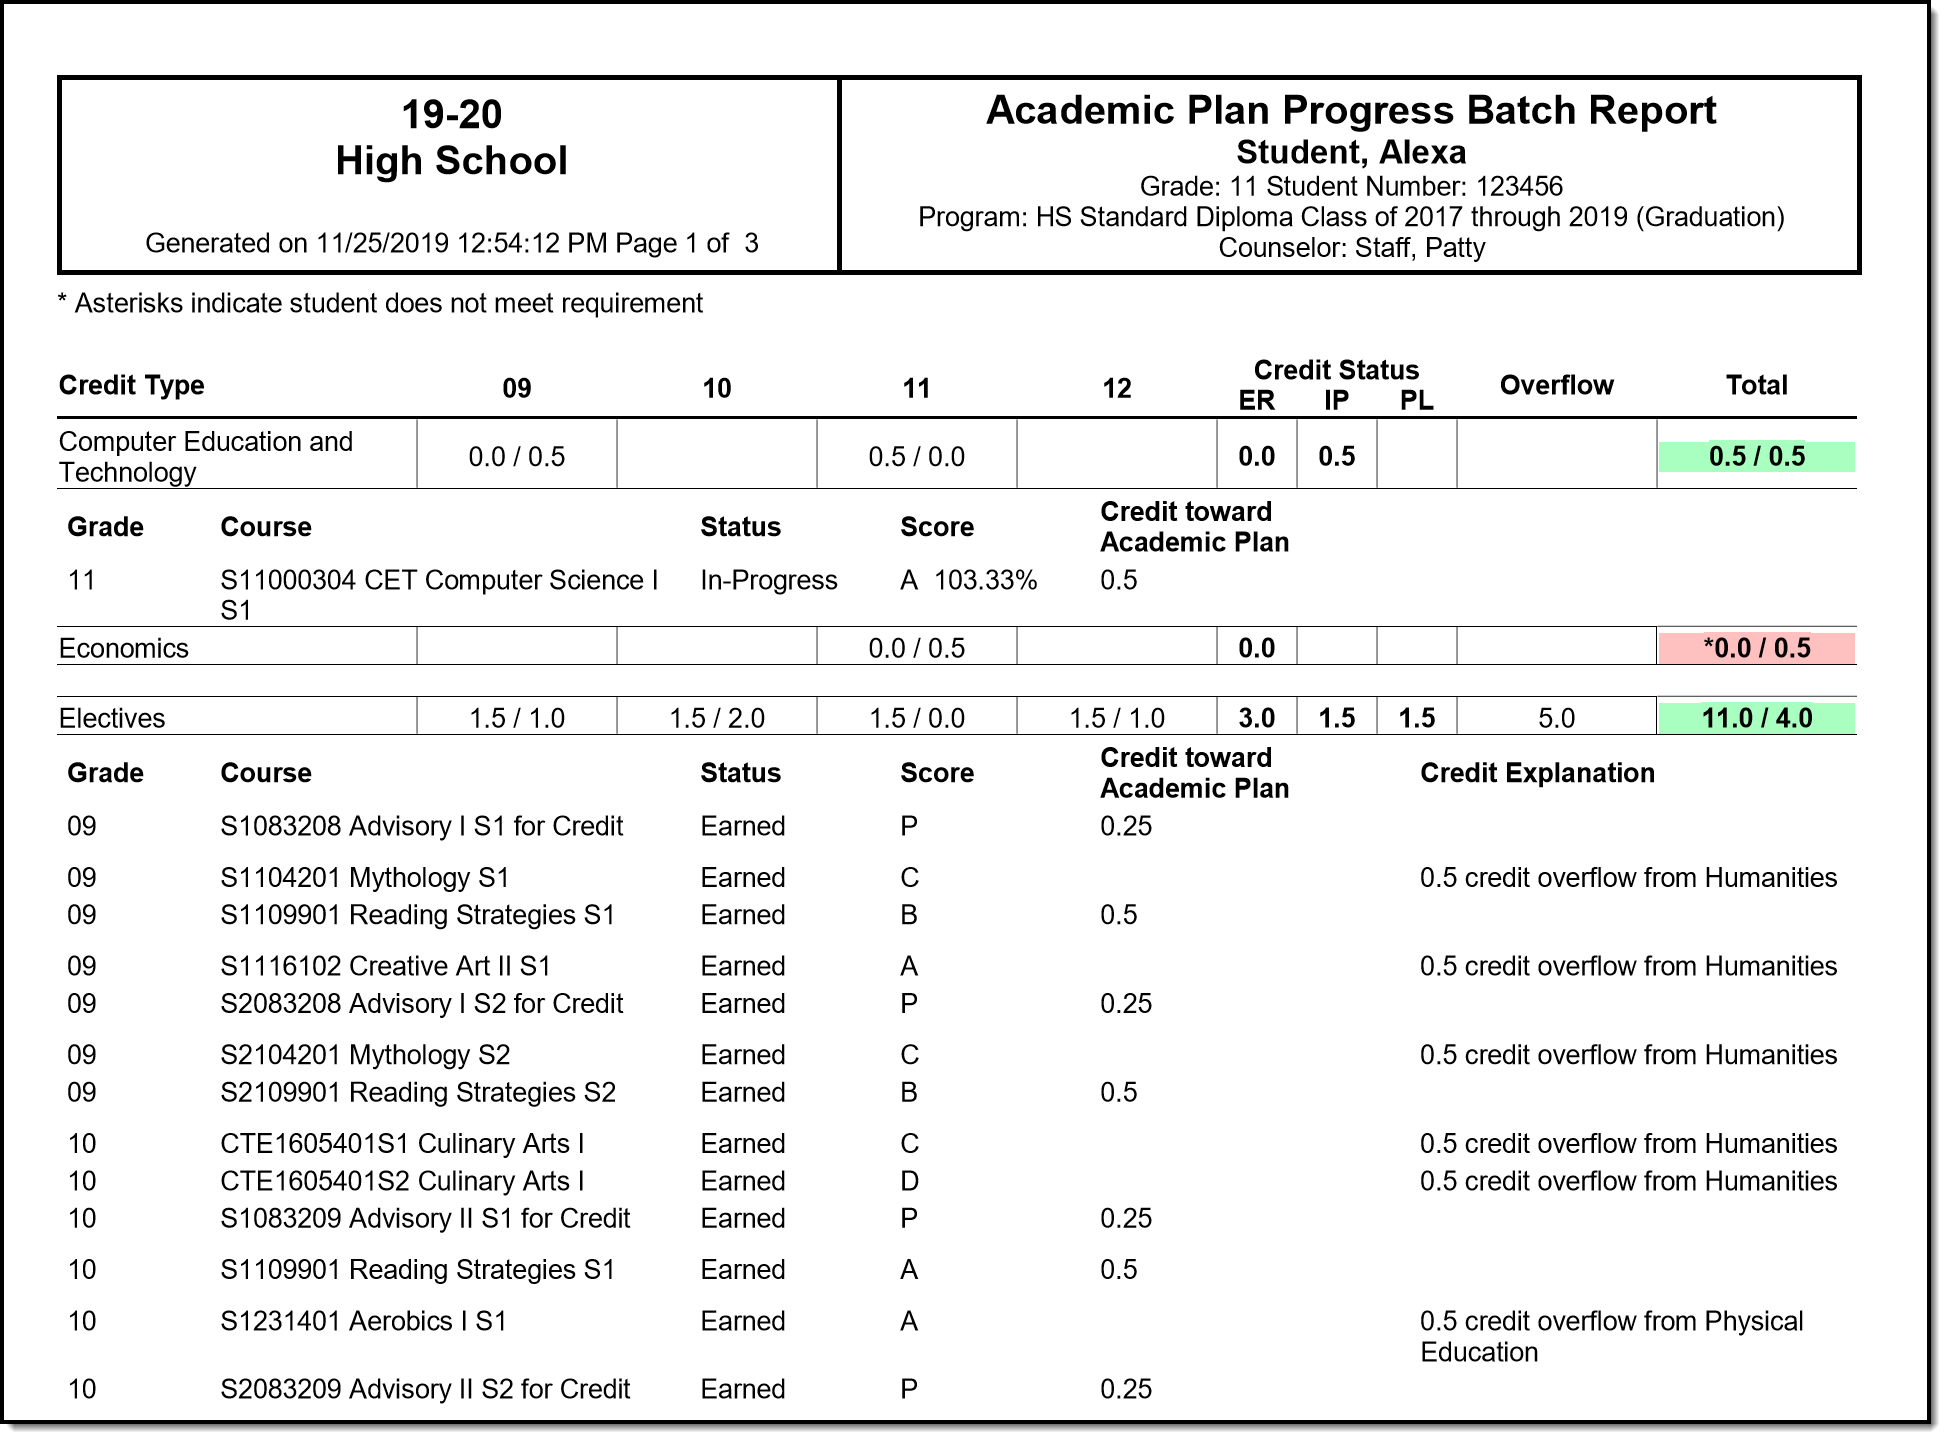
The Academic Plan Progress Batch Report allows counselors and other administrators to view a PDF report of several students' progress on their academic plan.
Path: Student > Program Administration > Academic Plan Progress Batch Report
The Academic Plan Progress Batch Report allows counselors and other administrators the ability to view a PDF report of several students' progress of their academic plan. This same report can be generated one student at a time by printing the Academic Plan Progress report from the student's Academic Planning Progress tab.
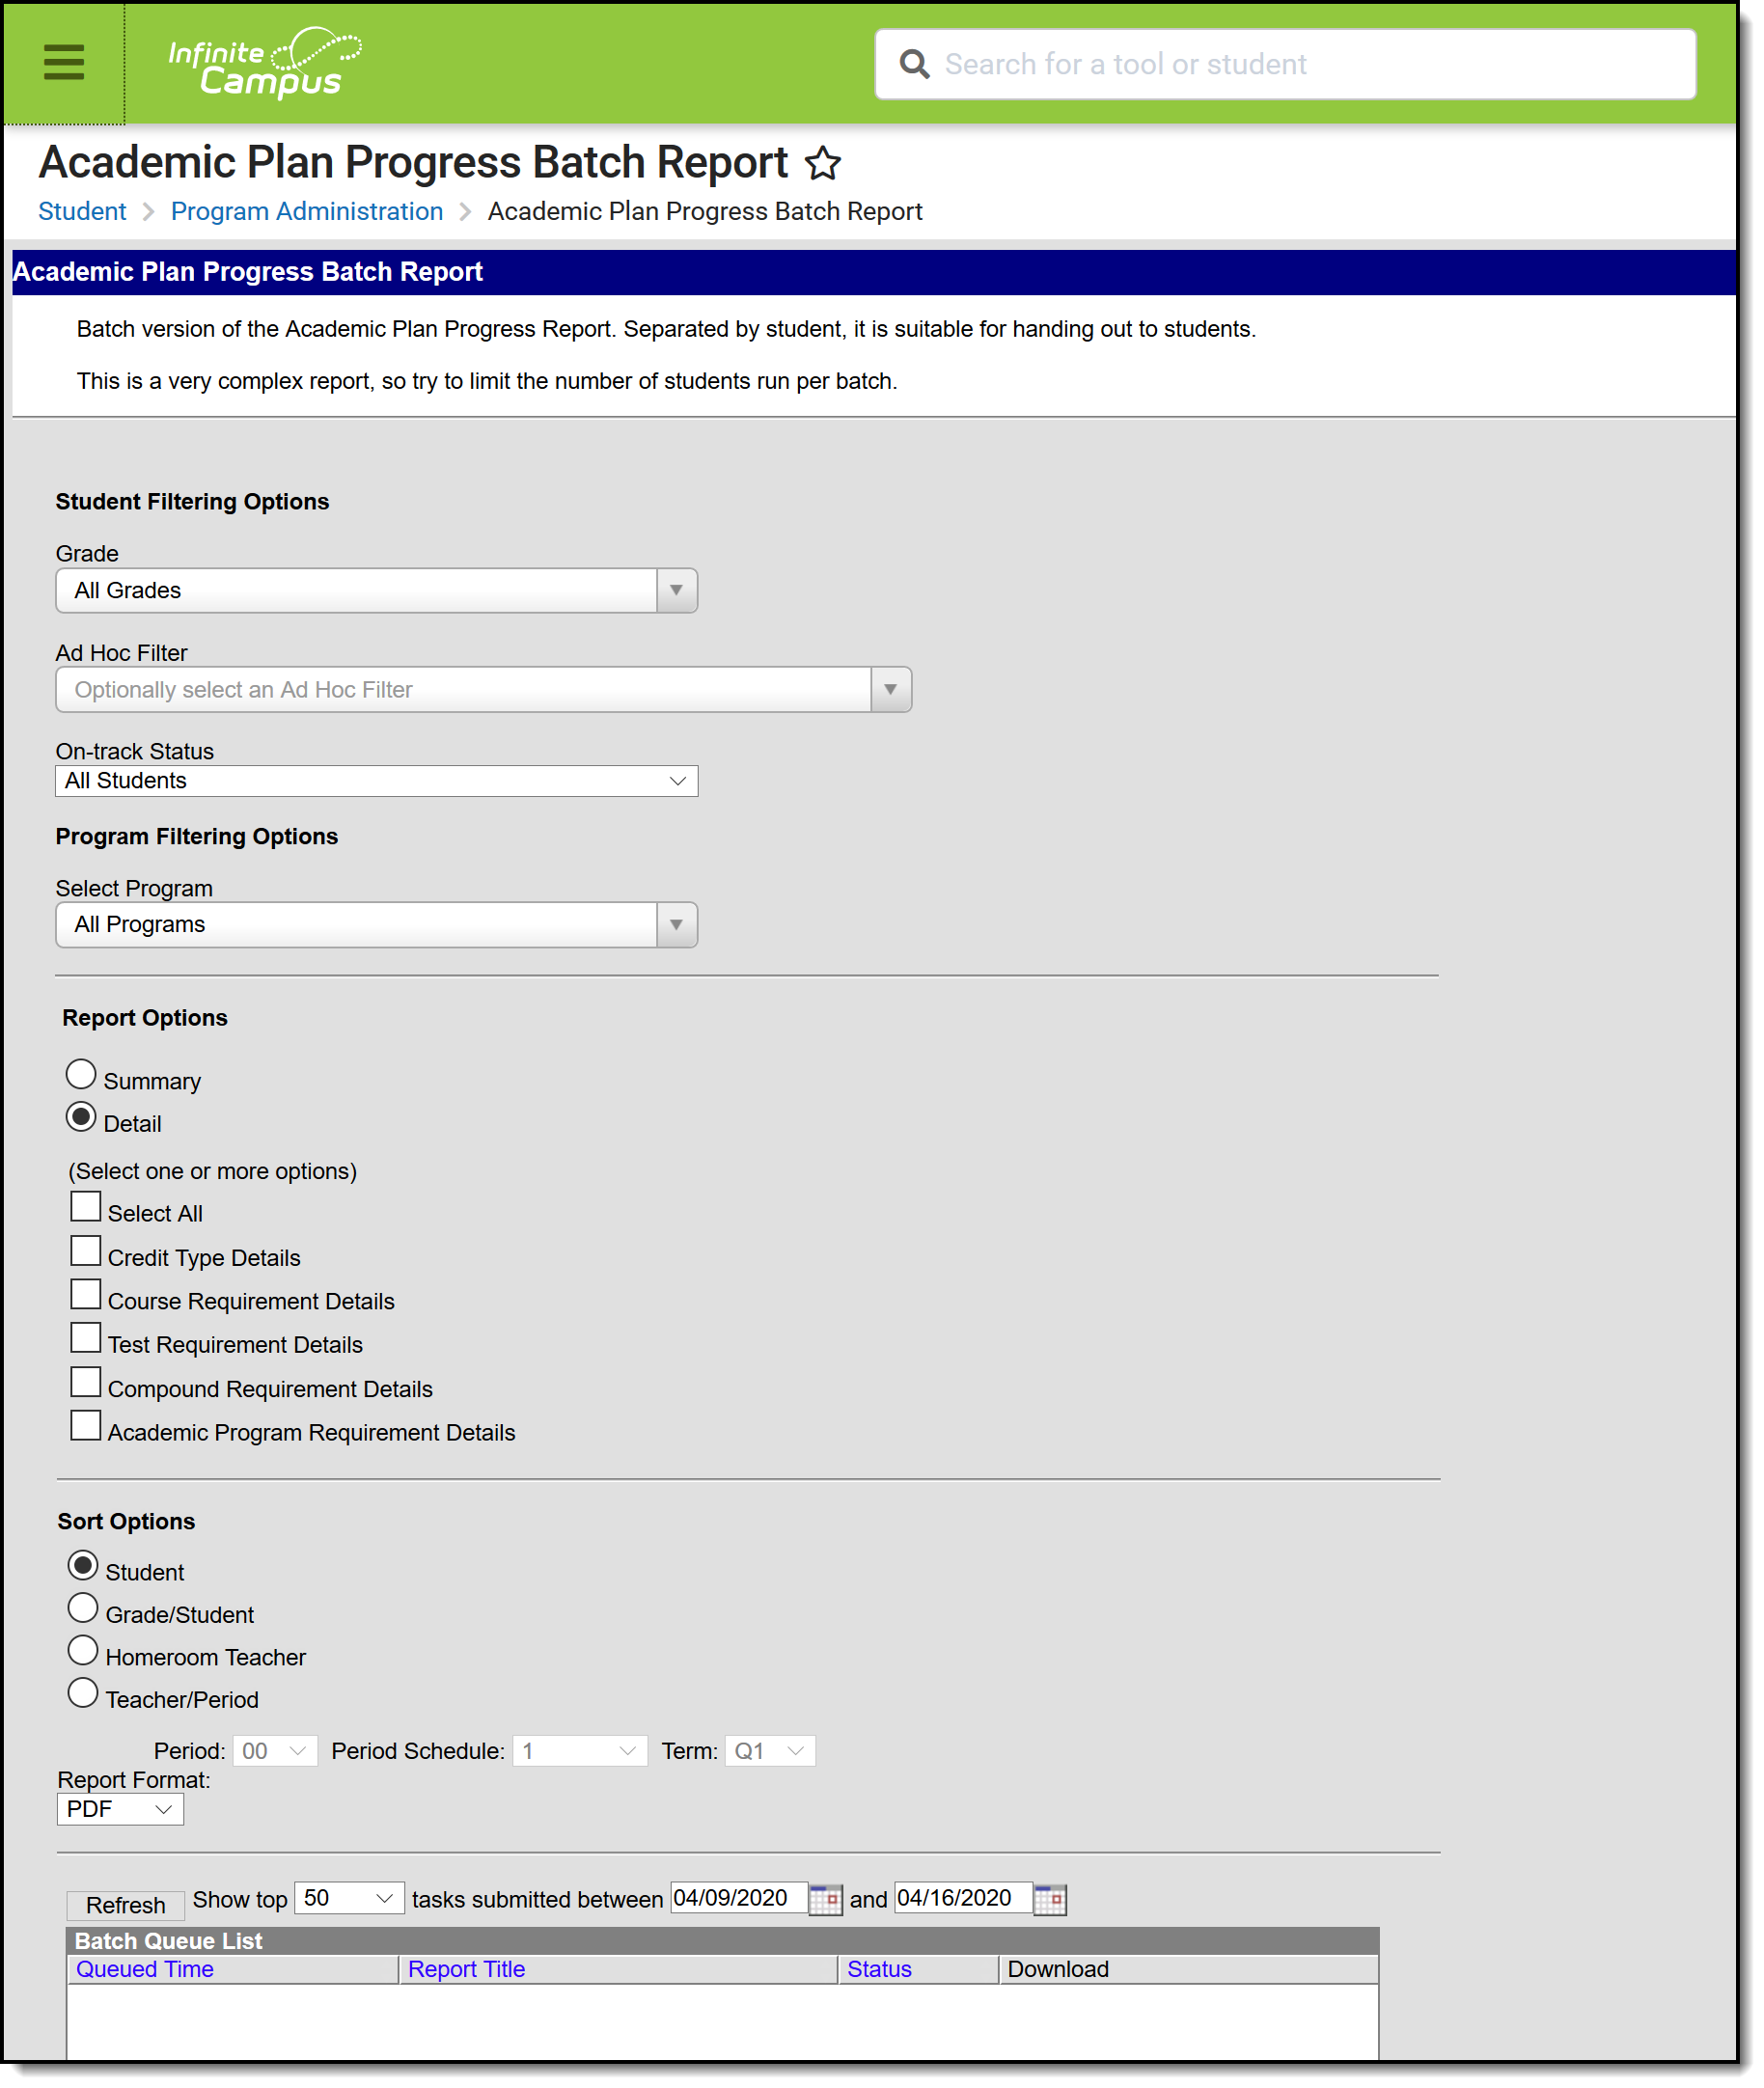 Select options and generate the report.
See the Academic Plan Progress Batch Report Tool Rights article for information about rights needed to use this tool.
Report logic
This report only generates information for the selected calendar in the Campus toolbar. Multiple calendars cannot be selected.
Only students who are assigned graduation programs are included in the report.
Report editor
| Data Element | Description |
|---|---|
| Student Filter Options | |
| Grade | Filters the students included in the report to the selected grade level of enrollment. All Grades can be selected. Because this is a complex report, it is recommended that a specific grade level be selected. |
| Ad hoc Filter | Select an existing filter of students. Only those students included in the filter are considered for inclusion in the report. This filter can be selected in addition to a grade level. For example, if the filter includes all students with the last name of A, and the grade level selection is set to 10, only students in grade 10 who also have a last name that starts with A are included in the report population. |
| On-track Status | Select this option to return student who are off-track only (behind in program requirements), on-track only (met or exceeded program requirements) or All Students (on-track status is not considered). |
| Program Filtering Options | |
| Select Program | Reports information for the selected program only. When All Programs is selected, all Graduation Programs and Academic Programs assigned to the students are returned (if Academic Programs are available). When a specific Graduation Program or Academic Program is selected, only information on the selected program is returned. |
| Report Options | |
| Summary | The summary report includes information on the student's assigned graduation program, their on-track status, and the student's progress. |
| Detail | The detail report includes all of the information in the summary report, plus the information on the specifics of the requirement, and allows the selection of the following (one or all):
|
| Sort Options | |
| Student | This option displays students alphabetical by last name. |
| Grade/Student | This option displays students first by grade level of enrollment (09, 10, etc.), then alphabetical by last name. |
| Homeroom Teacher | This option displays students by the homeroom teacher, then alphabetical by last name. |
| Teacher/Period | This option displays students by the selected teacher, period, period schedule and term selected in the corresponding dropdown list. Students who are scheduled as of the last calendar day print on the report. |
| Report Format | The report prints in either PDF or DOCX formats. |
| Report Generation Options | |
| Generate Report | Use the Generate Report button to display the results of the report immediately. |
| Submit to Batch | Use the Submit to Batch option to determine when the report generates. Because this is a complex report, if your selected student number is more than 50, use the Submit to Batch option. |
Generate the report
- Select the Grades to include in the report.
- Select the Ad hoc Filter to use to further narrow the results of the report, if desired.
- Select the desired On-track Status for the students.
- Select the desired Academic Program.
- Select the desired Report Options and Sort Options.
- Select the desired Report Format.
- Click the Generate Report button or the Submit to Batch button.
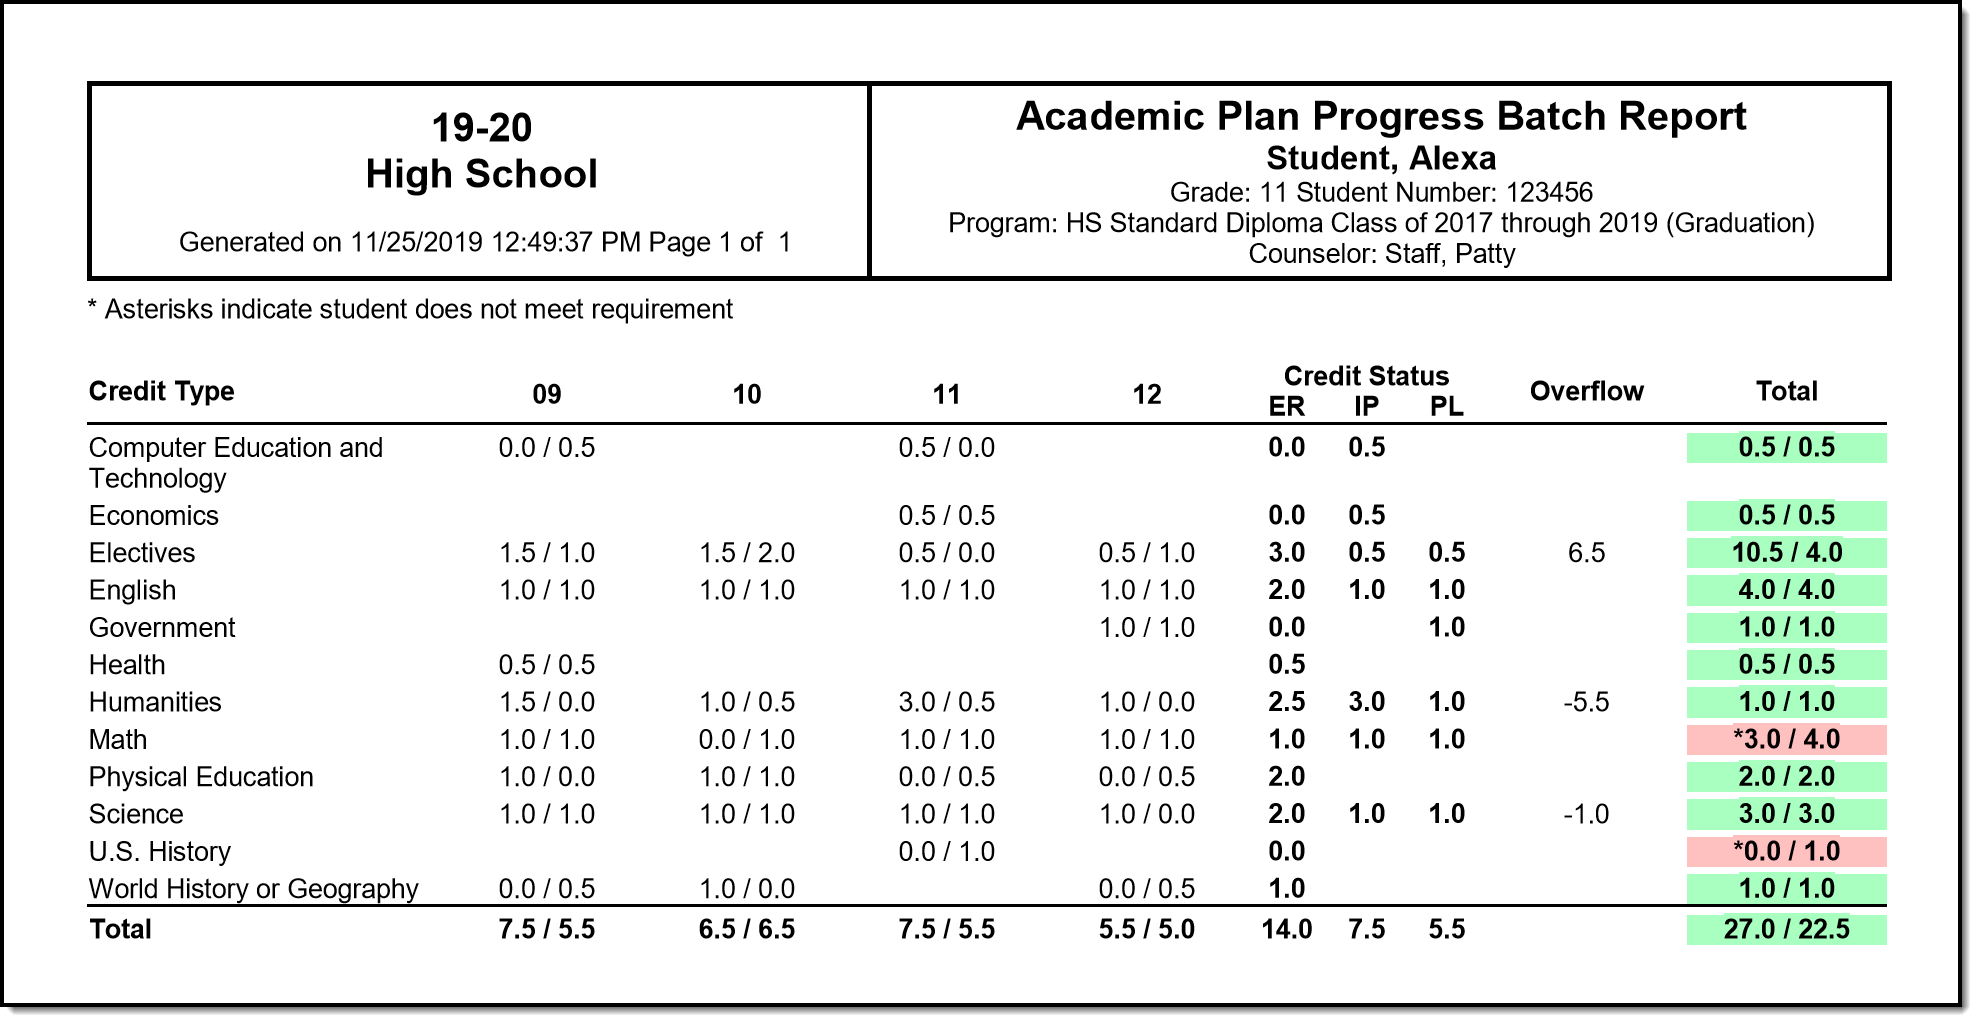 This is the summary view of the report
 This is the detail view of the report.
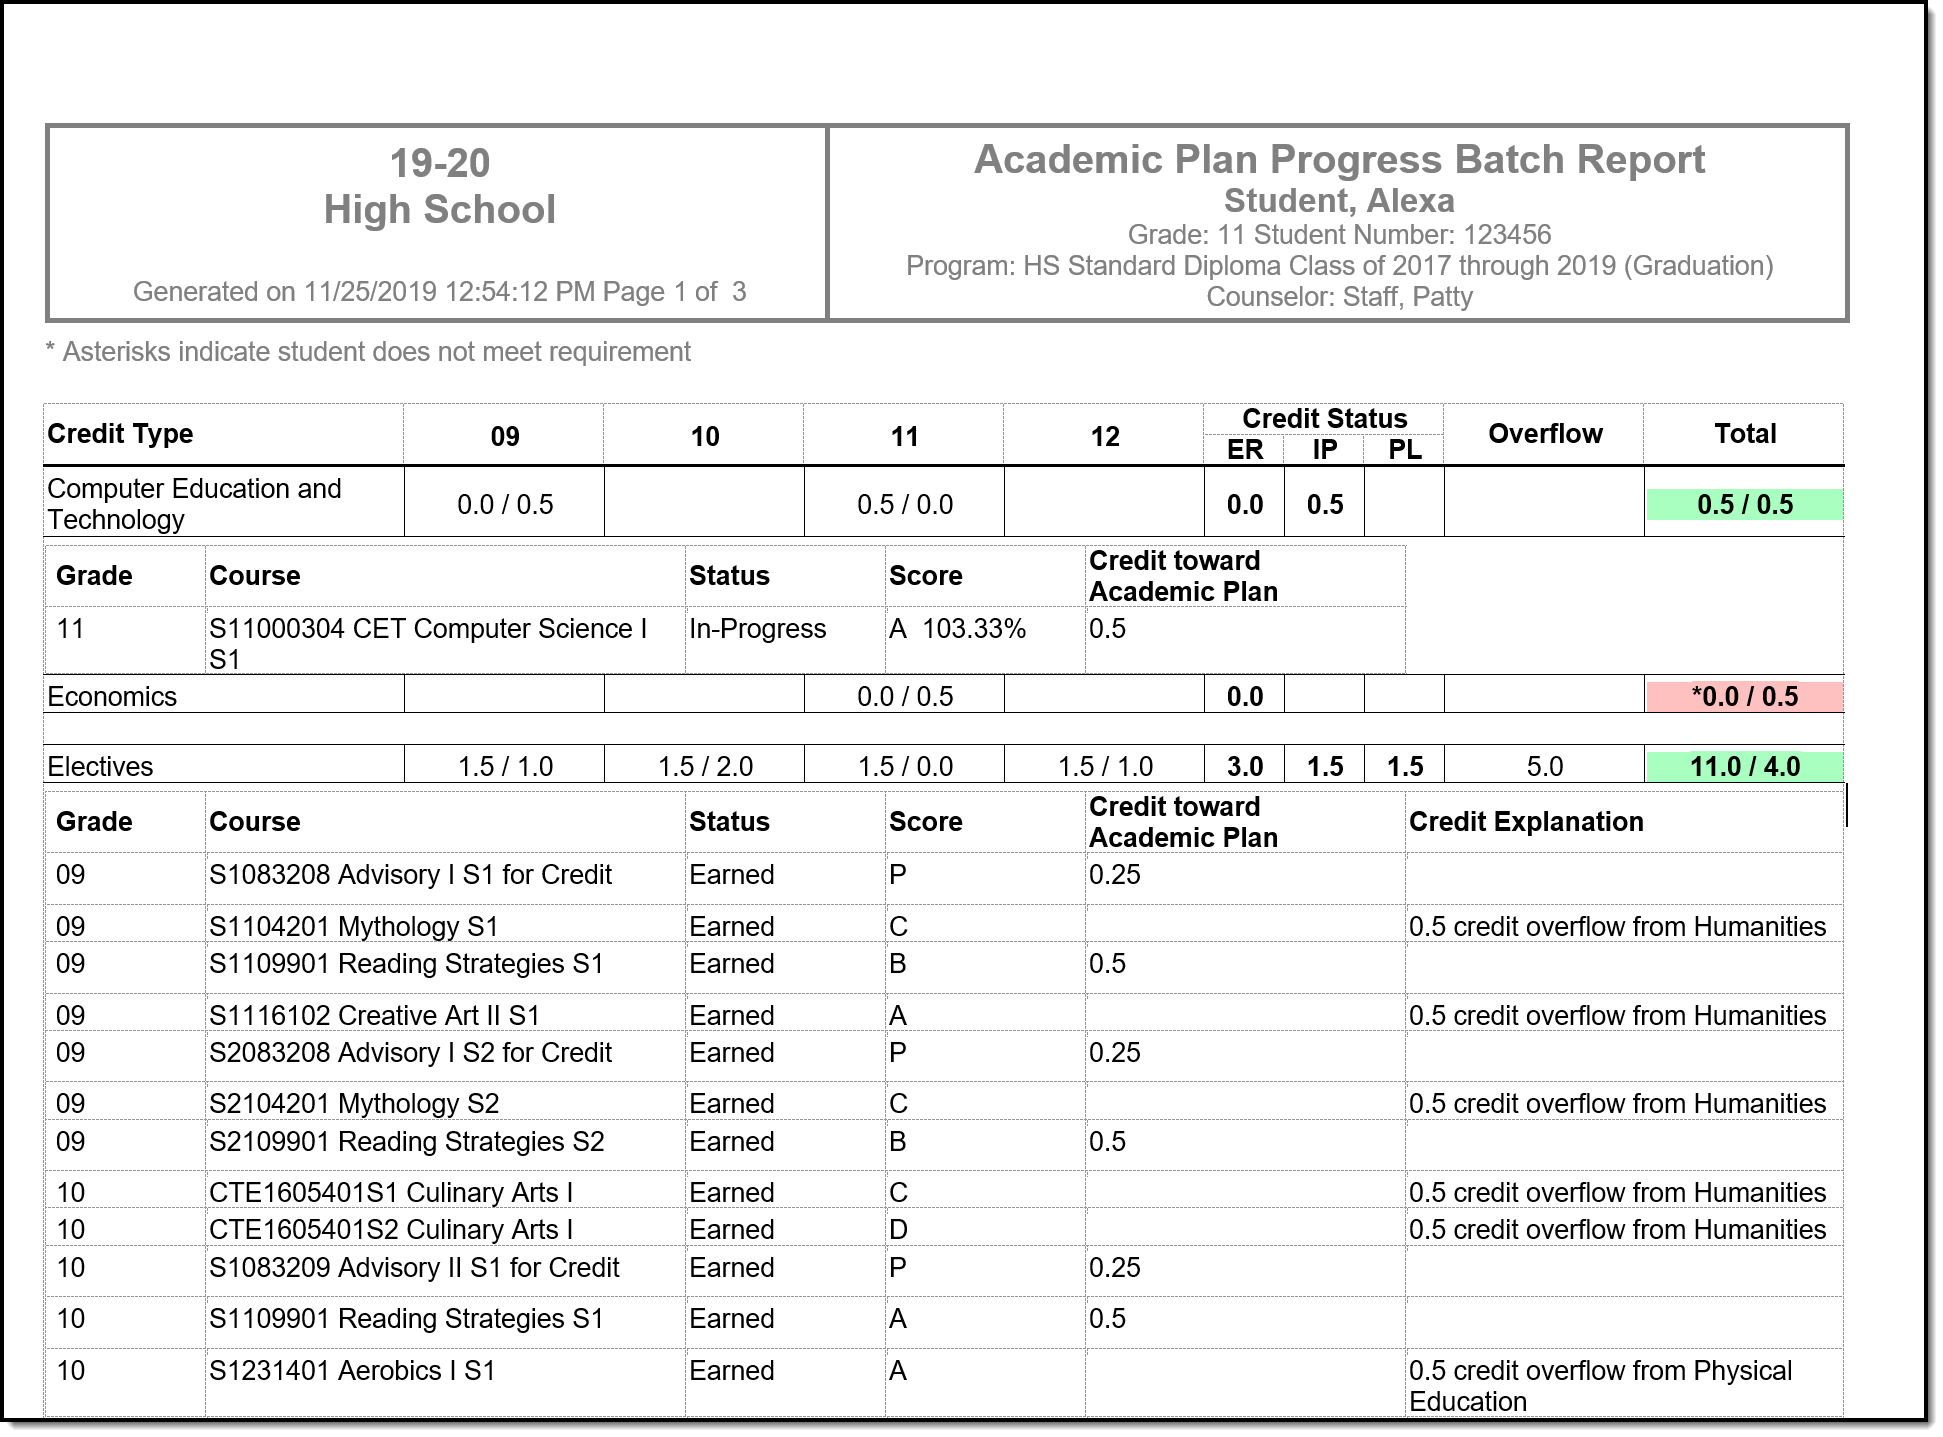 This is the DOCX view of the report.
Academic Plan Status
The Academic Plan Status Report indicates whether a student's graduation or academic program is on-track to meet minimum program requirements to graduate.
The Academic Plan Status Report indicates whether a student's graduation or academic program is on-track to meet minimum program requirements to graduate. Use this report to look for missing data, errors in student plans, or signs that there may be an error in transcript data or in the setup requirements. You can also use this report to find students who do not have an active assignment to a graduation or academic plan.
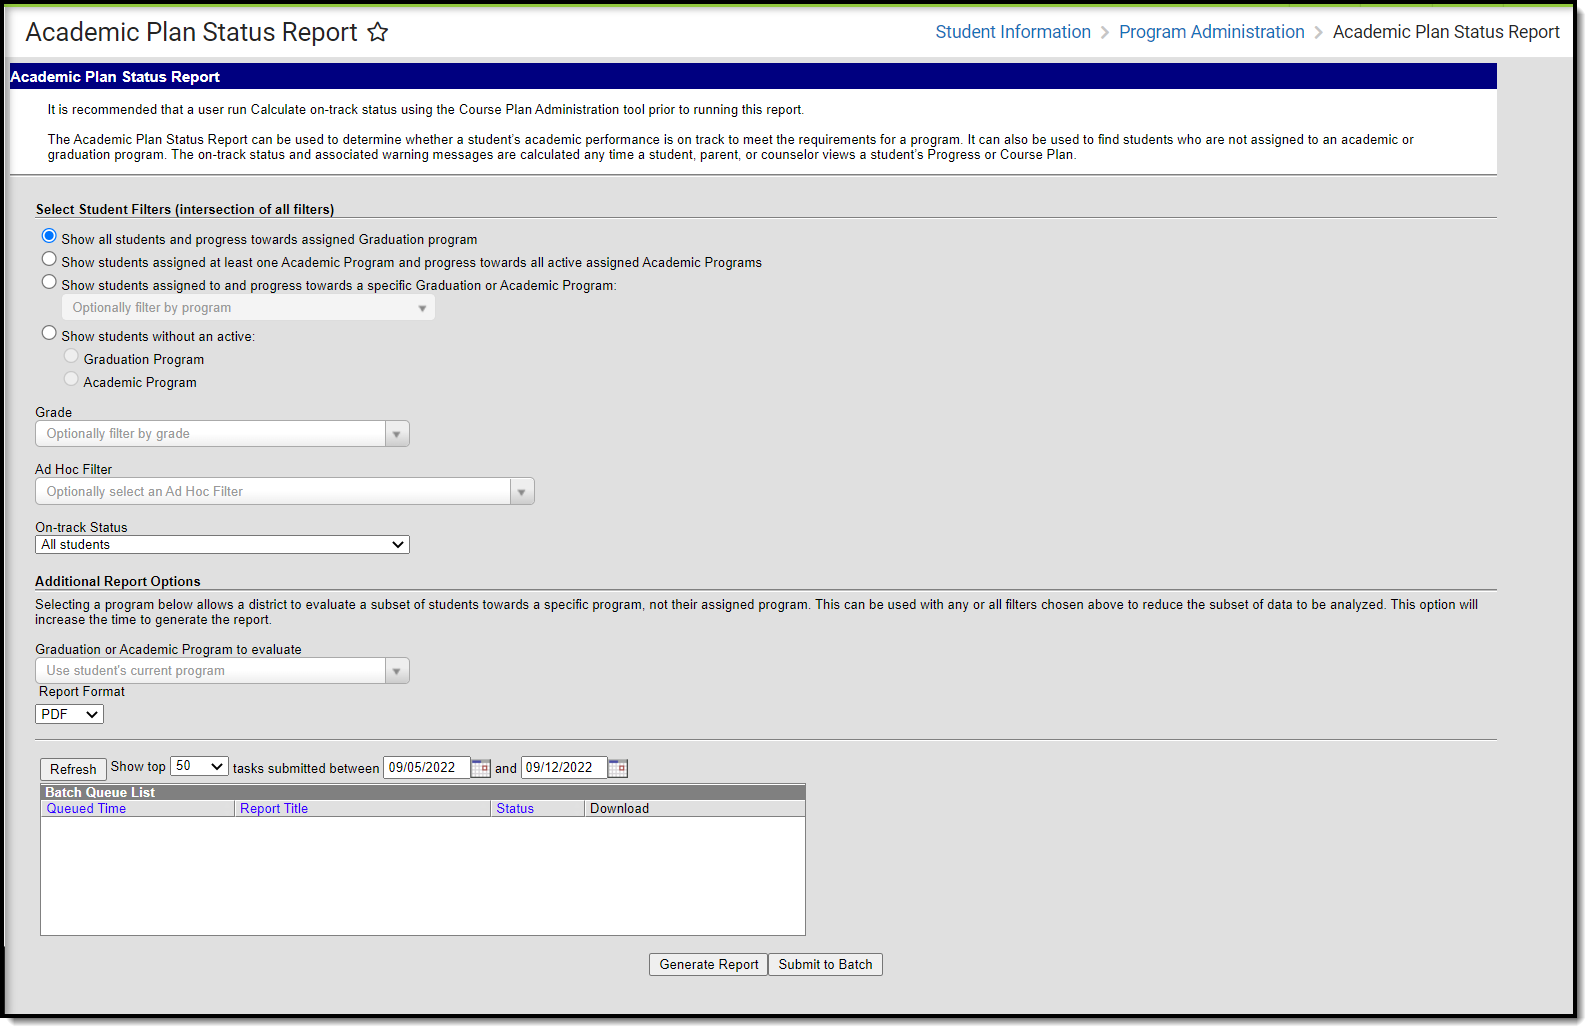 Academic Plan Status Report
See the Academic Plan Status Report Tool Rights article for information about rights needed to use this tool.
Report Logic
When used to evaluate student status, this report pulls on-track status and warning messages (missing data, no program assigned, list of credit requirements, etc.) from cached calculated values. These values are updated any time a student, parent or counselor views a student's academic plan. If a transcript post or grading window has passed since the students viewed their courses, update the calculated values using the Course Plan Admin tool.
On-track status is calculated in the following areas:
- Saving Graduation Progress from the Campus Portal (either by the student or parent)
- Saving Grad Progress information
- Saving Academic Plan information from the Campus Portal (either by the student or parent)
- Saving Course Plan information
- Saving Test Requirement information
- Running the Calculate On-Track Status option from Course Plan Admin
Report Editor
| Field | Description |
|---|---|
Select Student Filters Selecting student filters shows a student's progress in their assigned program. | |
| Student and Program Selection | Selection of one of the following radio buttons is necessary:
|
| Grade | Lists all grade levels in the selected calendar. |
| Ad hoc Filter | Lists all filters to which the user has access. |
| On-Track Status | Selection option returns just those students who are currently classified as the chosen status, based on the information in their Grad Progress tool. Options are:
|
Additional Report Options Selecting a program allows a district to evaluate a subset of students towards a specific program, not their assigned program. This can be used with any or all filters chosen above to reduce the subset of data to be analyzed. This option increases the time required to generate the report. The Submit to Batch option is recommended. | |
| Graduation or Academic Program to evaluate | Lists all active and inactive graduation and academic programs. The category assigned to the program displays in parentheses behind the program name. The selection is used as a comparison against the student's currently assigned academic program. |
| Report Format | The report can be generated in either PDF, CSV or DOCX format. |
| Report Generation Options | The report can be generated immediately using the Generate Extract button. When there is a larger amount of data chosen, use the Submit to Batch button, which allows the user to choose when the report is generated. See the Batch Queue article for more information. |
Report Current On-Track Status
- Select one of the student filter options (described above) for inclusion in the report.
- Select the desired Report Format.
- Click the Generate Report button to display the results immediately, or click the Submit to Batch button to choose when the report generates.
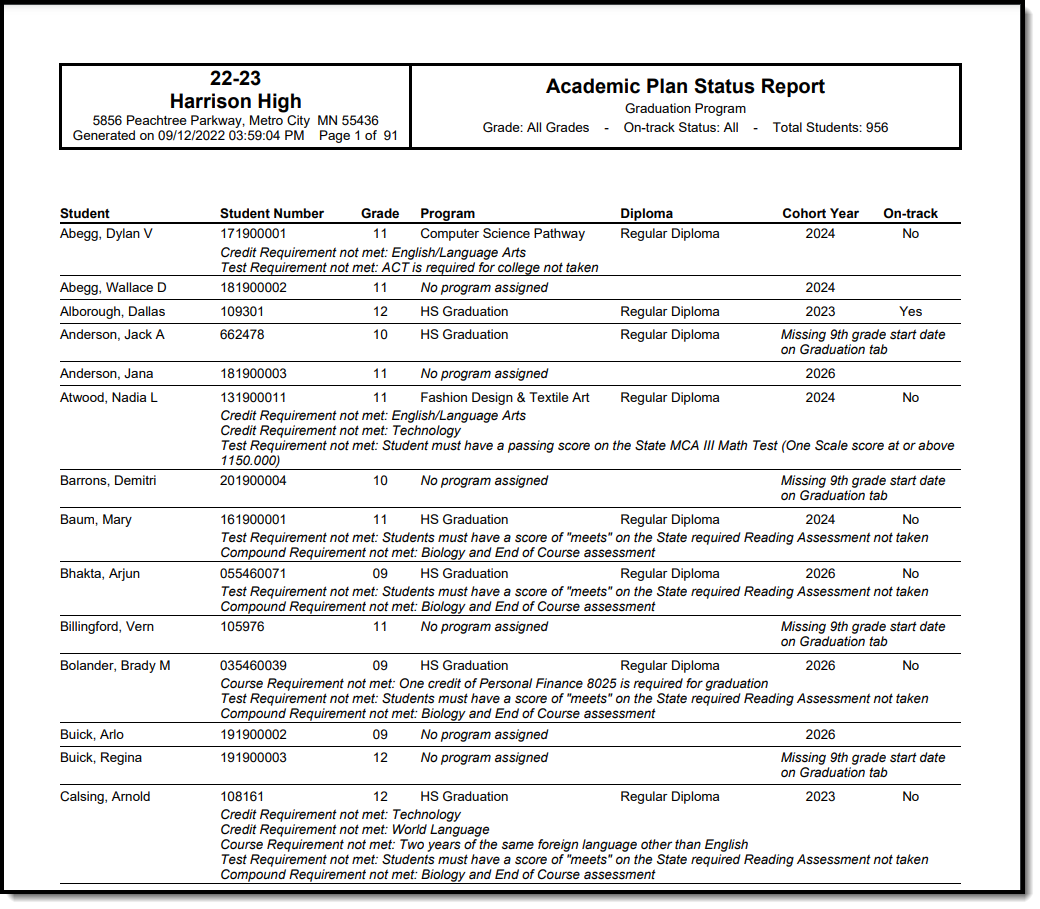 Show all students and progress towards assigned Graduation program option
Report Status of Progress Toward Another Program
A school year, school name and calendar must be selected in the Campus toolbar in order to generate this report.
- Select one of the student filter options (described above) for inclusion in the report.
- Select another Academic Program to Evaluate from the dropdown list.
- Select the desired Report Format.
- Click the Generate Report button to display the results immediately, or click the Submit to Batch button to choose when the report generates.
Because of the way the data is pulled from the tables to determine a student's progress towards another program, it is recommended to use the Submit to Batch process.
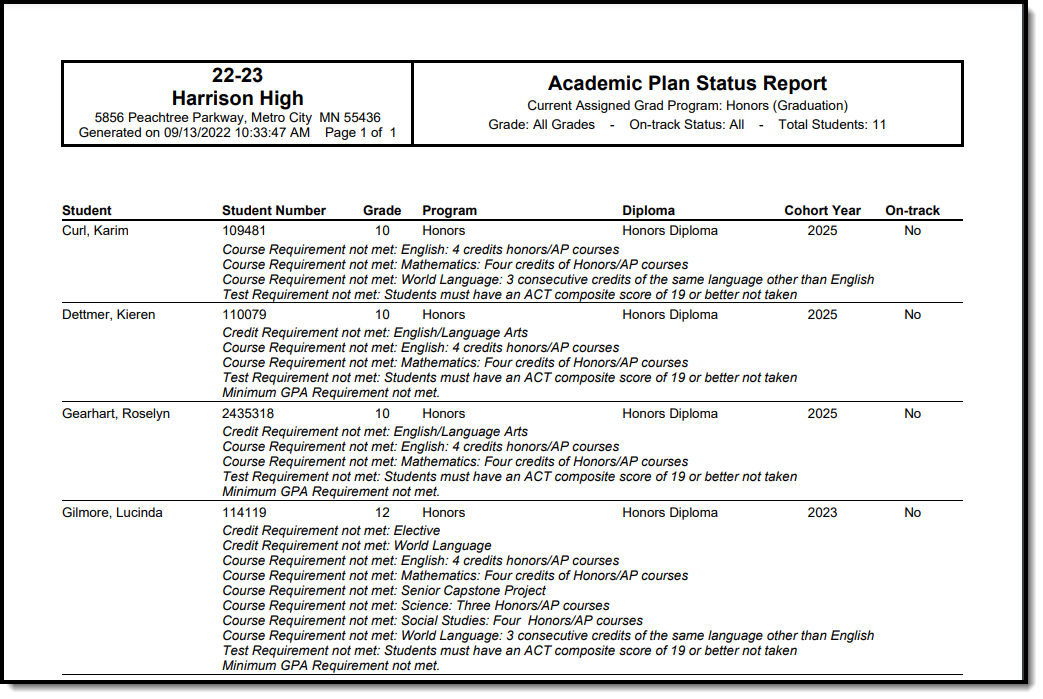 Show students assigned to and progress towards a specific Graduation or Academic Program option
Report Layout
| Data Element | Description | Type, Format and Length | Campus Database | Campus Interface |
|---|---|---|---|---|
| Student | Reports the student's last name, first name in alphabetical order | Alphanumeric, 50 characters | Identity.lastName Identity.firstName |
Census > People > Demographics > Person Information > Last Name, First Name |
| Student Number | Reports the student's locally assigned student number. | Numeric, 12 digits | Person.student Number | Census > People > Demographics > Person Identifiers > Student Number |
| Grade | Reports the student's grade level of enrollment. | Alphanumeric, 2 characters | Enrollment.grade | Student Information > General > Enrollments > General Enrollment Information > Grade |
| Program | Reports either the student's currently assigned program or the selected program to see the student's progress towards that program. If the student is not assigned a program, No Program Assigned displays in this column. |
Alphanumeric, 25 characters | Program.name | Student Information > Academic Planning > Program > Academic Program Detail > Program |
| Diploma | Reports the type of diploma the student receives upon graduation and successful completion of the assigned academic program. This is set on the Graduation Program tool. This field is blank when the report is generated for evaluating a student's progress towards another program. |
Alphanumeric, 15 characters | ProgramParticipation. Diploma | Programs > Academic Programs > Diploma Type |
| Cohort Year | Reports the NCLB Cohort End Year assigned on the graduation tool. If this field is blank on the student's graduation tool, Missing 9th grade start date on Graduation tool displays in this column. |
Numeric, 4 digits
|
Graduation.cohort YearNCLB | Student Information > General > Graduation > NCLB Cohort End Year |
| On-Track | Indicates the student's on-track status as either yes or no. See the Report Logic section for information on how this is calculated. If the student is on track and has met all requirements, the report indicates the type of diploma the student received and when. |
Alphabetic, 3 characters Yes or No |
Calculated value, data not stored | Calculated value, data not stored |
| Requirements Not Met | When students are missing requirements for graduation, those credit types are listed. This reports for each requirement that could be reported:
|
Alphanumeric, 50 characters | Calculated value, data not stored | Calculated value, data not stored |
Find Students without an Active Program
This report can also be used to find students who do not have an active assignment to a graduation or academic program.
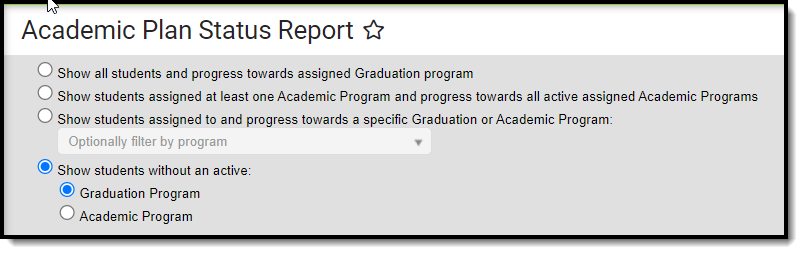 Show students without an active program option
Report Editor (No Active Program)
| Field | Description |
|---|---|
| Select Student Filters |
|
| Grade | Lists all grade levels in the selected calendar. |
| Ad Hoc Filter | Lists all filters to which the user has access. |
| On-track Status | Not available when using these filters. |
| Graduation or Academic Program to evaluate | Not available when using these filters. |
| Report Format | The report can be generated in either PDF, CSV or DOCX format. |
| Report Generation Options | The report can be generated immediately using the Generate Extract button. When there is a larger amount of data chosen, use the Submit to Batch button, which allows the user to choose when the report is generated. See the Batch Queue article for more information. |
Find Students Without an Active Program Assignment
- Select Graduation Program or Academic Program from the Show students without an active: option.
- Filter by Grade or Ad Hoc Filter if desired.
- Select the desired Report Format.
- Click the Generate Report button to display the results immediately, or click the Submit to Batch button to choose when the report generates.
Report Layout (No Active Program)
| Data Element | Description | Type, Format and Length | Campus Database | Campus Interface |
|---|---|---|---|---|
| Grade | Reports the student's grade level of enrollment. | Alphanumeric, 2 characters | Enrollment.grade | Student Information > General > Enrollments > General Enrollment Information > Grade |
| Student | Reports the student's last name, first name in alphabetical order | Alphanumeric, 50 characters | Identity.lastName Identity.firstName |
Census > People > Demographics > Person Information > Last Name, First Name |
| Student Number | Reports the student's locally assigned student number. | Numeric, 12 digits | Person.student Number | Census > People > Demographics > Person Identifiers > Student Number |
Course Plan Batch
The Course Plan Batch Report allows counselors and other administrators to view a PDF report of several students' course plans.
Path: Student Information > Program Administration > Course Plan Batch Report
The Course Plan Batch Report allows counselors and other administrators the ability to view a PDF report of several students' course plan. This same report can be generated one student at a time by printing the Course Plan Report from the student's Course Plan.
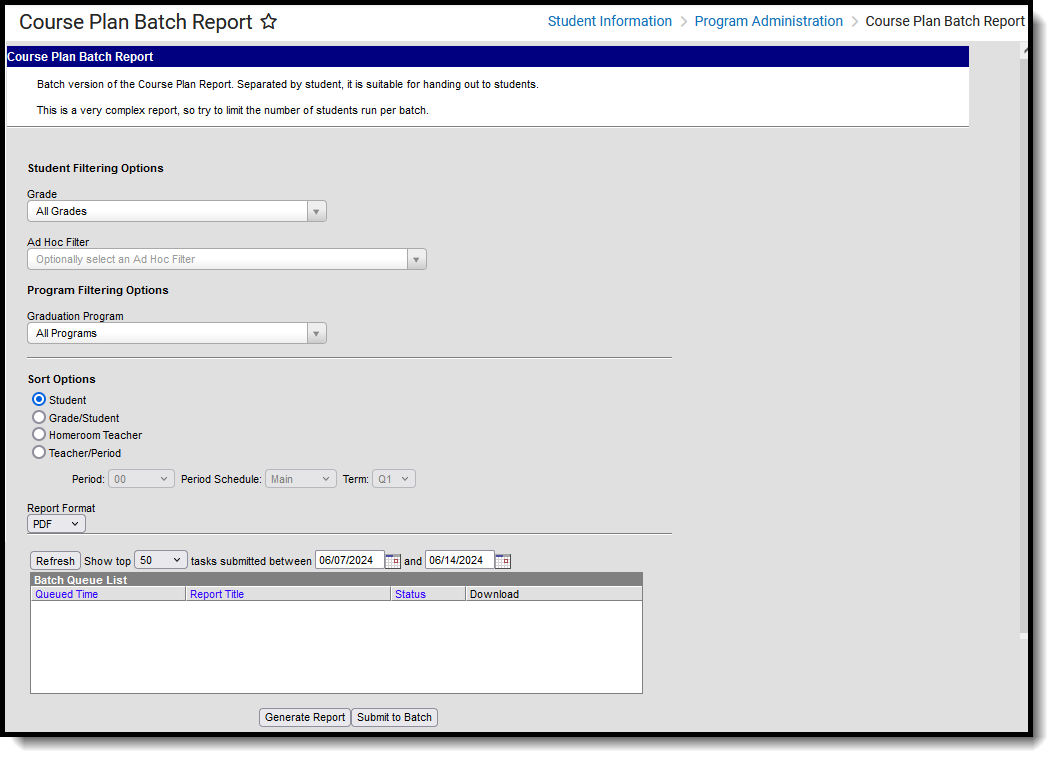 Select options and generate the report.
See the Course Plan Batch Tool Rights article for information on available tool rights.
Report logic
This report only generates information for the selected calendar in the Campus toolbar. Multiple calendars cannot be selected.
Only students who are assigned graduation programs are included in the report.
Report editor
| Data Element | Description |
|---|---|
| Student Filter Options | |
| Grade | Filters the students included in the report to the selected grade levels of enrollment. All Grades can be selected. Because this is a complex report, it is recommended that a specific grade level be selected. |
| Ad hoc Filter | Select an existing filter of students. Only those students included in the filter are considered for inclusion in the report. This filter can be selected in addition to a grade level. For example, if the filter includes all students with the last name of A, and the grade level selection is set to 10, only students in grade 10 who also have a last name that starts with A are included in the report population. |
| Program Filtering Options | |
| Graduation Programs | Filters the programs included in the report to the selected graduation programs. The category assigned to the program displays in parentheses behind the program name. Academic programs are not included. |
| Sort Options | |
| Student | This option displays students alphabetical by last name. |
| Grade/Student | This option displays students first by grade level of enrollment (09, 10, etc.), then alphabetical by last name. |
| Homeroom Teacher | This option displays students by the homeroom teacher, then alphabetical by last name. |
| Teacher/Period | This option displays students by the selected teacher, period, period schedule and term selected in the corresponding dropdown list. Students who are scheduled as of the last calendar day print on the report. |
| Report Format | The report can be generated in either PDF or DOCX format. |
| Report Generation Options | |
| Generate Report | Use the Generate Report button to display the results of the report immediately. |
| Submit to Batch | Use the Submit to Batch option to determine when the report generates. Because this is a complex report, if your selected student number is more than 50, use the Submit to Batch option. |
Generate the report
- Select the Grades to include in the report.
- Select the Ad hoc Filter to use to further narrow the results of the report, if desired.
- Select the desired Graduation Program.
- Select the desired Sort Options.
- Select the desired Report Format.
- Click the Generate Report button or the Submit to Batch button.
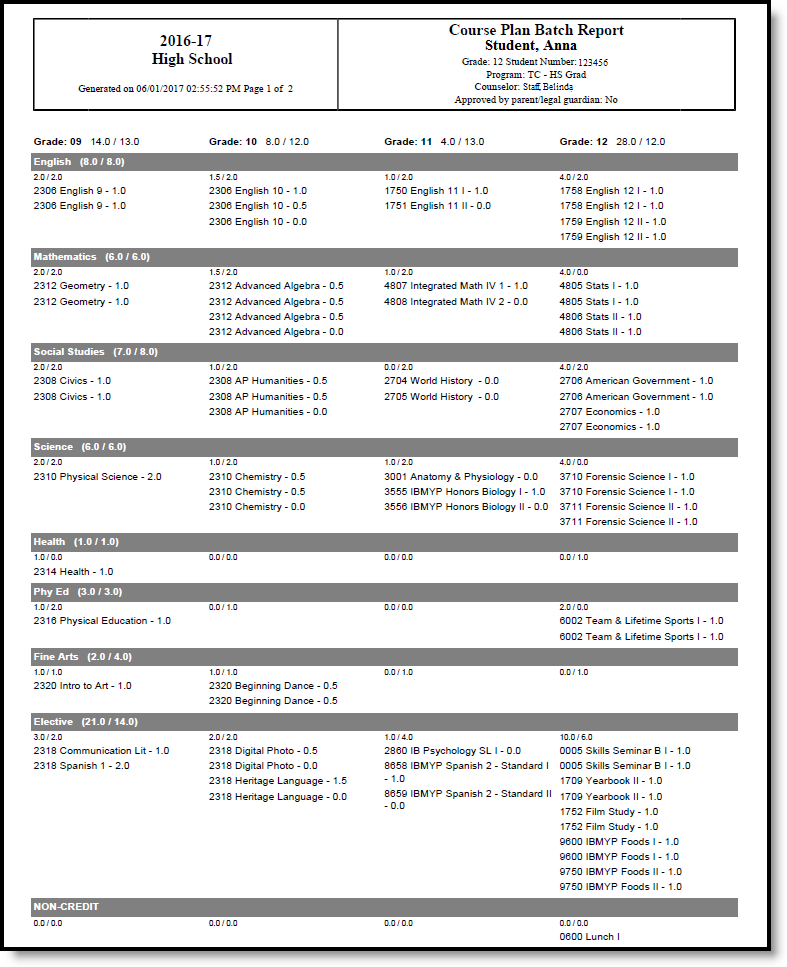 Generate the report in PDF format.
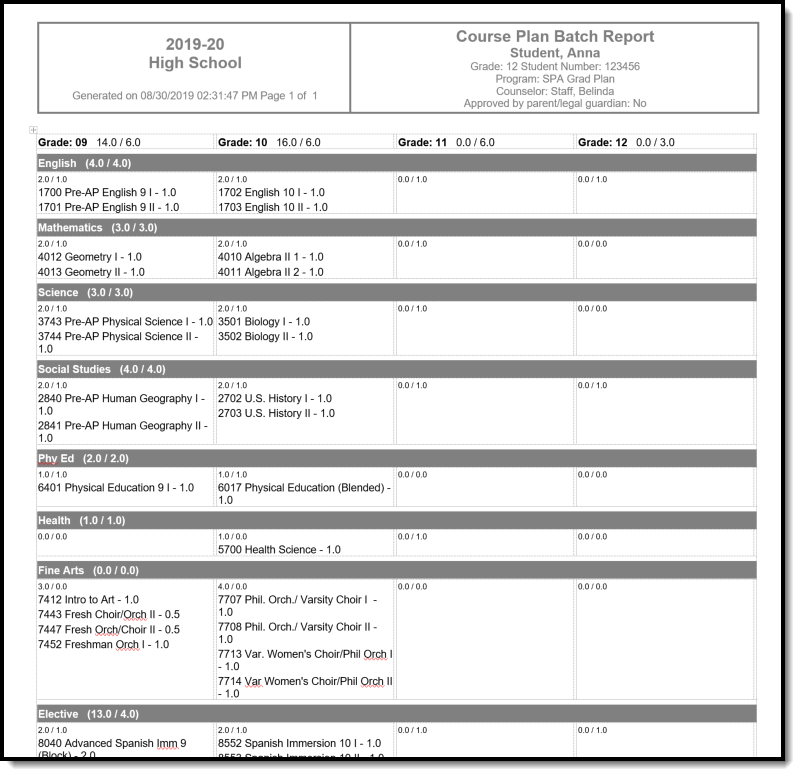 Generate the report in DOCX format.
Course Projections Report
The Course Projections Report uses planned courses from student academic plans to make course projections for future years.
Tool Search: Course Projections Report
The Course Projections Report uses planned courses from student academic plans to make course projections for future years. Section counts are estimated based off of the value entered in the Max Students field on the Course Information editor.
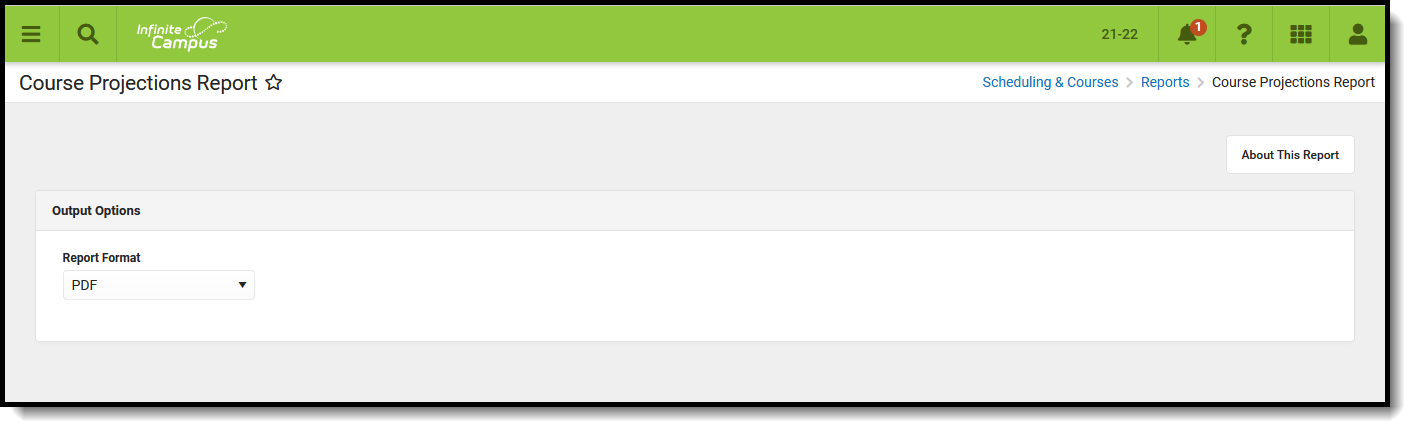 Course Projection Report
Submit feedback for the Course Projections Report by clicking the Feedback button in the bottom right hand corner. This takes you to the Campus Community Course Projections forum topic where you can add your suggestions for this report.
See the Scheduling & Courses Reports Tool Rights article for information about rights needed to use this tool.
Report Logic
Logic first looks for students who have a future enrollment in the selected school (not the current students who have an enrollment in the selected calendar). From those students who have future enrollments in the selected calendar, the Course Plan Data is used to determine which students are included on the report.
Generate the Course Projections Report
This report requires the selection of a Calendar in the Campus toolbar. To display current student and section counts for comparison to a future year, generate this report in the current calendar.
Click the Generate Report button. The results of the selected calendar display in PDF or DOCX format.
- If departments have been assigned to courses, the report sorts the results in Department order. Courses where a department is not assigned display first with a header of No Department Assigned.
- Years are sorted from active year (first column) up to three additional years in chronological order. In order for future years to display, student course plans must be populated for future years.
- For each year, a total count of the number of students who plan to take the course is listed, as well as a total count of how many sections are needed for each course in each school year.
- The Sections value is calculated based on the number of students who plan to take the course divided by the Max Students value of the course based on the scope year and calendar. If there is a remainder of students greater than 60% of a section, another section is added.
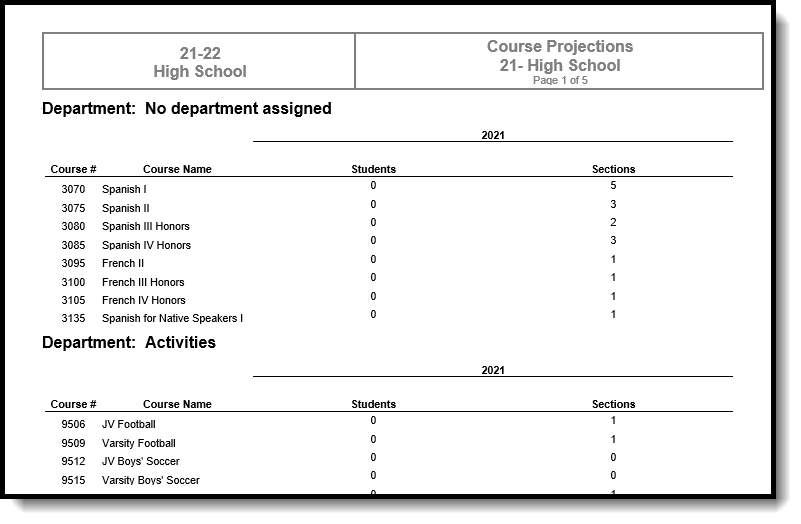 Course Projections Report for Current Year, DOCX Format
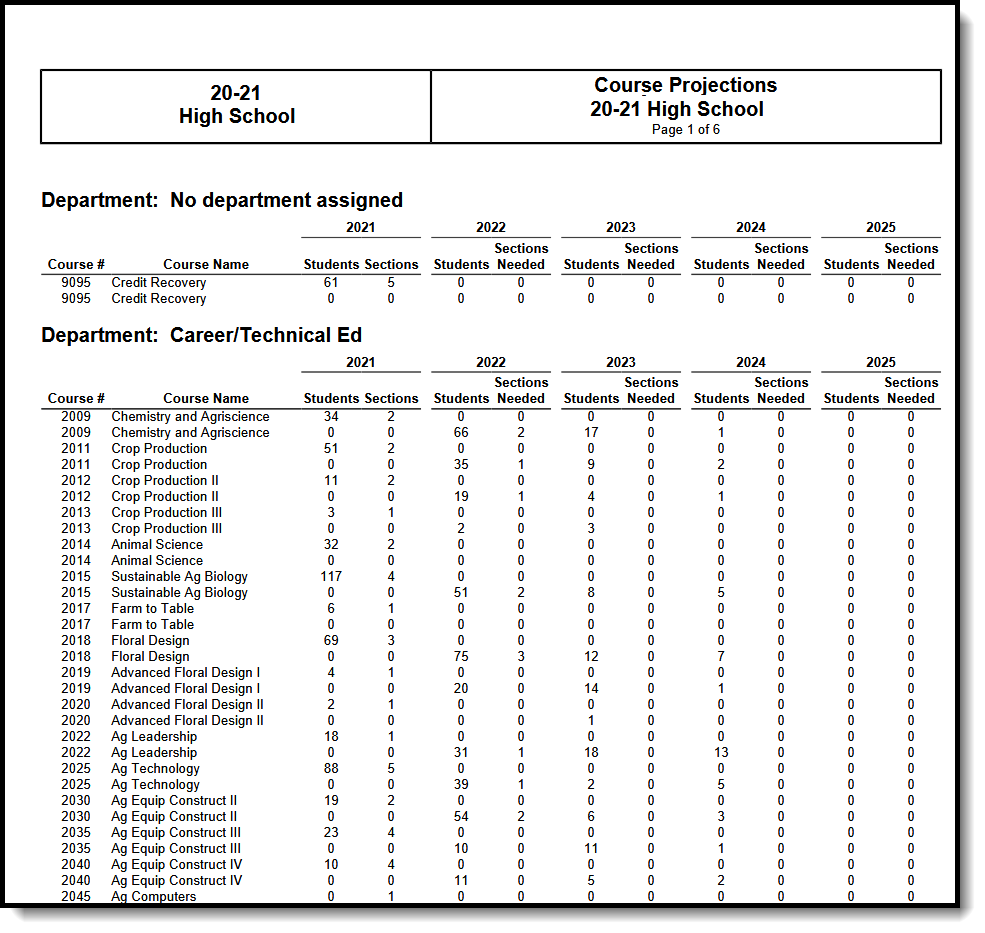 Course Projections Report for Future Years - PDF Format
