Classic View: System Administration> Messenger > Messenger Preferences > Email Settings
Search Terms: Email Settings
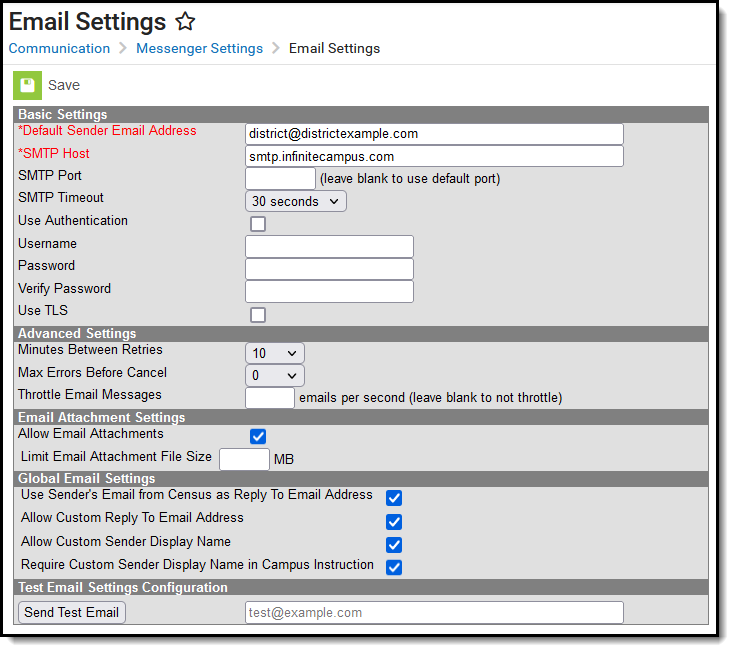
The Email Settings tab allows a user to configure general settings for email messages. The initial setup of this tab should be completed before email messaging is attempted.
Tool Rights
PATH: System Administration > User Security > Users > Tool Rights
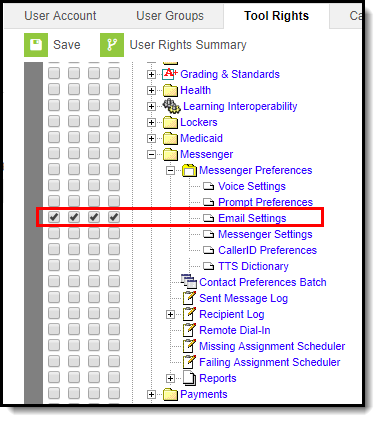
Users must have at least A(dd) tool rights in order to configure Email Settings.
Email Settings Tool Rights
SMTP Server Configuration
The sections below will describe how to configure your email depending on whether or not you will use TLS encryption:
- Non-TLS Configuration
- TLS Configuration
- Field Descriptions (SMTP)
Non-TLS Configuration
To configure the Email Settings for email messaging from an internal school/district server, or other email service that does not use TLS encryption:
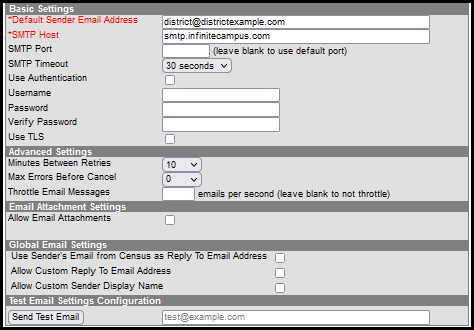 Standard Email Settings
The following steps are required for standard setup:
- Enter the Default Sender Email Address.
- Enter the SMTP Host address.
- Enter the SMTP Port.
- Choose the number of Minutes Between Retries (optional).
- Select the allowed Max Errors Before Cancel (optional).
- Click the Save icon.
Users are highly advised to enter and Send a Test Email to ensure entered values are correct.
TLS Configuration
To configure the Email Settings to allow emails from email services and SMTP servers that require TLS encryption of transferred messages:
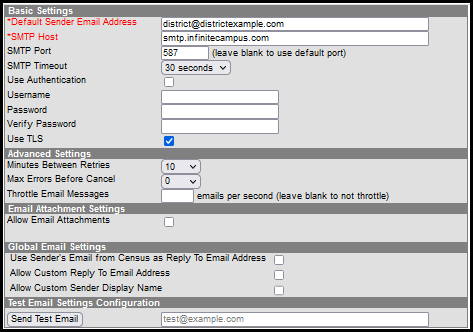 TLS-Encrypted Setup of Email Settings
The following steps are required for standard setup:
- Enter the Default Sender Email Address.
- Enter the SMTP Host address.
- Enter the SMTP Port.
- Mark the Use TLS checkbox.
Users are highly advised to enter and Send a Test Email to ensure entered values are correct.
Click the Save icon.
Optional Configuration Steps
The following steps are optional for standard setup:
- Mark the Use Authentication checkbox and enter values in the authentication fields:
- Username
- Password
- Choose the number of Minutes Between Retries.
- Select the allowed Max Errors Before Cancel.
Field Descriptions (SMTP)
The table below describes each field available:
| Field | Description |
|---|---|
| Default Sender Email Address | The default email address that appears as the "sent from" address on sent email messages. This field is required. The Default Sender Email Address must be a real email address so that the recipient’s email server does not view the message as SPAM. A real email address also allows bounce-back messages to be delivered to an actual mailbox even if the mailbox is not monitored. Do not include “infinitecampus” in the email address as this incorrectly gives the impression that emails are being delivered by the company Infinite Campus. To reduce the chance an email is flagged as spam, avoid using "noreply" or "donotreply" in the Default Sender Email Address. |
| Use SMTP Server | Select this radio button to begin configuring email settings for an SMTP server. |
| SMTP Host | The Simple Mail Transfer Protocol (SMTP) host name used to transfer emails. SMTP is the only protocol supported in Campus. |
| SMTP Port | The specific port allowing SMTP and email exchange. To use the default SMTP port, leave blank. Otherwise, if a specific port number is required by a service, enter it in this field. |
| SMTP Timeout | The amount of time that Campus will wait for the SMTP server to respond. If the SMTP server does not respond in the specified amount of time, the message will timeout and Campus will resend the message according the preferences set in the Advanced Settings group on this screen.
|
| Use Authentication | If a username and password are required for SMTP authentication, this box should be checked. When checked, the Username and Password fields will be unlocked for editing. |
| Username | The username required for server authentication, if required by SMTP server setup. This field is available for editing when the Use Authentication field is set to a value of "Yes." |
| Password | The password required for server authentication, if required by SMTP server setup. This field is available for editing when the Use Authentication field is set to a value of "Yes." |
| Use TLS | Checkbox indicates whether or not Transport Layer Security (TLS) should be used to encrypt email transfer on the server. Some services require this encryption. |
| Minutes Between Retries | The number of minutes to wait between a failed message delivery attempt and the next message delivery attempt. |
| Max Errors Before Cancel | The maximum number of failed message delivery attempts allowed before all attempts to deliver the message are canceled. The default value for this field is "10." |
| Throttle Email Messages | This option determines the number of email messages the application server will process per second. You may enter any number from 1 to 999. |
| Allow Email Attachments | This option allows users to add email attachments to messages. When this option is checked, all Messenger tools display the option to send email attachments. When this option is not checked, no tools display the option to send email attachments. If there are template email attachments and this checkbox is cleared so that the option to upload an attachment is removed, the templates will NOT send the attachments. |
| Limit Email Attachment File Size | This option allows you to set size limits for email attachments. If a user tries to attach a file that is larger than the limit set in this field, an error message will display explaining that their file is too large. The maximum file size is 100 MB and is set in the Campus XML file. Districts using Campus' SMTP Host are limited to 1.3 MB regardless of what is entered in this field. Large email attachments of several MBs will take several minutes to upload. If there are templates with email attachments and this field is changed to a limit lower than what exists on the saved templates, the templates WILL send the saved email attachment. If the template is changed and saved, you will not be able to save the large email attachment. |
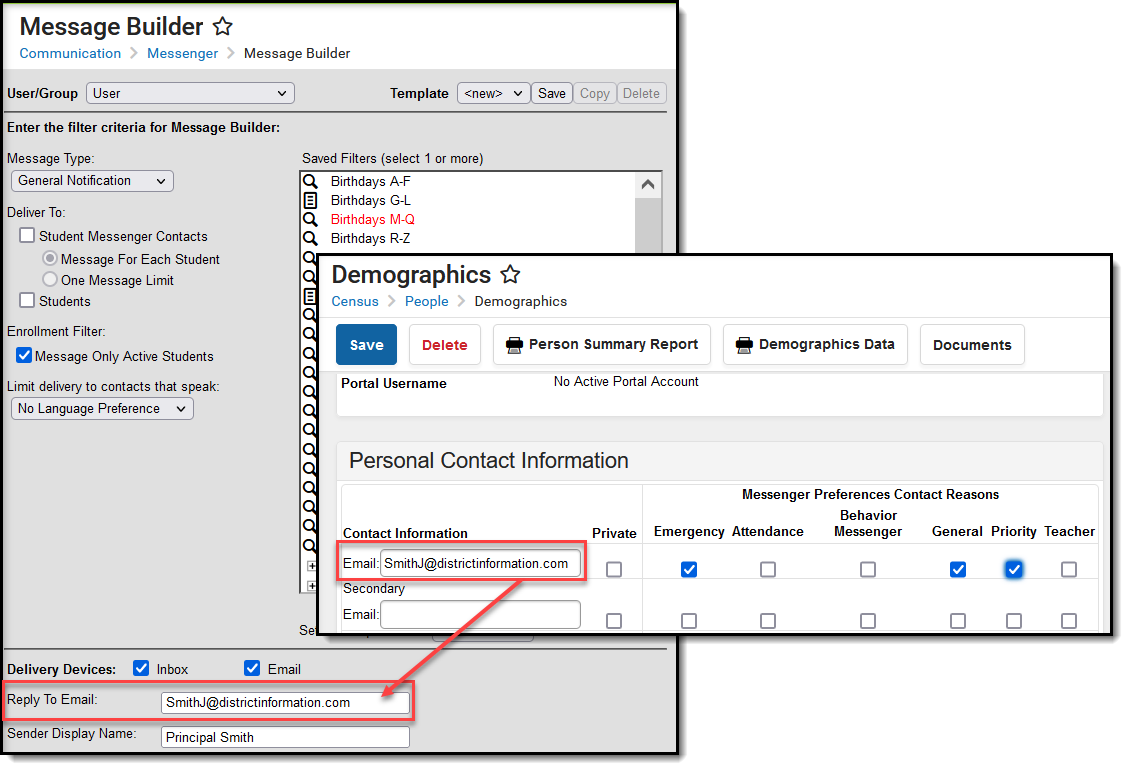
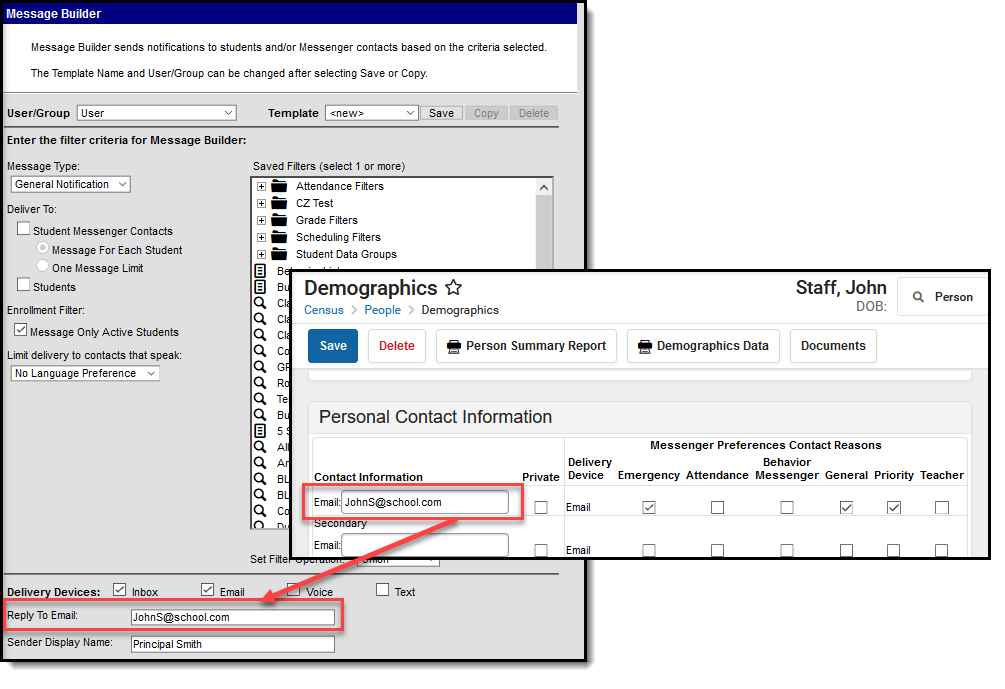
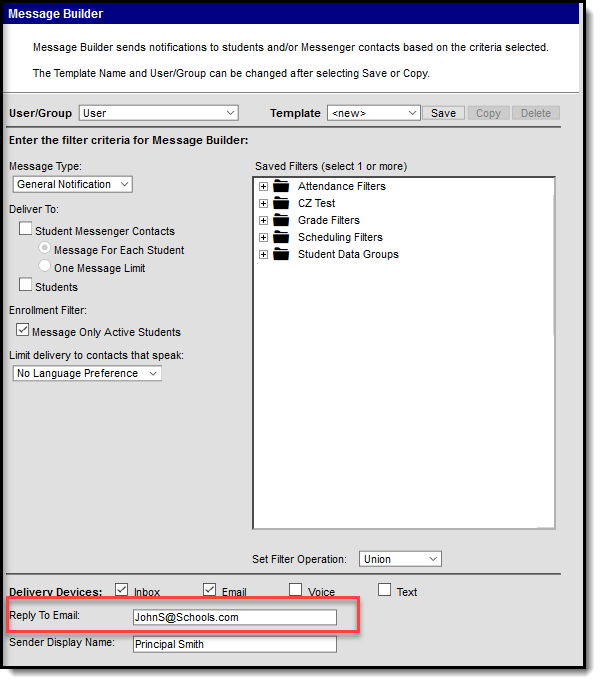
| User Sender's Email from Census as Reply to Email Address | Mark this checkbox to have the sender's email address (Census > People > Demographics > Email) auto-populate the Reply To Email field in the Message Builder and Staff Messenger tools. If the default language en_US is removed from Attribute Dictionary > Contact > Pref. Language, the option to User Sender's Email from Census will not work. Districts can add/edit other languages within the Attribute Dictionary, but should never edit or delete en_US. This option does not apply to Emergency Messenger. Emergency Messenger uses the Email Address from the Default Sender Email Address on this screen. |
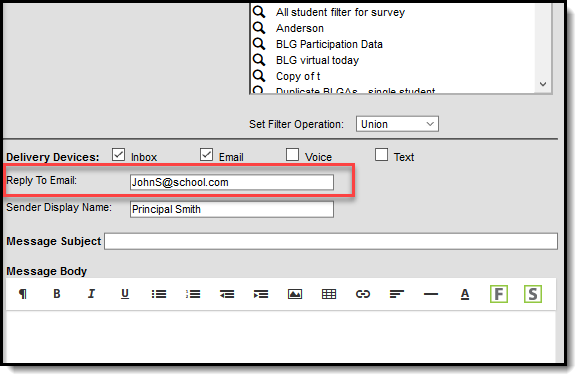
| Allow Custom Reply to Email Address | Mark this checkbox to have the Reply to Email field in the Message Builder and Staff Messenger tools unlocked and able to be edited. If you check both the User Sender's Email from Census as Reply to Email Address and Allow Custom Reply to Email Address checkboxes, the Reply to Email field will auto-populate with the sender's email address but remain unlocked and able to be edited. This option does not apply to Emergency Messenger. Emergency Messenger uses the Email Address from the Default Sender Email Address on this screen. |
| Allow Custom Sender Display Name | Mark this checkbox to have the Sender Display Name field display in the Message Builder, Staff Messenger and Emergency Messenger tools. If enabled, the field will display only when Email is selected from the Delivery Devices options. This field allows the sender to customize the name they would like displayed in the recipient's email inbox for easier identification purposes.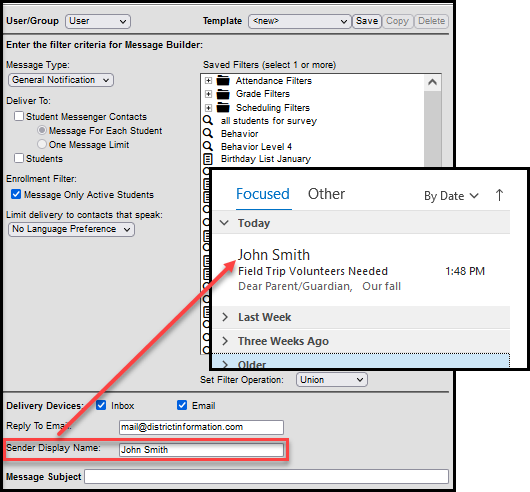 |
| Require Custom Sender Display Name in Campus Instruction | Mark this checkbox to display the Sender Display Name field in Campus Instruction messenger tools. When marked, an entry is required before the message can be sent. This checkbox is available only when the Allow Custom Sender Display Name checkbox is marked. |
| Send Test Email | Enter a valid email address and select the Send Test Email button to test whether the Email Settings entered above this field are correct. If you receive the test email in your inbox, your Email Settings are configured properly. If you do not receive the test email, this indicates one or more of the fields above is incorrect or invalid. |
Mailgun Configuration
Mailgun is a third party email relay system Campus uses to distribute emails out to service providers. Campus provides Mailgun to Campus Cloud (CC) or Campus Cloud Choice (CCC) hosted districts. Non-CC/CCC hosted districts can obtain an account directly from Mailgun if desired. This section will walk you through configuring Campus to send email messages using Mailgun.
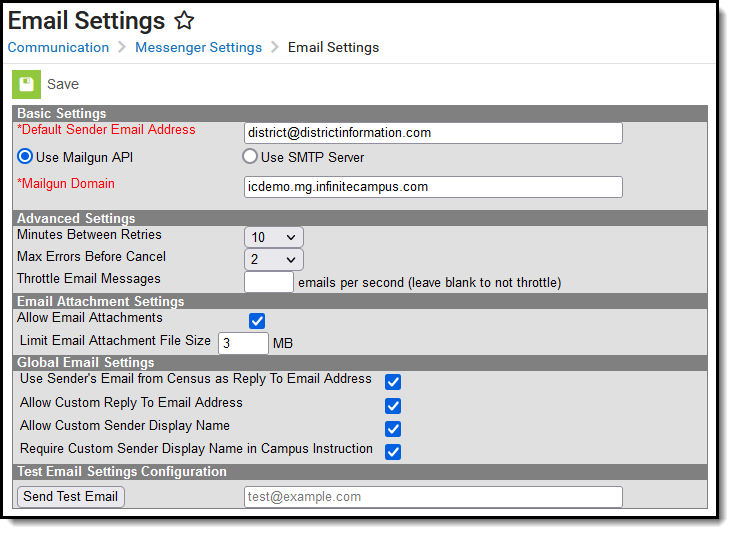 Mailgun Configuration
The following steps are required for a Mailgun setup:
- Enter the Default Sender Email Address.
- Select the Use Mailgun API radio button.
- Enter your Mailgun Domain.
- Enter an email address in the Test Email Setting Configuration section and click the Send Test Email button. This test email allows you to ensure the settings you have entered are correct.
- Click the Save icon.
Optional Configuration Steps
See the table below for more information about remaining optional fields found in the editor.
Field Descriptions (Mailgun)
The table below describes each available field.
| Field | Description |
|---|---|
| Default Sender Email Address | The default email address that appears as the "sent from" address on sent email messages. This field is required. The Default Sender Email Address must be a real email address so that the recipient’s email server does not view the message as SPAM. A real email address also allows bounce-back messages to be delivered to an actual mailbox even if the mailbox is not monitored. Do not include “infinitecampus” in the email address as this incorrectly gives the impression that emails are being delivered by the company Infinite Campus. To reduce the chance an email is flagged as spam, avoid using "noreply" or "donotreply" in the Default Sender Email Address. |
Use Mailgun API | Mark this radio button if you use Mailgun as your email delivery service. This feature is only relevant for users who use Mailgun as their email delivery service. This functionality is only available for Campus Cloud and Cloud Choice customers. |
| Mailgun Domain | The domain tied to your Mailgun account. |
| Minutes Between Retries | The number of minutes to wait between a failed message delivery attempt and the next message delivery attempt. |
| Max Errors Before Cancel | The maximum number of failed message delivery attempts allowed before all attempts to deliver the message are canceled. The default value for this field is "10." |
| Throttle Email Messages | This option determines the number of email messages the application server will process per second. You may enter any number from 1 to 999. |
| Allow Email Attachments | This option allows users to add email attachments to messages. When this option is checked, all Messenger tools display the option to send email attachments. When this option is not checked, no tools display the option to send email attachments. If there are template email attachments and this checkbox is cleared so that the option to upload an attachment is removed, the templates will NOT send the attachments. |
| Limit Email Attachment File Size | This option allows you to set size limits for email attachments. If a user tries to attach a file that is larger than the limit set in this field, an error message will display explaining that their file is too large. The maximum file size is 100 MB and is set in the Campus XML file. Districts using Campus' SMTP Host are limited to 1.3 MB regardless of what is entered in this field. Large email attachments of several MBs will take several minutes to upload. If there are templates with email attachments and this field is changed to a limit lower than what exists on the saved templates, the templates WILL send the saved email attachment. If the template is changed and saved, you will not be able to save the large email attachment. |
| Use Sender's Email from Census as Reply to Email Address | Mark this checkbox to have the sender's email address (Census > People > Demographics > Email) auto-populate the Reply To Email field in the Message Builder and Staff Messenger tools. If the default language en_US is removed from Attribute Dictionary > Contact > Pref Language, the option to User Sender's Email from Census will not work. Districts can add/edit other languages within the Attribute Dictionary, but should refrain from editing or deleting en_US. This option does not apply to Emergency Messenger. Emergency Messenger uses the Email Address from the Default Sender Email Address on this screen. |
| Allow Custom Reply to Email Address | Mark this checkbox to have the Reply to Email field in the Message Builder and Staff Messenger tools unlocked and able to be edited. If you check both the User Sender's Email from Census as Reply to Email Address and Allow Custom Reply to Email Address checkboxes, the Reply to Email field will auto-populate with the sender's email address but remain unlocked and able to be edited. This option does not apply to Emergency Messenger. Emergency Messenger uses the Email Address from the Default Sender Email Address on this screen. |
| Allow Custom Sender Display Name | Mark this checkbox to have the Sender Display Name field display in the Message Builder, Staff Messenger and Emergency Messenger tools. If enabled, the field will display only when Email is selected from the Delivery Devices options. This field allows the sender to customize the name they would like displayed in the recipient's email inbox for easier identification purposes. |
| Require Custom Sender Display Name in Campus Instruction | Mark this checkbox to display the Sender Display Name field in Campus Instruction messenger tools. When marked, an entry is required before the message can be sent. This checkbox is available only when the Allow Custom Sender Display Name checkbox is marked. |
| Send Test Email | Enter a valid email address and select the Send Test Email button to test whether the Email Settings entered above this field are correct. If you receive the test email in your inbox, your Email Settings are configured properly. If you do not receive the test email, this indicates one or more of the fields above is incorrect or invalid. |
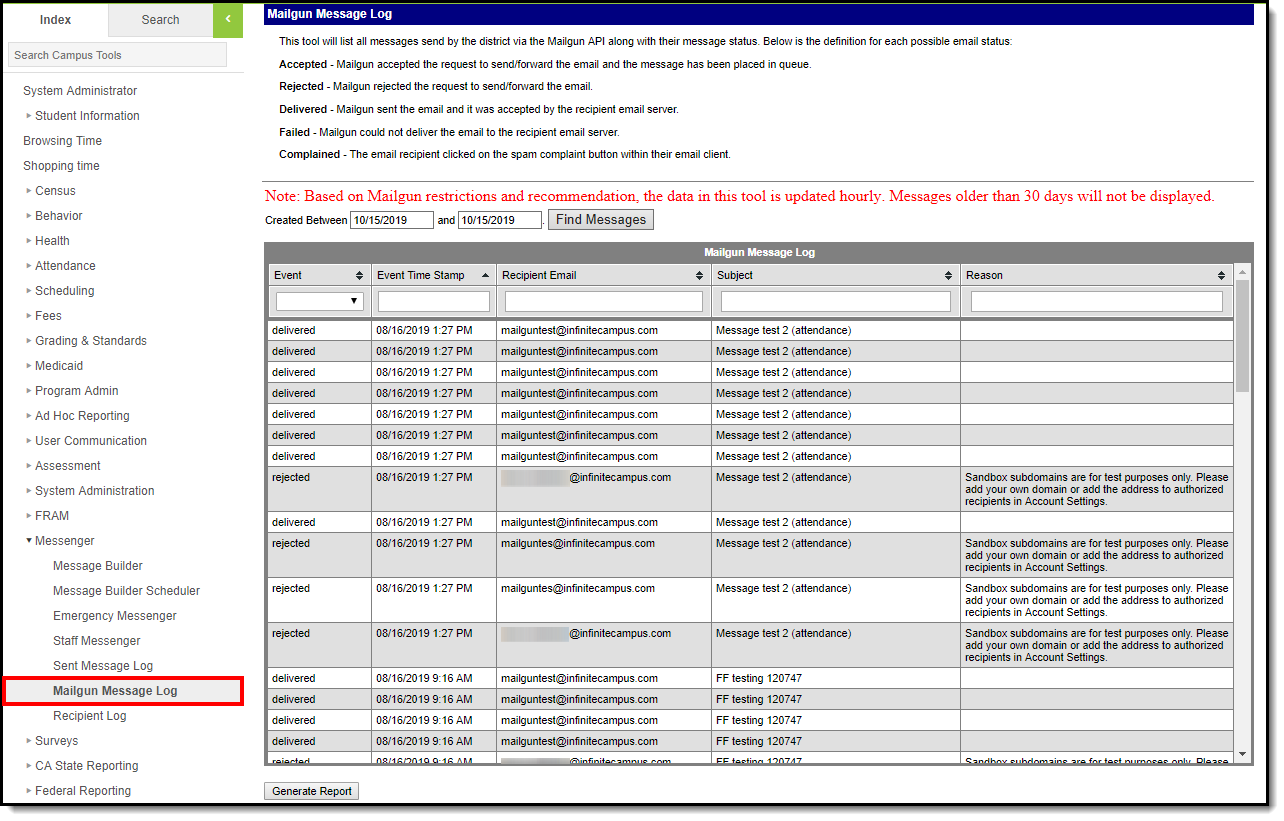
Review Sent Messages via Mailgun API
The Mailgun Message Log allows you to review all messages sent in the last 30 days via the Mailgun API.
