Course requests indicate which courses each student is required to take, which courses they are electing to take, and which courses may be used as alternates to fill the student's schedule in the upcoming year. Use this study guide to learn about options for entering and managing student course requests for scheduling purposes.
Enter Student Course Requests
There are a number of different ways student course requests can be entered.
Request Wizard
The Request Wizard allows schedulers to quickly add or remove course requests for a large group of students. Requests are entered based on factors such as grade level, team assignments, ad hoc filters, existing requests or roster data from a prior year. Requests entered in this manner are considered Required for the students.
Allow Online Registration
Districts can choose to enable a system preference that allows students to register for courses via Campus Portal.
Tool Search: Display Options
The Portal Display Options allow schools to determine which tools and data are available in the Campus Student and Campus Parent Portals. This tool is scoped to the school selected in the Campus toolbar.
Options are managed by creating templates and assigning calendars (and schedule structures) to that template. This tool also contains Batch Edit options to simplify updating multiple templates or schools.
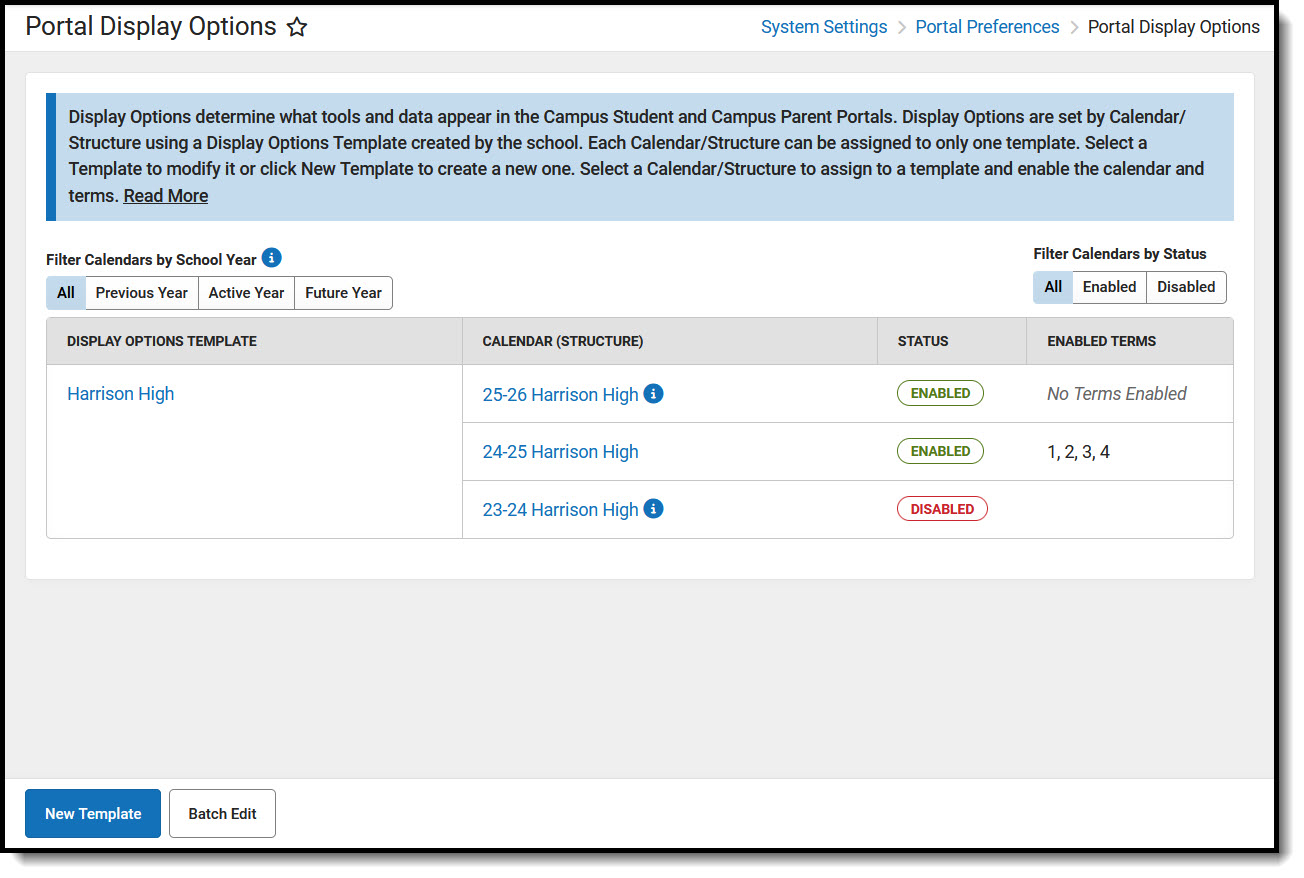 Portal Display Options
See the Portal Display Options Tool Rights article for suggested tool rights.
Understand the Portal Display Options Tool
The primary view of the Portal Display Options tool lists the Templates created for the school and the Calendar(s) assigned to each template. Click the name of the template or calendar to view more information.
For each template, a Status and, if applicable, which terms are enabled are displayed. The status indicates whether portal data is enabled for the calendar assigned to the template.
Use the filter options above the table to filter the list by calendars in the Previous, Active, and Future school years or by calendar status.
| The Active year is the School Year currently marked as Active in the School Year Setup tool. |
What does 'Enabled' mean?
If a Calendar (Schedule Structure) is enabled, data is available on the Campus Student and Campus Parent Portals for that calendar. The available data is determined by the display options marked in the template to which the calendar is assigned.
If a Term is enabled, Assignment, Attendance, Grades, and Schedule data for that term are available, depending on which display options are enabled.
Which calendars can be enabled?
Calendars can be enabled if they are for the current, active school year, the prior (previous) school year, or the next (future) school year.
Calendars from the previous school year can be enabled for only 90 days from the Calendar End Date. This is done by extending the enabled status of the calendar. See the Calendar & Term Settings section below for information about enabling previous calendars.
For enabled calendars in the active and previous school years, the data available on the Portals is determined by the Display Options selected. For calendars in the future school year, only the Display Options for Academic Plan, Activity Registration, Course Registration, Documents, and Schedule tools are applicable. All other data is hidden from enabled calendars in future school years.
Questions? Check out the Portal Preferences FAQ article.
Create a Template
To create a new display options template, click the New Template button at the bottom of the tool. Alternately, open an existing template, click the arrow next to the Save button, and then Save & Copy to create a copy of that template as a starting point.
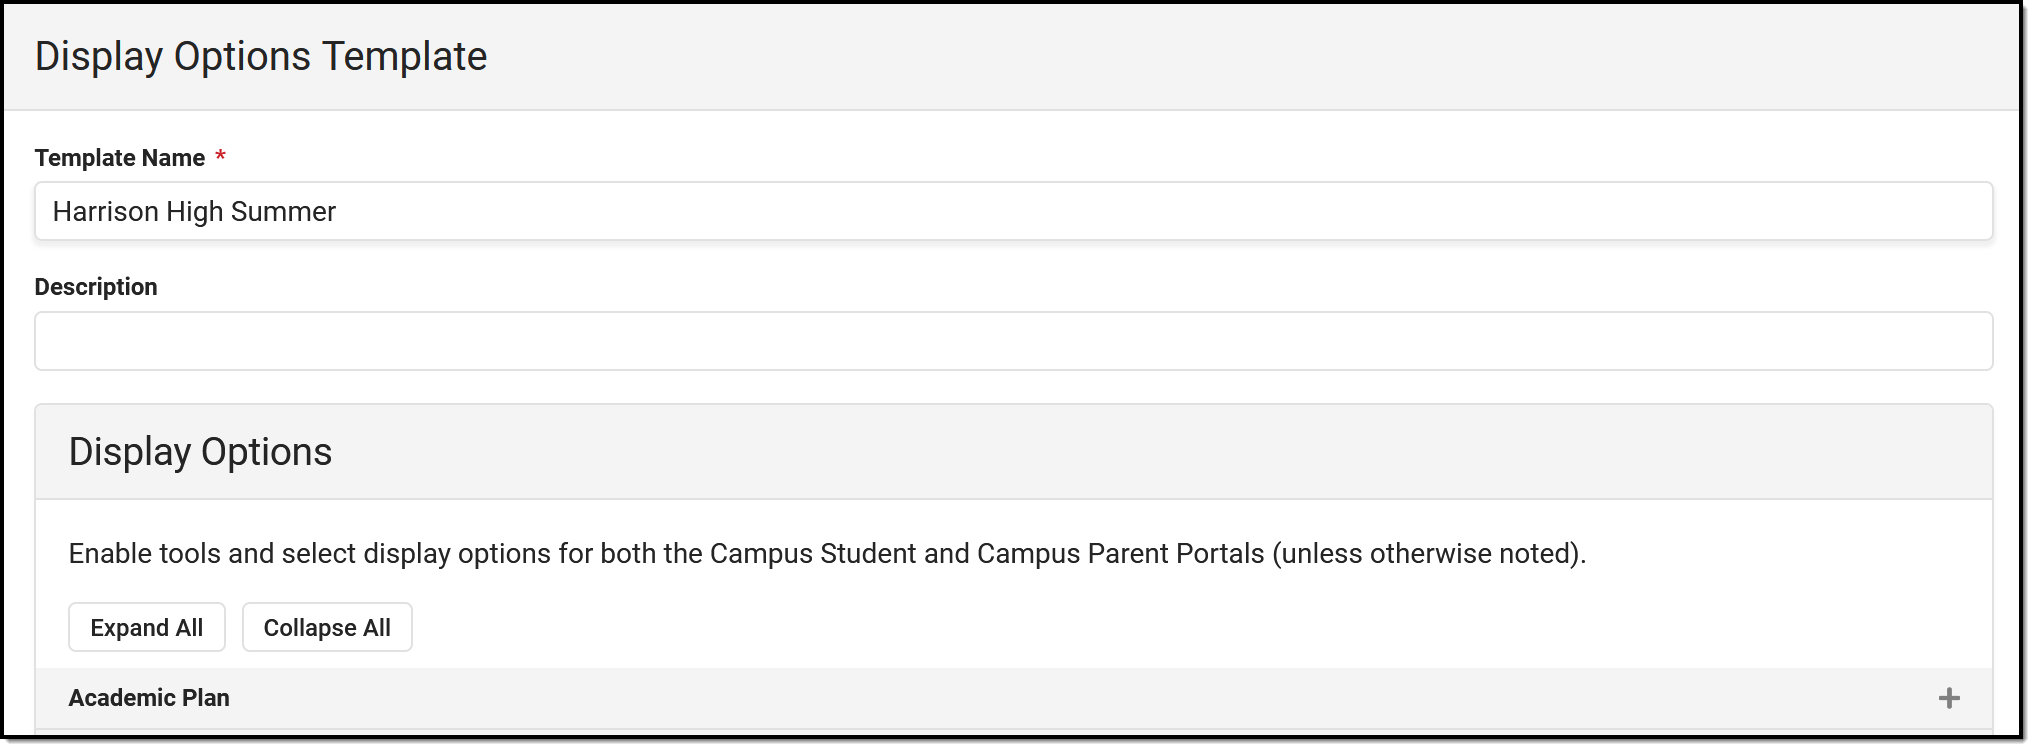 Manage display options by first creating a template.
Enter a unique Template Name. This is the name displayed in the Portal Display Options tool and when assigning calendars. Enter a Description if desired. Currently, this description is only displayed in this tool. It may help provide more information about what data is enabled in the template and how it should be used.
Display Options are grouped in expandable sections by tool. Click Expand All to view all options. When enabled tools are collapsed, an indication in the section heading indicates if the tool is enabled.
For many tools, display options can be set individually for Campus Student and Campus Parent. For some tools, additional options are displayed for specific settings when the tool is enabled. See the Display Options section below for a breakdown of each tool, its related settings, and examples from the apps. |
Once the desired options for this template are marked, click Save to complete the template. The next step is assigning calendars to the template.
Assign Calendars to a Template
To assign calendars to a template, click the Manage Calendars button at the bottom of the template. Click Assign next to the calendar(s) to assign to this template. Calendars can also be assigned by clicking the calendar name from the main display options screen.
Calendars can only be assigned to one template at a time.
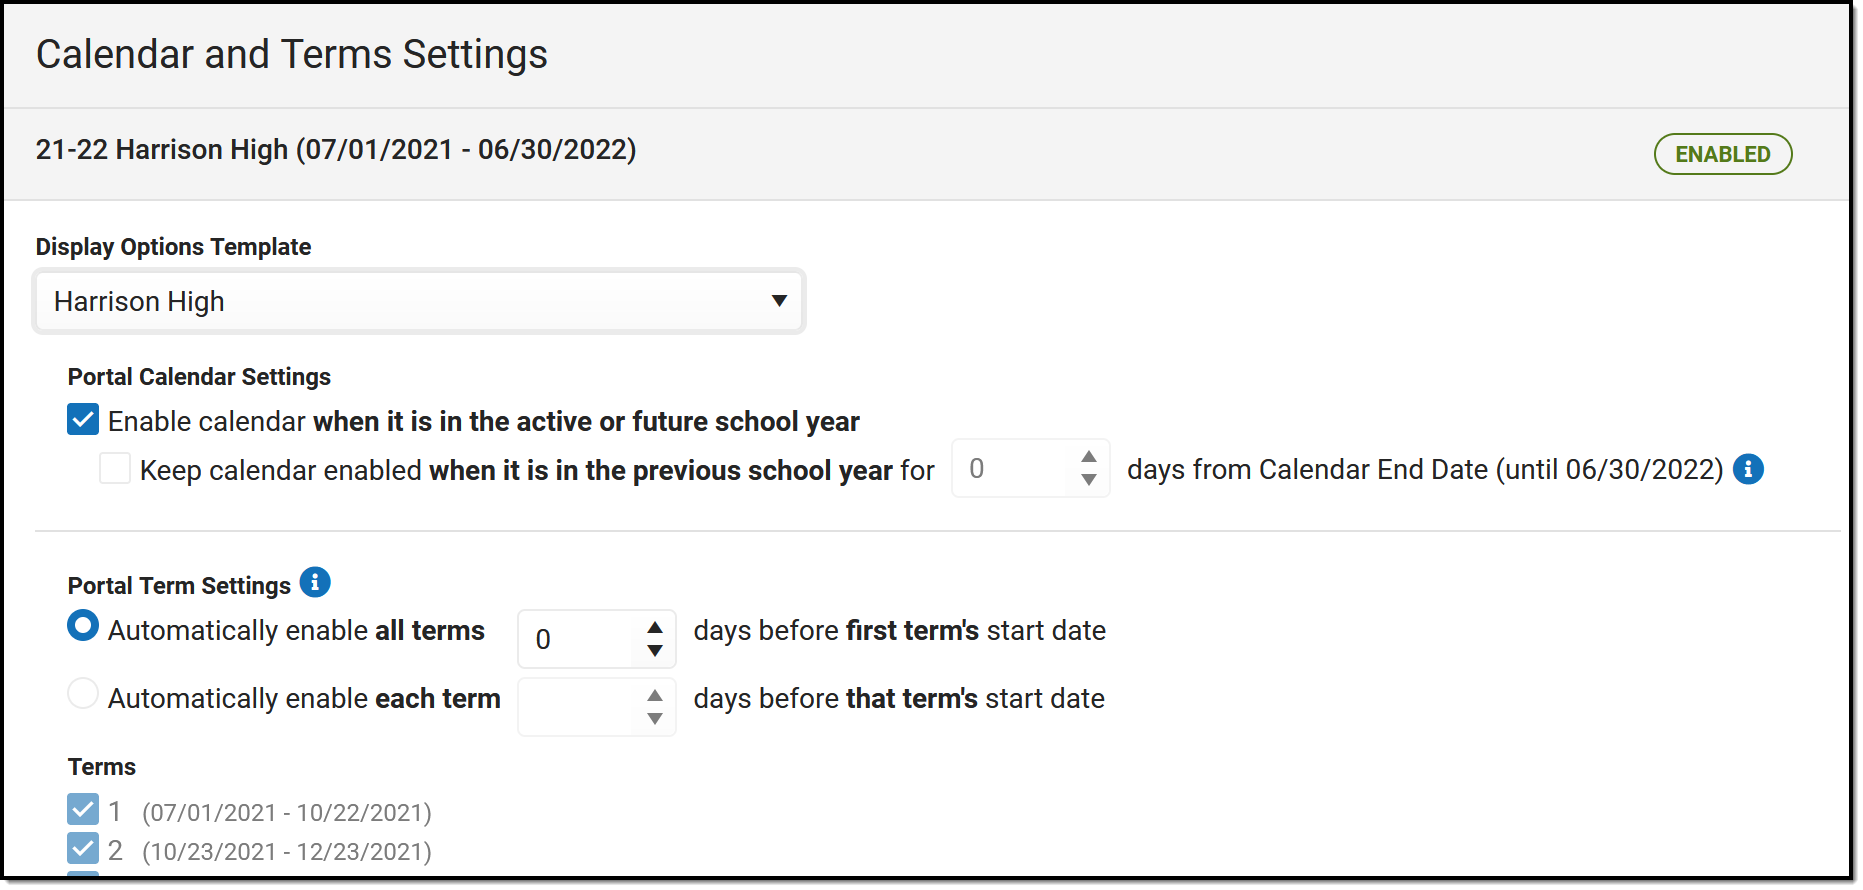 Next, calendars to the template
Calendar and Term Settings
When a calendar is assigned to a template, additional settings display:
Enable calendar when it is in the active or future school year.
When a calendar is enabled, data in that calendar is available in the portals, depending on the options selected. This setting to enable a calendar applies to calendars in the active or future school year. The Active year is the School Year currently marked as Active in the School Year Setup tool. The future school year is the next one.
Keep calendar enabled when it is in the previous school year for X days from Calendar End Date
Keeping a calendar enabled allows parents and students to access a calendar's data past its end date. This option is especially helpful for data such as Grades and Assignment scores.
Access can be extended up to 90 days past the Calendar End Date. After that date, the calendar will no longer be listed in the Portal Display Options tool and cannot be made available.
Portal Term Settings
Term-specific settings control access to Assignments, Attendance, Grades, and Schedule data.
Terms are automatically enabled based on the term's Start Date based on the automatic preferences selected. Automatically enable all terms according to the first term's Start Date, or enable each term according to its own Start Date. Select the number of days before the Start Date for which the terms should be enabled.
Display Options Summary
Below the list of terms is the Display Options Summary, which indicates the template selected for the calendar and which options are enabled.
Display Options
The following describes the available options to display in Campus Student and Campus Parent. An example of the option is provided in the last column.
See the Campus Student and Campus Parent articles for examples of what these apps look like.
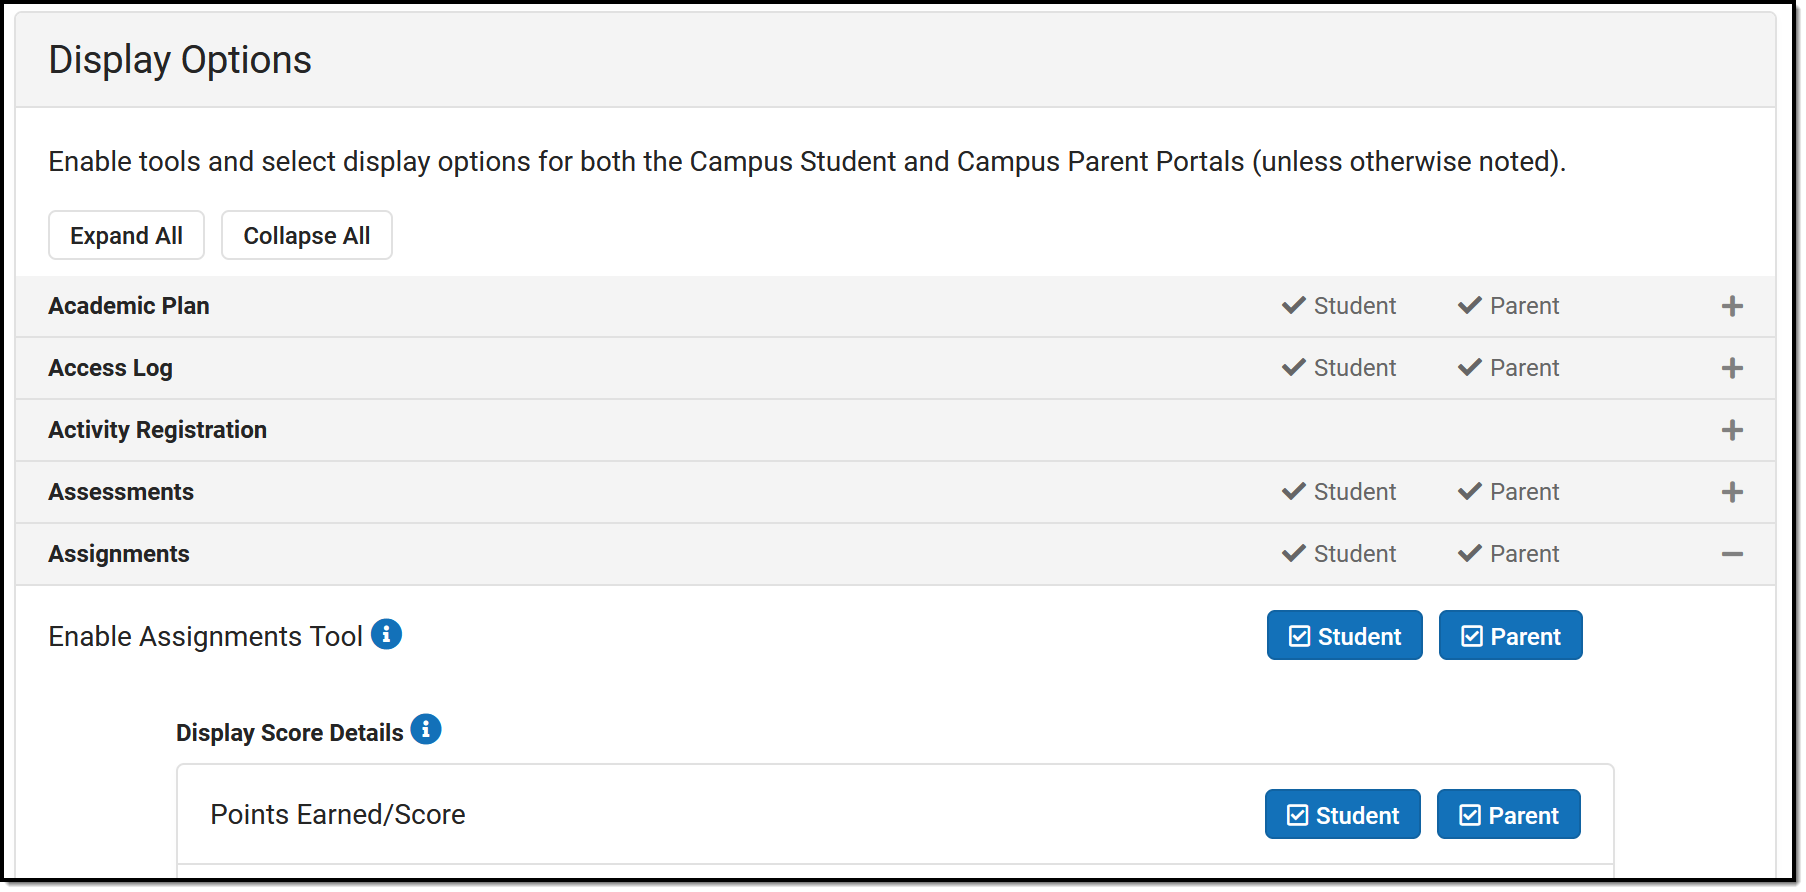 Expand sections of the display options to enable tools and specific data elements to display in the portals.
Attention districts who update their Portal Display Options via custom scripts:
Campus has provided a prism call to refresh the portal cache. This call should be run after a script updates options using the Task Scheduler. The prism call is: x=portal.PortalDisplay-reloadPortalDisplayOptionsCache
Schedule the task as desired in the Scheduler. The Tool Code for this tool is resources.PortalOptions. Select a Task Type of Java (Prism URL call) and enter the text above in the text box.
| Option | Description | Campus Student and Campus Parent |
|---|---|---|
| Academic Plan | ||
| Enable Academic Plan Tool | Displays information related to a student's course plan.
The Academic Planner and Course Registration options can be turned on at the same time, but it is not recommended. It is best to have a window of time when students can add courses to their course plans and a window of time when students can enter course requests. This eliminates the risk of overwriting course requests or planned courses. |
 Click to enlarge |
| Enforce All Rules | When marked, students can only save their academic plan if ALL planning rules and requirements have been fulfilled.
When it is not marked, students can save their plan without meeting all requirements, but all planning rules must still be met. Warning messages from failed requirements and failed planning rules are displayed so users can see the issues but still save the entry. |
|
| Require approval by parent/legal guardian | When marked, parent/legal guardians can mark this box indicating they have reviewed the student's academic plan.
This field displays as marked when the student views the plan when logged into the portal and when the counselor views the student's Course Plan. Parents/guardians can review the student's academic plan and mark this checkbox without being able to change the programs or course plans. This is helpful in situations where a counselor has worked with the student to create a plan and finalize it but still wants parents/guardians to review the selections. |
|
| Display Course Fees | Any fees assigned to a course will be displayed when viewing that course in the Course Catalog search results. | |
| Allow portal users to change program | When marked, parents/guardians and students can select a different academic plan. When not marked, only district staff (counselors, graduation program planners, etc.) can change students' academic plans. | |
| Allow to change course plans | When marked for Campus Student or Campus Parent, students and/or parents can add or remove courses from the course planner. Parents/guardians can approve the student's course plan regardless of whether this checkbox is marked. When not marked, only district staff (counselors, graduation program planners, etc.) can change academic plans for students. | |
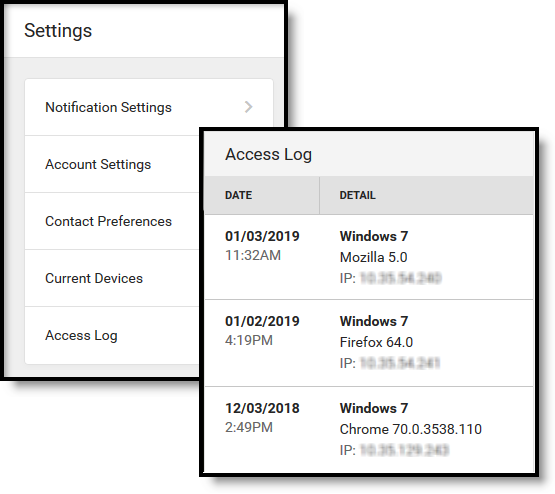
| Access Log | ||
| Enable Access Log tool | Displays the date, time, and IP address of successful login attempts. |
|
| Activity Registration | ||
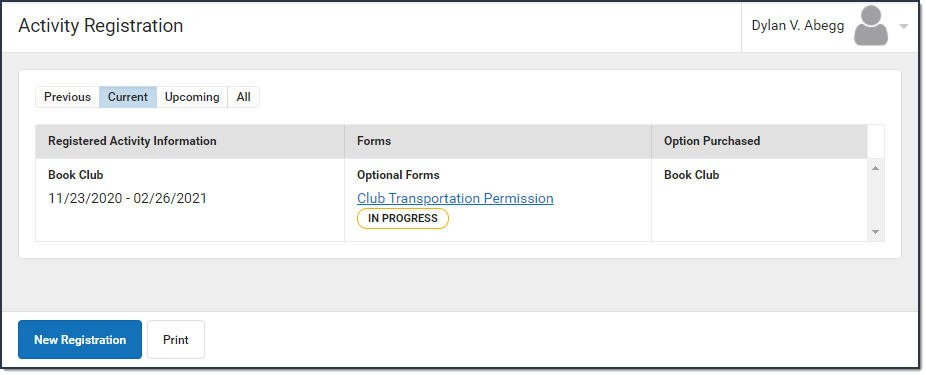
| Enable Activity Registration Viewing tool | Displays Activity Registration information in Campus Parent Portal and Campus Student Portal.
Campus finds the student's current enrollment record and checks that school's preference to determine whether Activity Registration information should display. If there isn't a current enrollment record, Campus will use a previous enrollment record to determine if the Activity Registration data can display. |
 Click to enlarge |
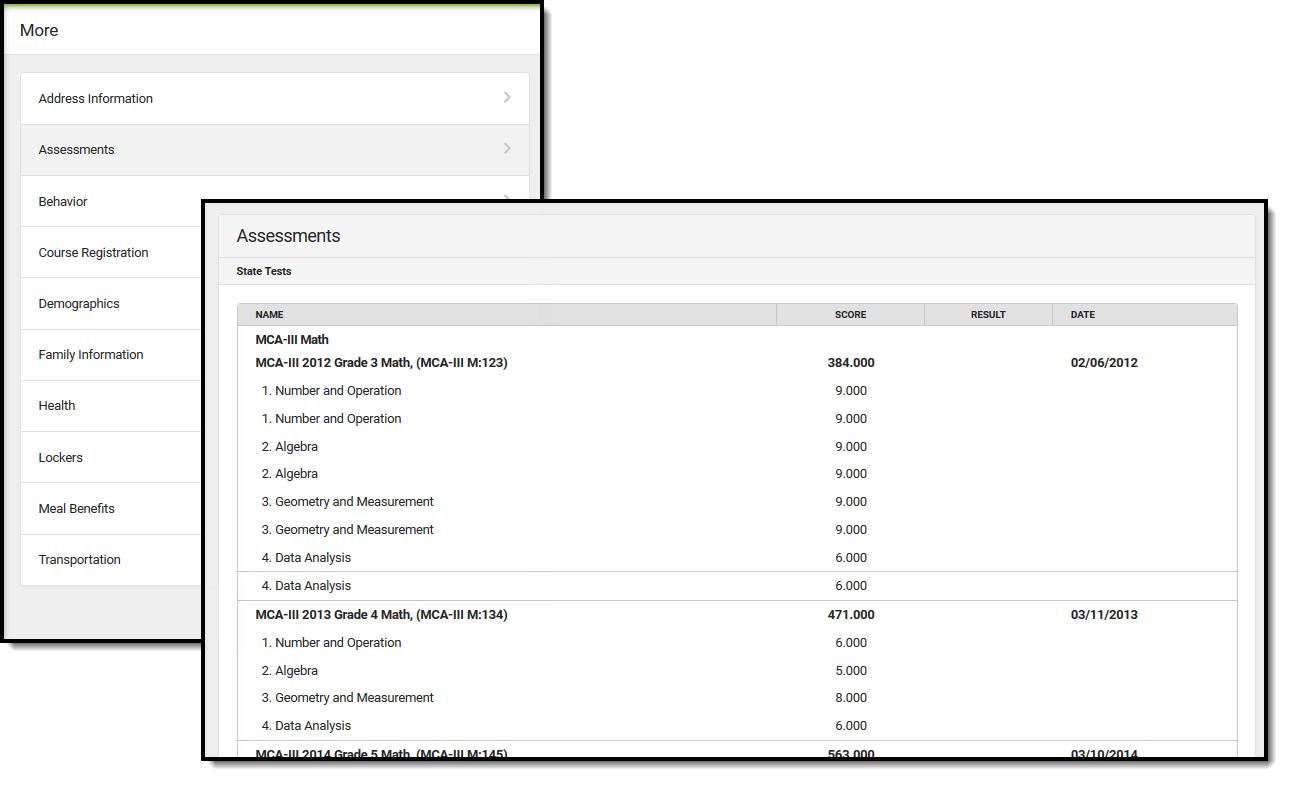
| Assessments | ||
| Enable Assessments tool | Displays a student's district, state, and national test scores. |
|
| Assessment Display Text - Student/Parent | Enter text in these two editors to display that text at the top of the Assessment tool in Campus Student and Campus Parent, respectively. | |
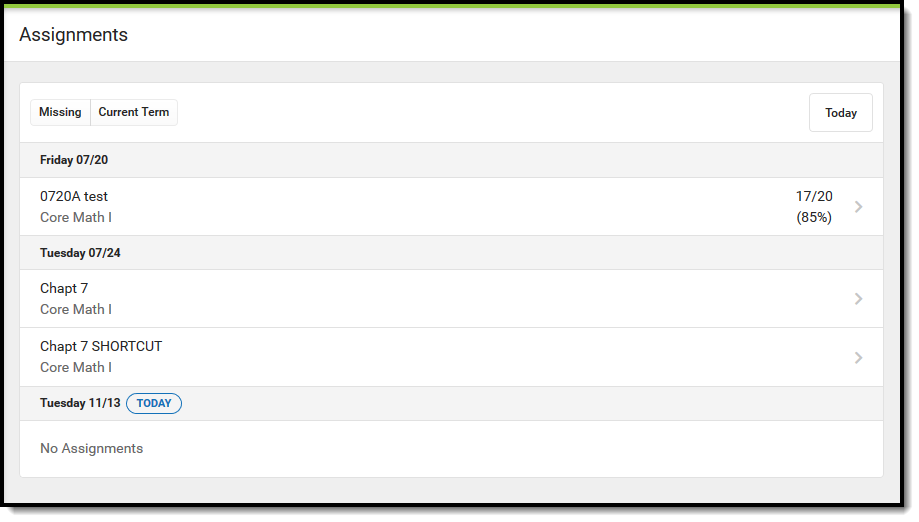
| Assignments | ||
| Enable Assignments tool | Enables the tool that lists a student's assignments for the year. Students can view scores and submit work, as enabled by their teacher. Assignments are also displayed in other areas of Campus Student and Campus Parent, including Grade Book Updates, Today, and the Calendar, as well as the Course detail and Grade detail. |
|
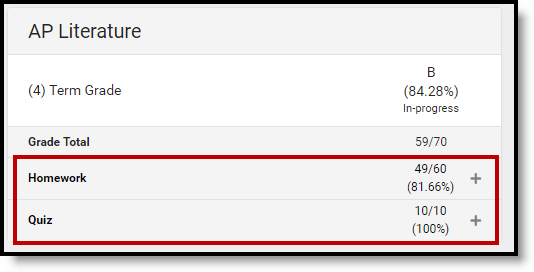
| Display Score Details | Displays the selected details about a student's score. Selecting these options also enables notifications when assignments are scored, based on student and parent settings.
| |
| Display Category Details | Displays category data in the grade detail, by clicking a specific task/standard in the Grades tool. Specific options include:
|
 Click to enlarge |
| Attendance | ||
| Enable Attendance Tool | Displays the student's attendance events for the school year in the Attendance tool and the Calendar. | 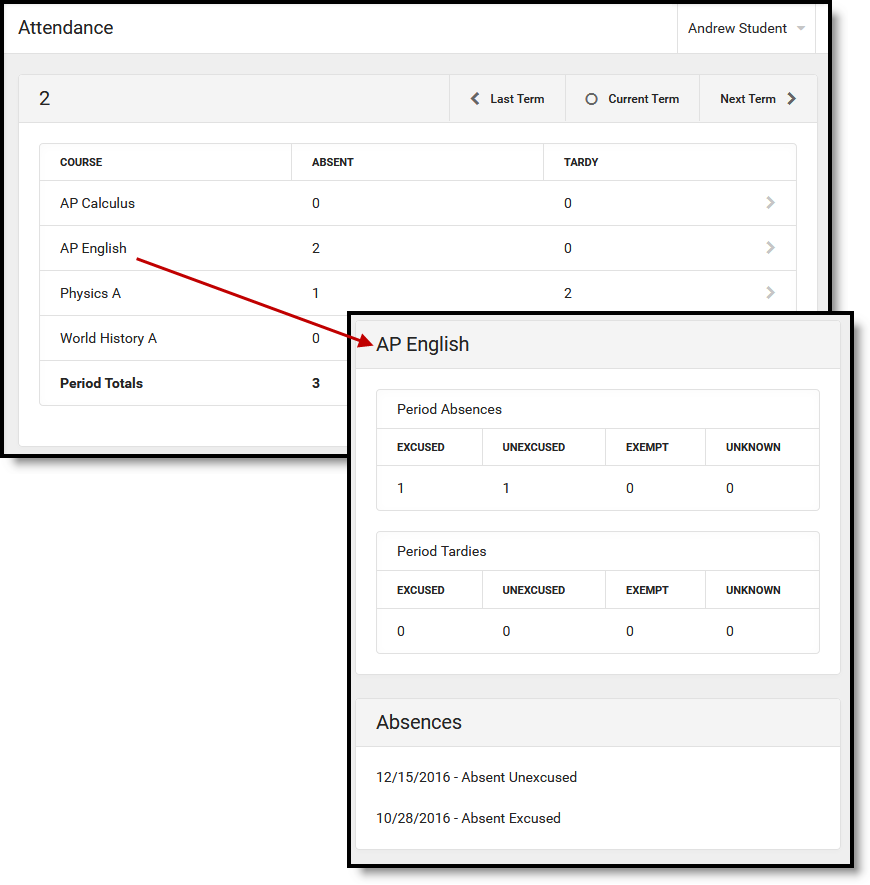 Click to enlarge |
| Display Attendance Comments | Displays the comments attached to attendance events (click second image) (NOT available for Kentucky districts). | |
| Display Positive Attendance Attendance tool only) | Displays attendance for any courses using Positive Attendance functionality (click third image). This option may not display for all states and districts. | |
| Show Unknown Attendance | Enables attendance with a status of Unknown to display within the Portal (ONLY available for Kentucky districts). | |
| Attendance Display Text - Student/Parent | Enter text in these two editors to display that text at the top of the Attendance tool in Campus Student and Campus Parent, respectively. | |
| Behavior | ||
| Enable Behavior Tool | Displays a student's behavior events for the school year. | 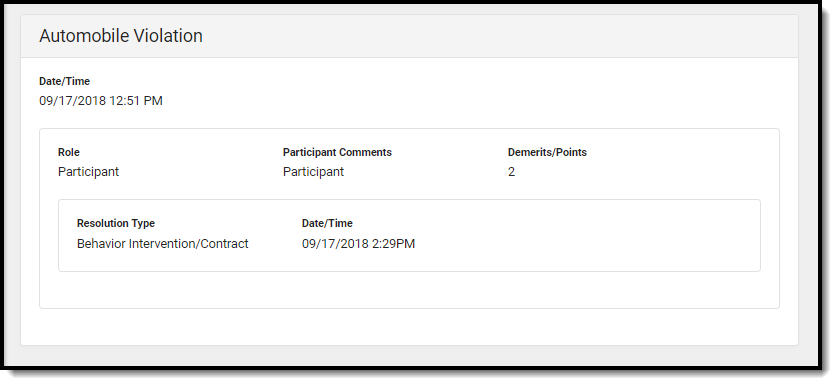 Click to enlarge |
| Behavior Display Text - Student/Parent | Enter text in these two editors to display that text at the top of the Behavior tool in Campus Student and Campus Parent, respectively. | |
| Contact Preferences | ||
| Enable Contact Preferences tool | Displays the parent/guardian's message contact information and gives access to the Change Contact Info tool. | 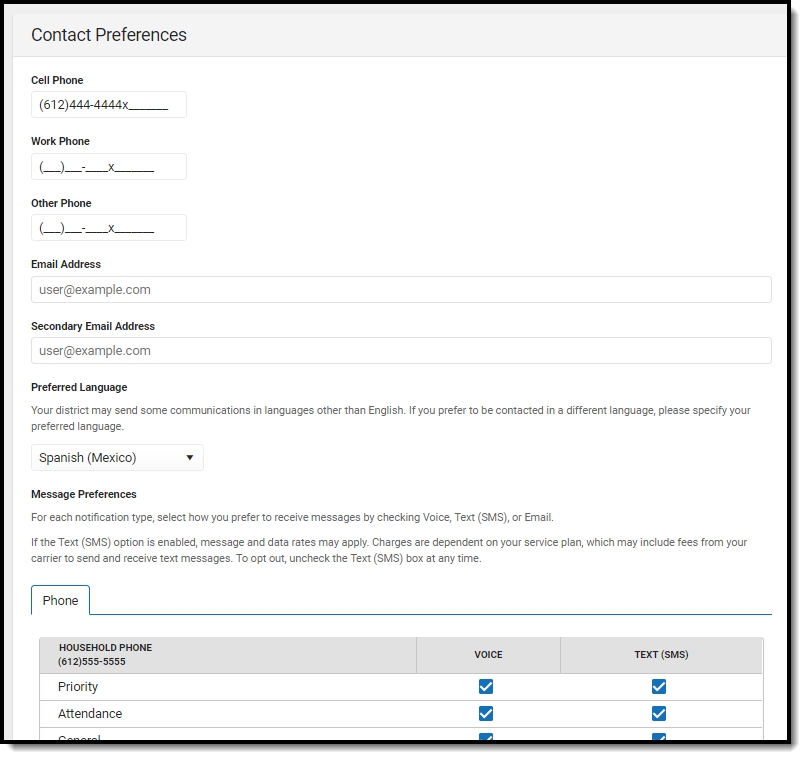 Click to enlarge |
| Allow Update | Students and Parents can update the following contact information from the Contract Preferences tool:
| |
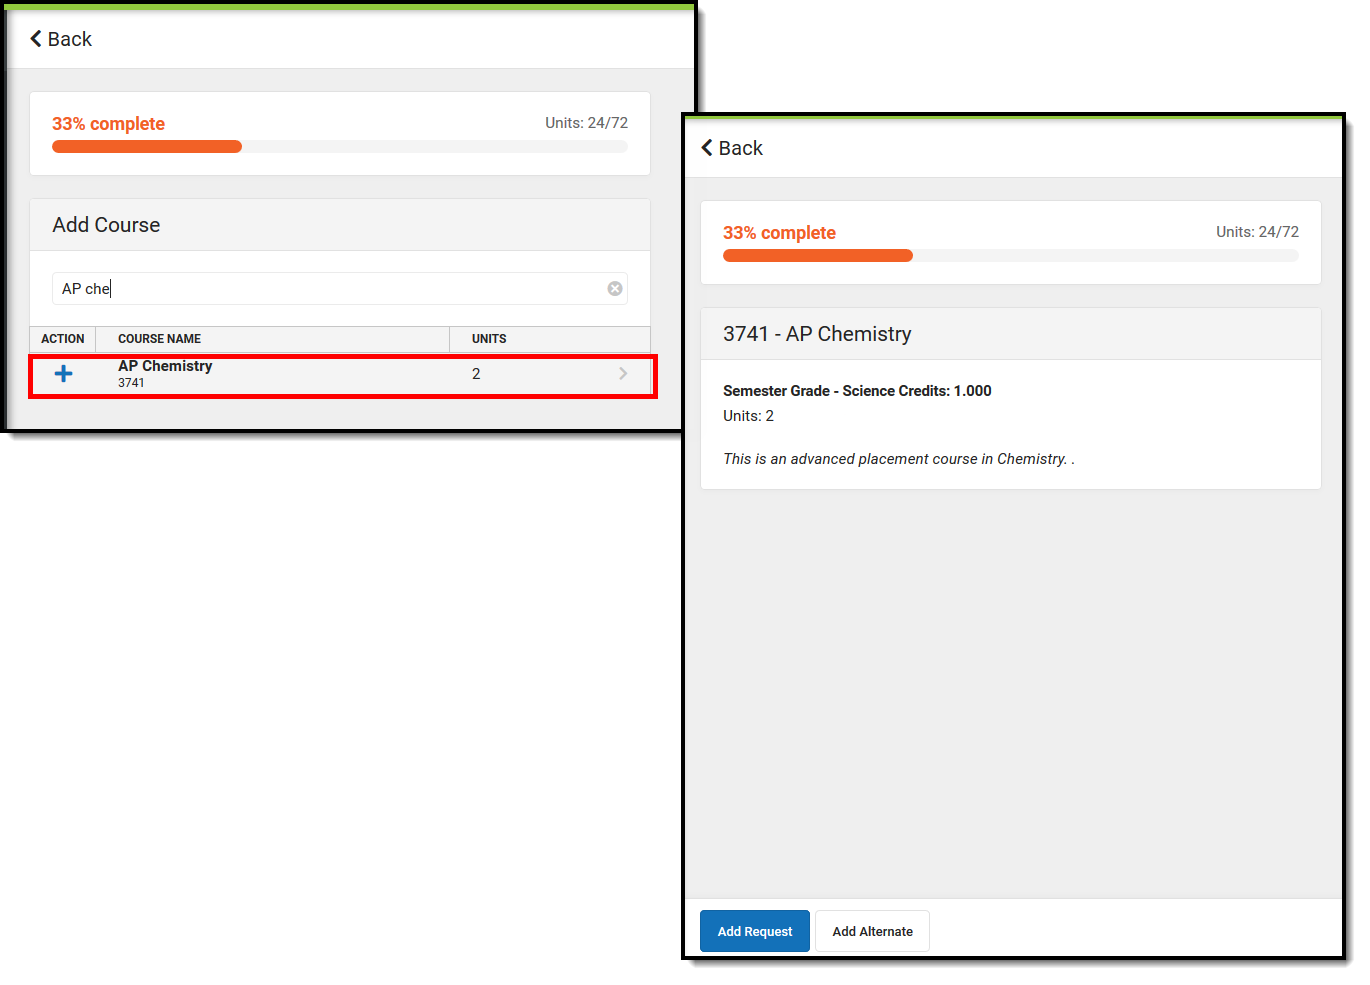
| Course Registration | ||
| Enable Course Registration Tool | Lists the requested courses for the next school year for students. It is recommended that this option be turned on only during registration time.
Both the Academic Planner and Course Registration options can be turned on at the same time, but it is not recommended. It is best to have a window of time when students can add courses to their course plan, and a window of time when students can enter course requests. This eliminates the risk of overwriting course requests or planned courses. In order for students (and parents) to enter course requests, the following must be done:
See the Course Registration article for information on requesting courses. |
|
| Documents | ||
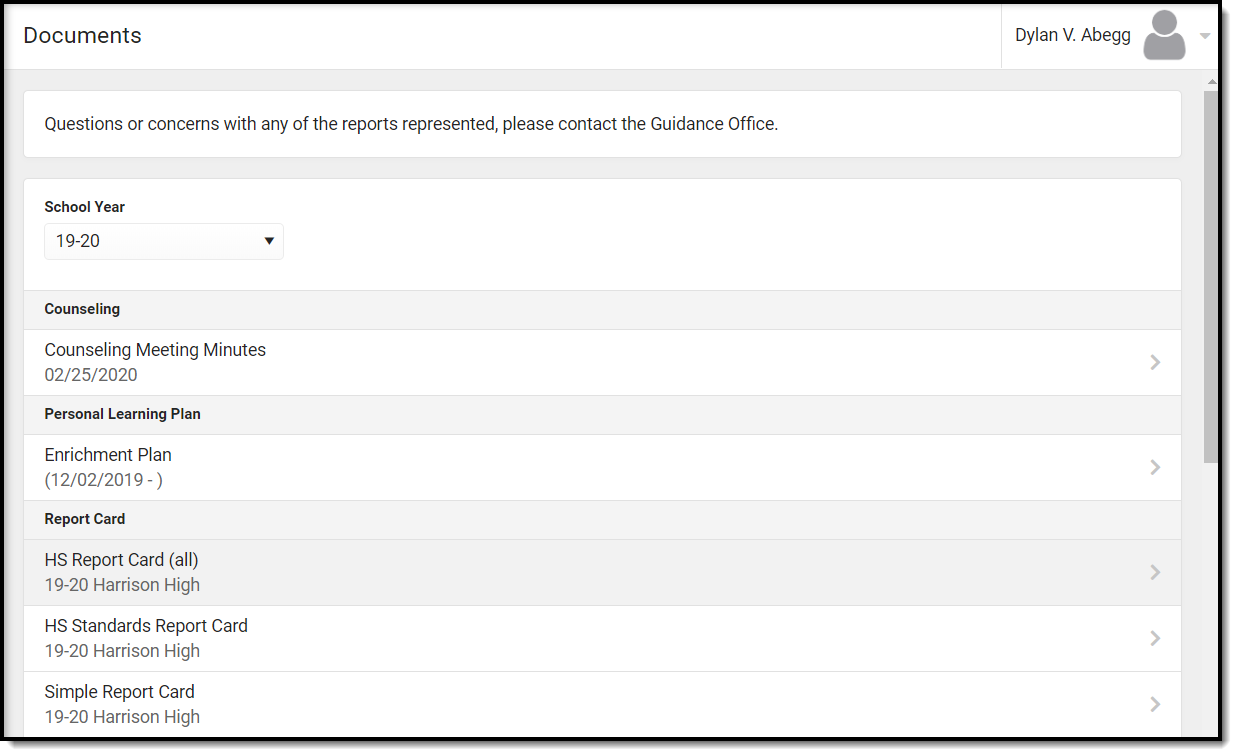
| Enable Documents Tool | Allows users to access report cards, transcripts, custom forms, and other documents.
Note: Report Cards, Transcripts, and configured Schedule reports display in this tool if 'Available in Portal' is selected in the Report Preferences. For report cards, if the Portal - Historical option is marked in the Report Setup, report cards from previous school years will also be available in the Portals. |
Click to enlarge Academic Progress:
Click to enlarge |
| Reports and Plans | The following reports and plans can be enabled:
| |
| Custom Modules | Displays Custom Forms created in corresponding Custom Modules on Portal:
For eSignature Custom Forms to display on the Portal, the following setup must be completed. See each section of the document below for detailed instructions.
|
|
| Food Service | Food service options are only available for districts who are Food Service customers. | |
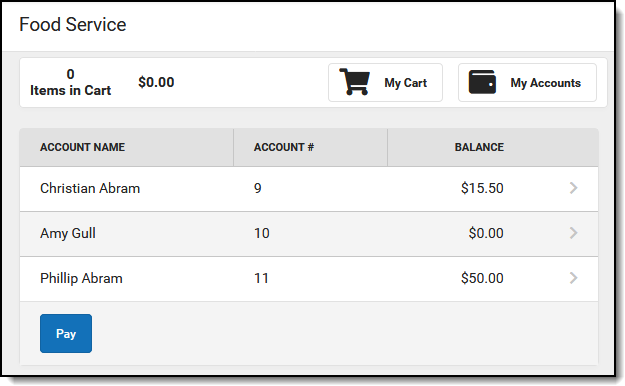
| Enable Food Service Tool | Displays Food Service Account information. This option only affects Food Service-enabled districts. Marking this option for non-Food Service districts has no effect. |
Click to enlarge |
| Display Food Service Balance on the Today screen | Displays the student's food service balance on the today screen. | |
| Food Service - Barcode | Food service options are only available for districts who are Food Service customers. | |
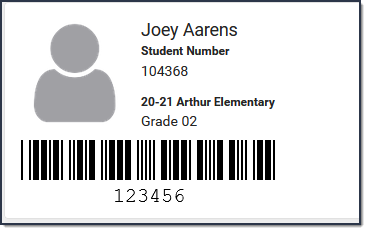
| Display Food Service PIN Barcode on the Today screen | Displays the student's Food Service PIN as a barcode in Campus Student and Campus Parent. Students and parents can use the barcode to make Food Service purchases.
If the option "Display Barcode of Student Number on Campus Student" is also selected, each barcode displays in its own collapsible area. 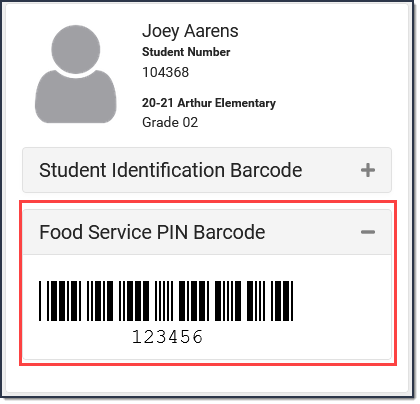 Point of Sale customers who set their student's PINs to be the same as their Student Number do not need this feature if the option "Display Barcode of Student Number on Campus Student" is selected. Point of Sale customers who set their student's PINs to be the same as their Student Number do not need this feature if the option "Display Barcode of Student Number on Campus Student" is selected. |
 Click to enlarge |
| Grades | ||
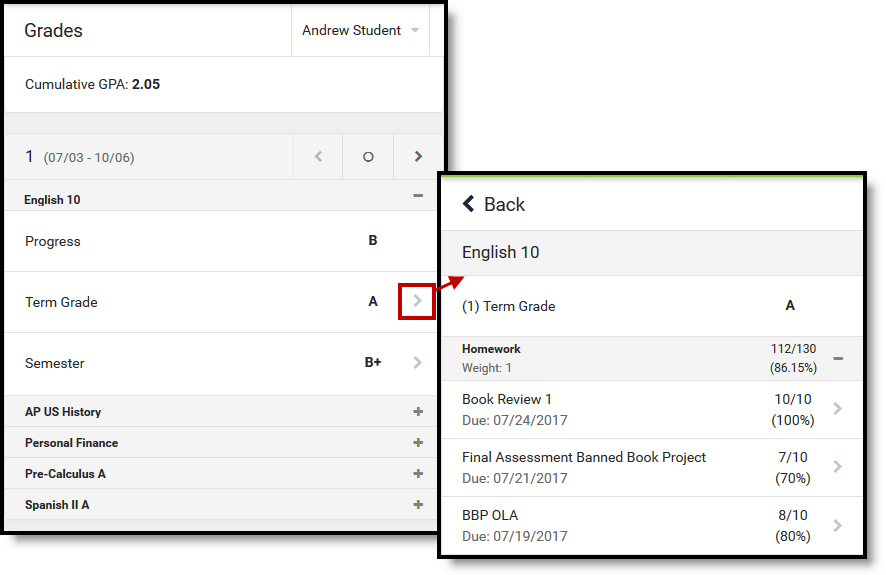
| Enable Grades tool | Enables the grades tool, which lists the tasks and standards aligned to the student's courses, as well as in-progress and posted grades (based on the additional options selected). | |
| Display Grade Type | Displays the following types of grades. Selecting these options also enables notifications for grade updates, based on student and parent settings.
| |
| Display Grade Total | Displays the selected Grade Totals:
| |
| Display GPA | Displays the selected grade point average:
| |
| Other |
| |
| Grades Display Text - Student/Parent | Enter text in these two editors to display that text at the top of the Grades tool in Campus Student and Campus Parent, respectively. | |
| Health | ||
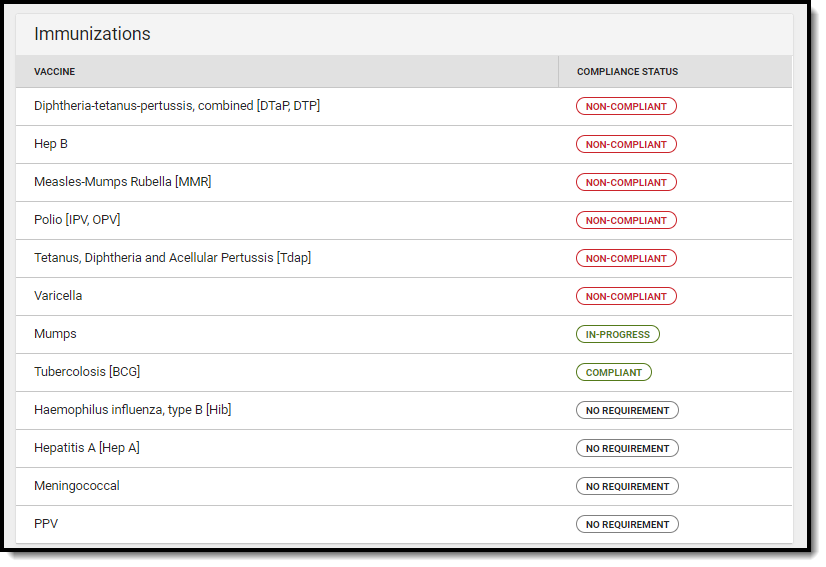
| Enable Health Tool | The Health tool lists the student's recorded vaccinations, immunizations and screenings. Separate options display for the following tools:
|
 Click to enlarge |
| Learning Tools | ||
| Enable Learning Tools | Displays a list of enabled learning tools, from which students can access learning materials. Learning tools are enabled in the LTI Configuration tool. | |
| Lockers | ||
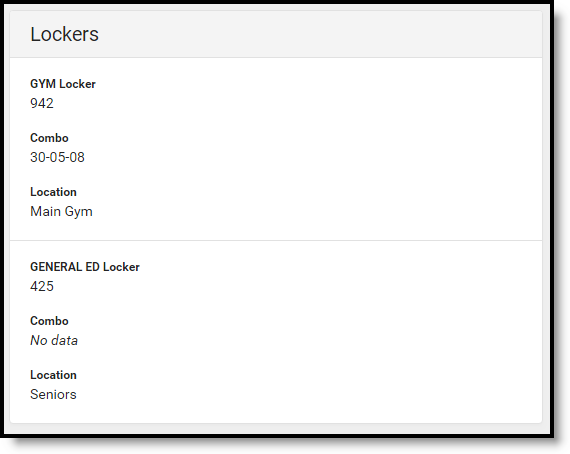
| Enable Lockers Tool | Displays all Locker assignments for the student. |
Click to enlarge |
| Responsive Schedule | ||
| Enable Responsive Schedule Tool | Displays Responsive Scheduling offerings in Campus Student and Campus Parent.
NOTE: Additional setup for responsive scheduling courses is required. See the the Responsive Scheduling article for more information. |
Click to enlarge |
| Schedule | ||
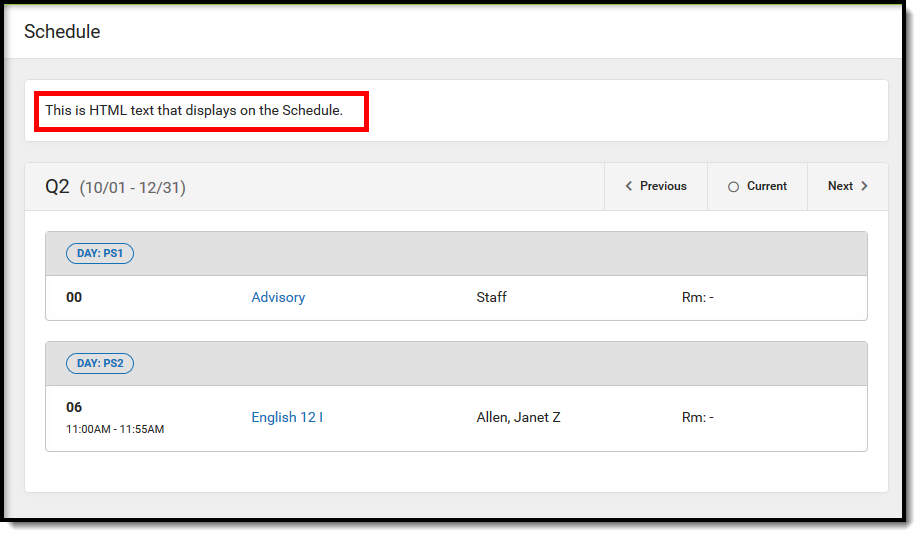
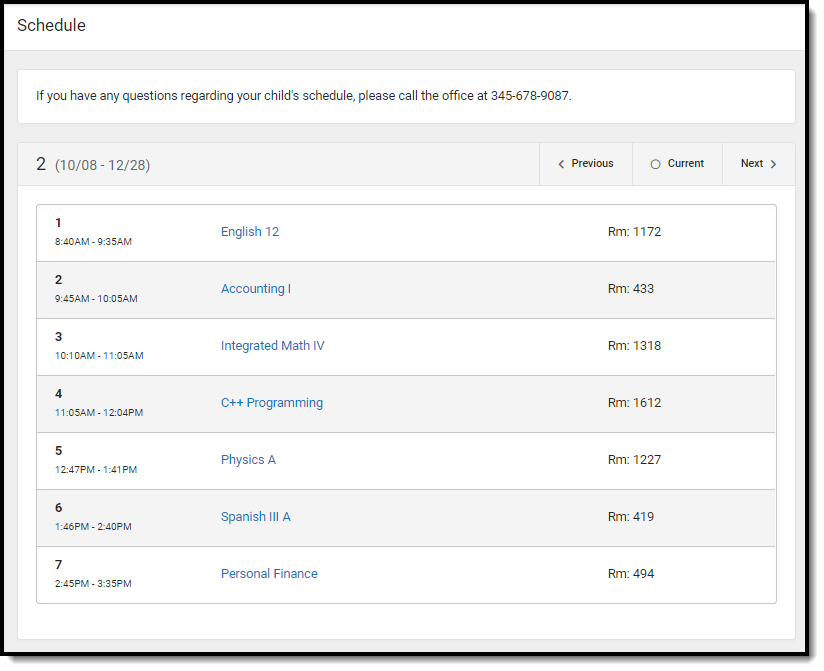
| Enable Schedule Tool | Displays the student's schedule, both in the Schedule tool, and in the Today and Calendar views.
Schedules display for enabled terms only. Disable future terms to hide schedules until they are finalized. |
 Click to enlarge |
| Display Period Times | Displays Period Times in the student's schedule. | |
| Schedule Display Text - Student/Parent | Enter text in these two editors to display that text at the top of the Schedule tool in Campus Student and Campus Parent, respectively. |
|
| School Choice | ||
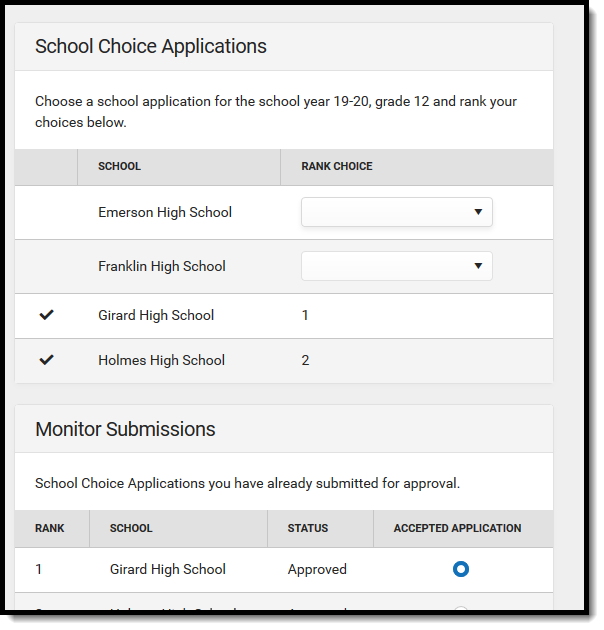
| Enable School Choice Tool | Displays data related to school choice and allows parents to accept enrollment when the school has completed processing school choice applications. |
Click to enlarge |
| Section Feed | ||
| Enable Section Feeds | Enables the Section Feed tool for students and parents. |  Click to enlarge Click to enlarge |
| Display Other Students' Comments | Displays comments for other students in a section. (Campus Parent only) | |
| Display Other Students' Names | Displays the names of other students in a section with their comments. (Campus Parent only) | |
| Student Questions | ||
| Enable Student Questions | Allows students to ask questions of their teachers from the Today screen, which is displayed in the Control Center. | |
| Transportation | ||
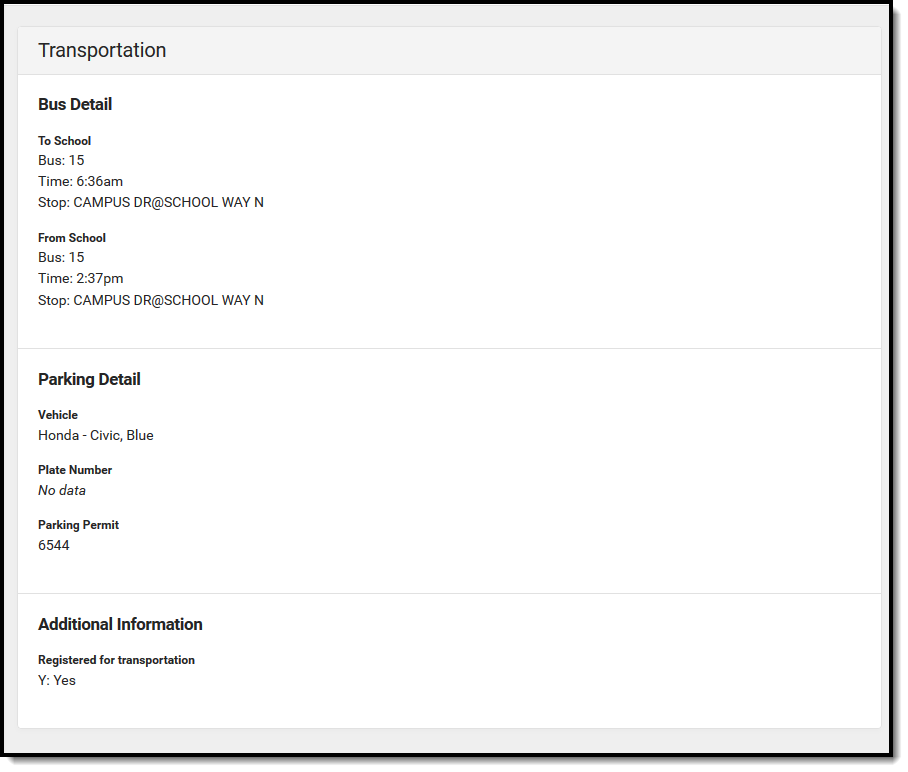
| Enable Transportation Tool | Displays the bus(es) a student rides to and from school. |
Click to enlarge |
| Transportation Tool Display Text - Student/Parent | Enter text in these two editors to display that text at the top of the Transportation tool in Campus Student and Campus Parent, respectively. | |
| Tuition | ||
| Enable Tuition Tool | Displays the Tuition tool that enables parents to submit school tuition payments. | |
| Tuition Options | Displays a student's tuition balance on the Home Screen. | |
| Other Display Options | ||
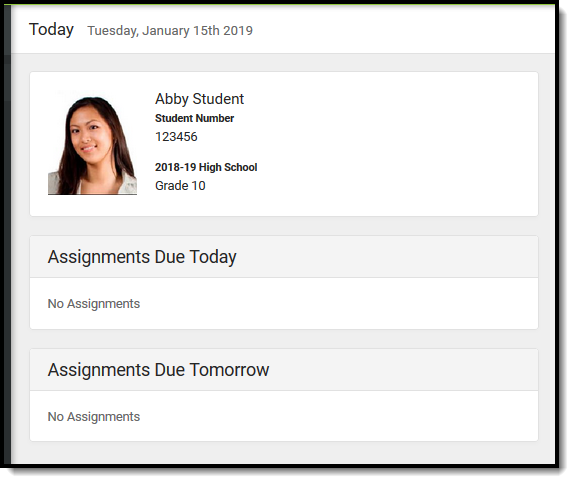
| Display Student Picture | Displays the student's current picture for parent and student users. |
|
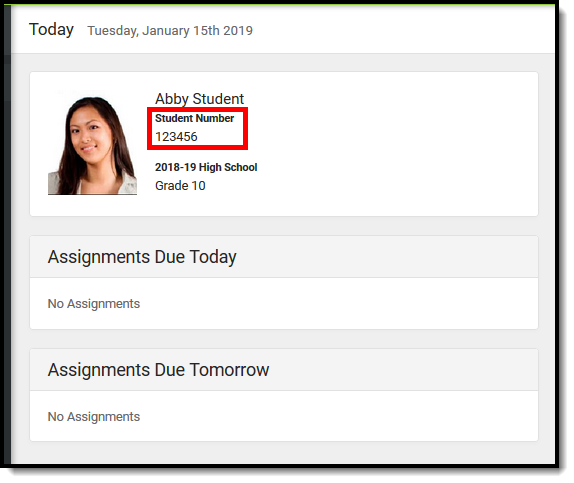
| Display Student Number | Displays the student's district-assigned student number. |
Click to enlarge |
| Display Student State ID | Displays the student's State ID number on the Home page. | 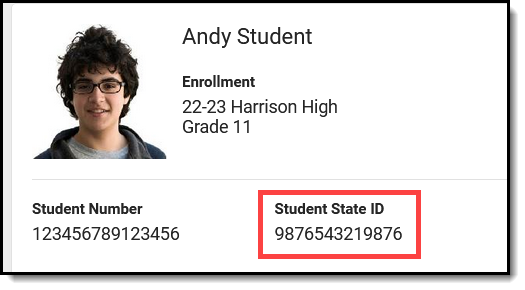 Click to enlarge Click to enlarge |
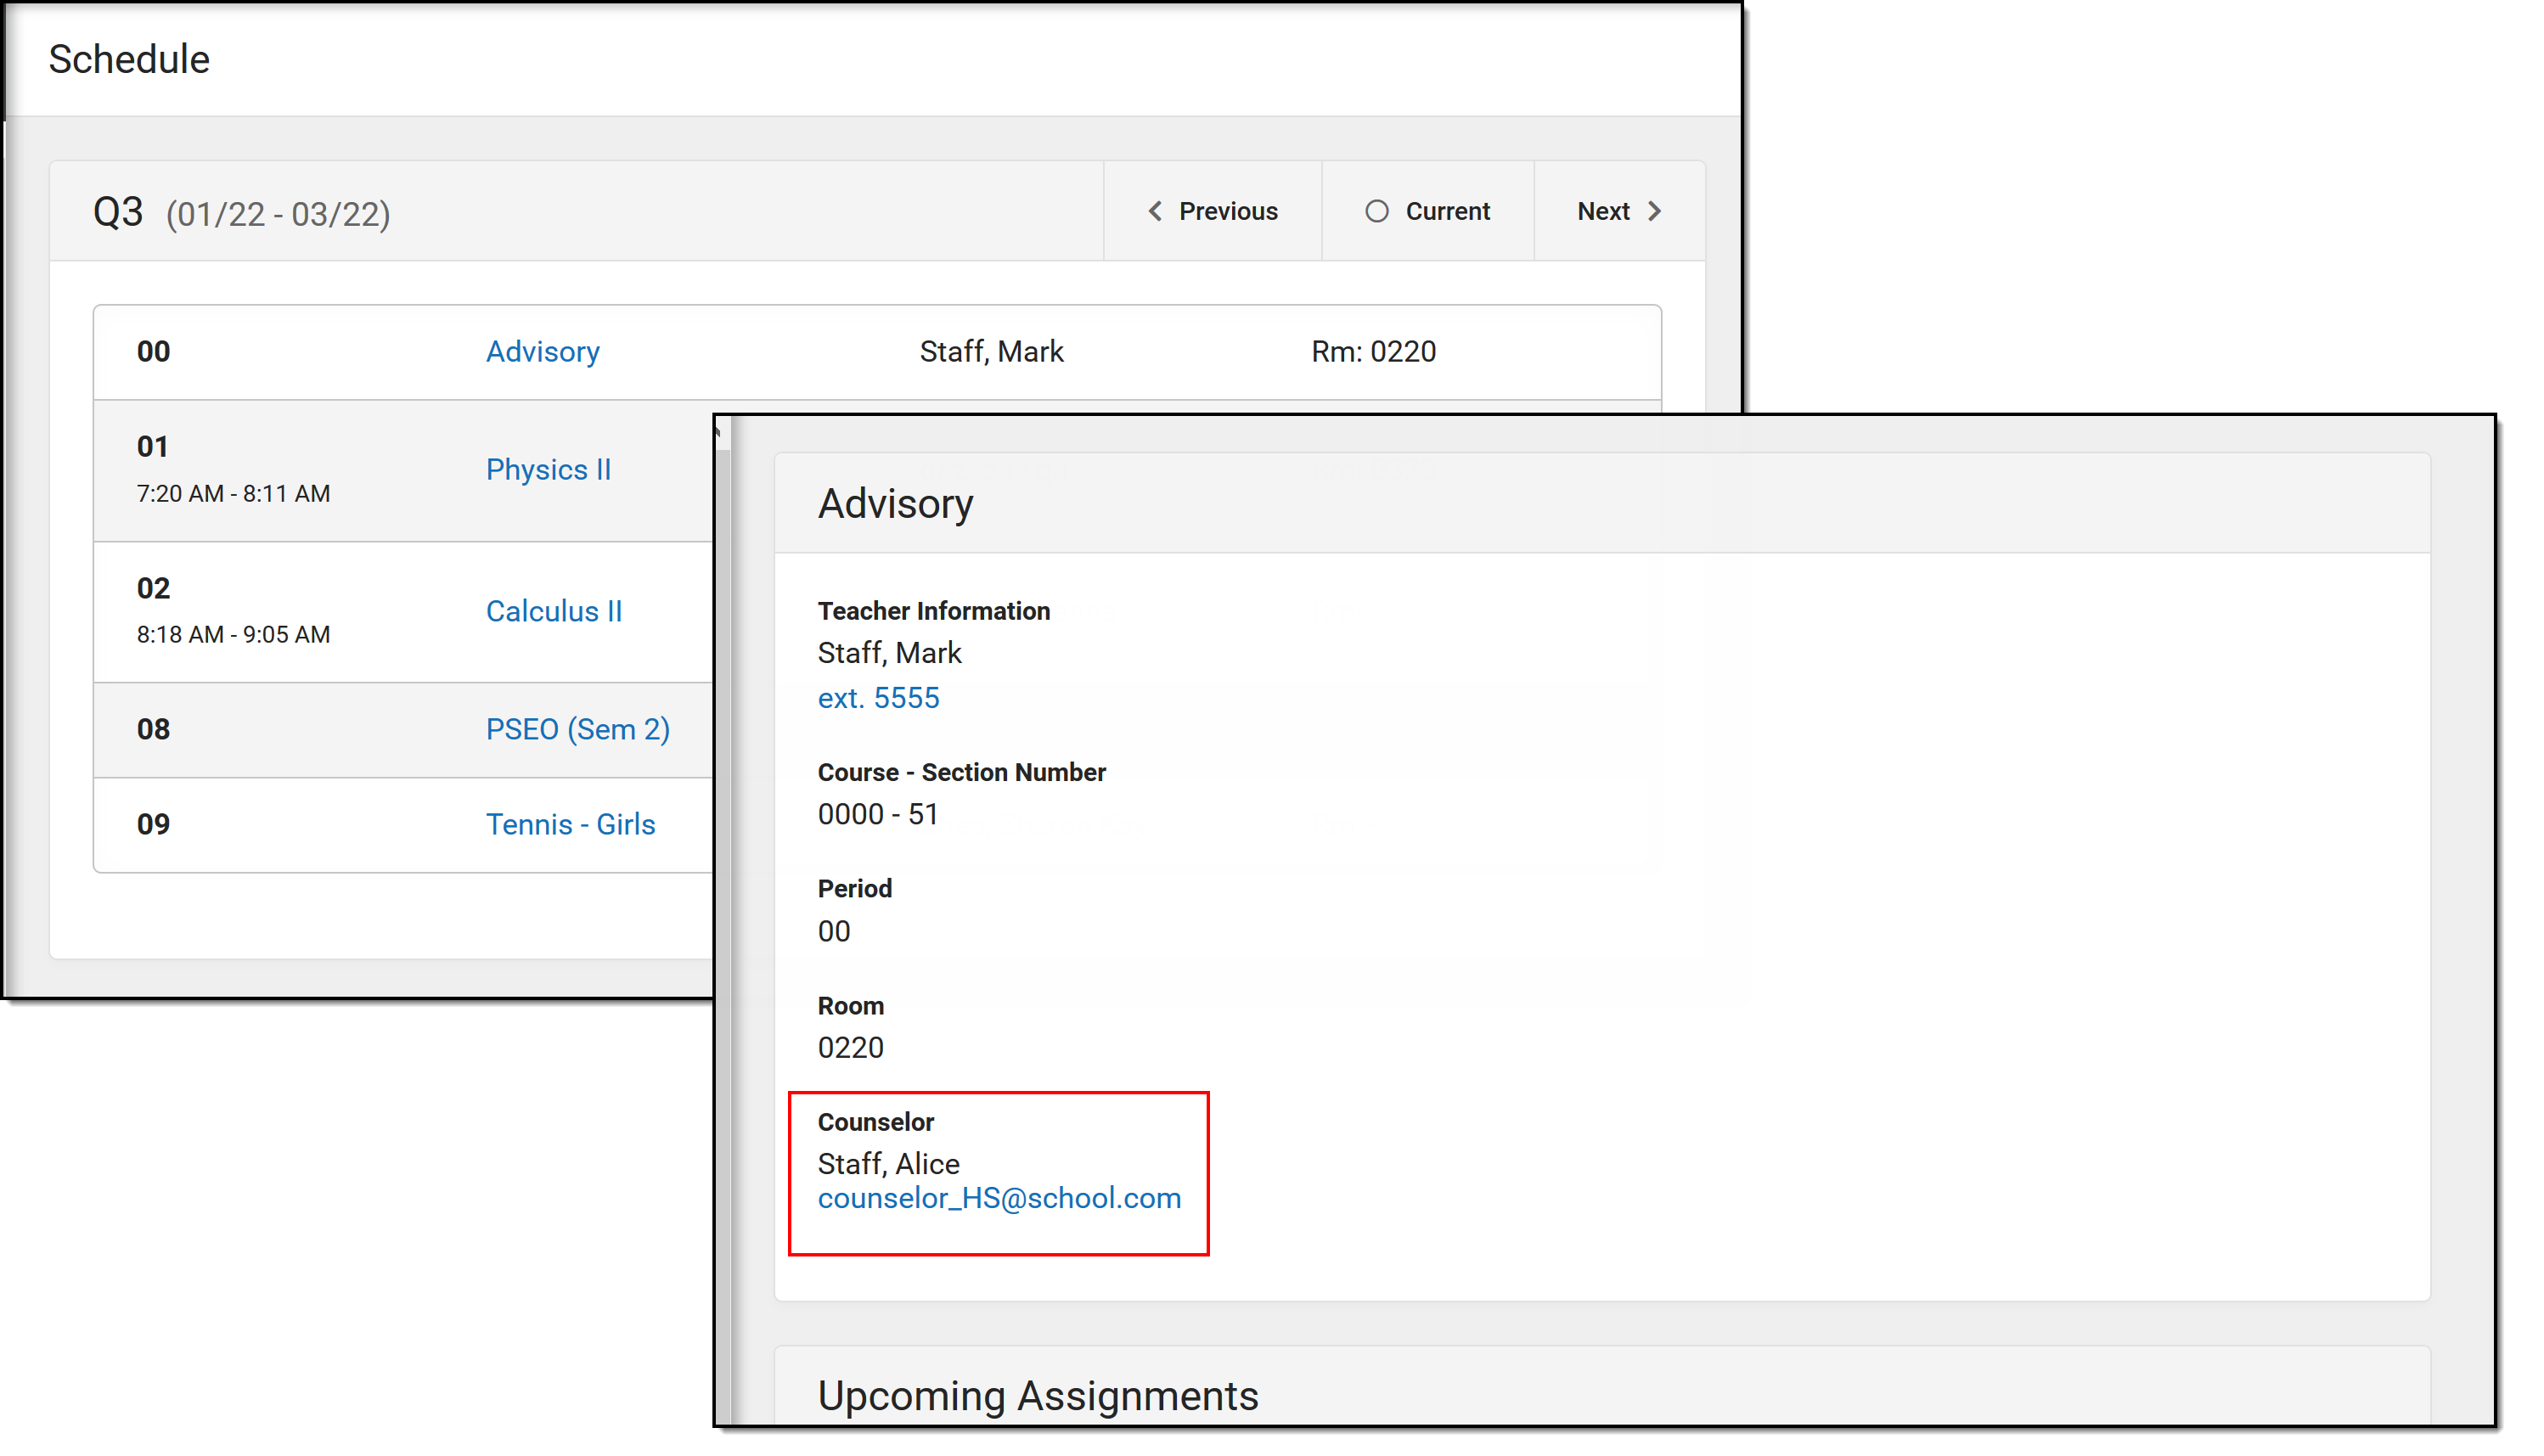
| Display Counselor Email on the Course screen | Displays the email address for the student's assigned guidance/academic counselor. When marked, students or parents can email the counselor to request schedule changes.
The counselor's email is displayed on the Course detail of the Schedule.
|
Click to enlarge |
| Display Blended Learning Group Name | Displays the blended learning group that is active for the student for that day on the Today screen. | 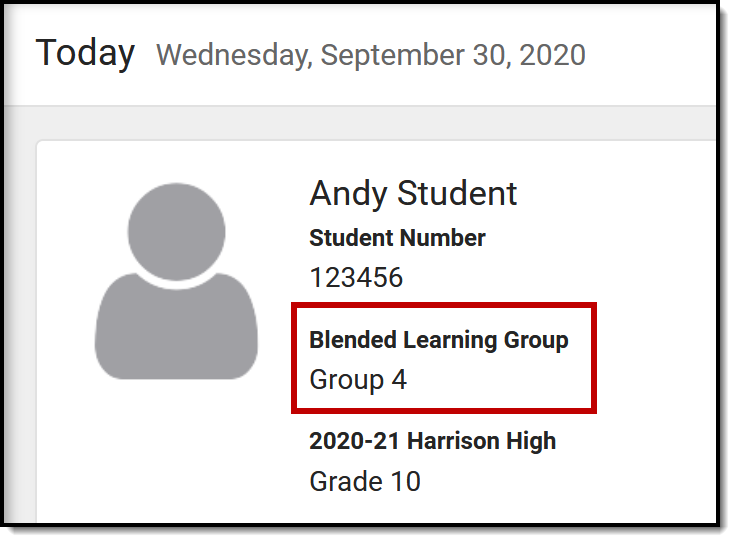 |
Display Barcode of Student Number on Campus Student
|
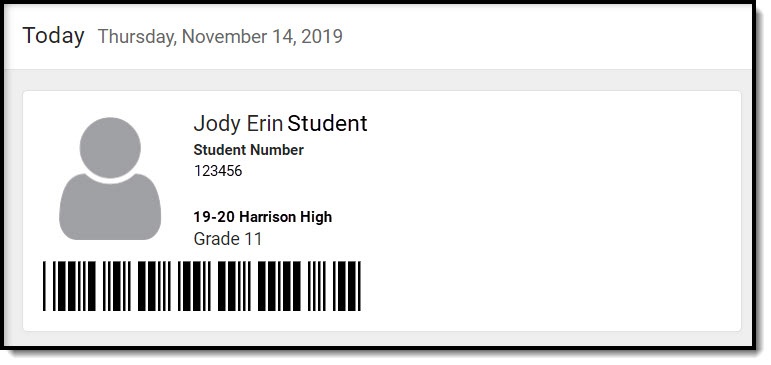
Displays a barcode of the student number after the student logs in. The barcode can be used for attendance scanning as part of the Campus Workflow Suite. This option is only available for districts who have purchased the Workflow suite.
Point of Sale customers who set their student's PINs to be the same as their Student Number can use this feature. If student PINs are the same as their student number, a terminal with a 2D scanner can read the student's barcode from their mobile device and process the transaction. This feature eliminates the need to distribute a paper barcode and allows contactless payment. |
Click to enlarge |
Previous Version
Insert topic article here.
Requests by Teachers for Future Year
The Teacher Course Requests tool allows a teacher to recommend which course students in sections they teach should take next year.
Tool Search: Course Requests
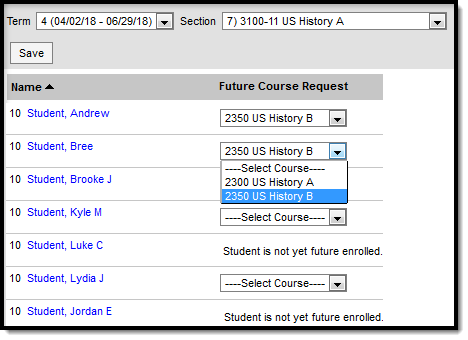
The Teacher Course Requests tool allows a teacher to recommend a course for any student in their course section, eliminating the paper process of a student gaining approval for moving to the next course available or to an advanced placement course. Course requests are applied to the next calendar and are entered into the current calendar. To enter course requests for the next year, calendar and enrollments must be rolled forward.
Course Requests
Course Requests are similar to Student Course Recommendations. The difference is that recommendations are used in academic planning whereas course requests are used in scheduling.
Course Requests record a teacher's permission for a student to take another course at the same school, courses which appear in the student's Walk-In Scheduler and are created based on Scheduling Rules. In comparison, recommendations suggest courses for future school years in the student's Course Plan.
Using this tool requires additional setup not done by teachers.
See the Instruction Tool Rights article for information on available tool rights.
Enter Requests
The student list populates based on the roster of the Section selected in the Campus toolbar. Dropped students display in red text if the Account Setting is set to include them.
Available requests appear in the dropdown list for each student who has an enrollment in the future calendar.
- Select a course from the dropdown list. Options include courses in the next calendar that match the course Name, Number, and School.
- Click Save when finished.
Requested courses display in the Request List on the student's Walk-In Scheduler and in the student Portal in Registration.
Additional Information
- Requests entered for the student by an administrator (counselor, principal, etc.) will not be editable by the teacher.
- "Elective Request" displays next to courses requested by the student. Teachers can modify these requests.
Setup
This section provides information about setting up course requests. This process is not done by teachers and is provided here as background information to understand the full Course Requests process. For complete information on this process, see the Teacher Course Requests and Course Recommendations.
Before teachers can record requests for students, the course must be set up to allow them. Mark Allow teacher requests/recommendations on the Course tab to enable.
Before/After Course Rules must also be established in the current year's calendar to use Course requests.
The Course Requests tool in Campus Instruction allows teachers to determine the next course each student should take during the next school year. This video demonstrates how to enter course requests for students in a course section.
Multi-Year Academic Planning
Academic Planning tools in Campus allow districts to map out and track student progress towards graduation. Part of the mapping process is establishing which courses students on a given program are required to take each year. See the document below for more information on Multi-Year Academic Planning. Additional information is available in the Academic Planner study guides.
Tool Search: Academic Planning
Academic Planning allows schools to create an academic plan encompassing a student's entire high school career, as well as track a student's progress toward graduation. This typically includes 8th-grade students moving into 9th grade all the way through their senior year, but can be used for grade levels Kindergarten through 12th grade.
Academic Planning (Student Information) includes the following tools:
Best Practices and Things to Know
It is not required to use Academic Planning functionality, but if you do, there are certain things to consider. The articles linked in the Tools column below contain a Best Practices section for these considerations.
- Academic Planning considers all enrollment types.
- Only one credit group is allowed per academic program.
- The Credit Summary report can only be generated from the student's Credit Summary tab. However, this information can be viewed on the student's Transcript, by building an Ad Hoc filter or generating other Grading and Standards Reports.
- Course Catalogs used in different schools (for example, middle school and high school) should have unique course numbers.
- Terms must be entered in Course Information in order for course Progress information to display correctly for students.
- The Course Plan tool is used by counselors to populate the student's academic plan. Students can see this academic plan on their Academic Planner in the Portal. In turn, counselors can see the student's changes on the Academic Planner by viewing the Course Plan tool.
- If a student is scheduled (has a roster entry) into a course, grades for that course must be posted to the transcript using the Transcript Post tool. Grades may not be manually entered.
Academic Planning Prerequisites
The following areas must be appropriately established in order to properly use the Academic Planning tools:
Done | Task |
|---|---|
Establish Credit Groups. This is a list of credits a student can earn based on completion of grading tasks or achieving a certain level of scores. Credit Groups define what credits have been earned and under what group earned credits fall. | |
Create Graduation Programs and/or Academic Programs. Creation of these programs includes any combination of the following:
See the appropriate Programs article for detailed guidance on creating Graduation and Academic Programs. | |
Assign programs to students. This can be accomplished manually (one student at a time) on the Academic Planning Programs tab or through the Batch Assignment Tool. |
Academic Planning Workflow
Before beginning this process, gather the necessary documents for:
- State Graduation Requirements
- District Graduation Requirements
- Course Requirements
- Course Prerequisites
- School Course Catalog
- Student Handbook
Also, verify and/or assign tool rights for appropriate staff.
Task | Campus Location | |
|---|---|---|
Curriculum Director | ||
1. | Set up Credit Groups and Credit Types. | Grading and Standards > Credit Groups |
2. | Create Course Masters and Course Catalogs. | Grading and Standards > Course Masters Grading and Standards > Course Catalogs |
3. | Set Credit Overflow Override on the Course Grading Task or on the Course Master Grading Tasks. | Scheduling > Courses > Grading Task Grading and Standards > Course Masters > Grading Task |
5. | Review the Transcript Report Preferences. | System Administration > Preferences > Reports > Transcript |
6. | Scheduling > Courses > Course Rules > Planning Rules | |
7. | Set Course Editor checkboxes related to Academic Planning. | Scheduling > Courses > Course |
8. | System Administration > Calendar > Calendar Wizard > Create New Calendars by Rolling Forward | |
9. | Create an ad hoc report to see Course Rule information. | Ad hoc Reporting > Filter Designer |
10. | Create Graduation Program(s): | Student Information > Program Administration > Academic and Graduation Programs |
Create Academic Program(s): | Student Information > Program Administration > Academic and Graduation Programs | |
Counselor | ||
11. | Assign academic programs to students, either manually or in batch. When the program has been assigned:
| Student Information > Academic Planning > Programs Program Admin > Batch Assignment Tool |
Campus Administrator | ||
12. | Mark the Academic Planner to display in the Portal/Campus Student. | System Administration > Portal > Preferences > Display Options |
Student and Parent/Guardian | ||
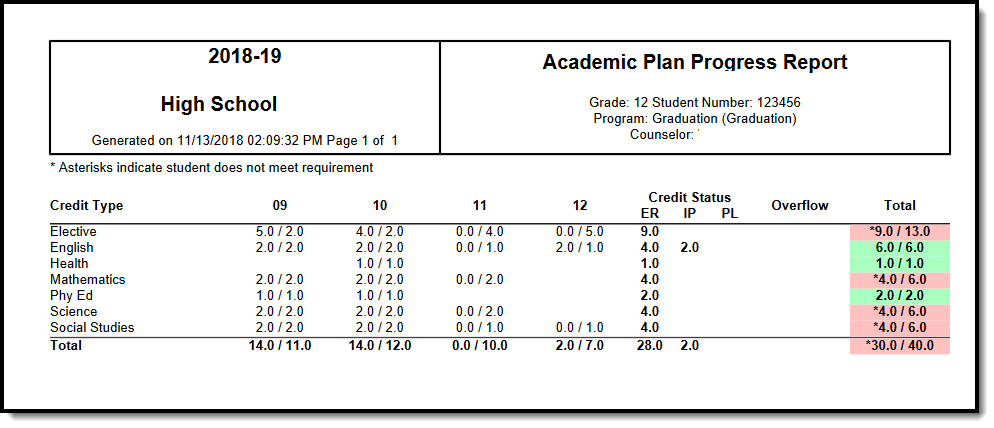
13. | Review progress toward graduation in the Portal | Portal > Academic Progress |
14. | (Student) Create or update the academic plan in the Portal (Parent) Review and approve the child's academic plan in the Portal | Portal > Academic Planner |
15. | Print the Academic Plan Progress report. | Portal > Academic Planner |
Counselor | ||
16. | View the student's approved course plan. Work with the student to establish a course plan for the coming year of enrollment.
| Student Information > Academic Planning > Course Plan |
17. | Calculate the student's on-track status. | Program Admin > Course Plan Admin |
18. | Generate the following reports to assist in the management of student academic plans: | Program Admin > Reports > Academic Plan Status Report Program Admin > Reports > Academic Plan Progress Batch Program Admin > Reports > Course Plan Batch |
Teacher | ||
19. | Campus Instruction > Student Course Recommendations | |
Counselor | ||
20. | Prepare for scheduling students into courses for the next school year by:
| Program Admin > Programs Program Admin > Course Plan Admin Scheduling > Reports > Course Projections |
21. | Post diplomas for graduating students. | Program Admin > Course Plan Admin |
22. | Reset course plans for future changes by:
| Program Admin > Course Plan Admin |
Ad hoc Information for Academic Planning
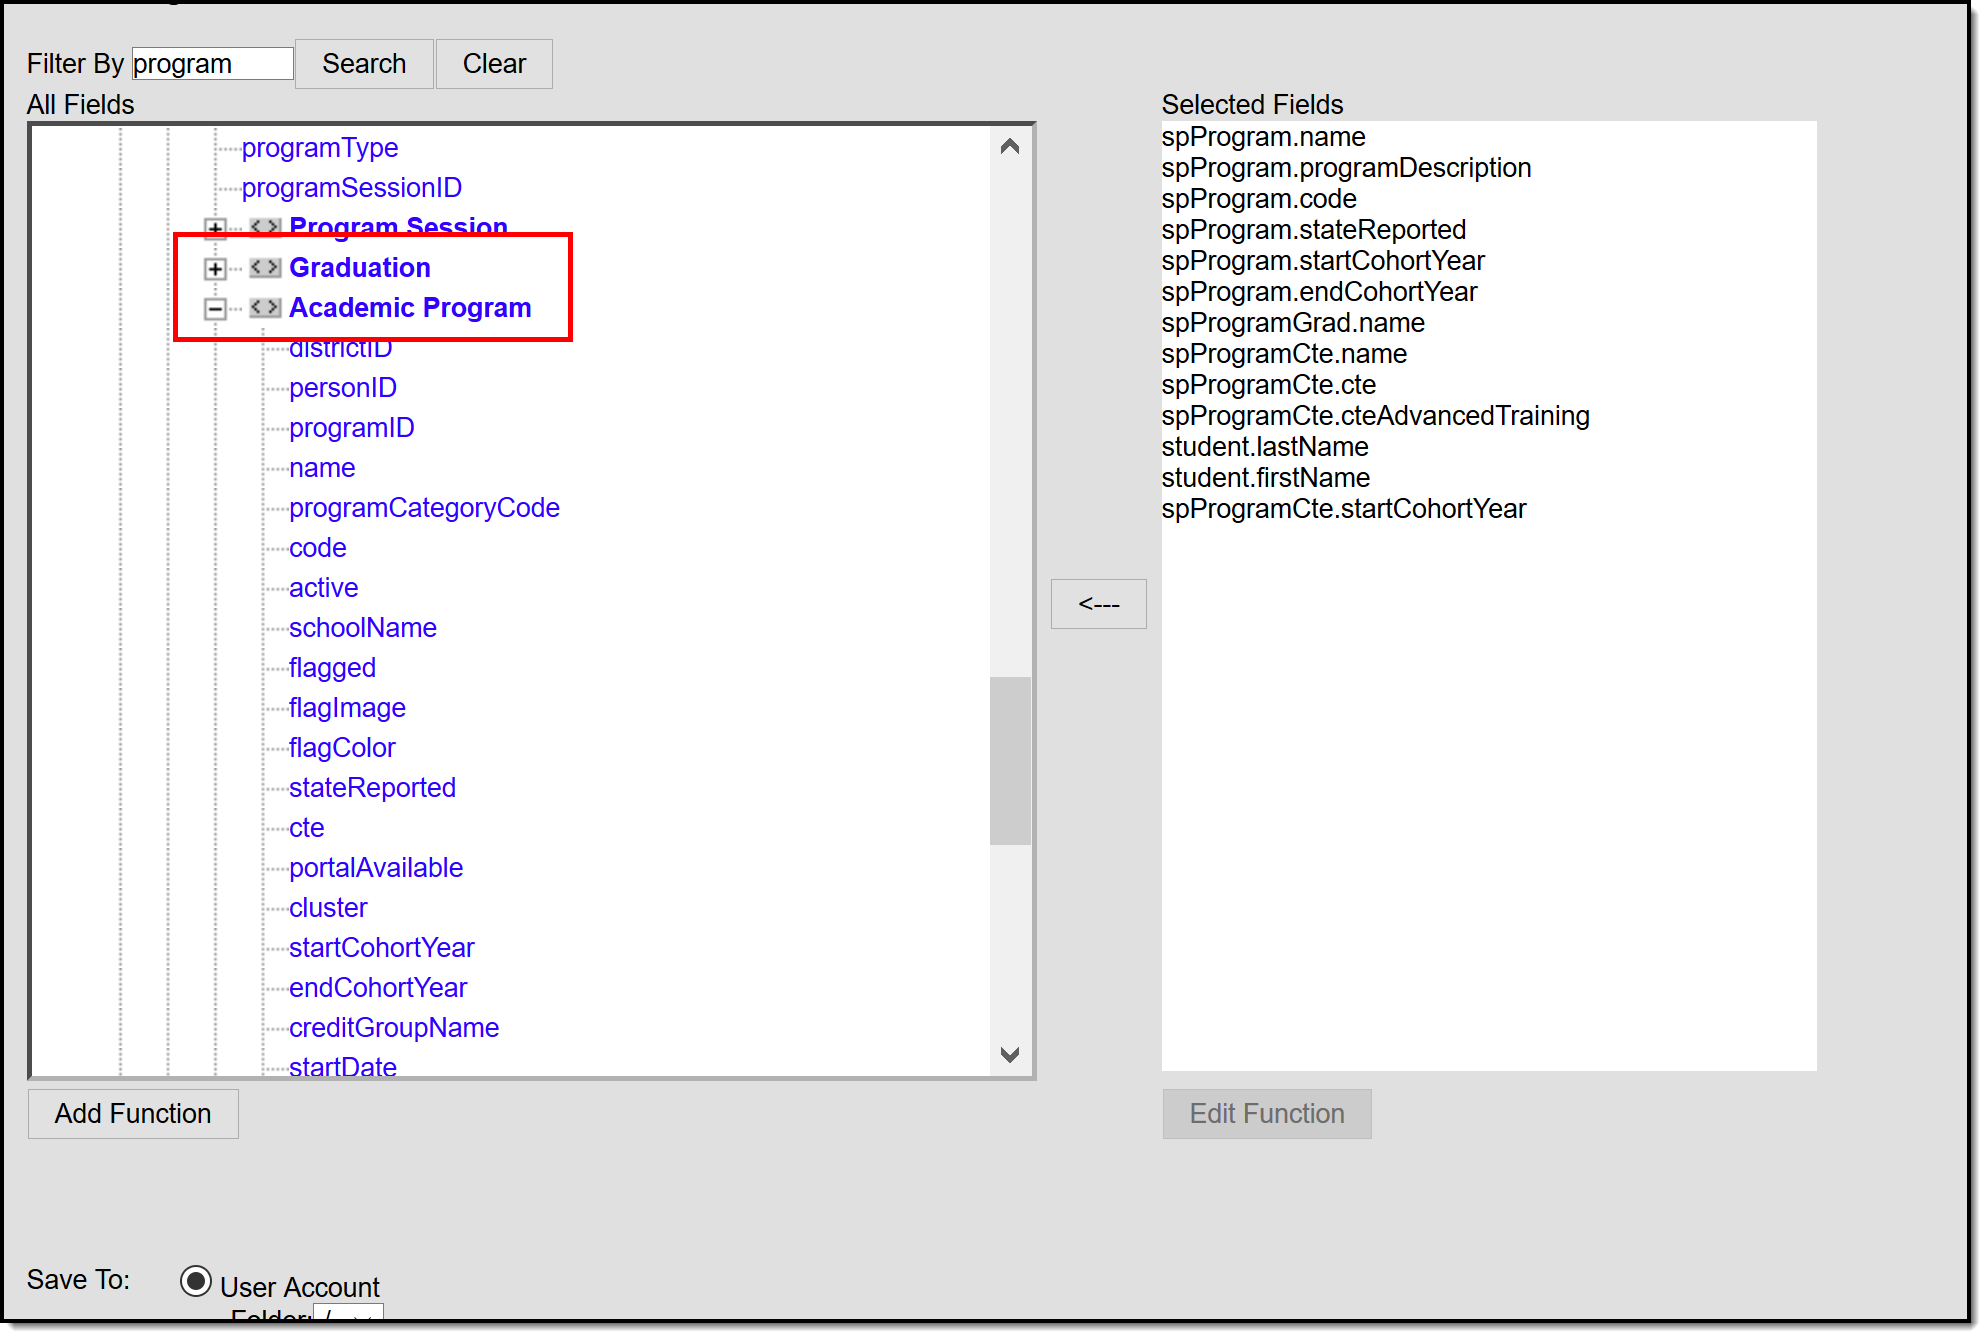
Demographics information is available in the Query Wizard for Student Data Type filters. Fields can be selected from the following locations:
- Student > Learner > Programs/Flags: This section includes fields related to Programs (those not related to Graduation or Academic Programs) and Flags assigned to the student.
- Student > Learner > Programs/Flags > Graduation: This section includes fields related to assigned Graduation Programs.
- Student > Learner > Programs/Flags > Academic Program: This section includes fields related to assigned Academic Programs (formerly Career Tech Programs).
Create and Use Scheduling Groups (Teams)
Scheduling Groups, or Teams, can be created and used to mass-request courses and mass-schedule students based on team assignment. Follow the links in the documentation below to learn how to create teams, assign students to teams, assign teams to course sections, and fill teams.
Tool Search: Scheduling Group
The Team (Scheduling Group) Setup tool allows schools to create teams for use in scheduling students in appropriate courses. The team is assigned to the student on the Schedule tab when viewing the Walk-In Scheduler and is assigned to Course Sections. This group also prints on the Schedule Report.
In the Scheduling Board, Scheduling Groups (also called Teams) can be assigned to Course Sections by right-clicking on the placed section and choosing the Scheduling Group. On the Fill Teams Wizard, students will be assigned to courses based on the teams. This is often used in middle schools or elementary schools.
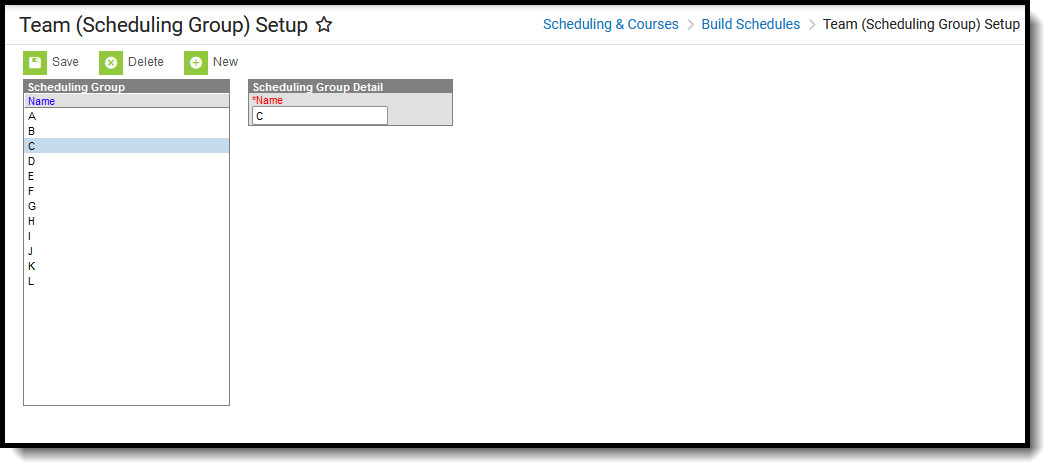 Scheduling Group Setup Editor
See the Team (Scheduling Group) Setup Tool Rights article for information about rights needed to use this tool.
Create Scheduling Groups
- Select the New button from the Action Bar. A Scheduling Group Detail editor displays.
- Enter the Name of the scheduling group.
- Click the Save button when finished.
Delete and Edit Scheduling Groups
Scheduling Groups can be deleted as long as they are not assigned to Course Sections. Once deleted, all information related to that group is also deleted.
Names of Scheduling Groups can be renamed at any time. Renaming a group will update the team assignment on the student's Walk-In Scheduler.
Tool Search: Fill Teams
The Fill Teams Wizard assigns scheduling groups (teams) to students after the scheduling process is complete. It is designed to be used AFTER scheduling is complete and prior to the start of the school year. Once that is completed you can use it again for incoming students by selecting fill empty option, but the override option is not intended to look at current rosters where students have ended and moved to others and update the team records
The following must be done prior to using the Fill Teams Wizard:
- Scheduling Groups must be created in the calendar in order to assign the groups to the students.
- Scheduling Groups must be assigned to the Course Sections.
- All scheduling for the next school year must be complete. This includes scheduling done via the Scheduling Board and scheduling done using the Walk-In Scheduler tool.
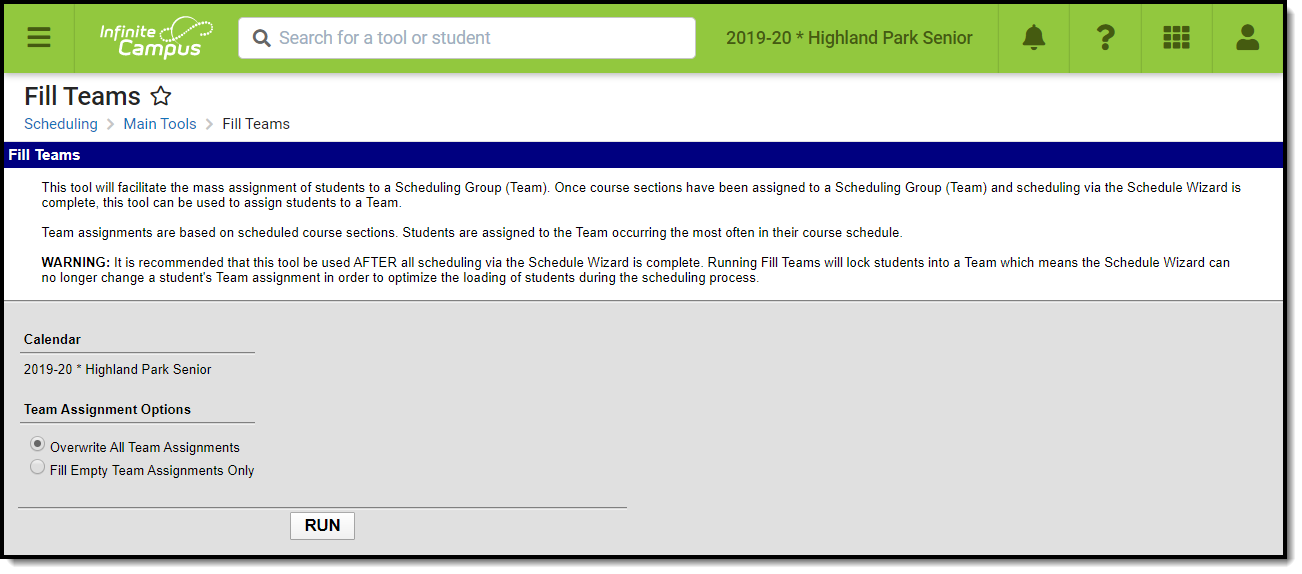 Fill Teams
See the Fill Teams Wizard Tool Rights article for information about rights needed to use this tool.
The Fill Teams wizard requires a calendar to be selected from the Campus Toolbar. While no warning displays indicating a calendar needs to be selected, the wizard does not assign teams without a calendar selected.
Fill Teams Wizard Details
Users can assign scheduling teams using one of the following options:
Wizard Options | Description and Logic |
|---|---|
Overwrite All Team Assignments | When this option is chosen, all existing team assignments are deleted and new teams are inserted depending on the course sections into which the student is scheduled. |
Fill Empty Team Assignments Only | When this option is chosen, teams are assigned to students who do not currently have an assigned team. All existing team assignments remain as is. The chosen team depends on the course sections into which the student is scheduled. |
A Scheduling Team is assigned to a course section on the Course Section editor.
The team to which the student is assigned displays on the student's schedule when viewing the course sections where the team is assigned and when searching for courses to add to a student's schedule.
The Team is also displayed between Gender and Counselor in the student header.
Use the Fill Teams Wizard
- Select the appropriate Year, School and Calendar from the Campus toolbar.
- Select the appropriate Team Assignment Option mentioned above.
- Click the Run button. Teams are assigned to students based on the selected Team Assignment options. When complete, a message displays indicating how many team assignments were updated and/or assigned.
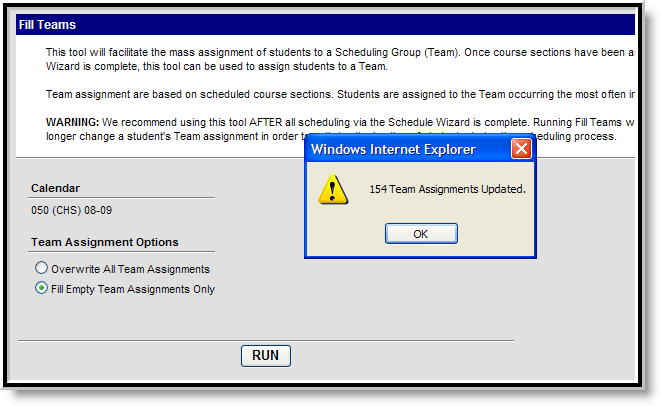 Fill Teams - Assignments Updated
Reports
Here are some reports that are commonly used to analyze student requests.
Request Batch
Schools may wish to print a copy of each student's requests to give to them after the requests have been made. Use the Request Batch report to batch print student course requests.
Tool Search: Request Batch
The Request Batch Report prints a list of student requests, one page per student for the selected calendar in the toolbar. It can be given to students if necessary.
 Request Batch Report
See the Scheduling & Courses Reports Tool Rights article for information about rights needed to use this tool.
Report Logic
The report returns course requests for the currently active trial and lists both required courses, requested courses, and any alternate courses. These are determined, as noted on the student's Walk-In Scheduler.
When courses are requested through the Course Registration process, they are given a type of E (Elective). When courses are entered by the counselor on the Walk-In Scheduler, they are given a type of R (Required). However, the Type can be changed on all requests, regardless of how they originated, using the Walk-In Scheduler.
When multiple students have the same name, the middle name and personID fields are used to determine the order in the report.
Report Editor
Field | Description |
|---|---|
Ad hoc Filter | Selecting an ad hoc filter returns requests for only those students included in the ad hoc filter. |
Grade | Selection returns students in the selected grade level based on their current enrollment. Select either All Students to generate the report for every student in the selected calendar, or a specific grade level. |
Sort Options | The report can be sorted in three ways:
|
| Course Display Option | Select how the report should group the requested course information:
|
| Report Comments | Enter any text (up to 250 characters) that should be communicated to the students and parents/guardians about this list of courses. This could be instructions on returning the report to the students' guidance counselors or information on the timeline of schedules for the next school year. Note that any text entered here prints on ALL pages of the report. This comment displays before the list of courses. |
| Report Format | The report can be generated in either PDF or DOCX format. |
Teacher Sort Options These options only display when using the Teacher Student Sort Options selected above. | |
| Calendar Used for Sort | Selection indicates from which calendar the teacher schedule is pulled. This option matches the School and Year selected in the Campus toolbar, but can be modified if needed. For example, the report is generated for course requests entered into the future 2019-20 calendar selected in the Campus toolbar, but it is to be handed out to students in Period 2 of the current 2018-19 calendar. |
| Schedule Structure | Selection indicates from which schedule structure the teacher schedule is pulled. If the selected calendar does not have multiple schedule structures, the field still displays with the selection of Main. This is how the Calendar setup tools name schedule structures. |
| Effective Date | Determine the date from which to base the teacher sort options. The entered date is used to build the correct roster list for the teachers. |
| Period | Selection indicates the period in which the reports are handed out and uses the roster information from the selected period. |
Generate the Report
- Select an Ad hoc Filter to return students in that filter.
- Or, select All Students or a specific Grade Level from the dropdown list.
- Select the desired Sort Options.
- Select the desired Course Display Options.
- Enter any desired Report Comments that print on ALL pages of the report.
- Select the desired Report Format.
- If sorting by Teacher, make the desired selections in the Calendar Used for Sort, Schedule Structure, Effective Date, and Period fields.
- Click the Generate Report button.
This report is just a reference for the student and parent/guardian. A final list of courses for the next school year may not be decided until closer to the end of the current year or even closer to the beginning of the next school year.
Requested courses in bold text are considered priority requests because of the student's assigned academic program. Once planned courses have been created as course requests, those courses are considered a priority and display in bold.
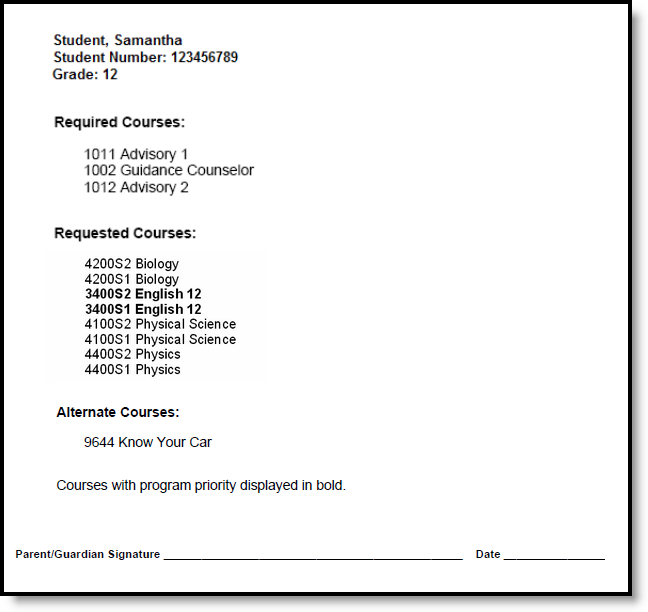 Request Batch Report - All Students, Alphabetical, Requests Grouped as Required, Elective or Alternate
Request Conflicts
The Request Conflicts report shows where students have course requests that potentially conflict with each other.
Tool Search: Request Conflicts
The Request Conflicts Report provides a list of courses that have scheduling issues with another course when a student has requested both courses and how many student requests are in conflict. The report displays course pairs where a student has requested both courses.
 Request Conflicts Report
See the Scheduling & Courses Reports Tool Rights article for information about rights needed to use this tool.
Report Logic
The Request Conflicts Report uses entered student requests to determine where that student may have a potential scheduling conflict. Courses considered required that meet every period display on the report as conflicting with every other course.
This report only looks for sections already placed on the Master Schedule, not the Sections to Build value.
Report Editor
The following defines the report options available on the Report Editor.
Field | Description |
|---|---|
Limit Courses | Selection limits report results to the option selected, as follows:
When Any Number of Sections is selected, all potential course request conflicts are listed, regardless of how many sections exist. When any other Limit Courses options are selected, the Limit Courses logic applies to both sides of the comparison courses when looking for conflicts, not just the department or courses of focus in the department or Courses selections.
|
Department | Selection returns course information for courses assigned to the selected department. If departments are not assigned to courses (created in System Administration on the Departments tool and assigned on the Course editor), select courses instead. |
Courses | Selection returns course conflicts for the selected courses only. |
| Report Format | The report can be generated in either PDF or DOCX format. |
Report Generation | Two buttons are available for report generation:
|
Generate the Request Conflicts Report
For best results, limit the items selected on the Report Editor.
- Select the types of courses to include on the report in the Limit Courses dropdown list.
- Select the Department, if desired, from the dropdown list.
- Or, if not limited by Department, select the Courses to include in the conflict comparison.
- Select the desired Report Format.
- Click Generate Report to generate the report immediately, or use the Submit to Batch to choose when a report generates.
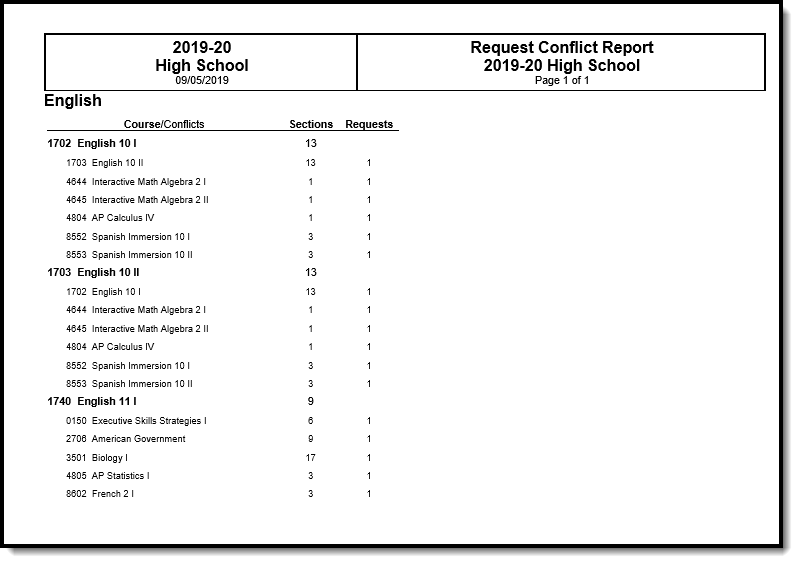 Request Conflicts Report - PDF Format
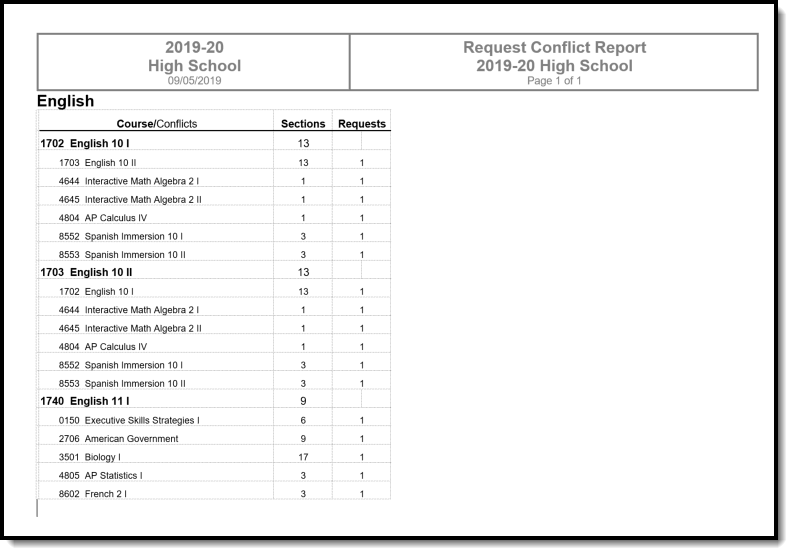 Request Conflicts Report - DOCX Format
Request Schedule Units
The Schedule Units report is used to find students who have not requested enough courses to fill their schedule.
Tool Search: Schedule Units Report
The Schedule Units Report shows a count of the number of units that can potentially be filled by a student's course requests. The report can be generated for all students, or filtered to only those students who have not requested enough courses to fill their schedule.
- The number of units for a full schedule is calculated using the number of periods in each period schedule that is in use, multiplied by the number of terms in which they are assigned in the selected calendar in the Campus toolbar.
- The number of units that each course can fulfill is determined by multiplying the values entered into the Terms, Schedules and Periods fields on the Course Editor.
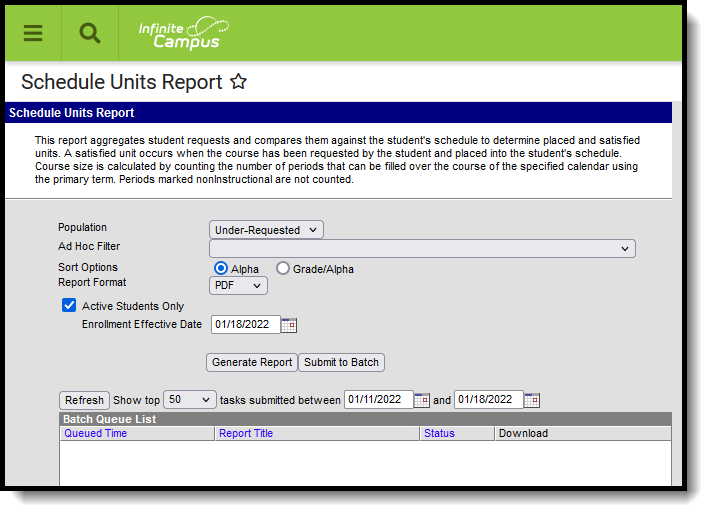 Schedule Units Report
More information on Schedule Units is available in the Walk-In Scheduler article.
See the Scheduling & Courses Reports Tool Rights article for information about rights needed to use this tool.
Report Editor
| Option | Description |
|---|---|
| Schedule Structure | An indication of which schedule structure must be made prior to generating the report. This option only displays when the selected calendar has multiple schedule structures. |
| Population | Choose either the Under-Requested option, which reports only those students who have not requested enough courses for a full schedule, or choose the All Students option, which reports students who have not requested enough courses plus students who have requested enough courses. |
| Ad hoc Filter | Select a previously created ad hoc filter that includes specific students. When a filter is chosen, only those students included in the filter are included on the report when they meet the other reporting requirements chosen. |
| Sort Options | The report can be sorted by Alpha (by name) or by Grade/Alpha (numerically by grade level, then alphabetically by name). |
| Report Format | The Schedule Units Report can be generated in either PDF, DOCX or CSV format. |
| Active Students Only | When marked, only students who have a current enrollment record (enrollment record does not have an end date) are included in the report. When this checkbox is not marked, both active and inactive enrollment records are included in the report. |
| Enrollment Effective Date | Indicates the date by which enrollment records are considered active. Enrollment records must have a start date before or on the entered date and must have an end after or on the entered date. If the Active Students Only checkbox is not marked, the date in this field cannot be modified. |
| Report Generation | Two buttons are available for report generations:
|
Generate the Report
- If applicable, select the desired Schedule Structure from the dropdown list.
- Select the desired report Population - Under-Requested or All Students.
- Select the desired ReportFormat.
- If desired, select an Ad hoc Filter that includes a set of students. This isn't a required selection.
- Select the desired Sort Option.
- If desired, mark the Active Students Only checkbox and enter an Enrollment Effective Date.
- Click the Generate Report button to display the results of the report immediately, or use the Submit to Batch button to choose when the report generates.
The report displays in the selected format, listing the student, the student's grade level, student number and the number of requested units. It also indicates the number of units for a full schedule.
- The number of Requested Units is the same total that displays when viewing Student Requests on the Walk-In Scheduler as Requested Units. It is found by multiplying the number of periods times the number of period schedules times the number of terms for requested courses.
- The number of Placed Units is the number of populated periods as viewed on the student's schedule.
- The number of Satisfied Units is the number of filled units where the scheduled course equals the requested course. This is matched on the course number and is only counted if the course request has a type of E or R.
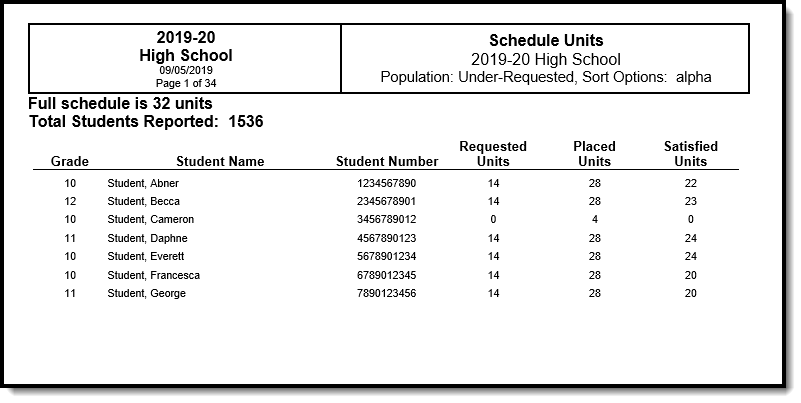 Schedule Units Report - PDF Format
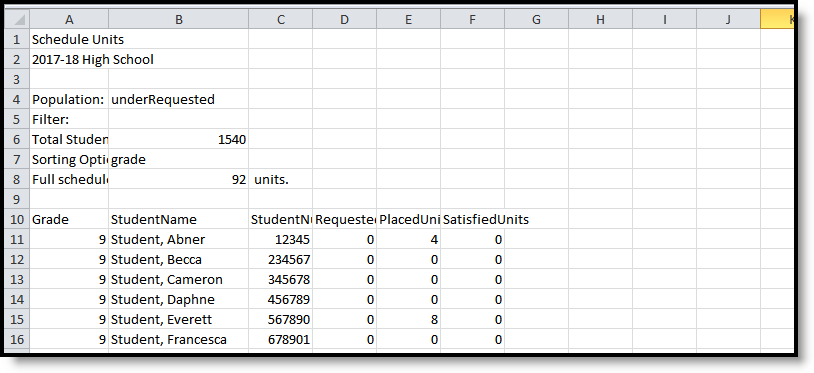 Schedule Units Report - CSV Format
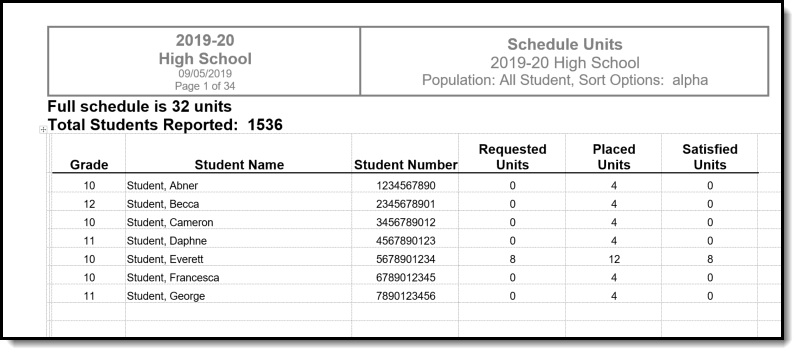 Schedule Units Report - DOCX Format
Request Detail
The Request Detail report displays information about requests for each course, including student names and grade levels and whether the requests are Required, Elected or Alternate.
Tool Search: Request Detail
The Request Detail Report returns student course request information for the upcoming school year. The report uses information entered by either counselors, teachers or students when planning the course schedule for the next school year. Requested courses can be viewed from the student's Schedule tool in the Walk-In Scheduler.
The report can be sorted by student last name or by grade of enrollment, then alphabetical by last name. Students who have ended enrollment in the current school year and have entered course requests are included.
 Request Detail Report
See the Scheduling & Courses Reports Tool Rights article for information about rights needed to use this tool.
Report Editor
Field | Description |
|---|---|
| Schedule Structure | When the selected calendar contains multiple schedule structures, an indication of which schedule structure must be made prior to generating the report. |
| Request Type | Selection indicates which type of course requests are included in the report - Required, Elected or Alternate. Required and Elected request types are automatically selected. Choosing All returns required, elected and alternate course requests. Course requests made by or for a student are assigned a request type of Required, Elected or Alternate. These are request types only, separate from and not related to the types of courses being selected.
|
| Display Only Active Courses | When marked, only courses that are currently active are listed for selection. When not marked, both active and inactive courses are available for selection. Active courses display first; inactive courses display after the active courses and are in red text with an asterisk before the course number. An Active Course is defined as a course that is not yet dropped, which has one of three impacts, depending on the context of the course:
|
Department | Returns request information for each course assigned to the selected department. If departments are not assigned to courses (created in System Administration on the Departments tool and assigned on the Course editor), select a course instead. Either a department or a course can be selected. |
Course | Lists all courses within the calendar selected in the Campus toolbar, and are sorted in course number order. Depending on the selection of the Display Only Active Courses checkbox, both active and inactive courses are listed. Inactive courses display in red text with an asterisk before the course number. Either a department name or a course can be selected. |
| Ad hoc Filter | Selecting an ad hoc filter returns course request information only for those students included in the Filter. |
Sort Options | The report can be sorted either alphabetically (Alpha) by the student's last name or numerically by grade level, then alphabetical (Grade/Alpha) by the student's last name.
|
| Prepare report for duplex printing | Allows the report to print on both the front and back side of the paper.
Print options for printing from the web browser still need to be set to print both sides, whether this checkbox is marked or not. |
| Report Format | Determines the layout of the report, either in DOCX, PDF or CSV format. |
Report Generation | Two buttons are available for report generation:
|
Generate the Report
Select a Year, School, and Calendar from the Campus toolbar to populate the Department and Course lists.
- If applicable, select the applicable Schedule Structure.
- Select the desired Request Types.
- Mark the Display Only Active Courses checkbox to only see the active courses for selection and reporting, if desired.
- Select the Department for which to review course requests. Or, select the Courses for which to review course requests.
- Narrow the students included in the report by choosing an Ad hoc Filter.
- Determine the appropriate Sort Options.
- Mark the Prepare report for duplex printing checkbox, if desired.
- Select the Report Format in which the report should generate - CSV, PDF or DOCX.
- Click Generate Report to generate the report immediately, or use the Submit to Batch to choose when a report generates.
Students who are assigned an Academic Program with a priority requirement display in bold text
Note the following about the print view of the report:
- Courses are listed in department order. Active courses without a defined department print first; then inactive courses without a defined department.
- When the duplex printing checkbox is marked, a blank page (no student information) is included between department names.
- Inactive courses print in red text with an asterisk when generating in PDF. This is also noted in the Legend at the top of the report.
- Students with longer names wrap to fit within the course section.
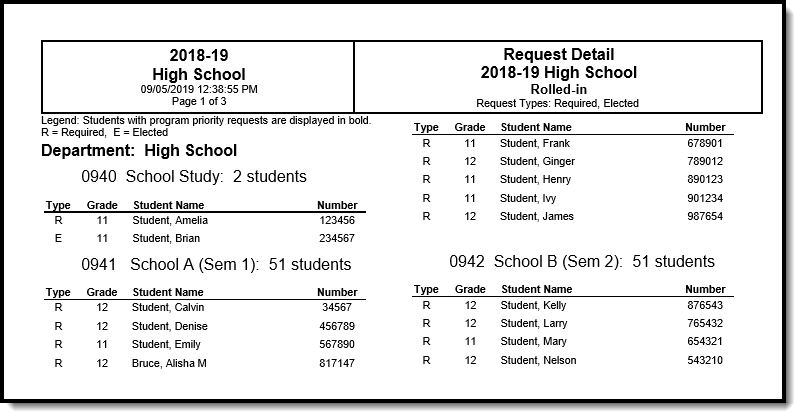 Request Detail Report, PDF Format
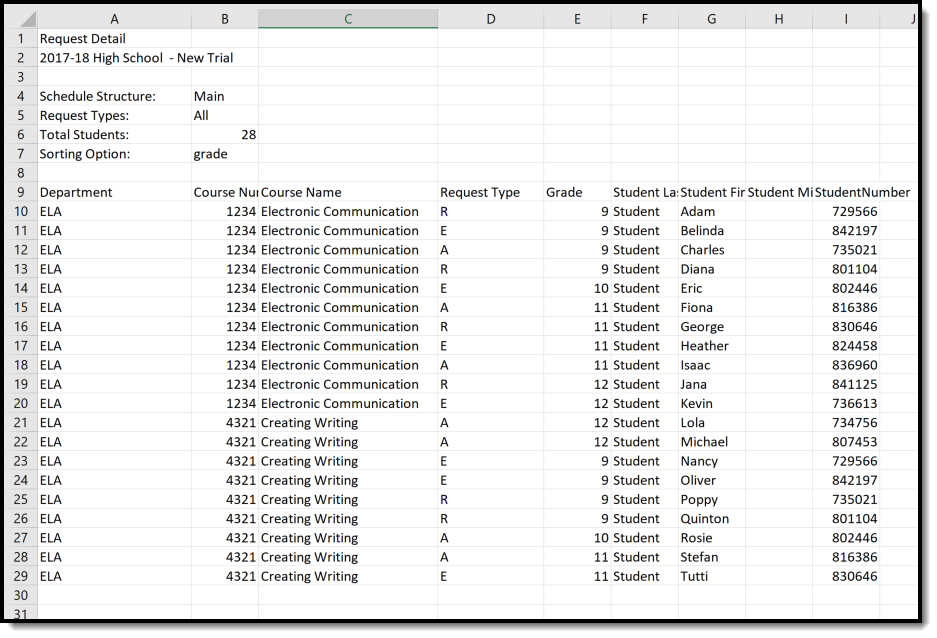 Request Detail Report, CSV Format
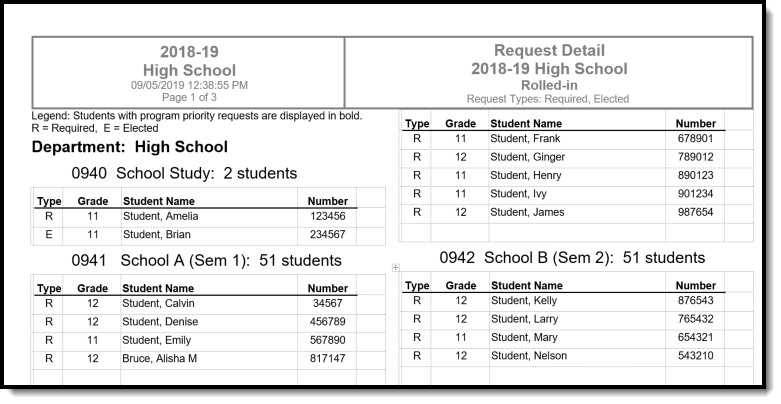 Request Detail Report, DOCX Format
