Document Upload Options

This documentation only applies to the Online Registration Prime version.

Classic Path: Census > Online Registration > OLR Set Up > Document Upload

Search Terms: Document Upload

The Document Upload functionality for Online Registration allows for a district to choose where the uploaded documents will be uploaded to within Infinite Campus once the application is approved and posted.

These are the four default document upload options that Infinite Campus has created for districts:

  • Immunization record
  • Transcript/Report Card
  • Proof of Residency (i.e. Utility Bill)
  • Birth Certificate. 

A document such as a utility bill will be uploaded for each student in the application upon posting.

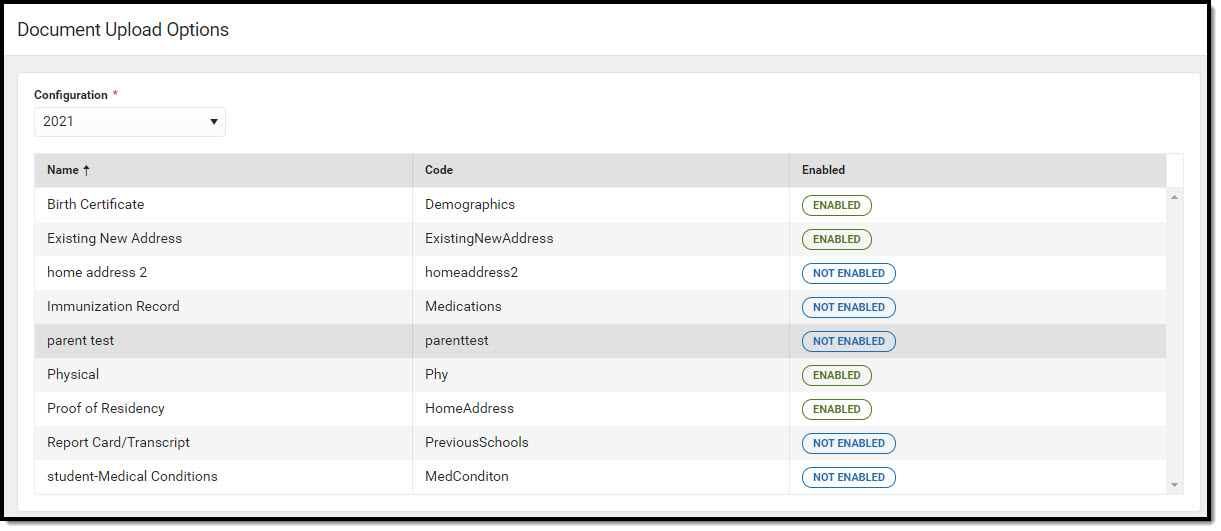
Document Upload Options List Screen

To use this functionality, a district must have had to agree to the terms of use within the Digital Repository preferences area.

Online Registration Workflow

This article is for Campus Online Registration (OLR) and Campus Online Registration-Prime (OLR Prime).

    
Step Campus Location
OLR
OLR Prime
Calendar and Enrollment Management
1 Create calendars for the next school year

Scheduling & Courses > Calendar Setup > Calendar Wizard

X X
2 Roll enrollments forward for the next school year. Student Information > General Student Administration > Enrollment Roll Forward X X
3 Review the grade levels associated with each calendar, and if desired, mark the Exclude from Online Registration Calculations checkbox. Scheduling & Courses > Calendar Setup > Grade Level Setup X X
Online Registration Setup
4

Add Languages.

System Settings > Online Registration Setup > Language Groups X X
5 Enter language translations that display on Online Registration panels. System Settings > Online Registration Setup > OLR Literals Bank X X
6 Enter language translations that display on Online Registration panels in the dropdown lists. System Settings > Online Registration Setup > OLR Lists Bank X X
7 Create letters to send to parents announcing acceptance or denial based on their applications. Reporting > Ad hoc Reporting > Letter Designer  X X
8 Create approval/denial statuses. System Settings > Online Registration Setup > OLR Status X X
9 System Settings > Online Registration Setup > OLR Setup X X
10 Enable the Online Registration Portal outline link for the active date range on the OLR Setup. System Settings > Custom Data and Links > Custom Tool Setup X X
11 Select OLR System Settings. System Settings > Online Registration Setup > OLR System Settings X X
12 Enter registration dates for each school. System Settings > Online Registration Setup > Registration Window by School
X
13 Set Document Upload Options. System Settings > Online Registration Setup > Document Upload
X
14 Modify fields that appear on pleats using the OLR Builder.
(OLR version has limited functionality.)
System Settings > Online Registration Setup > OLR Builder X

X
15 Create Notifications. System Settings > Online Registration Setup > OLR Notification Editor
X
16 Reference the OLR Information Center to view links to OLR tools. System Settings > Online Registration Setup > OLR Information Center X X
17 Create application queues. System Settings > Online Registration Setup > OLR Queue Setup
X
18 Modify application queues. Census > Online Registration > OLR Queue Applications
X

19

Review the Configuration List Editor to verify the appropriate options are in the dropdown lists. System Settings > Online Registration Setup > OLR Configuration List Editor X X

Student Application Entry

These articles are intended for the parents/guardians entering the registration information. All articles can be saved as a PDF and given to the parent, or made available on the district website. See the Enter Applications article for information on accessing OLR and other important information. 

20 Enter Household Information. Portal > Online Registration > Household X X
21 Enter Parent/Guardian Information. Portal > Online Registration > Parent/Guardian X X
22 Enter Emergency Contact Information. Portal > Online Registration > Emergency Contact X X
23 Enter Other Household Children. Portal > Online Registration > Other Household (non-enrolled children) X X
24 Enter Student Information. Portal > Online Registration > Student X X
25 Review and complete student registration. Portal > Online Registration > Completed X X
Process and Analyze Applications
26 View applications that have been submitted by year or school and by status. Census > Online Registration > OLR Dashboard X X
27

Search for applications by status and begin review and approval of them.

Census > Online Registration > Staff Processing, Student Processing, Health Processing, Parent Information X X
28 Run the OLR Summary.

Census > Online Registration > OLR Summary

X X
29

Merge list options from the List Bank Replacer from the OLR database into Campus.

System Settings > Online Registration Setup > OLR List Bank Replacer X X
30

Merge list options from the List Value Updater from the OLR database into Campus.


System Settings > Online Registration Setup > OLR List Value Updater
X
31 When necessary, mass re-post registration data. System Settings > Online Registration Setup > Mass Re-Post Applications
X
32 Review the Data Change Tracker tools to track OLR information being added to Campus. System Settings > Data Change Tracker X X

Document Upload Options

Select an existing record or click New to view the Document Upload Options detail.

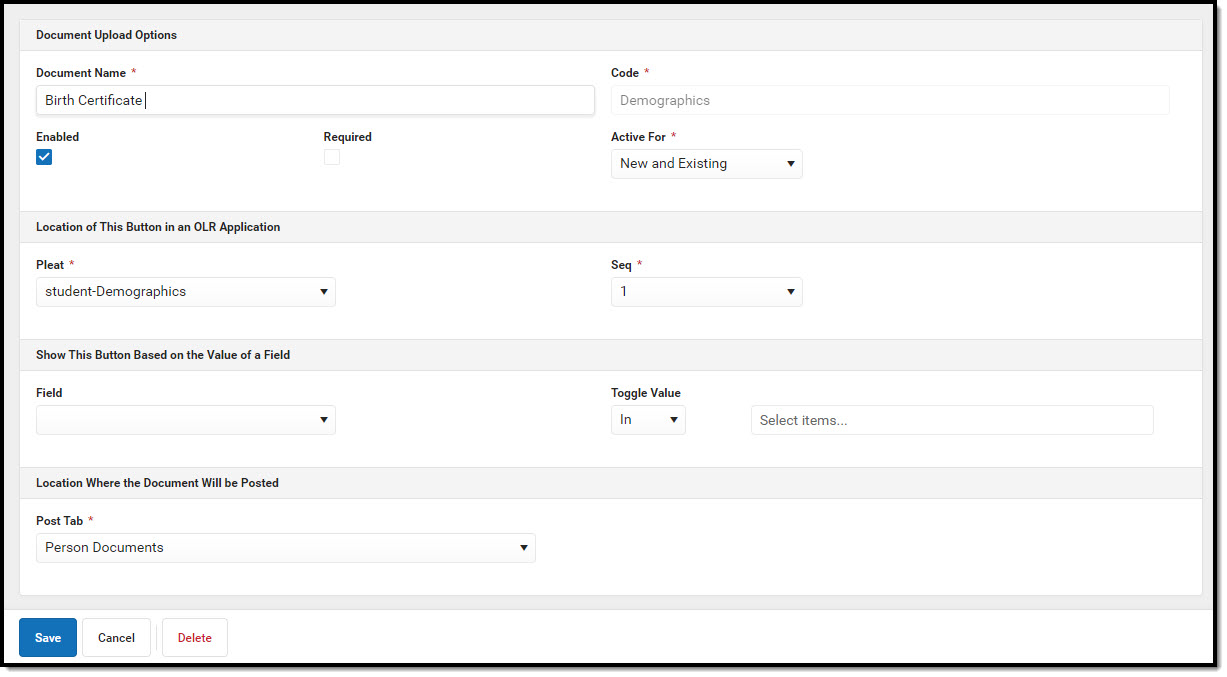
Document Upload Options Detail Screen

ElementDescription
Document Name
Required
The name of the document. 
Code
Required
Identifies the document once it's uploaded. This is usually the same name as the document or its location in the application. Only letters, numbers, and the underscore character may be entered in this field.
EnabledThis enables this kind of document to be uploaded during Online Registration. 
Required

When this is marked, every Online Registration application requires the uploaded document.

Best practice for this field is to NOT require a document to be uploaded, as not every parent would have the ability or knowledge to do this.

Active For

Required
 

Denotes when the document is active. Options include New, Existing, or New and Existing.

  • When Existing is selected, applications can be submitted through the Campus Portal for the active years.
  • When New is selected, applications can be submitted via the kiosk and email links.
  • When New and Existing is selected, applications can be submitted through the Campus Portal for the active years, and applications can be submitted via the kiosk and email links.
Location of This Button in an OLR Application
Pleat
Required
The location of the upload document within a specific pleat on the application.
Seq
Required
When multiple document uploads are available on one pleat, choose the order in which the document upload buttons appear.
Show This Button Based on the Value of a Field
FieldThe field within the application that determines that appearance of the document upload button.
Toggle Value

The operation of the field. Options include: In or Not In.

Select items...The exact value of the field that will trigger the document upload button. Options available are dependent on the Field selected.
Location Where the Document Will be Posted
Post Tab
Required

When the digital repository is enabled, choose to what tab the document posts. Districts can choose to upload the document or choose to delete the document when the application is approved/posted.


Digital Repository preferences must be set for all of the tabs to show for the district.

See the Document Upload article for additional information on how to upload documents into Campus.