The Grade Book allows teachers to create assignments and enter scores for students assigned to their course sections. Additionally, the Grade Book provides a visual representation of student performance. This Study Guide will help you learn how to set up, navigate and begin utilizing the Grade Book.
Grade Book Overview
Understand Campus Grade Book
The Grade Book allows teachers to easily create assignments, enter scores, and track student progress. This document and video contain overview information about Campus Grade Book.
This article collects all of the articles available about the Campus Instruction Grade Book:
Settings Menu
- Grade Book Setup
- Grade Book Tools
- Other
- Preferences
Articles about Assignments
Click Library to view the Curriculum Library where you can add curriculum to your section that other teachers have shared. Click List to open the Curriculum List for this section.
Scoring and Score Analysis
The Grade Book includes a variety of tools designed to help teachers view and analyze their students' data in different ways.
- Options such as filtering and color-coding change the visual display of the Grade Book to highlight patterns in student performance and help teachers drill into specific problem areas.
- Other options display score data in a new way, such as sparkline graphs and box and whisker diagrams. Some analysis tools differ based on whether you are viewing a Grading Task that uses traditional scoring logic or a standards-based approach scored with rubrics.
- Finally, the Grade Totals section provides basic calculations based on student performance. These sections also differ based on whether you're scoring Tasks or Standards.
Filtering and Sorting
Posting Grades
Grade Book Setup
Grade Book Setup Overview
The Grade Book Settings tab includes tools used in Grade Book setup, a variety of options for displaying student scores, and other Grade Book display preferences. The context of the Grade Book is determined by the options selected in the Campus toolbar and the Term, Section and Task dropdowns above the Grade Book.
Location: Grade Book > expand Settings menu
The Settings tab of the Grade Book includes tools used in Grade Book setup, a variety of options for displaying student scores in ways that can help teachers focus on student performance, and other Grade Book display preferences. Use ALT G to expand and collapse the settings menu.
The context of the Grade Book is determined by the options selected in the Campus toolbar and the Term, Section and Task dropdown lists above the Grade Book. The Grade Book remembers where you were and opens to the same Term, Section and Task as your last visit.
The Traditional Grading and Standards-Based Grading articles provide more information about score analysis based on Task type. Sorting and filtering options appear above the Grade Book.
See the Instruction Tool Rights article for more information.
Grade Book SetupSee the following articles about grade book setup:
Grade Book Tools |  Settings in the Grade Book |
Other
- Help - opens a help modal with more information about box and whisker diagrams, quartile calculations, color indicators, proficiency estimates, sparkline graphs, and keyboard shortcuts.
- Web Site Address
Preferences
The following table describes the Preferences available in the Grade Book Settings
Option | Description |
|---|---|
| Pass/Fail Coloring Settings | Click this link to open the Account Settings and set global settings for color coding student's grades and/or scores as passing or failing. |
Display Sparkline Graph | Mark this preference to add a sparkline graph next to each student's name, which condenses all scores into a compact graph that shows the patterns in the student's overall performance over time. This graph is always displayed chronologically, regardless of assignment sort options. Points/Marks based scoring displays as a blue line and Rubric based scoring displays as colored bars along an axis of proficiency. |
| Save Alert | When there is unsaved data in the Grade Book, the Save button displays as orange until the changes are saved. Mark this preference to receive a notification each time you click save indicating the "Grade Book has been saved." |
| Assignments Per Page | Set the number of assignments that display on each page of the grade book. Decreasing the number of assignments per page can decrease how long it takes to load the Grade Book in classes with many students. Navigate between pages using the options that display above the Grade Book when there are multiple pages.
|
Save
Teachers can use various tools in Grade Book Settings to configure how assignment scores convert into final grades. This video provides an overview of Grade Book Setup.
Filtering and Sorting the Grade Book
From the Grade Book, teachers have the ability to filter assignments based on specific criteria, as well as sort the order in which assignments are displayed.
Location: Grade Book > Sort button, Filter button
Filtering options determine which students and/or assignments display in the Grade Book.
Sorting options change the order in which assignments display in the Grade Book. Additionally, each column in the Grade Book has double arrows in the header, which can be used to sort the Grade Book by that column (alphabetically by student name or numerically by score or grade).
Sorting Assignments
Open the Sort window to sort how assignments display horizontally in the Grade Book. These options are saved with the Grade Book and apply each time you open or reload it.
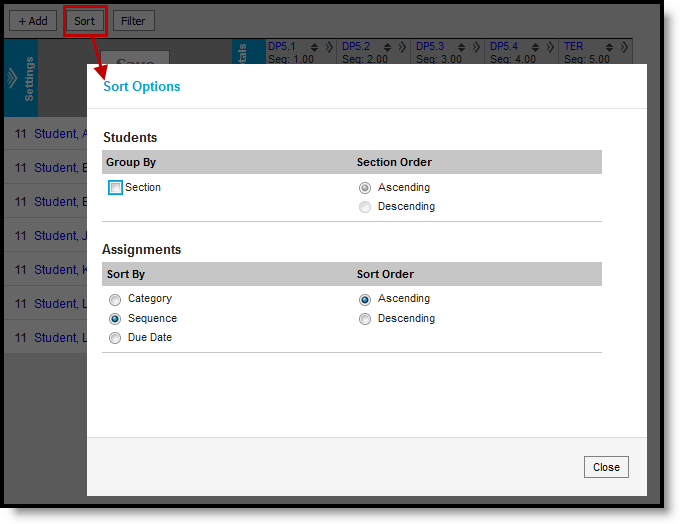
Grade Book Sorting Window
The option to sort Students by Section applies to Section Groups. If a group is selected, unmarking Section sorts students alphabetically without grouping them by section (Ascending or Descending).
For assignments, the Sort By option determines how assignments are grouped in the Grade Book, by Category (alphabetically, then by sequence), Sequence, or Due Date.
The Sort Order option determines the order of assignments:
- Category: If categories are sequenced, assignments are sorted by category sequence, then assignment sequence, then due date, then assignment name. If categories are not sequenced, assignments are sorted alphabetically by category name, then assignment sequence, then assignment name, then due date. Ascending sorts categories alphabetically beginning with A or numerically by sequence beginning with the lowest number. Descending sorts categories reverse alphabetically or numerically by sequence beginning with the highest number.
- Sequence: Ascending sorts lowest sequence to highest. Descending sorts highest sequence to lowest.
- Date: Ascending sorts earliest due date to latest. Descending sorts latest due date to earliest.
Past the midway point of the term, it may be useful to reverse the order in which assignments appear.
Sorting Students
Click the pair of arrows that appear in many column headers in the Grade Book to sort students by the values in that column.
- Click once to sort students ascending by column value with the highest value at the top.
- Click twice to sort students descending by column value with the lowest value at the top.
- Click three times to return to sort alphabetically by student name.
You can also sort students alphabetically using the arrows at the top of the Students column.

Sorting Students by Score, Grade, or Proficiency Estimate
Filtering By Students and Assignments
Open the Filter window to filter the Students and Assignments that display in the Grade Book. With the exception of the Settings > Filter Defaults, these options are reset each time you reopen or reload the Grade Book.
When filters are set, a blue dot appears in the Filter button. In the filter window, counts display next to each option. These counts are dynamic based on the options selected.
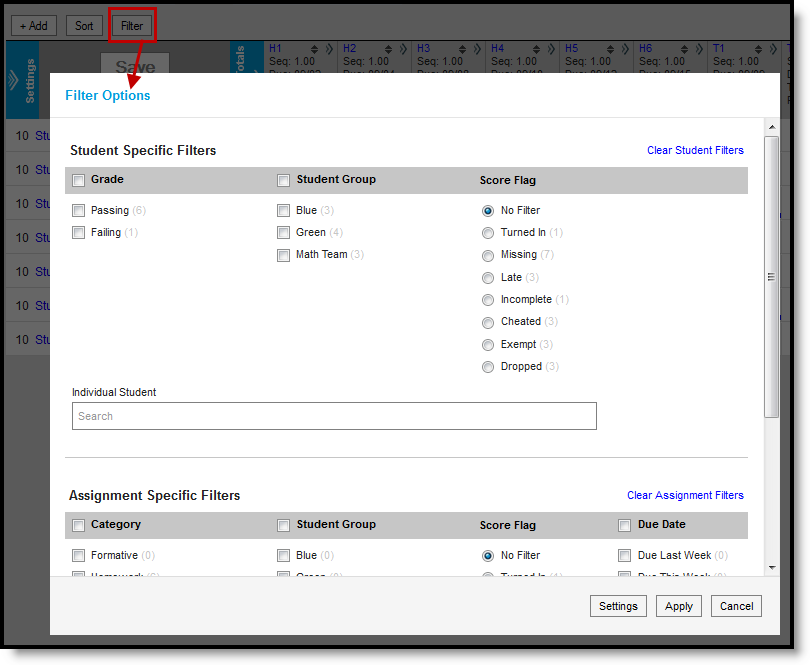 Click Filter to view filtering options.
The following filter options are available:
Student Filters
Teachers have the option of posting grades when a Student Group or Individual Student is selected.
Filter | Students Shown |
|---|---|
Grade | Shows only students who have a Passing or Failing grade in the section. This filter is based on In Progress Grade and the Grading Scale selected in the Grade Calc Options. |
| Student Group | Shows only students who are in the selected group(s). |
| Score Flag | Shows only students who have at least one assignment marked with the selected score flag. All assignments (rather than only flagged ones) display, unless the corresponding score flag is marked in the assignment filters. |
| Individual Student | Search for an individual student to exclude all others from view. This option is helpful when showing a student only their scores during a meeting or parent-teacher conference. This option mirrors the effect of expanding a student in the Grade Book and clicking "Hide Others."
|
Assignment Filters
Filter | Students Shown |
|---|---|
Category | Show only assignments in the selected category(s). |
| Student Group | Shows only assignments assigned to the selected group(s). |
| Score Flag | Shows only assignments that have the selected score flag marked for at least one student. All students (rather than only flagged ones) display, unless the corresponding score flag is marked in the student filters. |
| Due Date | Shows only assignments due during the calendar week(s) selected. These options can be set as the default Grade Book view that apply automatically when you open or reload the Grade Book. |
| Individual Assignment | Search for an individual assignment to only view that one. This option is helpful to score a specific assignment among many. |
Filter Defaults
Location: Grade Book > click Filter > Settings; Grade Book > expand Settings menu > Filter Defaults
The three Due Date filters can be set as default filters for the Grade Book: Due Last Week, Due This Week, and Due Next Week. Set defaults from the Filter window or the Grade Book Settings menu.
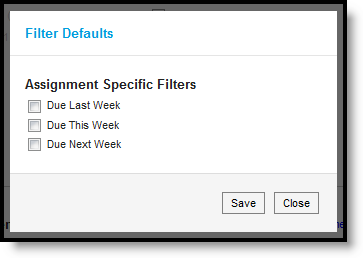
Filter Default Options
When set as default, these filters apply automatically when you open or reload the Grade Book.
Filtering Tips
- Within a column in the filter window, OR logic applies. For example, select two student groups in the student filters to view students in either group.
- Across columns in the filter window, AND logic applies. For example, select a student group filter and the Missing score flag in the assignment filter to view assignments assigned to the selected group that have at least one score flagged as missing.
- Combine student and assignment filters to further focus the Grade Book. For example, marking both Missing score flag options filters the Grade Book so that only students who are missing at least one assignment and assignments that have at least one score flagged as missing.
- With the exception of Filter Defaults, all filters are cleared when you reopen or reload the Grade Book.
The Grade Book Settings can be configured by teachers to determine how student scores should display in the Grade Book. In this lesson, a teacher needs to modify display settings to focus on specific students and assignments to review student performance.
Establish Assignment Categories
Categories are collections of assignments such as homework, tests, and group projects. Categories must be created before you can create assignments.
Location: Grade Book > expand Settings menu > Categories; Planner > My Planner > click Section name > Categories; Progress Monitor > Settings > Categories
Categories are groupings of related assignments, used for sorting and grade calculation. Categories must exist before you can create assignments.
Examples of categories include Homework, Quizzes, and Tests, or Formative and Summative.
View and edit categories in the following locations:
Grade Book > Settings
|
Planner > Section Name
|
Progress Monitor > Settings
|
|
The Categories list may include categories created at the district level. These categories may not be editable.
If a category is created at the district level that has the same name as one you've created, your version of the category will be appended with "(1)".
Teachers with tool rights Categories can create their own. Categories that display with a lock icon cannot be edited by teachers. |
|
The Edit Categories tool right in Additional Access Rights > Instruction Tools is required to access this tool. See the Instruction Tool Rights article for more information.
Where do Categories Display?
District-created and teacher-created categories are not differentiated outside of the Categories tool.
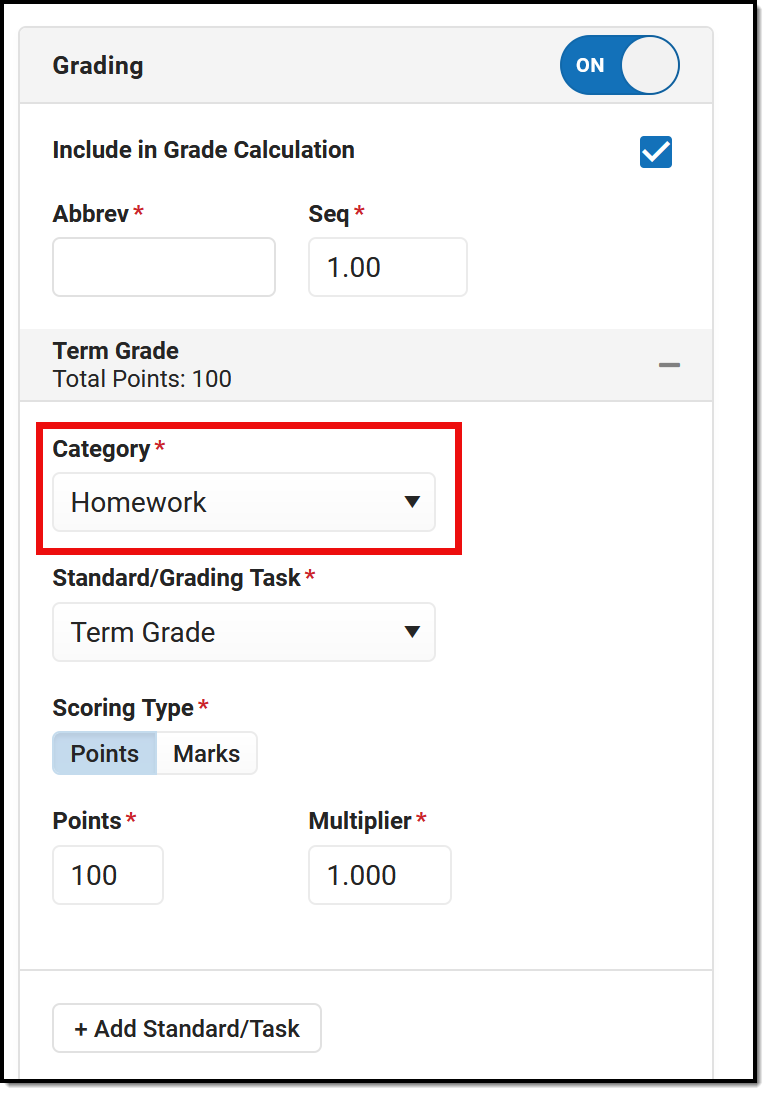
Selecting Categories in the Assignments editor |
In Assignments:Select a Category in the Grading area of an assignment. Categories must be selected for each grading alignment. |
In the Grade Book:Assignments can be sorted by Category in the Grade Book.
In the Grade Book, categories display in the Grade Totals. Categories do not display until they have assignments aligned to them. |
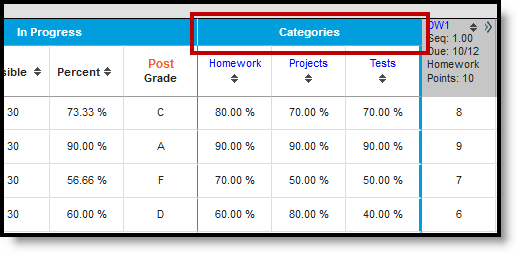
Categories are shown in the Grade Totals area of the Grade Book |
View the Category List
| The Category List that displays upon opening the Categories tool lists all categories in any of your sections, regardless of the context of the tool you started in.
Filter the list by selecting a Section at the top. Sort the list using the Sort By dropdown list. When you select a section, only categories in that section are displayed in the list, with the settings specific to that section shown, such as Weight and Sequence. Clicking on a category in the context of a section opens the category for all sections, not just the selected section. |
 Select a Section to view section-specific settings. Select a Section to view section-specific settings. |
Create a Category
Categories must be created before assignments can be added to the Grade Book.

Select which sections should include a category in the category editor
- Access Categories from the tool of your choosing, by opening the Grade Book Settings menu, clicking a section name in the Planner, or opening Settings in the Progress Monitor.
- Click Add at the bottom of the Category List.
- Enter a Name for the Category, which displays on assignments and in the Grade Book. Names must be unique and can be up to 50 characters long.
- Select the Sections that should include this category. For each selected section, enter or mark the following. Use the fields and arrow buttons in the header row to fill settings for all selected sections.
-
Setting Description Enter a Weight. The weight of a category determines the effect of each category on the final grade, in relation to other categories. Weights can be entered as percentages (without the % sign) or calculated as a ratio based on the other weights entered Weights only influence calculation if the Weight Categories option is selected in the Grade Calculation Options. - Percentages Example: In the opening image of this article, Homework is worth 50% of students' grades, with Quizzes worth 20% and Tests the remaining 30%.
- Ratios Example: A course where tests make up half of students' grades could be expressed as follows using ratios: Tests: 2, Homework: 1, Quizzes: 1.
- To leave categories unweighted, enter the same weight for all categories (such as 0) and then leave the Weight Categories option in Grade Calculation Options. unmarked.
Enter a Sequence. The sequence of the category determines the order in which categories are listed in the Grade Book and other tools. Mark the checkbox to Exclude from Calculation. Excluded categories are not included in grade calculation and display with an asterisk. Assignments in excluded categories still display in the Portal/Campus Student unless individually marked to be excluded. Mark the checkbox to Drop Lowest Score. This setting automatically removes the lowest score in the category (by percentage) from calculating into the student's grade. See the drop lowest score logic article for more information. Select the Default scoring options, if desired. When a category is selected for an assignment, the default scoring options are populated by default. See the Assignments & Resources article for more information about Options include: - Default Scoring Type: Indicate how an assignment will be scored. Options are points, marks, and rubrics (standards only). If using Marks, also select a default Assignment Mark.
- Default Points: The total number of points the assignment is worth. Displays if a scoring type of Points or Marks is selected.
- Default Multiplier: Determines how the score affects students' grades. For example, a 50 point assignment with a Multiplier of 2 counts as a 100 point assignment. Displays if a scoring type of Points or Marks is selected.
- Click Save to add the category to the list.
Delete a Category
- Open Categories from the tool of your choice.
- Click on the category Name to open it.
- Click Delete in the bottom right corner.
- Verify that you would like to delete the category in the warning message that appears.
A category cannot be deleted if it already has an assignment.
Drop Lowest Score Logic
Logic for Drop Lowest Score can be found in the Drop Lowest Score Logic article.
Previous Version
Categories (Instruction) [.2403 - .2535]
Save
Save
Save
Save
Save
Save
Save
Save
Save
Using Categories, teachers can group related assignments for sorting and grade calculation. Categories must exist before you can create assignments. This video demonstrates how to configure assignment categories.
Previous Versions
Categories (Instruction) - Video [.2128 - .2535]
Copy Categories Across Sections
Once assignment categories have been created for a course section, they can be copied to another section using the Category Copier tool. Categories can be copied from any section taught, including past and future sections.
Location: Grade Book > expand Settings menu > Category Copier
Use the Category Copier to copy your existing categories to other sections. Categories can be copied from any section you teach, including past and future sections.
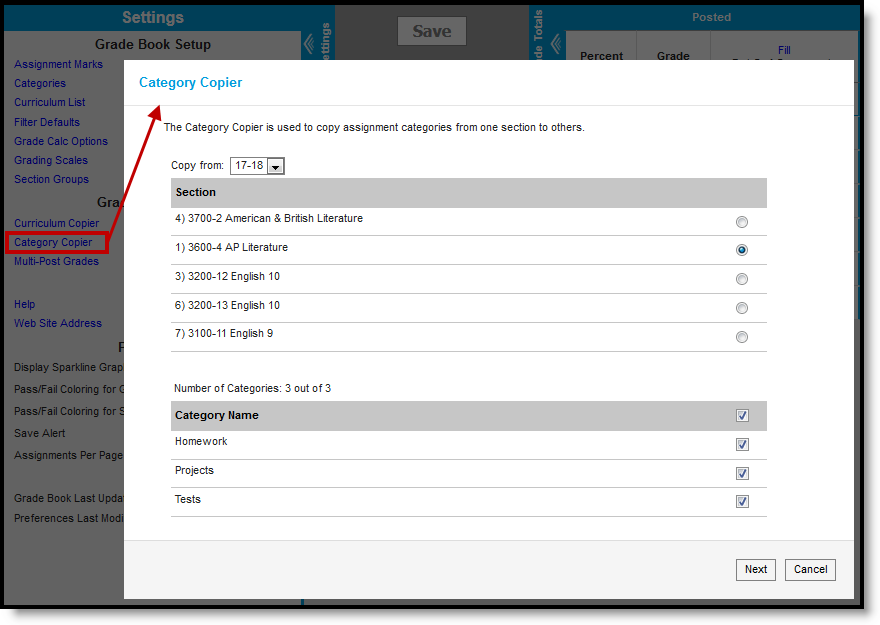
Copying categories between sections
Category Copier tool rights grant full access to this tool.
Copy Categories
- From the Grade Book Settings menu, click the Category Copier.
- Select the source Section from which you'd like to copy categories.
- Select the Categories you'd like to copy.
- Click Next to continue.
- In the next screen, select the destination Section(s) that will receive the categories.
- Click Copy to complete.
When you perform these actions, categories are copied but assignments are not.
The Category Copier tool allows teachers to copy categories from one of their sections to another. This video demonstrates how to copy assignment categories.
Create Grading Scales
Grading scales translate In Progress student percentages into letter grades. Scales describe the range of score percentages that earn specific grades. Grading scales may be provided by the school district. Depending on district preferences, teachers may not be able to edit or add additional grading scales.
Location: Grade Book > expand Settings menu > Grading Scales
Grading scales translate In Progress percentages into letter grades. Scales describe the range of score percentages that earn specific grades.
The grading scales list includes all scales you've created and all district scales, regardless of the Year or School selected in the Campus toolbar. The district may provide all the grading scales you'd like to use, but you could create your own scales if, for example, you wanted a more rigorous scale for an advanced class that required a higher percentage to earn a standard grade letter.
 Grading Scales Accessed from the Grade Book
Grading Scales tool rights grant full access to this tool.
Use Grading Scales
Select the grading scale you wish to use to score assignments for each Grading Task in the Grade Calculation Options. This scale is used to calculate the In Progress grade based on the scores entered for the student.
- When using Points to score an assignment, the grading scale defines the grade based on the percent of total points earned out of points possible.
- If Use Score's % Value is selected in the Grade Calculation Options, the Grade Book calculates the percentage of each score, and then calculates the In Progress grade based on those percentages, rather than on the points earned. In this scenario, two scores of 4/5 and 8/10 would be worth the same percentage and would have the same effect on the In Progress grade.
 Selecting Grading Scales in the Grade Calculation Options
Grades scales match calculated grades to the district-defined Score Group. Score Groups convert the grade earned into a GPA value.
The grading scale is also applied to determine Pass/Fail Coloring in the Grade Book. These colors are determined by which items are marked as Passing on the scale.
Create a Grading Scale
Some districts allow teachers to create their own grading scales beyond those offered by the district.
Grading scales should match the Score Group aligned to your grading task for all grades that can be calculated. For example, if the score group includes grades A-F and I for incomplete, the grading scale would only include A-F. A grade of I would have the same percentage range (such as 59-0%) as an F, but an I is given based on extenuating circumstances, not a grade that can be calculated based on student performance. Other options in the score group can be assigned when posting grades.

- From the Grade Book, open the Settings menu and click Grading Scales in the Grade Book Setup section.
- In the window that opens, click the Add button at the bottom right hand corner.
- Enter a Name for the grading scale. The Owner of the grading scale defaults to your name.
- Click Add Row to begin adding items to the scale. To remove an item, click the blue X next to it.
- For each item, the Sequence auto-populates. Enter the following fields for each item:
- A Name such as A, Pass, or Satisfactory. This field describes the grade the student can receive.
- A Min %, the lowest percent the student can achieve and receive this grade. For example, if the Min % is 93 for an A and 90 for an A-, scores between 90 and 92% are an A-. The lowest grade possible, such as an F, should have a Min % of zero. This value can be a decimal with up to three digits before and after the decimal. If you'd like to implement rounding logic, set the minimum percent to .5 below the true cut-off. For example, if 90% is the minimum percentage for an A but you'd like percentages to round up, enter a Min % of 89.5.
- A Grade, such as A, P or S. This field indicates the letter grade you'll score the assignment with.
- Indicate if the score is considered passing.
Items should be added for all grades that could be calculated in the Grade Book, which means that a grade such as I for Incomplete should not be included in the scale.
- When you've added rows for each item, click Save to add the scale to your list. Your name displays as the owner of the scale.
Grading Scales can be used by teachers to convert In Progress percentages into letter grades for evaluating student performance. In this video, you will learn how to create, view, and manage personal grading scales.
Previous Versions
Create Assignment Marks
Assignment marks allow teachers to create their own grading thresholds through rubrics, which convert entered scored into percentages that can contribute to a student's In Progress or Final grade.
Location: Grade Book > expand Settings menu > Assignment Marks
Assignment marks allow teachers to create their own set of scoring options. Marks can be grades, symbols, or any other set of scores. Each mark is assigned a percentage, which is used to calculate scores. The numerical score used in calculating grades is the percent of Total Points for each assignment. For example, if I score an assignment worth 10 points with a mark aligned to 80%, the student receives 8 points.
This tool is useful in instances when you want to create a custom set of scores for an assignment that should have a numeric effect on student grades, without revealing those numbers to students. For example, I created a set of marks for scoring a daily free writing assignment. Students receive a score of +, /, or -, based on whether students complete the assignment satisfactorily (100%), completed it but need improvement (90%), or did not complete the assignment (60%). Each mark is associated with a percentage, which is used to calculate grades. But the marks allow me to provide feedback on the writing assignment without putting the emphasis on the numerical score the student received.
Teachers have access to marks they've created and those managed by their district. Ownership of marks is indicated in the list.
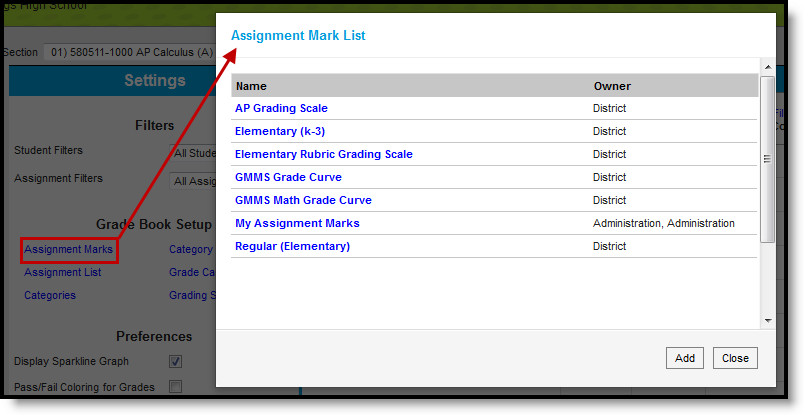
Assignment Marks Accessed from the Grade Book
Assignment Marks tool rights grant full access to the tool.
Use Assignment Marks
| Assignment marks can be used when you need a custom scale for a specific type of activity. Assignment marks are aligned to individual assignments in the Grading area. Select a Scoring Type of Marks to display the Marks dropdown list and select a set of Marks. Assignments scored with marks require a Total Points, which inform grade calculation. For example, if a + is worth 100%, the Total Points determine if that is 100% of 10 points, of 50 points, etc. See the Assignments article for more information about setting up assignment grading. |
Create Assignment Marks
Create Assignment Marks to address specific scenarios when you may want a custom set of scores.
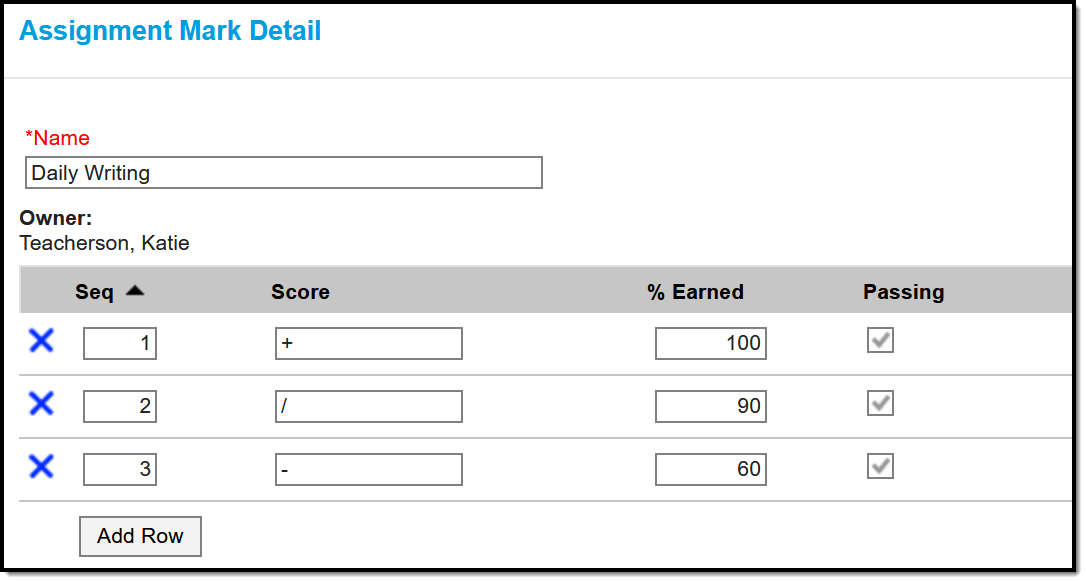
An example of a set of Assignment Marks.
- From the Grade Book, open the Settings menu and click Assignment Marks in the Grade Book Setup section.
- In the window that opens, click the Add button at the bottom right hand corner.
- Enter a Name for the marks. The Owner of the grading scale defaults to your name.
- Click Add Row to begin adding items to the marks. To remove an item, click the blue X next to it.
- For each item, the Sequence auto-populates. Enter the following fields for each item:
- A Score: the mark used to score the assignment.
- A % Earned: the numeric equivalent of the score entered. Unlike grading scales, multiple scores can have the same percent value, which can be used to communicate feedback using marks without differentiating scores.
- Indicate if the score is considered passing.
- When you've added rows for each item, click Save to add the marks to your list. You are listed as the owner of the marks.
A set of Assignment Marks cannot be deleted if it is selected in the Grading area of an assignment.
Save
Assignment Marks allow teachers to create their own grading values, which convert entered scores into percentages. This video demonstrates how to create assignment marks.
Determine Grade Calculation Options
Grade Calculation Options allow teachers to determine how assignments and categories calculate a student's grade based on a grading scale, or their proficiency level on a standard based on an assignment mark.
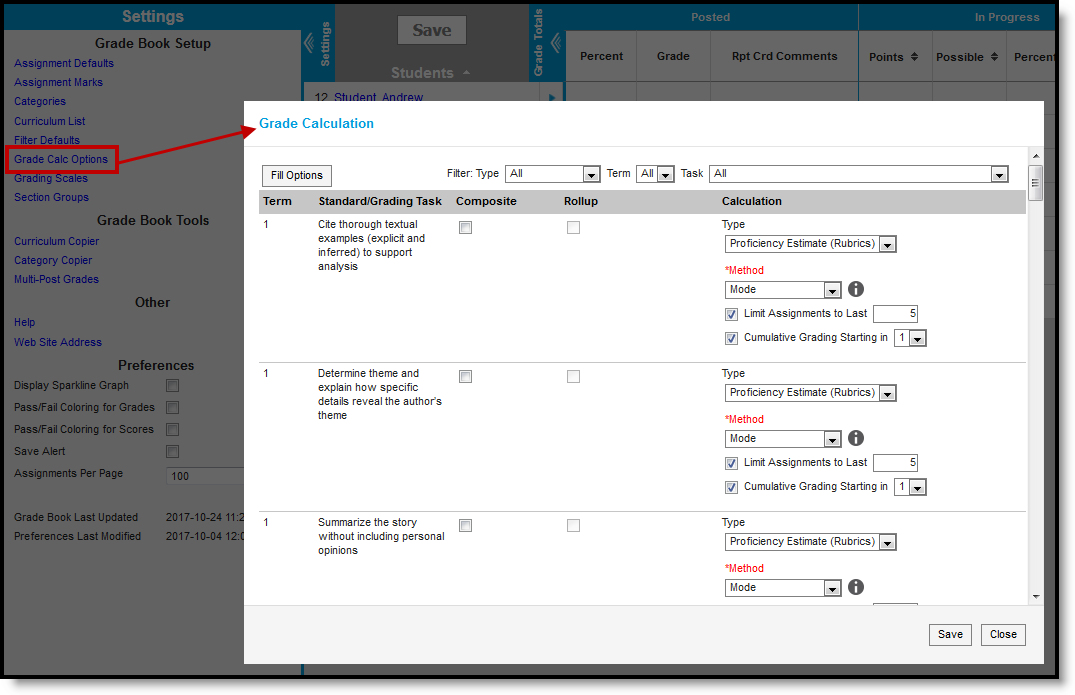
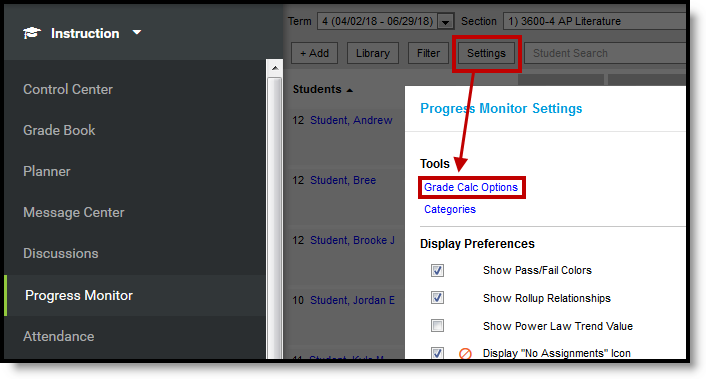
Location: Grade Book > expand Settings menu > Grade Calc Options; Progress Monitor > Settings > Grade Calc Options
The grade calculation options are the preferences you select to determine how the Grade Book calculates In Progress grades and proficiency estimates.
This tool is where you apply Grading Scales.
The calculation options for grading tasks and standards are different. Select calculation logic for individual tasks or standards or to multiple items using the Fill option. Grade Calc Options may be established at the Course or Course Master level and may therefore be read-only.
In Grade Book:
 |
In Progress Monitor:
|
| Grade Calculation Options for In Progress Grades of Grading Tasks and Proficiency Estimates of Standards
| |
If a task or standard was added to the section since the last time you modified these options, a notification appears notifying you that the Options records need to be updated. Click Continue to proceed.

Tool rights to Grade Calc Options can be found in Additional Access Rights > Instruction Tools. This tool right gives access to the tool in both places, if you also have rights to the Grade Book and/or Progress Monitor.
Viewing In Progress Grades and Proficiency Estimates in the Grade Book
The options selected in this tool determine how In Progress Grades are calculated in the Grade Book. If No Calculation is selected, no data calculates in the In Progress section of the Grade Totals.
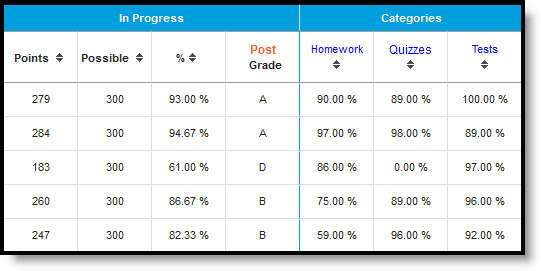
In Progress Grades in the Grade Book
Fill and Filter Options
To apply a specific grading setup to multiple tasks or standards, select Fill Options. From there, filter using the Type, Term, and Task dropdown lists and then select the Calculation Type and other options to apply to all standards or tasks that fit the filter criteria. For example, in the image below, I'm setting the Term Grade task to calculate the same way in all terms.
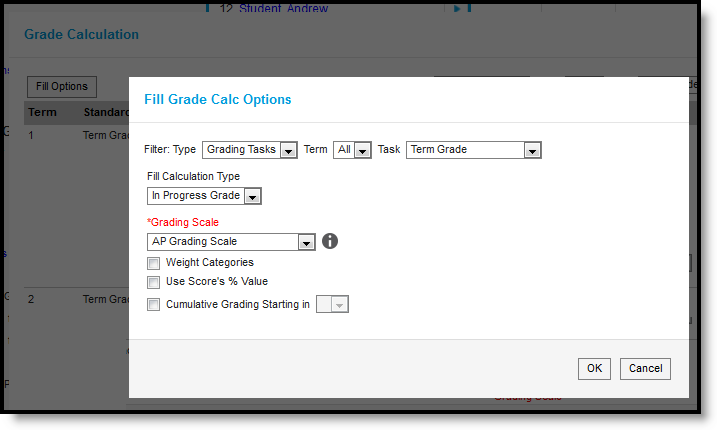
Use the Fill and Filter options to apply grade calculation options to multiple standards or tasks.
Additionally, the filter options are available in the main Grade Calc Options screen to filter the individual standards and tasks displayed.
In Progress Proficiency Estimates for Standards
Establish calculation preferences for multiple standards using the Fill options or for each Term/Standard combination individually.

The following options are available for calculating grades for standards.
The following table describes the Types of calculations available for Standards. See the Additional Options section for other types of setup completed in Grade Calc Options.
|
Type |
Description |
|---|---|
|
No Calculation |
Select this option to exclude the standard from calculation of students' In Progress proficiency estimate in the Grade Book. This option allows teachers to manually enter grades without an In Progress grade being calculated. This option is pre-selected and cannot be modified when a standard is marked as Post-only on the Course Standards tab or the Course Masters Standards tab. No assignments or categories can be assigned to post-only standards. |
|
In Progress Grade |
Select this option to calculate an In Progress grade for this standard using a Grading Scale. Use this option if you're scoring the standard with Points or Marks. Additional options appear when this option is selected:
|
|
Proficiency Estimate (Rubrics) |
Select this option if the standard is scored using a rubric. Rubrics are used to described quality of work, rather than a numerical score. Choose a Method to calculate grades:
In the grade book, hover over a student's proficiency estimate to see each of these values calculated. |
In Progress Grades for Grading Tasks
Establish calculation preferences for multiple tasks using the Fill options or for each Term/Task combination individually.

The following options are available for calculating grades for tasks.
The following table describes the Types of calculations available for Grading Tasks. See the Additional Options section for other types of setup completed in Grade Calc Options.
|
Option |
Description |
|---|---|
|
No Calculation |
Select this option to exclude the task from calculation of students' In Progress grades in the Grade Book. |
|
Calculate In Progress Grade |
Select this option to calculate an In Progress grade for this task. Additional options appear when this option is selected:
|
Post-only Tasks
Categories and assignments cannot be aligned to tasks marked as Post-only on the Course > Grading Tasks or Course Masters > Grading Tasks tabs. However, calculation options can be set up for these tasks to allow a Grade to be calculated in the Posted column when a Percent is entered for a student.
Additional Options in Grade Calc Options
The following options are available for standards and tasks:
| Option | Description |
|---|---|
| Composite | A composite task or standard is a parent task that is grade based on the child tasks that make it up. For example, a semester task may be a composite of two quarter tasks. See the Composite Grading article for more information. |
| Rollup | A parent standard or task can be calculated by "rolling up" child tasks. See the Rollup Grade Calculations article for more information. |
| Limit Assignments to Last ___ | This option limits the grade calculation to only include the most recent x number of assignments. For example, proficiency in a standard may be calculated as the mode of the most recent 5 assignments. |
| Cumulative Grading Starting in | This option allows teachers to set a starting term for calculating grading across multiple terms. See the Cumulative Grading article for more information. |
Save
Save
Save
The Grade Calculation tool allows teachers to set how grading tasks and/or standards are calculated for a course section. This video demonstrates how to define grade calculations.
Grade Calc Options allow teachers to determine how assignments and categories contribute to a student’s grade. In this lesson teachers need to define grade calculations for the new school year.
Establish Composite Grading
Grade Calculation Options can be used to set up composite grading for a course section using the Grade Book tool. Composite grading is a calculation that allows grades from multiple grading tasks or standards to contribute towards a single grade. For instance, composite grading can be used to set up grading for a semester task that is calculated from two quarter tasks.
Location: Grade Book > expand Settings menu > Grade Calc Options > Composite checkbox; Progress Monitor > Settings > Grade Calc Options > Composite checkbox
The Grade Calculation Options tool also includes Composite Grading rules in Campus Instruction. These rules indicate when a grading task or standard is calculated using child tasks or standards, such as a semester task that is calculated from two quarter tasks.
Composite Grading can be set up here by the teacher, or at the course level.
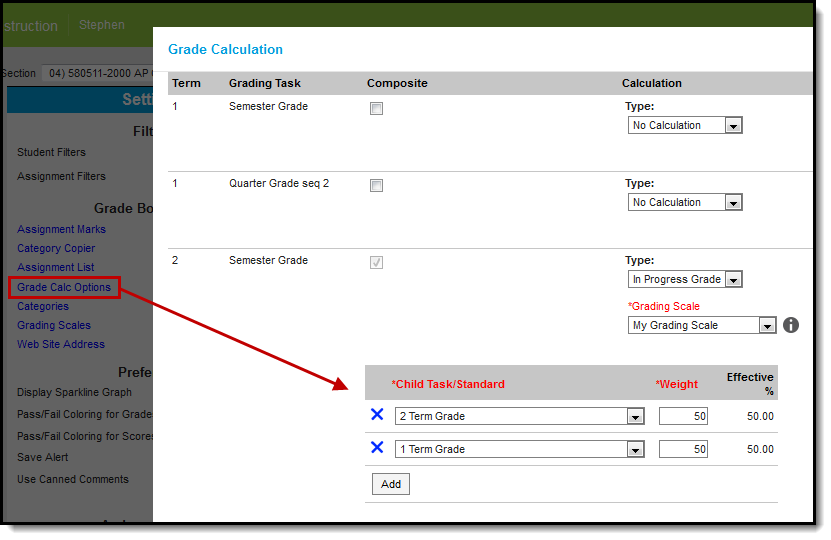
Composite Grading in Instruction
When using composite grading, assignments should be aligned to the child tasks, not the parent.
The Edit Composite Grades tool right in Additional Access Rights > Instruction Tools is required to modify composite setup. See the Instruction Tool Rights article for more information.
Setting Up Composite Grading
To set up Composite Grading for a task or standard, mark the Composite checkbox next to the parent task or standard. The composite options display below.
- Select a child task or standard. Tasks or standards that are already children in another composite or rollup setup cannot be selected and display in gray.
- Click Add to add another child task or standard. The options available are based on the Grading Tasks and Standards aligned to the course.
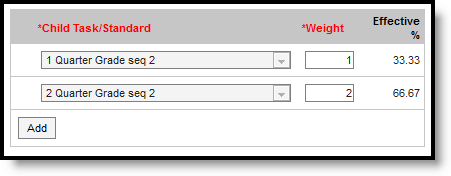
- Enter a Weight for each child. Weights calculate relative to each other, rather than as percentages of 100. The Effective % column shows the relative percentage of each weight, calculated based on the other weights entered.
- Example 1: Use relative weights to setup composite grading that is difficult to represent as percentages. For example, if there are two children and Task 1 should have a weight that is half that of Task 2, enter a Weight of 1 for Task 1 and 2 for Task 2, which calculates as 33.33% for Task 1 and 66.667% for Task 2.
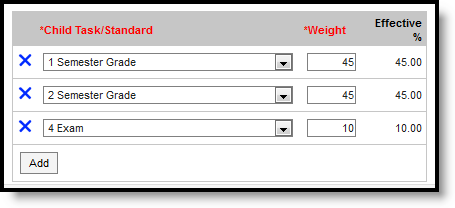
- Example 2: You can also enter weights in numbers representing percents, if that style more accurately represents your composite grading setup. For example, this image illustrations a scenario in which your section has two Semester grading tasks (S1 and S2) that have equal weight and a Final Exam that is worth 10% of the student's grade.
- Example 1: Use relative weights to setup composite grading that is difficult to represent as percentages. For example, if there are two children and Task 1 should have a weight that is half that of Task 2, enter a Weight of 1 for Task 1 and 2 for Task 2, which calculates as 33.33% for Task 1 and 66.667% for Task 2.
- Click Save to finish setting up your composite grading.
The Composite Grading calculation adjusts automatically if a student was not enrolled in the section for all included tasks. For example, a section is set up with a Final Grade that consists of each Quarter weighted as 20% and a Final Exam that is also 20%, but one student doesn't join the section until Q2. For that student only, Q2, Q3, Q4, and the Final Exam are each weighted as 25% (20+20+20+20/80).
Course-Level Composite Grading
If Composite Grading has been set up at the course level, the rules display below the parent task/standard in your Grade Calculation Options for the section. These rules may be locked, which means you cannot edit them. Otherwise, you can change the weights of each child task/standard. If you make changes, an option appears to Reset to Default, which resets the composite grading rules to those established for the course.
Composite Grading in the Grade Book
When Composite Grading rules are established for a Grading Task, an additional section displays in the Grade Book to the right of any assignments, with the Composite Percent and Grade calculated from the source tasks. The In Progress Percent is calculated as the average of the Percents of the child tasks, weighted based on the Composite Grading rules entered for each task. This percent is calculated from the Posted Percent of each child task, or from the In Progress Percent for any tasks that do not have grades posted. If only a letter grade is posted for a child composite task, the percentage calculates as null. If the posted grade is removed from the child task, the In Progress grade for the child task displays in the parent task.
If you district uses the Autograde Wizard to post grades, only posted percentages from child tasks are included in the calculation of the parent task. If a child task doesn't have an In Progress or Posted Percent, that task doesn't contribute to the calculation.
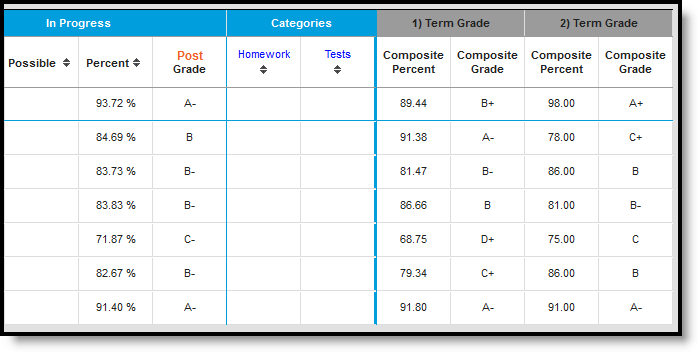 An example task in the Grade Book with composite grading set up.
In the Progress Monitor, composite grading setup is represented visually by displaying child alignments nested under the parent, unless the section has more than 50 standard/task alignments.
From the Grade Book tool, teachers can set up composite grading for a course section. This video demonstrates how to configure composite grading for a course section.
Composite grading can be configured for a course section using Grade Calculation Options within the Grade Book tool. In this lesson, a teacher needs to setup composite grading for a course section.
Configure Cumulative Grading
Grade Calculation Options can be used to set up cumulative grading for a course section. Cumulative grading allows teachers to define a starting term for calculating cumulative grades across multiple terms. For instance, an elementary school teacher may want to track students' progress using standards cumulatively graded over all three terms of a school year.
Location: Grade Book > expand Settings menu > Grade Calc Options > Cumulative Grading Starting in; Progress Monitor > Settings > Grade Calc Options > Cumulative Grading Starting in
Using cumulative grading allows teachers to set a starting term for calculating grades across multiple terms. Cumulative grading is established in Grade Calc Options.
This option could be useful for sections that meet across multiple terms.
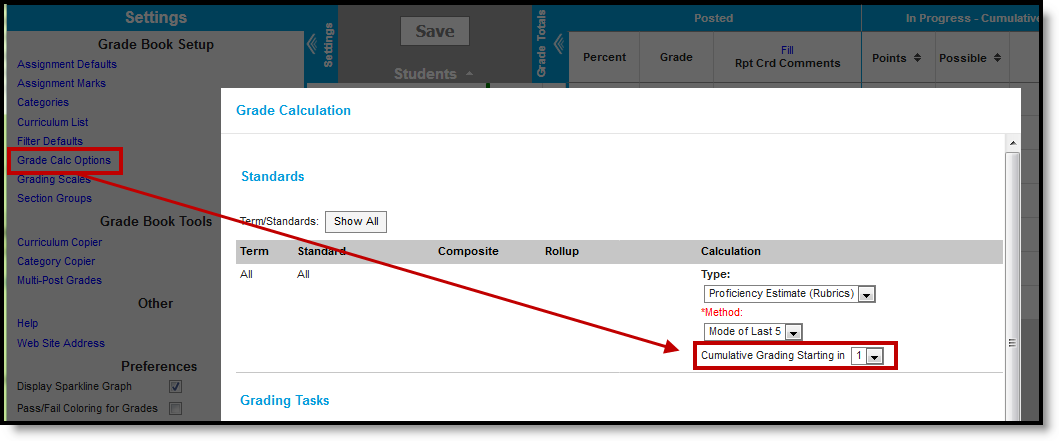
Cumulative grading is established in Grade Calc Options.
The Edit Grade Calc Options tool right in Additional Access Rights > Instruction Tools is required to modify cumulative grading. See the Instruction Tool Rights article for more information.
To set up Cumulative Grading select a term in the Cumulative Grading Starting in field. In the example above, cumulative grading is established for all standards in all terms in the section - cumulative grading can also be set for individual tasks or standards as well.
In the grade book, any cumulative grading setup is indicated in the heading of the In Progress section of Grade Total, as in the following image:

Established cumulative grading rules are indicated in the In Progress header of Grade Totals
Cumulative Grading Example
The two images above show an example of using cumulative grading across two terms. This example is provided for explanatory purposes and does not represent the only way this option can be implemented.
The section of American & British Literature meets during Terms 1 and 2. The standard "Cite thorough textual examples" is assessed across both sections using formative assignments that are not included in calculations, and essay assignments aligned to the Summative category, which contribute to In Progress grades.
In Grade Calc Options, I selected a Method of Mode of Last 5 and set Cumulative Grading to start in term 1. Term 2 is shown in the grade book image.
The grade book is filtered to show only assignments aligned to the Summative category. The In Progress score for the Summative Category (the Mode of last 5) is calculated from the 3 assignments in term 2 (shown above) and 2 assignments from term 1.
Cumulative Grading in Parent and Student Views
Teachers should be aware of the following when setting up cumulative grading. In parent and student views of grades (such as in the Portal and Campus Student), grades are shown for all terms included in the cumulative logic. Therefore, the current In Progress grade earned by the student will be shown for future terms, even if they haven't begun yet.
Save
Save
Setting up cumulative grading allows teachers to set a starting term for calculating grades across multiple terms. Cumulative grading is set up in Grade Calc Options.
Cumulative grading allows users to define a starting term for calculating cumulative grades across multiple terms. In this lesson, a teacher needs to configure cumulative grading for his reading standards.
Curriculum List
From Grade Book settings, the Curriculum List allows users to view all curriculum items and/or assignments created for a course section.
Users must have Campus Learning and the Enhanced Curriculum tool right to access advanced curriculum options such as folders and resources. |
Location: Click the List button in tools through Instruction, including Grade Book, Planner > My Planner, or Progress Monitor; Grade Book > expand Settings menu > Curriculum List; Planner > click section name > Curriculum List
The List displays all curriculum for a section, across terms and alignments.
This list looks different for teachers who do not have Campus Learning and the Enhanced Curriculum tool right. See the Without Enhanced Curriculum section below for more information.
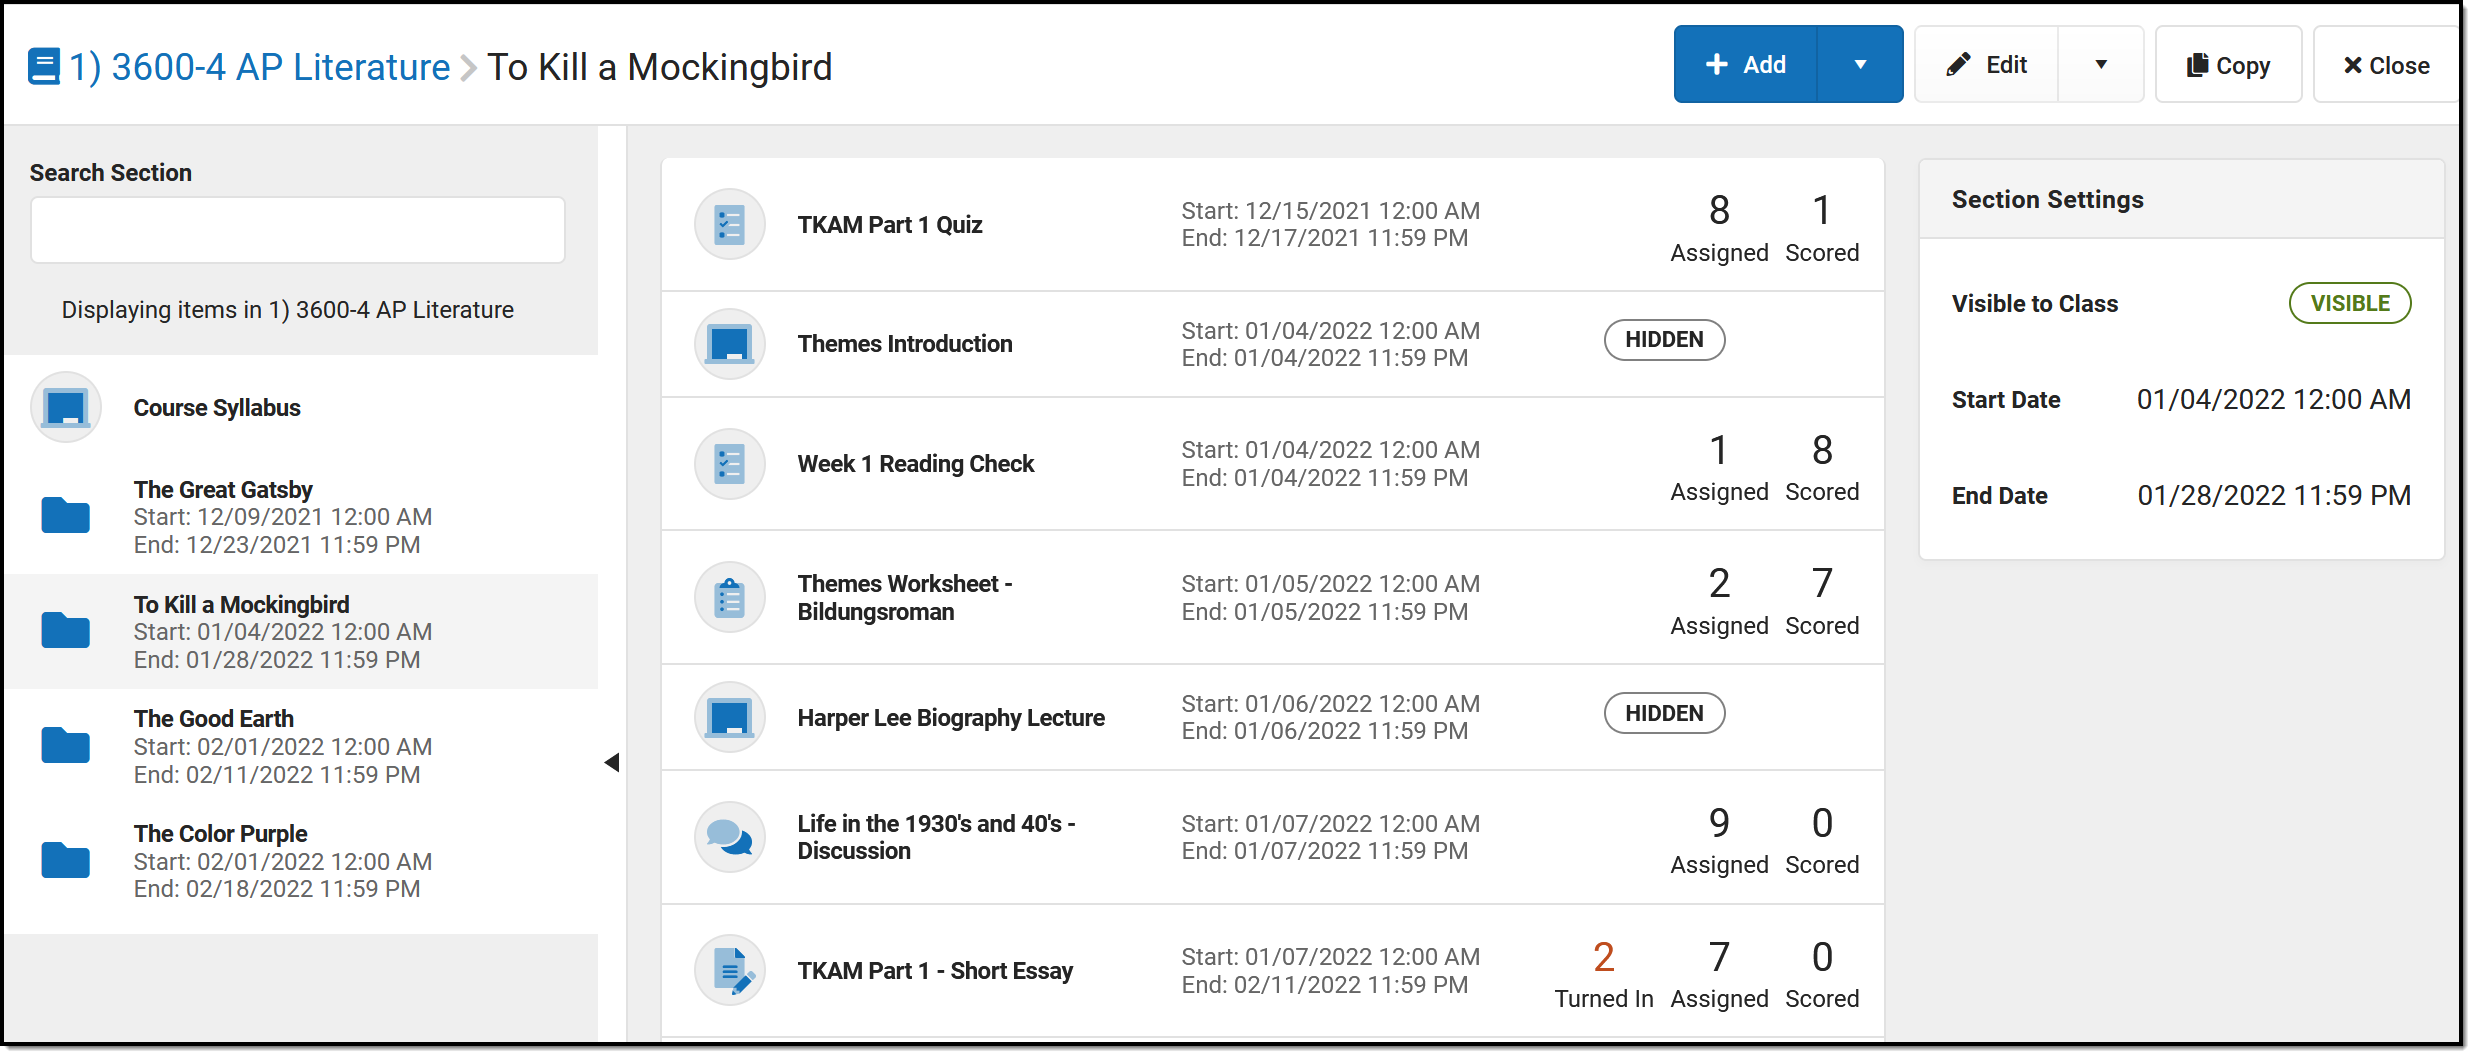 The List shows all curriculum for the section. Use folders to organize content.
When you open the list, the highest level of your curriculum hierarchy displays. If you don't use folders to organize your content, you'll just see a list of all assignments and resources, ordered by Start Date.
In the example above, I've organized my items into folders for the books my Lit class is reading, with a Course Syllabus resource at the top to keep it visible to students. I then clicked on the "To Kill a Mockingbird" folder to view the assignments, resources, and other items nested within that folder.
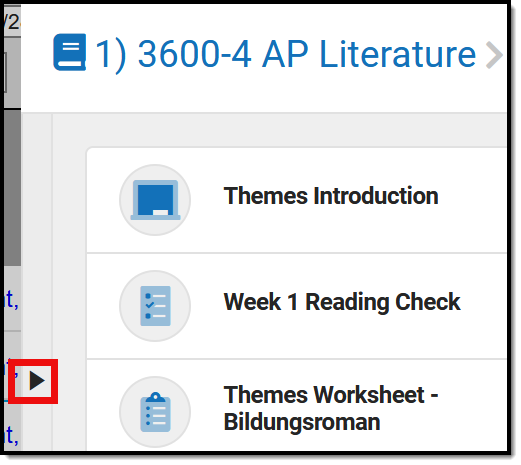 | Within a folder, click the black arrow on the left side of the list to expand or collapse the folder list. In the image above, I've expanded the folder list to display next to my assignments and resources. |
Numbers display next to assignments to provide more information about their status:

| Turned In | Assigned | Scored |
| The first number, in red, indicates if there are unscored submissions for the assignment. Click this number to view and score student work. | The assigned number indicates how many student have been given this assignment and have not turned it in or received a score. Click this number to Individualize the assignment | The scored number indicates how many students have received a score for this assignment. Click this number to open the scoring editor. |
At any point when viewing the list or a piece of curriculum, use the breadcrumbs at the top to navigate up through the hierarchy. In the example below, I've opened an assignment in the To Kill a Mockingbird folder. At the top, I can click the folder name to view it, or the section name to return to the top level curriculum list: |
Curriculum TypesEach type of curriculum has its own identifying icon. Links below provide more information: | |
 | Folders |
 | Assignments |
 | Resources |
 | Discussions |
 | Quizzes |
 | Submissions |
| Imported Assignments | |
Create an assignment by clicking  or click the arrow next to +Add to create any other item.
Click Library to view the Curriculum Library where you can add curriculum to your section that other teachers have shared. Click Copy to open the Curriculum Copier
Filtering the List
At the top level of the list, filtering options display along the top to simplify finding curriculum.
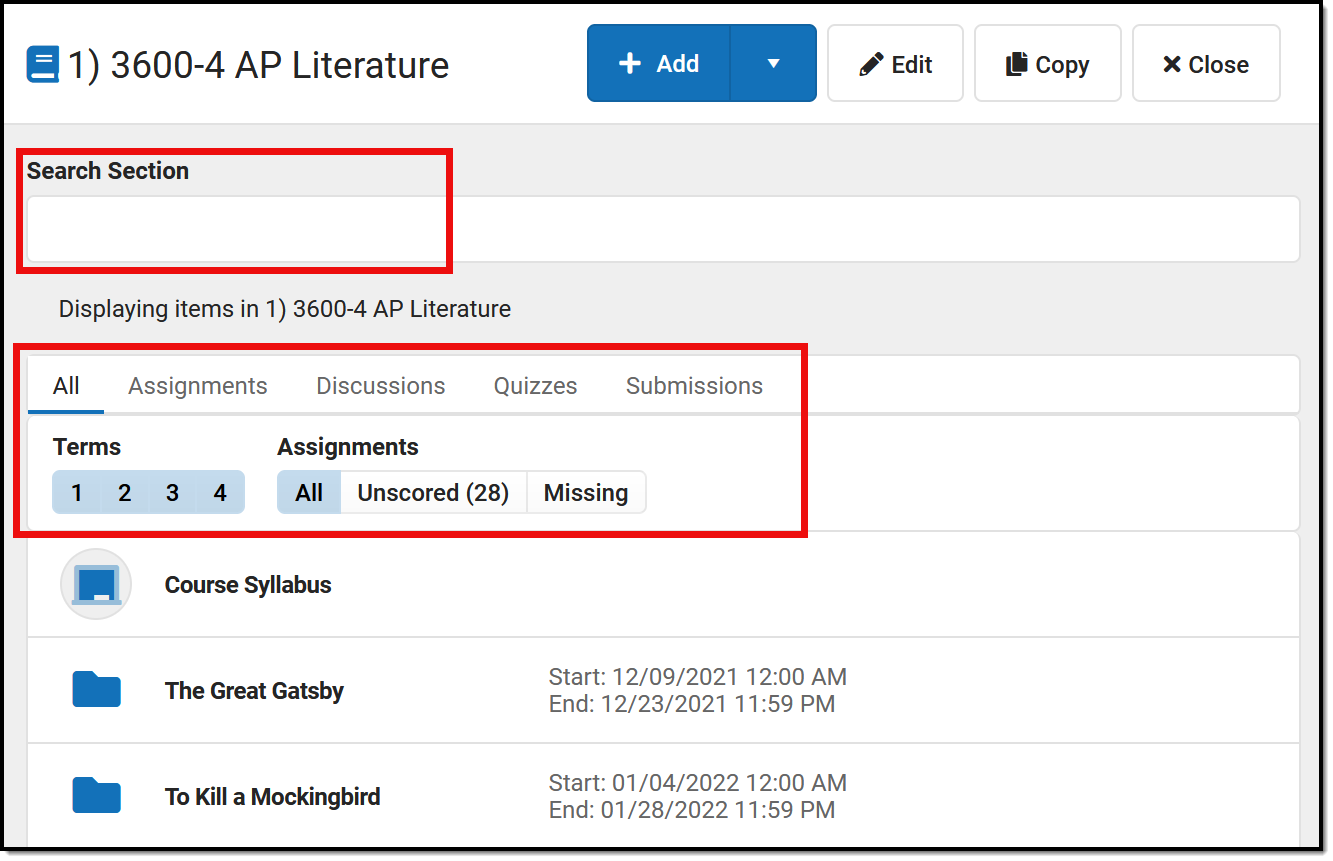 Filter options display at the top of the Curriculum List.
Search within all items in the section using the search bar at the top. This search includes the title and all other content entered for items, including summaries and notes.
Filter the list to show All items, only Assignments (any item with Grading toggled on), or based on the Task aligned to the item: Discussions, Quizzes, and Submissions. Users who receive assignments from a different program also have a filter for Imported items. Use the Term buttons to filter the list to only display items that are in-progress at some point during the selected term(s). Finally, use the Assignment filters to display graded items that are Unscored, are have Unreleased scores, or have any students flagged as Missing.
Filter the list to Unreleased assignments to display the Release All Scores button, which updates all assignments with Release Dates in the future to have a Release Scores setting of On Save. See the Release Scores article for more information.
Edit Mode
Click the Edit button to open edit mode for your current view of the list, whether it be a single assignment, all items in a folder, or everything in your section.
Below is an example of edit mode for all items in a folder:
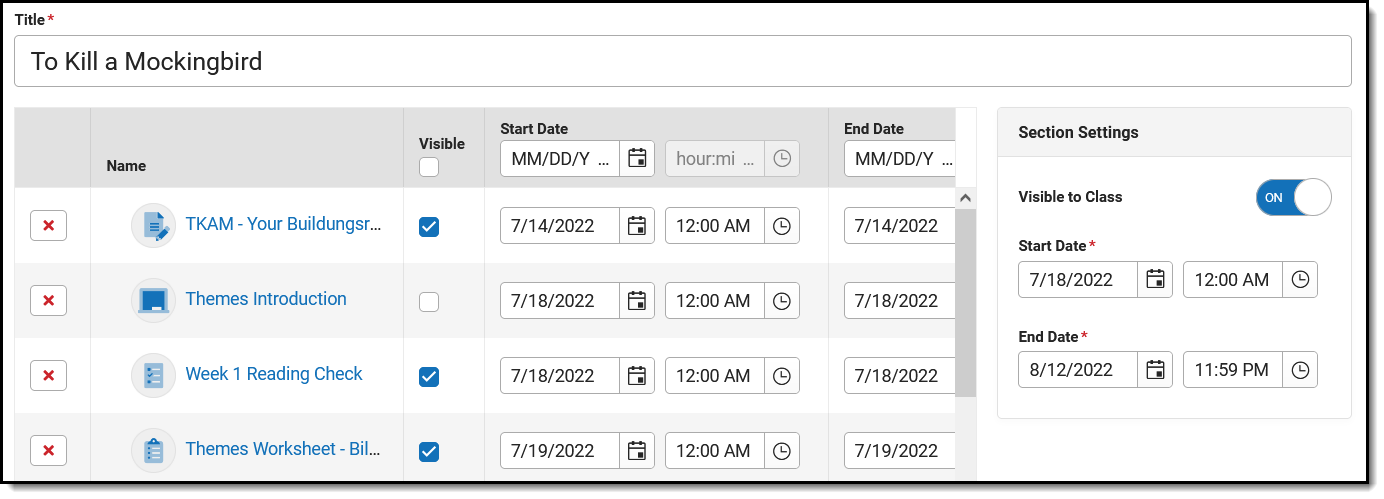 Click 'Edit' to modify the folder and items in it.
Edit the Title of the folder at the top. Edit the visibility of the folder and the dates in the Section Settings on the right. If a folder is hidden, all items within it are hidden by default.
Editing Items
All changes made in this view take effect once you click Save. Fill the visibility status or dates of all items using the fields in the table header.
- Click the red
 next to an item to delete it.
 - Click the name of an item to view a read-only version of it.
- Indicate if the item should be Visible on Campus Student and Campus Parent using the checkbox.
- Modify Start and End Dates by clicking the date to type or select another day. To set both dates easily, click the date to open the calendar, then click the Start Date you want and then the End Date, without closing the calendar. Click the clock icons to set times for the assignment
- Click the Grading link to view the grading setup for the item. Resources are not scored; click Grading Setup for a resource to change it to an assignment and set up grading.
As you modify items, a dot next to the name indicates which items have unsaved changes. | 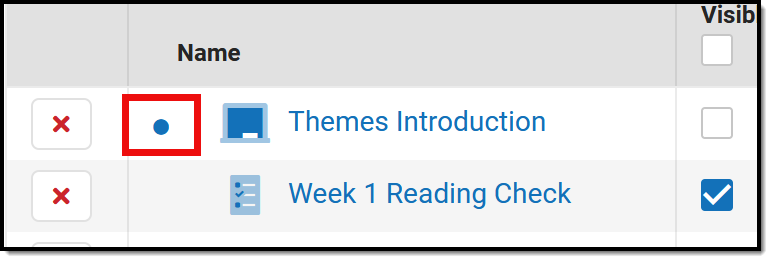 |
Click Save when finished to apply all changes.
Click the arrow next to the Edit button and select Move to change the parent folder of an item.
Without Enhanced Curriculum
Teachers who do not have Campus Learning and the Enhanced Curriculum tool right only see assignments in this list.
Search for assignments in the section using the Search Section bar at the top. Assignments are listed by Start Date. Add an assignment, open edit mode for the section (described below), or copy assignments from this section using the buttons at the top. Click an assignment to view a read-only version. With the assignment, click Edit to make changes. Click Edit to make changes to multiple assignments without opening them individually. See the Editing Items section above for more information. | 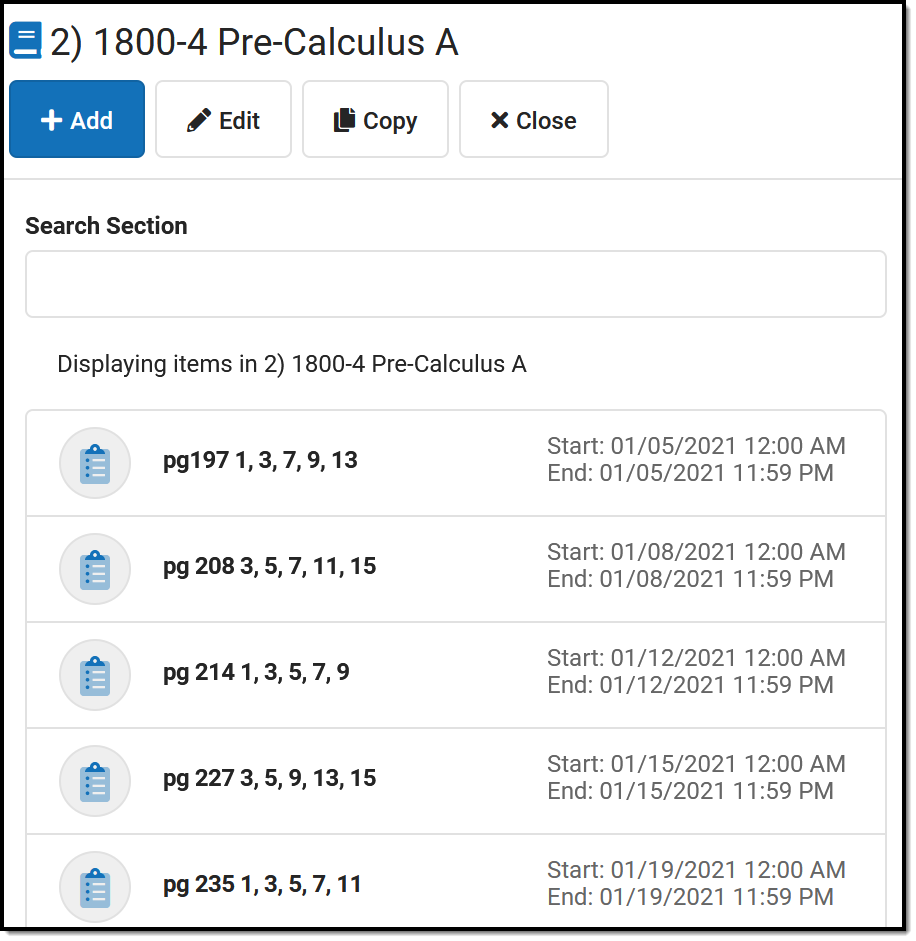 |
Save
Users must have Campus Learning and the Enhanced Curriculum tool right to access advanced curriculum options such as folders and resources. Visit the Campus Learning Suite page to learn more.
Using the Curriculum List, teachers can view all curriculum for a section, across terms and alignments. In this video, you will learn how teachers can use the Curriculum List.
Copying Curriculum
The Curriculum Copier allows teachers to copy curriculum between any section that they are assigned to teach.
Users must have Campus Learning and the Enhanced Curriculum tool right to access advanced curriculum options such as folders and resources.
Location: Open an assignment from anywhere in Instruction and click Copy; Grade Book > expand Settings menu > Curriculum/Assignment Copier; Planner > click section name > Copy Curriculum
The Curriculum Copier allows teachers to copy curriculum items, such as assignments, resources, and folders, from one of their sections to another. This tool can be especially useful at the beginning of the school year to copy last year's class materials to the new year.
Use the Duplicate option to make copies of individual curriculum items.
 Copy curriculum from one section to another.
Access the copier by clicking the Copy button in the top corner of an assignment, resource, or folder. Alternately, find the tool in the Grade Book Settings menu or by clicking the name of a section in the Planner.
Teachers who do not have Campus Learning and the Enhanced Curriculum tool right do not have access to advanced curriculum features.
The copy process is the same, but you'll only see assignments, not folder and resources with their unique icons. |
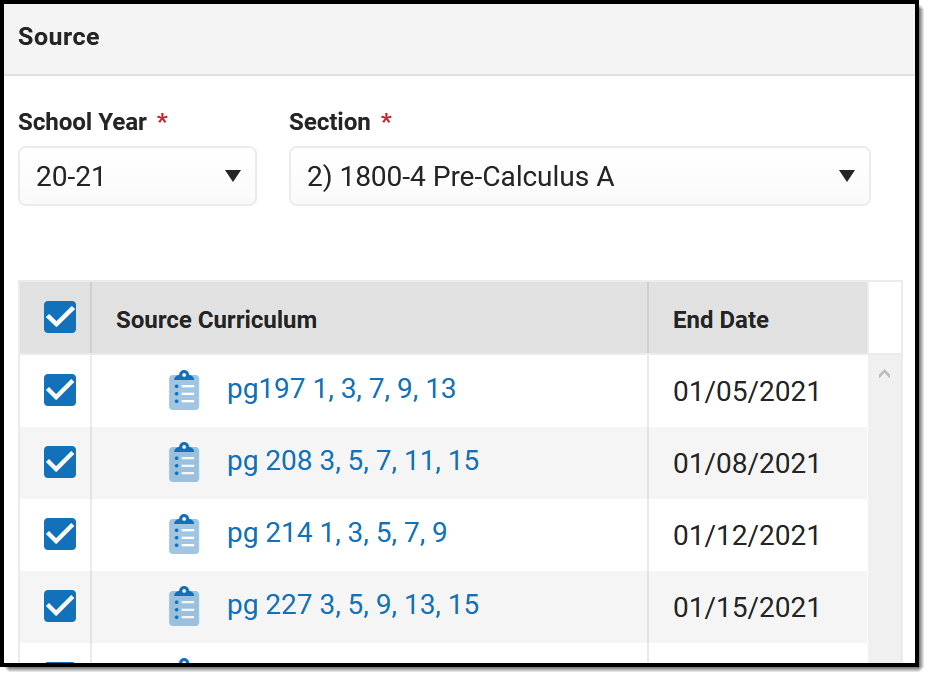 Copier without Enhanced Curriculum |
Step 1 - Select Items
The first step of copying curriculum is selecting the source and destination and which items should be copied. These instructions cover copying from a section to another section. For more information about copying to My Curriculu, see the Copy Curriculum to My Curriculum article.
- In the Copy From and Copy To fields, indicate if you're copying curriculum to and from a specific section or the My Curriculum tool.
- The Source School Year and Section default to the context where you opened the copier. Select a School Year and Section for the Destination section. The Destination Curriculum list populates with existing curriculum in that section. The Source Curriculum list populates with all curriculum in that section, but items that are already in the destination section display with an uneditable checkmark.
- Mark the checkbox next to curriculum in the source section to copy to the destination. Click the arrow next to folders to view what's inside them.
- To add the selected curriculum to a specific folder in the destination section, click Edit under the destination section and select a Folder.
- Click Next to proceed.
Note: Only curriculum created in Campus can be copied. Curriculum created in another program, such as Canvas or Schoology, won't show up in the Copier and cannot be copied.
Step 2 - Item Dates & Grading
In step 2, modify dates and grading setup as desired.
Click the black arrow next to folders to expand.
 In the second screen, modify visibility, dates, and grading.
Click the red next to an item to remove it from the copy list. Click the name of an item to view a read-only version of it. Indicate if the item should be Visible on Campus Student and Campus Parent using the checkbox.
Fill the visibility status or dates of all items using the fields in the table header.
Dates |
Grading |
Modify Start and End Dates by clicking the date to type or select another day. Click the clock icons to set times for the assignment. If copying an item from a previous year, the dates are calculated by determining what day of the term the item was originally scheduled and setting the date for the copied item to match that day in the destination section. For example, if an assignment has a Date of the 20th day of school in Term 1 and it's copied to Term 2, the Date defaults to the 20th day of Term 2. |
Click the Grading link to view the grading setup for the item. Resources are not scored; click Grading Setup for a resource to change it to an assignment and set up grading. If the grading setup of the source assignment is not valid in the destination section, a red warning icon displays. For example, an assignment may be aligned to a standard that isn't assessed in the destination section. Any invalid alignments will be removed when the copy process if finished; valid alignments will copy.
If the destination section doesn't have any alignments, or any alignments in common with the source section, assignments are copied as resources, with Grading turned off. Toggle grading on and add an alignment to score those items. |
Click Save to finish copying.
When assignments are copied, sequence order is maintained but sequence numbers are updated to be consecutive starting at 1. If the destination section already has assignments, copied assignments are sequenced starting with one value higher than the highest existing sequence.
Student Group selections are not copied between sections or calendars.
Users must have Campus Learning and the Enhanced Curriculum tool right to access advanced curriculum options such as folders and resource. Visit the Campus Learning Suite page to learn more.
Using the Curriculum Copier, teachers can copy curriculum items, such as assignments, resources, and folders, from one of their course sections to another. This video demonstrates how to copy curriculum from one course section into another.
Enter Assignment Details
Add an Assignment
From the Grade Book, teachers can create new assignments for course sections that they teach.
Advanced assignment tools are available as part of the Campus Learning premium offering and require the Enhanced Curriculum Editor tool right, including the Summary, Attach Content, and Add a Task areas of the Assignment editor.
Location: Click Add or List button in tools throughout Instruction, including Grade Book, Planner > My Planner, Assignment Overview, and Progress Monitor
Access assignments in various places throughout Instruction. Regardless of what tool you're in, the editor looks the same.
Available Actions
CreateCreate an assignment or resource anywhere you see an Add button (in the Planner, it's called New)
Click +Add to add an assignment, or click the arrow on the right of the button to add a Folder or a Resource, or to add an assignment starting with a Discussion, Quiz, or Submission.
Categories must exist before assignments can be created. |
ModifyTo modify an assignment, open it by clicking the name or abbreviation and then click the Edit button
Click Edit to modify the item, or click the arrow on the right of the button to move the assignment to a different folder or delete it.
When editing an item that is in multiple sections, you'll have the option of whether changes should be made to all instances or just the current one. |
Access to assignments requries tool rights to a grading tool, such as Grade Book, Planner, or Progress Monitor. Additionally, the Enhanced Curriculum tool right in Additional Access Rights > Instruction Tools grants access to advanced assignment options.
See the Instruction Tool Rights article for more information.
Other Edit Options
Click the arrow next to the edit button to access other options:
| Duplicate | Move | Delete |
| Creates a duplicate of the current item. | Allows you to select a different parent folder in the curriculum structure. | Removes the current item. Be careful when deleting assignments that have scores. |
Everything moved, help!
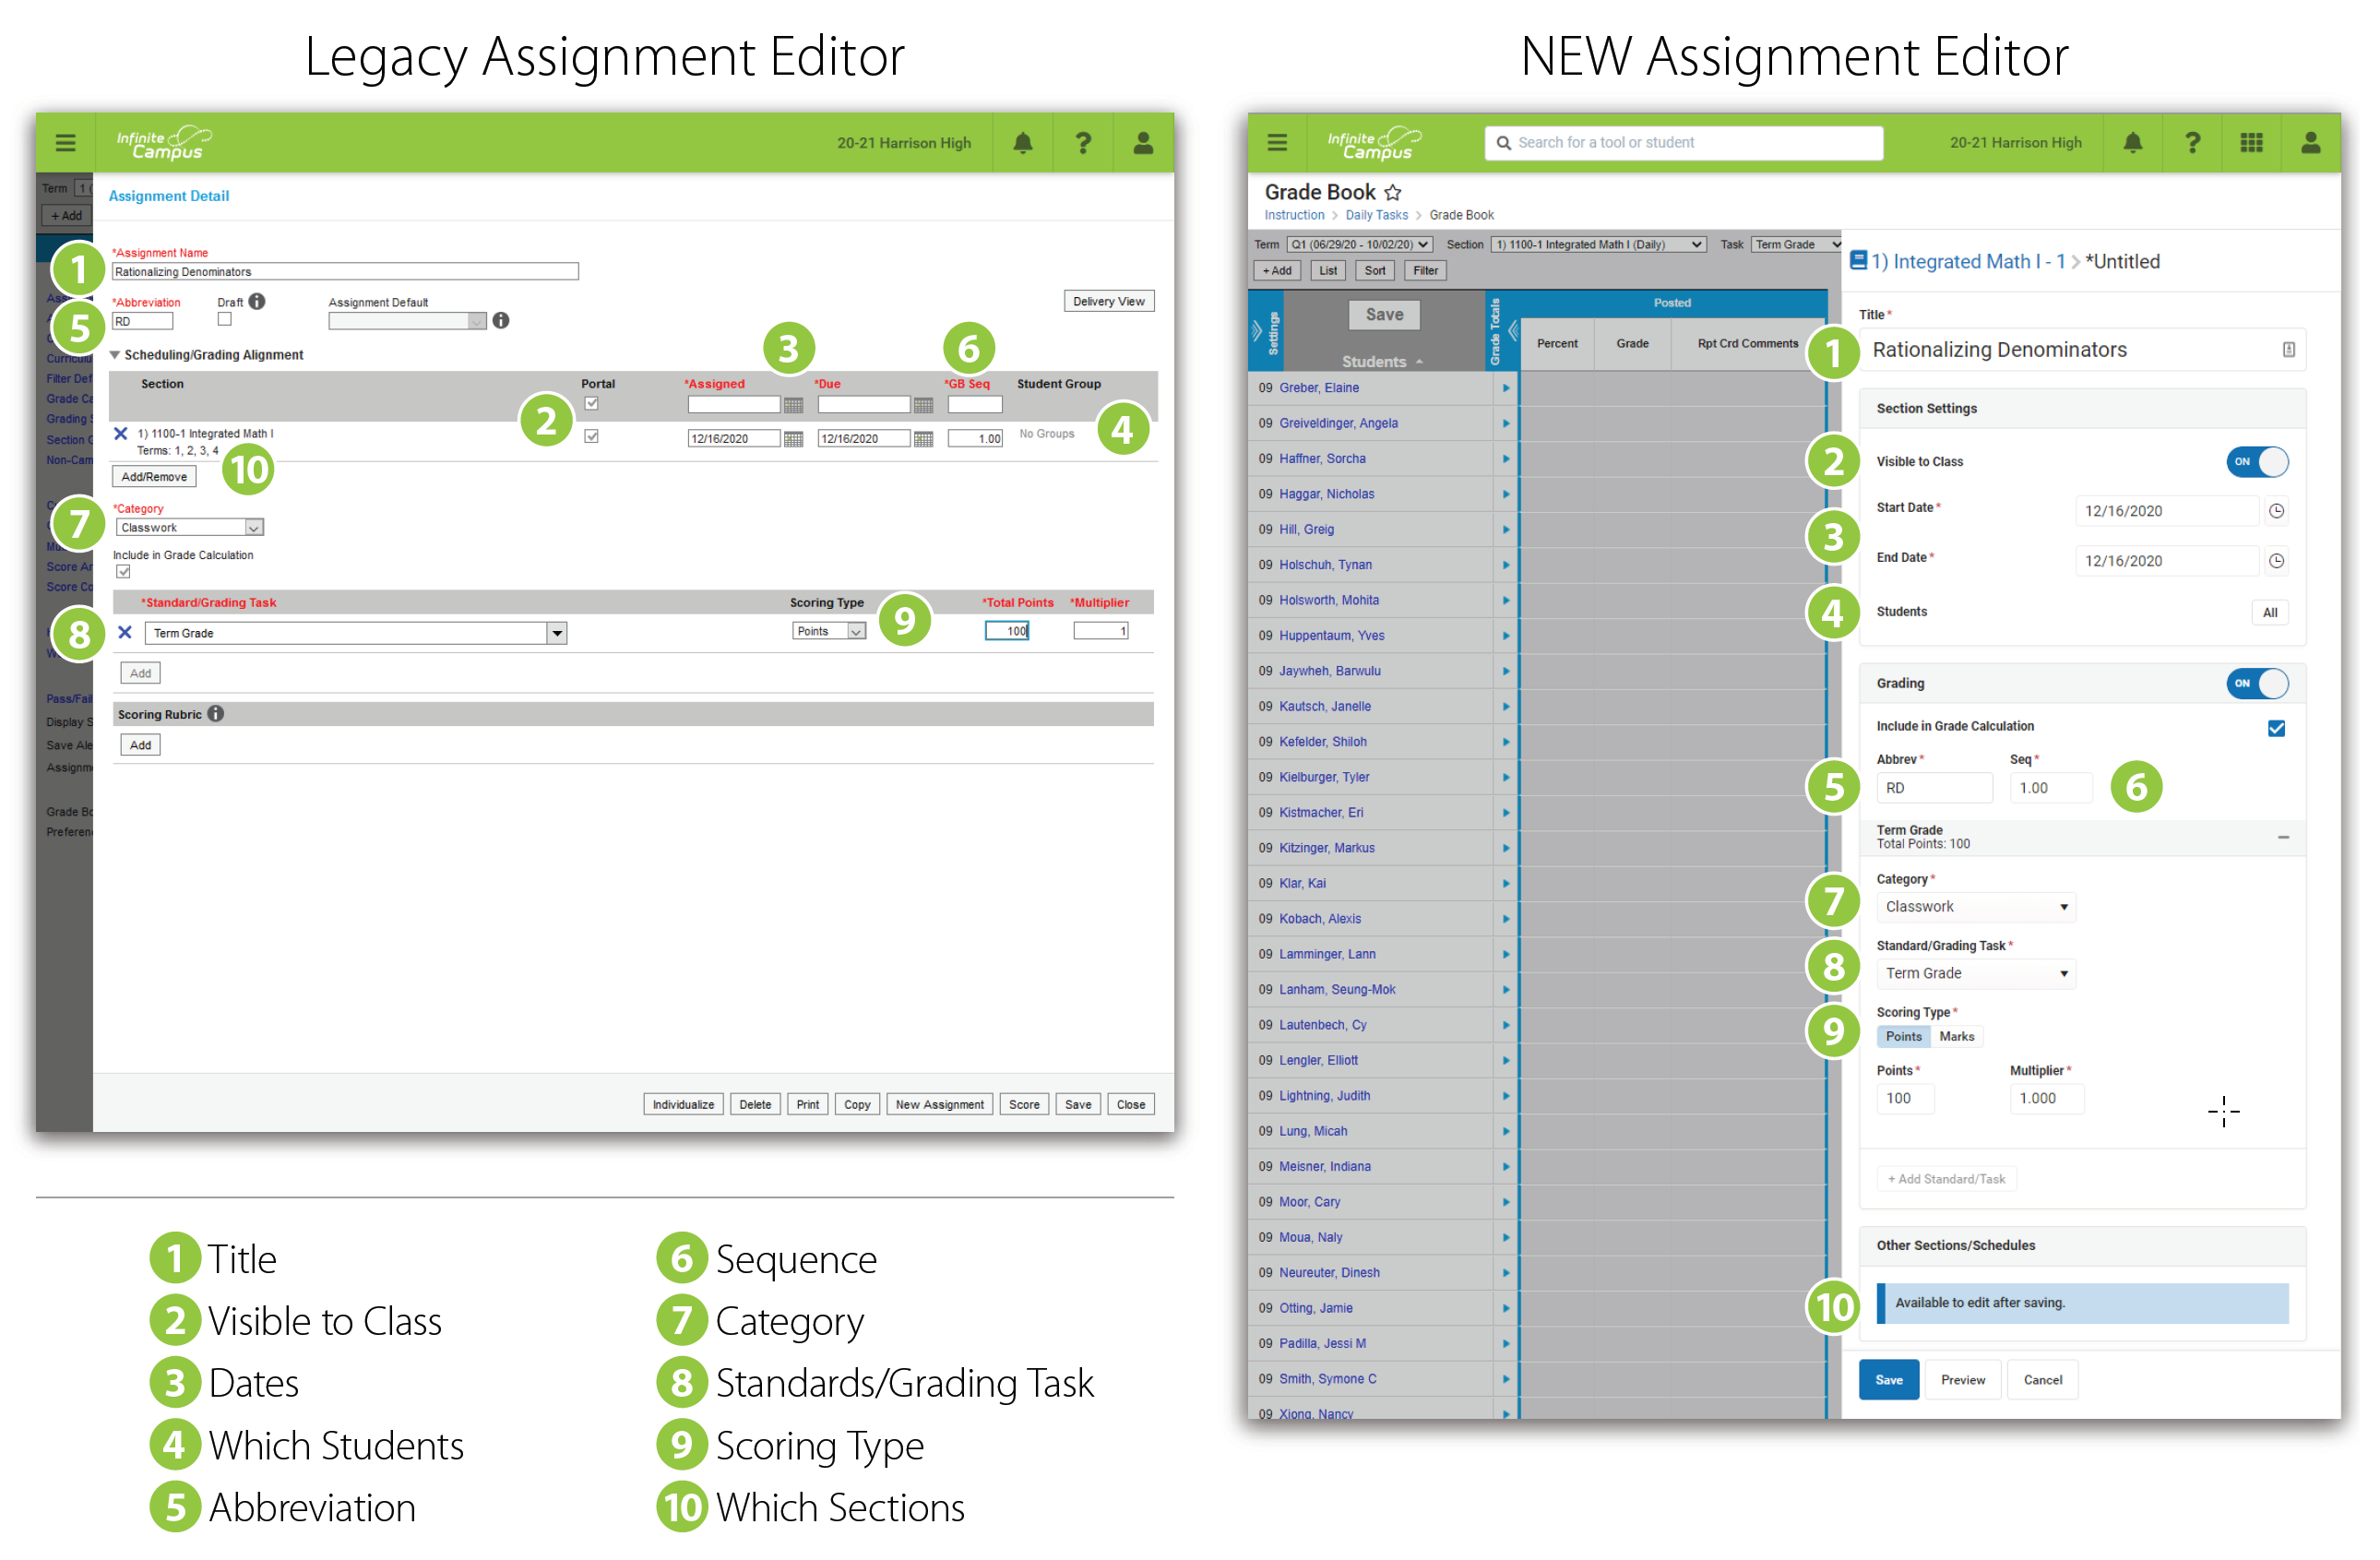
Recent improvements included redesigning the assignment editor. But don't worry, it's the same fields, just in different places. Expand below for a comparison of the old assignment editor and the new one:
What are Resources?
| Resources are, essentially, assignments that will not be scored. They allow teachers to share information with parents and students within the context of section curriculum.
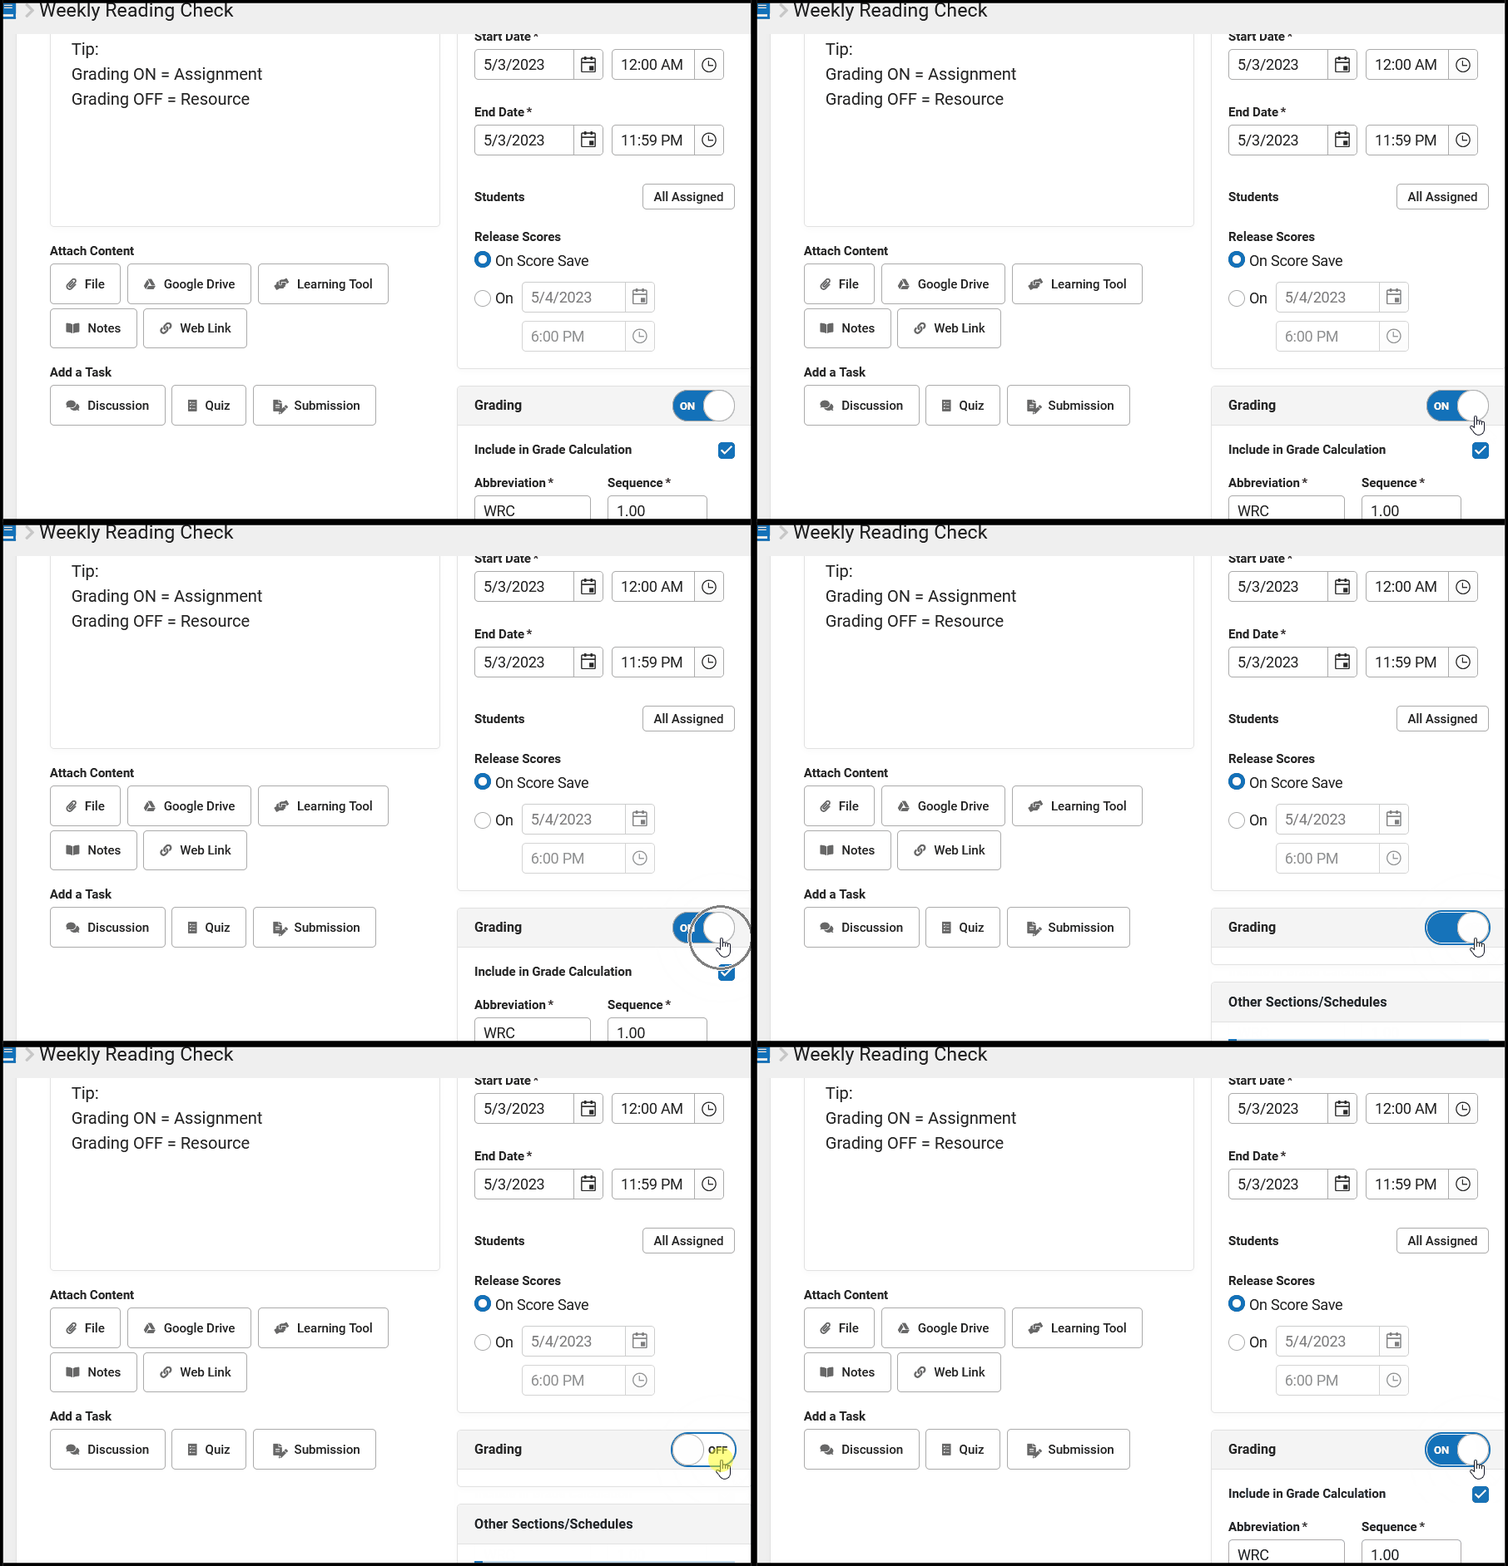
When creating an item, toggle Grading on to make it an assignment, or off to make it a resource. Because resources are not scored, they do not display in the Grade Book.
|
 |
Resources can be grouped within whatever folder structure you use to manage your curriculum. Consider creating a Course Resources folder to collect section-wide or often used materials, such as a syllabus.
Content, Details, and Reflections
Assignments and resources are made up of three tabs:
- Content: Information such as Dates, Grading, and the content of the assignment. This article describes this tab.
- Details: Metadata used when sharing curriculum to the Curriculum Library. See the Curriculum Details article for more information.
- Reflections: Records of how curriculum was used in your class. See the Reflections article for more information.
Areas of the Editor
Every assignment or resource needs a Title. Let's walk through each of the sections in the assignment editor:
In a hurry? Don't have Campus Learning or the Enhanced Curriculum Editor tool right? See The Basics: Assignments. |
Section Settings
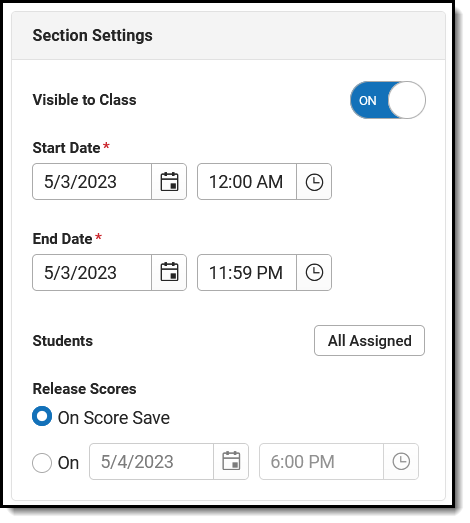 |
Visible to Class indicates if this item is visible on Campus Student and Campus Parent. Click the Preview button at the bottom of the editor to see what the assignment will look like for parents or students.
Start and End Dates default to today. Click the date to type or select another day. To set both dates easily, click the date to open the calendar, then click the Start Date you want and then the End Date, without closing the calendar. Dates are not required if Grading is toggled off.
To enter a time, such as for a quiz only available during a class period, click the clock icon.
By default, an assignment is available to all students in a section. To change this, click the All Assigned button next to Students. From here, select an existing student group or use the Assigned checkboxes to indicate which students should be assigned. All students not assigned will be marked as Exempt on the assignment. Campus Learning customers can also individualize dates for students. See the Individualized Assignments section for more information. |
The Release Scores setting determines when an assignment's score will be visible to parents and students. Leave the On Score Save option selected to keep scores visible as soon as they are entered. Or select a date for Release Scores On to schedule when scores will be made available to parents and students. This date must be after the End Date entered for the assignment. See the Release Scores article for more information about this option. | |
Grading
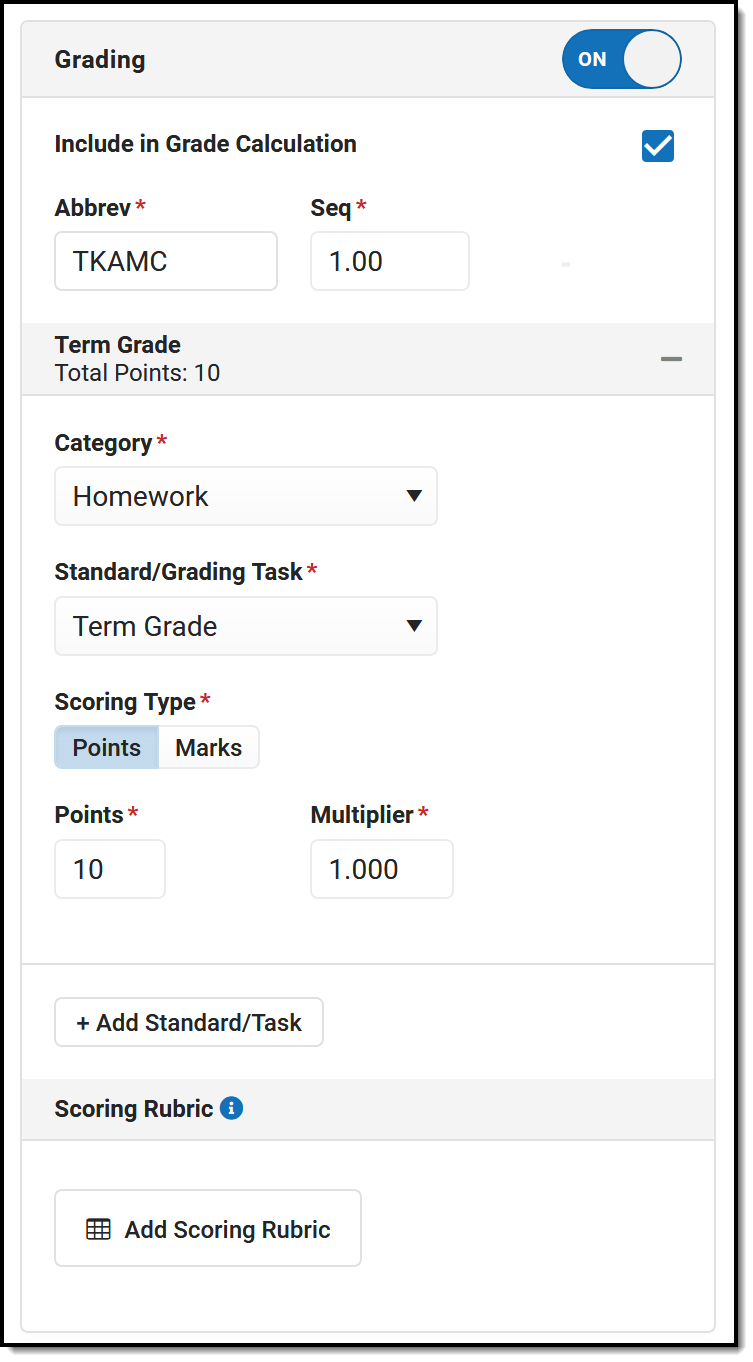
If Grading is toggled on, you're working on an assignment. If Grading is off, it's a resource. Include in Grade Calculation is marked by default - unmark this checkbox if the assignment will be scored but that score should not be included when calculating grades, such as for a practice test. If not marked, the assignment displays with an * in scoring screens like the Grade Book and Progress Monitor.
The Abbreviation for the assignment populates as you enter a title. The Sequence defaults to 1. Modify if desired, up to 7 digits: XXXXX.XX. The abbreviation is used to identify assignments in the Grade Book and the sequence is used to sort.
Grading alignments display in collapsible sections, with basic information in the heading.
Select a Category for the assignment. Categories are groupings of related assignments, such as Homework or Formative. If Default Scoring options are setup for a category, the Scoring Type, Points, and/or Multiplier may auto-populate based on the category selected. These details are still editable. See the Categories article for more information. Standards and Grading Tasks are item to which grades are posted. The Standard/Task of your current context, such as what's selected in the Grade Book, is selected by default. Only alignments available in your current section display.
Select a Scoring Type to indicate how the assignment will be scored. Options are: |
 Select applicable grading information for the assignment.
|
If desired, change the Multiplier if using points or marks, which determines how the assignment affects students' grades. For example, a 50 point assignment with a Multiplier of 2 counts as a 100 point assignment.
Add additional scoring alignments by clicking Add Standard/Task. Multiple alignments are most commonly used in standards-based grading, where a single assignment may demonstrate mastery in multiple standards.
The Add Scoring Rubric button displays for Campus Learning users who have the Enhanced Curriculum tool right. Scoring Rubrics allow teachers to communicate expectations for assignments with students and evaluate how well student work met those expectations. See the Create Scoring Rubrics article for more information. | |
Other Sections/Schedules
Adding an assignment to other sections is only available once the assignment has been saved.

To add the assignment to other sections, click Add/Edit and then the Add Sections button:
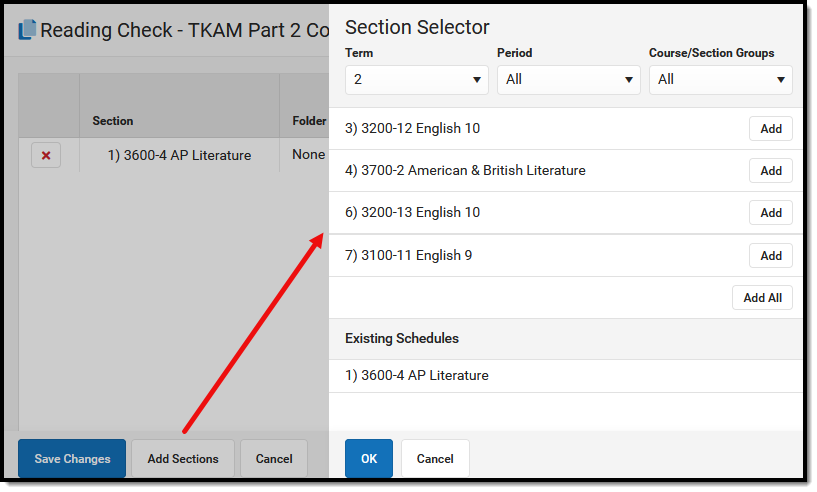 Add the assignment to other sections you teach.
|
Filter this section list by Term, Period, or Course/Section Groups at the top.
Click Add next to any section to add it to the assignment.
Any sections that already include this assignment are listed at the bottom in Existing Schedules.
Click OK when finished.
| |
Once added to the list, make any needed updates to each instance of the assignment, including the Folder (Campus Learning only), whether it's Visible on Campus Student & Parent, the Start/End Dates, and the Grading setup. By default, these fields match the original assignment.
Click the red X next to a section to remove the assignment from it. Sections cannot be removed if the assignment has already been scored.
Note: Previously, assignments had to have the same grading setup across sections. In the new assignment editor, grading setup can be different in each instance of the assignment, including the task/standard, the category, and the scoring information.
Click the blue scoring link ("100 points" in the example image above) to view and modify Grading information for that instance.
Click Save Changes when finished. The Other Sections/Schedules area now lists other sections that include this assignment. | ||
Advanced Features
If your district has Campus Learning and has given you the Enhanced Curriculum Editor tool right, additional features display for assignments and resources.
Summary & Notes
The Summary is a text field where you can enter any information about the assignment that would be helpful to students, such as instructions, objectives, and lesson materials.
- Format the text as desired, including bold/italics, text colors, or bullets and numbering in the
 menu.
menu. - You can also add links, tables, images by clicking those icons in the editor.
- Click the equation button to build a math equation using common mathematical operators, characters, and formulas.
- Click the + button to see options for embedding videos, special characters, or any other embeddable content enabled by your district.
Content in the Summary panel displays for students and parents (if the assignment is Visible) just as you see it here in the editor.
Notes are additional text fields, which can be helpful for grouping entered content, slotting text between other attachments and tasks, and adding information that is only visible to other teachers.
| Adding Images
To add an image, click the
|
 |
 |
The Summary always displays above any additional content added to the assignment, such as files or notes.
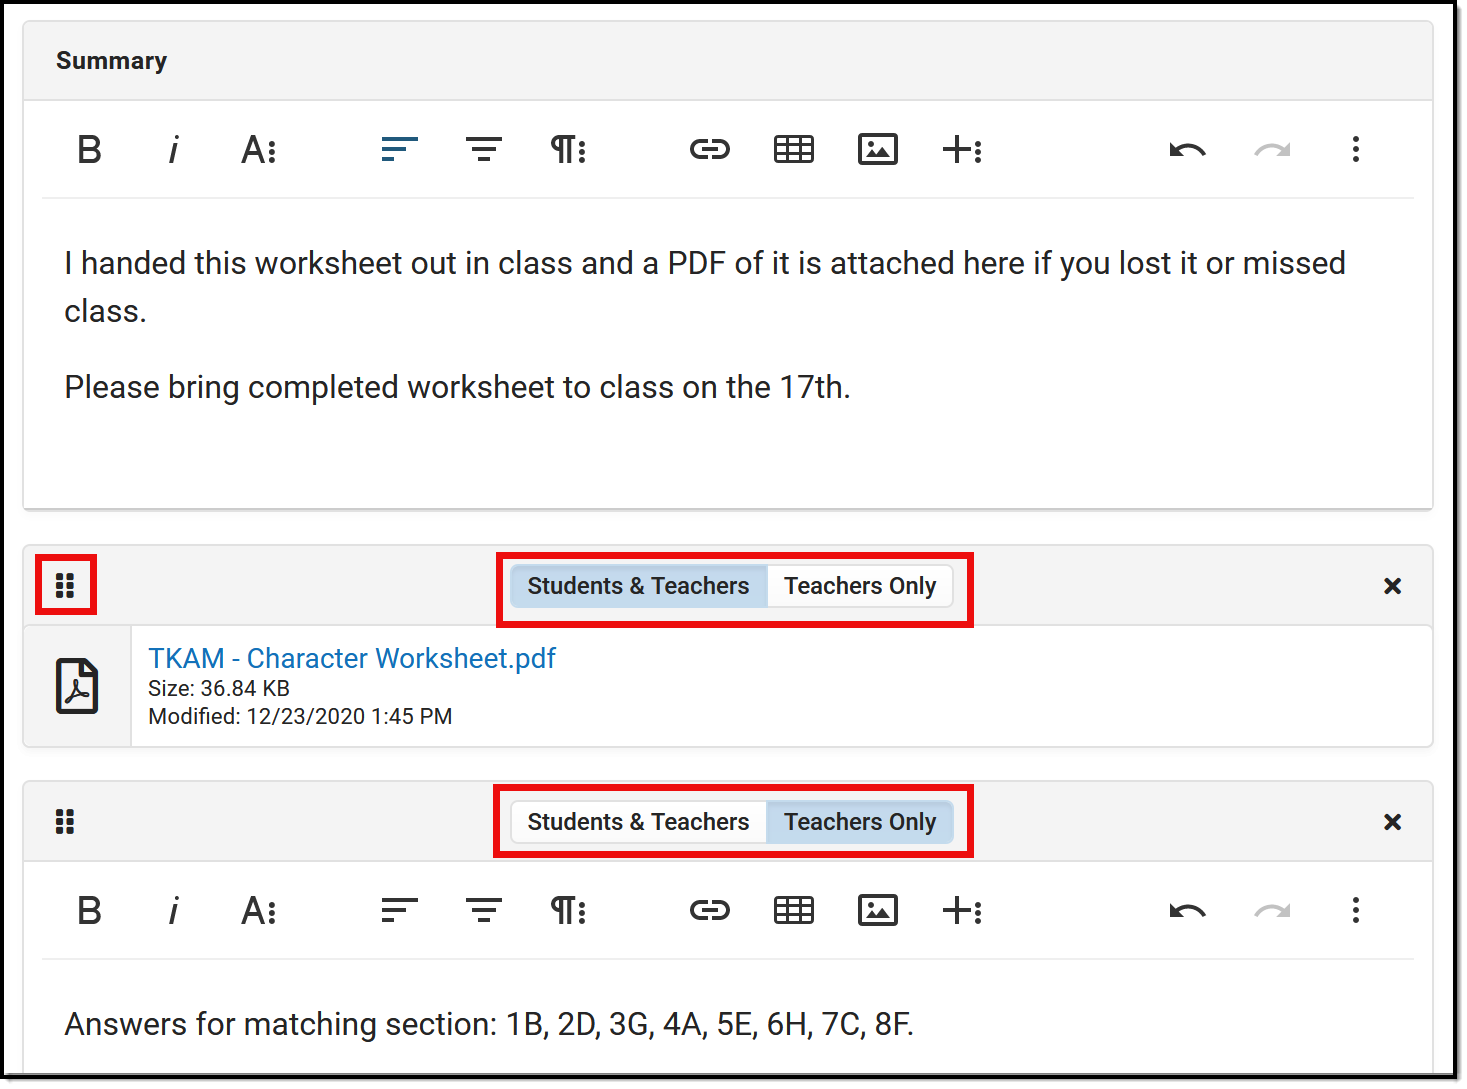
If multiple attachments, notes, or tasks are added below the Summary, they can be rearranged by clicking the dots icon in the top left corner and dragging the segment into the desired order.
The Summary is visible to anyone who can see the assignment. Other attached content and notes can be visible to Student & Teacher or to Teachers Only, which may be a helpful option for content such as an answer key.
Click the Preview button at the bottom of the editor to see how the assignment will appear for students. |
Attach Content
Various options may be available in the Attach Content section, based on your district/schools setup. Options include:
Add a Task
Additional tasks can be aligned to an assignment or resource. Check out the following articles for more information:
'About' Section
The About section on an assignment, resource, or folder houses the metadata used to identify curriculum in the Curriculum Library.
This section includes the following fields:
|  |
Individualized Assignments
Individualizing assignments allows teachers to specify which students receive an assignment and each student's Start and End Dates. Assignments can be assigned to select students, as in the case of remedial or advanced work. Start and End Dates can also be individualized to give students the time they need to complete assignments. Quiz timers can also be individualized.
See the Individualized Assignments for more information.
Save
Save
Save
Save
Some advanced assignment features are only available with the Enhanced Curriculum tool right, which is included as part of the Campus Learning Suite premium offering. Visit the Campus Learning Suite page to learn more.
From many places within Campus Instruction, teachers can quickly create new assignments using the assignment editor. The assignment editor is the same in all locations. In this video, a teacher will create a new assignment for one of their course sections.
Modifying Existing Assignments
Within the Grade Book, teachers can edit existing assignment information and alignment details by clicking the assignment name to open the assignment editor.
Advanced assignment tools are available as part of the Campus Learning premium offering and require the Enhanced Curriculum Editor tool right, including the Summary, Attach Content, and Add a Task areas of the Assignment editor.
Location: Click Add or List button in tools throughout Instruction, including Grade Book, Planner > My Planner, Assignment Overview, and Progress Monitor
Access assignments in various places throughout Instruction. Regardless of what tool you're in, the editor looks the same.
Available Actions
CreateCreate an assignment or resource anywhere you see an Add button (in the Planner, it's called New)
Click +Add to add an assignment, or click the arrow on the right of the button to add a Folder or a Resource, or to add an assignment starting with a Discussion, Quiz, or Submission.
Categories must exist before assignments can be created. |
ModifyTo modify an assignment, open it by clicking the name or abbreviation and then click the Edit button
Click Edit to modify the item, or click the arrow on the right of the button to move the assignment to a different folder or delete it.
When editing an item that is in multiple sections, you'll have the option of whether changes should be made to all instances or just the current one. |
Access to assignments requries tool rights to a grading tool, such as Grade Book, Planner, or Progress Monitor. Additionally, the Enhanced Curriculum tool right in Additional Access Rights > Instruction Tools grants access to advanced assignment options.
See the Instruction Tool Rights article for more information.
Other Edit Options
Click the arrow next to the edit button to access other options:
| Duplicate | Move | Delete |
| Creates a duplicate of the current item. | Allows you to select a different parent folder in the curriculum structure. | Removes the current item. Be careful when deleting assignments that have scores. |
Everything moved, help!
Recent improvements included redesigning the assignment editor. But don't worry, it's the same fields, just in different places. Expand below for a comparison of the old assignment editor and the new one:

What are Resources?
| Resources are, essentially, assignments that will not be scored. They allow teachers to share information with parents and students within the context of section curriculum.
When creating an item, toggle Grading on to make it an assignment, or off to make it a resource. Because resources are not scored, they do not display in the Grade Book.
|
 |
Resources can be grouped within whatever folder structure you use to manage your curriculum. Consider creating a Course Resources folder to collect section-wide or often used materials, such as a syllabus.
Content, Details, and Reflections
Assignments and resources are made up of three tabs:
- Content: Information such as Dates, Grading, and the content of the assignment. This article describes this tab.
- Details: Metadata used when sharing curriculum to the Curriculum Library. See the Curriculum Details article for more information.
- Reflections: Records of how curriculum was used in your class. See the Reflections article for more information.
Areas of the Editor
Every assignment or resource needs a Title. Let's walk through each of the sections in the assignment editor:
In a hurry? Don't have Campus Learning or the Enhanced Curriculum Editor tool right? See The Basics: Assignments. |
Section Settings
 |
Visible to Class indicates if this item is visible on Campus Student and Campus Parent. Click the Preview button at the bottom of the editor to see what the assignment will look like for parents or students.
Start and End Dates default to today. Click the date to type or select another day. To set both dates easily, click the date to open the calendar, then click the Start Date you want and then the End Date, without closing the calendar. Dates are not required if Grading is toggled off.
To enter a time, such as for a quiz only available during a class period, click the clock icon.
By default, an assignment is available to all students in a section. To change this, click the All Assigned button next to Students. From here, select an existing student group or use the Assigned checkboxes to indicate which students should be assigned. All students not assigned will be marked as Exempt on the assignment. Campus Learning customers can also individualize dates for students. See the Individualized Assignments section for more information. |
The Release Scores setting determines when an assignment's score will be visible to parents and students. Leave the On Score Save option selected to keep scores visible as soon as they are entered. Or select a date for Release Scores On to schedule when scores will be made available to parents and students. This date must be after the End Date entered for the assignment. See the Release Scores article for more information about this option. | |
Grading
If Grading is toggled on, you're working on an assignment. If Grading is off, it's a resource. Include in Grade Calculation is marked by default - unmark this checkbox if the assignment will be scored but that score should not be included when calculating grades, such as for a practice test. If not marked, the assignment displays with an * in scoring screens like the Grade Book and Progress Monitor.
The Abbreviation for the assignment populates as you enter a title. The Sequence defaults to 1. Modify if desired, up to 7 digits: XXXXX.XX. The abbreviation is used to identify assignments in the Grade Book and the sequence is used to sort.
Grading alignments display in collapsible sections, with basic information in the heading.
Select a Category for the assignment. Categories are groupings of related assignments, such as Homework or Formative. If Default Scoring options are setup for a category, the Scoring Type, Points, and/or Multiplier may auto-populate based on the category selected. These details are still editable. See the Categories article for more information. Standards and Grading Tasks are item to which grades are posted. The Standard/Task of your current context, such as what's selected in the Grade Book, is selected by default. Only alignments available in your current section display.
Select a Scoring Type to indicate how the assignment will be scored. Options are: |
 Select applicable grading information for the assignment.
|
If desired, change the Multiplier if using points or marks, which determines how the assignment affects students' grades. For example, a 50 point assignment with a Multiplier of 2 counts as a 100 point assignment.
Add additional scoring alignments by clicking Add Standard/Task. Multiple alignments are most commonly used in standards-based grading, where a single assignment may demonstrate mastery in multiple standards.
The Add Scoring Rubric button displays for Campus Learning users who have the Enhanced Curriculum tool right. Scoring Rubrics allow teachers to communicate expectations for assignments with students and evaluate how well student work met those expectations. See the Create Scoring Rubrics article for more information. | |
Other Sections/Schedules
Adding an assignment to other sections is only available once the assignment has been saved.

To add the assignment to other sections, click Add/Edit and then the Add Sections button:
 Add the assignment to other sections you teach.
|
Filter this section list by Term, Period, or Course/Section Groups at the top.
Click Add next to any section to add it to the assignment.
Any sections that already include this assignment are listed at the bottom in Existing Schedules.
Click OK when finished.
| |
Once added to the list, make any needed updates to each instance of the assignment, including the Folder (Campus Learning only), whether it's Visible on Campus Student & Parent, the Start/End Dates, and the Grading setup. By default, these fields match the original assignment.
Click the red X next to a section to remove the assignment from it. Sections cannot be removed if the assignment has already been scored.
Note: Previously, assignments had to have the same grading setup across sections. In the new assignment editor, grading setup can be different in each instance of the assignment, including the task/standard, the category, and the scoring information.
Click the blue scoring link ("100 points" in the example image above) to view and modify Grading information for that instance.
Click Save Changes when finished. The Other Sections/Schedules area now lists other sections that include this assignment. | ||
Advanced Features
If your district has Campus Learning and has given you the Enhanced Curriculum Editor tool right, additional features display for assignments and resources.
Summary & Notes
The Summary is a text field where you can enter any information about the assignment that would be helpful to students, such as instructions, objectives, and lesson materials.
- Format the text as desired, including bold/italics, text colors, or bullets and numbering in the
 menu.
menu. - You can also add links, tables, images by clicking those icons in the editor.
- Click the equation button to build a math equation using common mathematical operators, characters, and formulas.
- Click the + button to see options for embedding videos, special characters, or any other embeddable content enabled by your district.
Content in the Summary panel displays for students and parents (if the assignment is Visible) just as you see it here in the editor.
Notes are additional text fields, which can be helpful for grouping entered content, slotting text between other attachments and tasks, and adding information that is only visible to other teachers.
| Adding Images
To add an image, click the
|
 |
 |
The Summary always displays above any additional content added to the assignment, such as files or notes.
If multiple attachments, notes, or tasks are added below the Summary, they can be rearranged by clicking the dots icon in the top left corner and dragging the segment into the desired order.
The Summary is visible to anyone who can see the assignment. Other attached content and notes can be visible to Student & Teacher or to Teachers Only, which may be a helpful option for content such as an answer key.
Click the Preview button at the bottom of the editor to see how the assignment will appear for students. |
Attach Content
Various options may be available in the Attach Content section, based on your district/schools setup. Options include:
Add a Task
Additional tasks can be aligned to an assignment or resource. Check out the following articles for more information:
'About' Section
The About section on an assignment, resource, or folder houses the metadata used to identify curriculum in the Curriculum Library.
This section includes the following fields:
|  |
Individualized Assignments
Individualizing assignments allows teachers to specify which students receive an assignment and each student's Start and End Dates. Assignments can be assigned to select students, as in the case of remedial or advanced work. Start and End Dates can also be individualized to give students the time they need to complete assignments. Quiz timers can also be individualized.
See the Individualized Assignments for more information.
Save
Save
Save
Save
Some advanced assignment features are only available with the Enhanced Curriculum tool right, which is included as part of the Campus Learning Suite premium offering. Visit the Campus Learning Suite page to learn more.
Assignments can be modified wherever assignments are listed, including the Grade Book, Progress Monitor, Planner, or Assignment Overview. This video demonstrates how to manage scored assignment details and alignments in the grade book.
Duplicate Assignments and Resources
Teachers can use Duplicate to create an exact copy of an assignment or resource.
Location: Open an assignment > click the arrow next to the Edit button > select Duplicate
Duplicate an assignment or resource to create an exact copy of it. Use the Curriculum Copier to copy multiple items at a time or to copy curriculum between sections or terms.
 Click Duplicate to create a copy of an assignment or resource.
Access to assignments requries tool rights to a grading tool, such as Grade Book, Planner, or Progress Monitor. Additionally, the Enhanced Curriculum tool right in Additional Access Rights > Instruction Tools grants access to advanced assignment options. See the Instruction Tool Rights article for more information.
To duplicate an assignment open it in the Grade Book, Planner, or anywhere else you access assignments in Campus. Click the arrow next to the Edit button and select Duplicate. The copied assignment matches the original with the addition of "Copy of" before the title.
All details are copied from the original assignment, including dates, grading, other sections, content, and tasks. Modify fields as desired and click Save when finished. See the Assignments & Resources article for more information about the fields in this editor.
Use Duplicate to copy an assignment with a Scoring Rubric to reuse the rubric.
Teachers can use Duplicate to create an exact copy of an assignment or resources. This video demonstrates how to duplicate an assignment.
Enter Assignment Scores and Comments
Score Assignments
Teachers can enter student scores for each assignment in the Grade Book. Additionally, teachers can add assignment flags and/or comments to record more information about student work.
Tool Search: Grade Book
Assignments are scored in the Grade Book. The view of the Grade Book is based on the Section, Term and Task you've selected in the Campus toolbar.
- The Term you select determines which assignments display in the Grade Book based on the dates of the assignment.
- The Task you select determines which assignments display based on the Scoring Alignment of the assignment.
Assignments are sorted based on the Sort By and Sort Order fields in the Settings.
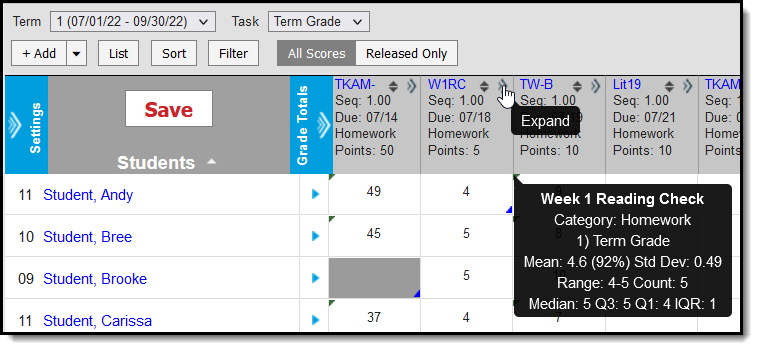 Enter scores in the Grade Book grid or expand the assignment for more options.
For information about scoring student submissions, see the Scoring Submissions article.
Enter scores for an assignment in the appropriate column, based on the scoring options selected for that assignment, such as points or rubrics. For example, in the image above, the highlighted assignment is aligned to a Grading Task and scored with Points, with 50 points possible. Use the Arrow Keys, Tab and Enter to navigate among the score cells.
The column header includes the abbreviation of the assignment, the Sequence, the Due Date, the Category and the Points Possible. Clicking the abbreviation or ALT E opens the assignment editor where you can edit the assignment.
Assignments that are not marked to Include in Grade Calculation display with an asterisk. Scores can be entered for these assignments, but they are not included in grade calculation.
To access additional scoring options, expand the assignment by clicking either the chevron in the top right of the header or in the score grid, or by using the ALT A key command.
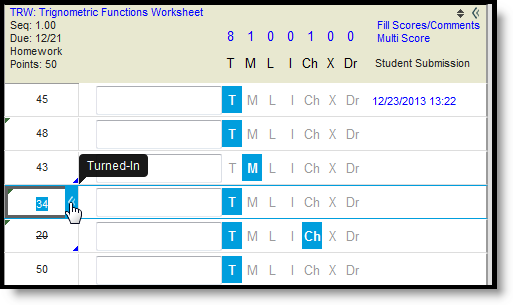
Expanded View of an Assignment
Within this expanded view, you can enter comments for scores, add flags to scores, and apply different scoring options, like filling and multi score.
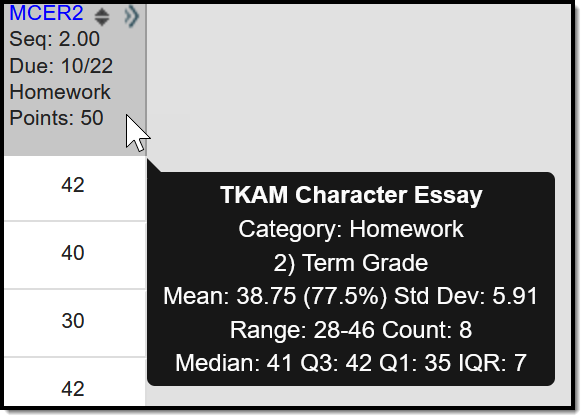 | Hover over the column header for an assignment to see the Calculation Summary, which includes the full name of the assignment and category and calculations such as the mean (average) and score range. |
If an assignment has a Release Date set, the column in the grade book for that assignment displays as blue. Teachers have the option of setting a release date to schedule when scores will be made visible to parents and students. See the Release Scores article for more information.
Score Flags
The following table describes the effect of marking a flag for an assignment:
Abbreviation | Description | Grid Indicator | Additional Logic |
|---|---|---|---|
T | Turned In | Top left of grid | If you mark an assignment as Turned In and then as Missing, the Turned In flag is removed. Assignments which are enabled for Submission through Campus Student are closed for submission when the Turned In flag is marked. Assignments are flagged as Turned In when a student submits work through Campus Student. To allow students to resubmit an assignment, remove the Turned In flag. |
M | Missing | Bottom right of grid | The logic of the Missing flag is dependent on whether a Missing Assignment Percentage is entered by your district. If the district has not set a calculation, the Missing flag is an indicator only; flagged assignments CAN be scored. If the district has set the flag to auto-calculate and entered a Missing Assignment Percentage, flagged assignments calculate as the entered percentage of Total Points for assignments scored using Points or Marks. Hover over the score field to see the calculated score. In this instance, a score cannot be entered if the Missing flag is selected. Score are not auto-calculated for assignments scored using Rubrics. If you mark an assignment as Missing and then as Turned In, the Missing flag is removed. If the missing flag is set to auto-calculate, when calculating a Proficiency Estimate via Mode of a limited number of assignments, if any of those assignments are marked as Missing, the Proficiency Estimate will not calculate. How do I know what my district has set? Can you enter a score for a missing assignment? If so, no calculation has been set. If you cannot enter a score, hover over the score field to see the calculated score. For example, if a district has set the missing flag as 25%, a 20 point assignment calculates as 5 points, as shown below:
|
L | Late | Bottom right of grid | This flag has no effect on student score. |
I | Incomplete | Bottom right of grid | This flag has no effect on student score, except: When calculating a Proficiency Estimate via Mode of 3 or Mode of 5, if any of the 3 or 5 scores are marked as Incomplete, the Proficiency Estimate will not calculate. |
Ch | Cheated | Bottom right of grid | Score appears stricken-through. Scores with the cheated flag automatically calculate as zero. When calculating a Proficiency Estimate via Mode of 3 or Mode of 5, if any of the 3 or 5 scores are marked as Cheated, the Proficiency Estimate will not calculate. |
X | Exempt | Grey grid color | Score appears stricken-through. The grid of scores flagged as Exempt appear in grey. Exempted assignments do not display in student and parent views. Exempt scores are not included in In Progress grade calculations. When calculating a Proficiency Estimate via Mode of 3 or Mode of 5, if any of the 3 or 5 scores are marked as Exempt, the Proficiency Estimate will not calculate. |
Dr | Dropped | Bottom right of grid | Dropped scores are not included in In Progress grade calculations. The Drop Lowest Score option can be set for categories to automatically mark the lowest score in the category as dropped. |
| - | - | Square in bottom left corner | A small gray square displays in the bottom left corner of the score grid if the student was not rostered into the section on the due date of the assignment. |
If you enter a comment on a score, a red indicator displays in the top right corner of the score grid. Hovering over the score displays the comment.
Typing the flag Abbreviation into the score grid sets that flag, unless the abbreviation is a valid Assignment Mark or Rubric score. If you clear the abbreviation and move to a different cell, a message appears asking if you want to clear any flags on the score. However, replacing the abbreviation with a score does not remove the flag.
Hovering over the score or selecting a score grid displays any flags on that score, as in the example above where the assignment is marked as Turned In for the student.
Click a flag in the assignment header to mark all assignments with that flag.
Fill Options
Use the fill options for an assignment to save time entering scores or proficiency levels.
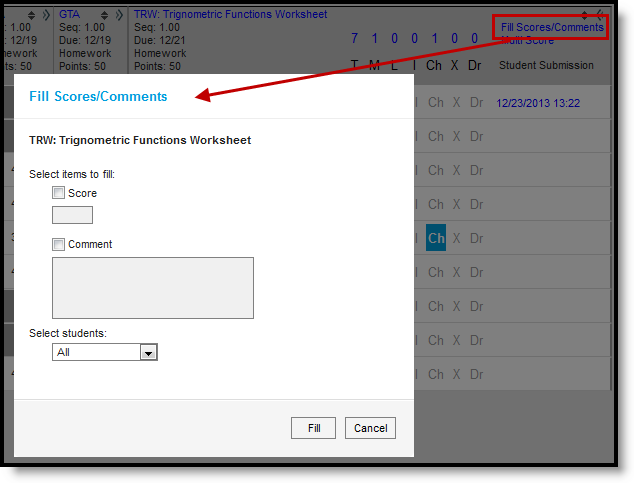
Fill Options
Indicate whether you want to fill Scores or Comments or both using the checkboxes. Enter the score and/or comment to add. Then select which students should be given the score and/or comment. Options are:
- All - adds the score and/or comment to all students for the assignment.
- Empty - adds the score and/or comment to all student who do not already have a score and/or comment.
- Present & Empty - adds the score and/or comment to all students who do not already have a score and/or comment and who are not marked as absent on the assignment due date.
Click Fill to fill scores and/or comments.
Score Button (and Scoring Multiple Alignments)
Clicking the ![]() button in various places in Campus Instruction, including the assignment editor, the Progress Monitor, and the Curriculum List, opens the the Scoring editor. This view is also accessed through the Multi-Score link in the Grade Book and is helpful when scoring assignments with multiple scoring alignments.
button in various places in Campus Instruction, including the assignment editor, the Progress Monitor, and the Curriculum List, opens the the Scoring editor. This view is also accessed through the Multi-Score link in the Grade Book and is helpful when scoring assignments with multiple scoring alignments.
For example, an essay assignment in my AP Literature class is aligned to multiple standards that evaluate citing sources, identifying themes, and so on. In this scoring editor, I can score all alignments at once, instead of having to switch the Task context in the Grade Book.

This Scoring view makes it easy to score multiple alignments on one assignment.
For alignments scored using Rubrics, options display as buttons if there are 5 or fewer rubric scores. Otherwise, select a score from the dropdown list. Type scores for assignments using points or marks.
- Click the
 to view Score Analysis for the assignment if your district is using Campus Learning.
 - Click on a student's name to view demographic and contact information. If the student has an absence or tardy record for the due date of the assignment, an indicator displays below the student's name.
- Hover over the column header to view the full name of the Standard or Grading Task.
- Entered Comments also display in the Grade Book.
Tip: Click the  to include the text {Name} in your comment and then click
  to fill the comment (with options to Fill All, Fill Empty, and Fill Empty & Present). The comment filled for each student includes that student's first name in place of {Name}.
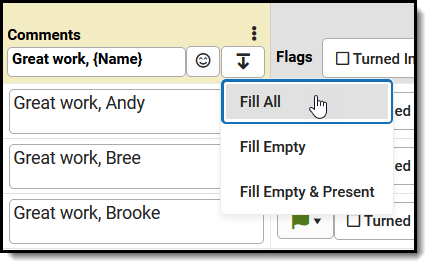
- Click the
 to add a flag to the assignment. Click a flag to remove it. Since the Dropped flag applies to individual alignments, not the assignment as a whole, selecting this option places a
  next to each alignment; click the flag to remove it from scores that should not be dropped.
 - The Student Work column links to other materials. Click Evaluate Work for assignments with submissions to open the submission scoring screen and view submissions. Click Evaluate Rubric for assignments with Scoring Rubrics. These options are only available for teachers with access to Campus Learning.
Fill Options
Fill scores vertically (by alignment) or horizontally (by student).
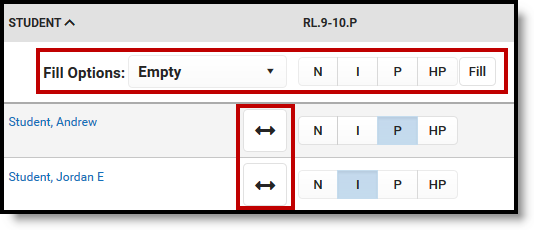
Fill scores by alignment in the column header or by student using the two-way arrows.
Click or enter a score in the Fill row just below the column header to fill scores for that alignment (vertical fill). The Fill Options list determines which scores are filled:
- All: Fills all scores for that alignment.
- Empty: Fills only alignments that have not yet been scored.
- Empty & Present: Fills only alignment that have not yet been scored for students who were not absent on the Due Date.
Click the ![]() button to fill all alignments for that student (horizontal fill). The Fill Option selected does not apply to the horizontal fill.
button to fill all alignments for that student (horizontal fill). The Fill Option selected does not apply to the horizontal fill.
Rapid Scoring
Rapid Scoring supports teachers who want to quickly enter scores using their keyboard. Turn this option on to change the style of the view and make it more easy to navigate using Tab and Arrow keys.
In this example, I want to quickly enter scores for a quiz my students took in class, typing in scores as I page through papers.
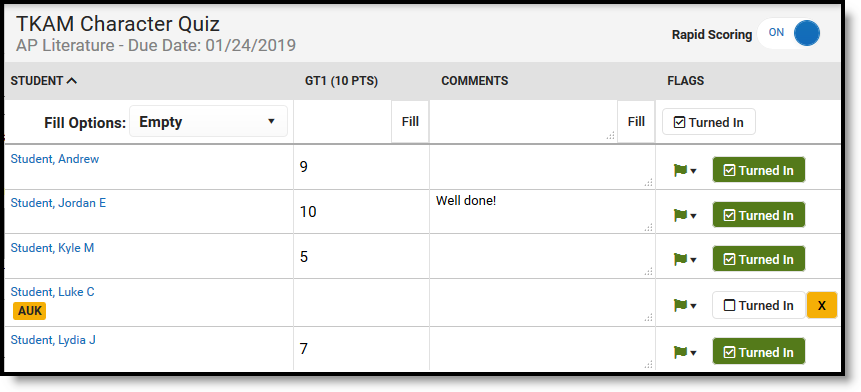
Turn on Rapid Scoring to easily navigate between scoring cells.
Save
There are two parts to this video. The first part focuses on the basic features to score an assignment. The second part looks at more advanced scoring options. To switch between the parts, click the More Videos icon in the video player.
The Grade Book allows teachers to enter scores, flags, and comments for an assignment. This video demonstrates how to enter scores, flags, and comments in the Grade Book.

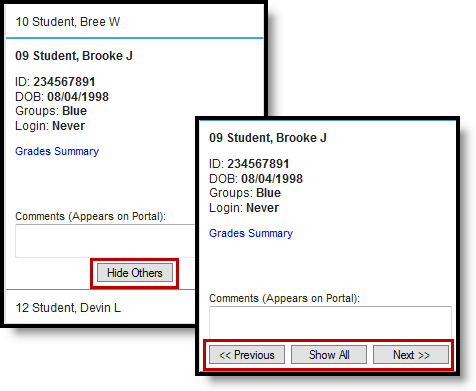
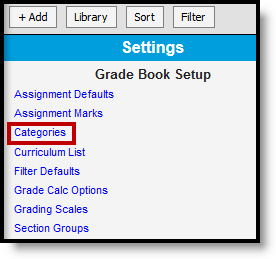
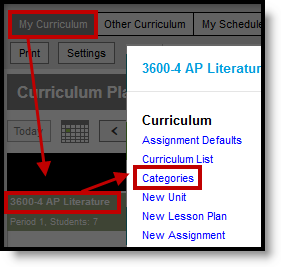
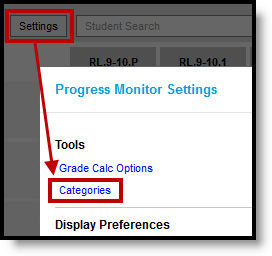

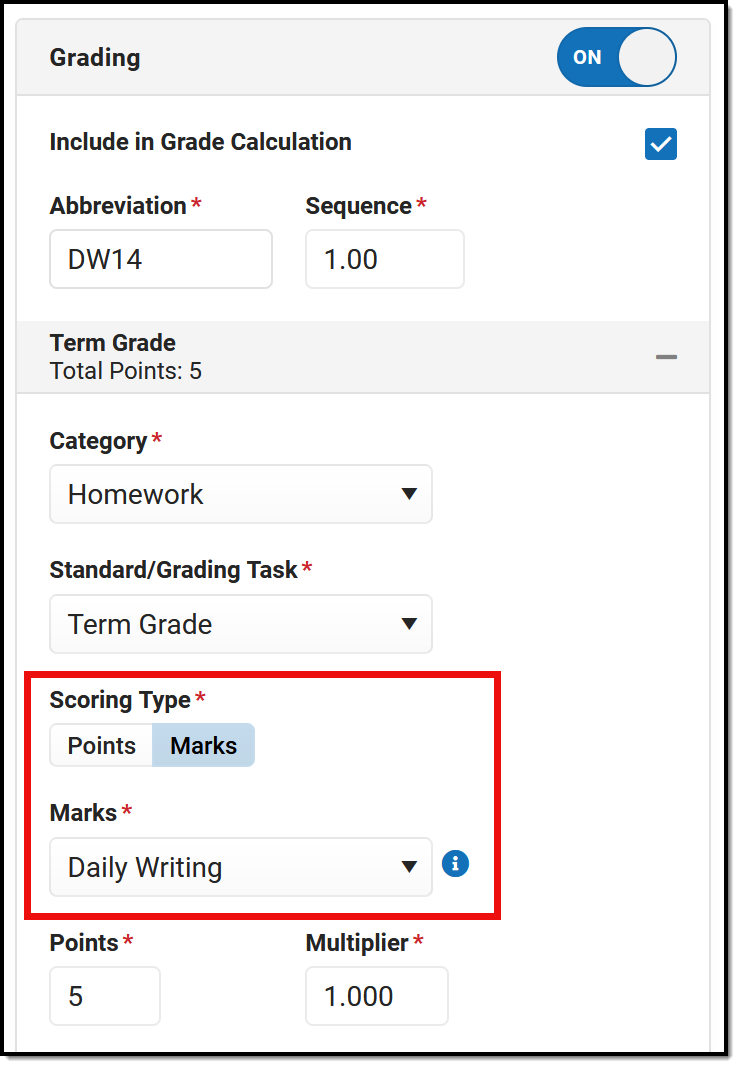


 menu.
menu. 
 to fill the comment (with options to Fill All, Fill Empty, and Fill Empty & Present). The comment filled for each student includes that student's first name in place of {Name}.
