Classic View: Student Information > General > Forms
Search Terms: Forms
The Forms tool is used to store and manage all Custom Forms attached to a student. Custom Forms added and edited using the module specific Documents tools display in the Forms tool.
Only Custom Forms display in the Forms tool. See the Documents tool documentation for information about the document types available in each module:
- Counseling
- Health
- PLP
- Response to Intervention
- Special Ed
List Screen
The List Screen displays all existing Custom Forms attached to a student.
By default all existing Custom Forms are sorted by Year, with the most current year on the top. Drag column headers to the top of the screen to further sort. Forms can also be sorted by clicking on the column headers.
Enter text into the fields below the header or select values in the dropdowns to filter the list of Forms. The funnel icon provides additional filtering options. Custom forms can be filtered by Year, Module, Title, Created Date, Modified Date, and/or Status.
| Column Header | Description |
|---|---|
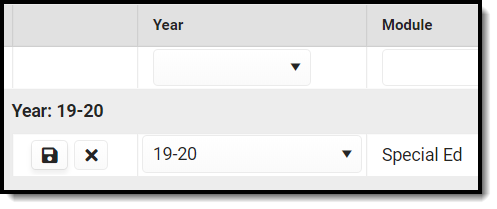
| Year | The year in which the form is organized. If the form needs to be organized into a different year, click the edit button. Select a year from the dropdown and then click the save button or the cancel button to go back. The year cannot be modified for batch created forms. |
| Module | The module in which the form is organized. |
| Title | The name of the form. |
| Created Date | The date the form was created for the student. |
| Modified Date | The date the form was last edited. |
| Status | The state of the form. Statuses include: Non-eSignature Documents Statuses
eSignature Documents Statuses
Note: If the form has no participants, the user can contact their administrator regarding updating Census information OR they can confirm that there aren't any participants by selecting the individual form and Review Participants > Confirm No Participants. The form displays on the Forms tool. |
| Batch Name | Indicates if the form was created with the Form Batch Setup tool. Batch created forms CANNOT be deleted from the Forms tool. |
Blank Forms
Blank forms are print only versions of district or state-defined forms. Blank Forms are uploaded to Campus in the Custom Forms area of System Administration.
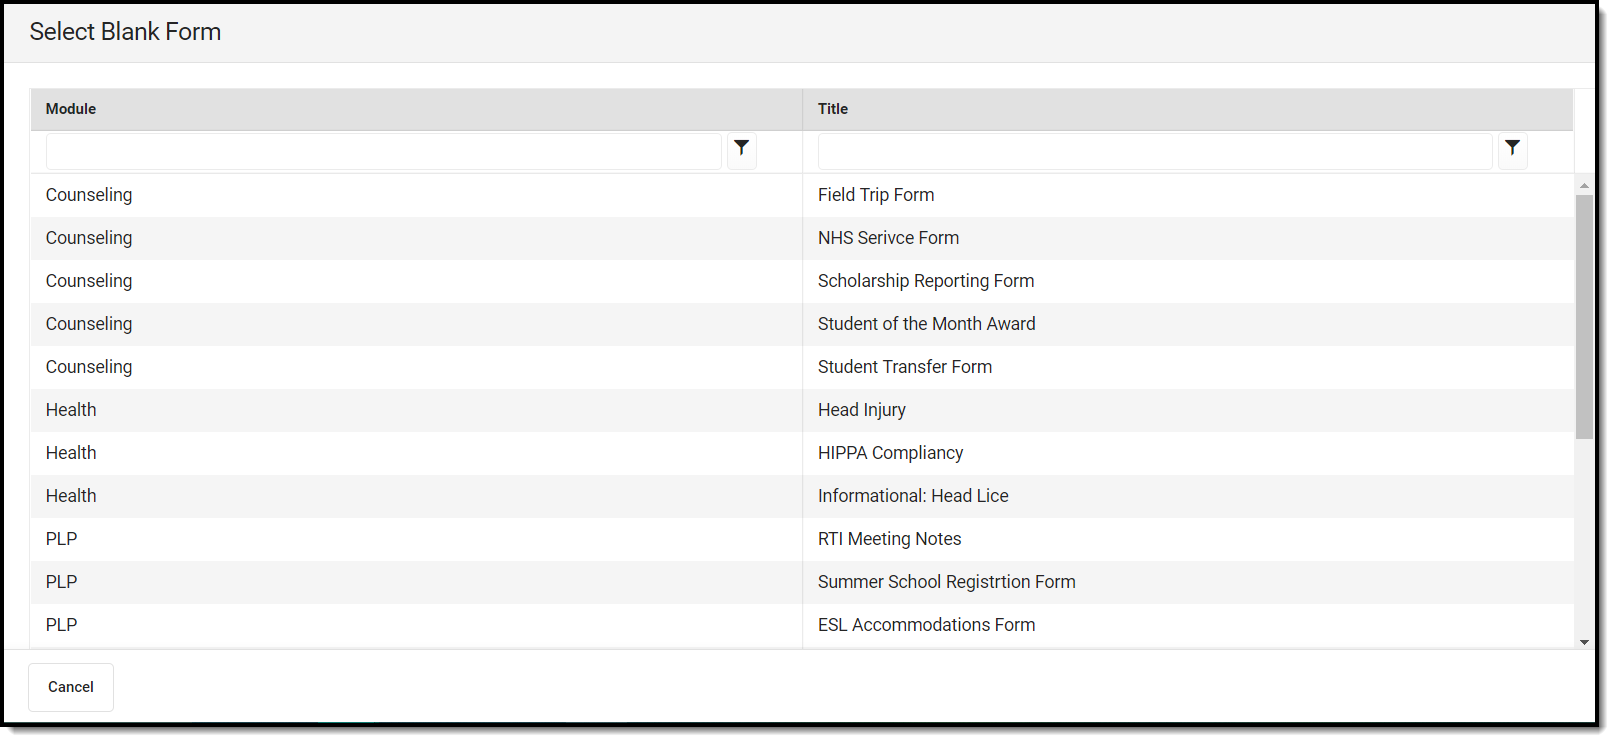
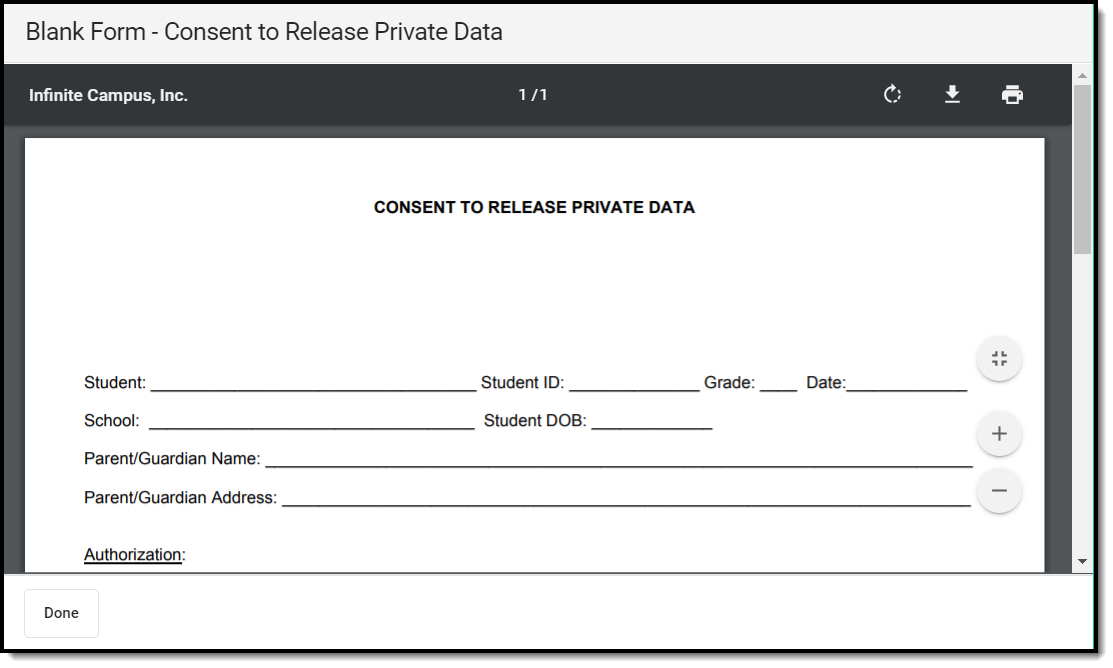
Click the Blank Form buttonto view all the Blank Forms available to print.
Click the print icon at the top of the PDF menu to print. Printing through the browser (File > Print, etc.) prints the Index, not the form itself.
Interactive Forms
Interactive Custom Forms are editable documents used to supplement documents linked to a person's record. To create a new Custom Form, click the New button. The Select Form screen displays all active forms available.
See the Custom Forms tool for information on how to set up each of the Form types. Other options for forms that can be created using the Forms tool include:
| Form Type | Description |
|---|---|
| Interactive |
|
| Interactive, Portal |
|
| Interactive, eSign |
|
| Interactive, p Fillable |
|
| Interactive with DB Table |
|
| Interactive with DB Table, Portal |
|
| Interactive with DB Table, eSign |
Note: eSignature data cannot be queried in Ad hoc. |
| Interactive with DB Table, p Fillable |
Note: eSignature data cannot be queried in Ad hoc. |
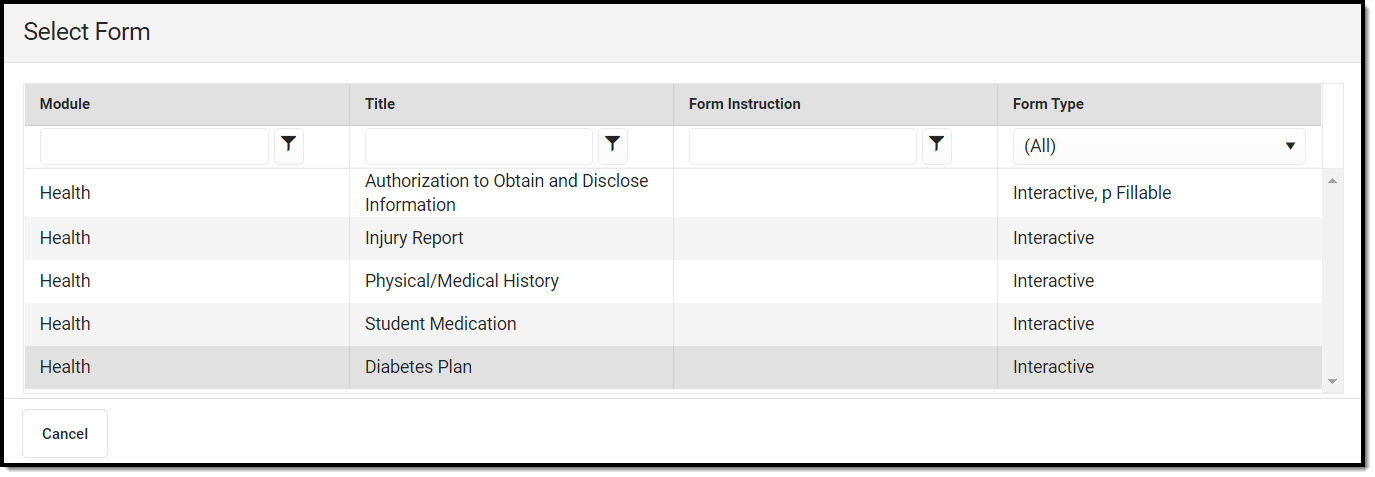 Select Form
Select Prepopulation Data
The content of existing custom forms associated with a person will not change when an Administrator changes Ad Hoc mappings on the form in System Administration. See the Custom Forms article for additional information.
When setting up a Custom Form, form administrators have the option of mapping Ad hoc fields to editable fields in the form. These mapped fields populate based on the person's data to which the form is attached.
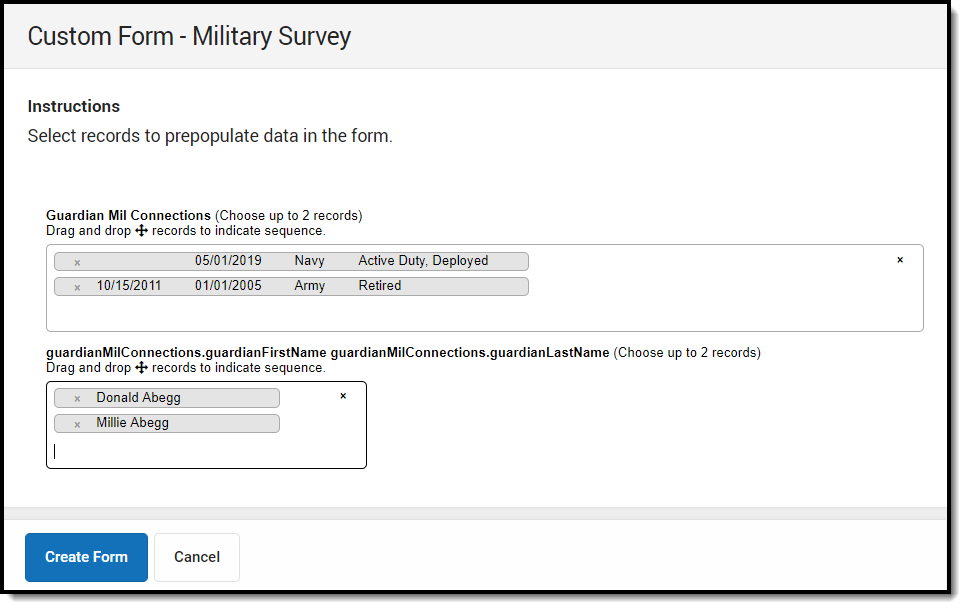
Forms may include multiple fields mapped to the same Ad hoc field, such as reporting a list of team members or behavior events. When the form is created in System Administration, Sequence values are selected for fields in a list. The user creating the form then indicates the order that records should populate in the form. This process is best illustrated with an example.
Military Connection Example
An example form includes a list of a person's team members. When mapping Ad hoc fields to the form, the form administrator aligned guardianMilConnections.guardianFirstName and guardianMilConnections.guardianLastName to two fields in a list, with Sequences of 1 and 2. When a user selects the form to add to a person, the first step is to select which records populate in these fields and in what order. Select records from the dropdown list and reorder them as desired by clicking and dragging records.
Click the Create Form button after all selections have been made. In the form, selected records display in the indicated order.
Complete Form
The Name and the Instructions display at the top of the form. The header also indicates if the form displays on Roster and/or Portal or sent to the parent/guardian and/or student for eSignature and data entry.
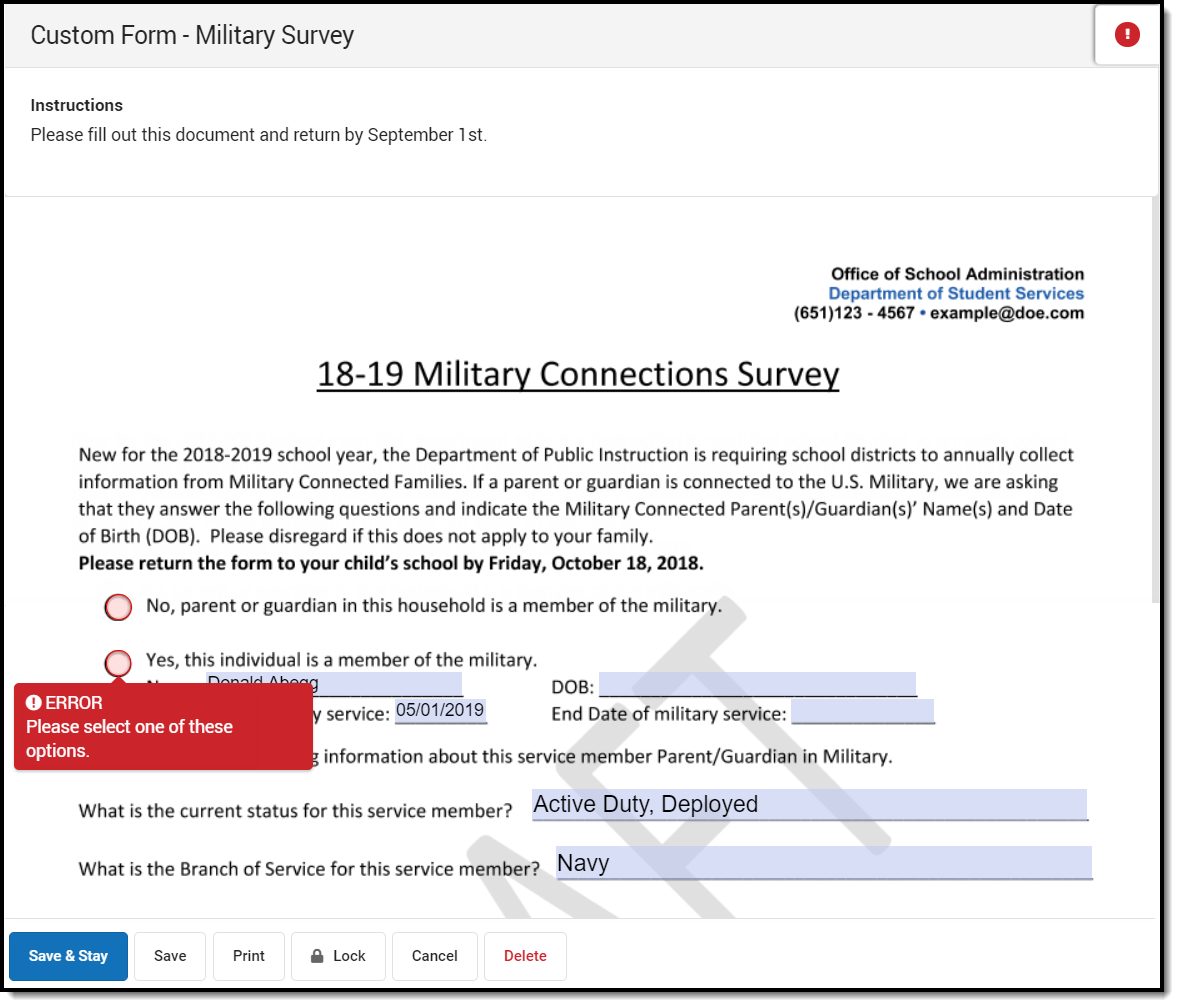
A warning icon displays in the upper right corner if there are any errors, such as missing required fields or overfilled fields. Click this button to navigate through the errors on the form. An unlocked icondisplays if there are no errors and the form is unlocked. A locked icondisplays if there are no errors and the form is locked.
A draft of the form can be saved with rule errors. However, a draft of the document will not save if there are overfilled fields.
Enter and/or select data in the form as needed. Click Save & Stay to save progress and continue working on the form or Save to save progress and navigate to the list screen. Or, click Cancel.
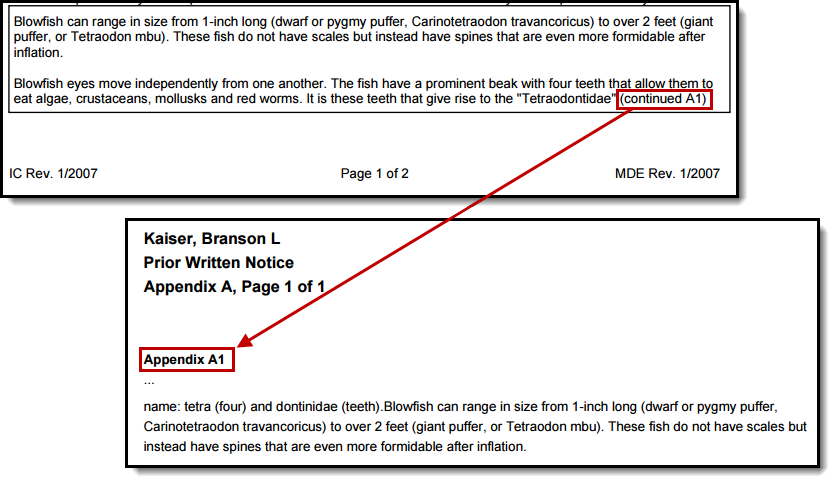
When text entered in a multiline text field on a custom form goes beyond the capacity of space on the page, the overflow text displays on subsequent pages when the form is printed. The text on one page ends with the word Continued and a Letter-Number combination in parenthesis which indicates where the text is continued on another page. See the Custom Forms article for additional information concerning the overflow functionality.
For example, if a text field ends with "Continued A1," the text is continued on an overflow page labeled Appendix A1 (see image 8 below). The ellipsis (...) under the Appendix label indicates the text is continued from a previous page.
The maximum capacity for each overflow text field is 1 MB, with a maximum of 4 MB per form.
Overflow Setup
When creating the form in Adobe, the multiline option must be selected under Text Field Properties. The Overflow checkbox must also be marked in System Administration. See the Custom Forms documentation to learn about Custom Form setup.
Print Draft Custom Forms
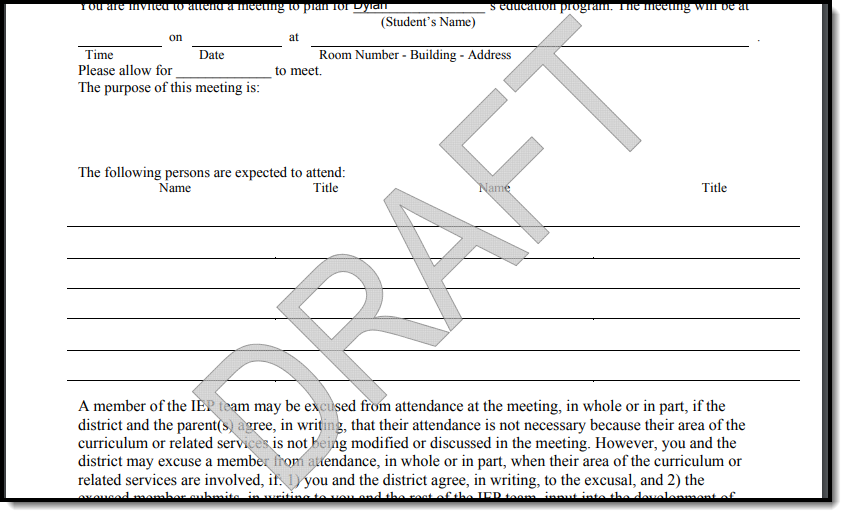
A Draft watermark displays when printing Custom Forms in a draft status.
Print Expired Custom Forms
An Expired watermark displays when printing Custom Forms in an Expired status.
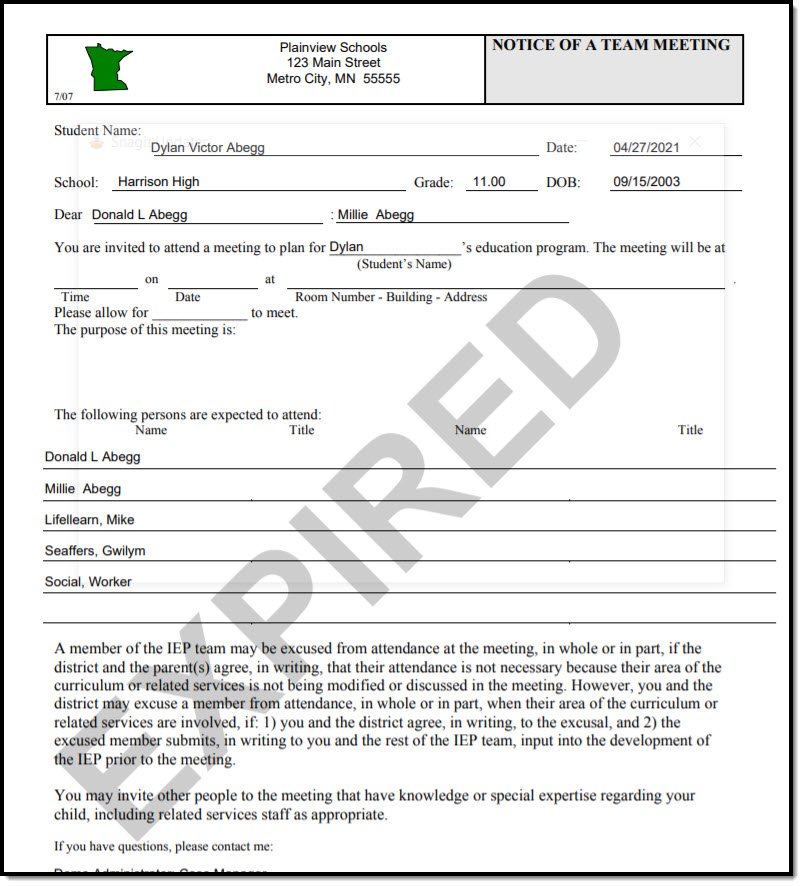 Expired Custom Form
Lock/Unlock
The Lock and Unlock button does not display for Custom Forms that are eSignature Requests. See the Review Participants section for additional information.
Users can click the Lockor Unlock button to change the lock status of the document. A locked document indicates no additional changes can be made. Before locking or unlocking, a validation message displays, alerting the user to the logic associated with locking a form.
Certain Custom Forms display on Campus Parent and/or Campus Student Portal once the form is locked. Three conditions must happen in order for a Custom Form to display on the portal:
| Step | Image Click to Enlarge |
|---|---|
| 1. Mark the Display Custom Form on Portal option on the Custom Forms Upload step. | 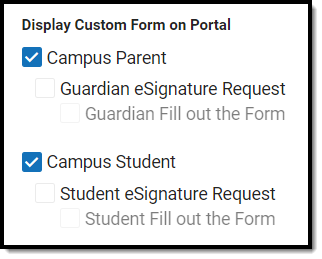 Display Custom Form on Portal Options |
| 2. Mark the Portal Preference for the module the form is in at System Administration > Portal > Preferences > Display Options on the Documents section. Portal preferences are set by school. See the Portal Preferences Display Options documentation for additional information. | 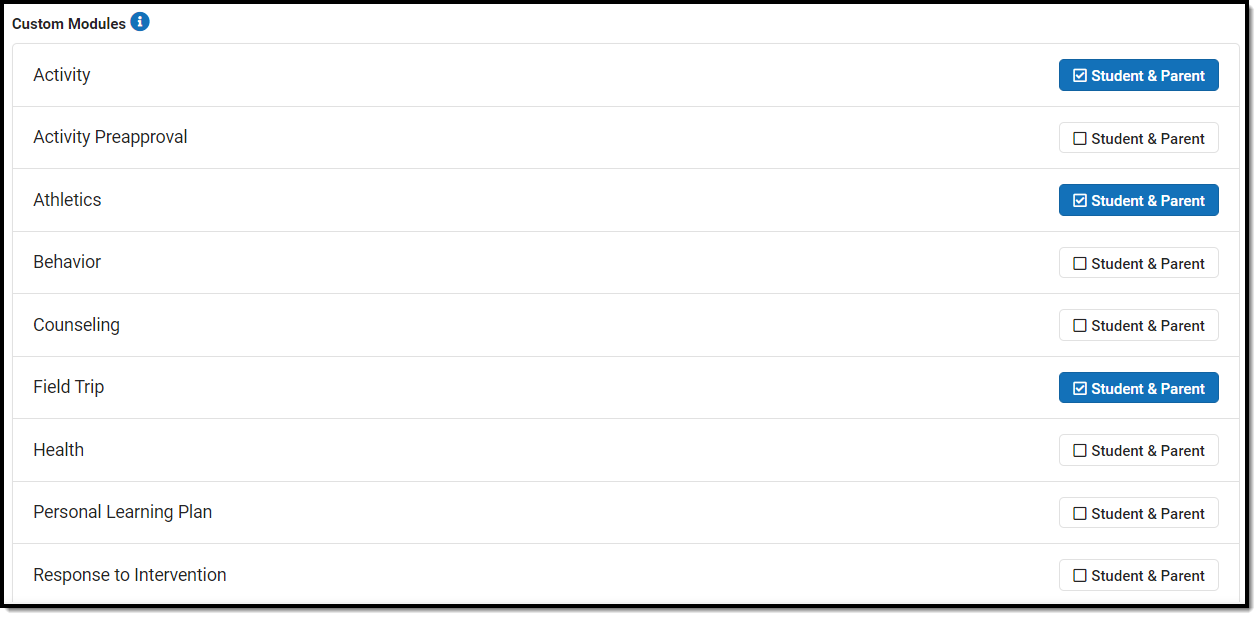 Display Options for Custom Modules |
| 3. Attach the Custom Form to a student and lock the document (either on the Forms tool or the Documents tool). | 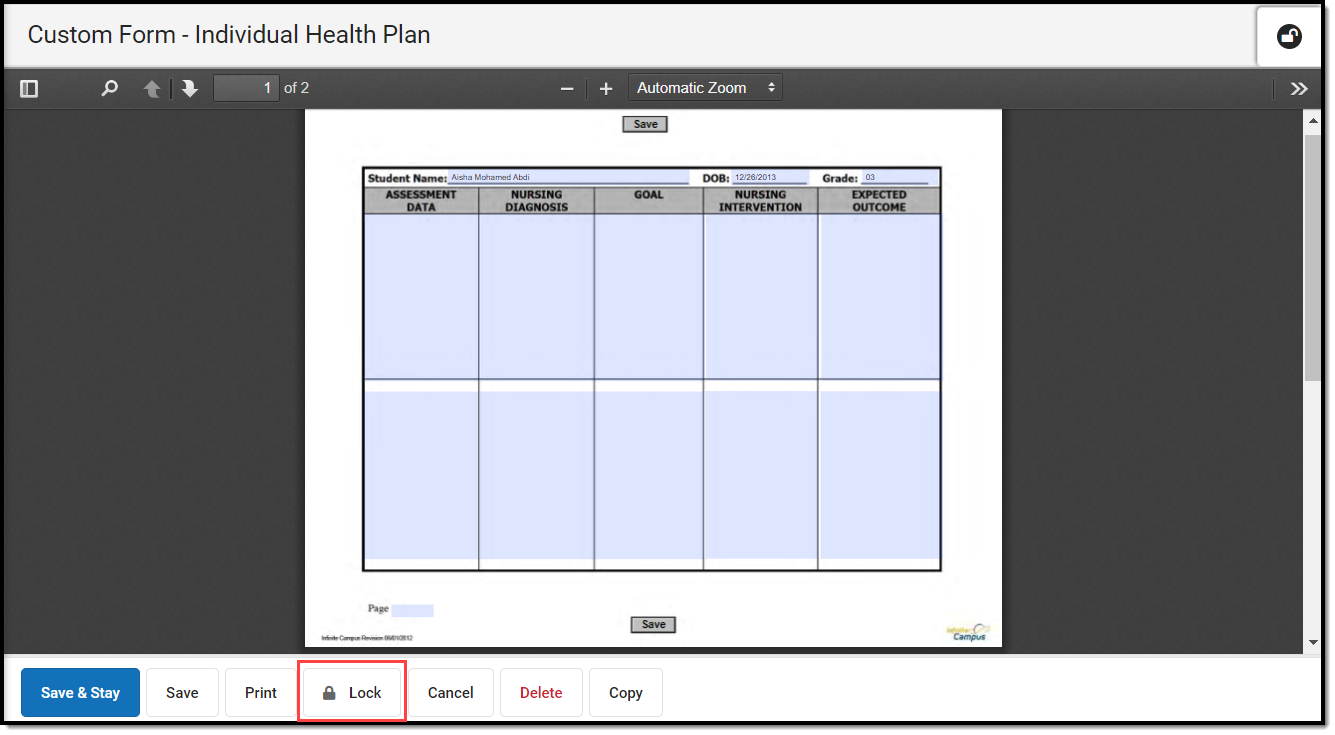 Lock a Custom Form |
When a form is locked and published, the status of the form on the Forms list screen displays as Locked & Published. Hover over the locked icon within the form to view a message that the form is locked and published.
The ability to lock a document is given if the user has Write rights to the Forms tool. The ability to unlock a document requires RWAD rights to Student Information > General > Forms > Module > Unlock AND Write rights to the Forms tool (Student Information > General > Forms). See the Forms Tool Rights documentation for additional information.
Optional Start Date and Time
A Start Date and Time can be set for Forms that are sent to the Campus Parent and/or Campus Student in the future. So if the above conditions have been met concerning the Portal setup, the Form is Locked, and a Start Date and Time is set, the Form publishes to the Portal as of the Start Date and Time.
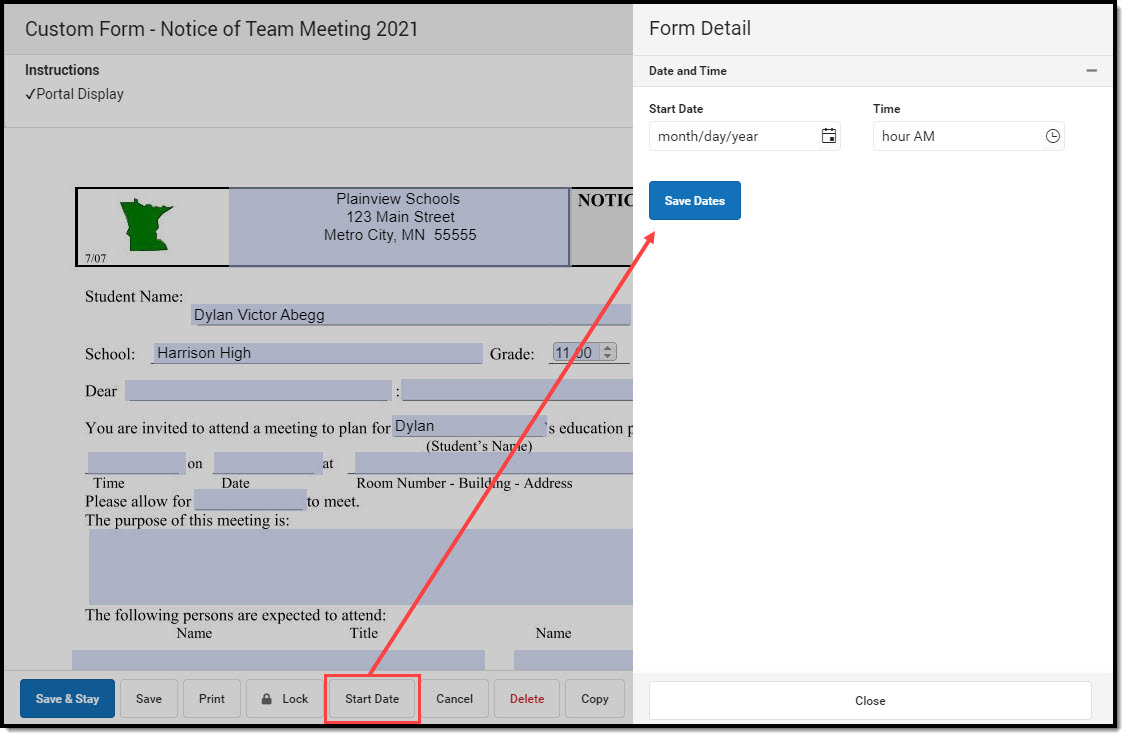 Portal Start Date and Time
Review Participants
Forms supports emancipated student functionality. Emancipated students receive a form via the Parent Portal if it is marked to be sent to the Parent Portal. See the Emancipated Students documentation for information on setting up emancipated students.
The Review Participants button displays after an initial save. When finished entering data into the form, click the Review Participants button to verify to whom the form is being sent and send eSignature request(s). The Form Detail also allows the user to select when the Form is sent and when the form becomes read-only on the Portal.
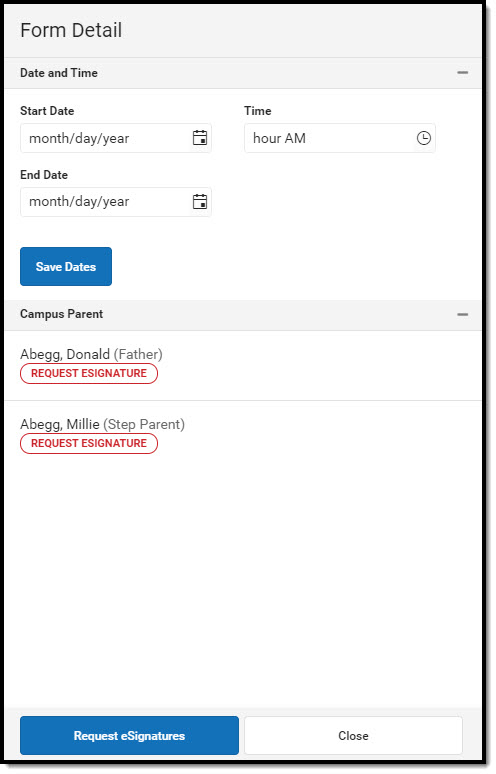 Review Participants Side Panel
Custom Form eSignatures
If the Request Parent/Guardian and/or Student Signature option is selected on the Custom Forms Setup tool, this form is sent to parent/guardian(s) and/or the student for an electronic signature (eSignature). Note certain forms allow the parent/guardian and/or the student to enter data.
Note: eSignature Custom Forms do not sync to the state for State Edition users.
In order for an eSignature Request/Fillable form to be sent to the Campus Parent or Campus Student Portal, the following conditions must be met:
| Step | Image Click to enlarge |
|---|---|
1. Mark the Display Custom Form on Portal AND the Request eSignature options on the Custom Forms Upload step. | 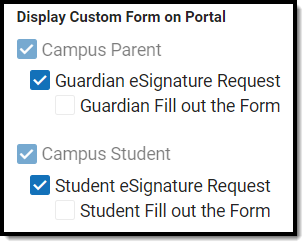 Display Custom Form on Portal Options |
2. Mark the Portal Preference for the Module the form is in at System Administration > Portal > Preferences > Display Options on the Documents section. Portal preferences are set by school. See the Portal Preferences Display Options documentation for additional information. |  Display Options for Custom Modules |
3. Save the Custom Form for a student and click the Request eSignatures button. Requesting eSignatures makes the form read-only. You are not be able to make additional changes after requesting signatures. |  Request eSignatures Button |
4. Parent/Guardian(s) receive the eSignature request(s) when the Guardian, Mailing, and Portal checkboxes are marked on the Relationships tool for the student. The Parent/Guardian must have a valid Portal account in order to receive eSignature forms. The order of the Parent/Guardian(s) names is determined first by the Emergency Priority on the Relationships tool. If no Emergency Priority is entered, the names display in alphabetical order. |  Relationship Checkboxes for eSignature |
Request eSignature(s) Process
- Enter data into the form.
- Click Review Participants.
- Optional: Select a Start Date and Time when the form is available on the Portal, after eSignatures have been requested.
- Optional: Select an End Date when the form becomes read-only on the Portal.
- Click Request eSignatures.
- Click Request eSignatures or Cancel. Requesting eSignatures makes the form read-only. You are not able to make additional changes after requesting signatures.
Note: The End Date field can be changed, even after the form is Expired. The Start Date and Time CANNOT be changed once the eSignature(s) is requested.
After the eSignature Request(s) have been sent, the Review Participants button can be used to see the status per person as well as override eSignatures and/or enter a contact log record. Statuses include:
- Signed: The person signed the form.
- Declined: The person declined the form.
- Pending: The form is awaiting action by the person.
- In Progress: The person is currently editing the form. If a person has an In Progress status, their signature cannot be overridden.
- Overridden: The teacher has overridden that person's signature.
Override eSignature Request(s)
The Override eSignature Request option forces the eSignature to be signed so the form can be completed. This option can be used if for any reason a parent/guardian or student is unable to eSign or a paper form is signed and submitted instead of the virtual form.
Overriding eSignatures requires a separate tool right. See the Forms Tool Rights article for additional information.
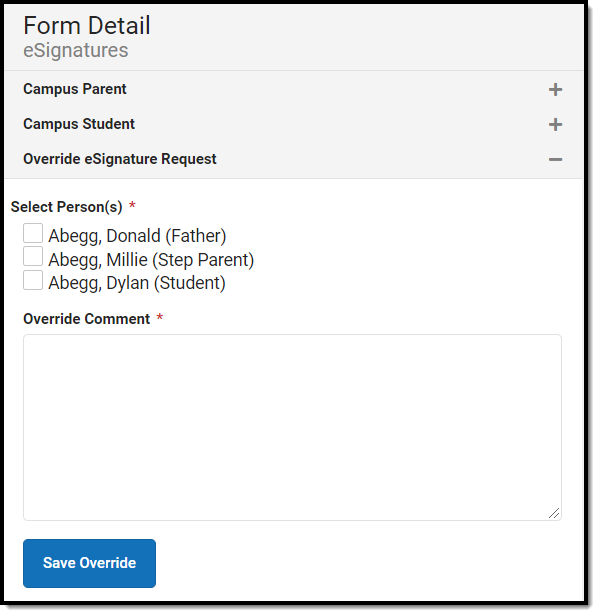 Override eSignature Request
- Click Review Participants after the eSignature request(s) have been sent.
- Mark the checkbox for the person whose signature is to be overridden.
- Enter an Override Comment.
- Click Save Override. The Status of this form after the user Completes the form is Locked & Overridden.
eSignature Contact Log
The Custom Forms Contact Log is used to document any interactions between the participants of the Custom Form.
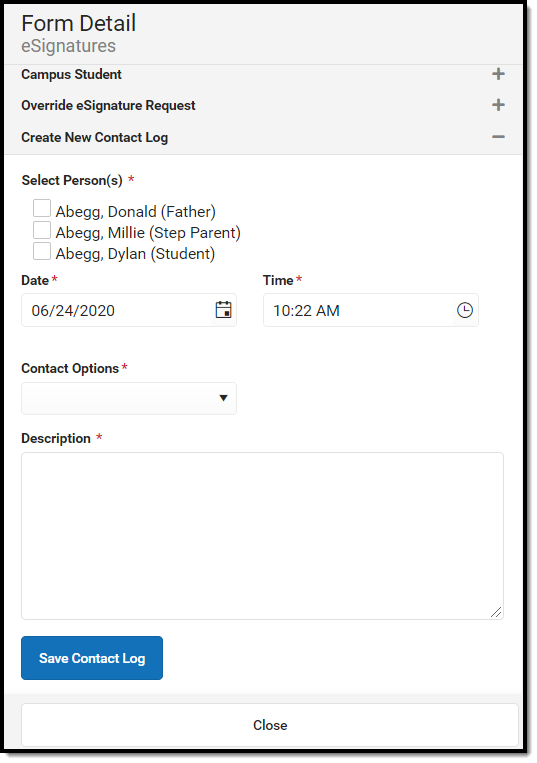 eSignature Contact Log
- Click Review Participants after the eSignature request(s) have been sent.
- Mark the checkbox for the person who was contacted.
- Select the Date and Time when the contact occurred.
- Select the Contact Options from the dropdown. This dropdown is populated from the Attribute Dictionary > ContactLog > Contact Type.
- Enter a Description of the communication.
- Click Save Contact Log. Multiple Contact Log records can be saved per form. Contact Log records can be created any time after the eSignature request(s) have been sent, including after the form is Completed.
Delete
Click Deleteto permanently remove a document from a person's record. A warning displays confirming the action.
Once an eSignature request has been sent, users cannot delete the form.
Copy
Click the Copy buttonon an existing document to create a copy. A warning displays confirming the action. The user is automatically navigated back to the list screen and the new copy of the document can be found with a date and timestamp of when the copy was created.
Only existing forms can be copied. The name of the document cannot be be modified when making a copy.

