Classic View: Attendance > Attendance Letters
Search Terms: Attendance Letters
Attendance letters using the Exact Day Absences Letter Type uses student attendance minutes that meet the entered weight to generate a letter, using the entered Student Day minute values on the Calendar tab. This type is best for schools that only report attendance for a specific period, or only have one period in their schedule.
Verify the correct School and Calendar is selected in the Campus toolbar.
Refer to the Attendance Letter Workflow when creating a letter.
Other Letter Types are available for selection. See the following table for a description of each letter type:
Enter Letter Criteria
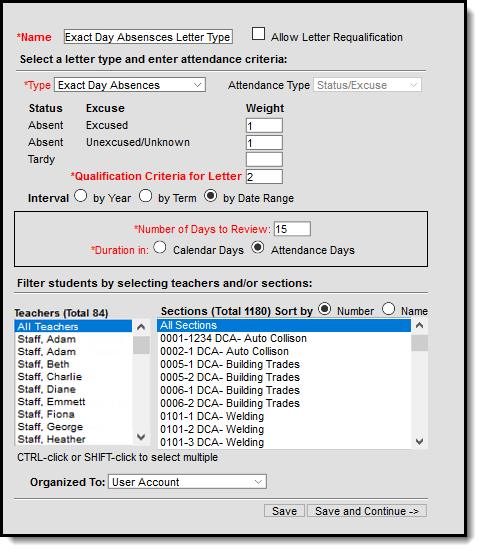
- Select the New button. A criteria entry screen appears.
- Enter a Name for the letter.
- Determine if students can requalify for the letter. If yes, mark the Allow Letter Requalification checkbox.
- Select Exact Day Absences from the Type dropdown list.
- Enter Weight values for each Status/Excuse combination.
- Enter the total Qualification Criteria for Letter value in the provided text box.
- Choose the Interval to determine which attendance days will be counted. See the Intervals section for an explanation of each option.
- If the letter interval is by Term or by Course/Term, and it should be made available for use at multiple schools in the district, and your chosen interval is by Term or by Course/Term, expand the Select terms for additional calendars option, and select the desired terms for each desired school.
- If the letter should be run for a particular group of Teachers or Sections, select the relevant groups. When a specific teacher is selected, the list of sections are only those for which the selected teacher is the primary teacher. Or, leave the Teacher selection at All Teachers and All Sections, which lists every possible teacher and section.
- Indicate where the letter should be Organized to.
- Click the Save button to save the letter. Click the Save and Continue button to enter the body of the letter. Both of these options do save the entered criteria.
- Continue to the Write the Body of the Letter procedures.
Exact Day Absences Letter Types can only be created using the Status/Excuse Attendance Type.
Write the Body of the Letter
See the Letter Format article for detailed information about entering the text of the attendance letter, including how to create letters in multiple languages.
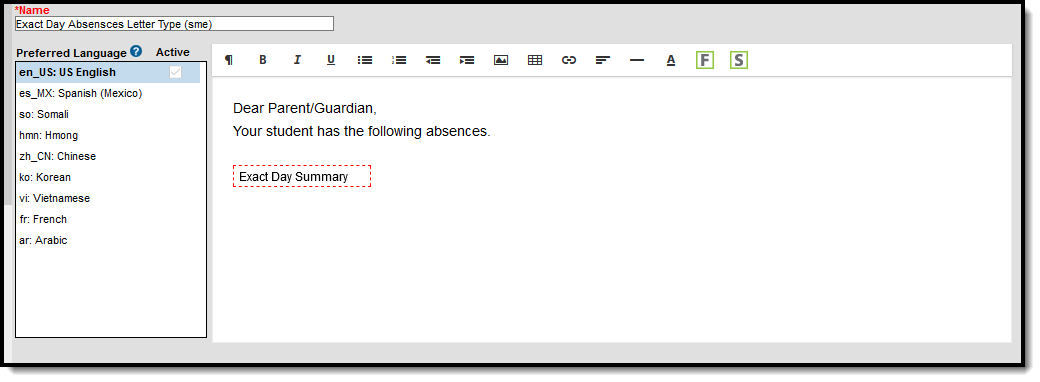
- Enter the text of the letter using the editor.
- To insert a data element from Campus (such as guardian name or other data) to complete a mail merge, select the Campus Field icon at the top right of the editor. NOTE: When including guardian names, choose the mailingAddress.guardianXXX options from the Campus Fields (within Student > Census > Mailing Addresses section).
- To insert a pre-formatted table of information (such as an attendance summary), select the Campus Sub-Report icon at the top right of the editor.
- When finished, click Save Format. A letter may be saved to a user account (by having user account selected in the organized to) or shared with a user group. When the letter is saved, it will be available for future selection from the main page of the Attendance Letter Wizard.
To create letters in another language, see the Preferred Language Setup section.
This example uses the Exact Day Summary Subreport.
Exact Day Letter Format
Generate and Print Letters
Generating and Printing Letters is referenced in Steps 13-18 of the Attendance Letter Workflow.
Information in this report uses data stored in the AttendanceDayAggregation table. This means that attendance data for the current date is accurate as of the previous night's attendance calculation, or the last time the Attendance Aggregation Refresh was run. If needed, the Attendance Aggregation Refresh tool can be run to force an attendance recalculation to pull in the current day's data.
Without an Ad hoc Filter
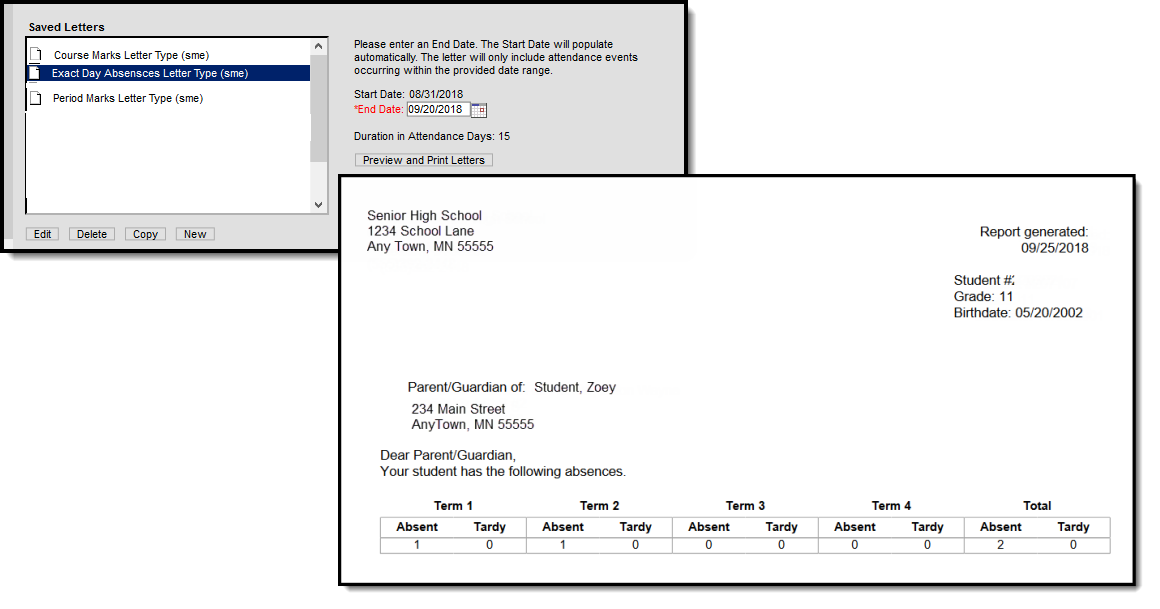
- Select the letter to generate from the Saved Letters list.
- Click the Print and Preview Letters button. A list of students who met the criteria of the letter are listed.
- Review the list of students that met the criteria of the letter, and remove their selection as needed.
- Click the Preview button to review the letter format prior to printing.
- If satisfied with the format, click the Print Letters button, and select how to sort the letters and choose to record a PLP Contact record.
With an Ad hoc Filter
- Select the letter to generate from the Saved Letters list.
- Select the desired Ad hoc Filter.
- Click the Print and Preview Letters button. A list of students who met the criteria of the letter and the criteria of the Ad hoc Filter are listed. See the Attendance Letters and Ad hoc Filters section for more information.
- Review the list of students that met the criteria of the letter, and remove their selection as needed.
- Click the Preview button to review the letter format prior to printing.
- If satisfied with the format, click the Print Letters button, and select how to sort the letters and choose to record a PLP Contact record.
In this example, the chosen Interval was Date Range. When generating the letter, an End Date (the last day attendance events are considered needs to be entered. Also entered was a Duration of 15 attendance days. This letter returns attendance events from the first day of school through the entered date.


