Classic Path: Scheduling > Add Course Wizard
Search Terms: Add Course
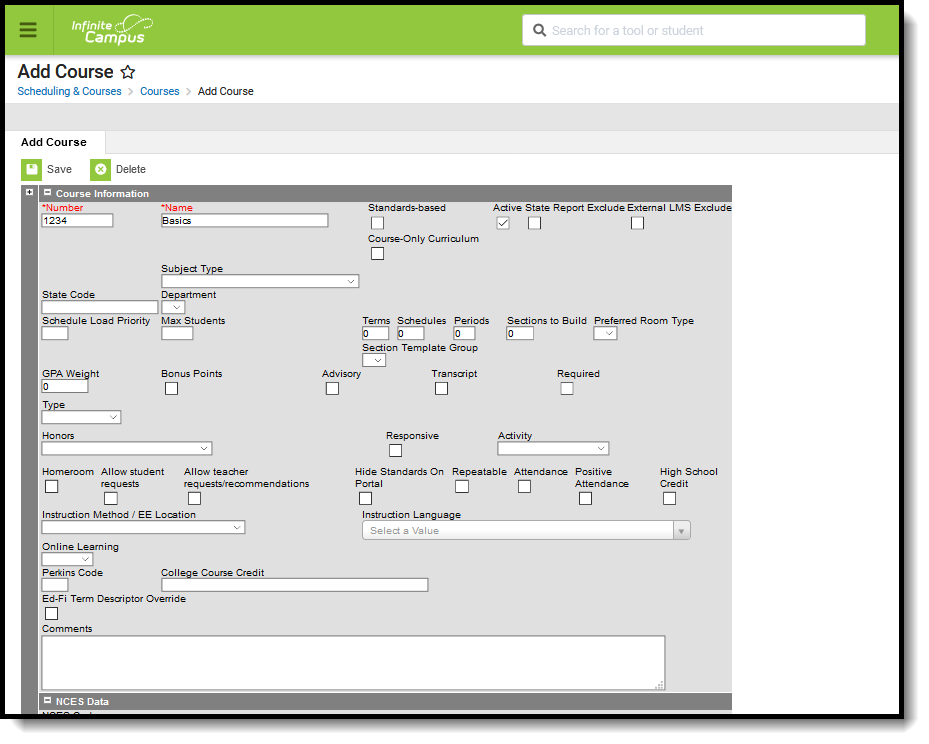
The Add Course Wizard provides the data entry for basic course information. This editor contains the same fields and options as the Course editor does. The Add Course Wizard can be used for schools that use the Course Master tools and those that do not.
 Add Course
See the Courses article for descriptions of the fields on the Course Editor.
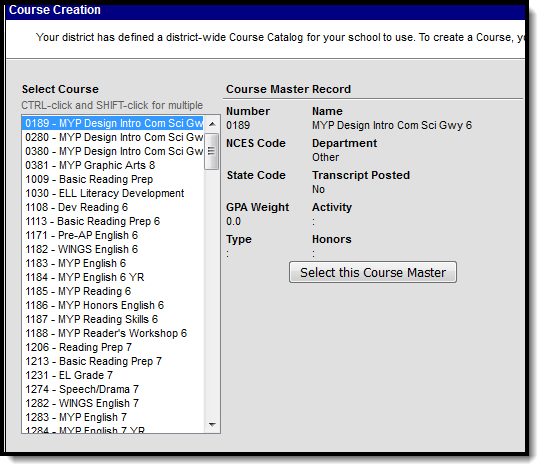
A summary of the course master appears when the course master is selected. Listed in the summary are the following:
- Course Master Name and Number
- NCES Code
- Department
- State Code
- Transcript Posted
- GPA Weight
- Activity Selection
- Type Selection
- Honors Selection
Select the correct course from the Select Course list on the left and click the Select this Course Master button.
Add Course Editor Fields
The following is a list of fields available on the Add Course editor. Some of these fields may not appear in all states.
Data Element | Definition |
|---|---|
Number | This number is used for identification, searching, and making requests. It will appear on student schedules and transcripts. Spaces are not allowed at the beginning or end of this field. Numbers or letters can be entered. |
Name | A more descriptive identifier, the course name is visible in many places in Campus and can be up to 30 characters in length. Spaces are not allowed at the beginning or end of this field. |
Standards-based | This checkbox indicates if this course will be graded using a traditional grading scale or aligned with a standards area. |
Active | This checkbox indicates if the course is active and therefore available for requests and scheduling. It is also used in the Academic Planning process. |
| State Report Exclude | When marked, course information is not included in any state reports. See the Responsive Scheduling and Course Management section for this field's impact on responsive courses. |
| External LMS Exclude | If a district is sharing Campus data with an external learning management system, this checkbox can be used to exclude specific records from being shared. This designation also applies to all Sections associated with this Course. If the Exclude checkbox is marked for the School or Calendar associated with this Course, that designation also applies to this Course. |
Subject Type | A field that indicates whether the content of the course is considered Core (Secondary), Elementary, Special Education, or none of these (N/A). |
| Core Academic Class | When Subject Type is Core Academic Subject Area (CORE), this field appears with a dropdown list of Secondary Core content areas. |
State Code | A code given a course to be used in state reporting, up to 15 characters long. See the Responsive Scheduling and Course Management section for this field's impact on responsive courses. |
Department | This list contains the departments created in System Administration Resources that can be used to organize courses. Assigning a department to courses helps in the organization of the schedule. When using the scheduling wizard or when searching by department, all courses in that department will be grouped together. |
Schedule Load Priority | Indicates priority that should be given to a course during scheduling. |
| Max Students | Displays the maximum number of students that can be scheduled into the sections of the course. This field is also on the Section editor; it only needs to be populated in one location (either on the Course editor or the Section editor). When using the Schedule Wizard to build course sections, this field MUST be populated with a value that is greater than zero. |
Terms | Indicates the number of terms one instance of the course will cover, such as a semester long course that lasts for two terms in a four quarter schedule. For Academic Planning this field is used to calculate the credit a student will receive for this course. This field should not be blank or have a value of zero. This field, along with the Schedules and Periods fields, needs to be populated in order to accurately reflect a student's requested units. |
| Schedules | This field indicates the total number of period schedules in which the course will meet. This field, along with the Terms and Periods fields, needs to be populated in order to accurately reflect a student's requested units. |
| Periods | Indicates the number of periods in one day a course is taught. This value is most often one. For schools using block scheduling, this number would be two - the student attends the same course for two hours. This field, along with the Terms and Schedules fields, needs to be populated in order to accurately reflect a student's requested units. |
| Sections to Build | This field indicates to the schedule wizard how many sections of this course will exist. |
| Section Template Group | Indicates to which Section Template Group the course is assigned. This is used in section placement for schools that have a complex schedules (rotating days with different periods on each day, waterfall schedules, biometric scheduling, etc.). If this field is populated, the Terms, Schedules and Periods fields cannot be modified. |
| GPA Weight | This field indicates that the course contributes to the student’s cumulative GPA calculation. It indicates the impact of the course score in GPA calculations relative to other courses. For example, a school’s score group is on a standard 4.0 scale. A course has a weight of 2. For a student that receives an A (4.0), the GPA value will then equal an 8, thus inflating his calculation. Most often, this field is set to a 1. If the course does not contribute to the GPA at all, leave the field blank. If the GPA Weight on a Transcript Course Record is blank/null/zero, the GPA Value for that Course is not included in any Weighted or Unweighted GPA calculations on the transcript. |
| Bonus Points | This checkbox indicates if bonus points will be used in calculating GPA. |
| Transcript | This checkbox indicates if the course will appear on student transcripts. |
| Required | This checkbox indicates if the course is required for graduation. |
| Type | The options available in this dropdown can be edited in the Attribute Dictionary and provide additional filtering fields in Ad hoc Reporting. |
Course Level | The options available in this dropdown can be used to indicate level of work demonstrated by that course. It may use a state-defined set of codes or have a state-specific name (like Honors or AP Course). This field is used in eTranscripts. If districts are using the PESC format for eTranscripts, this must be included. |
| Responsive | Indicates the course allows responsive offerings to be created and scheduled. See the following for more information: |
| Activity | The options available in this dropdown can be used to indicate that the course is being used to track an activity such as an athletic team or extra-curricular. It may use a state- or district-defined set of codes. |
| Homeroom | This checkbox indicates that this course functions as a homeroom. This field is used in scheduling and attendance reports and functions as a sort option when scheduling courses for the next school year. It also causes the teacher's name to print on the Report Card. |
Allow Student Requests | Indicates that students can request this course through the Portal. When this is not marked, the course displays in the Course Catalog search results with a message that courses can only be added by a counselor, and students are not allowed to request this on the Portal. See the Student Course Recommendations article for additional information. This is used in the Academic Planning process. |
Allow teacher requests/recommendations | Checkbox indicating that teachers are able to recommend students for this course. When marked, teachers assigned tool rights can suggest courses for the student using Teacher Course Requests and Student Course Recommendations. Additional logic is included with this. See the Teacher Course Requests article for additional information. Student Course Recommendations are used in the Academic Planning process. Teacher Course Requests are used in the Scheduling process. |
| Repeatable | Courses marked as repeatable can be chosen by students multiple times to add to their academic plan. This is used in the Academic Planning process. |
| Attendance | Indicates if attendance will be taken during this course. |
Positive Attendance | Indicates if attendance recorded for this section is in the form of positive attendance, in which the teacher tracks how long students work in a given course area. If the Positive Attendance Preference is set to No, this field is used as an indicator. If the preference is set to Yes, additional logic is turned on, allowing schools to enter positive attendance data for these courses. |
| Expected Hours | When the Positive Attendance Preference is set to Yes, this field displays, indicating the total number of hours of attendance a student enrolled in this class is required to have. Hours can be entered as whole numbers or as decimal numbers up to 6 characters (1000.25, etc.). A maximum value of 8760 hours can be entered. |
| High School Credit | Indicates students taking this course receive high school credit for it. |
| Instruction Method | State-specific field noting how the course was delivered to students. |
| Online Learning | The options in this dropdown can be used to Indicate the type of online learning used to offer the course. It may use a state-defined set of codes. This field is used to populate the same field on the Course Section editor. |
| Hide Standards On Portal/Student App | This field hides the standards assigned to a course from being viewed on the Portal and Student App. Standards still display for teachers in Campus Instruction. Marking this checkbox marks it for all of a course's section upon save. |
| Comments | Area provided for comments related to this course. |
Add a Course
- Enter the new Course Information. Number and Name are required fields.
- Click the Save button when finished. The added information will be saved.
- Navigate to the Courses tool and search for the newly added course.
Add a Course with a Course Master
- Select a Course Master from the list on the left.
- Click the Select this Course Master button. An Add Course Editor will appear.
- Enter the new Course Information. The Number and Name will already be populated.
- Click the Save button when finished. The added information will be saved.
- Navigate to the Courses tool and search for the newly added course.
Multiple Course Masters can be selected at one time. This changes the Select this Course Master button to Batch Add these Course Masters. When the course masters are finished being added, a pop-up displays noting how many courses were added.

