This article describes the steps to configure Ed-Fi in Indiana for the 2025-2026 school year.
Configuring Ed-Fi for the 2025-2026 School Year
Step 1. Update to the most recent version of Campus
To have the schema and logic in place, you must update to the most recent version of Campus. Failure to do this will result in an inability to properly report data for the 2025-2026 school year.
Step 2. Create a New Ed-Fi Configuration for 2025-2026
The image below shows the proper field entries for the Connection Configuration.
Click the New button. The Connection Detail editor displays.
Select the Connection Type of State.
Enter a Connection Name of 25-26 EdFi Configuration or something similar.
Select the School Year of 2025-26. This requires the 2025-26 School Year to be created.
Enter the following values:
Field
Value
Ed-Fi Connection Type
State
O-Auth URL
https://dataexchange.doe.in.gov/2026
API URL
https://dataexchange.doe.in.gov/2026
Post-Amble
/data/v3
ID Post-Amble
/IDOEIdentity/v2/idoe
Timeout in Seconds
This field defaults to 60 seconds and determines (in seconds) the time allowed to pass before the connection between Campus and Ed-Fi is considered timed out and Ed-Fi events are not processed. These Ed-Fi events are then reprocessed the next time a Quartz job runs.
Connection Credentials
Add Multiple Credentials
Turn on this feature if multiple districts use the same instance of Infinite Campus to create multiple connections to the state ODS within the same school year.
Users must enter a Credential Name, Client Key, and Client Secret for each credential. For data to be reported correctly, sites with multiple districts must populate the District Number field. Users must also select the School(s) using each credential.
Client Key
The state provides the Client Key.
Client Secret
The state provides the Client Secret.
Test Connection
Click the Test Connection button to ensure configuration values are correct and a connection to Ed-Fi has been made. This test should be done before selecting the Save option and creating the new connection. Auto-mapping will NOT work if the initial connection is not properly configured.
If desired, a certificate can be imported for the Ed-Fi configuration. For more information, please see the 'Import Certificates'sectionof theEd-Fi Configuration article.
6. Click the Save button.
7. Click the Test Connection button to ensure the configuration values are correct and that a connection to Ed-Fi was made. A "Connection is Valid" message displays when the connection is successful.
Step 3. Review the Ed-Fi Setup Checklist to Ensure Items are Complete
Review and/or update data based on the list below to ensure data is set up properly throughout Campus.
System Administration > Preferences > System Preferences > Enable Ed-Fi
Yes = Ed-Fi functionality is enabled, and Ed-Fi data will sync from Campus to the Ed-Fi system (if properly enabled via Ed-Fi Configuration tools).
Tools Only = You can fill out Ed-Fi fields (such as Ed-Fi ID) within Campus, but this data will not sync to the Ed-Fi system until this field is set to Yes. This is especially useful when setting up Ed-Fi IDs for students within a school or district so that data properly syncs between Campus and Ed-Fi before enabling it.
No = Ed-Fi functionality is not enabled for the district, and users cannot access Ed-Fi tools within Campus.
Infinite Camps automaps most codes for the user. However, auto-mapping does not occur when the dictionary is unlocked (the user can create custom codes) or when the mapping depends on dates/terms (like the Sessions resource). Auto-mapping only occurs if the user creates a successful connection (see Step 2). If the initial connection creation was not configured correctly, it will not properly auto-map.
Auto-mapping only occurs if the user creates a successful connection (see Step 3). If the initial connection creation was not configured correctly, it will not properly auto-map.
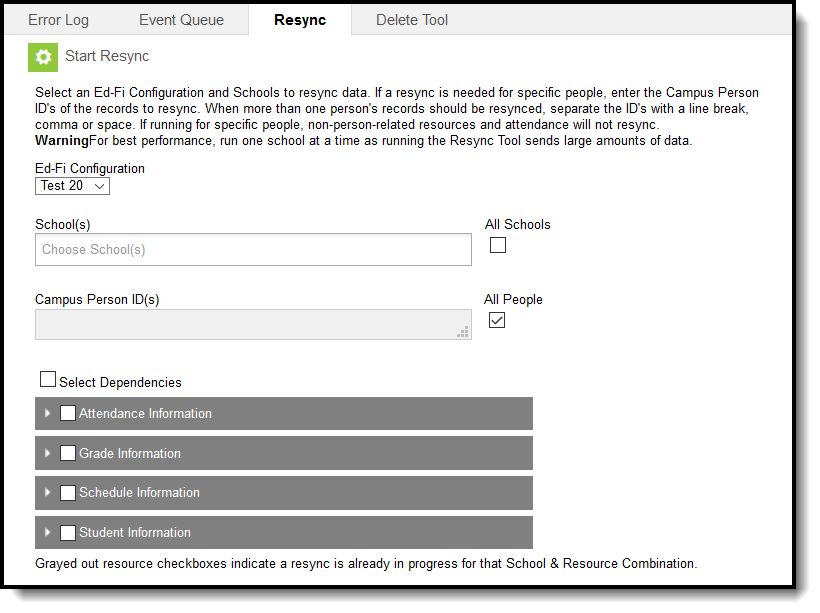
Step 4. Perform a Resync for the 2025-2026 Scope Year
Now that the 2025-2026 school year's Ed-Fi configuration is in place and data has been properly reviewed, the Resync tool can resync Ed-Fi data.
Resync
Verify that 2025-2026 is selected in the toolbar.
Select the 2025-2026 Configuration option from the Ed-Fi Configuration dropdown.
All schools, Person IDs, Course IDs, and Course Section IDs must be resynced for the next year. To do so, mark the All Schools, All People, All Courses, and All Sections checkboxes.
Mark the Select Dependencies checkbox to ensure related data is sent properly. Review the Recommended Resync Order for guidance on when to sync each resource. The options in the Ed-Fi Resource Preferences tool determine which options are available for selection here.
Mark the checkbox next to each data set that should be resynced, enter the appropriate dates, and mark the desired resource(s).
Note: On the first resync for 2025-2026, it is recommended that you turn on one resource at a time. This enhances performance for massive data resyncs and allows you to deal with specific errors one resource at a time. After the first resync, all resources can be left on.
Select the Start Resync button.
If the resync is successful, data will flow properly from Campus to Ed-Fi. The Ed-Fi Error Log shows any errors that occur. See the Indiana Ed-Fi Errors and Resolutions article for additional information.
Recommended Resync Order for Indiana Ed-Fi Resources
The table below outlines the recommended resync order for Indiana Ed-Fi resources (Suite v7.3, Data Standard v5.2) implemented in the 2025-2026 school year.
#
Category
Resources
1
Schedule Information
Calendars
Calendar Dates
2
Grade Information *If being used to report Progress Reports.
The Ed-Fi Attendance Resync scheduled task must be updated each year. Please refer to the Indiana Ed-Fi Scheduled Tasks article for more information.
Beginning of the New School Year
Please see the Beginning of School Year Process article for a general (not Ed-Fi specific) checklist of activities that should be performed within Infinite Campus at the beginning of a new school year.
 Ed-Fi Connection Detail
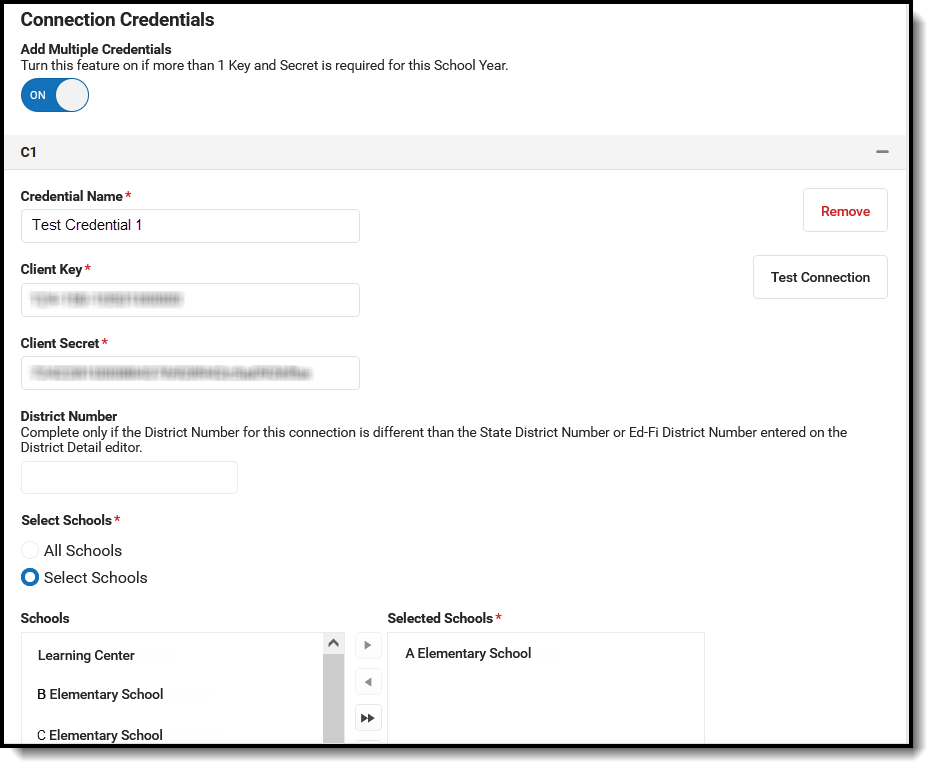
 Resync