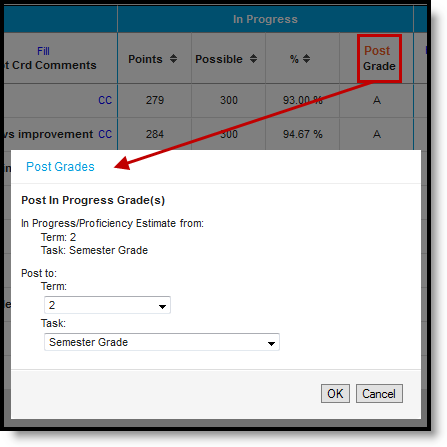
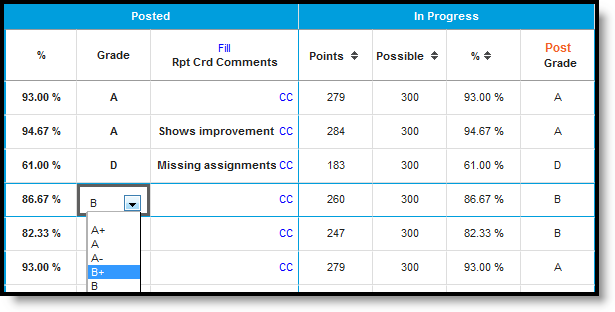
The student grade submission process involves proper grading setup on courses, opening/closing the grading window and generating report cards.
Traditional Course Grading Setup
Grading Scales
Grading Scales are used by the Campus grade book to convert numeric percentages to in-progress grades. The grading scale should include all scores that can be auto-calculated by the grade book.
Tool Search: Grading Scale Setup
Grading scales are used by the Campus grade book to convert numeric percentages to In Progress grades. Values entered in the Score column must match items defined in the Score Group in order to post grades. The grading scale should include all scores that can be auto-calculated by the Campus Grade Book.
Grading Scales are not dependent on the Year or School selected in the Campus toolbar.
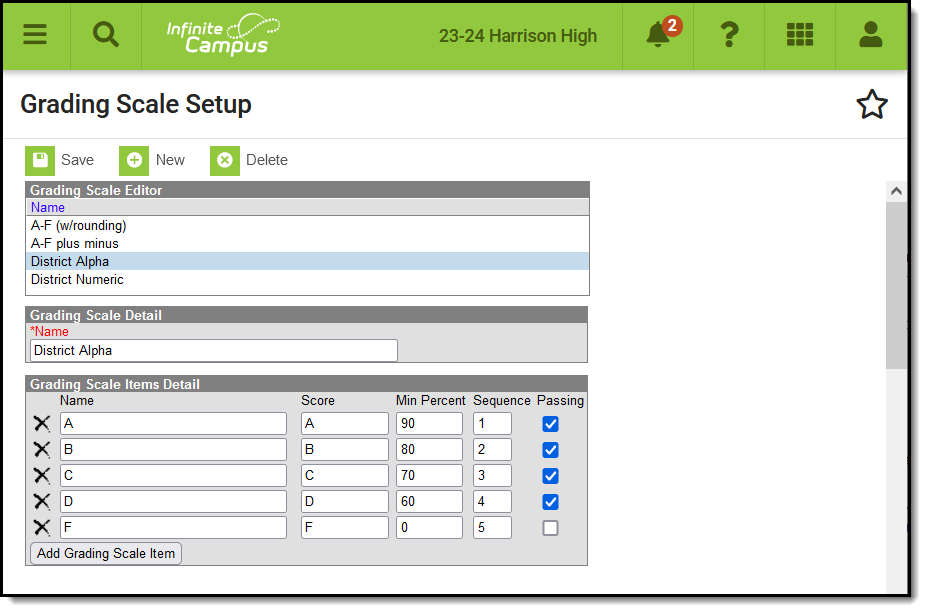 Grading Scales express percentages as letter grades.
For example, a school that has grades of A through F with pluses and minuses would create one item for each grade on the grading scale. Report card grades such as I for incomplete or NC for no credit should not be automatically calculated by Grade book and should be left off of the grading scale. A tool exists in the instruction modules for teachers to create their own personal Grading Scales if district policy allows them to do so.
See the Grading Setup Tool Rights article to learn about rights needed to use this tool.
Creating a Grading Scale
- Select the New button.
- Enter a unique Name for the grading scale.
- Enter the Name for each item in the grading scale, such as A, Pass or Satisfactory. Add additional items by clicking the Add Grading Scale Item button. Remove items by clicking the X next to the item.
- Enter a Score for each item in the grading scale, such as A, P or S.
- Enter a Min Percent for each item in the grading scale. This number is the lowest percent that will earn the entered score. For example, if the Min Percent for an A is 93 and the Min Percent for an A- is 90, the possible percents that will earn an A- are 90-92. This value can be a decimal with up to three digits before and after the decimal.
- Enter a Sequence for each item in the grading scale, which will control the order in which the scores appear.
- Indicate which scores are considered Passing.
- Click Save to save the grading scale.
Uses in Campus
Grading Scales are created at the district level in System Administration or at the teacher level in the Grade Book. Grading Scales and Assignment Marks are used to score assignments and then converted using Score Groups and Rubrics into values reported on student transcripts.
Grading scales are selected for use in the Grade Book using the Grade Calculation Options.
The Grading Scales Setup tool allows administrators to create grading scales which can then be used to grade assignments in Campus Grade Book. This video demonstrates how to create grading scales.
Score Groups
Score Groups are used in traditional grading to determine the scores that make up the basis of grading. Score groups must be set and aligned with a course before teachers can enter grades.
Tool Search: Score Group
Score Groups and Rubrics are two different ways to determine the scores that make up the basis of grading. While very similar, Score Groups hold objective marks for traditional grading (98% = A, 60% or less = F for example) while Rubrics hold subjective marks for standards grading (Pass, Fail, etc.).
Score Groups and Rubrics are used by teachers to score student work. Rubrics are aligned to standards in the Standards Bank. Score groups are linked to Grading Tasks. Score Groups and Rubrics cannot be removed if they are aligned to tasks or standards. Scores from Score Groups and Rubrics are not typically used in assignments, only in Grading Tasks and Standards, respectively.

Score Groups and Rubrics
The Score Groups and Rubrics editor can be sorted alphabetically by clicking Name or Type.
See the Grading Setup Tool Rights article to learn about rights needed to use this tool.
List Item Options
This table describes the fields associated with Score Groups and Rubrics. See the article for creating Score Groups and Rubrics for more information about how these fields should be used.
|
Field |
Description |
|---|---|
| Sequence |
The sequence determines the order in which the items will appear. This is the order that the scores appear in Post Grades and the Grade Book. If sequences are not entered, scores will appear in alphabetical order. Sequences must be entered for Rubric scores for Proficiency Estimates to work correctly in the Grade Book. |
|
Name |
The descriptive name of the item. |
|
Score |
This is the score that teachers will assign to assignments and term grades and which will be seen by students in the Portal. This is the value that appears in report cards and transcripts. This value must be unique. |
| State Score |
The State Score value that is mapped to score groups. This value is available for selection on the Transcript.
This field is only used in Minnesota, New Hampshire, North Dakota, and Tennessee. |
| Ed-Fi Grade Type |
Reports the completion status of a course in the Ed-Fi Grades resource. Users should only add the 'Final' Ed-Fi Grade Type value onto grading tasks that are truly the Final grade in a particular course.
This field is only used in Wisconsin districts. |
| Passing Score | This checkbox indicates that the list item is considered to be a passing score. This field determines the color-coded system used in the Grade Book to indicate which students are passing.
For Standards and Rubrics, the individual scores will be color-coded as passing or not. For Grading Tasks and Score Groups, the color-coding logic is applied to the In Progress grade. At least one score must be marked as passing in order to save the group or rubric. |
|
Credit Coefficient |
This value is used as a multiplier to determine if this score changes the number of credits earned for the course. |
|
Minimum Value |
The minimum percent needed to earn this score. This field is only used in conjunction with the Auto Grade Wizard.
To calculate a grade when a method of Mean or Decaying Average is selected, rubric scores are converted into numeric values using the Mean Value field on the rubric. Those values are then averaged and converted back into a rubric score using the Minimum and Mean values. |
| Rollup Value |
The numerical value assigned to each rubric score, which is used in generating a rollup calculation. This value only applies to calculation types of Mean and Weighted Mean.
For example, when calculating the rollup score using the calculation Type of Mean, the mean of the child standards is calculated using this numerical value and that number is then converted back into a rubric score based on the Minimum Value.
The Rollup Value for each score cannot be lower than that score's Minimum Value. |
| Mean Value | The numerical value assigned to each rubric score, which is used in calculating the Mean of scores received. To calculate a grade when a method of Mean or Decaying Average is selected, rubric scores are converted into numeric values using the Mean Value field on the rubric. Those values are then averaged and converted back into a rubric score using the Minimum and Mean values. |
|
GPA Value |
GPA values are usually used only for Score Groups. The weight of the score when calculating GPA. For example, in a Score Group, an A is commonly considered to calculate as a 4, a B as a 3, etc.
When a score should not affect the student's GPA, this field should be left blank. |
|
GPA Unweighted Value |
GPA values are usually used only for Score Groups. The unweighted GPA value of the score for calculating GPA.
When a score should not affect the student's GPA, this field should be left blank. |
|
GPA Bonus Points |
Indicates any bonus points for GPA calculation assigned to the score. |
| Bypass Composite Rule |
This checkbox refers to the System Preference to Require all scores for Composite Grading and only displays if it is set to Yes.
If this checkbox is marked for a score and that score is posted for a task that is part of a composite setup, that task is not included in the calculation of the composite grade.The composite grade is calculated based on the proportionate weights of the remaining posted grades, based on the same logic that calculates a composite grade if this system preference is not set and grades are not posted for all children tasks.
Example scenario: A course has a Final task that is a composite of two Semester tasks and a Final Exam task. However, if students gets an A in both semester tasks, they don't have to take the final exam. In the score group aligned to the tasks, the district includes an grade in the Score Group called Exempt that has this Bypass checkbox marked. Students who don't need to take the final exam receive this Exempt score as the posted grade for the Final Exam task. The composite task is calculated from the remaining posted grades. |
For Score Groups, it is recommended that users populate both GPA Value and Unweighted GPA Value, even if the values are the same. These values calculate independently of each other in students' Transcript Tab.
Score Groups and Rubrics can be displayed in Report Cards if the option is selected in Report Card Preferences.
Create a Score Group
- Select New Score Group icon in the action bar.
- Give the Score Group a unique Name.
- Enter the appropriate information for each desired Score GroupList Item. See the List Item Options table following for a description of each option.
- Click Add ScoreListItem to add additional List Items.
- Click the Save button when finished.
Create a Rubric
- Select New Rubric icon in the action bar.
- Give the Rubric a unique Name. In report cards Rubrics displays as "Academic Achievement Level For Name Entered."
- Enter the appropriate information for each desired Rubric List Item. See the List Item Options table following for a description of each option.
- To include Power Law fields in a Rubric, mark Show Power Law Fields and enter values based on the field descriptions below.
- Click Add ScoreListItem to add additional List Items.
- Click the Save button when finished.
Power Law Fields
Power law is a mathematical calculation that determines a student's proficiency on a standard based on the trend shown by the scores that student has earned. Power law trend values provide a guide for teachers in determining a student's overall proficiency in a standard. When given a series of proficiency estimates, teachers no longer have to guess at what those estimates mean together.
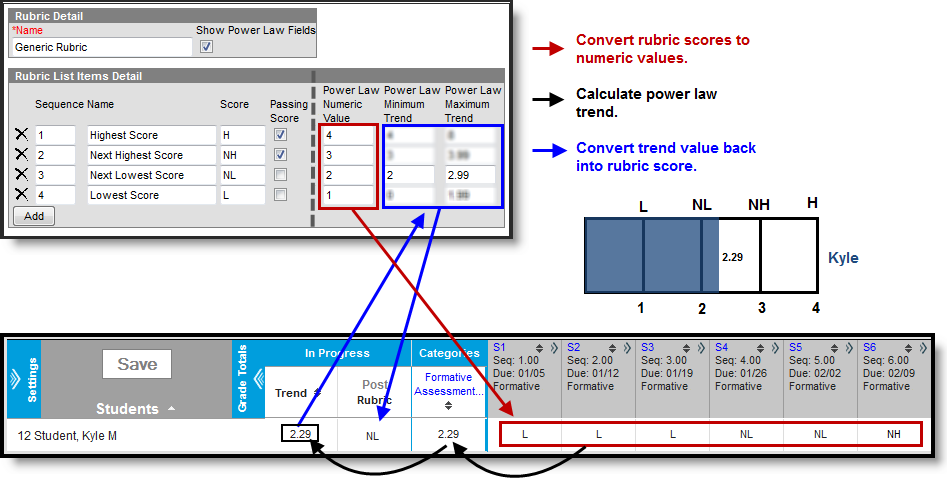
Campus calculates power law by converting rubric scores into numeric values and applying a standard power law formula to determine the trend of the student's proficiency. This calculation considers both the student's performance and rate of improvement, and the expected rate of improvement for the material. More recent scores are given a higher weight than older scores.
To set up a rubric to calculate power law, mark the checkbox next to the rubric Name to Show Power Law Fields. Three additional fields display for the rubric. These three fields implement established district grading policy, which should be discussed and finalized prior to use.
- Power Law Numeric Value: In order to calculate power law trend score, rubric scores must be mapped to numeric values. This field defaults to a whole number for each rubric score starting at 1, but you can change these values to represent the distribution of scores. Keep in mind that even if your rubric uses numbers (such as a 1,2,3,4 scale) these are symbols that represent a proficiency level, not numeric values. Numeric values do not need to match rubric scores.
- Power Law Minimum Trend: After the student's power law trend score is calculated, this is the lowest score that will be converted back into the corresponding rubric value in the grade book. Allows up to two decimal places. Gaps between one score's minimum trend and the previous score's maximum trend generate an error.
- Campus recommends setting the lowest minimum as 0.
- Power Law Maximum Trend: After the student's power law trend score is calculated, this is the highest score that will be converted back into the corresponding rubric value in the grade book. Allows up to two decimal places. Gaps between one score's maximum trend and the next score's minimum trend generate an error.
- Campus recommends setting the highest maximum as 2 x the highest numeric value.
Please note, all rubric setup should be done based on district policy.
Power Law Formula
Similar to the formula for calculating slope (y = mx + b), the Power Law formula is also seeking to find a trend.
- y is the calculated student score.
- x is the original score the student received.
- m and b take into account the number of scores received for a given standard and where in the scope of the student's progress they received that score.
m and b are calculated using this formula, where ∑ indicates "sum of" and N indicates the number of assignments for a given standard.

Power Law Top-to-Toe Example
The following steps describe the process of using power law to calculate In Progress grades:
- Administrator establishes the Power Law Numeric Value, Minimum Trend, and Maximum Trend values for a rubric. That rubric is aligned to a standard.
- Teacher selects Power Law as the method of calculation in the Grade Calculation Options.
- Teacher enters rubric scores for students in the Grade Book for assignments aligned to that standard.
- Each rubric score is converted into its corresponding Power Law Numeric Value.
- The Power Law Trend is calculated from these values. This trend displays in the Trend column of the In Progress area of the Grade Book.
- Using the Minimum and Maximum Trend ranges, the In Progress Trend value is mapped back to a rubric score, which displays in the Rubric column of the In Progress area of the Grade Book.
- Teacher can post this Rubric score as is or modify if desired.
Power Law in Instruction
State-Specific Information
Fields may vary by state:
Save
The Score Groups and Rubrics tool allows users to create score groups and rubrics, which are used to score grading tasks and standards. This video demonstrates how to create score groups.
Grading Tasks Assigned to a Course Master
After score groups are created, they will link to individual grading tasks and standards. Grading tasks may then be assigned to a course master and then "pushed" to the course level. This allows for easier maintenance and consistent grading district-wide.
Tool Search: Grading Tasks
The Grading Tasks tab lists the items the teachers grade as part of the grading process. These tasks include mid-term grades, quarter grades, semester grades, etc. These grading tasks are created in the Grading Tasks tool in the Grading and Standards area.
Review the Course Masters Overview article for information on Course Masters best practices and a Course Master Workflow.
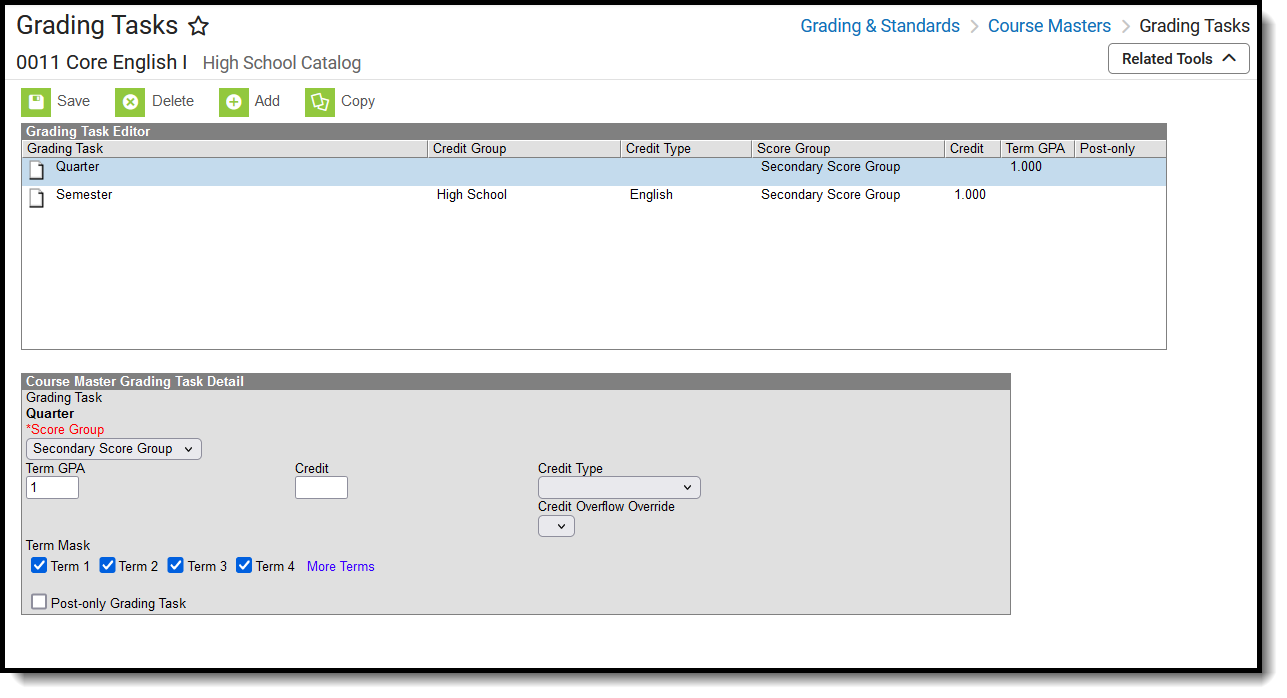 Course Masters Grading Tasks Editor
Visit the Course Status tool to view a list of all courses associated with a given course master, see the status of grading setup for each course, and relink courses as needed.
See the Grading Tasks Tool Rights article to learn about rights needed to use this tool.
Grading Task Information in Ad hoc Query Wizard
Course Grading Task fields are available in the Query Wizard when using the Course/Section Data type in the Course > Course Information > Grading Task Credit folder.
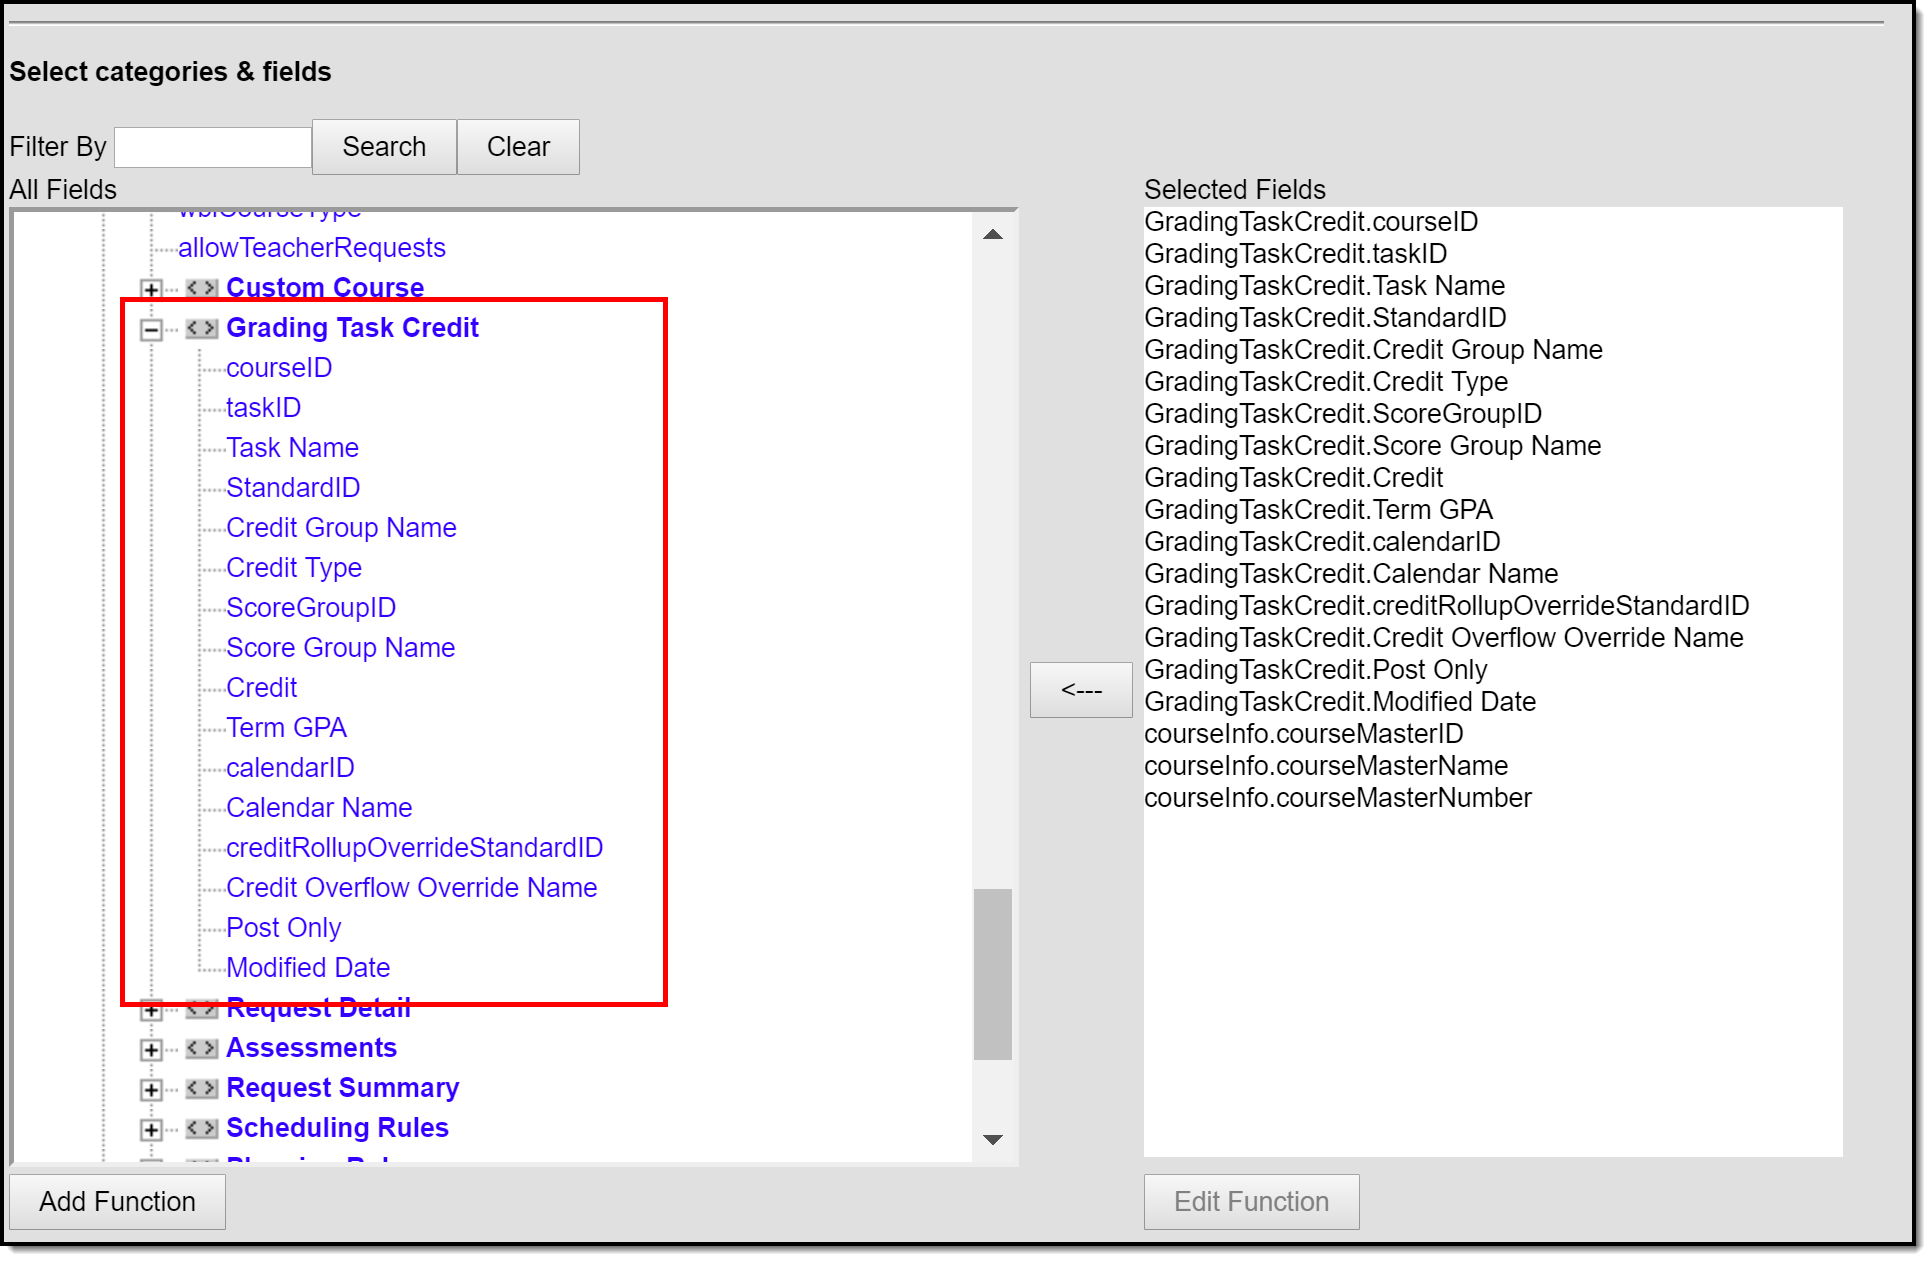 Grading Task Ad hoc Fields
Course Master Grading Task Editor
Before assigning grading tasks to courses, verify the following:
- Grading Tasks have been created in the Grading and Standards area.
- Score Groups have been created in the Grading and Standards area.
- Credit Types have been created in the Grading and Standards area.
The Grading Task editor provides a list of grading tasks and a detail editor showing specific elements of the selected grading task. The following provides a description of the fields on the Course Master Grading Task editor.
|
Field |
Description |
Ad hoc Fields |
|---|---|---|
|
Score Group |
Determines the points and/or letter grades that will be used when scoring the grading task. |
GradingTaskCredit.ScoreGroupName |
|
Term GPA |
Indicates the weight used when calculating the grade of the student. Refer to the GPA Calculations in Campus article for detailed explanations. |
GradingTaskCredit.TermGPA |
|
Credit |
Indicates the amount of credit the student receives upon completion of the course or when the course is posted on a transcript. This value depends on the setup of courses. This is usually only populated on those tasks that are posted to transcripts. |
GradingTaskCredit.Credit |
|
Credit Type |
Indicates the group of credit the student receives when credit is given. This is used in Academic Planning when tracking the progress of the student towards graduation. |
GradingTaskCredit.CreditType |
| Credit Overflow Override |
This field is set for a single course Grading Task and is used to roll credits when the current credit type has met its credit requirements.
The credits from the course will first try to roll up to the override credit type. If that credit type has met its requirements, it will then look at the overflow setup for the course's credit type.
A particular course may be able to count towards more than one credit type. For example a particular CTE course may fulfill a science credit or a math credit. This course would be set up with its default credit type of Math and an override rollup credit type of Science. If the student has completed their math requirement, this course would then be counted as a science credit (only if a science credit was still needed). If both credit requirements were met, then the default rollup would occur, likely going from math to elective credit. |
GradingTaskCredit.CreditOverflowName |
|
Term Mask |
Selection indicates when the task is graded. Term masks are always selected when the task is needing to be graded.
|
This field is not available in Ad hoc Reporting. |
| Post-only Grading Task |
Indicates a grading task cannot be aligned to assignments and categories in the teacher's Grade Book. Post-only Grading Tasks are for posting grades only, not for aligning student work. |
GradingTaskCredit.PostOnly
Reports a value of 1 if the checkbox is marked; reports a value of 0 if the checkbox is not mark. |
Add Grading Tasks to Course Masters
- Click the Add icon. A Course Master Grading Task Detail will display.
- Select the Grading Task to add to the Course Masters from the dropdown list.
- Select the Score Group from the dropdown list.
- Enter the Term GPA weight the student receives.
- Enter the Credit value the student receives.
- If desired, select the appropriate Credit Overflow Override option from the dropdown list.
- Select the Credit Type from the dropdown list.
- Mark the appropriate Term Mask for the grading task.
- If desired, mark the Post-only Grading Task checkbox.
- Click the Save icon when finished.
Any changes made to the Grading Tasks or any other Course Master tab require a push process to the courses. This option is available on the Course Master Info tab.
Delete a Grading Task from a Course Master
- Select the Grading Task to delete from a course from the Grading Task table.
- Click the Delete icon. A warning message will appear indicating the Grading Task is about to be deleted. If the Grading Task is used in a composite grade calculation, that calculation must be edited to not use the Grading Task that's being deleted.
- Click OK to continue or click Cancel.
Copy a Grading Task to Another Course Master
The entire Course Master can be copied from one school to another using the Copy button on the Course Master Info tab.
Use the Copy icon to easily add the Grading Tasks associated with one Course Master (called the Source Course Master) to one or more other Course Masters in the same Course Catalog (called Destination Course Masters). The Copy icon displays when proper tool rights are assigned.
When copying a grading task from one course master to another:
- The Course Catalogs must be the same for the source course master and the destination course master.
- Grading tasks that already exist in the destination course master will not be copied again. This means when five grading tasks are selected to be copied in the source course master, but three of those already exist in the destination course master, only the two that do not exist in the course master will be copied.
- When a Course Catalog is locked for grading tasks, the copy process pushes the grading task to destination courses.
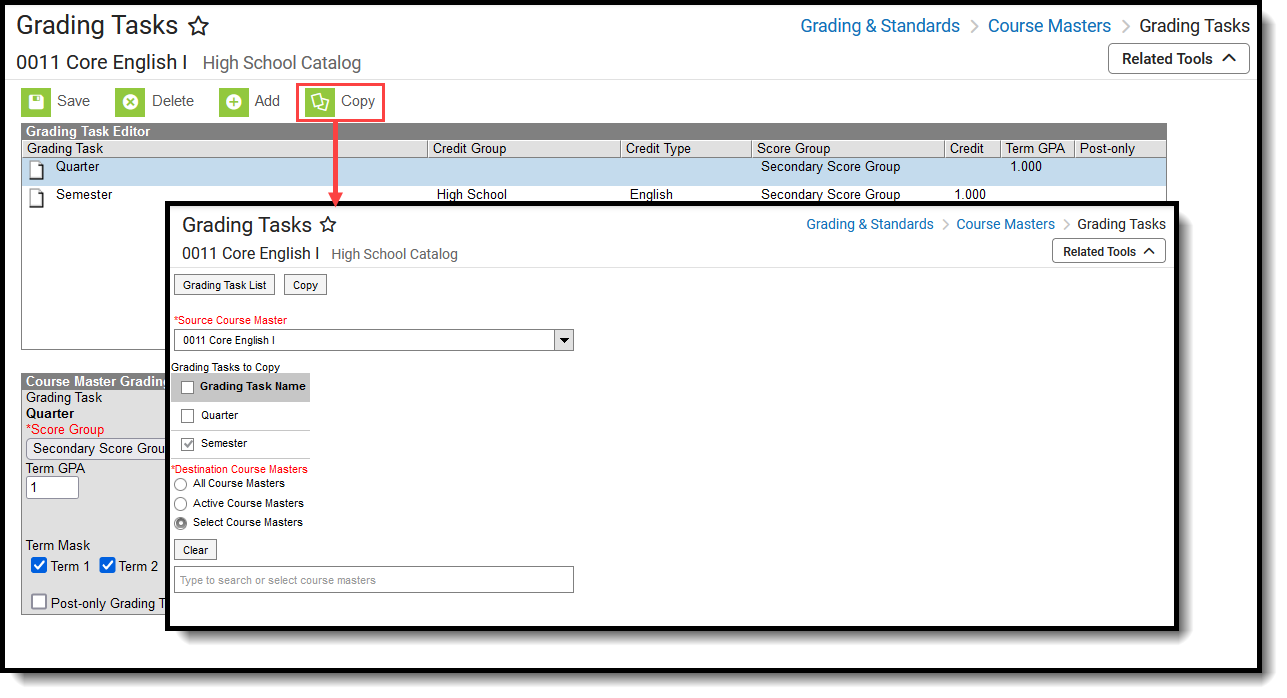 Copy Grading Tasks
- Select a specific grading task to copy or just click the Copy icon without selecting a grading task. When a specific grading task is selected to copy, that grading task is the only one selected to copy; when no grading tasks are selected to copy, all of the grading tasks in that Course Master are automatically selected to copy.
- Select the Source Course Master from the dropdown list. This displays the currently selected course master. To change this selection, begin typing in the dropdown field.
- Mark the Grading Tasks to Copy. Or, clear the selections by clicking the checkbox in the gray Grading Task Name header.
- Select the Destination Course Master:
- All Course Masters: copies task(s) to all course masters in the course catalog.
- Active Course Masters: copies task(s) to all course masters in the course catalog that currently have the Active flag marked.
- Select Course Masters: copies task(s) to the selected course masters. To select a master, type the Number or Name in the search field. Multiple masters can be selected. Click Clear to remove all masters from the list.
- Click the Save button to copy the selected grading tasks to the destination course master. This action saves the selection; the grading tasks are not copied until a school year is selected (see the information below).
When the copy is complete, and the catalog is locked, an alert displays asking to which calendar years the information should be pushed. Select the school year from the dropdown and click OK.
A confirmation displays indicating the selected grading tasks from the Source Course Master have been copied to the Destination Course Masters. At this point, the grading tasks are copied and are displayed on the Course Master Grading Task tab of the Destination Course Master.
If there are no grading tasks to copy, an alert displays indicating all selected grading tasks already exist in the destination course master.
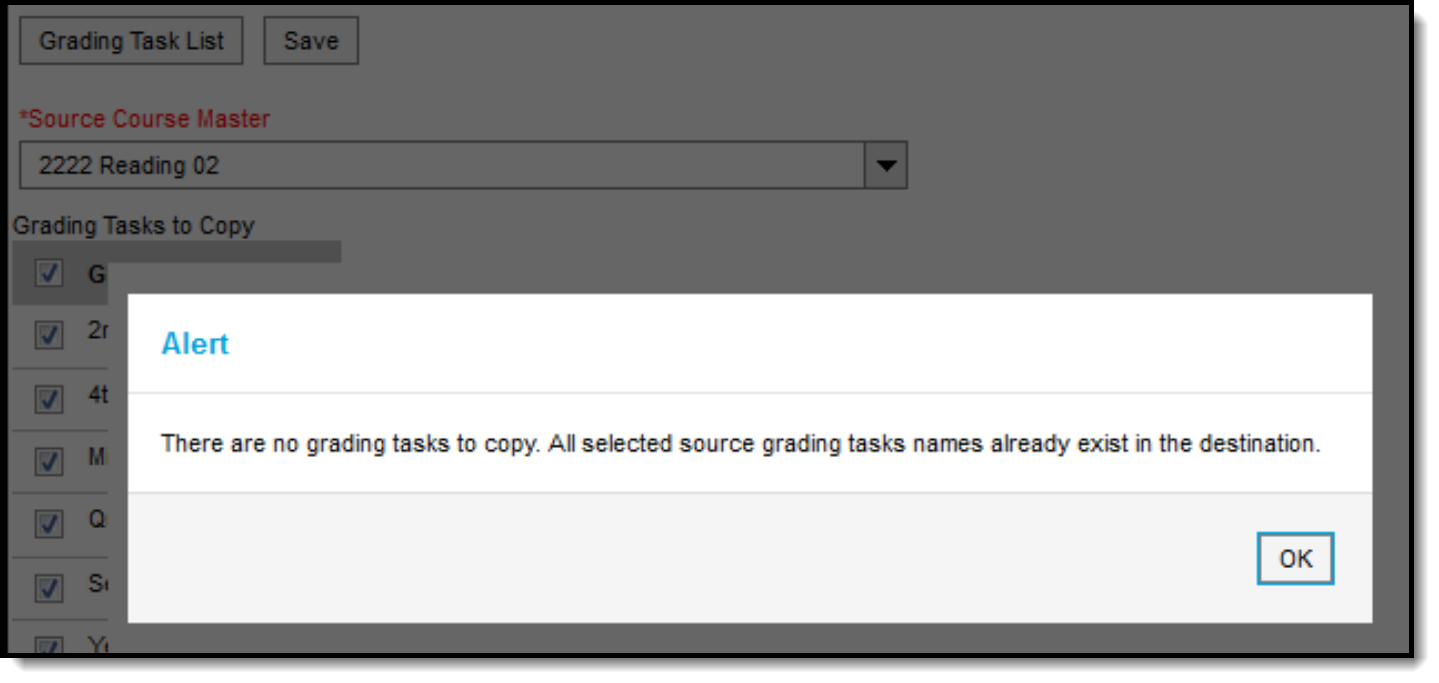 Alert Indicating No Grading Tasks were Copied
To return to the main view of Course Master Grading Task, click the Grading Task List button.
Grading Tasks Assigned to a Course
Grading tasks are the items to which teachers post grades for reporting on report cards and transcripts. These tasks may be added to the course master and pushed to individual courses or added at the course level.
Tool Search: Course Grading Tasks
The Grading Tasks tool lists the items the teachers grade as part of the grading process. These tasks include mid-term grades, quarter grades, semester grades, etc. These grading tasks are created in the Grading Tasks tool in the Grading and Standards area.
If you are using the Multiple Year Academic Planning functionality, see the Best Practices for more information.
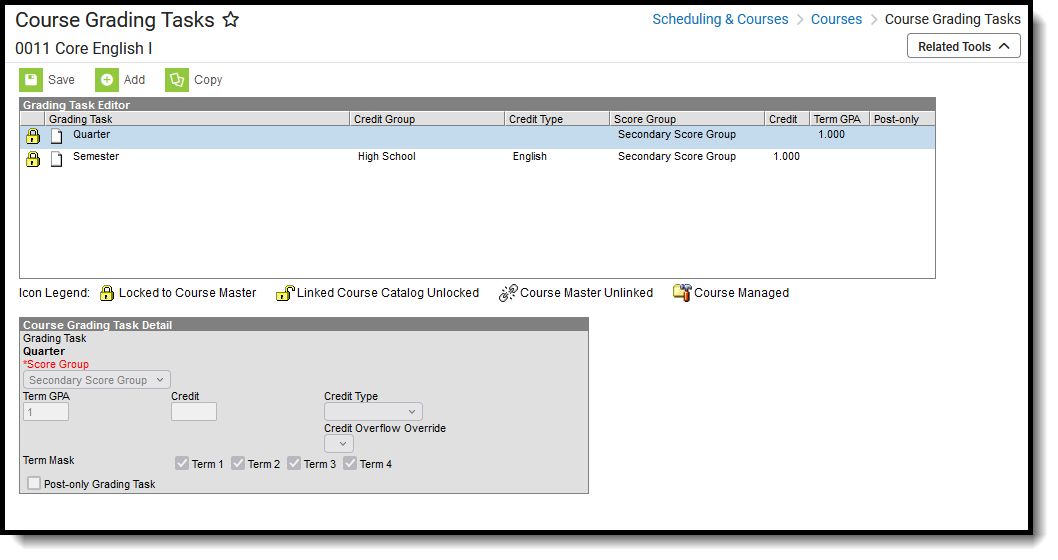 Course Grading Tasks
See the Course Grading Tasks Tool Rights article for information about rights needed to use this tool.
Grading Tasks can also be managed at the Course Master level. Icons in the Grading Task List provide more information about each task:
| Icon | Text | Description |
 |
Locked to Course Master | Indicates that the task corresponds to a task at the Course Master level. These tasks are not editable in this tool. |
 |
Linked Course Catalog Unlocked | Indicates that tasks are unlocked for the whole Course Catalog. These tasks are editable in this tool. |
 |
Course Master Unlinked | Indicates that the tasks is associated with a tasks at the Course Master level, but that the link with that task is broken.
To relink tasks:
|
 |
Course Managed | Indicates that the task is managed at the Course level and does not have a corresponding record at the Course Master level. |
Visit the Course Status tool to view a list of all courses associated with a given course master, see the status of grading setup for each course, and relink courses as needed.
Best Practices for Grading Tasks
When using Academic Planning functionality:
- When a calendar is assigned a Course Master, the Credit Overflow Override field must be set on the Grading Task of the course in the course master.
- When a calendar is not assigned a Course Master, and courses are maintained at each school, the Credit Overflow Override field must be set on the Grading Task of the course.
For districts that have more than one high school and multi-year academic planning is used, it is recommended that Course Masters be created. This reduces the amount of individual course maintenance that needs to be performed.
Grading Task Information in Ad hoc Query Wizard
Course Grading Task fields are available in the Query Wizard when using the Course/Section Data type in the Course > Course Information > Grading Task Credit folder.
 Grading Task Ad hoc Fields
Course Grading Task Detail Editor
Before assigning grading tasks to courses, verify the following:
- Grading Tasks are created in the Grading and Standards area.
- Score Groups are created in the Grading and Standards area.
- Credit Types are created in the Grading and Standards area.
The Grading Task Editor provides a summary of the grading task, including its name, assigned credit group and credit type (if listed), the score group, the credit value and the term GPA. It also indicates if that grading task is locked. The locked icon displays when the course is linked to a Course Master, and grading tasks are assigned at the Course Master level. Changes can only be made through the Course Master. Fields are marked as locked on the Course Catalog.
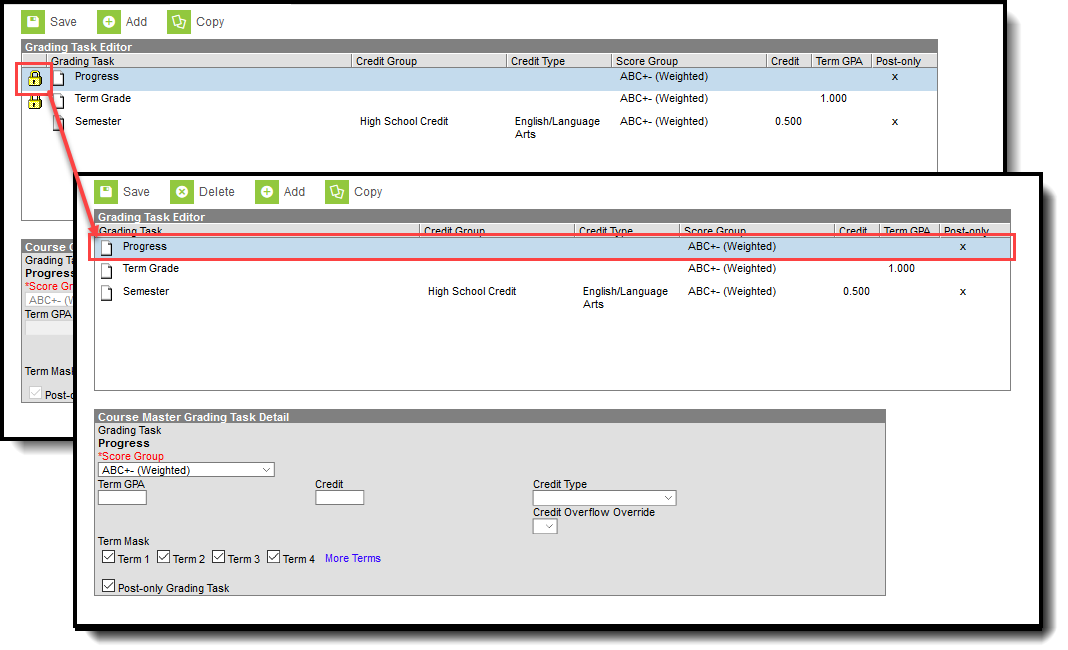 Grading Task Lock Display from Course Master
The Grading Task editor provides a list of grading tasks and a detail editor showing specific elements of the selected grading task. The following provides a description of the fields on the Course Grading Task editor.
|
Field |
Description |
Ad hoc Fields |
|---|---|---|
|
Score Group |
Determines the points and/or letter grades that is used when scoring the grading task. |
GradingTaskCredit.ScoreGroupName |
|
Term GPA |
Indicates the weight used when calculating the grade of the student. |
GradingTaskCredit.TermGPA |
|
Credit |
Indicates the amount of credit the student receives upon completion of the course or when the course is posted on a transcript. This value depends on the set up of courses - whole year courses or semester long courses. This is usually only populated on those tasks that are posted to transcripts. |
GradingTaskCredit.Credit |
|
Credit Type |
Indicates the group of credit the student receives when credit is given. This is used in Academic Planning when tracking the progress of the student towards graduation.
|
GradingTaskCredit.CreditType |
|
Credit Overflow Override |
This field is set for a single course Grading Task and is used to roll credits when the current credit type has met its credit requirements.
The credits from the course first try to roll up to the override credit type. If that credit type has met its requirements, it then looks at the overflow setup for the course's credit type.
A particular course may be able to count towards more than one credit type. For example a particular CTE course may fulfill a science credit or a math credit. This course would be set up with its default credit type of Math and an override rollup credit type of Science. If the student has completed their math requirement, this course would then be counted as a science credit (only if a science credit was still needed). If both credit requirements were met, then the default rollup would occur, likely going from math to elective credit. |
GradingTaskCredit.CreditOverflowName |
|
Term Mask |
Selection indicates when the task must be graded.
|
N/A |
| Post-only Grading Task |
Indicates a grading task cannot be aligned to assignments and categories in the teacher's Grade Book. Post-only Grading Tasks are for posting grades only, not for aligning student work. |
GradingTaskCredit.PostOnly
Reports a value of 1 if the checkbox is marked; reports a value of 0 if the checkbox is not mark. |
| Exclude from Ed-Fi
(WI only) |
Indicates the Grading task is not reported to Ed-Fi. |
|
Add Grading Tasks to Courses
- Click the New icon. A Course Grading Task Detail displays.
- Select the Grading Task to add to the Courses from the dropdown list.
- Select the Score Group from the dropdown list.
- Enter the Term GPA weight the student receives.
- Enter the Credit value the student receives.
- Select the Credit Type from the dropdown list.
- If desired, select the appropriate Credit Overflow Override option from the dropdown list.
- Mark the appropriate Term Mask for the grading task.
- If desired, mark the Post-only Grading Task checkbox.
- Click the Save icon when finished.
Copy Grading Tasks to Another Course
Use the Copy icon to easily add the Grading Tasks associated with one course to another course (called the Source Course) to one or more other courses (called Destination Courses). The Copy icon displays when proper tool rights are assigned.
When copying a grading task from one course to another:
- Grading tasks that already exist in the destination course are not copied again. This means when five grading tasks are selected to be copied in the source course, but three of those already exist in the destination course, only the two that do not exist in the destination course are copied.
- Destination courses cannot be tied to any course masters.
- Grading tasks are copied from one course to another course within the same calendar year.
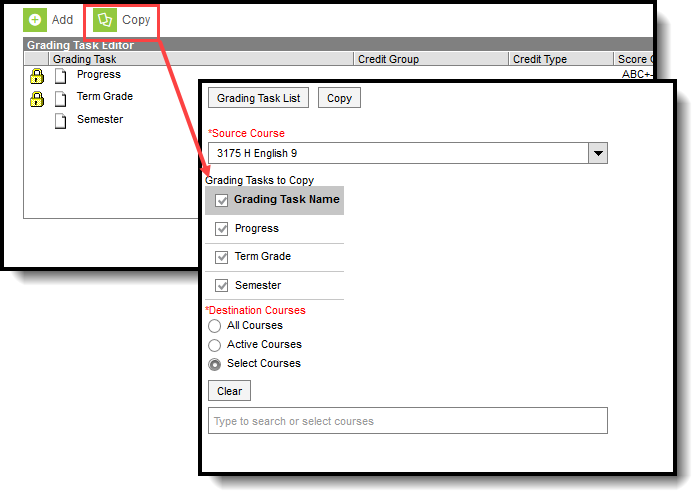 Copy Grading Tasks
- Select a specific grading task to copy, and then click the Copy icon.Or, just click the Copy icon without selecting a grading task. When a specific grading task is selected to copy, that grading task is the only one selected to copy; when no grading tasks are selected to copy, all of the grading tasks in that course are automatically selected to copy.
- Select the Source Course from the dropdown list. This displays the currently selected course. To change this selection, begin typing in the dropdown field.
- Mark the Grading Tasks to Copy. Or, clear the selections by clicking the checkbox in the gray Grading Task Name header.
- Select the Destination Course(s):
- All Courses: copies tasks to all courses in the calendar.
- Active Courses: copies tasks to all courses in the calendar that currently have the Active flag marked.
- Select Courses: copies tasks to the selected courses. To select a course, type the Number or Name in the search field. Multiple courses can be selected. Click Clear to remove all courses from the list.
- Click the Save button to copy the selected grading tasks to the destination course.
If there are no grading tasks to copy, an alert displays indicating all selected grading tasks already exist in the destination course master.
Standards-Based Course Grading Setup
Rubrics
Rubrics are used to determine the scores that make up the basis of standards-based grading. Teachers select the applicable score from the rubric for the standard being scored.
Tool Search: Score Group
Score Groups and Rubrics are two different ways to determine the scores that make up the basis of grading. While very similar, Score Groups hold objective marks for traditional grading (98% = A, 60% or less = F for example) while Rubrics hold subjective marks for standards grading (Pass, Fail, etc.).
Score Groups and Rubrics are used by teachers to score student work. Rubrics are aligned to standards in the Standards Bank. Score groups are linked to Grading Tasks. Score Groups and Rubrics cannot be removed if they are aligned to tasks or standards. Scores from Score Groups and Rubrics are not typically used in assignments, only in Grading Tasks and Standards, respectively.

Score Groups and Rubrics
The Score Groups and Rubrics editor can be sorted alphabetically by clicking Name or Type.
See the Grading Setup Tool Rights article to learn about rights needed to use this tool.
List Item Options
This table describes the fields associated with Score Groups and Rubrics. See the article for creating Score Groups and Rubrics for more information about how these fields should be used.
|
Field |
Description |
|---|---|
| Sequence |
The sequence determines the order in which the items will appear. This is the order that the scores appear in Post Grades and the Grade Book. If sequences are not entered, scores will appear in alphabetical order. Sequences must be entered for Rubric scores for Proficiency Estimates to work correctly in the Grade Book. |
|
Name |
The descriptive name of the item. |
|
Score |
This is the score that teachers will assign to assignments and term grades and which will be seen by students in the Portal. This is the value that appears in report cards and transcripts. This value must be unique. |
| State Score |
The State Score value that is mapped to score groups. This value is available for selection on the Transcript.
This field is only used in Minnesota, New Hampshire, North Dakota, and Tennessee. |
| Ed-Fi Grade Type |
Reports the completion status of a course in the Ed-Fi Grades resource. Users should only add the 'Final' Ed-Fi Grade Type value onto grading tasks that are truly the Final grade in a particular course.
This field is only used in Wisconsin districts. |
| Passing Score | This checkbox indicates that the list item is considered to be a passing score. This field determines the color-coded system used in the Grade Book to indicate which students are passing.
For Standards and Rubrics, the individual scores will be color-coded as passing or not. For Grading Tasks and Score Groups, the color-coding logic is applied to the In Progress grade. At least one score must be marked as passing in order to save the group or rubric. |
|
Credit Coefficient |
This value is used as a multiplier to determine if this score changes the number of credits earned for the course. |
|
Minimum Value |
The minimum percent needed to earn this score. This field is only used in conjunction with the Auto Grade Wizard.
To calculate a grade when a method of Mean or Decaying Average is selected, rubric scores are converted into numeric values using the Mean Value field on the rubric. Those values are then averaged and converted back into a rubric score using the Minimum and Mean values. |
| Rollup Value |
The numerical value assigned to each rubric score, which is used in generating a rollup calculation. This value only applies to calculation types of Mean and Weighted Mean.
For example, when calculating the rollup score using the calculation Type of Mean, the mean of the child standards is calculated using this numerical value and that number is then converted back into a rubric score based on the Minimum Value.
The Rollup Value for each score cannot be lower than that score's Minimum Value. |
| Mean Value | The numerical value assigned to each rubric score, which is used in calculating the Mean of scores received. To calculate a grade when a method of Mean or Decaying Average is selected, rubric scores are converted into numeric values using the Mean Value field on the rubric. Those values are then averaged and converted back into a rubric score using the Minimum and Mean values. |
|
GPA Value |
GPA values are usually used only for Score Groups. The weight of the score when calculating GPA. For example, in a Score Group, an A is commonly considered to calculate as a 4, a B as a 3, etc.
When a score should not affect the student's GPA, this field should be left blank. |
|
GPA Unweighted Value |
GPA values are usually used only for Score Groups. The unweighted GPA value of the score for calculating GPA.
When a score should not affect the student's GPA, this field should be left blank. |
|
GPA Bonus Points |
Indicates any bonus points for GPA calculation assigned to the score. |
| Bypass Composite Rule |
This checkbox refers to the System Preference to Require all scores for Composite Grading and only displays if it is set to Yes.
If this checkbox is marked for a score and that score is posted for a task that is part of a composite setup, that task is not included in the calculation of the composite grade.The composite grade is calculated based on the proportionate weights of the remaining posted grades, based on the same logic that calculates a composite grade if this system preference is not set and grades are not posted for all children tasks.
Example scenario: A course has a Final task that is a composite of two Semester tasks and a Final Exam task. However, if students gets an A in both semester tasks, they don't have to take the final exam. In the score group aligned to the tasks, the district includes an grade in the Score Group called Exempt that has this Bypass checkbox marked. Students who don't need to take the final exam receive this Exempt score as the posted grade for the Final Exam task. The composite task is calculated from the remaining posted grades. |
For Score Groups, it is recommended that users populate both GPA Value and Unweighted GPA Value, even if the values are the same. These values calculate independently of each other in students' Transcript Tab.
Score Groups and Rubrics can be displayed in Report Cards if the option is selected in Report Card Preferences.
Create a Score Group
- Select New Score Group icon in the action bar.
- Give the Score Group a unique Name.
- Enter the appropriate information for each desired Score GroupList Item. See the List Item Options table following for a description of each option.
- Click Add ScoreListItem to add additional List Items.
- Click the Save button when finished.
Create a Rubric
- Select New Rubric icon in the action bar.
- Give the Rubric a unique Name. In report cards Rubrics displays as "Academic Achievement Level For Name Entered."
- Enter the appropriate information for each desired Rubric List Item. See the List Item Options table following for a description of each option.
- To include Power Law fields in a Rubric, mark Show Power Law Fields and enter values based on the field descriptions below.
- Click Add ScoreListItem to add additional List Items.
- Click the Save button when finished.
Power Law Fields
Power law is a mathematical calculation that determines a student's proficiency on a standard based on the trend shown by the scores that student has earned. Power law trend values provide a guide for teachers in determining a student's overall proficiency in a standard. When given a series of proficiency estimates, teachers no longer have to guess at what those estimates mean together.
Campus calculates power law by converting rubric scores into numeric values and applying a standard power law formula to determine the trend of the student's proficiency. This calculation considers both the student's performance and rate of improvement, and the expected rate of improvement for the material. More recent scores are given a higher weight than older scores.
To set up a rubric to calculate power law, mark the checkbox next to the rubric Name to Show Power Law Fields. Three additional fields display for the rubric. These three fields implement established district grading policy, which should be discussed and finalized prior to use.
- Power Law Numeric Value: In order to calculate power law trend score, rubric scores must be mapped to numeric values. This field defaults to a whole number for each rubric score starting at 1, but you can change these values to represent the distribution of scores. Keep in mind that even if your rubric uses numbers (such as a 1,2,3,4 scale) these are symbols that represent a proficiency level, not numeric values. Numeric values do not need to match rubric scores.
- Power Law Minimum Trend: After the student's power law trend score is calculated, this is the lowest score that will be converted back into the corresponding rubric value in the grade book. Allows up to two decimal places. Gaps between one score's minimum trend and the previous score's maximum trend generate an error.
- Campus recommends setting the lowest minimum as 0.
- Power Law Maximum Trend: After the student's power law trend score is calculated, this is the highest score that will be converted back into the corresponding rubric value in the grade book. Allows up to two decimal places. Gaps between one score's maximum trend and the next score's minimum trend generate an error.
- Campus recommends setting the highest maximum as 2 x the highest numeric value.
Please note, all rubric setup should be done based on district policy.
Power Law Formula
Similar to the formula for calculating slope (y = mx + b), the Power Law formula is also seeking to find a trend.
- y is the calculated student score.
- x is the original score the student received.
- m and b take into account the number of scores received for a given standard and where in the scope of the student's progress they received that score.
m and b are calculated using this formula, where ∑ indicates "sum of" and N indicates the number of assignments for a given standard.

Power Law Top-to-Toe Example
The following steps describe the process of using power law to calculate In Progress grades:
- Administrator establishes the Power Law Numeric Value, Minimum Trend, and Maximum Trend values for a rubric. That rubric is aligned to a standard.
- Teacher selects Power Law as the method of calculation in the Grade Calculation Options.
- Teacher enters rubric scores for students in the Grade Book for assignments aligned to that standard.
- Each rubric score is converted into its corresponding Power Law Numeric Value.
- The Power Law Trend is calculated from these values. This trend displays in the Trend column of the In Progress area of the Grade Book.
- Using the Minimum and Maximum Trend ranges, the In Progress Trend value is mapped back to a rubric score, which displays in the Rubric column of the In Progress area of the Grade Book.
- Teacher can post this Rubric score as is or modify if desired.

Power Law in Instruction
State-Specific Information
Fields may vary by state:
Save
Rubrics are used as a tool to determine subjective marks for standards that make up the basis of grading. This video demonstrates how to create a rubric.
Rubrics can be created to hold subjective marks for grading as an alternative to traditional grading. In this lesson, a new rubric will be created for an elementary school.
Standards Assigned to a Course Master
Standards are the items to which teachers post grades for reporting on report cards and transcripts.
Tool Search: Course Master Standards
The Standards tool lists the standards which the school must administer and/or grade for the selected course. To add standards to a Course Master, standards must be created first in the Standards Bank.
Any changes made to the Standards or any other Course Master tool require a push process to the courses. This option is available on the Course Master Info tool.
Review the Course Masters Overview article for information on Course Masters best practices and a Course Master Workflow.
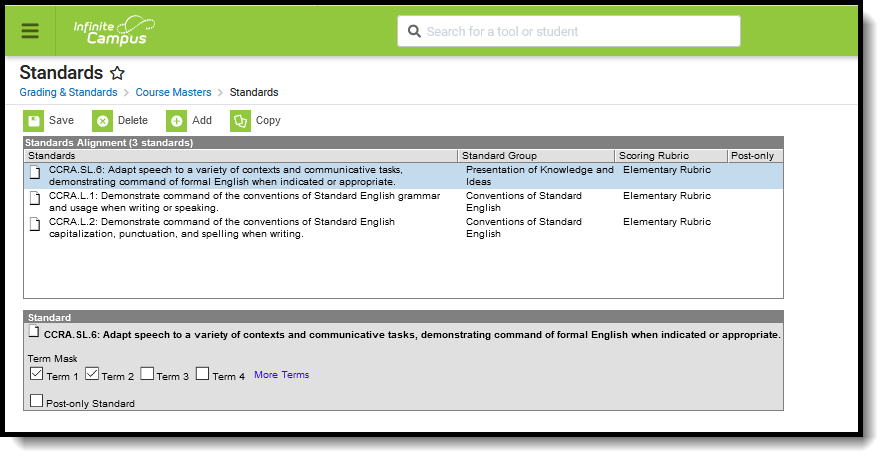 Course Master Standards
See the Standards Tool Rights article for information about rights needed to use this tool.
Standard Information in Ad hoc Query Wizard
Course Master Standard fields are available in the Query Wizard when using the Course/Section Data type in the Course > Course Information > Grading Task Credit folder.
 Standards Fields in Filter Designer
Add Standards
Select Add from the Action Bar. A Standard Detail window appears with a Search field and the expanded list of Standards. The search engine searches based on Abbreviation and standard Display Name. Only standards attached to the selected school on the School Standards tool appears in the selection list.
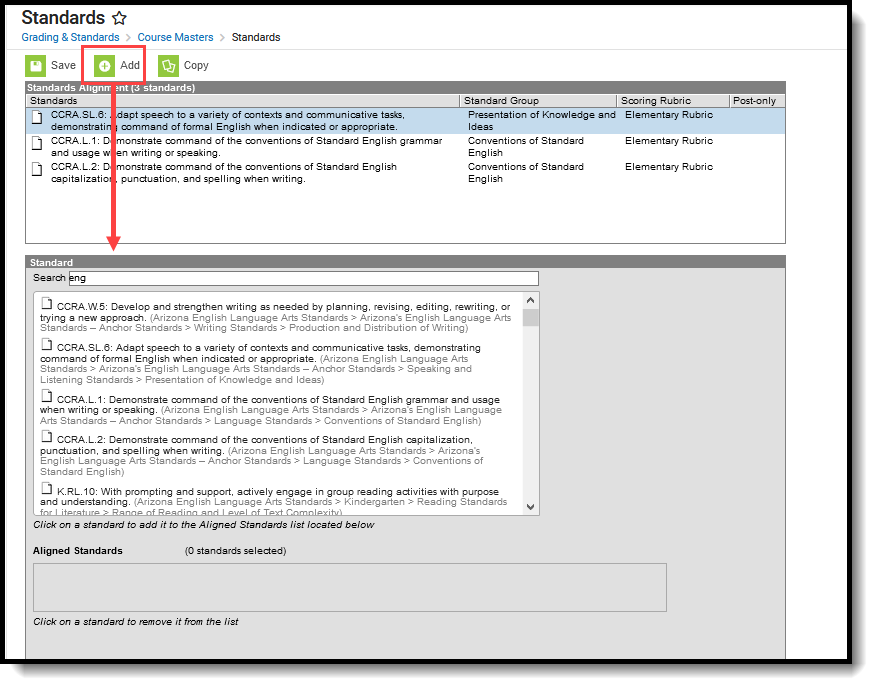 Searching for a Standard
The results window lists the full Standards Bank in expanded form. Users can manually scroll through this list if desired. Standards are listed as follows: Abbreviation: Display Name (Location). After selecting a standard, a blue checkmark icon appears next to the name of the standard in the search results and the standard is added to the Aligned Standards section.
Multiple standards can be added to a course within one save action. A checkmark icon appears next to each selected Standard in the search list. Users can then mark the appropriate Term Mask, which determines when the standard is assessed.
Users can also mark the Post-only Standard checkbox. This checkbox indicates teachers cannot align assignments or categories to the standard. Post-only standards are only used for posting scores, not for tracking student progress. When the checkbox is marked, an X displays in the Standards Alignment table in the Post-only column.
Standards that are assessed multiple times can be added, as well as standards that are assessed once (called One-Time Standards). See the Standards Bank article for more information on One-Time Standards and general Standards setup.
It is recommended that users add standards to courses by term in order to utilize en masse updating options on Term Mask.
To remove a Standard, click the Standard in the Aligned list or in the search results.
Click Save to add the selected standard(s) to the course.
If a school has not added a Standard in the School Standards tool, a message appears when a user attempts to add a standard to a course.
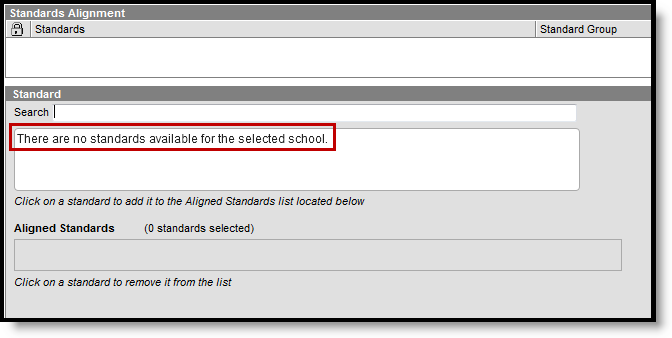 No School Standards Selected
Delete a Standard from a Course Master
- Select the Standard to delete from a course from the Standards Alignment table.
- Click the Delete icon. A warning message appears indicating the standard is about to be deleted. A warning message appears indicating the Standard is about to be deleted. If the Grading Task is used in a composite grade calculation, that calculation must be edited to not use the Standard that's being deleted.
- Click OK to continue or click Cancel.
Users cannot delete a standard if scores have been entered for it.
Copy a Standard to Another Course Master
The entire Course Master can be copied from one school to another using the Copy button on the Course Master Info tool.
Use the Copy icon to easily add the Standards associated with one Course Master (called the Source Course Master) to one or more other Course Masters in the same Course Catalog (called Destination Course Masters). The Copy icon displays when proper tool rights are assigned.
When copying standards from one course master to another:
- The Course Catalogs must be the same for the source course master and the destination course master.
- Standards that already exist in the destination course master are not copied again. This means when five standards are selected to be copied in the source course master, but three of those already exist in the destination course master, only the two that do not exist in the course master are copied.
- When a Course Catalog is locked for standards, the copy process pushes the standard to the destination courses.
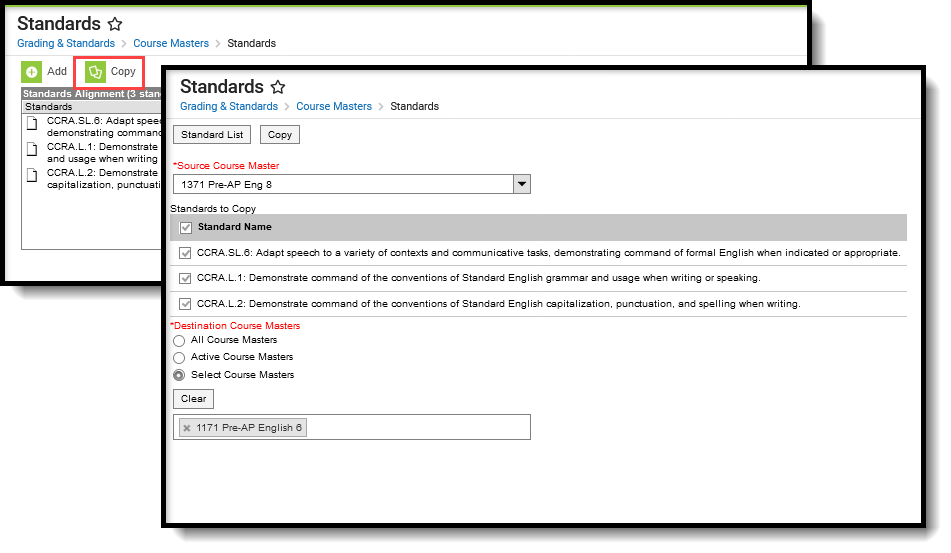 Copy Course Master Standards
- Select a specific standard to copy or just click the Copy icon without selecting a standard. When a specific standard is selected to copy, that standard is the only one selected to copy; when no standards are selected to copy, all of the standards in that Course Master are automatically selected to copy.
- Select the Source Course Master from the dropdown list. This displays the course master to which the current standards are assigned. To change this selection, begin typing in the dropdown field.
- Mark the Standardsto Copy. Or, clear the selections by clicking the checkbox in the gray Standard Name header.
- Select the Destination Course Master:
- All Course Masters: copies standard(s) to all course masters in the course catalog.
- Active Course Masters: copies standards(s) to all course masters in the course catalog that currently have the Active flag marked.
- Select Course Masters: copies standards(s) to the selected course masters. To select a master, type the Number or Name in the search field. Multiple masters can be selected. Click Clear to remove all masters from the list.
- Click the Save button to copy the selected standards to the destination course master. This action saves the selection; the standards are not copied until a school year is selected (see the information below).
When the copy is complete, and the catalog is locked, an alert displays asking to which calendar years the information should be pushed. Select the school year from the dropdown and click OK.
A confirmation displays indicating the selected standards from the Source Course Master have been copied to the Destination Course Masters. At this point, the standards are copied and are displayed on the Course Master Standards tool of the Destination Course Master(s).
If there are no standards to copy, an alert displays indicating all selected standards already exist in the destination course master.
To return to the main view of Course Master Standards, click the Standards List button.
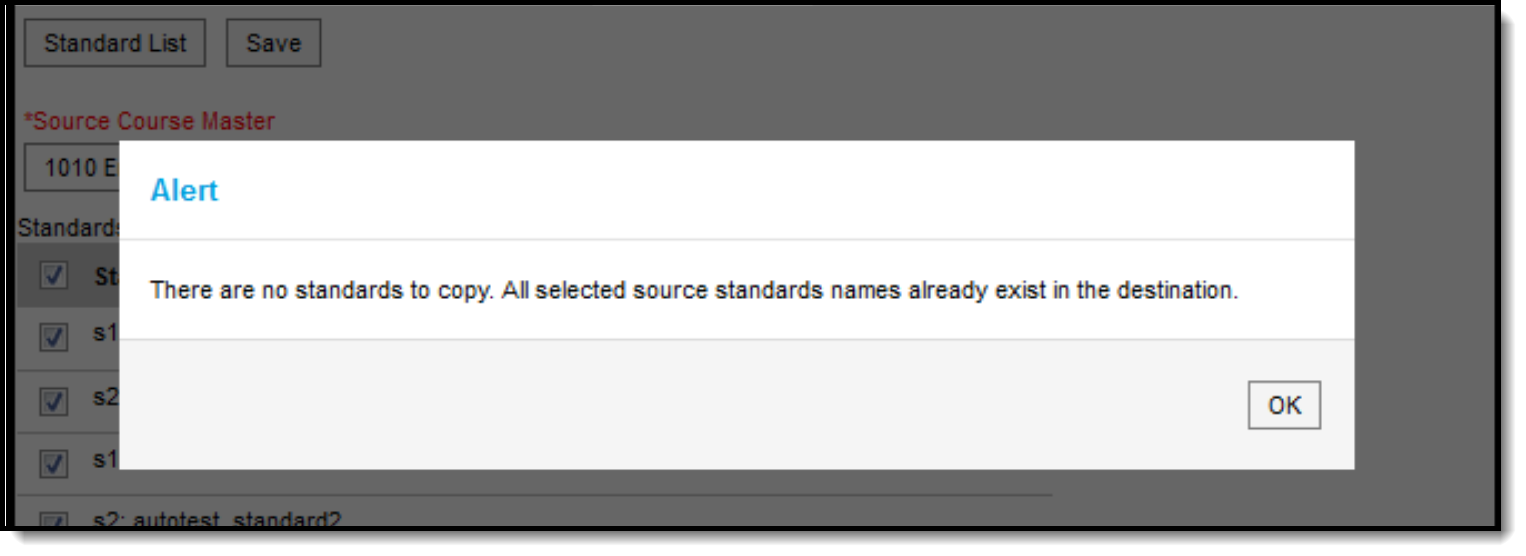 Alert Indicating No Standards were Copies
Standards can be defined for course masters to ensure consistency in how courses are graded across schools. This video demonstrates how to define a standard for a course master.
Standards Assigned to a Course
The Standards tab on a course lists the standards that the teacher needs to administer and/or grade for the selected course. To add standards to a course, they must be created first in the Standards Bank. When standards are added to the Standards Bank, rubrics are assigned there.
Tool Search: Course Standards
The Standards Alignment Editor lists the standards that the teacher needs to administer and/or grade for the selected course. To add standards to a course, they must be created first in the Standards Bank. When standards are added to the Standards Bank, rubrics are assigned there. There is no need to modify the rubric on the course. If the rubric is incorrect, it should be modified in the Standards Bank.
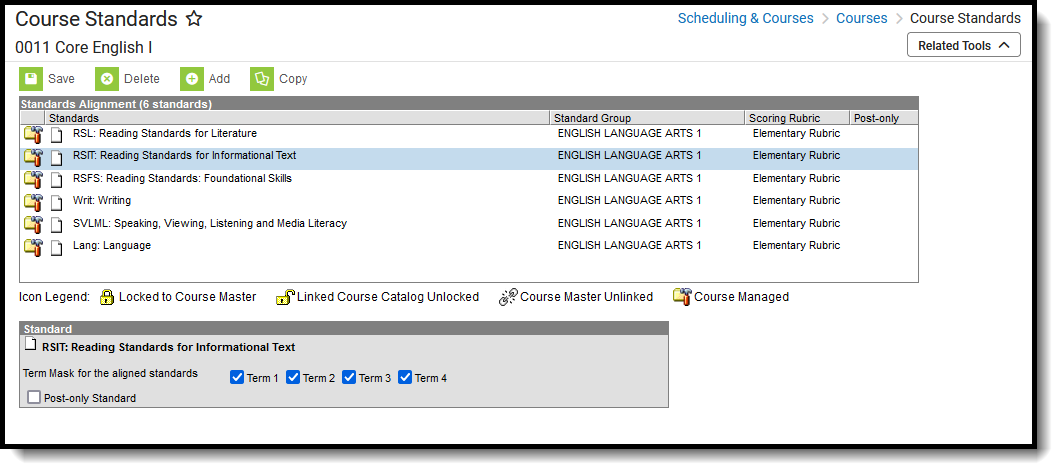 Course Standards
See the Course Standards Tool Rights article for information about rights needed to use this tool.
When the course linked to a Course Master, and editing of standards and standards is locked on the Course Catalog, a lock icon displays. This lock indicates the linking to the course master, and changes can only be made to the standard through the Course Master.
Standards can also be managed at the Course Master level. Icons in the Standards List provide more information about each standard:
| Icon | Text | Description |
 | Locked to Course Master | Indicates that the standard corresponds to a standard record at the Course Master level. These standards are not editable in this tool. |
 | Linked Course Catalog Unlocked | Indicates that standards are unlocked for the whole Course Catalog. These standards are editable in this tool. |
 | Course Master Unlinked | Indicates that the standard is associated with a standard record at the Course Master level, but that the link with that standard is broken. Standards can be relinked using the Push All Course Masters tool, selecting a Push Mode of Overwrite and leaving Standards marked in the Data to be Pushed section. |
 | Course Managed | Indicates that the standard is managed at the Course level and does not have a corresponding record at the Course Master level. |
Standard Information in Ad hoc Query Wizard
Course Standard fields are available in the Query Wizard when using the Course/Section Data type in the Course > Course Information > Standards folder.
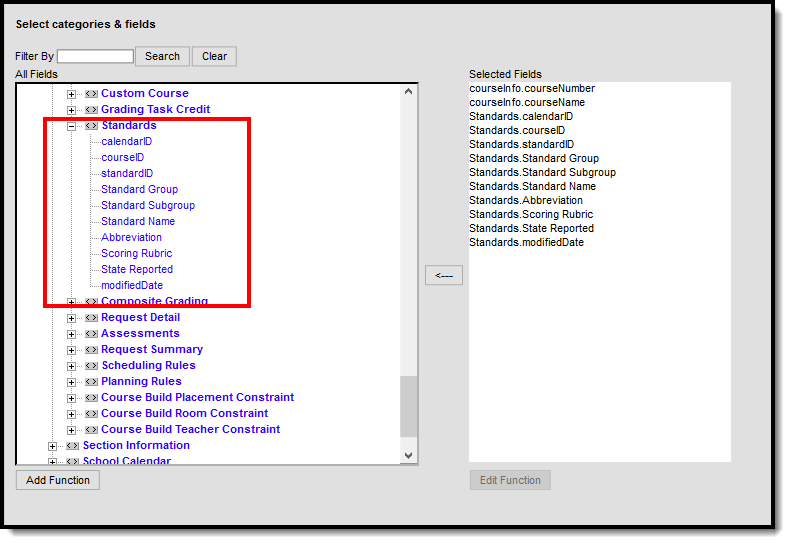 Course Standard Ad hoc Fields
Add Standards
Select Add from the Action Bar. A Standard Detail window appears with a Search field and the expanded list of Standards. The search engine searches based on Abbreviation and standard Display Name.
Only standards attached to the selected school in School Standards are listed for selection.
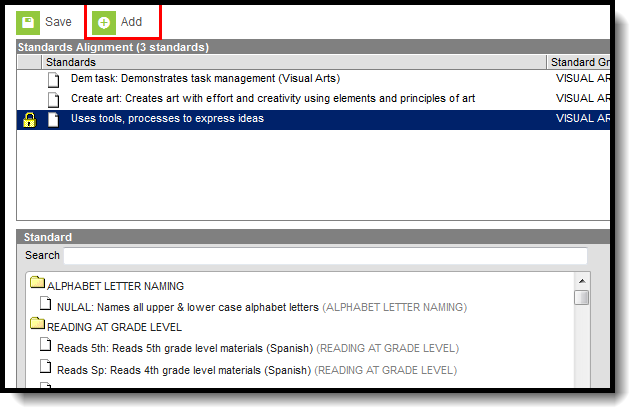 Search for a Standard
The results window lists the full Standards Bank in expanded form. Users can manually scroll through this list if desired. Standards are listed as follows: Abbreviation: Display Name (Location). After selecting a standard, a blue checkmark icon displays next to the name of the standard in the search results and the standard is added to the Aligned Standards section.
Multiple standards can be added to a course within one save action. A checkmark icon displays next to each selected Standard in the search list. Users can then mark the appropriate Term Masks. Term masks indicate in what term the standard is graded.
Users can also mark the Post-only Standard checkbox. This checkbox indicates teachers cannot align assignments or categories to the standard. Post-only standards are only used for posting scores, not for tracking student progress. When the checkbox is marked, an X displays in the Standards Alignment table in the Post-only column.
It is recommended that users add standards to courses by term in order to utilize en masse updating options on Term Mask.
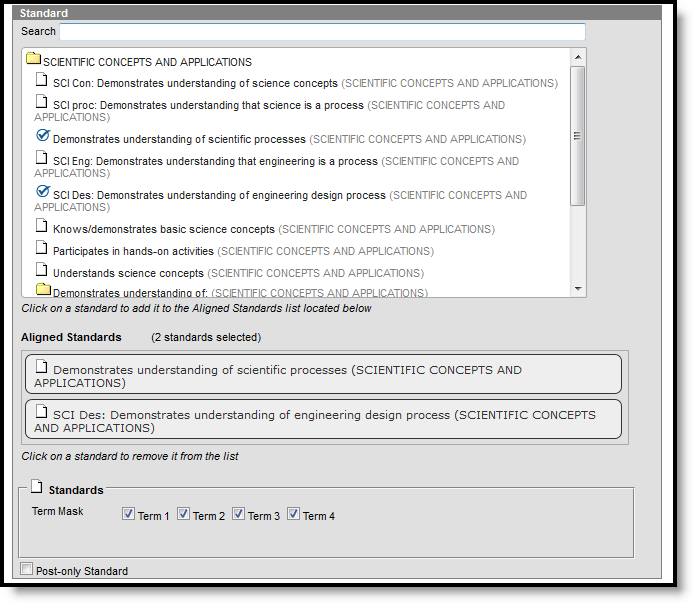 Standard Details
To remove a selected standard, click the standard in the Aligned list or in the search results.
Click Save to add the selected standard(s) to the course.
If a school has not added the standard in School Standards, a message appears when a user attempts to add a standard to a course.
When searching for standards, all standards and groups that match the entered text are returned, including those standards that do not have a display name entered.
Delete a Standard from a Course
- Select the Standard to delete from a course from the Standards Alignment table.
- Click the Delete icon. A warning message displays indicating the standard is about to be deleted.
- Click OK to continue or click Cancel.
Users cannot delete a standard if scores have been entered for it.
Copy Standards to Another Course
Use the Copy icon to easily add the standards associated with one course to another course (called the Source Course) to one or more other courses (called Destination Courses). The Copy icon displays when proper tool rights are assigned.
When copying a standard from one course to another:
- Standards that already exist in the destination course is not copied again. This means when five standards are selected to be copied in the source course, but three of those already exist in the destination course, only the two that do not exist in the destination course are copied.
- Destination courses cannot be tied to any course masters.
- Standards are copied from one course to another course within the same calendar year.
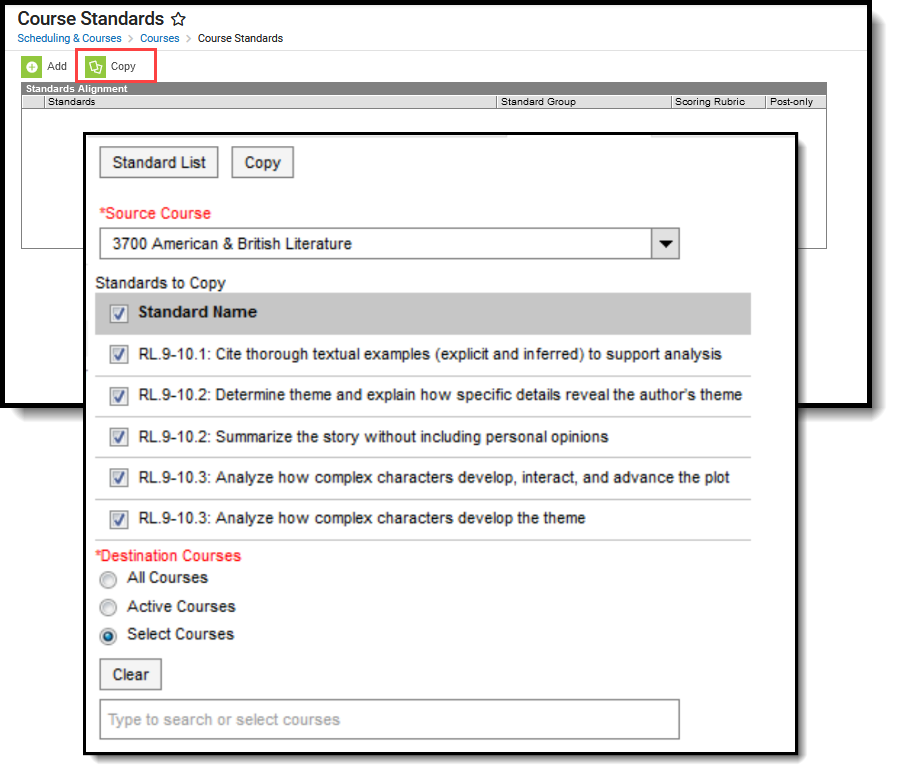 Copy Standards to Another Course
- Select a specific standards to copy, and then click the Copy icon.Or, just click the Copy icon without selecting a standard. When a specific grading task is selected to copy, that standard is the only one selected to copy; when no standards are selected to copy, all of the standards in that course are automatically selected to copy.
- Select the Source Course from the dropdown list. This displays the currently selected course. To change this selection, begin typing in the dropdown field.
- Mark the Standards to Copy. Or, clear the selections by clicking the checkbox in the gray Standard Name header.
- Select the Destination Course(s):
- All Courses: copies standards to all courses in the calendar.
- Active Courses: copies standards to all courses in the calendar that currently have the Active flag marked.
- Select Courses: copies standards to the selected courses. To select a course, type the Number or Name in the search field. Multiple courses can be selected. Click Clear to remove all courses from the list.
- Click the Save button to copy the selected standards to the destination course.
If there are no standards to copy, an alert displays indicating all selected standards already exist in the destination course.
Course Grading Reports
Grading Changes Not Pushed Report
The Grading Changes Not Pushed report lists changes in the grading setup that haven't been pushed from the course master to the course.
Tool Search: Grading Changes
The Grading Changes Not Pushed report lists changes to grading setup that could not be pushed from the course master to the course for various reasons. These reasons include:
- Assignments and scores aligned to tasks, standards, or grade calc options that were removed or marked as post-only at the course master level.
- Differences in composite grading setup that would affect scores.
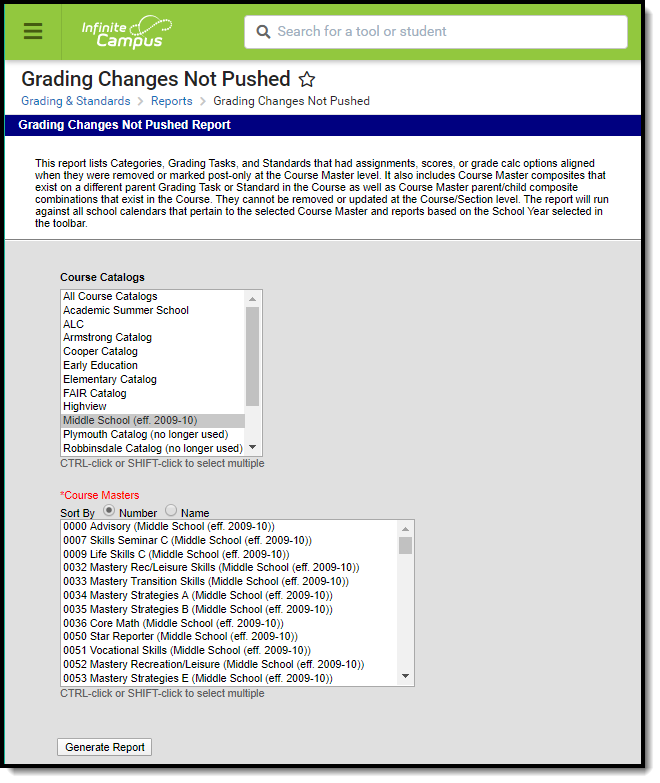 Image 1: Grading Changes Not Pushed Report
See the Grading & Standards Reports Tool Rights article for the tool right needed to generate this report.
Generate the Grading Changes Not Pushed Report
- Select the Course Catalog to display a list of Course Masters. Options display based on the options selected in the Campus toolbar.
- Select the Course Master(s) to include in the report. The list can be sorted by number or alphabetically by name.
- Click the Generate Report button. The report displays in CSV format.
 Image 2: CSV Example
The Reason column lists why the grading changes could not be pushed. Reasons include:
- Assignment - the modified item already has an assignment aligned at the section level.
- Scores - the modified item already has scores or grades aligned at the section level.
- Exists as a composite - the modified grading task has been selected as a child task in composite grading setup.
The Grading Changes Not Pushed Report lists grading setup changes that could not be pushed from the course master to the course. In this lesson, an administrator needs to review the Grading Changes Not Pushed Report.
Course Audit Report
The Course Audit report is be used to compare course masters and associated courses for differences in grading tasks, grade calculations, standards and categories. Differences reported may be the result of changes being made on the course master that were not pushed to courses.
Tool Search: Course Audit
The Course Audit report compares the grading setup between course masters and their associated courses to identify differences. These differences could result from unpushed changes at the course master level or changes to unlocked elements of individual courses.
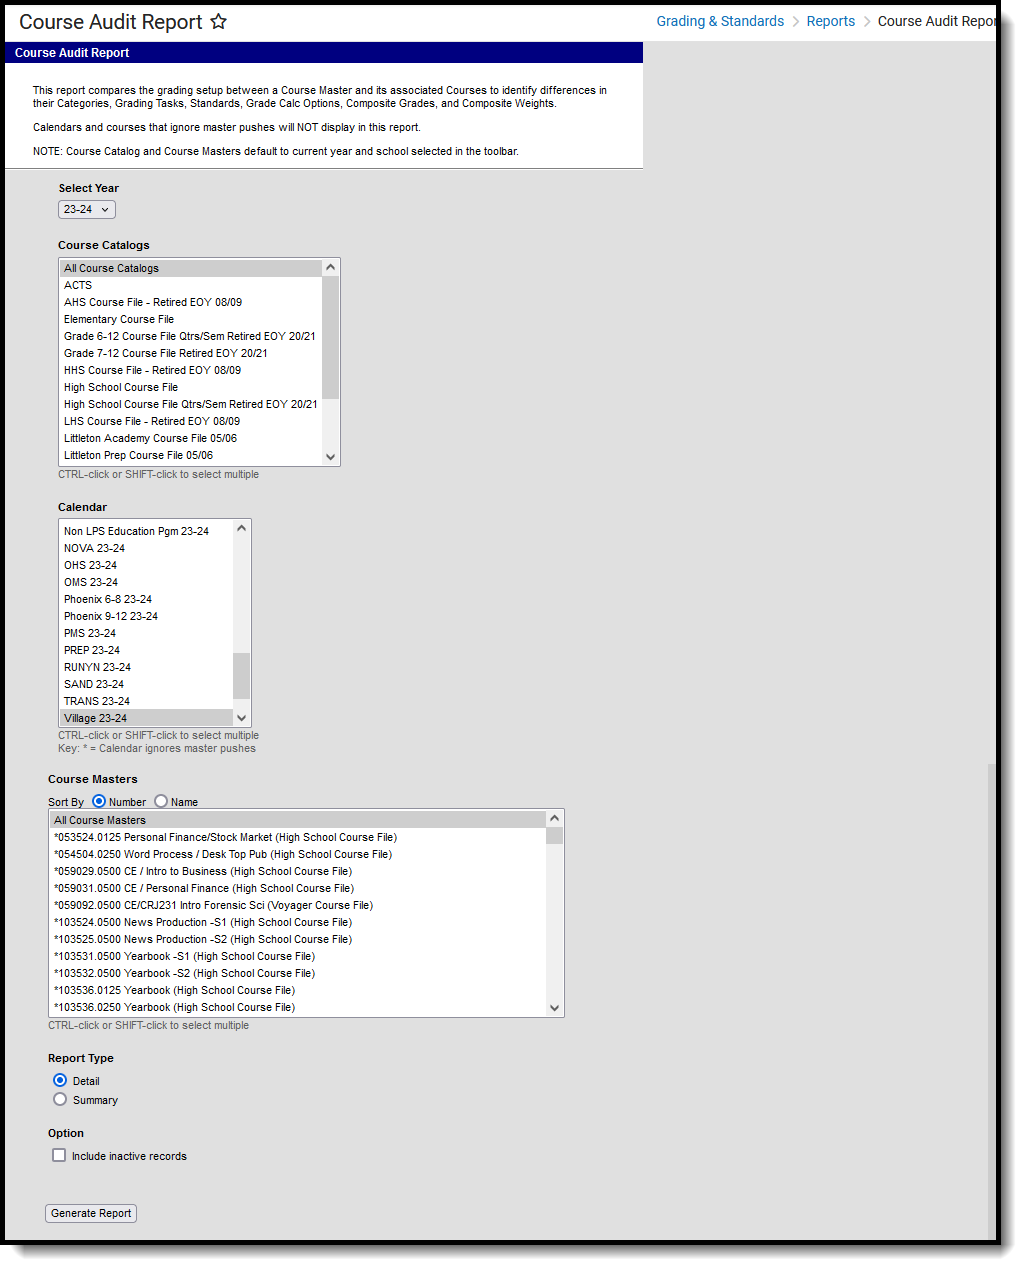 Course Audit Report
See the Grading & Standards Reports Tool Rights article for the tool right needed to generate this report.
Report Logic
This report looks at differences between the course master and associated courses in the following areas:
| Course Master | Course |
|---|---|
| Categories | Categories |
The report can be generated in Detail or Summary versions.
- The Detail report lists each difference between courses and course masters.
- The Summary report
Generate the Course Audit Report
- Select the Course Catalog to display a list of Course Masters. Options display based on the Calendar selected in the Campus toolbar.
- Select the Course Master(s) to include in the report. The list can be sorted by number or alphabetically by name.
- Indicate if the report should be the Detail version or the Summary.
- Leave the Exclude inactive courses checkbox marked to not report courses not flagged as Active.
- Click the Generate Report button. The report displays in CSV format.
 Detail Report Example
The Course Master Data and Course Data columns of the report indicate the details of the differences in grading setup.
The Course Audit Report compares the grading setup between Course Masters and its associated Courses to identify differences in their Categories, Grading Tasks, Standards, and Grade Calc Options. In this video, you will learn how to generate the Course Audit Report.
Course Standards Report
This report generates a list of all standards and the course(s) to which they are aligned.
Tool Search: Course Standards Report
The Course Standards Report lists standards of learning assigned to the courses in the selected calendar. It can be generated one of four ways:
- Standards assigned to each course
- Courses offering each standards
- Standards that are NOT assigned to courses
- Courses that are NOT assigned standards
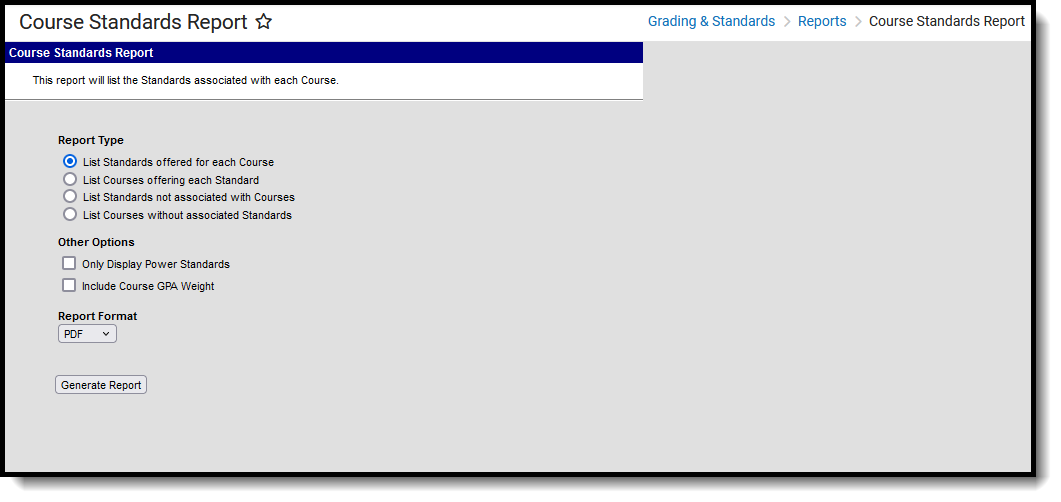 Course Standards Report
See the Grading & Standards Reports Tool Rights article for the tool right needed to generate this report.
Report Logic
Course standards are created and managed in the Standards Bank and attached to a course on the Courses Standards tool. The report is generated based on the Year and School selected in the Campus Toolbar.
The report options refer to certain selections on the standard, like the Power Standard and Archived checkboxes.
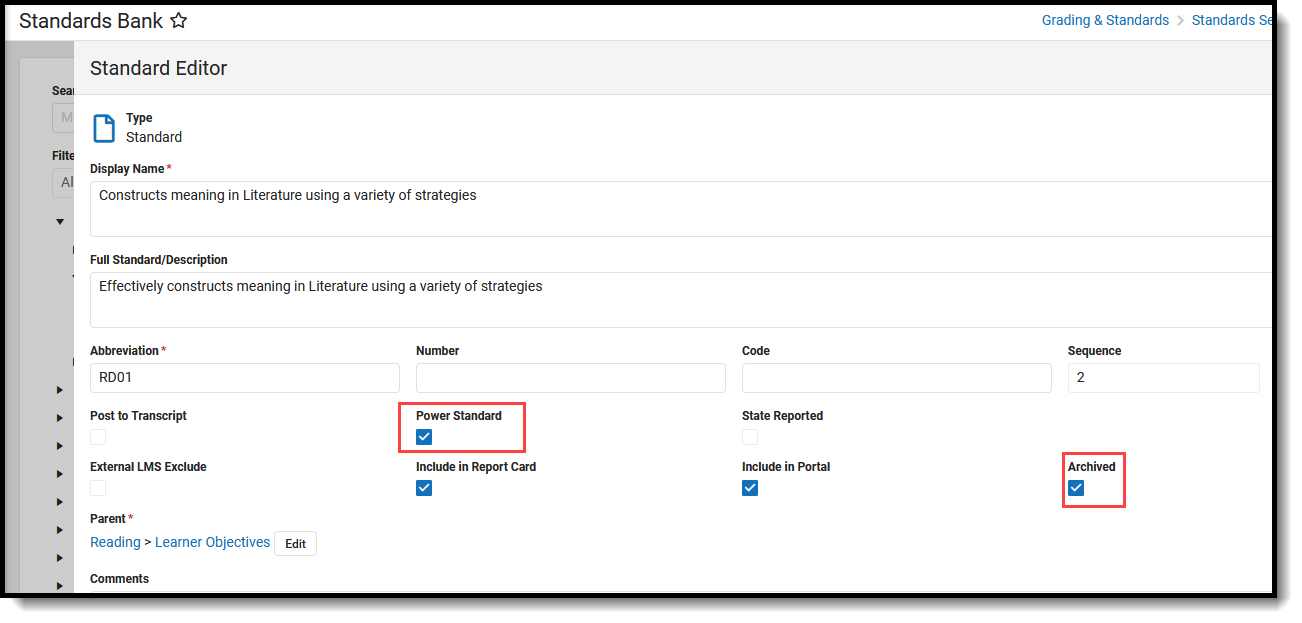 Standards Editor - Power Standard, Archived Standard
Course GPA Weight is entered on the Course Information editor (or the Course Master Detail if using Course Masters).
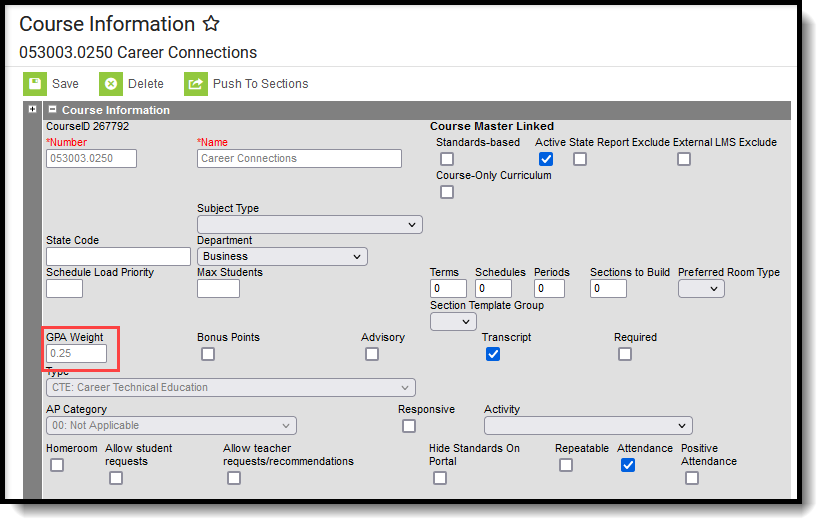 Course GPA Weight
Report Editor
Option | Description |
|---|---|
| Report Type | |
Standards offered for each Course | This report lists each of the standards assigned to an active course in the selected calendar that has at least one Standards assigned to it. |
Courses offering each Standard | This report lists any Standard associated with an active course in the selected calendar. Standards are sorted based on the order in which they were added to the Course Standards tool. |
Standards not associated with Courses | This report lists any active Standards that are not currently assigned to any active Courses but are aligned to the School selected in the Campus toolbar. |
Courses without associated Standards | This report lists any active courses that do not have Standards assigned. |
| Other Options These options are optional and vary depending on the Report Type selected. | |
| Only Display Power Standards | When selected, only those standards marked as Power Standards in the Standards Bank are included. This option is available when the selected Report Type is:
|
| Include Course GPA Weight | When marked, the GPA Weight value assigned on the Course editor prints. This option is available when the selected Report Type is:
|
| Include Archived Standards | When marked, standards that are marked as Archived in the Standards Bank are included, in addition to Standards not marked as Archived. This option is available when the selected Report Type is List Standards Not Associated with Courses. |
| Courses Without Power Standards | When marked, courses that do not have any Power Standards assigned are included. This option is available when the selected Report Type is List Courses without Associated Standards. |
| Report Format | |
| The report can be generated in either PDF or DOCX format. | |
Generate the Course Standards Report
- Select which Report Type to generate.
- Select which Other Options to include on the report, if desired.
- Select the desired Report Format - either PDF or DOCX.
- Click Generate Report to generate the report.
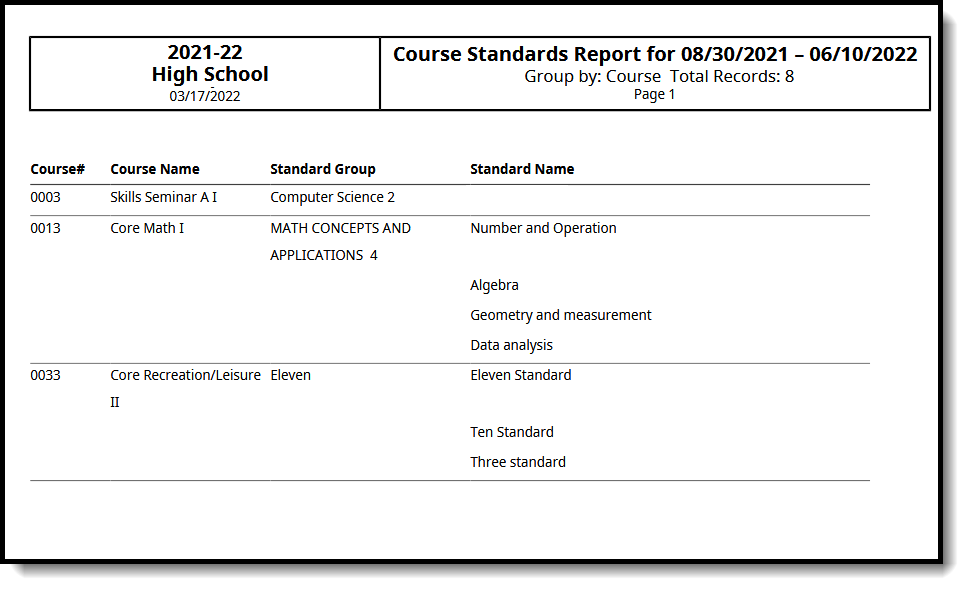 Course Standards Report - Standards Offered for Each Course, No Other Options Selection
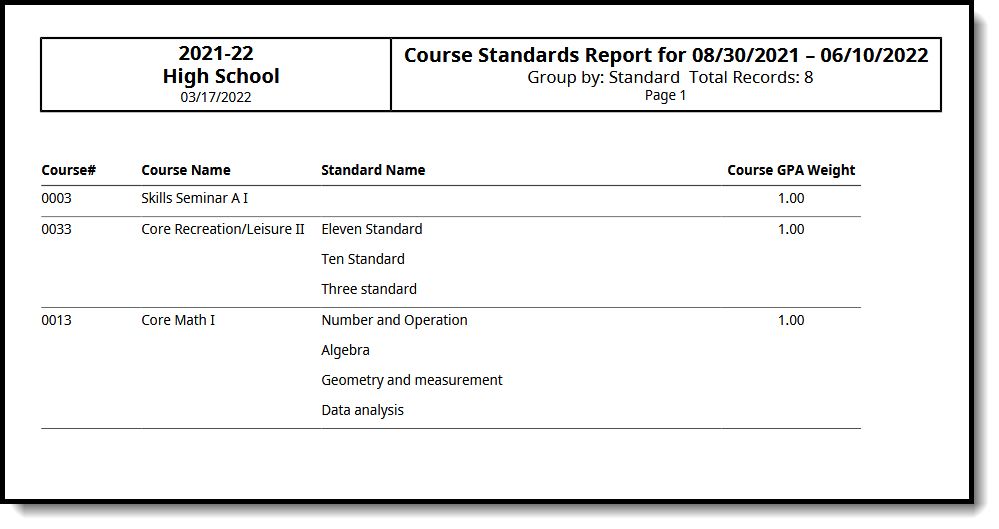 Course Standards Report - Courses Listing Each Standard - Includes Course GPA Weight
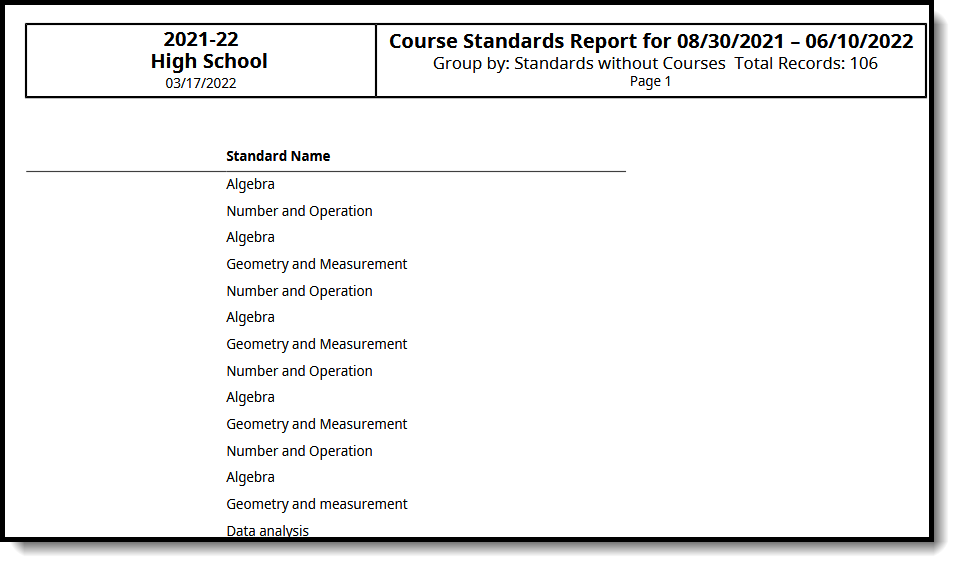 Course Standards Report - Standards without Courses
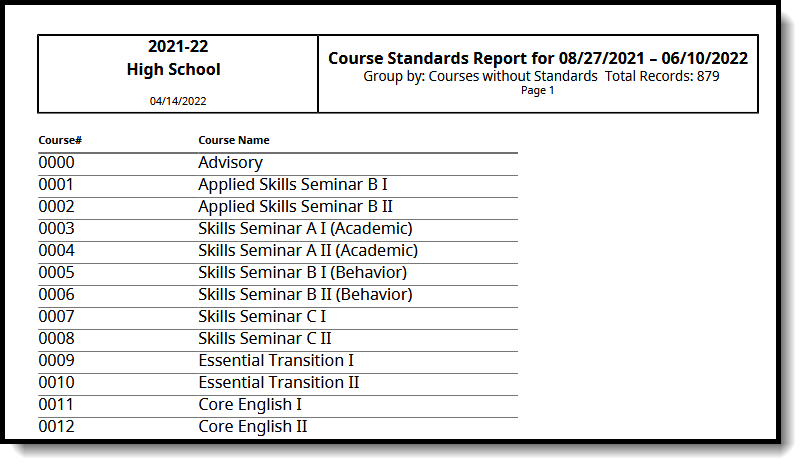 Course Standards Report - Courses without Standards
Grade Submission
Opening & Closing the Grading Window
The Grading Window determines when teachers can post grades. It may be opened one course at a time for specific Grading Tasks and Standards or for an entire school based on a selected task/term combination using the Grading Window Wizard.
The Grading Window determines when grades can be posted to official student documents, such as Report Cards and Transcripts. Teachers can enter scores at any time, but posting grades is usually done during specific times, such as when progress reports are sent out or towards the end of grading terms.
Tool Search: Grading Window
The Grading Window determines when scores can be posted to official student documents. Grades are posted for individual Grading Tasks and Standards, with assignments attached and scores entered for those assignments. This process moves grades from In-Progress to Posted. Teachers can enter scores at any time, but those grades are posted at specific times, such as when progress reports are sent out or towards the end of terms. The Grading Window may be opened for an entire school, based on a selected task/term combination using the Grading Window.
Grading Window information is not included in the Ad Hoc Filter Designer. However, courses assigned grading tasks and standards are available in the Filter Designer. This information can be included in a report to see which courses may be missing grading tasks and standards.
Use the Course type and include fields in the Grading Task Credit and Standards folder
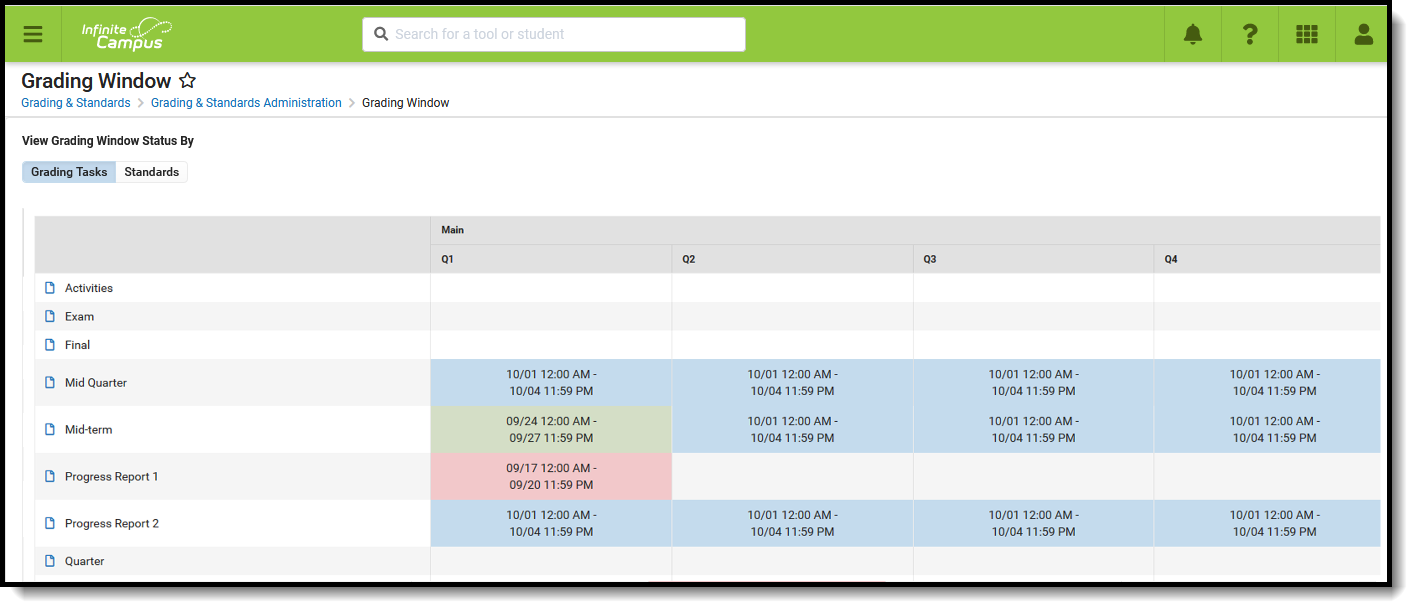 Grading Window - Grading Tasks View
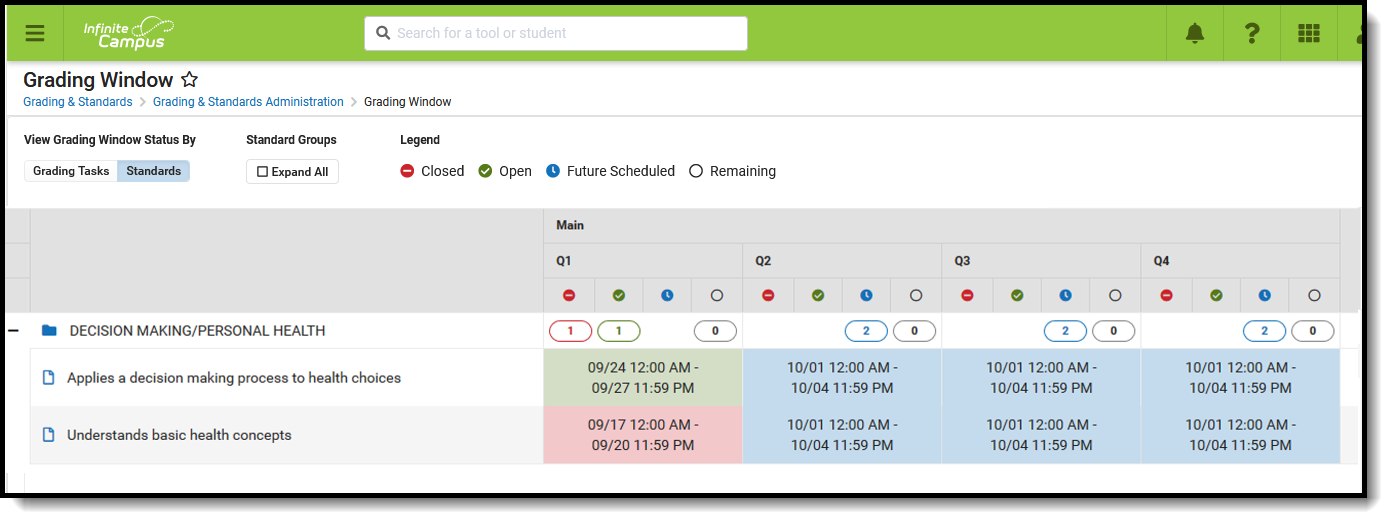 Grading Window - Standards View
When the Standards Replacement Wizard is used to update standards, any scheduled Grading Window that includes any selected standards that were updated in the replacement process is also updated.
Use the information in this article to schedule Grading Windows for schools to post student grades/scores at the end of terms. To schedule a Grading Window for a specific student, grade level, or teachers, courses, and sections, follow the instructions in the Grading Window Exceptions article.
Check out the Grading Window video for more information!
See the Grading Window Tool Rights article to learn about the rights needed to use this tool.
Required Course Setup
The following are required to post grades for courses:
- Grading Tasks need to be created for the school.
- Standards need to be created for the school, and School Standards need to be marked accordingly.
- Grading Tasks and Standards must be assigned to courses.
- The Term Mask for both Grading Tasks and Standards must be marked for the appropriate terms where those grading tasks and standards are to be graded.
Create/Edit Grading Windows
Grading Windows can be modified and created from the main view in three ways:
- Modify or View an Existing Grading Window - Click the existing record from the main grid of the Grading Window. A side panel opens. Click the row to change the dates and times of the Grading Window. From here, Grading Windows can be immediately closed (Close Now) or deleted (Remove). Modifications to closed Grading Windows from this side panel as well.
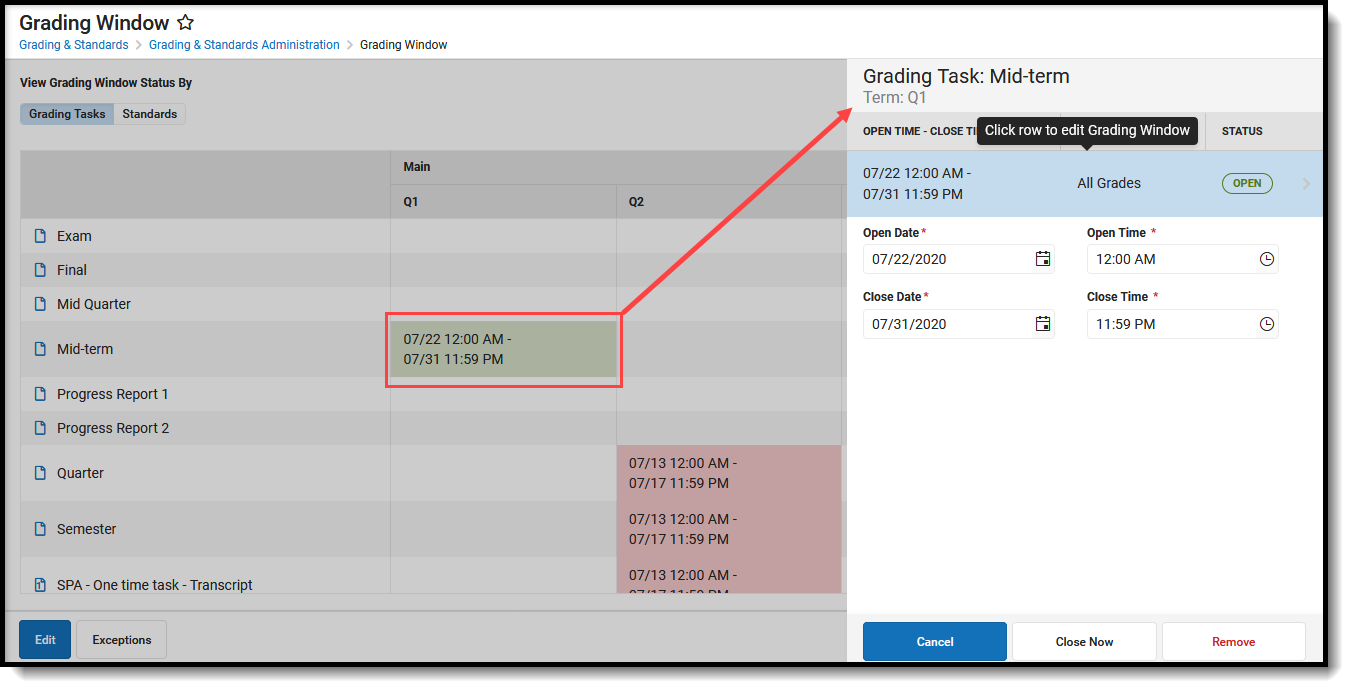
- Schedule a New Grading Window for a Single Task and Term by Clicking in an Empty Term Cell - For a particular Grading Task or Standard, click the corresponding empty cell in line with the desired term. A side panel shows where the Open Date and Time and the Close Date and Time can be entered and saved. Once saved, click the cell again to edit (as described above), or click Edit to modify all grading windows for the calendar (as described below)

3. Schedule a New Grading Window Using the Progress Tracker - Click the Edit button. This displays a list of existing Grading Windows. To modify those Grading Windows, click that item in the list. To add a new Grading Window, click the Add button. At any time during the process, use the Previous button to move to the previous screen, the Cancel button to start over, or click the Progress Tracker checkboxes to return to that specific screen. Detailed steps for this option follow.
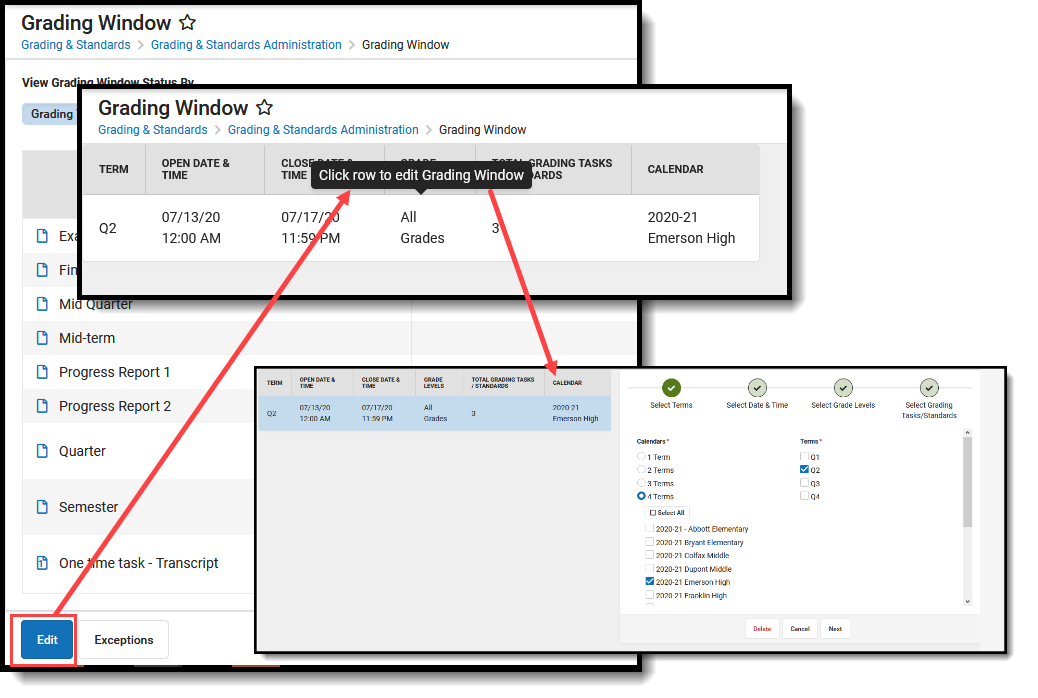
Understanding the Scheduling Grading Windows Process
Scheduling a Grading Window is a four-step process that includes selecting the calendars and terms, choosing dates and times for the grading window, and selecting the desired grading tasks and standards.
A Year must be selected from the Campus toolbar in order to create Grading Windows.
A progress tracker displays on each screen so users can quickly tell where they are in the process. If there is an issue with one of the selections, an exclamation point displays (i.e, when there are no dates selected or when there are no grading tasks selected). These are indications to revisit that step in the process (click the exclamation point) to verify the entered information is correct.
![]() Grading Window Progress Tracker
Grading Window Progress Tracker
When editing or adding grading windows, the left side shows a live update to the grading window as long as calendars, terms, and dates have been added.
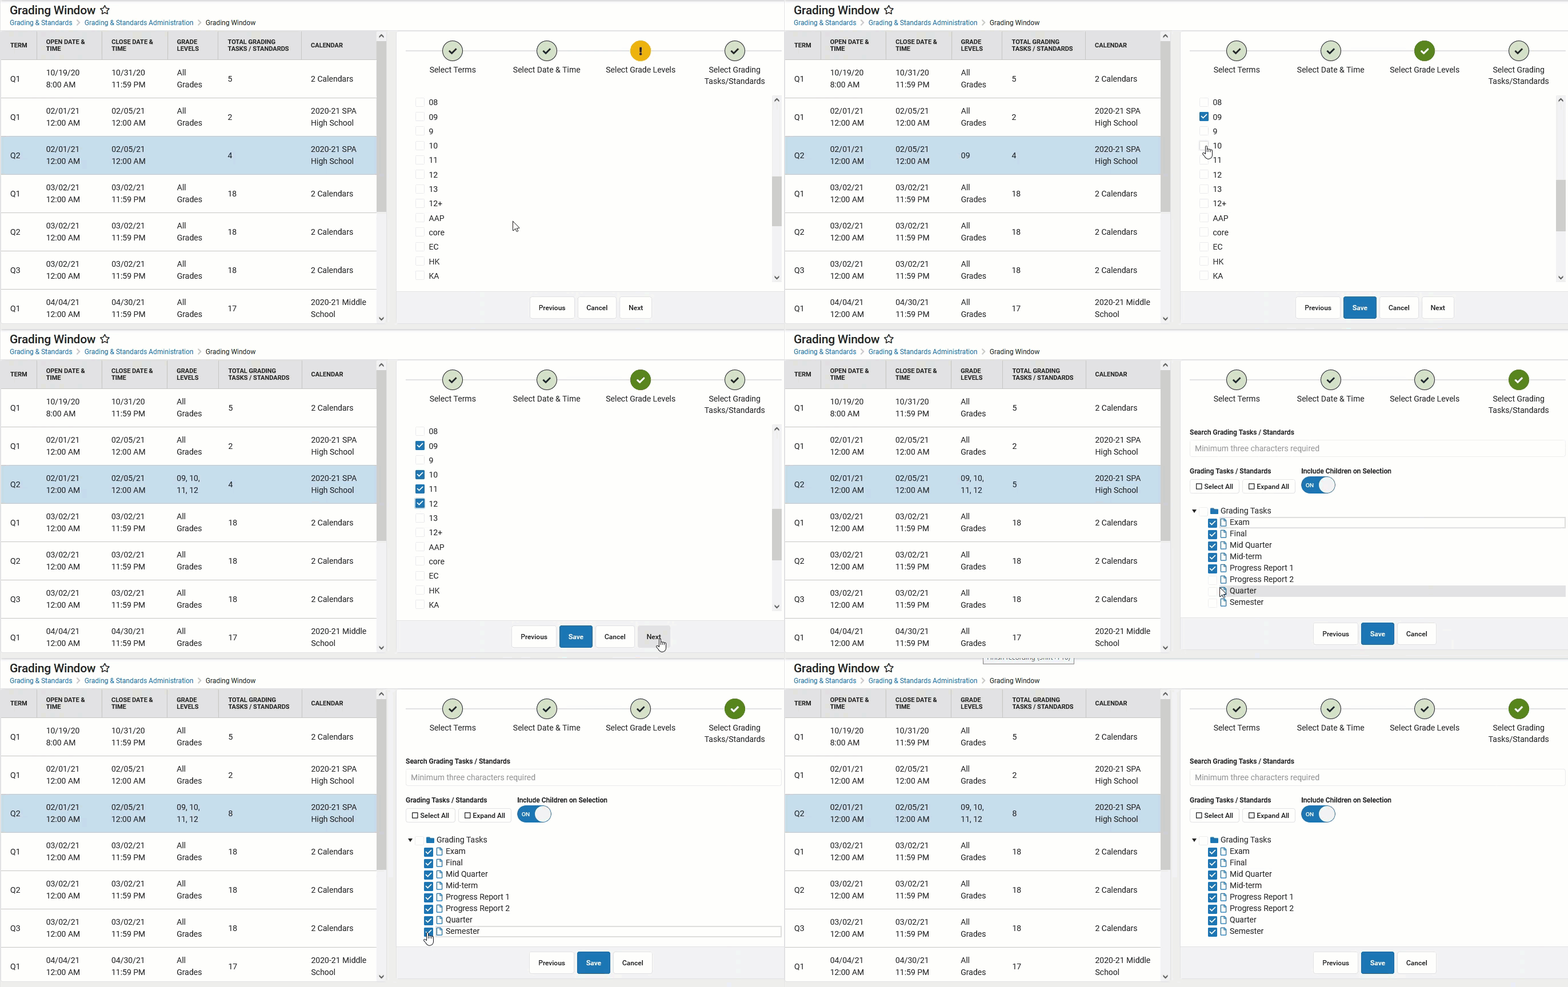 Live Updates to Grade Levels, Grading Tasks
When adding or editing a Grading Window using the Progress Tracker, grading windows that have identical terms, open/close dates and times, and grade levels, the Grading Windows are merged in the table to the left. A pop-up message displays when this happens, and the record must be saved.
Calendars and Terms
Calendars are grouped by term structure, like Semesters, Quarters, etc. When a Term radio button is selected (1 Term, 2 Terms, etc.), calendars with 1 or 2 terms are displayed for selection.
Grading Windows can only be created for calendars with similar term structures at one time. This means that a Grading Window for a calendar with Trimesters and one for a calendar with Quarters cannot be created together.
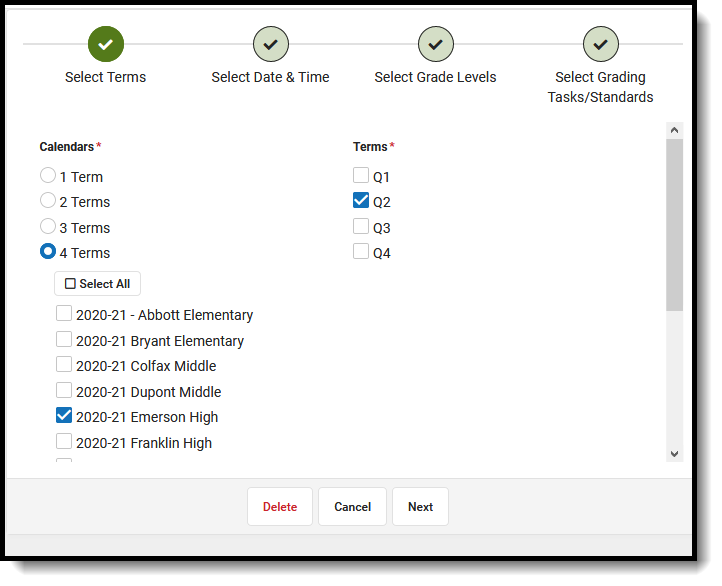 Calendar and Term Selection
If a calendar has more than one Term or Schedule structure, it appears multiple times with the added criteria. For example, if Emerson High School had two schedule structures - one called Main and one called Alternate - Emerson High is listed as Emerson High School - Main and Emerson High School - Alternate. If Emerson High - Alternate had many term structures, it would be listed in each category, such as Emerson High School - Alternate - Trimesters and Emerson High School - Alternate - Quarters.
To select all calendars, click the Select All button below the Terms heading (and Deselect All to remove the selection).
Once a calendar is selected, its Terms are enabled and can also be selected. The Grading Window can be set for any combination of terms, meaning the first and third terms can be turned on, or just the first term, or just the third term. Note that the term numbers displayed are the order assigned to the term, and not necessarily the name of the term. This means that, for the term structure Q1 (order 1), Q2 (order 3), Q3 (order 5), and Q4 (order 7), the terms are displayed as 1, 2, 3, and 4.
All calendars to which the user is assigned, with modify rights, are listed. At least one calendar and one term must be selected.
Date and Time Selection
Selecting a date and time for the grading window can be done by choosing dates in the calendar view or using the term-end dates.
Entering information in the Date Range view and then switching to the Term End Date view removes any selected dates in the Date Range view, and vice versa.
The Date Range format creates a single Grading Window for all terms selected in a calendar. The Term End Date format creates multiple Grading Windows, one for each term selected. For example, if terms 1 and 3 are selected, choosing the Date Range option allows grades with the term mask of 1 and 3 to be open for grading during one date range; choosing the Term End Date option opens the grading window for two days after the term, for four days on different dates.
Dates are required when scheduling a grading window.
Date Range
The Date Range option shows two months: the current month, with the current day highlighted in blue, and the next month. Arrows allow scrolling to previous months and future months. Click the TODAY option in the upper-right corner to set the current date as the selected date.
An alert displays to let users know the dates are outside the calendar range, but users are not prevented from creating grading windows outside the calendar range.
- The Open Date cannot be before the Start Date of the selected Calendar. If more than one calendar is selected, the earliest calendar start date is used to validate the Open Date of the Grading Window.
- The Close Date cannot be more than 90 days after the Calendar's End Date. If more than one calendar is selected, the latest calendar end date is used to validate the Close Date of the Grading Window.
Dates are selected by clicking a specific date in the calendar, by typing a date in the date fields, or by clicking the calendar icon in the date fields. Click the calendar itself to easily jump to a specific month. Times default to midnight (12:00 AM) on the entered open date through 11:59 PM on the entered close date, and can only be entered in standard AM/PM format.
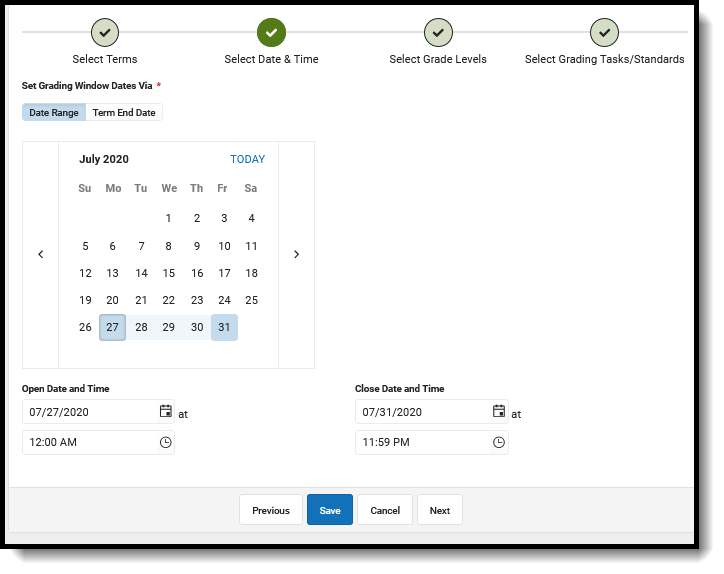 Date Range Selection
Term End Date
The Term End Date option allows users to choose how many days before or after the term's end date that a grading window is open, grouped by term end dates, starting at a certain time, and for how many days, and closing at a certain time. A list of the calendars chosen in Step 1 displays, along with the term's end date.
The entered date applies to EACH term included in the Grading Window.
Only numeric values, including zero (0), can be entered in the Open and Duration fields. Times are entered in standard AM/PM format.
In this example, the grading window opens 2 days after the term end date, beginning at 6:30 am for 4 days, and closes at 8:00 pm. Notice that the Term information from the calendar updates with that information. This calendar's Term 1 end date is August 16. With the entered information, the grading window opens on August 18 at 6:30 am and closes on August 22 at 8 pm.
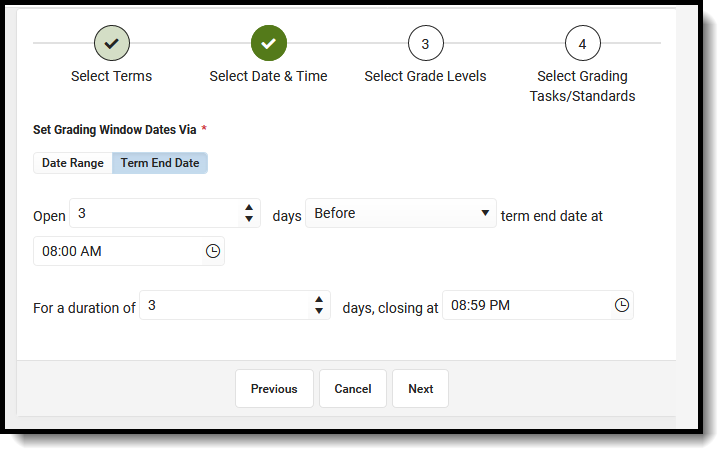 Term End Dates
Grade Levels
At least one grade level needs to be associated with the Grading Window.
Choose either All Grade Levels or Specific Grade Levels. The complete list of grade levels used in the district is available for selection. Individual grade levels cannot be marked when the All Grade Levels option is selected.
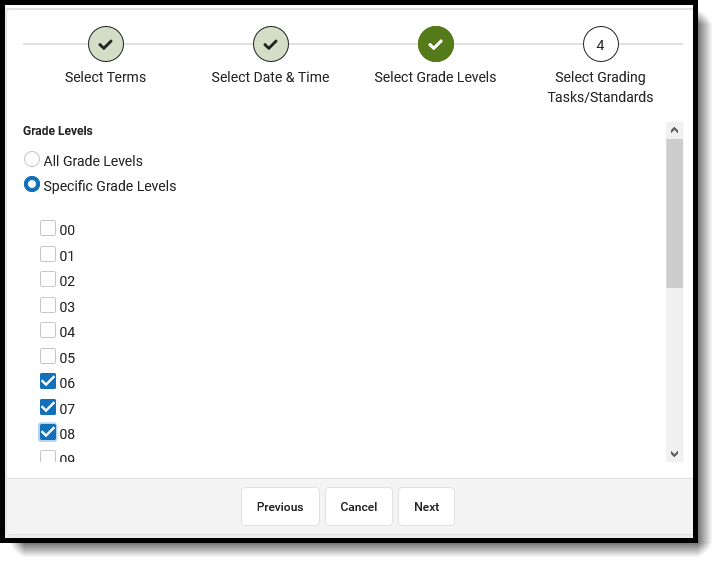 Grade Level Selection
When specific grade levels are selected, they are included in the summary of the Grading Window display on the main grid.
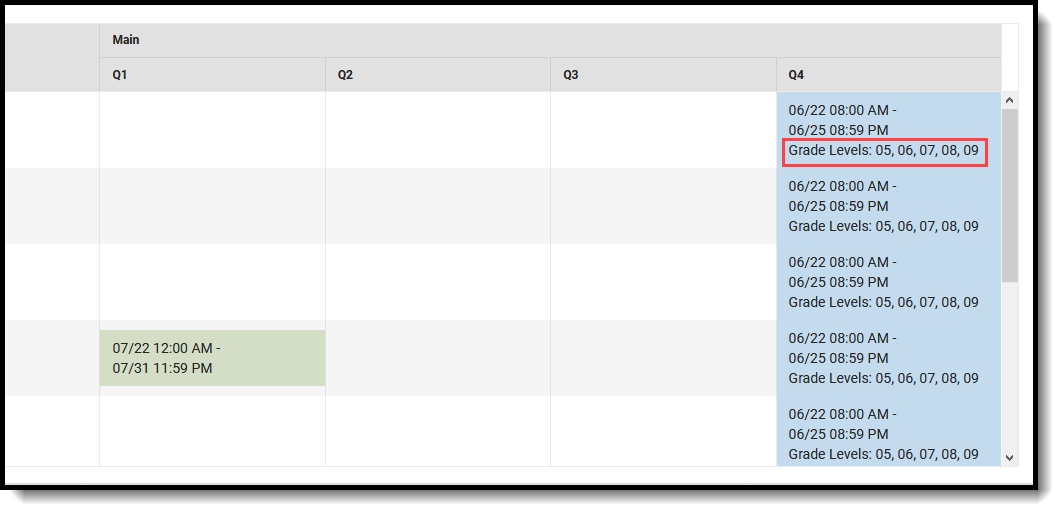 Specific Grade Level Selection
Grading Tasks and Standards Selection
At least one grading task or at least one standard is required when scheduling a grading window. If no grading tasks or standards are associated with the selected terms, a statement indicating this appears on the Select Grading Tasks and Select Standards screens.
All grading tasks associated with a course that have the Term Mask checkbox marked that match the terms selected when choosing calendars/terms are listed. For ease in selecting and viewing grading tasks, use the Select All/Deselect All and Expand All/Collapse All buttons. To locate a specific grading task or standard, enter the name of the task in the Search Grading Tasks or Search Standards field.
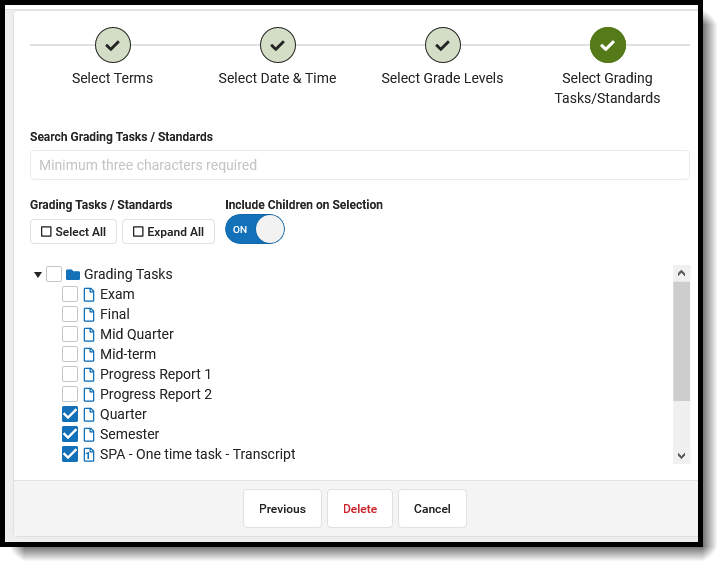 Grading Tasks and Standards Selection
When the Include Children on Selection (shown here with Standards) is set to On, marking the Standard group name (the parent standard) - Decision Making/Personal Health - selects all of the child standards associated with that standard group. When that option is set to Off, the parent standard can be posted without automatically selecting children, or the children can be posted without automatically selecting the parent.
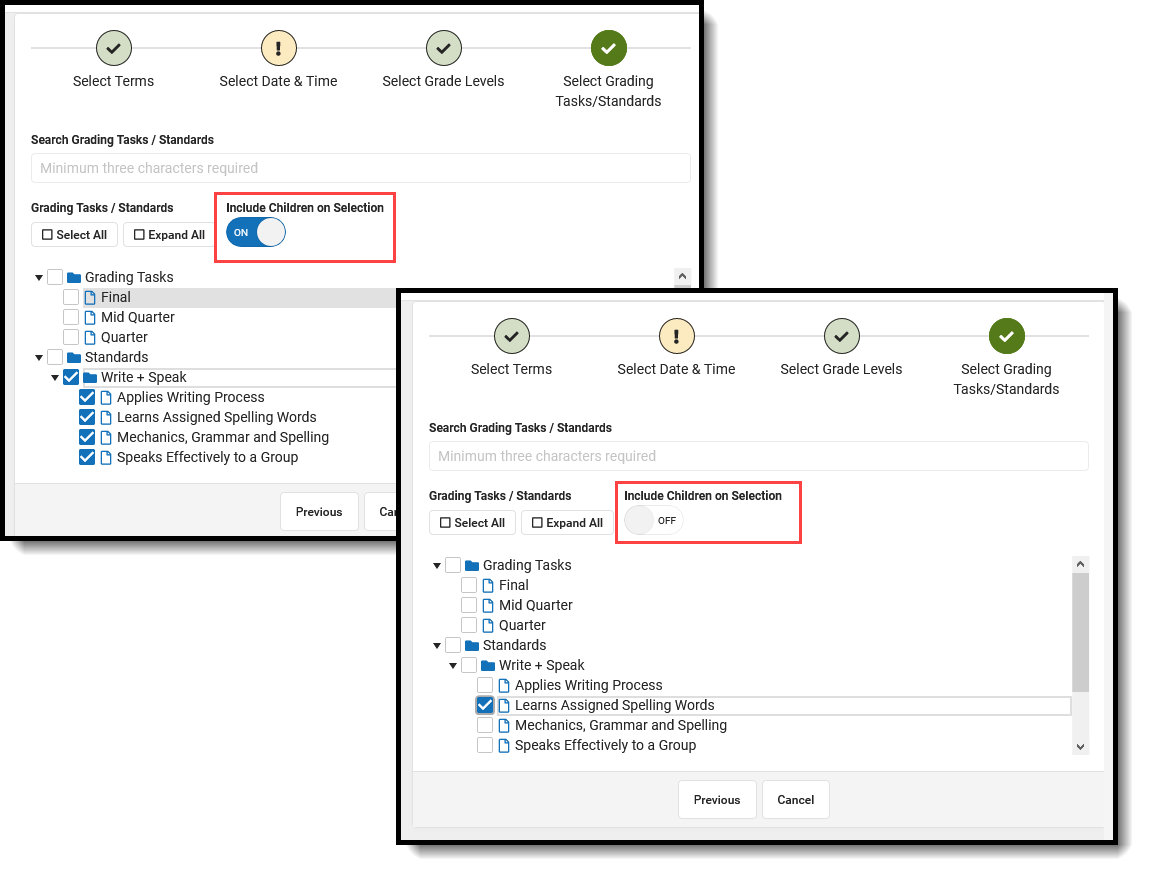 Parent/Child Standards Selection
Grading Tasks and Standards Icons
|
Grading Task Standard |
|
One-Time Grading Task One-Time Standard |
|
Archived One-Time Grading Task Archived One-Time Standard |
|
Archived Grading Task Archived Standard |
|
Standard Group |
|
Archived Standard Group |
Scheduling Grading Windows
Step 1. Calendar and Term Selection
- Choose the desired Calendars by locating them in the list. Calendars are organized by the number of terms they have.
- Mark the checkbox next to the calendar name. More than one calendar can be selected at a time.
- Select the desired Terms for the calendars.
- Click the Next button to select the dates and times of the Grading Window.
Step 2. Select Date and Time
Set the grading window dates using either the Date Range or the Term End Date option.
Set Grading Window Dates via Date Range
- Select the Date Range option in the Set Grading Window Dates Via field.
- Choose the date the grading window opens by selecting it in the calendar view.
- Choose the date the grading window closes by selecting it in the calendar view. The open date must be before the close date.
- The selected dates populate in the Open Date and Time and Close Date and Time fields. Modify the times as needed.
- Click Next to select the Grading Tasks and/or Standards.
The By Term Date fields are the only fields that do not populate for the record.
Set Grading Window Date via Term End Date
- Select the Term End Date option in the Set Grading Window Dates Via field.
- Enter the value of days before or after the term date for when the grading window Opens, or use the arrows on the field to change the number higher or lower than what was entered.
- Determine if the entered Open value is days Before or After, and change the selection accordingly.
- Enter the Time for the grading window to open in standard AM/PM format, or use the clock icon.
- Enter the number of days the grading window is open in the For a durationof field.
- Enter the Time for the grading window to close in standard AM/PM format, or use the clock icon.
- Click Next to select the Grade Levels.
Step 3. Select Grade Levels
Choose the desired Grade Levels by selecting the All Grade Levels or the Specific Grade Levels button. When selecting specific grade levels, at least one grade level must be selected.
Click Next to select the Grading Tasks or Standards.
Step 4. Select Grading Tasks and Standards
Mark the desired Grading Tasks and Standards to be scored in the grading window. Use the Select All button to mark all available grading tasks. Use the Expand All button to open all Standards Groups and display all parent/child standards. Enter search criteria for the grading task in the Search Grading Tasks/Standards field.
- If the Include Children on Selection is set to On, select the checkbox by the parent standard to mark the parent and all children; or, click the name of the parent standard to mark the parent and all children.
- Remove selections for individual standards as needed.
- If the Include Children on Selection setting is Off, parent and child standards must be marked individually.
Click Save when finished. The new Grading Window is listed in the existing Grading Windows table to the left.
 New Grading Window Added
View Grading Windows by Grading Tasks or Standards
Scheduled Grading Windows display on the main view of the grading window, and can be viewed by Grading Tasks (default view) or by Standards by changing the selection of View Grading Window Status By. This view displays for the calendar selected in the Campus toolbar. If that calendar only uses Standards, the Standards view displays, and vice versa.
The Grading Task view lists the grading tasks associated with the school in the Campus toolbar, along with the dates of the grading window for each term. In the example below, grading windows have been scheduled for the Final, Quarter and Semester grading tasks. These are displayed in blue, indicating that the dates are in the future.
Grading tasks are only listed in the grid if they are associated to a course in the selected calendar, or previously had a grading window record for the year chosen (for archived tasks; no longer associated but once had a grading window).
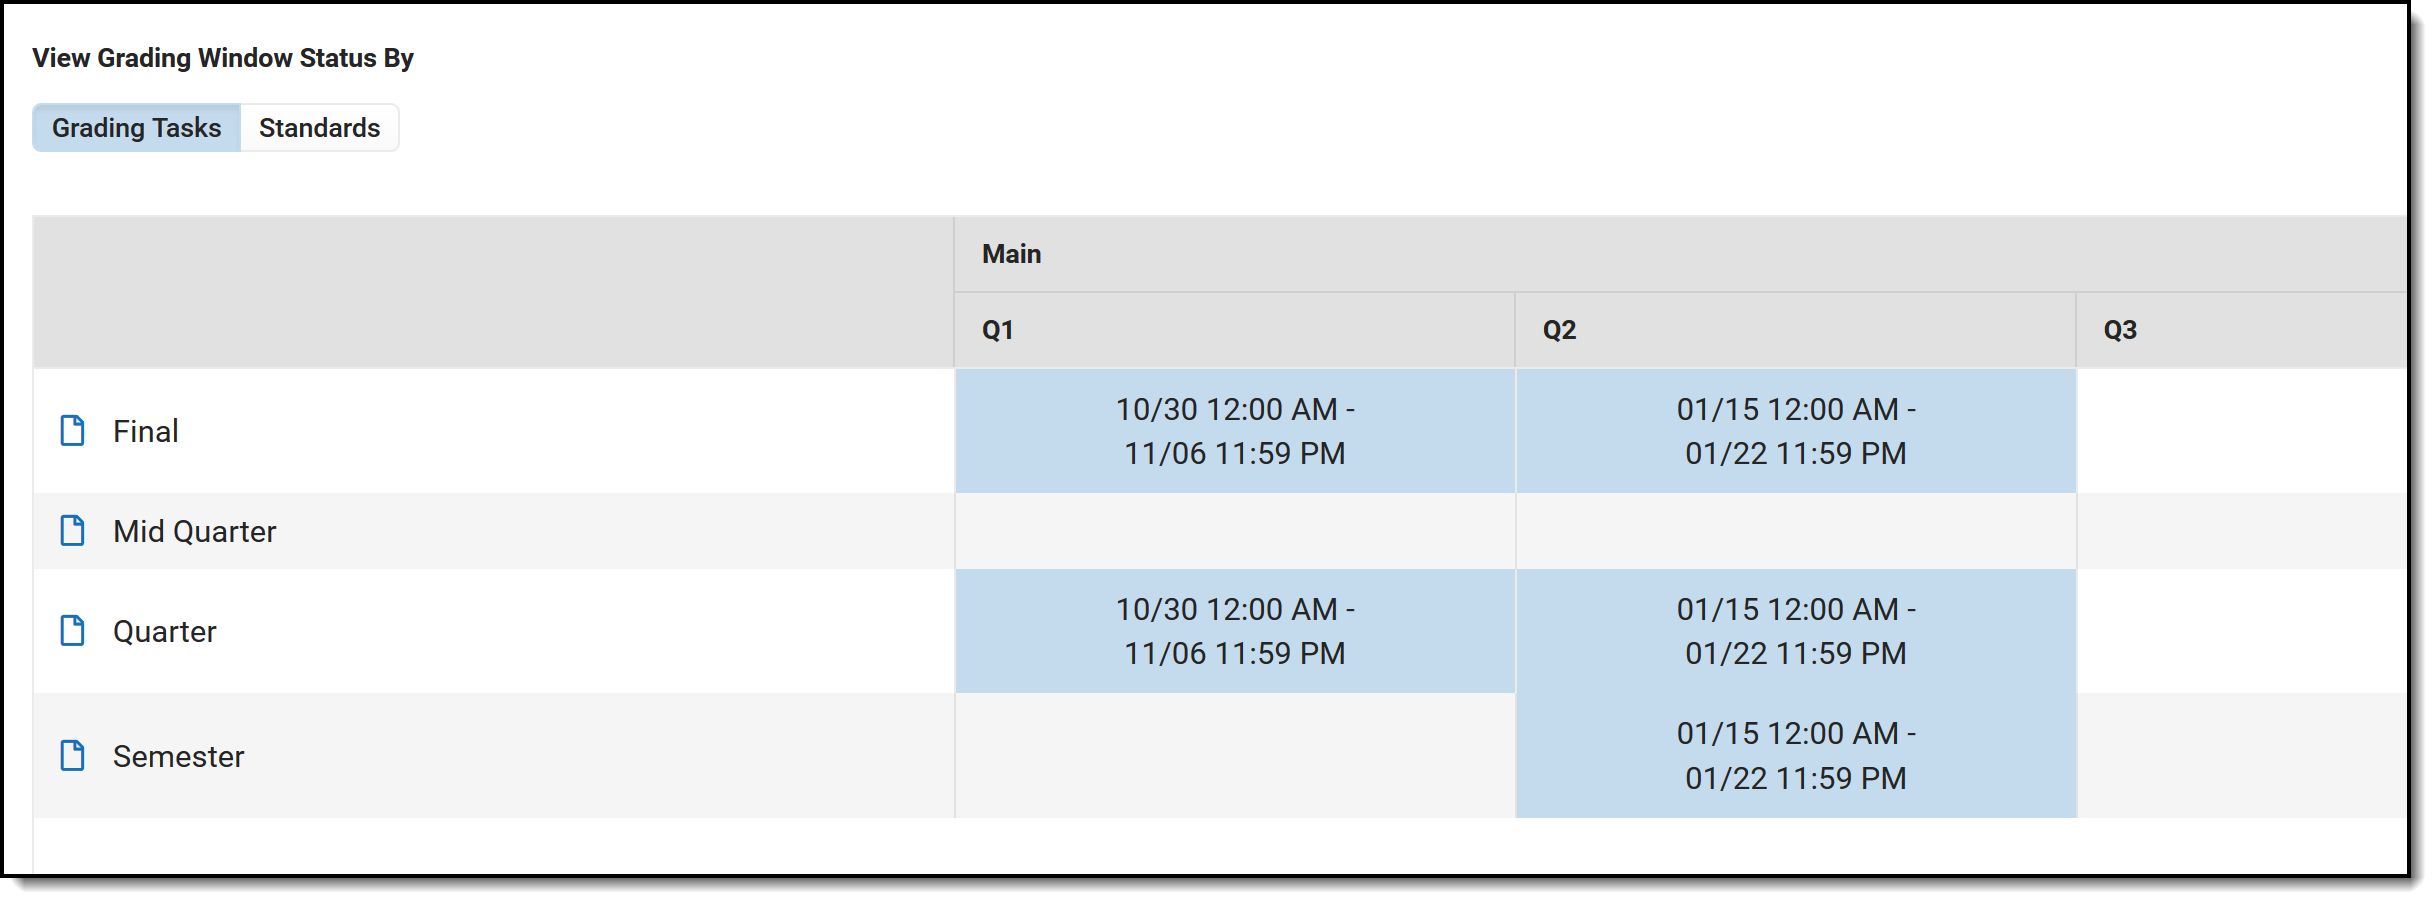 View Scheduled Grading Windows by Grading Tasks
The Standards view is organized by the Standards Group Name and lists the standards the school has chosen to score for that calendar. Using the Standards Legend as a guide, it is easy to see which standards for a particular term still need to be scheduled, have been scheduled, are currently open for grading, and which remain unassigned to a grading window.
- When the most current time slot is in the past (prior to the current date), a count displays in the first column for Closed and is in red text.
- When the time slot is currently open and today falls within the grading window, a count displays in the second column for Open in green text.
- When the time slot is in the future (after the current date), a count appears in the third column labeled Future Scheduled in blue text.
- When there is a task/term combination without any grading window time slots, a count appears in the fourth column for Remaining, displayed in black text.
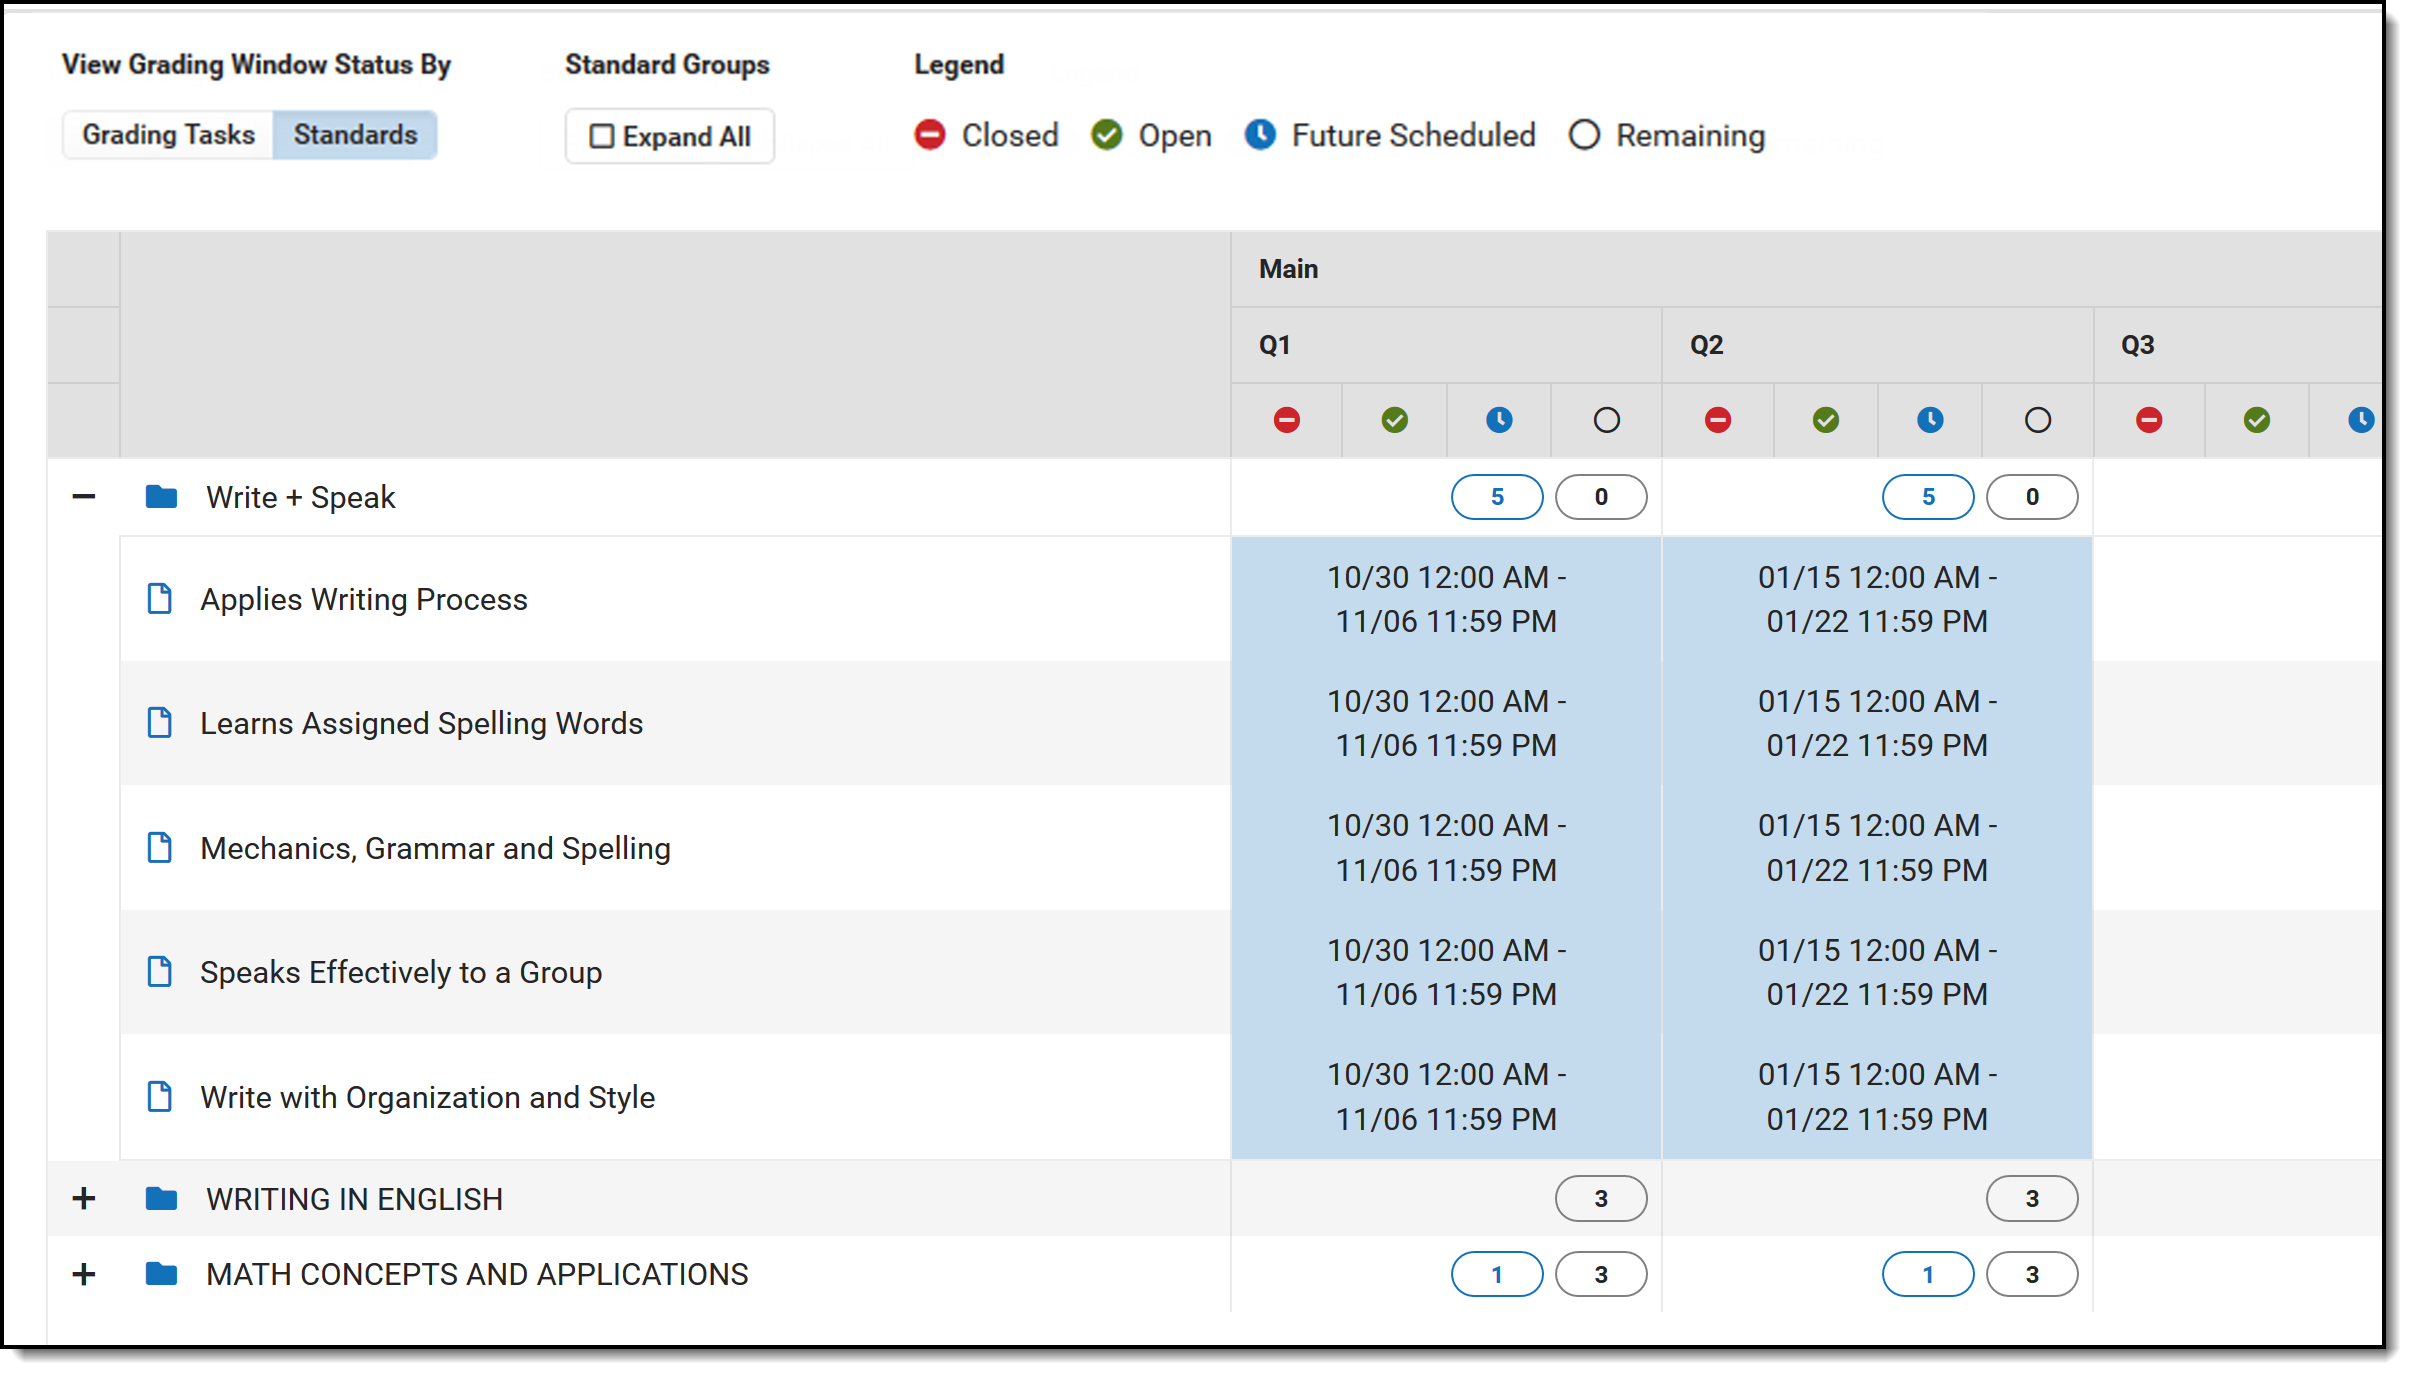 View Scheduled Grading Windows by Standards
In the example above, the five standards in the Write + Speak Standards Group are included in a Grading Window that opens at the end of October. Notice the Future Scheduled value has a total of 5, and the Remaining value is zero (0). The Writing in English Standards Group has no standards selected for grading, and the Remaining value is 3 (the number of standards in that group).
In the following example, standards have been scheduled for the Writing in English Standards Group and the Math Concepts and Applications Standards Group. Notice that the Uses standards mechanics standard has a grading window in green, indicating it is currently open, and the Uses proper grammar standard is in red, meaning the window for that standard is in the past. The total for this standards group lists one in the Closed column, one in the green column, and one in the remaining column, since one more standard in the group needs to be scheduled.
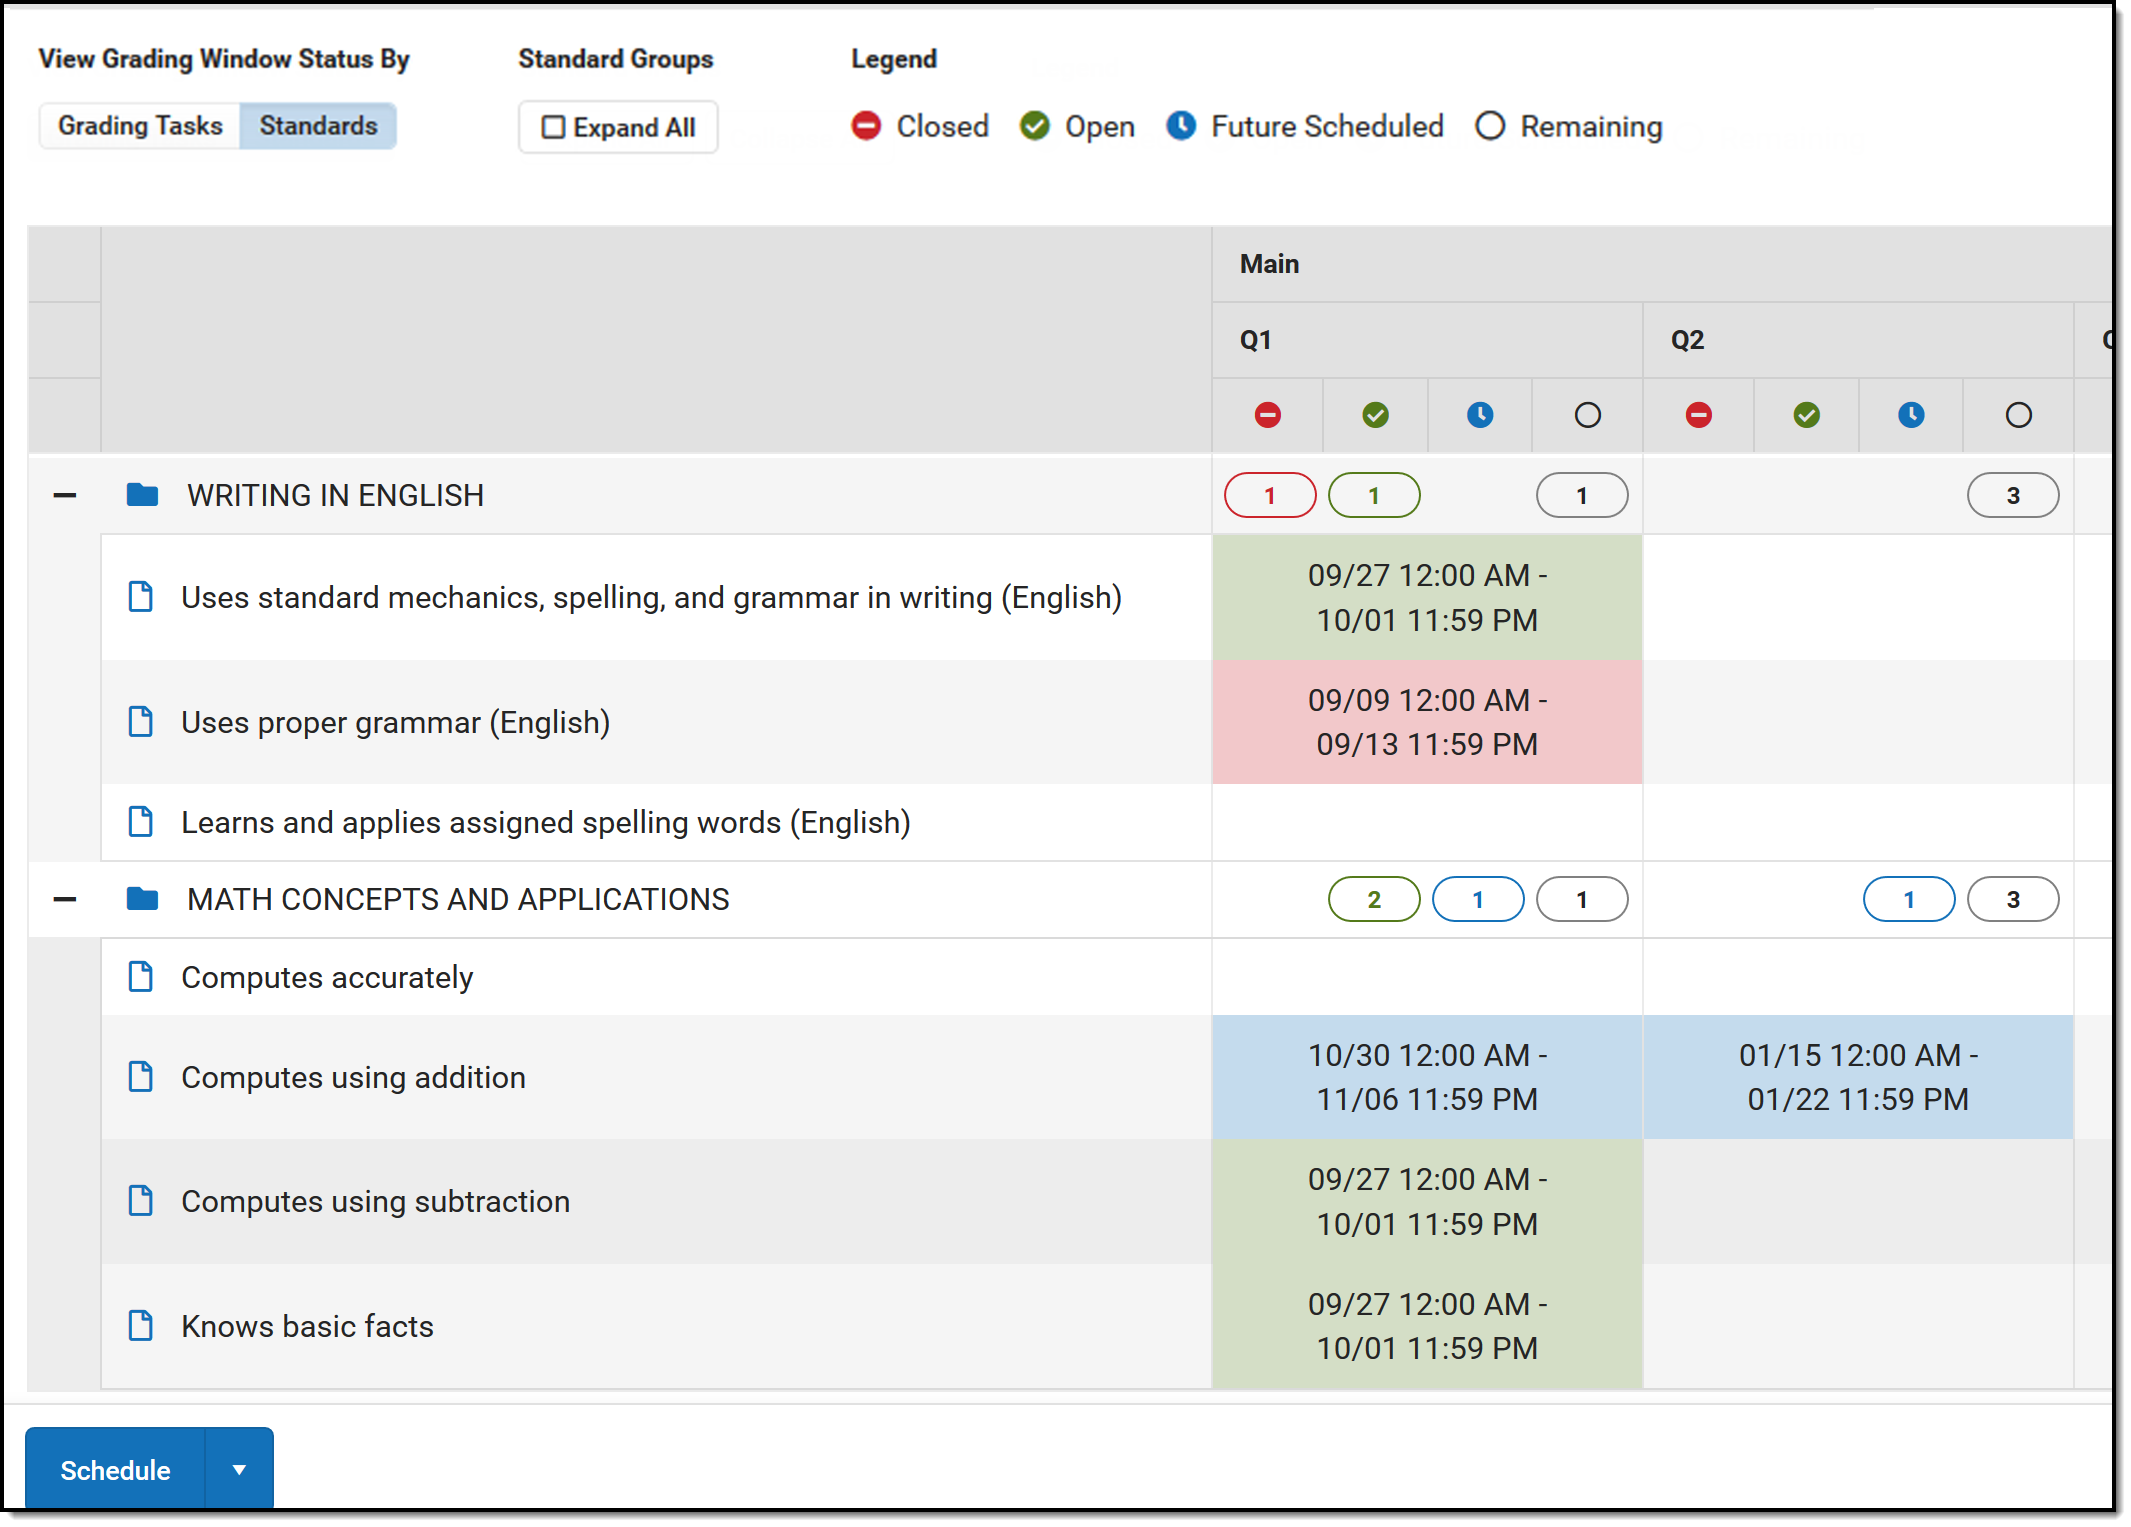 Additional Standards View Scheduled in the Past and Currently Open
Future scheduled icons appear when an additional Grading Window is scheduled but not represented in the main grid. In the example below, one grading window is currently open, and two additional grading windows exist that are also scheduled for the same term/task combination. ![]() Future Scheduled Grading Window
Future Scheduled Grading Window
When there is more than one Grading Window currently open, the main grid displays a second row for that Grading Window. There may be different open/close dates or times, but both can be seen from the main grid.
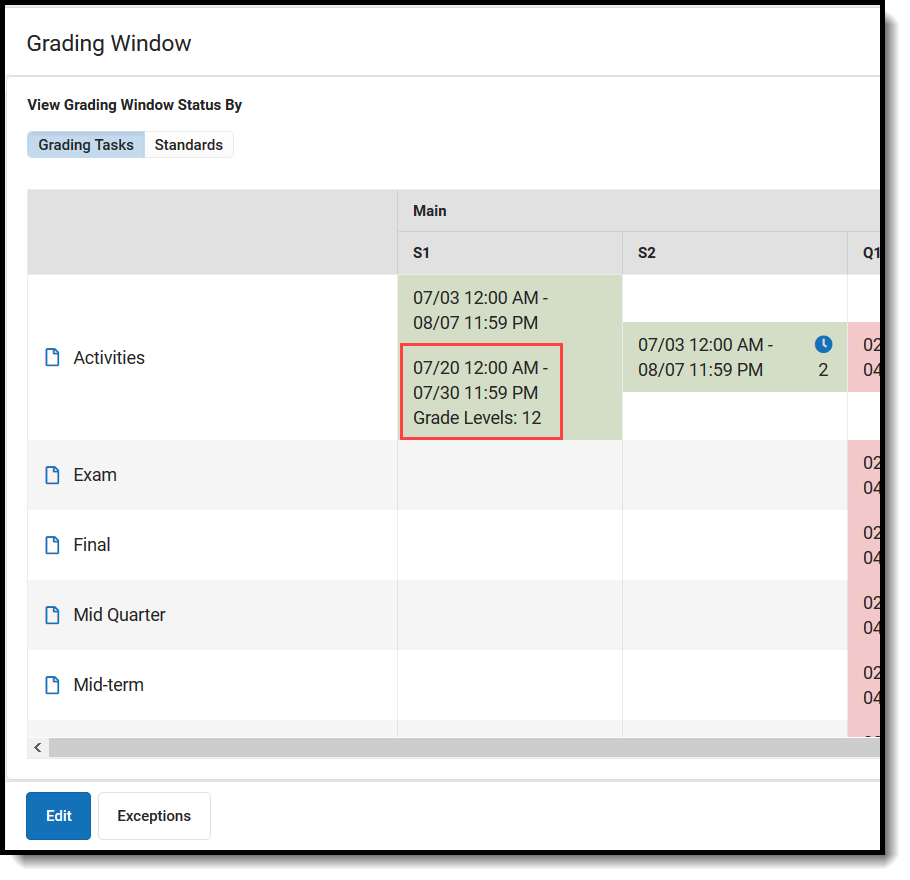 Multiple Rows for Grading Window Term
Change Dates of Grading Windows
- Select the Edit option to see a list of existing Grading Windows.
- Make the necessary changes, then click Save to apply the new selections.
Delete Grading Windows
- Select the Edit option to see a list of existing Grading Windows.
- Choose which Grading Window to delete from the list of existing Grading Windows.
- Click the Delete button to completely remove the Grading Window.
Deleting a grading window does not show if there are unsaved edits in the Progress Tracker.
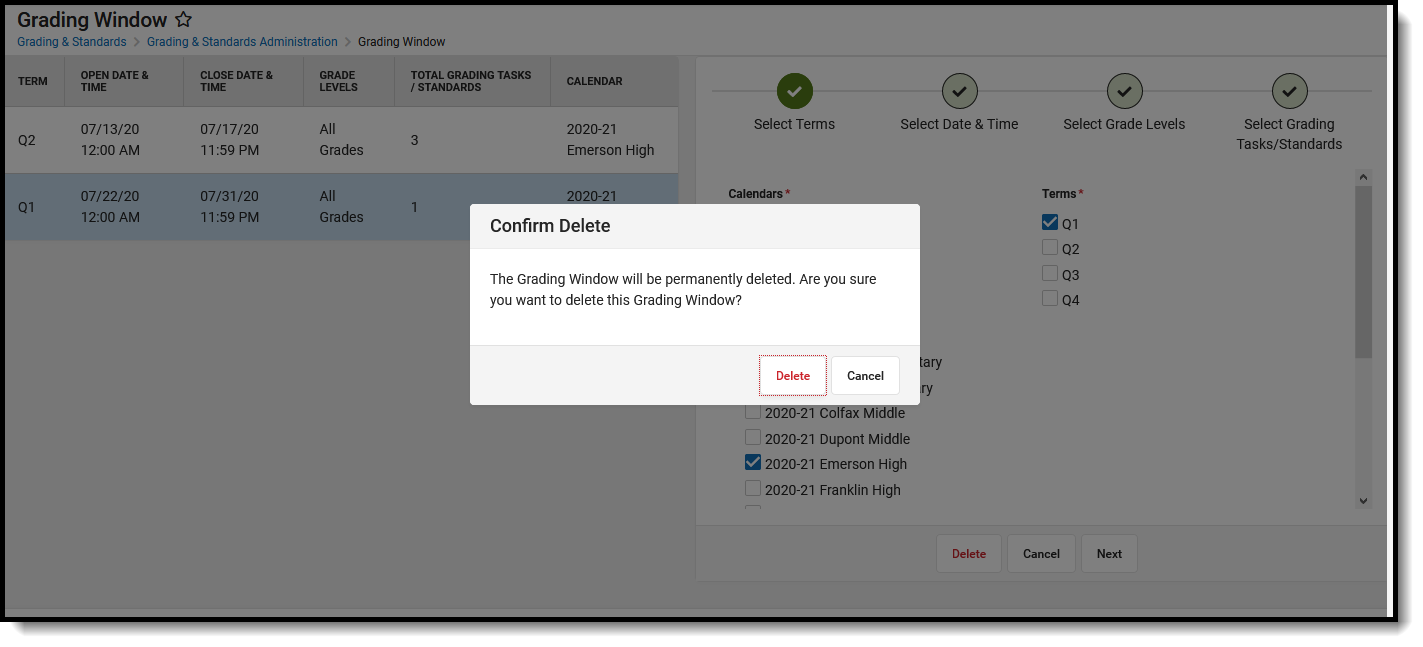 Delete Grading Window
Print Report Cards
After teachers have posted grades and the Grading Window has been closed, report cards can be printed en masse or individually.
Tool Search: Report Card
The Report Card Batch Report prints student report cards based on the options selected in the editor for multiple students en masse. A saved report card can be printed or the user may select from a list of Display Option Preferences.
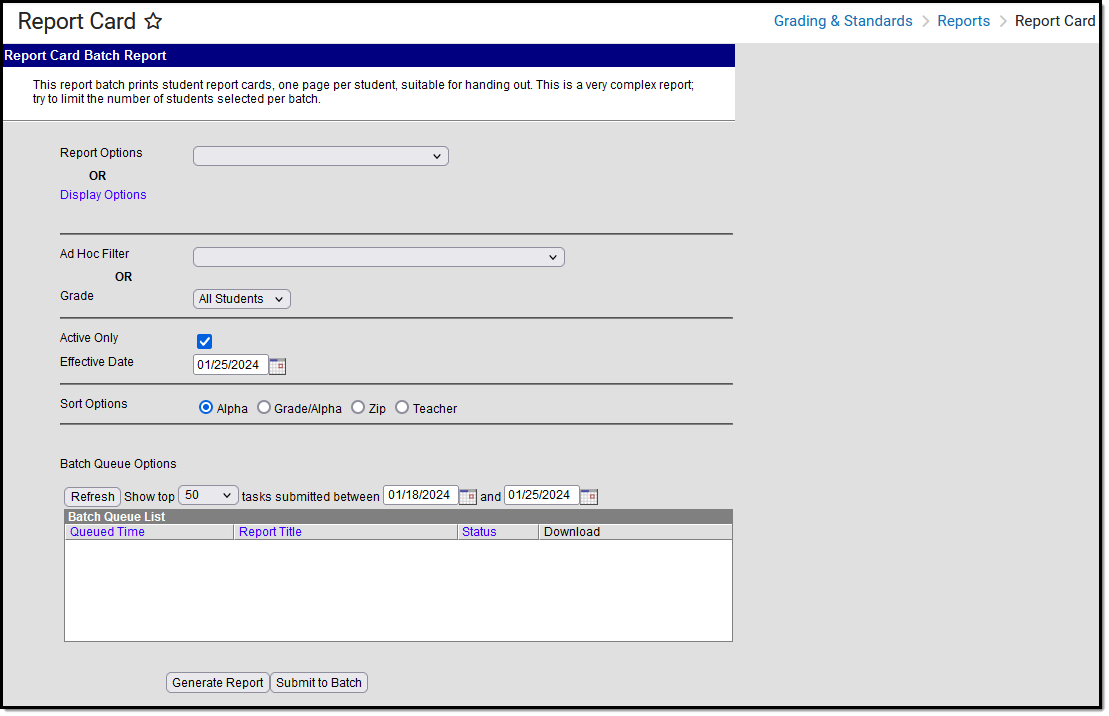 Report Card Batch Editor
See the Grading & Standards Reports Tool Rights article for the tool right needed to generate this report.
For students with multiple enrollments:
When the student has multiple enrollments in the same school year, Report Cards print for each school in which the student was enrolled.
Information in the letter sub-reports uses data stored in the AttendanceDayAggregation table. This means that attendance data for the current date is accurate as of the previous night's attendance calculation, or the last time the Attendance Aggregation Refresh was run. If needed, the Attendance Aggregation Refresh tool can be run to force an attendance recalculation to pull in the current day's data.
Report Card Batch Options
Field | Description |
|---|---|
Report Options | Select a report that has already been created in Report Preferences. If the Schedule Structure dropdown in the Campus tool bar is set to All, all reports cards for all schedule structures are listed for select. If a specific schedule structure is selected, only report cards for that structure are listed. The selected report card prints grades and attendance related to the selected schedule structure. |
Display Options | If there is no report card available in the Report Options dropdown list, or existing report cards do not meet the needs, choose the items to display from the Display Options list. In order to see the Display Options and make selections, users must have tool rights to Report Setup. |
Ad hoc Filter or Grade | Select the students to include in the report from an existing ad hoc filter. Only those students included in the filter will have a report card generated for them (if they meet the requirements of the report card). Or, select students by a grade level. All students in the school can be selected at one time, but it is recommended to limit the number of students included in each batch. |
Active Only | Marking this checkbox includes only those students who are actively enrolled as of the entered Effective Date. |
Effective Date | The entered date reflects the date by which students are actively enrolled. If all students regardless of active enrollment should be included in the report, remove the mark from the Active Only checkbox; this disables the Effective Date field. This field displays the current date but can be modified by typing in mmddyy format or using the calendar icon to select a date. |
Sort Options | The Report Cards can be sorted in the following ways:
|
Teacher Sort Options | When the Teacher Sort option is selected, options for selecting the Calendar of enrollment, the Effective Date and the Period of the day appear. If a student does not have a teacher for the selected period in the calendar for the effective date chosen, the student's report card prints first and the teacher's name is blank. |
Batch Queue Options | Generating report cards can sometimes be a long process. Submitting reports to Batch Queue allows the batch report to generate in the background while the user is free to use other parts of the product. Users can use the batch queue option to schedule reports to be processed at a later time and keep a record of reports that have been processed. To submit a Report Card Batch Report to the batch queue, select Submit to Batch after entering the appropriate fields in the report editor. A Batch Queue Reporting Options detail window displays. |
Generate Saved Reports Using the Report Card Batch Report
- In the Report Options dropdown list, select the report card to generate.
- Select the Grade Level or an Ad Hoc Filter.
- Mark the Active Only checkbox to only include active students.
- Enter an Enrollment Effective Date. This date is defaulted to the current date. If this date is outside of the calendar range, no records will be returned. This entry only prints report cards for students who were actively enrolled on that date.
- Select the Sort Options.
- Click the Generate Report button. The report displays in PDF format.
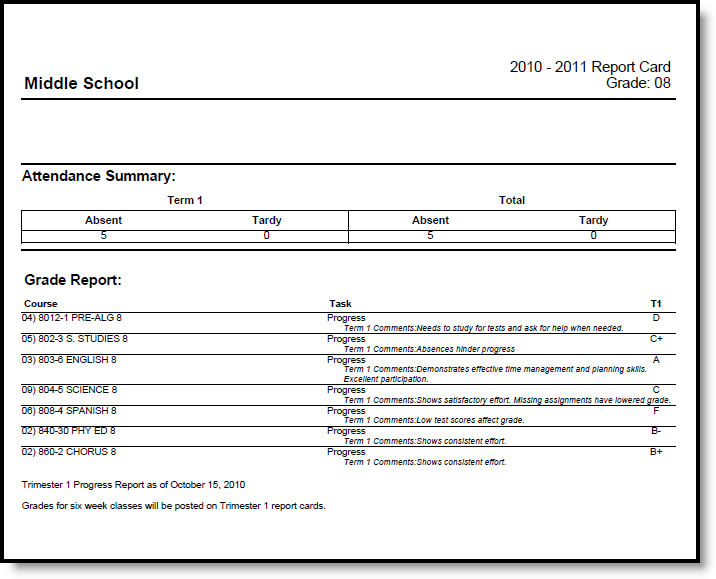 Report Card Print
Generate Report Cards using Display Options
- Click the Display Options link. A list of items to include on the report displays. See the Report Card Preferences for descriptions of these options.
- Select the Grade Level of the students to include on the report. Or, select students using an Ad Hoc Filter.
- Mark the Active Only checkbox to only include active students.
- Enter an Enrollment Effective Date.
- Select the Sort Options.
- Click the Generate Report button. The report displays in PDF format.
Generate Reports Cards using Batch Queue Options
- In the Report Options dropdown list, select the report card to generate.
- Select the Grade Level of the students to include on the report. Or, select students using an Ad Hoc Filter.
- Mark the Active Only checkbox to only include active students.
- Enter an Enrollment Effective Date.
- Select the Sort Options.
- Click the Submit to Batch button. The report card generates at the designated time.
Default Margin Sizes
The following table describes the default margin size for portrait and landscape report cards:
Report Type | Portrait | Landscape |
|---|---|---|
Conventional | Paper Size: Letter (8.5in X 11in) | Paper Size: A4 (210mm X 297mm) |
Standards Based | Page Size: Letter (8.5in X 11in) | Page Size: Letter (8.5in X 11in) |
The Report Card Batch report is used to batch print report cards. This video demonstrates how to batch print report cards.
Grades Reports
Term GPA Report
The Term GPA Report can be used to report grade point averages for selected students.
Tool Search: Term GPA Report
The Term GPA Report displays students' Term GPA based on the options selected in the report editor.
 Term GPA Report
See the Grading & Standards Reports Tool Rights article for the tool right needed to generate this report.
Term GPA Report Editor
The following table describes the options available for selection on the Term GPA Report editor.
Editor Field | Description |
|---|---|
| GPA Type | Indicates which GPA type (weighted or unweighted) reports. See the GPA Calculations in Campus article for more information. |
| Select Year | Selection indicates from which school year Term GPA data reports. Based on this selection, the calendars for that year are available for selection. The year selected in the toolbar is the default value. |
| Select Calendar | At least one calendar needs to be selected for the report to generate. Calendars can be chosen by Active Year, by School or by Year. If a calendar is selected in the Campus toolbar, that calendar is automatically selected. |
Grade | The grade level(s) to be included in the report. The options available depend on the school selected in the Campus Toolbar. |
Ad hoc Filter | Rather than selecting a grade level, users can select a previously-made Ad hoc Filter to indicate which students will appear in the report. |
Enrollment Effective Date | Limits report results to only enrollments which are active on the entered date. This option applies to both the grade level and the Ad hoc filter selections. |
Term Sequence | Allows selection of the terms to appear in the report. |
Minimum Term GPA | When a value is entered in this field, students who have GPAs of the entered value and higher are included in the report. If multiple terms are selected, the Term GPA in all terms must meet the entered value. Values entered here are limited to the System Preference for Number of Significant GPA Decimal Places. For example, if the preference is set to be three decimal places (i.e, 3.123), a value of 3.1234 cannot be entered. |
Maximum Term GPA | When a value is entered in this field, students who have GPAs of the entered value and lower are included in the report. If multiple terms are selected, the Term GPA in all terms must meet the entered value. Values entered here are limited to the System Preference for Number of Significant GPA Decimal Places. For example, if the preference is set to be three decimal places (i.e., 3.123), a value of 3.1234 cannot be entered. |
Display Options | Indicates what information appears in the report, in order of how they appear on the report. Items with asterisks are automatically selected for display in the report (but can be deselected). Options are:
When choosing the Use Bonus Points option, the display for multiple terms in the PDF is optimized when the System Preference for Number of Significant Decimal Places is set to 1 or 2 places. |
Sort Options | Indicates how the results will be sorted. Options are:
|
| Report Format | The report can be generated in either PDF format or CSV format. |
| Report Generation | The report can be generated immediately using the Generate Extract button. When there is a larger amount of data chosen (several calendars, large date range, etc.), use the Submit to Batch button, which allows the user to choose when the report is generated and to avoid time-out errors or system performance issues. See the Batch Queue article for more information. |
The Minimum GPA and Maximum GPA fields are not required. When both fields are populated, the report returns GPAs within the entered range. When only the Minimum GPA field is populated, the report returns GPAs of the entered value and above; when only the Maximum GPA field is populated, the report returns GPAs of the entered value and below.
Generate the Term GPA Report
- Select the desired GPA Type.
- Indicate which Students should appear in the report by selecting a Grade or an Ad hoc Filter.
- Enter an Enrollment Effective Date if desired. Defaults to the current date.
- Select which Terms should appear in the report.
- Enter a Min Term GPA and/or Max Term GPA to limit results to GPAs within the entered margin.
- Select which Display Options should appear in the report.
- Select the desired Sort Option for the report.
- Select the desired Report Format.
- Click Generate Report to generate the report immediately, or click the Submit to Batch button to choose when the report generates.
When the selected calendar has a Custom GPA associated with it, the Rolling Cum GPA (and the Cum GPA with Bonus) columns do not print.
When a student has no previous transcript records, but a Term GPA value exists on the Grades tab, the Term GPA value prints without a Rolling Cumulative GPA value. Note the students in Grade 09 in the screenshot below for an example.
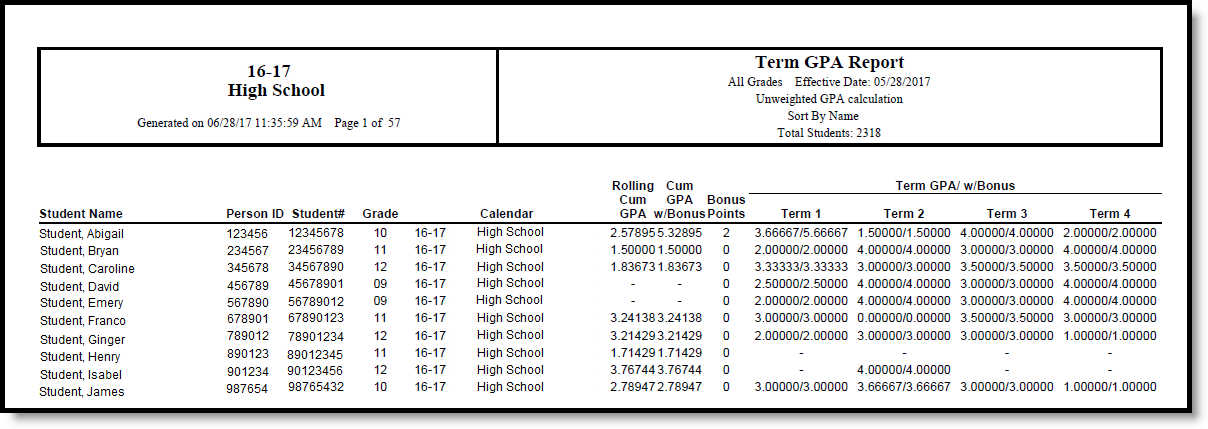 Term GPA Report - PDF Format
 Term GPA Report - CSV Format
Grades Report
The Grades Report will print students' posted grades based on selected criteria. This report is useful in determining which teachers have not posted grades or which students have missing grades.
Tool Search: Grades Report
The Grades Report provides a list of selected students and their posted term grades for selected tasks and standards. In Progress Grades are not included.
There are three report modes that can be generated:
- All Grades/Scores. Lists all posted grades for the selected group of students, teachers or course/sections.
- Missing Grades/Scores. Lists grading tasks and standards that do not have posted grades for the selected students.
- Grades/Scores. Lists specific posted scores (A+, B, B+, etc.) for the selected students.
Teachers can also generate a version of the Grades Report for students on their section rosters.
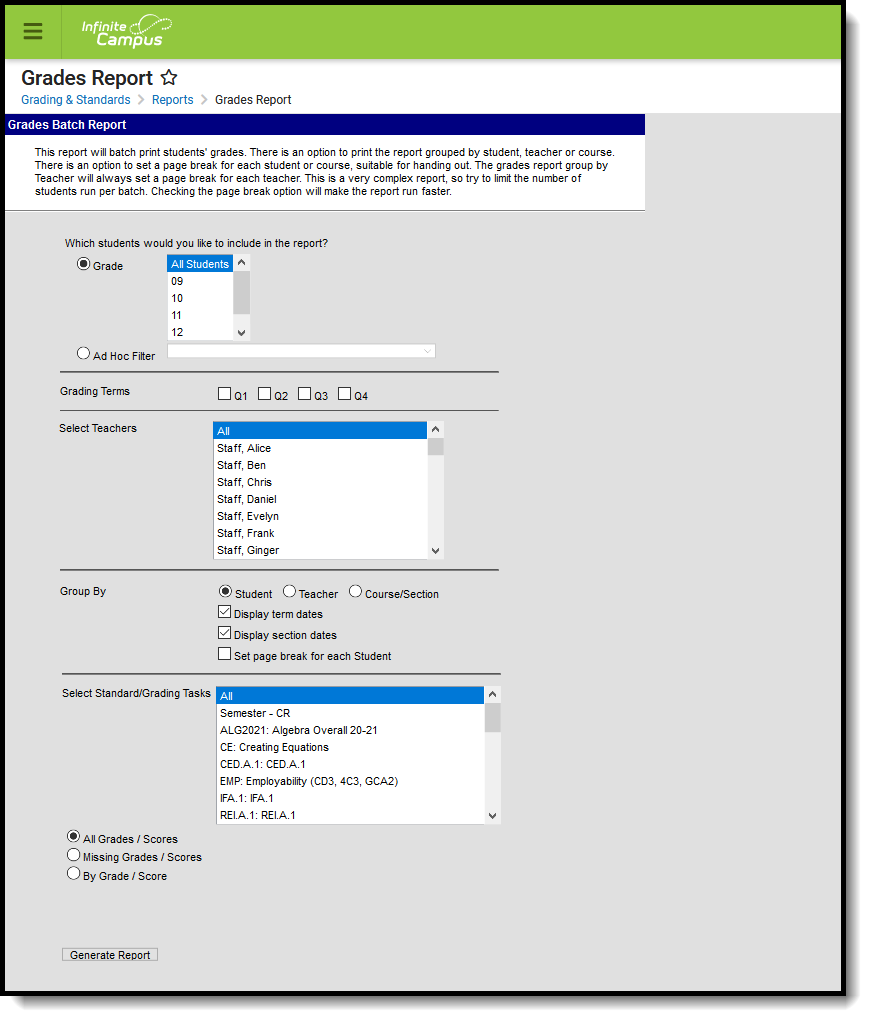 Grades Report
See the Grading & Standards Reports Tool Rights article for the tool right needed to generate this report.
Report Logic
Report logic varies depending on the selected mode. See the guidance for each of those modes for more information.
Labels for DROPPED and STARTED LATE
The student's start date in the selected Course Sections are used to determine which labels print. When multiple terms, are selected, the start date of the earliest term selected and the end date of the last term selected is used to decide the labels print on the report.
- If the report is generated for Quarter 1 and the student drops the course or ends enrollment in Quarter 2, the DROPPED label does not display because the roster end date is before the Quarter 2 term end date.
- If the report is generated for Quarters 1 and 2 and the student enrolled after the start date of Quarter 1, the STARTED LATE label displays because the roster start date is after the Quarter 1 term start date.
For the Student, Teacher and Course/Section Group By options, when a student has started a course after the first day of the first scheduled term or has dropped a course before the last day of the last scheduled term, STARTED LATE/DROPPED with the appropriate date displays on the student's record one time, no matter how many grading tasks are reported.
Report Editor
| Editor Options | Description |
|---|---|
| Student Selection | |
| Grade | Indicates the grade level in which students are enrolled. Only grade levels available in the calendar selected in the Campus toolbar are listed. When the School field in the Campus toolbar is set to All Schools, all grade levels in the district are listed. |
| Ad hoc Filter | A selected Ad hoc filter limits records reported to those included in a pre-defined filter. Ad hoc filters are created in the Ad hoc Filter Designer. |
| Grading Terms | |
| Grading Terms | Lists the terms of the school year included in the report. At least one term need to be selected in order to generate the report. All terms can be selected at one time. The names of the grading terms are based on the Calendar Terms for the selected calendar in the Campus toolbar. |
| Teacher Selection | |
| Select Teachers | All teachers can be selected, or a specific teacher can be selected. Only teachers who are actively employed in the School Year selected in the Campus toolbar or were employed in the School Year selected are listed. Teachers who are no longer active are available for selection on the report but their names display in red text. |
| Group By Options | |
| Student | Students are grouped by grade level and sorted alphabetically within that grade level. This provides a very simple report card of sorts for each student. The Teacher Display Name entered on the Course/Section is included as the name of the teacher, and includes courses that do not have active teachers. This option sorts the students by the period. |
| Teacher | Students are grouped by the primary teacher or teacher (not section staff) assigned to the course/section and sorted alphabetically within that group. The report sorts teachers by active and inactive, determined by their Staff History start and end dates for a particular section. The printed teacher's name uses the first and last name values entered on the person's Demographics record, not the Teacher Display Name entry on the Course/Section. For Active Course Sections (sections whose first day of the first placed term is on or before the current date and last day of the last placed term is on or after the current date):
Sections without an assigned teacher or primary teacher are not included (grades/sections/students) in the report. Page breaks are automatically inserted for this option after each unique teacher. |
| Course/Section | Reports records by course/section, sorted alphabetically by course name. Students are sorted alphabetically within each group. Teacher names print based on the Teacher Display Name on the Course Section. |
| Display Term Dates | Determines whether the term dates for each term selected should print in the header of the report. |
| Display Section Dates | Determines whether the section dates for each section should print by the section name in the header of the report. |
| Set page break for each Student or Course/Section | Indicates that a separate page should report for each student or Course/Section. This option is not available when grouping by Teacher, as this mode is formatted to print each teacher on a separate page. |
| Standards/Grading Task Selection | |
| Standards/Grading Tasks | Determines which Grading Tasks and Standards are considered in the report. This selection determines the scores reported. |
| Modes | |
| All Grades/Scores | This mode prints all posted scores for the selected Grading Tasks and Standards. Only posted grades are reported; In-Progress grades are not included. See the All Grades/Scores Mode section below for more information. |
| Missing Grades/Scores | This mode prints a list of students who do not have scores posted for the selected Grading Tasks and Standards. See the Missing Grades/Scores Mode section below for more information. |
| Show Dropped Students | When the Missing Grades/Scores option is selected, indicate whether students who have dropped a course should also be included in the report. Note: this option determines whether students who have dropped the class can be included or not - it is not tied to the logic for reporting the Dropped label for students. Dropped students typically have missing Grading Tasks and Scores. |
| By Grade/Score | This mode prints a list of students who have received the selected scored for the chosen Grading Tasks and Standards. For each rubric or score group, select which scores to include. See the By Grade/Score Mode section below for more information. |
Due to the complexity of this report, consider limit the number of students included in the report, or the number of scores included in the report, and consider using the page break options available in the Group by section.
All Grades/Scores Mode
The All Grades/Scores mode looks for all posted scores for grading tasks and standards for the selected terms and teachers. In-progress grades are not included.
When sorted by Course/Teacher, this report can be used as a progress check or grading overview to see how many teachers have posted grades for the selected terms.
When sorted by Student, the report can be used as a simple report card to use during conferences or to check in with students on their standing in the course.
Report Logic for All Grades/Scores
Any grade posted for a student's scheduled course sections for the selected terms are included in the report. Any course section that does not have posted grades is not included.
Generate the Grades Report for All Grades/Scores
- Select the students to include on the report by selecting a Grade Level or an Ad hoc Filter.
- Select the appropriate Grading Terms to include on the Report.
- Select the desired Teachers to include on the report.
- Determine the Group By option for the report, if Term and Section Dates should be included, and if Page Breaks should be used.
- Select the Standard/Grading Tasks to include in the report. Mark the specific Grading Scores to return if using the By Grading Scores option.
- Choose the All Grades/Scores radio button to see a list of students who have grades/scores posted for the selected teachers and grading tasks or standards.
- Click the Generate Report button. The report displays in PDF format.
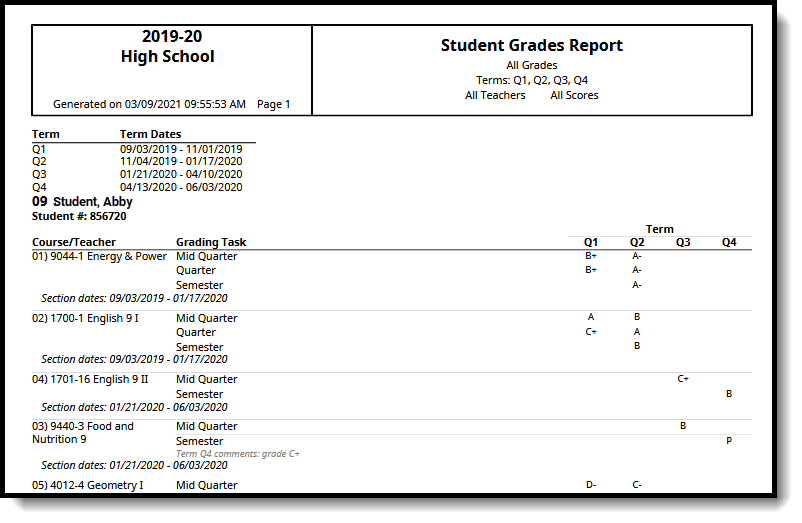 Grades Report - All Students, Grouped by Student
Missing Grades/Scores Mode
The Missing Grades/Scores mode looks for grading tasks and standards that are scored for the selected term(s) but have yet to be posted. This report mode is most often grouped by Course/Section or Teacher.
As part of the grading process, schools create a period of time, called a Grading Window, where teachers post scores for grading tasks and standards. At a determined date, the Grading Window closes and schools can then begin processing report cards. Scores that were not posted for a particular section after the Grading Window ends are considered missing. Notifications can be sent to teachers to remind them to post scores.
This mode also allows for the selection of Show Dropped Students.
Report Logic for Missing Grades/Scores
| When the report is generated... | Then... | Notes and Examples |
|---|---|---|
| ...using the Missing Grades/Scores mode and Show Dropped Students is not marked... | ...a student who has a roster end date is considered a dropped student and does not report when the roster end date is in the selected term. |
|
| ...using the Missing Grades/Scores mode and Show Dropped Students is not marked... | ...a student who has a roster end date before the section end date is not part of the reporting population UNLESS the student has a subsequent roster start date that is after the previous roster end date. | In other words, a student who has been dropped and then re-scheduled into a section is not a Dropped Student in the term(s) that contain the new roster start date.
Example The student has a roster end date in Term 2 and a new roster roster start date in Term 3. The student is a Dropped Student in Terms 1-2 but not in Term 3-4. That student only displays in the report if it is generated for Terms 3 and/or 4 (Terms 1-4, 2-4, 3-4, 3, 4, etc.). If the report is generated for Terms 1 and/or 2 only, the student is a Dropped student and does not display. |
| ...using the Missing Grades option and the Show Dropped Students is marked... | ...a student who has a roster end date before the section end date is part of the reporting population, is considered DROPPED and the roster end date reports. | A student who has a roster end date before the section end date and a subsequent roster start date that is after the previous roster end date is part of the reporting population, DROPPED displays when the report is generated for a term that is before or that contains the roster end date; STARTED LATE displays if the student has a roster start date that is after the section start date. Example The student has a roster start date in Term 1, a roster end date in Term 2, and a new roster start date in Term 3. The Missing Grades/Show Dropped Students options are selected. When the report is generated for Term 1, the STARTED LATE label displays for the first roster start date because the roster start and end dates are compared to the Term 1 start and end dates. When the report is generated for Term 2, the the DROPPED label displays for the roster end date because the roster start and end dates are compared to the Term 2 start and end dates. When the report is generated for Term 3, the STARTED LATE label displays for the second roster start date because the roster start and end dates are compared to the Term 3 start and end dates. When the report is generated for Term 4, the a label does not display because the roster start and end dates are compared to the Term 4 start and end dates. When the report is generated for Terms 1, 2, 3, and 4:
This is because the roster start and end dates are compared to the Term 1 start date and the Term 4 end date. |
Generate the Grades Report for Missing Grades/Scores
- Select the students to include on the report by selecting a Grade Level or an Ad hoc Filter.
- Select the appropriate Grading Terms to include on the Report.
- Select the desired Teachers to include on the report.
- Determine the Group By option for the report, if Term and Section Dates should be included, and if Page Breaks should be used.
- Select the Standard/Grading Tasks to include in the report. Mark the specific Grading Scores to return if using the By Grading Scores option.
- Choose the Missing Grades/Scores radio button to see a list of students who do not have grades/scores posted for the selected teachers and grading tasks or standards.
- Determine if Show Dropped Students should also be marked.
- Click the Generate Report button. The report displays in PDF format.
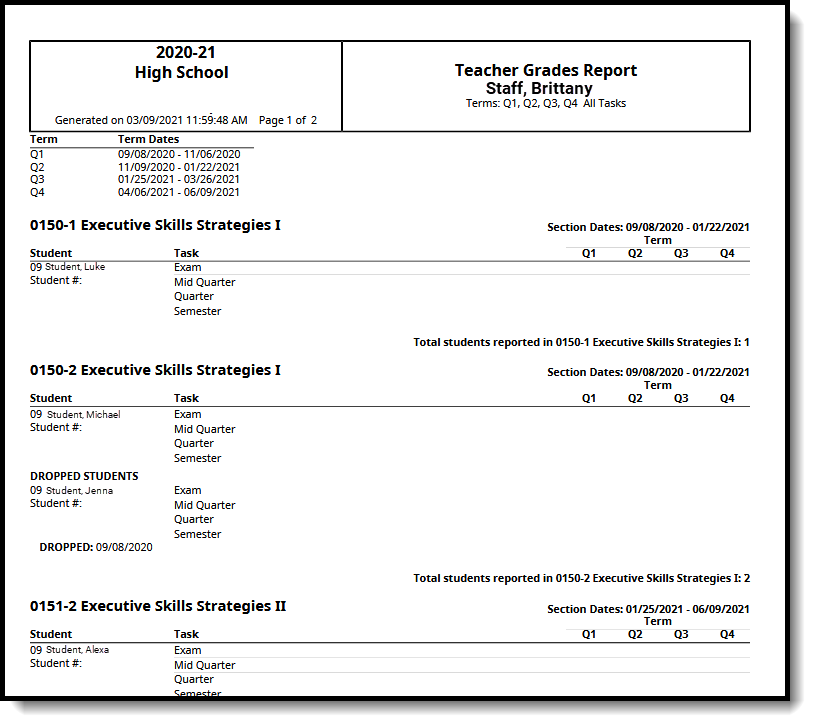 Grades Report - Missing Grades/Scores, sort by Teacher
By Grade/Score Mode
The By Grade/Score Mode requires the selection of a set of scores used in a Score Group/Rubric as a grading scale. This option can be used to show students who are at risk of failing the course or who are doing exceptionally well in the course.
Report Logic for Missing Grades/Scores
Only selected scores are included in the report, and a report only generates for students who have received those selected scores.
Generate the Grades Report for By Grade/Score
- Select the students to include on the report by selecting a Grade Level or an Ad hoc Filter.
- Select the appropriate Grading Terms to include on the Report.
- Select the desired Teachers to include on the report.
- Determine the Group By option for the report, if Term and Section Dates should be included, and if Page Breaks should be used.
- Select the Standard/Grading Tasks to include in the report. Mark the specific Grading Scores to return if using the By Grading Scores option.
- Choose the By Grade/Score radio button to see a list of students who have posted grades of a certain value or range.
- Click the Generate Report button. The report displays in PDF format.
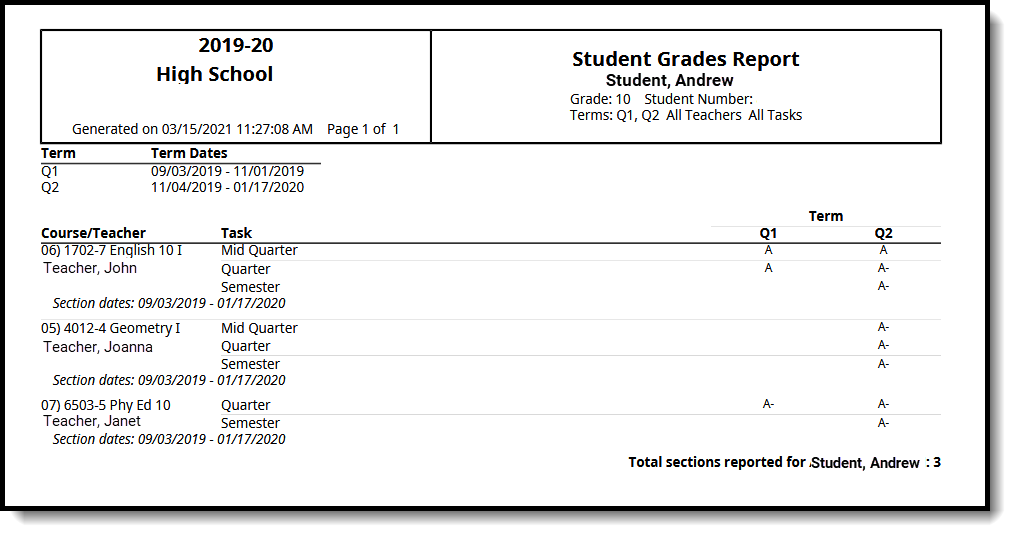 Grades Report - By Grade/Score, sorted by Student for Scores A and A-
Class Rank Report
The Class Rank report calculates a student’s class rank based on historical (transcripted) grades. Class rank is calculated from the score group and GPA value used in that group. It does not include any grades that are not posted on the transcript.
Tool Search: Class Rank
The Class Rank Report tool calculates students' class rank based on transcripted grades. Class rank is calculated from the GPA Value, GPA Weight, and Bonus Points (if applicable) from the courses posted to the transcript. Grades that have not been posted to students' transcripts are not considered.
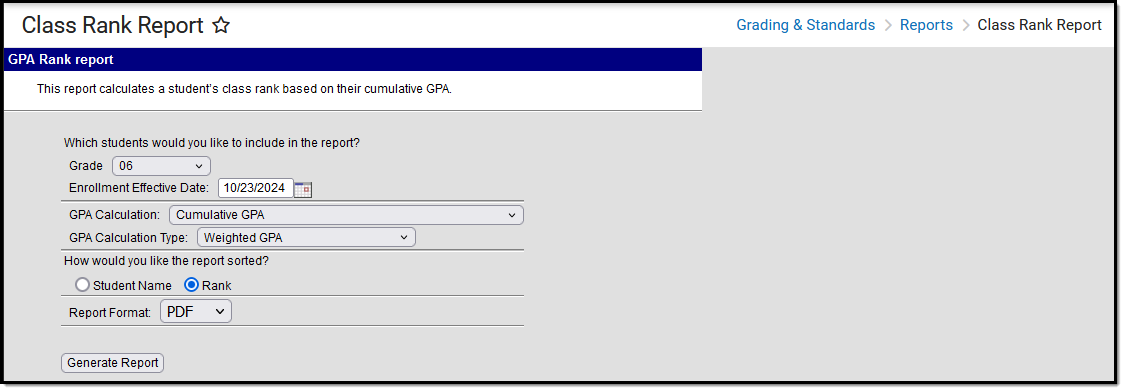
See the Grading & Standards Reports Tool Rights article for the tool right needed to generate this report.
Report Logic
A Year and School should be selected in the Campus Toolbar to generate this report. These selections control the Grade options in the report editor and the year that must be entered in the Date field.
The Number of Significant GPA Decimal Places System Preference determines the number of decimal places the Cumulative GPA columns display.
See the GPA Calculations in Campus article for details on the GPA calculations.
Report Editor
| Field | Description |
|---|---|
| Student Selection | Select students for this report by choosing their Grade level of enrollment and their Enrollment Effective Date. The entered date returns students who were enrolled as of the entered date. The field defaults to the current date, but it can be changed by entering a new date in mmddyy format or using the calendar icon to select a new date. |
| GPA Calculation | This field lists available custom GPA calculations associated with the calendar. If no Custom GPAs are associated with the chosen calendar, use the Campus Cumulative GPA option. |
| GPA Calculation Type | The type of GPA calculation:
See the Campus GPA Calculations article for more information. If a Custom GPA Calculation is selected, this field is not available. |
| Sort Option | Sort the report by:
|
| Report Format | Indicates how the report is generated:
|
Generate the Class Rank Report
- Select which Grade should appear in the report.
- Enter an Enrollment Effective Date in mmddyyyy format or by clicking the calendar icon and selecting a date. Only students whose enrollments are active on this date will appear in the report.
- Select the desired GPA Calculation.
- Select the desired GPA Calculation Type.
- Indicate how the report should be sorted, alphabetically by Student Name or numerically by Rank.
- Select the desired Report Format.
- Click Generate Report.
The Total Grade Points column always reports to three decimal points. The Highest/Lowest GPA information in the report header does not include excluded students.
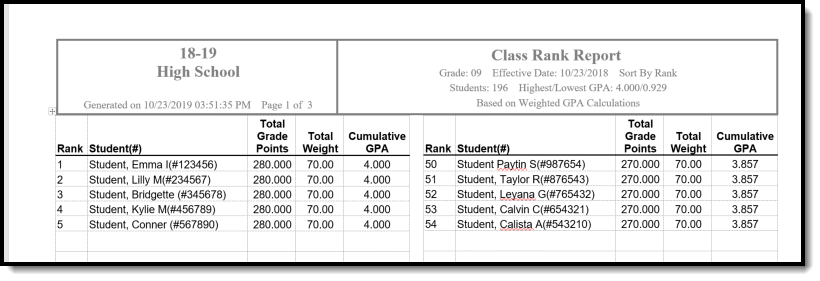 Class Rank Report - DOCX Format
Activity Eligibility
The Activity Eligibility Report can be used to monitor students' academic grades to determine participation eligibility.
Tool Search: Activity Eligibility
The Activity Eligibility Report can be used to monitor students grades to determine participation eligibility in activities such as sports and theater.
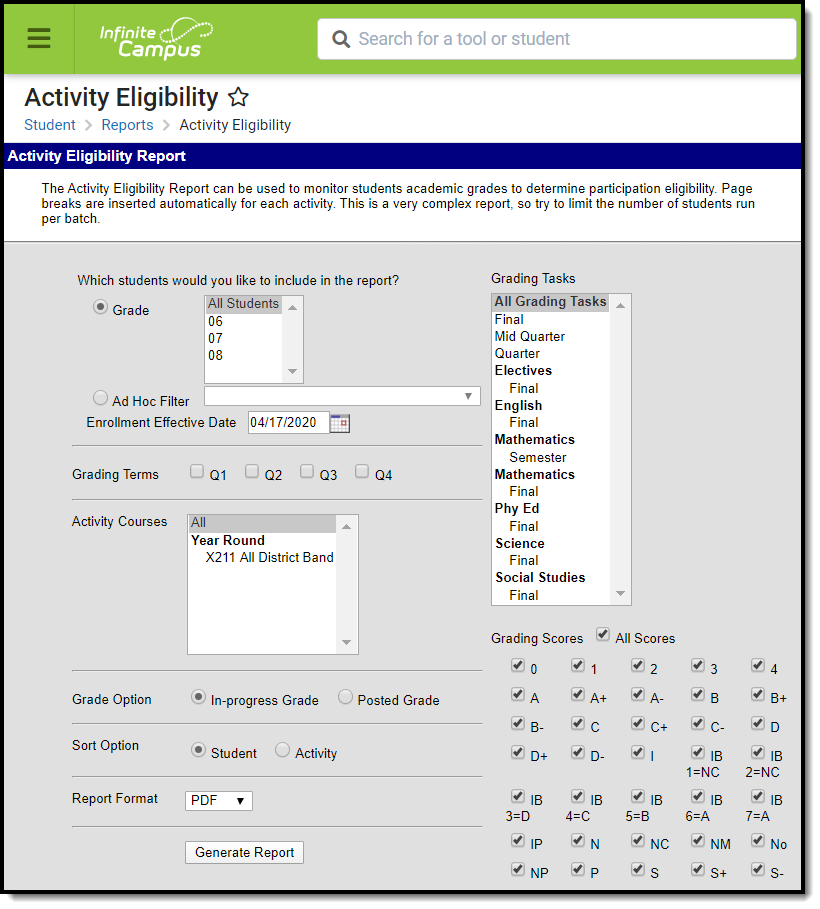 Activity Eligibility Report
See the Student Information Reports Tool Rights article for the tool rights needed to generate this report.
Report Logic
The Activity Eligibility Report looks at the student roster of the selected activity course(s) to identify a list of students the report should include. Only courses identified as an activity course (designated in the Course Information editor) will populate in the report's Activity Courses list.
Student eligibility is determined when:
- From the report's Activity Courses selection list, the student has an active roster placement in one (minimally) of the selected courses.
- The student has an active roster status in at least one academic course WHERE the in-progress grading score OR posted grading score they are receiving matches the Grading Scores selected for the Activity Eligibility Report.
Activity options are defined in the Attribute Dictionary under the Course module.
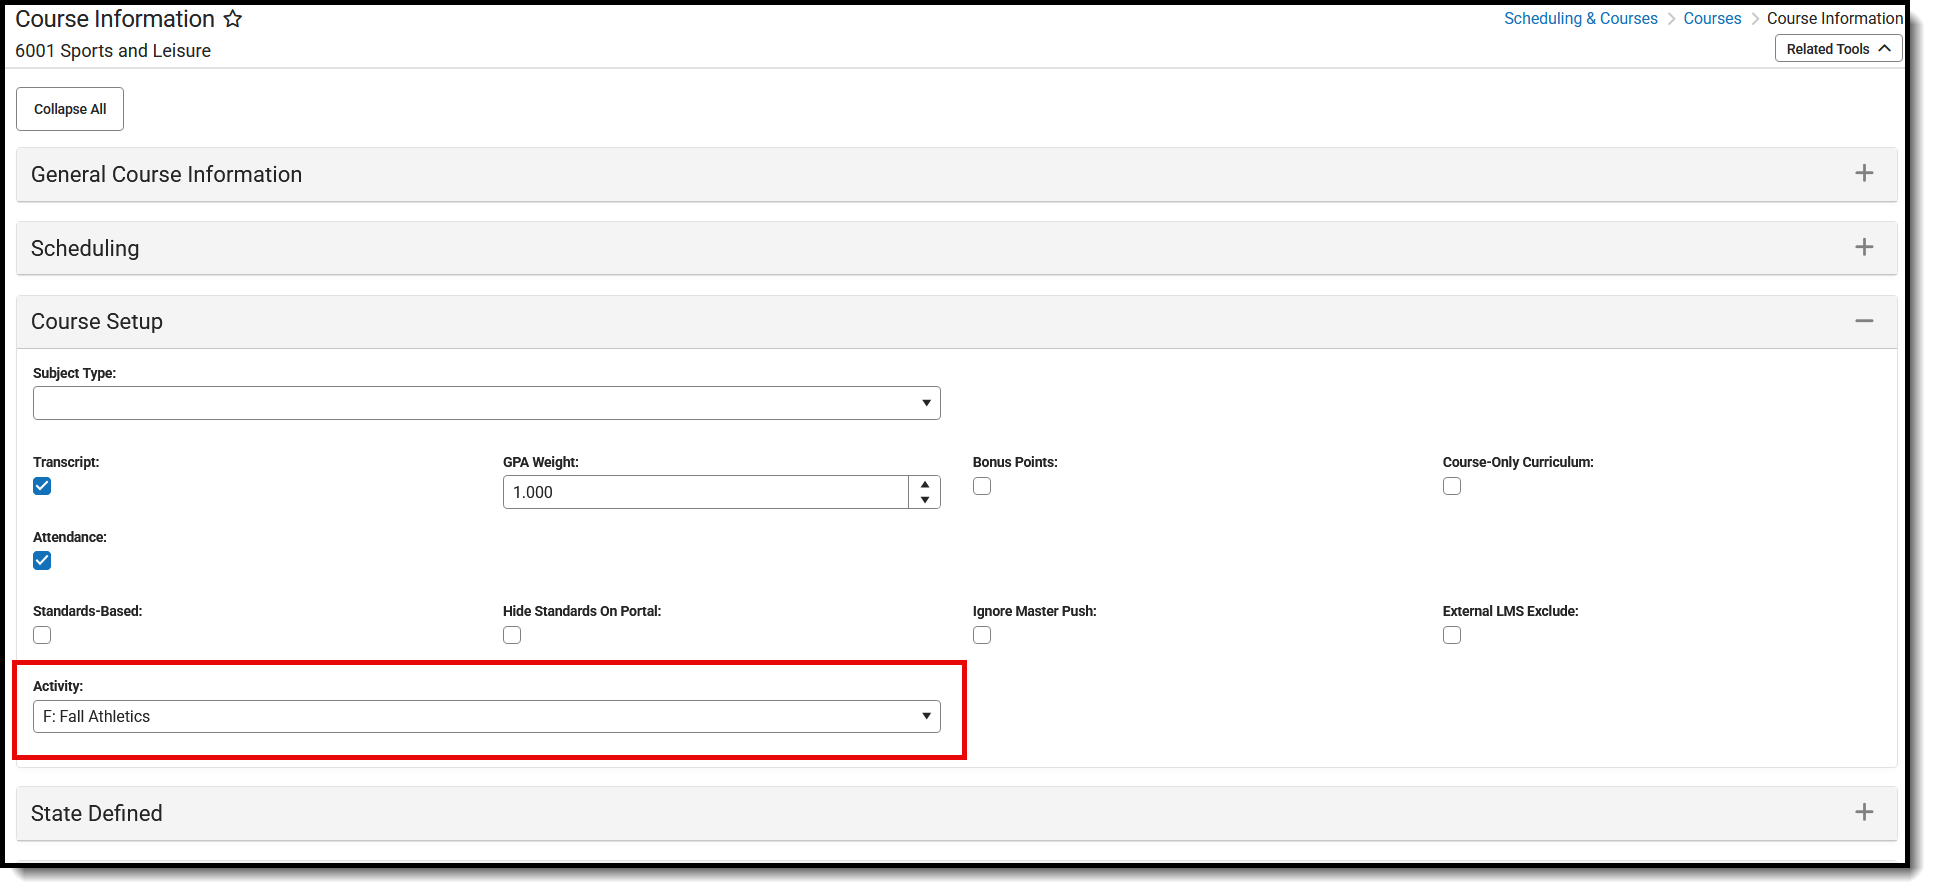 Activity Selection on Course Information
Report Editor
The following options are available on the Activity Eligibility Report.
|
Field |
Description |
|---|---|
|
Grade |
Selection indicates the grade level of enrollment of the students to include on the report. All Students can be selected, if desired; however, this is a complex report and selecting all students at one time may increase the report generation time. |
|
Ad hoc Filter |
Instead of selecting a grade level, select an ad hoc filter that includes the students who should be included in the report. |
|
Enrollment Effective Date |
Entered date (populated with the current date) indicates the date students are enrolled in the particular SECTION of the activity courses. Students not enrolled as of the entered date are not included. Dates are entered in mmddyy format, or use the calendar icon to select a date. |
|
Grading Terms |
Select the terms to include on the report. |
|
Activity Courses |
Select the courses to include in the report. Only those courses marked as an activity course on the Course editor are listed. This selection is used to determine the list of students actively enrolled on the activity course roster who will be evaluated only. |
|
Grading Task Selection |
Select which grading tasks to include on the report. A list of standards is also included for selection. |
|
Grading Scores |
Select the grading scores to include on the report. |
|
Grade Option |
Determine which grades to include - either In-Progress Grades or Posted Grades. In-Progress Grades are the current calculated grade according to the teacher's grade book for courses in which the student is currently enrolled in the current school year. Posted Grades are the submitted "final" grade for the term/task that displays on report cards and overrides the In-Progress Grade. |
|
Sort Option |
The report results can be sorted by either the student's last name or the name of the activity. |
| Report Format | Indicates how the report generates - PDF, CSV or DOCX format. |
Generate the Activity Eligibility Report
- Select the students to include on the report by selecting a Grade level or an Ad hoc Filter.
- Enter the desired Enrollment Effective Date.
- Select which Grading Terms to include on the report.
- Select the Activity Courses to include on the report.
- Select the Grading Tasks to include on the report.
- Select the Grading Scores to include on the report.
- Select the desired Grade Option.
- Select the desired Sort Option.
- Select the desired Report Format.
- Click the Generate Report button. The report displays in a new browser window.
 CSV Report Example
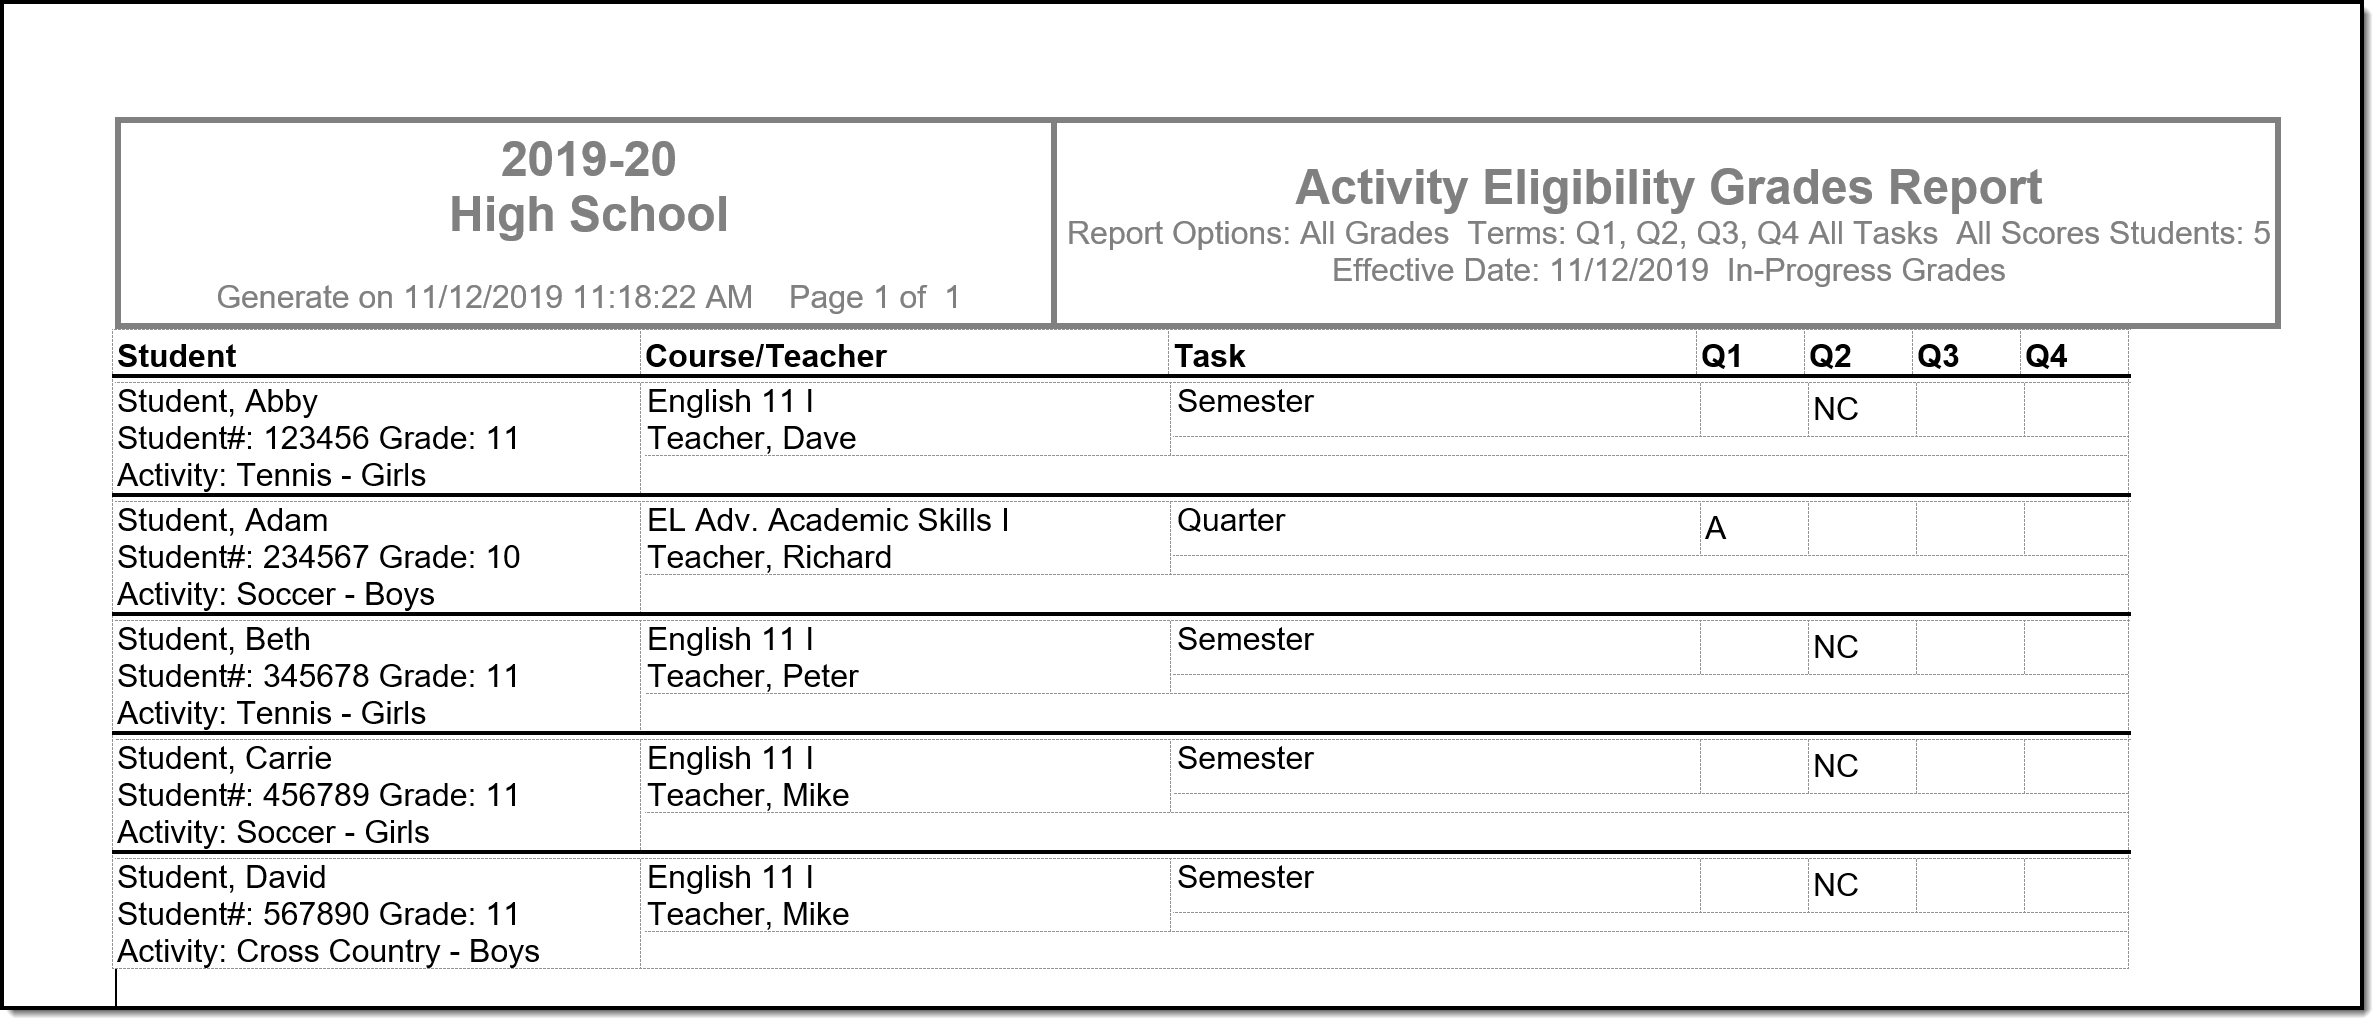 DOCX Report Example
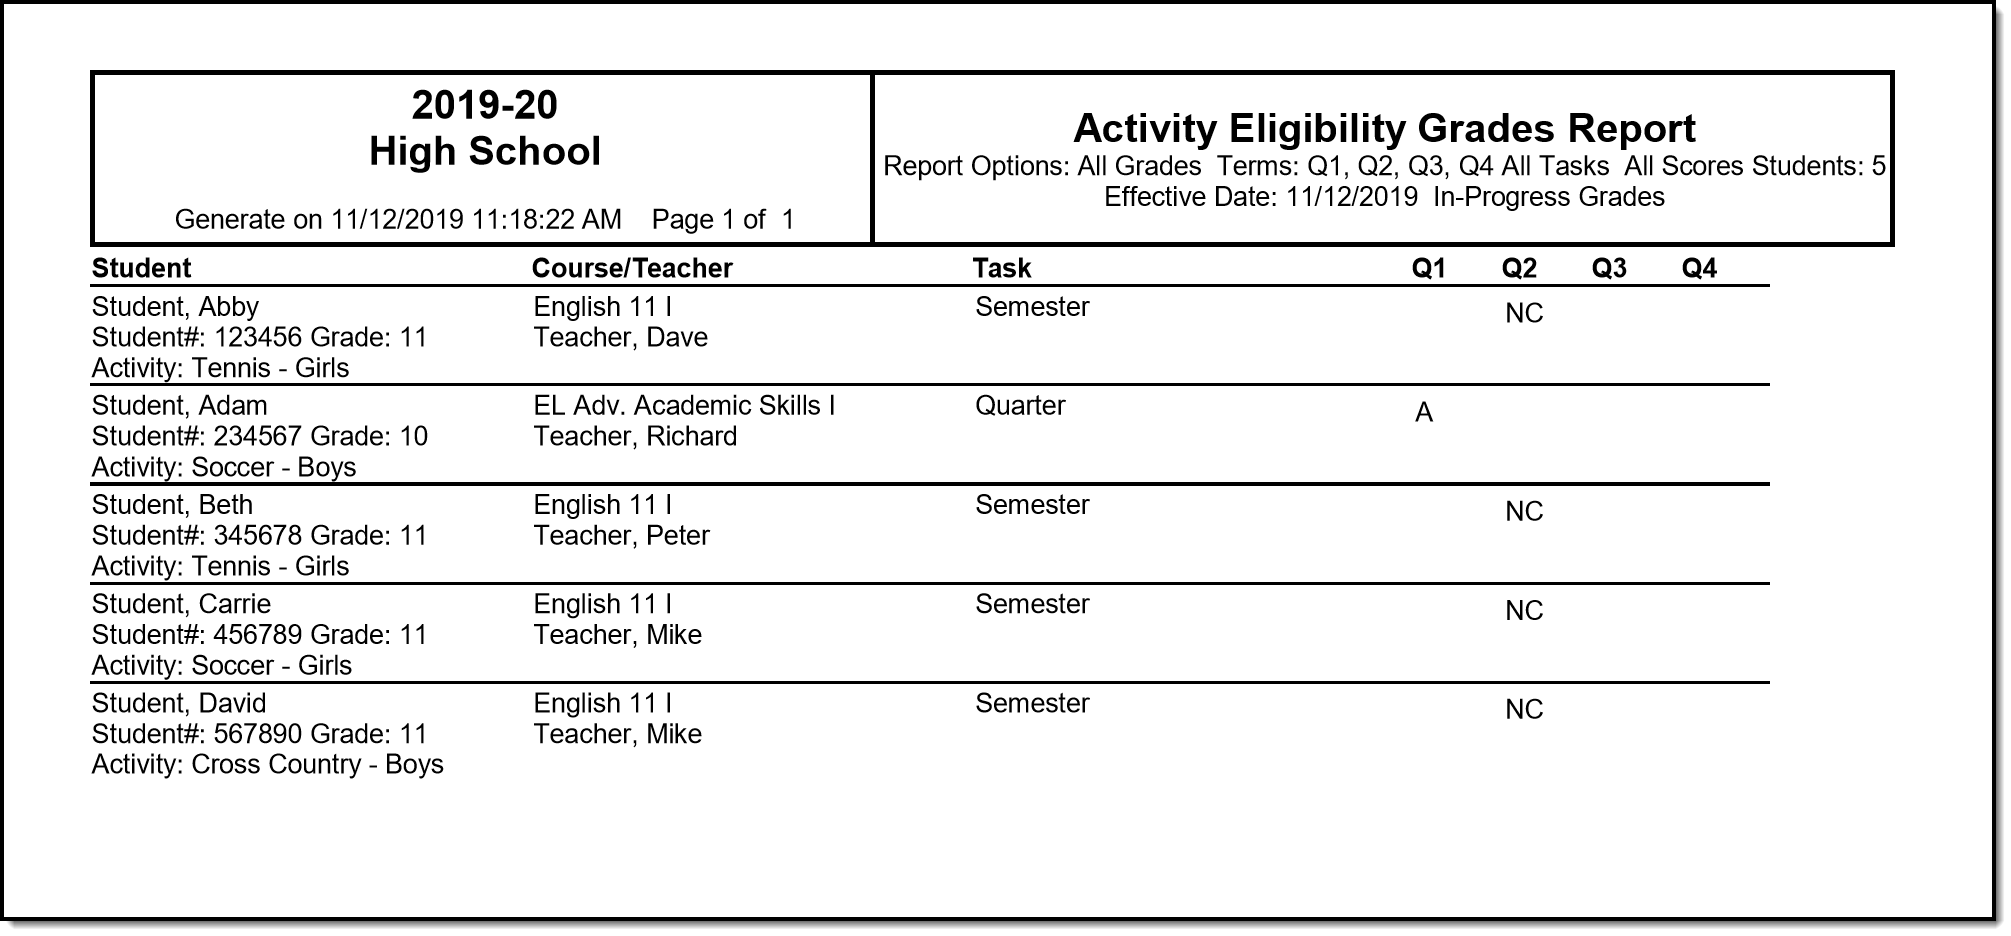 PDF Report Example
The Activity Eligibility Report may be used to determine student eligibility to participate in activities based on academic grades. Schools need to do some administrative setup and establish a process that meets their needs.
Posting Grades - A Teacher's Point-of-View
Posting Grades Through the Grade Book
Posting grades in the Grade Book posts grades to the students' Grades tab in Student Information > General.
Location: Grade Book > click Post (if Grading Window is open)
Posting grades copies the grades entered in the Grade Book to students' Grades tab. This is also the grade that posts to the students' Transcripts using the Transcript Post Wizard, if Post to Transcript is marked for the grading task or standard.
Automatic posting means clicking Post moves the In Progress grade or proficiency estimate to the Posted column. Manual means that the teacher is responsible for analyzing the data and determining the student's performance. The posting options available depend on the Grade Calculation Options selected.
| Grade Calculation Option Chosen |
Posting Options | |
| Manual | Automatic | |
|
No Calculation |
X |
|
|
In Progress Grade |
X |
X |
|
Proficiency Estimate - Highest, Mode of 3, Mode of 5, Most Recent |
X |
X |
|
Proficiency Estimate - Power Law |
X |
X |
Grades can only be posted if the Grading Window is open for the selected Task or Standard.
The grading window may be open for some students and not for others. Students for whom grades cannot be posted display in gray and uneditable. Hover over a cell of the Posted column to see if grades can be posted for a student.
Posting Grades*
* Posting grades is different for standards where the In Progress grade is calculated using Power Law.
Step 1: Populate Posted Grade Column
|
To post grades, review the In Progress portion of the Grade Totals. Click the red Post button to open the post grades window. Limit the students for who grades are posted by selecting a Student Group or using the filtering options.
The popup shows the source and destination of the grades you are posting. The current Term and Task appear in the from section and is selected by default in the Post to dropdown lists.
Change the destination term and task if you want to post the grades to another task, such as posting to a Progress Report task that is used to report grades but doesn't have any assignments. The Grading Window must be open for the destination grading task or standard. The grading window does not need to be open for the source term and task.
Click OK to copy grades from the In Progress columns to the Posted section, if the In Progress grade is a valid option in the score group. Grades are not yet posted. If you posted grades from one task another, the grade book switches to the context of the destination task. |
|
Step 2: Review Grades
|
Review the Posted grades and make modifications as desired, such as a grade that could round up to the next letter grade. Options in the grade dropdown list are based on the score group aligned to the grading task, rather than the grading scale which determined the In Progress grade.
Enter any comment in the Report Card Comments column (2500 character limit), use the Fill option to add comments for multiple students, or click the CC (canned comments) link to open the comments window. |
|
More about Canned Comments:
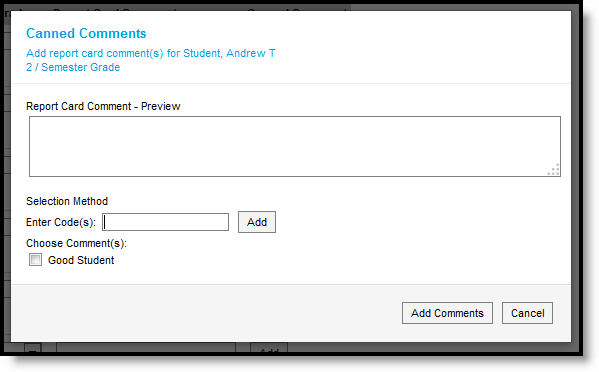
Enter comments in any of the following ways:
- By entering text in the Preview text box.
- By entering a numeric Code for the comment and clicking Add.
- By marking the checkbox next to the canned Comment.
As you add comments, they all appear in the Preview box, where you can modify as needed. The Canned Comments catalog is made in Grading Comments.
Enable Canned Comments by marking the preference in the Grade Book. You can only select canned comments if custom comments are disabled in your district's System Preferences.
Note: Grades do not populate in the Posted columns for students who have dropped the section. Manually select grades in the Grade column to post grades for dropped students. Dropped students display in red text in the grade book and only display if the Account Setting Show Active Students Only is turned off.
Step 3: Post Grades
Click Save in the Grade Book to post grades.
Manually Posting Grades
Posted grades can be entered manually in the Posted columns, bypassing assignment scores and In Progress grades.
- By Percentage: Type percentages in the Posted Percent column, which calculates the Posted Grade based on the Grading Scale selected in Grade Calculation Options.
- By Grade: Click the a cell in the Posted Grade column to select a grade from the score group from the dropdown list.
Click Save to post the entered grades.
Posting Grades when Using Power Law
If a rubric score displays in the Post column automatically, read this section.
Power Law is a mathematical calculation that converts proficiency levels into numeric values and determines a trend based on the student's scores. Power Law works on the assumption that standards are assessed at consistent intervals, such as weekly.
Rubric scores are converted using the Numeric Value entered on the Rubric and then the Power Law trend value is converted back into a rubric score based on the trend ranges also entered on the rubric.
For example, you've assessed your class for the same standard each Tuesday for the last few weeks, using a 4 point rubric of U, S, P and HP. Kyle has attained the following proficiency levels:

Using Power Law, his calculated trend value is 3.46, shown in this diagram:
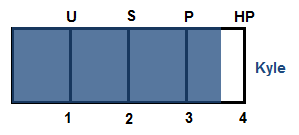
Power law trend values provide a guide for teachers in determining a student's overall proficiency in a standard. When given a series of proficiency estimates, teachers don't have to determine what those estimates mean together.
To post grades, click the red Post button in the In Progress column and choose the Task to post to. In the Posted section of the Grade Totals, you have the option of changing the student's grade if desired.
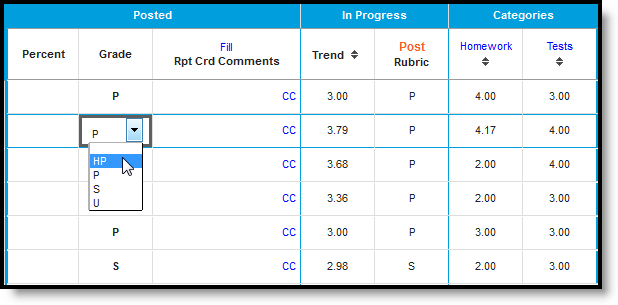
Selecting Posted Grades when using Power Law
Enter comments as described above.
Once you've verified all student grades, click Save to post grades.
Save
The Grade Book tool allows teachers to post grades for grading tasks and/or standards. This video demonstrates how to post grades and standard scores.
Previous Versions
Post Grades (Grade Book) - Video [.2016 - .2503]
The Grade Book within Campus Instruction can be used by teachers to post grades and comments for grading tasks and/or standards. In this lesson, an elementary school teacher and a high school teacher needs to post student grades.
Posting Grades Through the Post Grades Module
When the grading window is opened, the Post Grade tool is used to enter or update scores and percentages for grading tasks, with comments, and post those grades to students' official documents. The tool will display the students' current in progress grade found in the Grade Book and the Sparkline or bar graph representing scores (if selected to be displayed in the Grade Book).
Tool Search: Post Grades
Using the Post Grades tool, you have the option of posting grades by task or by student. When using this tool, you are posting grades for the entire task or standard, rather than entering scores for a specific assignment. Posted grades appear in the students' Grades tab and is the grade that posts to the students' Transcripts using the Transcript Post Wizard, if Post to Transcript is marked for the Grading Task or Standard.
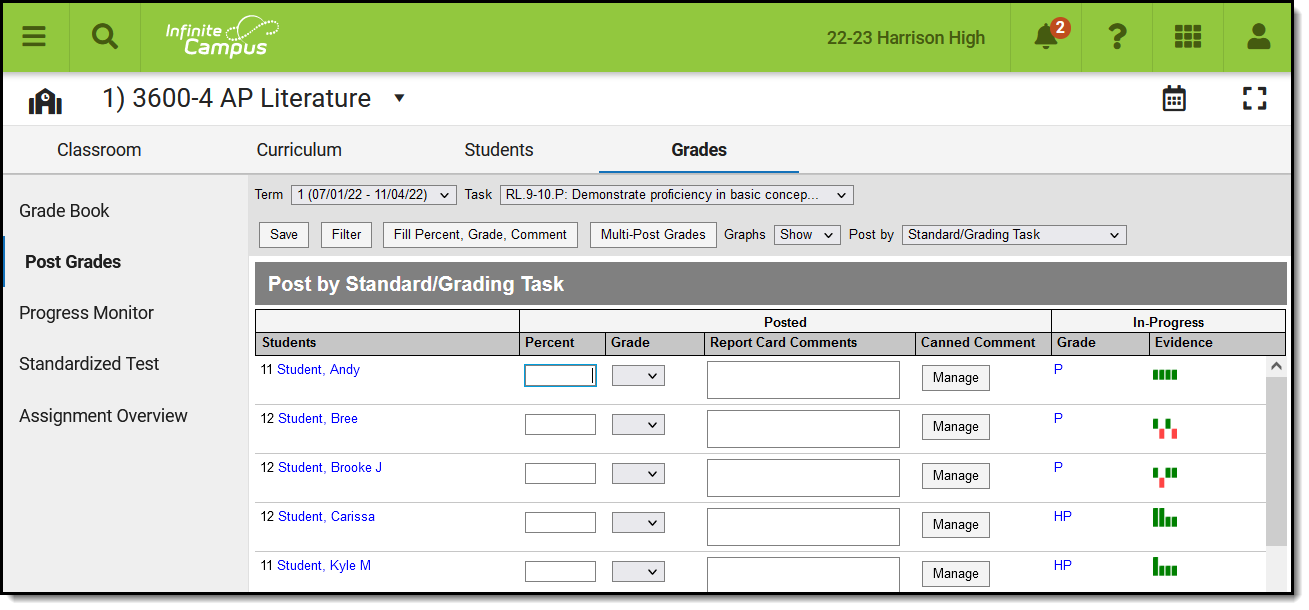 Use the Post Grades tool to post grades by task/standard or by student.
 See the Instruction Tool Rights article for more information.
Grades can only be posted to open (or active) grading tasks. If a task is selected that has no fields available for entering student grades, the task is not active for grading at this time. Tasks can be activated using the Grading Window. The grading window may be open for some students and not for others. Students for whom grades cannot be posted display in gray and uneditable.
A warning message displays at the top of the screen if the section includes any assignments that have unreleased scores. See the Release Scores article for more information.
In-Progress grades/Proficiency Estimates are calculated using only released scores. To see the difference between the In-Progress Grade calculated using all scores or only released scores, visit the Grade Book or Progress Monitor and toggle between the two calculation options. To release all scores prior to posting, visit the Curriculum List, filter to only Unreleased assignments, and click Release All Scores.
Scores and percentages that appear automatically have already been posted using the Grade Book.
Select the Section and Term from the dropdown lists at the top to populate the Task and Student dropdown lists with available options.
See the Using Rollup Grade Calculations article for more information about grading standards using the rollup calculation provided. This option can be set up in the Grade Calc Options for the Course or Course Master.
Posting by Task
To post by task, select Standard/Grading Task from the Post by dropdown list and a Task. All students in the selected section are listed.
Alternately, select All Standards and Grading Tasks from the Post by dropdown list to all tasks and standards aligned to the section. This option is useful when entering grades for parent standards based on the student's performance on child standards.
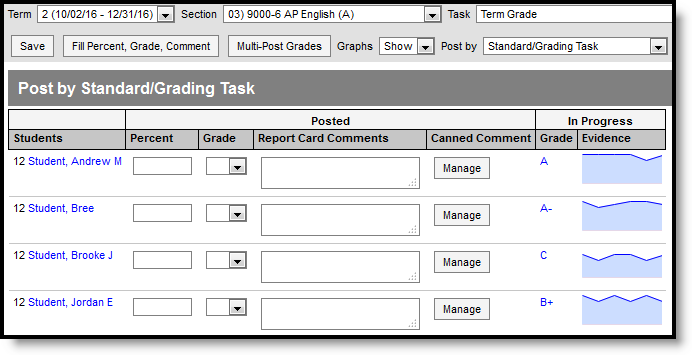
Posting Grades for a Standard or Task
Enter a Percent (if you're grading a task) and select a Grade from the score group or rubric aligned to the task or standard. Review the In Progress information populated from the Grade Book, including a grade and graph, as a guide for selecting a grade. (See the image in the Posting by Student section below for an example of the sparkline graph shown for standards.)
Comment options depend on district settings. If custom comments are enabled, enter any Comments for the report card using the text box. If Canned Comments are available, click Manage to access the canned comments window. Comments can be up to 2500 characters in length.
Click Save when finished to post grades.
Fill Options
Rather than entering grades individually for each student, you have the option of using the Fill tool.
Click Fill Percent, Grade, Comment to open the fill window.
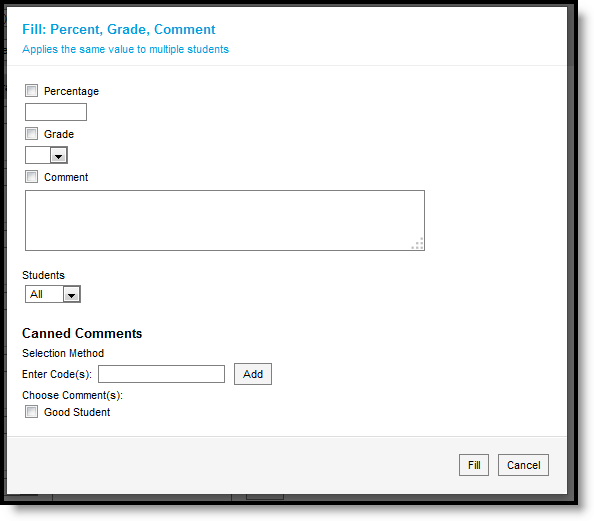
Enter the Percentage, select the Grade and enter any comments (using the text box or Canned Comments below). Then select which students whose grades you want to fill, all or only where fields are empty.Click Fill when finished.
Grades are only filled for tasks with the same Score Group.
Posting by Student
When posting by student, select a Student from the dropdown list. All standards and tasks assigned to that section appear. A filter is automatically applied to only show the selected term.
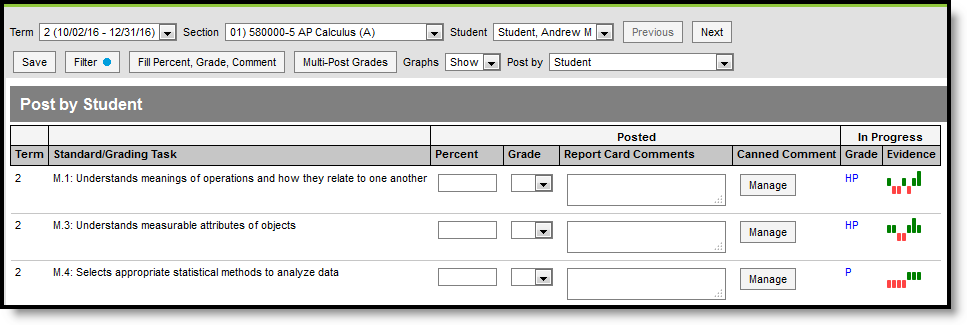
Posting Grades for a Student
Enter a Percent (if you're grading a task) and select a Grade from the score group or rubric aligned to the task or standard for each standard or task. Review the In Progress information populated from the Grade Book, including a grade and graph, as a guide for selecting a grade. (See the image in the Posting by Task section above for an example of the graph shown for tasks.)
Comment options depend on district settings. If custom comments are enabled, enter any Comments for the report card using the text box. If Canned Comments are available, click Manage to access the canned comments window. Comments can be up to 1200 characters in length.
Click Save when finished to post grades.
Filter Options
When posting grades by student, a filter option displays at the top of the screen. Use filter options to limit the Standards and Grading Tasks shown for the selected student.
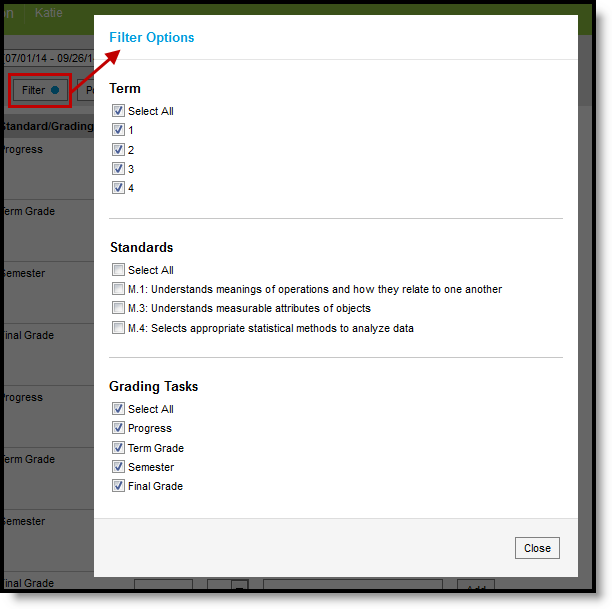
Filter Options when Posting By Student
To filter, select which Terms, Standards, and Grading Tasks to include. A blue dot appears on the Filter button when a filter is applied to your view.
Canned Comments
Click Add to open the canned comments window.
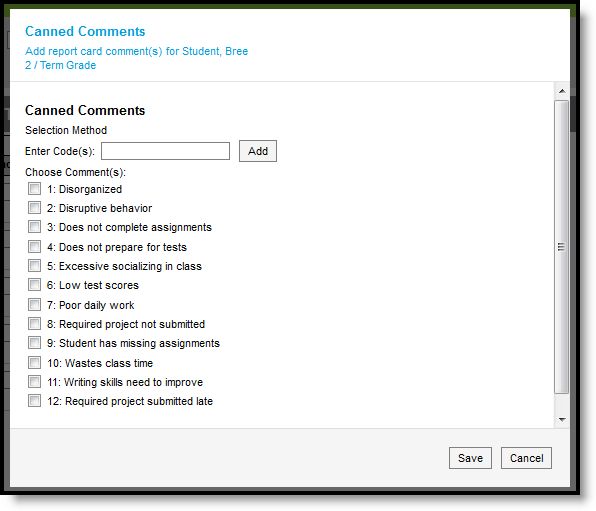
Enter comments in either of the following ways:
- By entering a numeric Code for the comment and clicking Add.
- By marking the checkbox next to the canned Comment.
The Canned Comments catalog is made in Grading Comments.
Enable Canned Comments by marking the preference in the Grade Book. You can only select canned comments if custom comments are disabled in your district's System Preferences.


