PATH: Campus Instruction > Grade Book
Posting grades copies the grades entered in the Grade Book to students' Grades tab. This is also the grade that posts to the students' Transcripts using the Transcript Post Wizard, if Post to Transcript is marked for the grading task or standard.
Automatic posting means clicking Post moves the In Progress grade or proficiency estimate to the Posted column. Manual means that the teacher is responsible for analyzing the data and determining the student's performance. The posting options available depend on the grade calculation options selected.
| Grade Calculation Option Chosen | Posting Options | |
| Manual | Automatic | |
No Calculation | X | |
In Progress Grade | X | X |
Proficiency Estimate - Highest, Mode of 3, Mode of 5, Most Recent | X | X |
Proficiency Estimate - Power Law | X | X |
Grades can only be posted if the Grading Window is open for the selected Task or Standard.
The grading window may be open for some students and not for others. Students for whom grades cannot be posted display in gray and uneditable. Hover over a cell of the Posted column to see if grades can be posted for a student.
Posting Grades*
* Posting grades is different for standards where the In Progress grade is calculated using Power Law.
Step 1: Populate Posted Grade Column
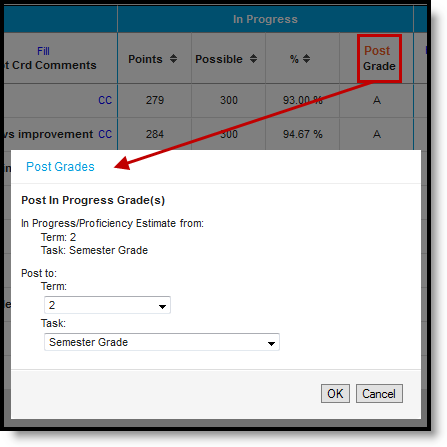
To post grades, review the In Progress portion of the Grade Totals. Click the orange Post button to open the post grades window. Limit the students for who grades are posted by selecting a Student Group or using the filtering options. The popup shows the source and destination of the grades you are posting. The current Term and Task appear in the from section and is selected by default in the Post to dropdown lists. Change the destination term and task if you want to post the grades to another task, such as posting to a Progress Report task that is used to report grades but doesn't have any assignments. The Grading Window must be open for the destination grading task or standard. The grading window does not need to be open for the source term and task. Click OK to copy grades from the In Progress columns to the Posted section, if the In Progress grade is a valid option in the score group. Grades are not yet posted. If you posted grades from one task another, the grade book switches to the context of the destination task. |
|
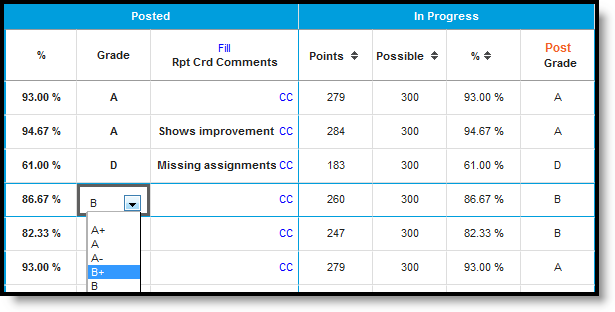
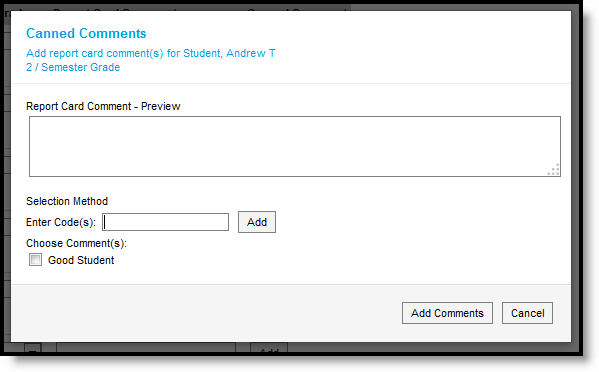
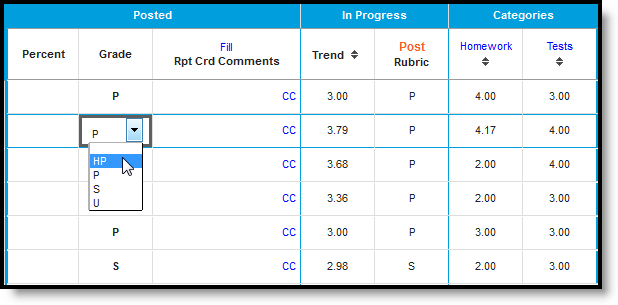
Review the Posted grades and make modifications as desired, such as a grade that could round up to the next letter grade. Options in the grade dropdown list are based on the score group aligned to the grading task, rather than the grading scale which determined the In Progress grade. Enter any comment in the Report Card Comments column (2500 character limit), use the Fill option to add comments for multiple students, or click the CC (canned comments) link to open the comments window. |
|
More about Canned Comments:
Step 3: Post Grades
Click Save in the Grade Book to post grades.
Manually Posting Grades
Posted grades can be entered manually in the Posted columns, bypassing assignment scores and In Progress grades.
- By Percentage: Type percentages in the Posted Percent column, which calculates the Posted Grade based on the Grading Scale selected in Grade Calculation Options.
- By Grade: Click the a cell in the Posted Grade column to select a grade from the score group from the dropdown list.
Click Save to post the entered grades.
Posting Grades when Using Power Law
If a rubric score displays in the Post column automatically, read this section.
Power Law is a mathematical calculation that converts proficiency levels into numeric values and determines a trend based on the student's scores. Power Law works on the assumption that standards are assessed at consistent intervals, such as weekly.
Rubric scores are converted using the Numeric Value entered on the Rubric and then the Power Law trend value is converted back into a rubric score based on the trend ranges also entered on the rubric.
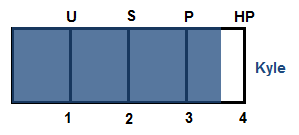
For example, you've assessed your class for the same standard each Tuesday for the last few weeks, using a 4 point rubric of U, S, P and HP. Kyle has attained the following proficiency levels:
Using Power Law, his calculated trend value is 3.46, shown in this diagram:
Power law trend values provide a guide for teachers in determining a student's overall proficiency in a standard. When given a series of proficiency estimates, teachers don't have to determine what those estimates mean together.
To post grades, click the orange Post button in the In Progress column and choose the Task to post to. In the Posted section of the Grade Totals, you have the option of changing the student's grade if desired.
Selecting Posted Grades when using Power Law
Enter comments as described above.
Once you've verified all student grades, click Save to post grades.
