The Health Module may be used to document health information for an individual student. This study guide demonstrates how to:
- View general student contact and schedule information
- View and manage information regarding medical conditions and treatments
- View and enter immunization and screening information
- View and manage medication information
- Upload documents and maintain contact log
- Schedule, view and record health office visits
- Run student health reports
Student Contact And Schedule Information
Student Summary
The Student Summary displays basic demographic and contact information for the selected student.
Tool Search: Summary
The Student Summary tool lists basic student information to provide a quick look at student data. This is a read-only tool that displays data entered in Census tools: Identities and Demographics, Address and Households. Functionality is the same in all locations, but review the Tool Rights section for additional information.
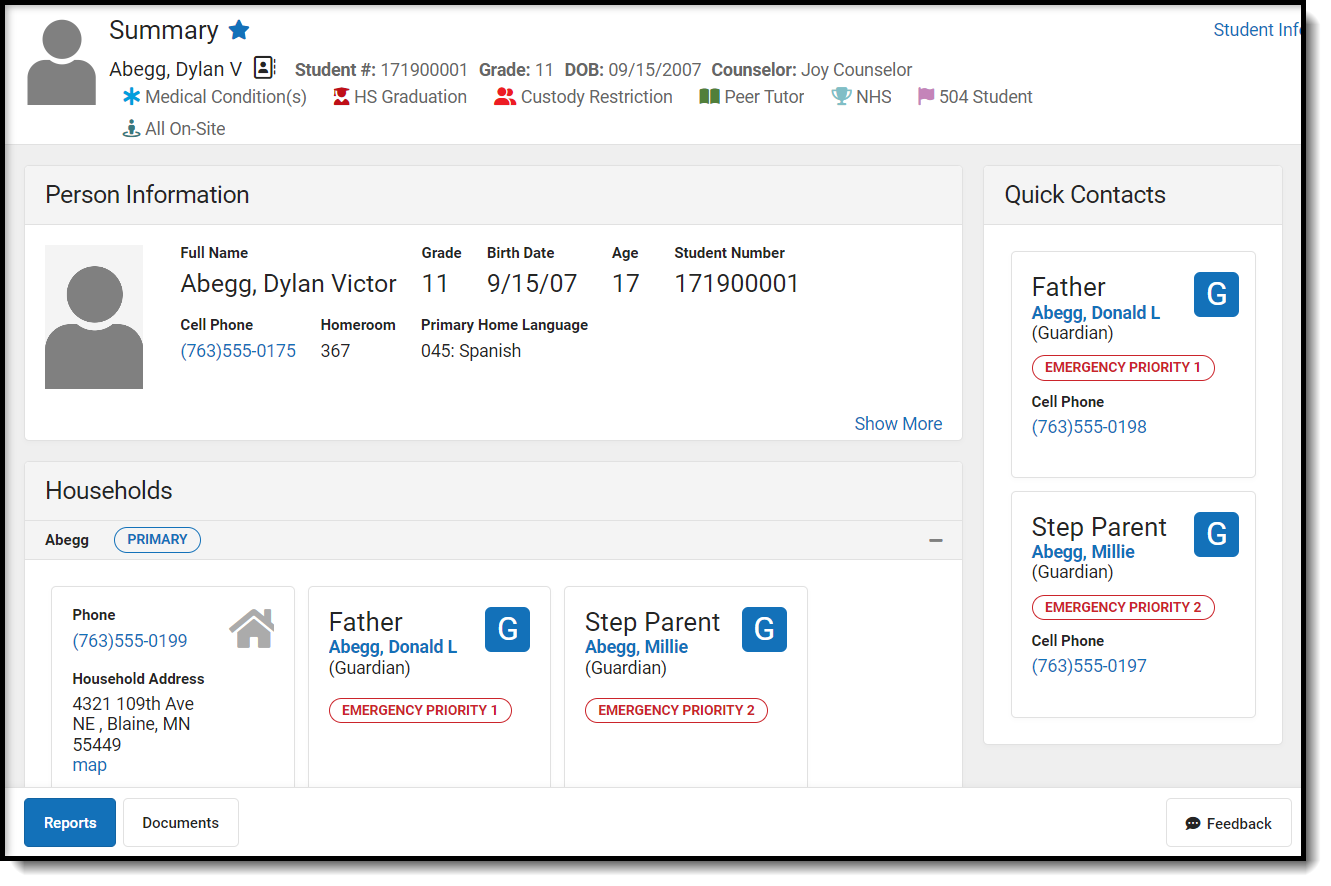 Student Summary
See the Summary Tool Rights article for information about rights needed to use this tool.
Information Card
Clicking on the Information Card located to the right of a student's name will open a pop-up window with a summarized view of that student's information. You may see different information here for students based on what has been entered into Infinite Campus for them. For example, if a student has not been assigned a counselor, that will not appear. For Contact Information, the student's contact information will appear first, followed by any persons marked as guardian for the student in the order of the Emergency Priority, if set.
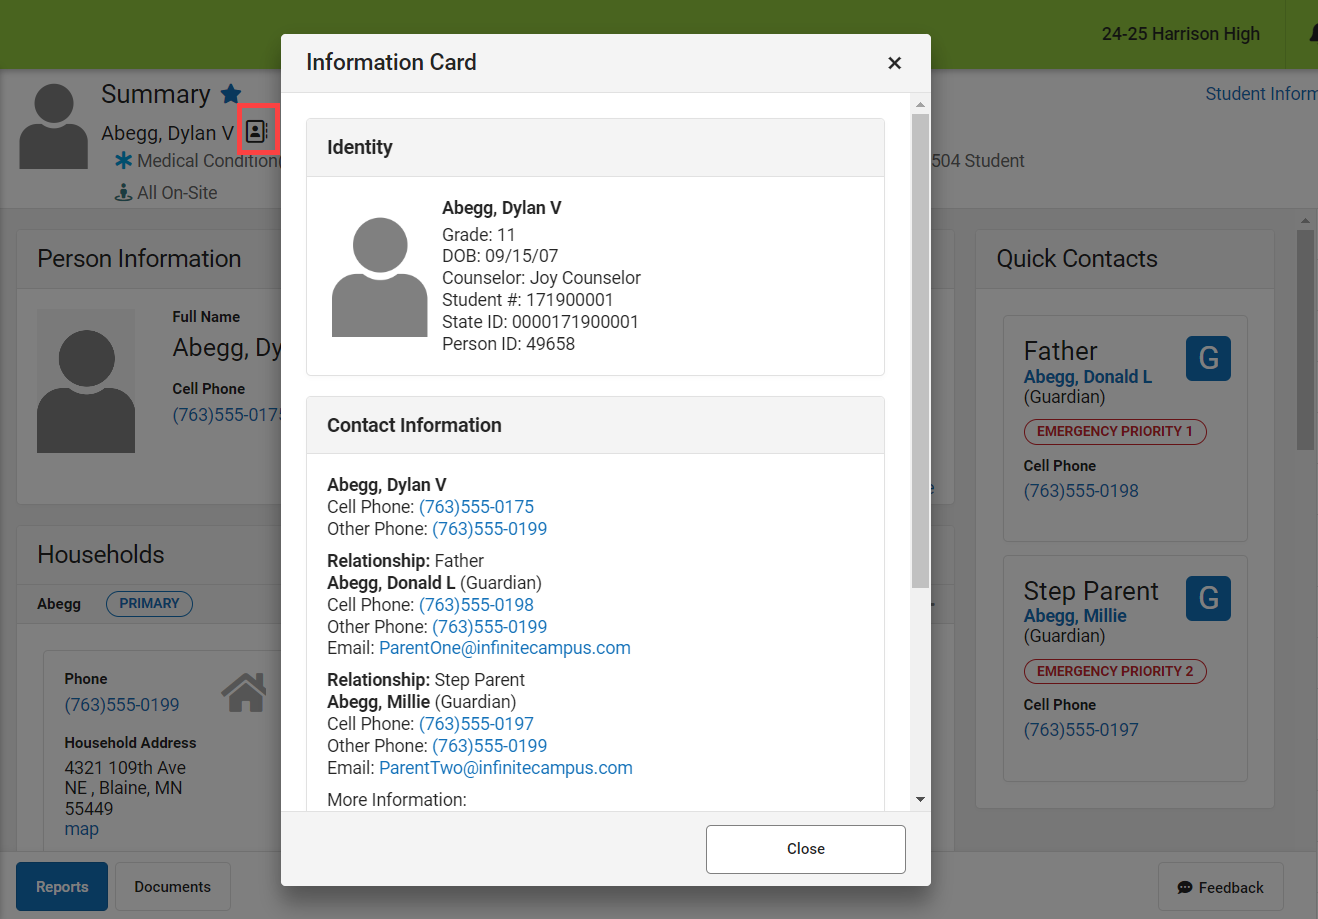 Information Card
Person Information
The Person Information area lists the student's name, student number, grade level, birth date and age, contact information, and their assigned Primary Home Language.
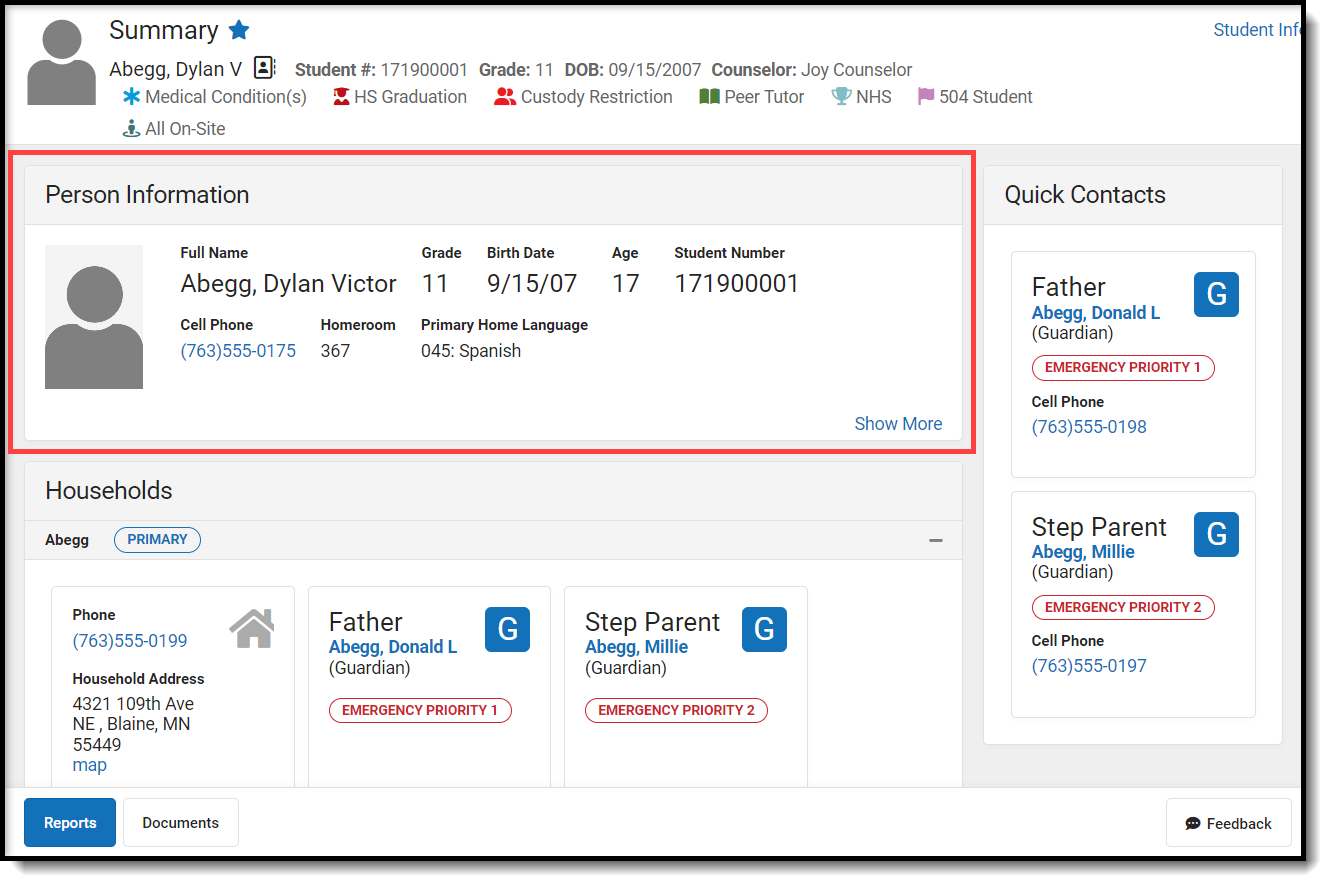 Person Information
For more information about the student, click the Show More link in the lower right hand corner of the card. In this section, the student's active transportation information displays (In Bus number only), as well as the student's academic locker, household address(es), state ID, race/ethnicity information and gender.
Most identifying information about the student (name, birth date, etc.) is entered and/or viewable on the student's Demographics tool. Bus information is entered on the student's Transportation tool, and Academic Locker information is entered on the student's Lockers tool.
- Active bus information displays based on the entered start and end dates of the transportation record. When an end date is added to an active record, that record is active through midnight of the entered end date. A new transportation would be active the next day. The active record displays in bold text in the Transportation Calendar. Transportation records only appear here for users who have been given rights to view them.
- Academic Locker information displays based on the Attribute Dictionary Locker Type code of ED. Locker Types (codes, names, etc.) can be modified by users; if you have changed this in the Attribute Dictionary, be aware that locker information may not display on Student Summary.
If updates are needed and users are assigned the appropriate tool rights, select the Click to View/Edit: Census > People > Demographics link. This opens the Demographics tool where changes to this information can be made.
Follow your district's policy for updating demographic data.
Households
The Households area provides a view of all of the student's households. If a student resides in three different households, all of those households would be listed here. This section includes "tiles" for each household address and members of that household. This lets you quickly see who resides in the household and who to contact if there is an issue.
Household Information
The first tile lists the household phone number and address(es), and displays as entered on the Household Info tool and Household Addresses tool.
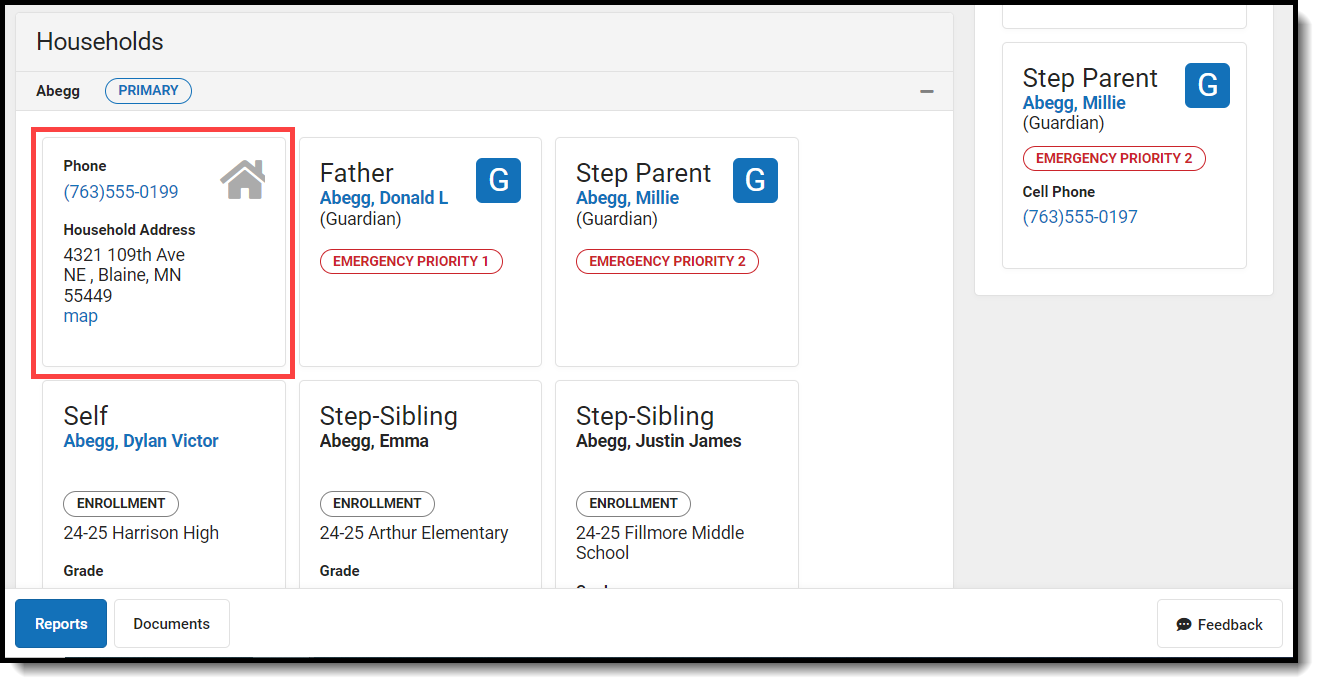 Active Address Information
If the information in this section needs to be updated and users are assigned the appropriate tool rights, select the Click to View/Edit: Census > People > Membership in Households link. This opens the person's Household tool, where changes can be made to this information.
Follow your district's policy for updating household information.
The images above show a family who has one primary household. In Campus, households are assumed to be Primary unless the Secondary checkbox is marked on the individual's Household Membership, or if there is only one household for those members. Notice how in the previous images, a Primary label displays for the household information.
In the image below, two members of that Primary household are now members of an additional household and have the Secondary checkbox marked on the Household Membership. Now on the Student Summary, the Second Household has a Secondary label.
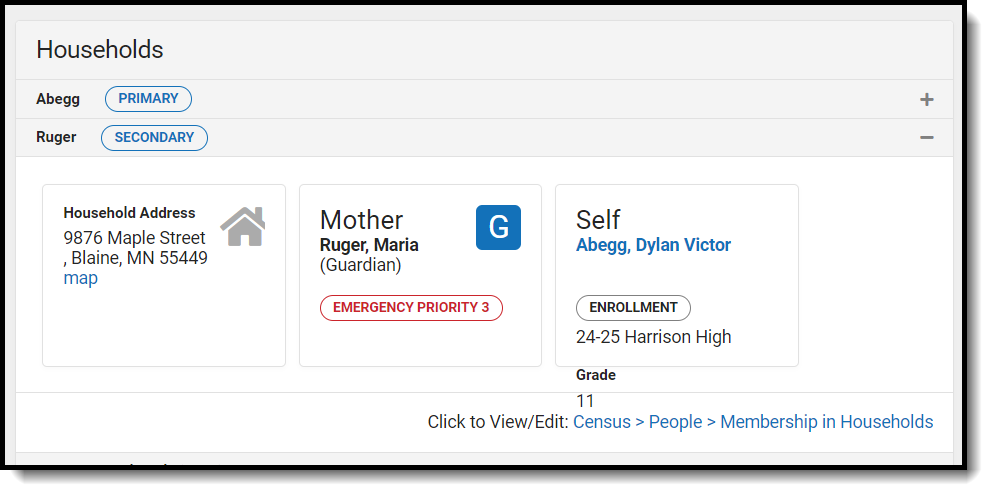 Secondary Household Display
Household Members and Relationships
Each member of the household is listed in their own tile. Any individual who has an active relationship (no entered end date) with the selected student displays on their own tile. If all relationships have been ended or there are no relationships established between the student and anyone else in the household, only the household information tile and the Self tile display.
Guardians display first, after the household information, with a large G. This information is entered on the person's Relationships tool, and lists the name assigned to the Relationship, which vary by district.
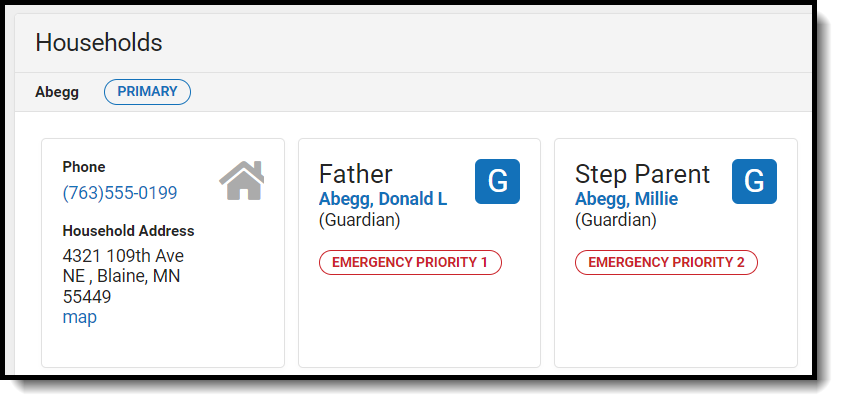 Relationship Type Display
Click the hyperlink of a household member's name to view their Personal Contact Information (entered on Demographics). A side panel displays to the right, listing all entered ways of contacting that individual - phone numbers, email, etc. Click the Close button to return to the Student Summary.
 Personal Contact Information Side Panel
An information icon next to an individual's name indicates that a comment has been entered on that person's Personal Contact Information. You can hover to see the message.
A tile for the selected students (labeled as Self) and siblings also display. In addition to entered contact information for the student and siblings, the school of enrollment and grade level are listed on the tile and the side panel. This displays the most current primary enrollment information for those members (school of enrollment and grade level).
- Future enrollment information does not show until the start date of that enrollment.
- If a student has multiple enrollments in the current school year, only the last grade level completed (last enrollment with an end date in a past calendar) displays, regardless of the enrollment end date.
- If a student has enrollments with end dates and enrollments without end dates, the current grade level (from the most recent enrollment) displays.
- Ended non-household relationships set to a relationship of Self are not listed.
Quick Contacts
 Quick Contacts
Quick Contacts includes information for those who are flagged as Guardian or have an Emergency Priority assigned to them. The following logic applies to which phone numbers display for Quick Contacts:
1. Cell Phone always displays, no matter what number is added first.
2. Work Phone displays when the Cell Phone has not been added and other numbers have.
3. Other Phone displays when the Work Phone and the Cell Phone have not been added and other numbers have.
4. Pager displays when no other number has been added, and only the Household Number is listed.
5. When only the Household Number is added for the contact, the contact will not be included in the Quick Contacts list.
Non-Household Contacts
Relationships to people outside of the household (aunt/uncle, daycare provider) appear in the Non-Household Relationship section. These individuals also have a relationship with the student, and may be marked as Emergency contacts. Click the hyperlink of their name to view the More Information side panel. This panel contains their Personal Contact Information (if entered) and their Household number (if entered).
Emancipated students also have non-household relationships established with themselves. See the Emancipated Students article for more information.
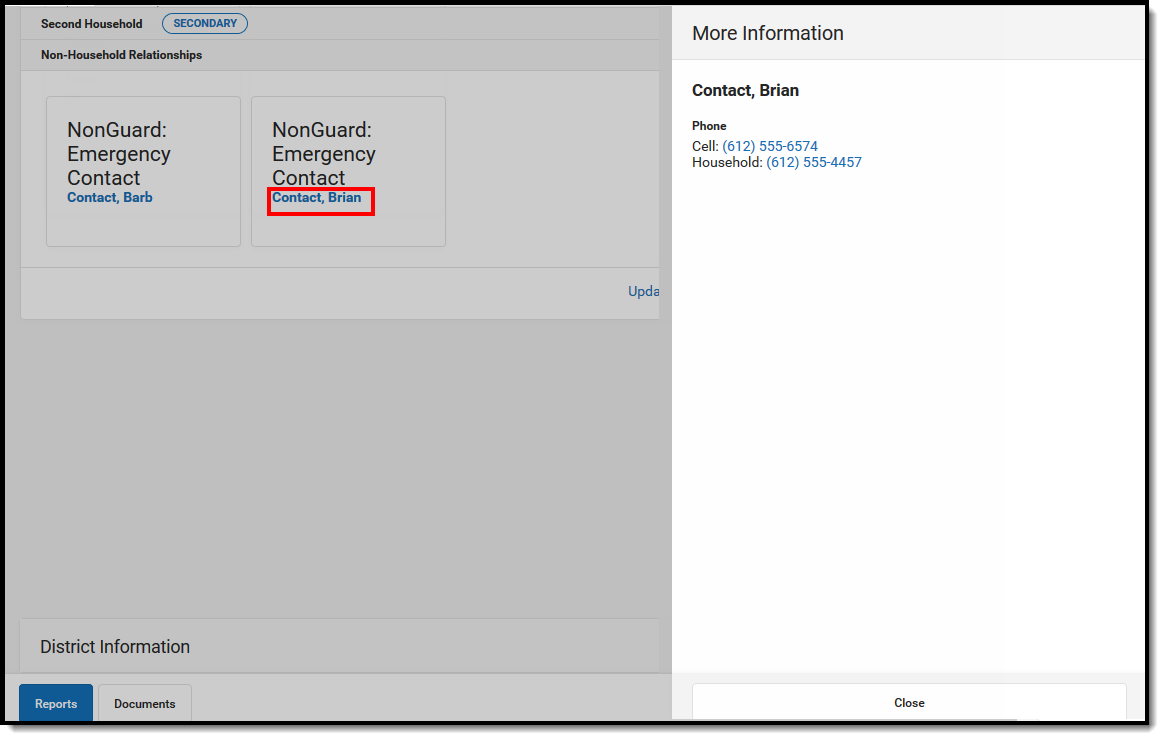 Non-Household Contact Information
Non-household contacts who have been designated by the guardians as Emergency Contacts display in the Quick Contacts section, along with the Guardians. This is determined by the Emergency Priority field on the Relationship tool. An Emergency Priority label displays as well in the Quick Contacts list, in the Non-Household Relationships section, and when viewing the side panel for that individual.
If the Emergency Priority field is not populated, only relationships marked as Guardian display in the Quick Contacts list.
District Information
If a district has created custom elements for use on the Student Summary, those elements display at the bottom of the screen. Your district should provide information on managing these fields.
Modification Alert
Because student information is protected under FERPA, certain fields on the Student Summary are controlled by specific tool rights (i.e., Social Security number). In addition to tool rights, notifications display in the Person Information area when the Summary data has been modified. This change alert lists the user who made the modification, the date of the modification and the time.
Student Summary Reports
The information that displays on the Student Summary can be printed and given to parents/guardians or other personnel for a review of the data.
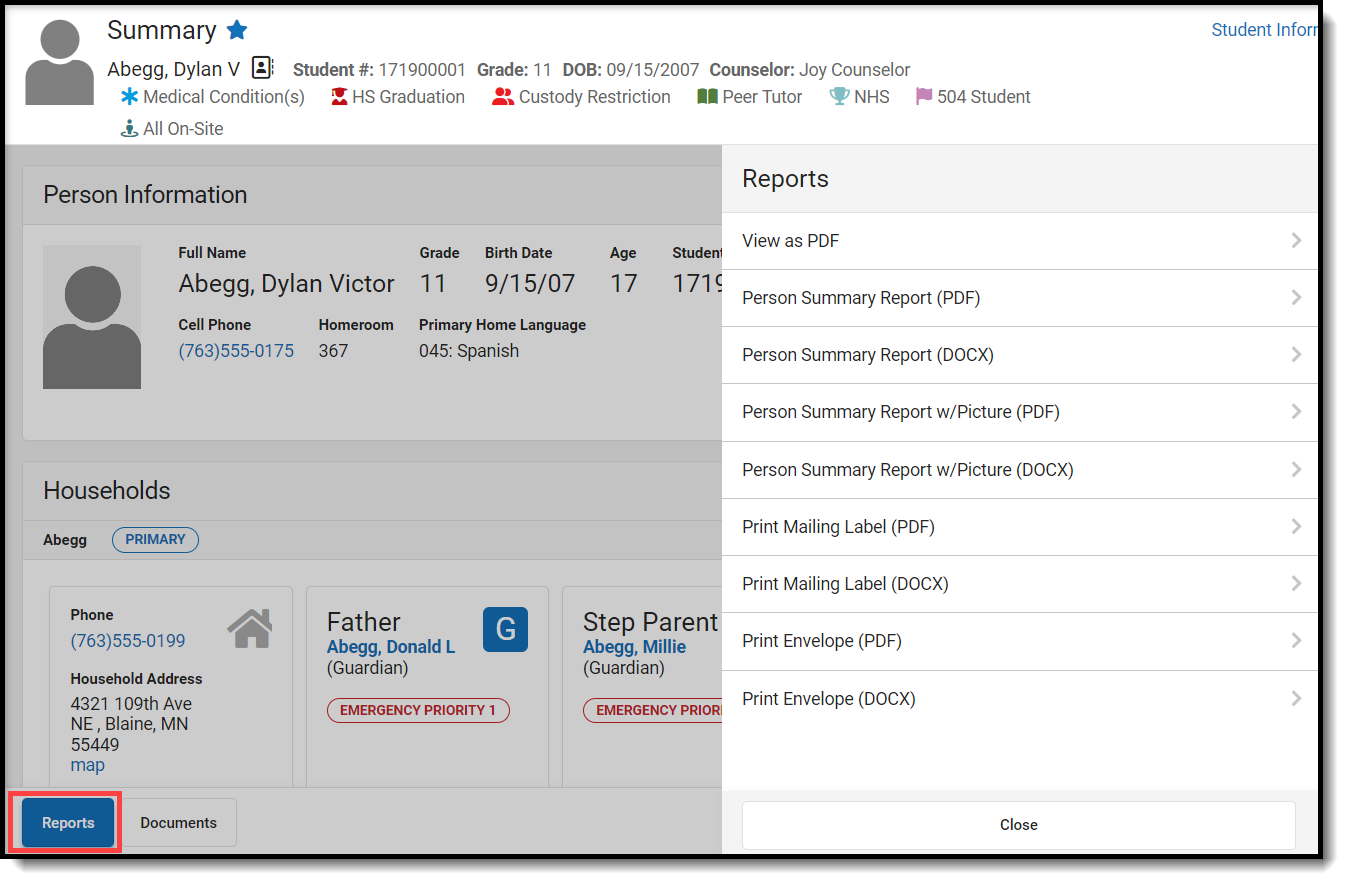 Student Summary Reports
The View as PDF Report generates a PDF of the Student Summary as it currently displays. If all of the cards are expanded, all of that information prints; if the Show More option is expanded and only the Primary Household card is expanded, that information prints.
Two options of the same report are available, and print in either PDF or DOCX.
- Person Summary Report (also available on the Census Demographics tool)
- Person Summary Report with Picture
In addition, a mailing label and an envelope can also be printed. These two print addresses marked as mailing, and are available in either PDF or DOCX.
- Print Mailing Label - uses 1" x 2-5/8' labels (Avery 5160
- Print Envelopes - uses with a #10 envelope (4 1/8 x 9 1/2)
For troubleshooting issues with printing and printer settings, see the Printing Labels article.
Documents
Documents can be uploaded from the student's previous schools of enrollment that relate to student summary information. This uses the Digital Repository features. There is no limit to the amount of documents uploaded here, but be aware your district may have set a maximum file size value.
Only documents uploaded to the Student Summary tool display here. Other types of uploaded documents do not display. To see other types of uploaded documents, view them on the Person Documents tool.
Mark the Consent statement (files cannot be saved if this is not marked), and click the Select File button to locate and upload documents. File names must be unique. Click the Save button when finished. A successful upload displays a Done checkmark next to the Select Files button. Close the side panel by clicking the Cancel button.
Uploaded files can be sorted by Newest (most recently uploaded) or Oldest. To remove an uploaded document, click the red X next to the file name.
For more information on document upload, see the Manage Document Attachments article.
Student Schedule
Use Student Schedule to see which class a student should be in at a given point in time.
Tool Search: Health Student Schedule
The Student Schedule tool allows users to view a student’s schedule within a specific calendar. A user is also able to view all course names and numbers, as well as section numbers, section teachers and room numbers for all classes within the calendar year selected.
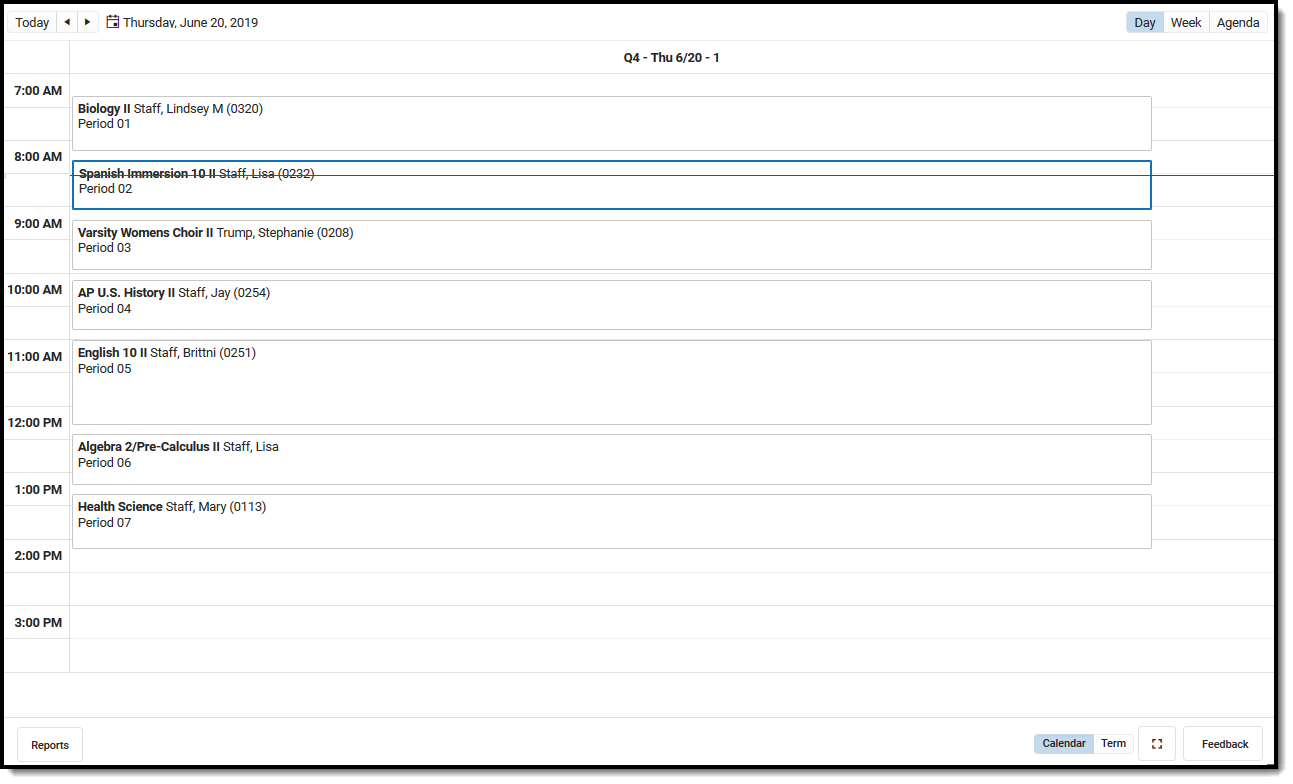 Student Schedule Display in Student Information Health
Submit feedback for the new Schedule using the Feedback button in the bottom right hand corner. This takes you to the Campus Community Schedule forum topic where you can add your concerns or suggestions for potential future development related to the Student Schedule.
Tool Rights
Full access to the Health Student Schedule tab requires R rights to the following items:
- Student Information > Health > General > Student Schedule
- Student Information > Health > General > Student Schedule > Additional Enrollment Schedules
- Student Information > Health > General > Student Schedule > View Attendance
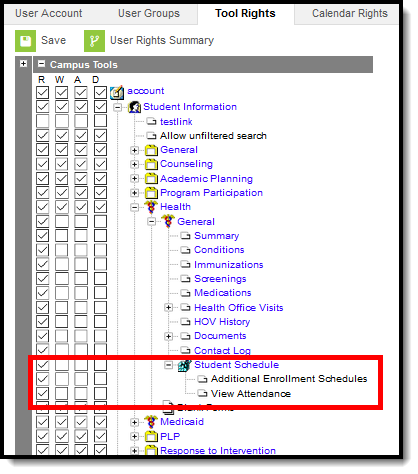 Health Student Schedule Tool Rights
Navigation of Health Student Schedule
Review the following information for a summary on features of the schedule and how to manage the Student Schedule. This new Student Schedule allows access using keyboard shortcuts when in the Calendar View. See the Keyboard Shortcuts section for navigation tips.
Note that when a user chooses to the view the student's Schedule in a certain way, by choosing one of the options of the Calendar View or by choosing the Term View, and then navigates away to a different tab within Campus, the next time the user accesses the student's Schedule, the same view option that was previously chosen displays again.
A calendar must be selected in the Campus toolbar to display schedule information.
| Feature | Image |
|---|---|
| General Navigation | |
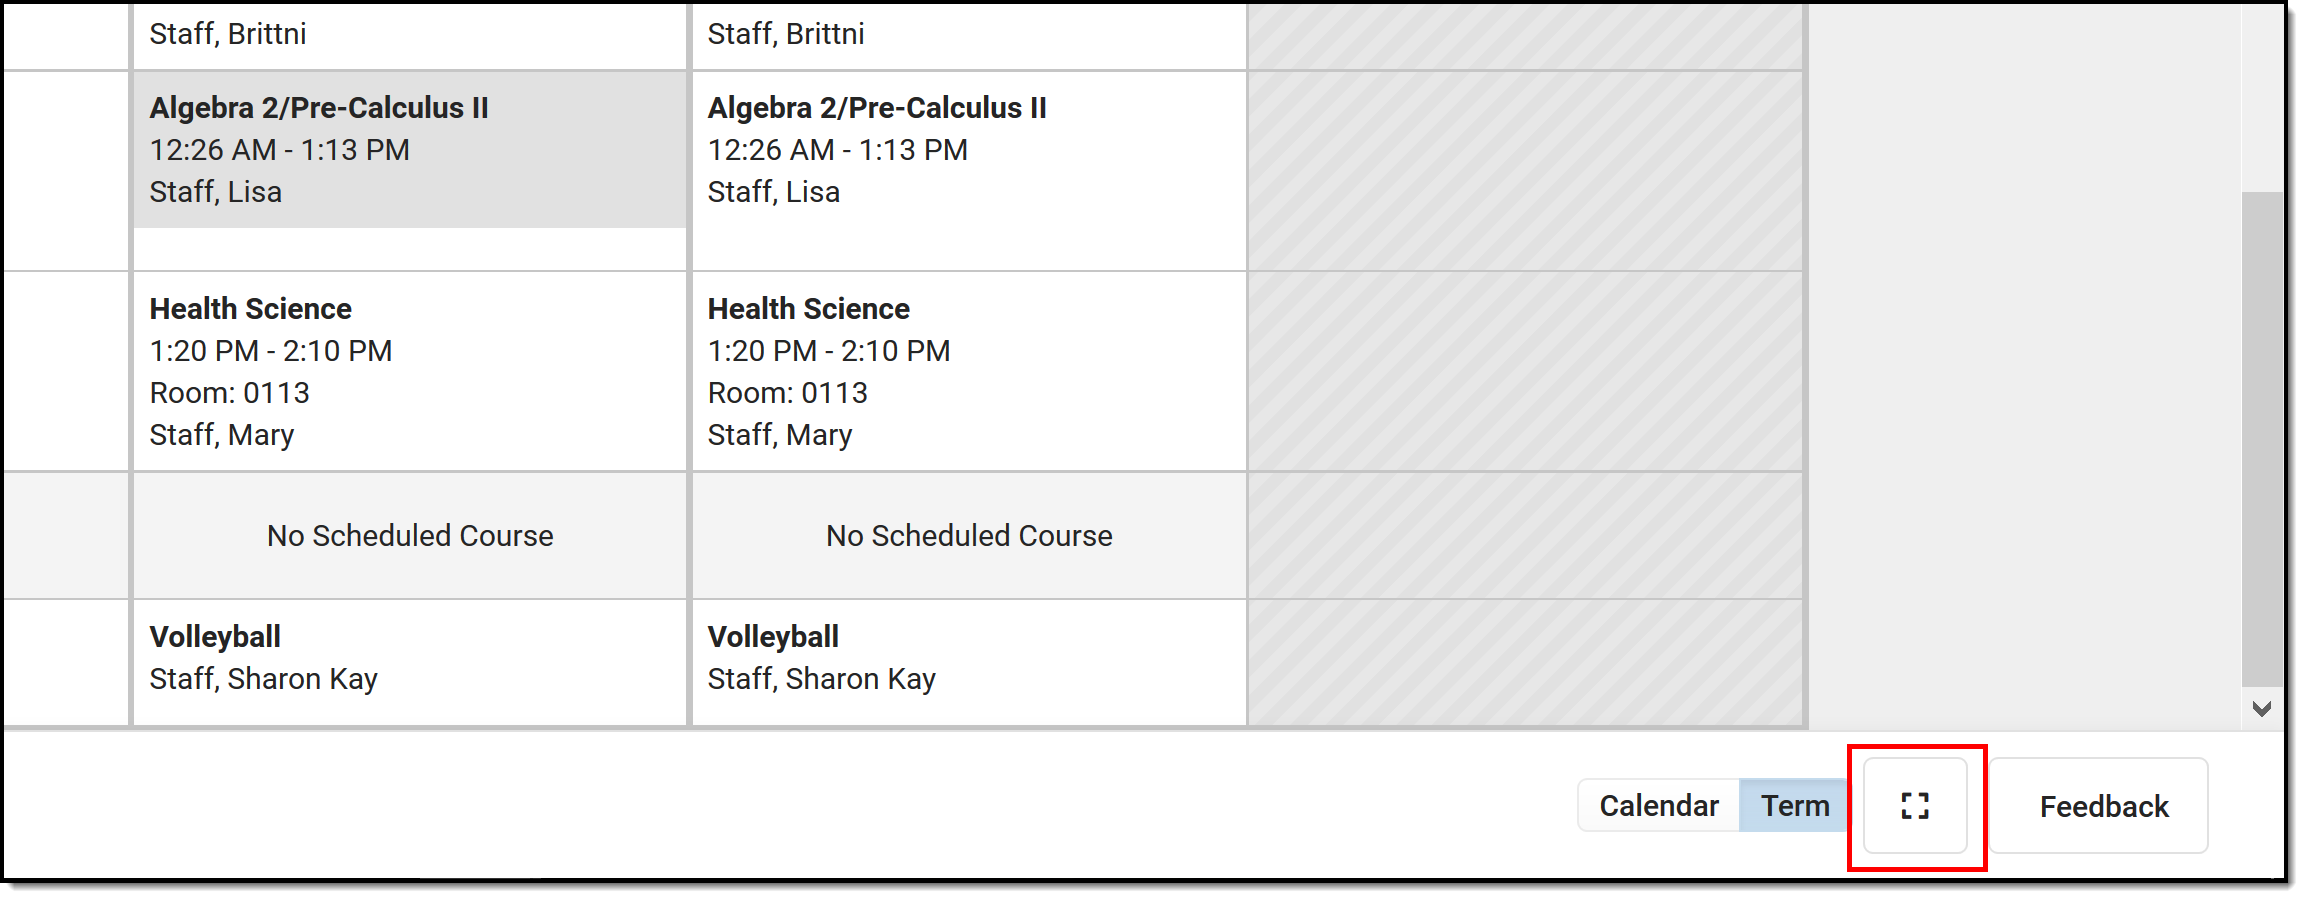
Use the Full Screen icon to display just the schedule in the entire browser window. This removes all tabs, all indexes, all headers, and just displays the schedule. This can be done in either the Calendar View or Term View. Click the icon again or click the ESC key to return to a non-full screen view. |
|
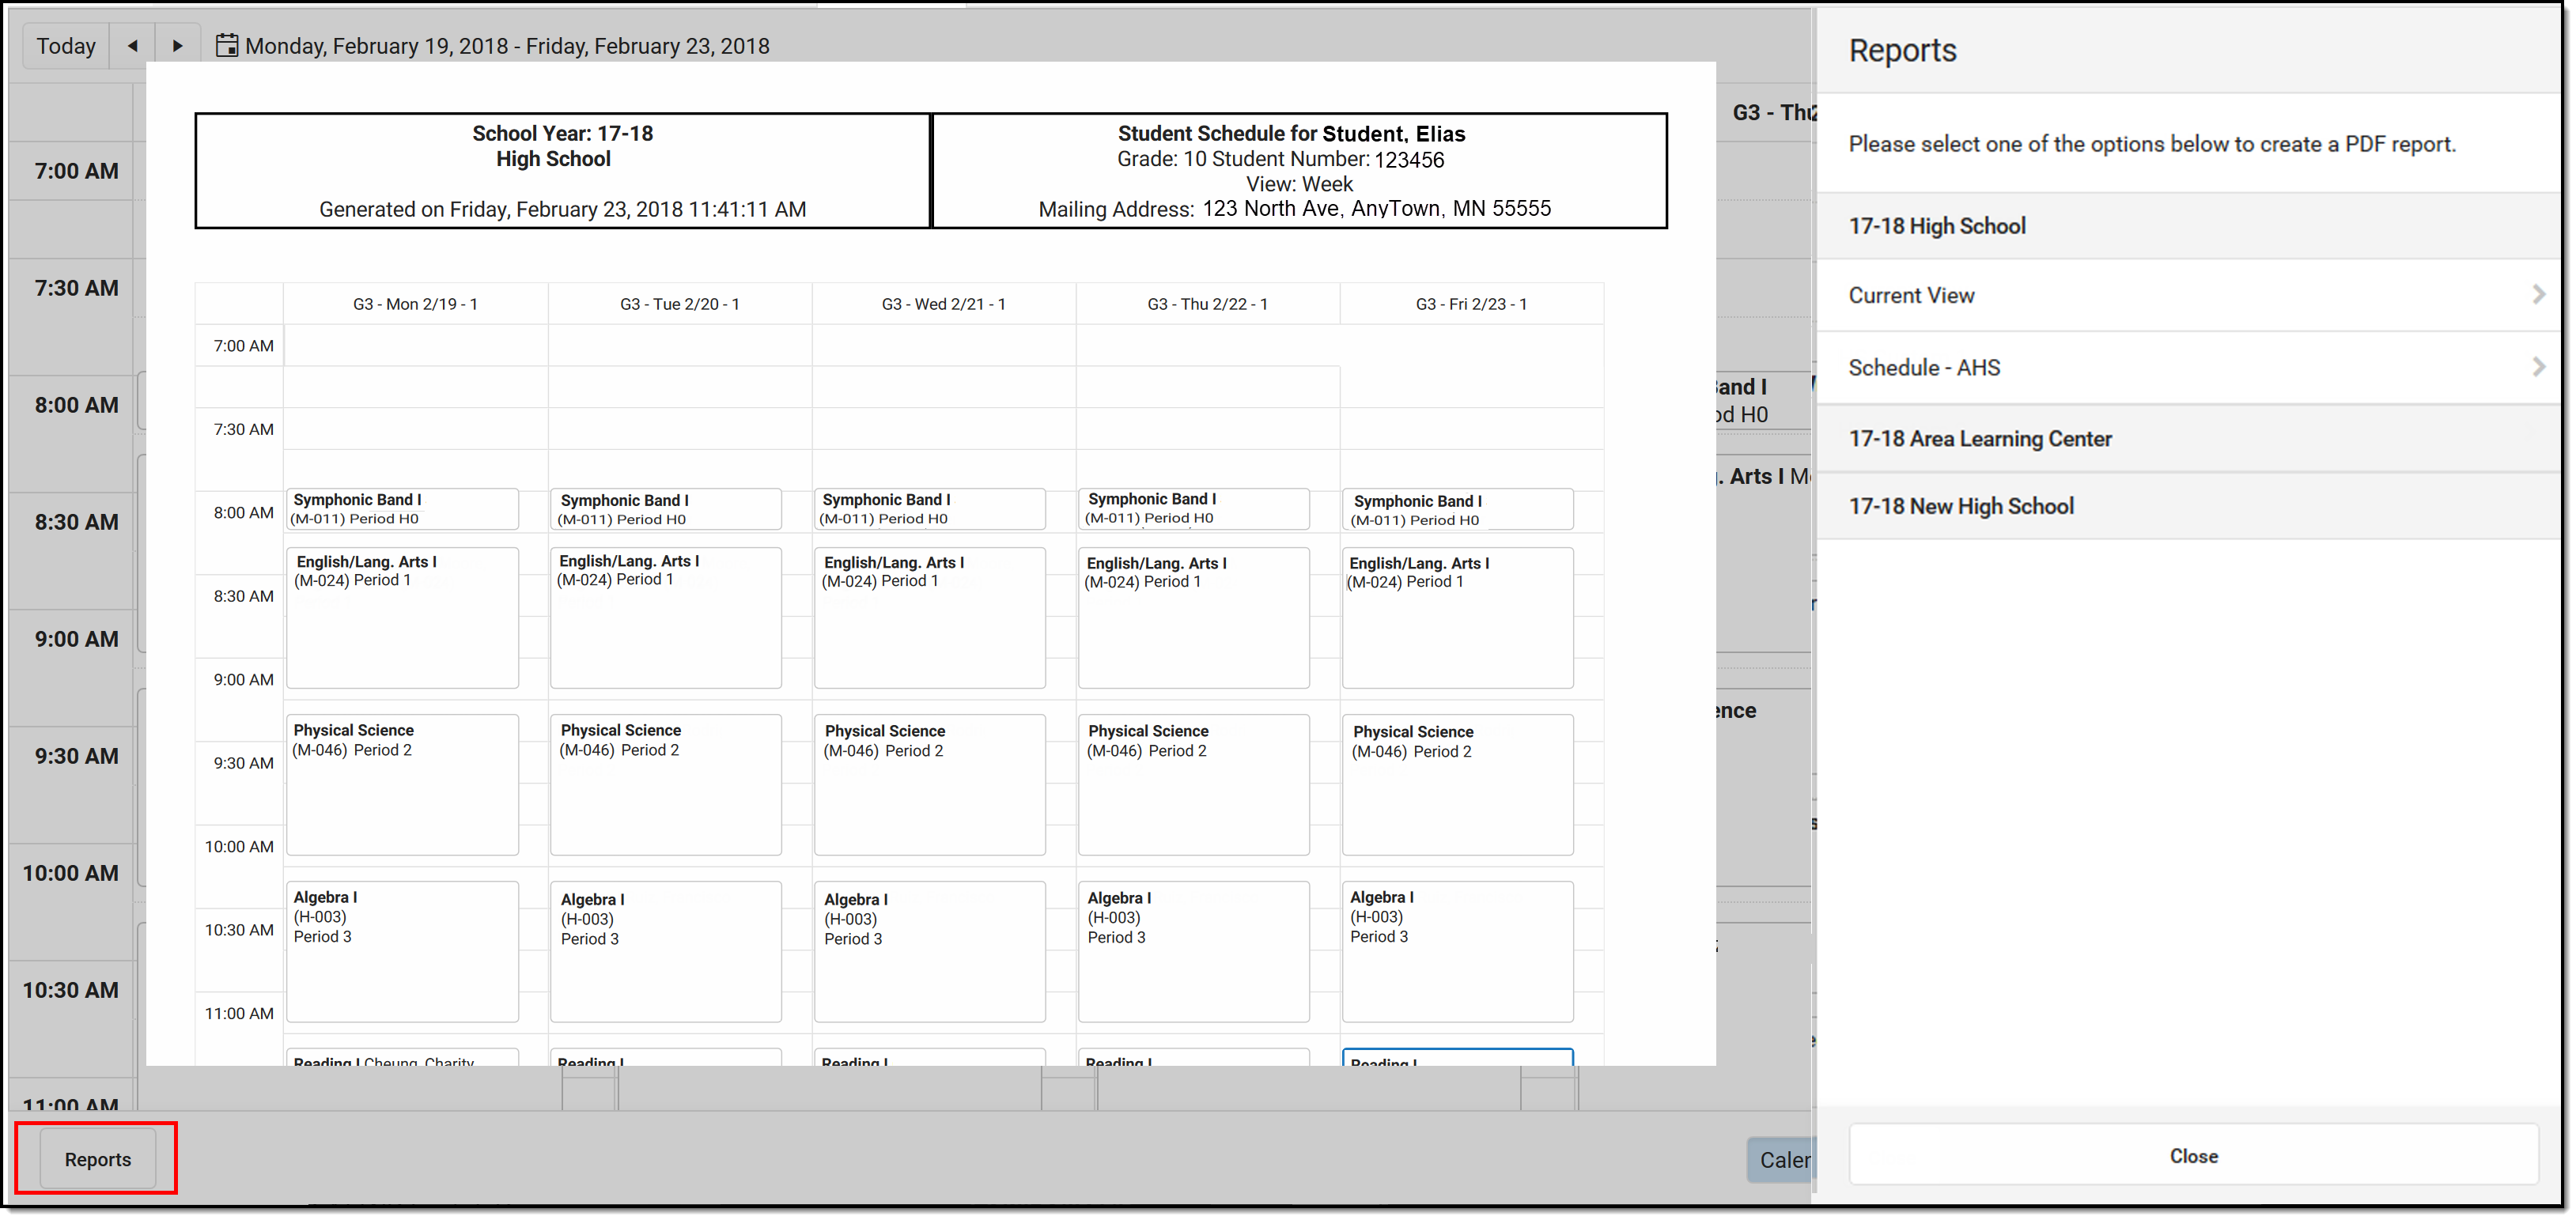
Access Schedule Reports by choosing the Reports button from the bottom of the page. Available reports display in the side panel. A report can also be printed for courses scheduled into periods without times by selecting the Current View or the Periods without Times print options (if there are periods without times) while in the Calendar View. Any scheduled Responsive courses are included in the reports. Any courses that are dropped in the future are included in the reports. |
|
View any Responsive Course Sections from either the Calendar view or the Term view. Past responsive course sections display as other dropped courses would display. |
|
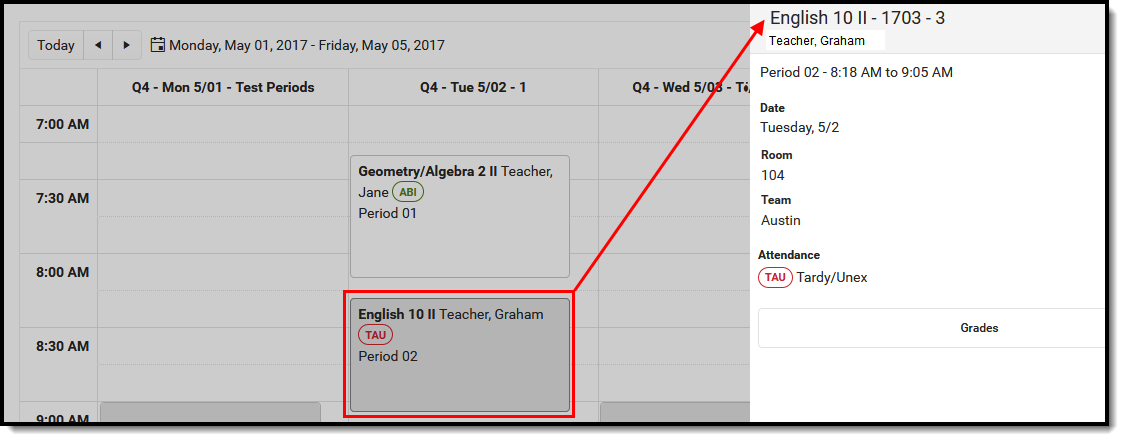
To see more information about a course (assignment scores, attendance data, etc.), select that course from the grid. A side panel opens that includes the course information, section information, any recorded attendance for that day, assigned scheduling teams and access to view posted grades. This can be done from the Calendar view in the Day or Week displays, and in the Term view (the Term View does NOT display attendance information). |
|
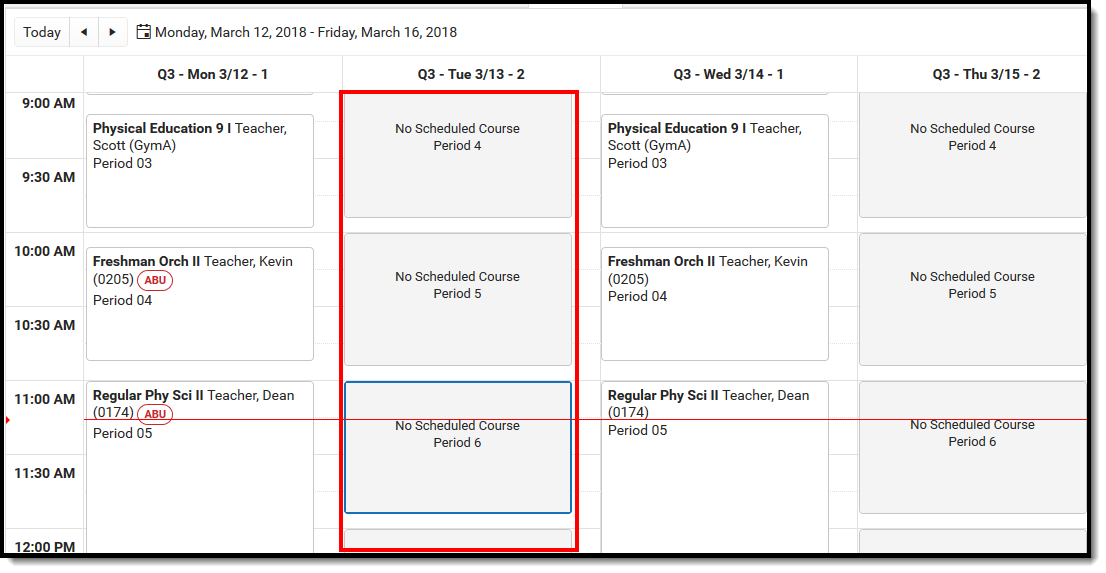
| If a student does not have a scheduled course during a particular period, the period displays as such. |
|
| Calendar View Navigation | |
When displaying the schedule in the Calendar view, the student's schedule can be displayed for the Day, for the Week, or in an Agenda layout. See the Calendar View section for more information on each of these options. Automatic scrolling to the current time of day occurs when viewing the schedule. If a counselor is looking for a specific student at 10:15, opening the schedule tab lets the counselor see which class that student is in and where. |
|
See courses that are not assigned a time to the far right (or below the schedule, depending on your screen size). These could be advisory periods or homeroom classes, or after-school sporting events or after-school club meetings. |
|
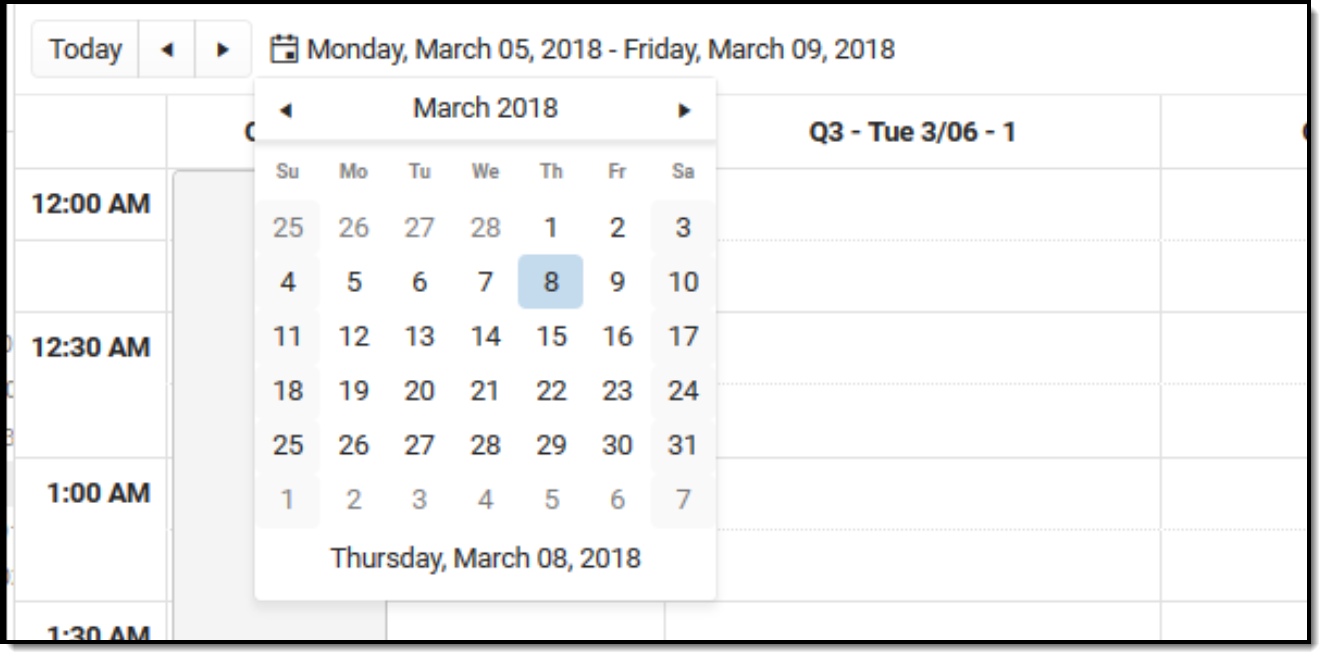
When in the Calendar view, the selected date always displays the current date. Use the left or right arrow keys to navigate to future dates or past dates. If viewing a future or past date, click the Today icon to return to the current date. To choose a day in a different month, click the current date and navigate through the pop-up calendar. |
|
| Term View Navigation | |
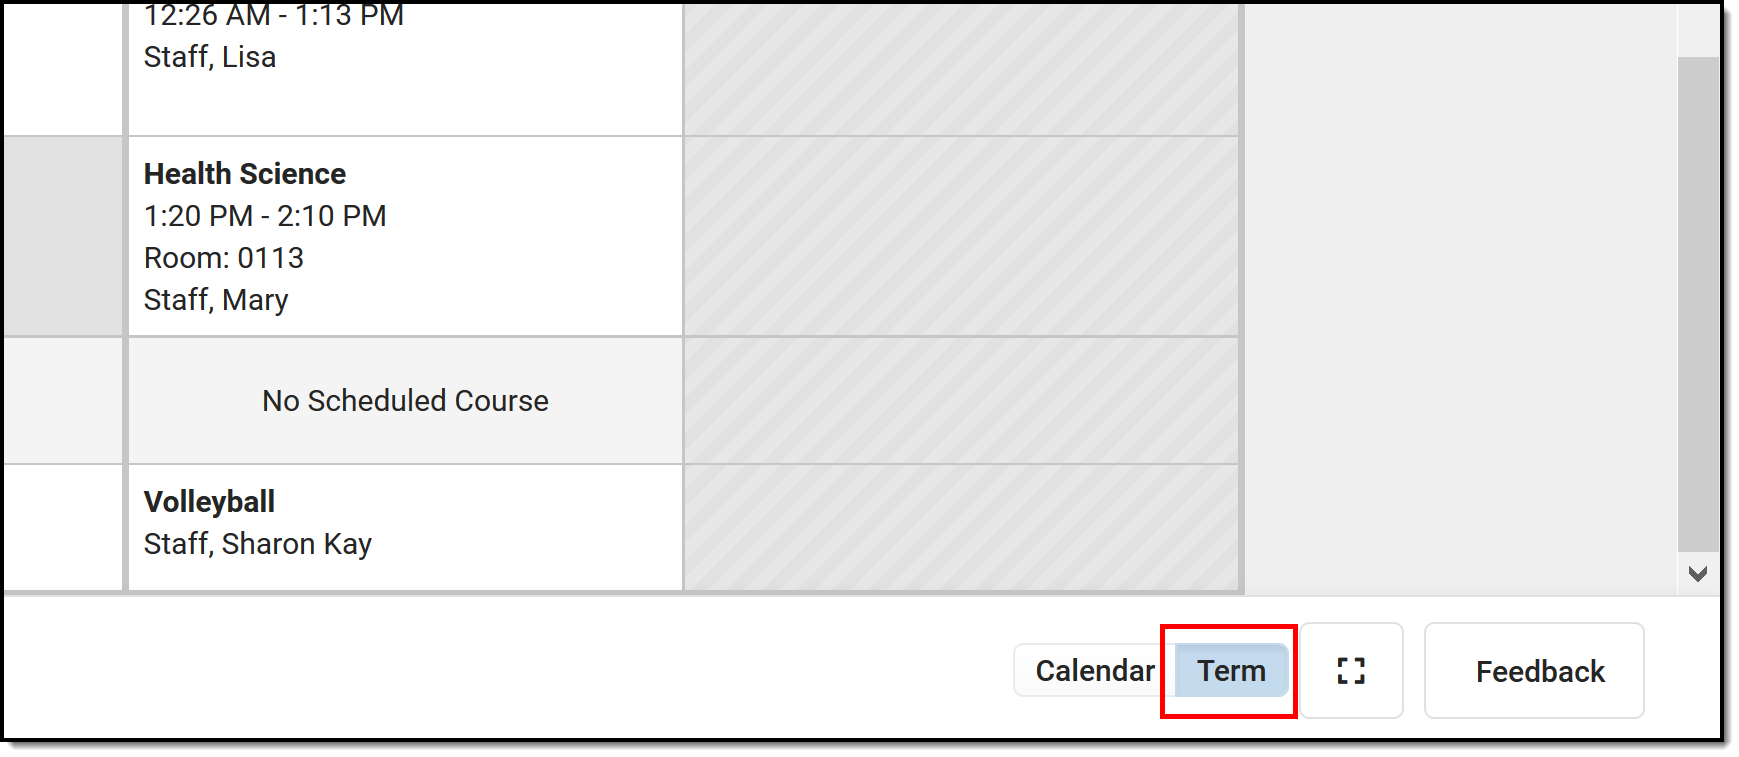
Choose the Term View button to display the Schedule organized by the term (Quarters, Trimesters, etc.).
Periods where the student is not scheduled into a course section are gray and the field displays No Scheduled Course. Periods where the scheduled course section does not meet (school holiday or other non-instruction day) are gray and the field displays No Scheduled Course. Diagonal gray bars indicate the calendar does not contain courses in those periods for those days. |
|
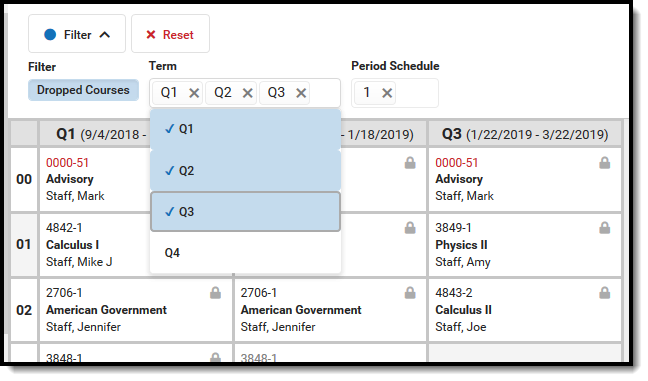
Select which Terms and Period Schedules to display by expanding the Filter dropdown and removing the Terms from the Term list and removing the selection of the period schedules from the Period Schedule list. The green checkmark to the left indicates the term or period schedule is selected and displays in the schedule; thos without a checkmark do not display. All terms and all period schedules are automatically selected. The Filter only displays when there is more than one term and/or one period schedule. |
|
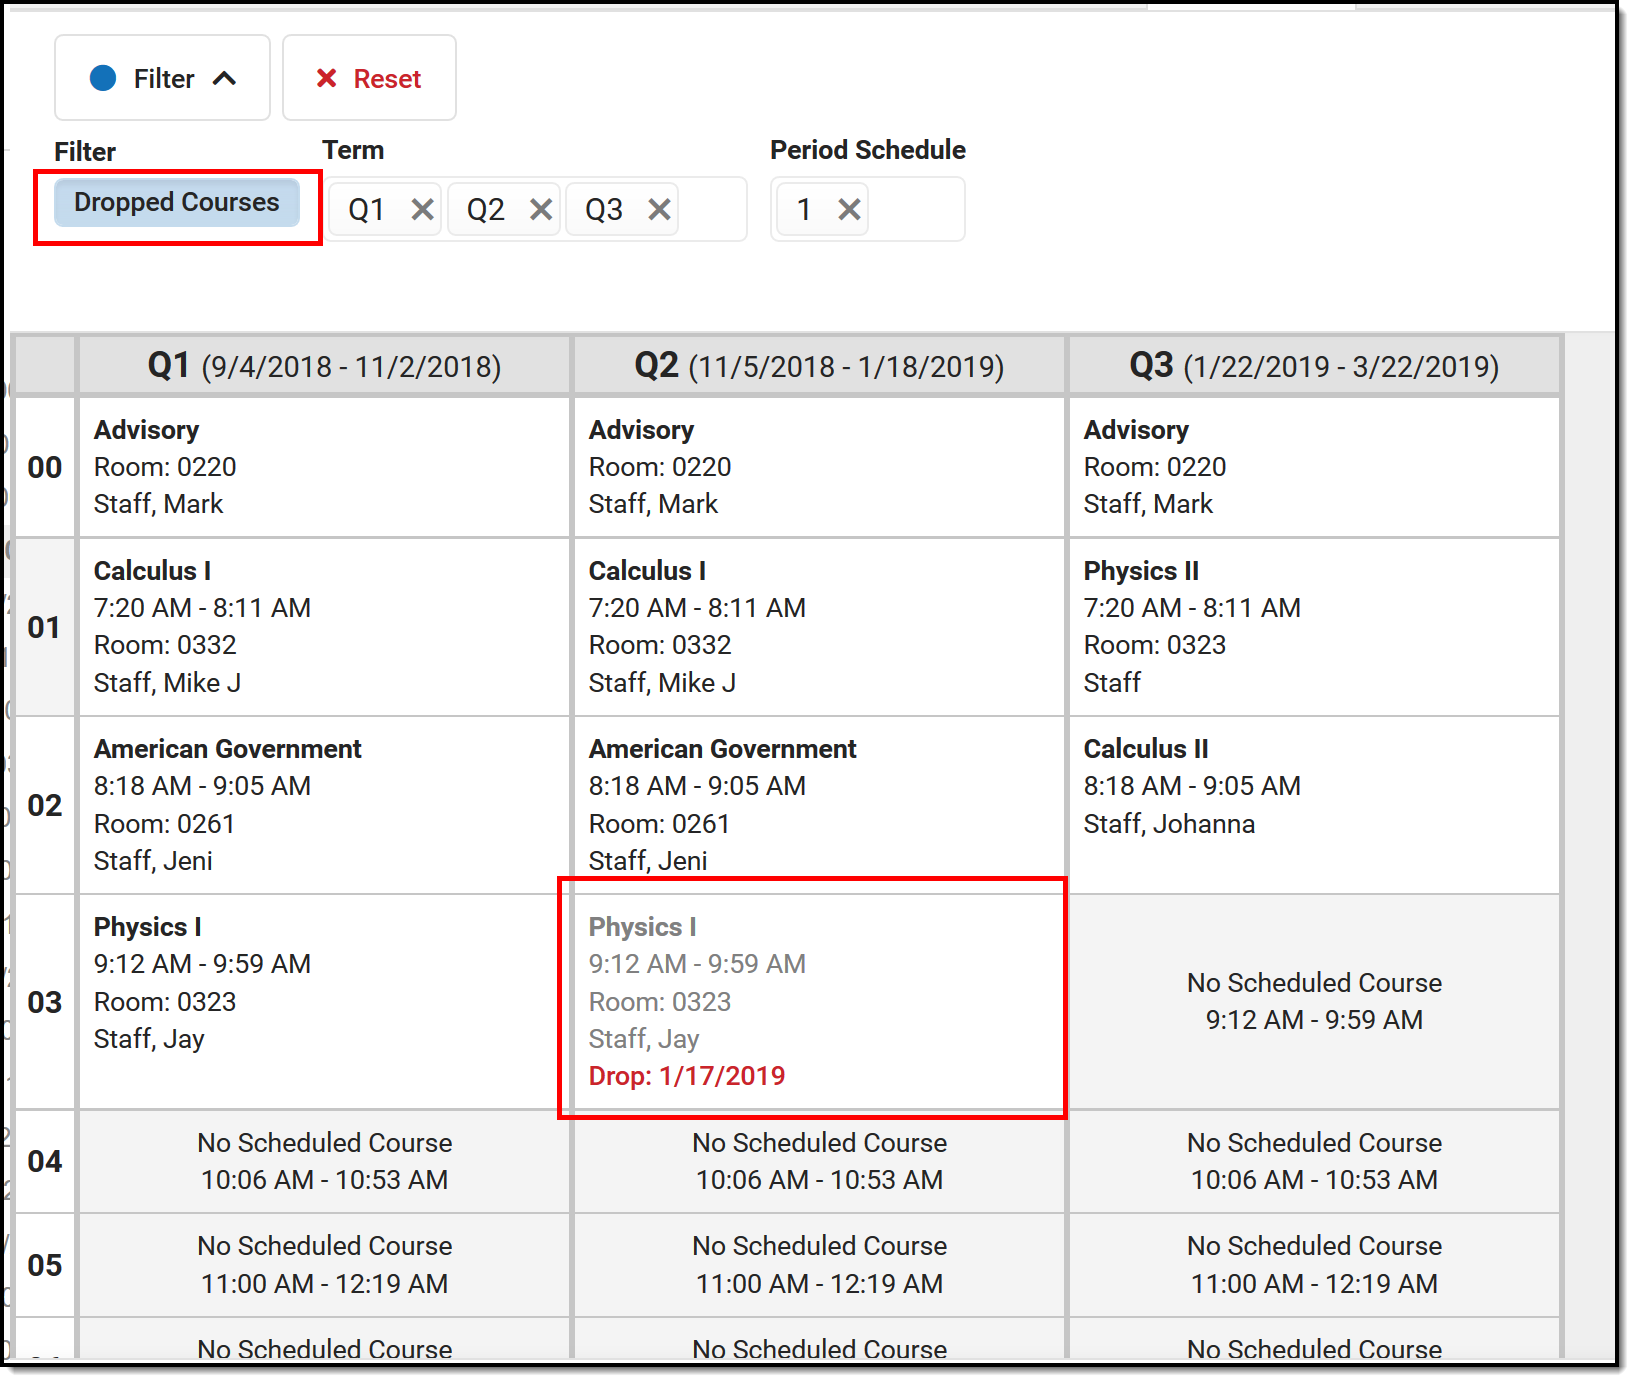
In the Term view, see dropped courses in the date in which they were dropped. The currently active course displays at the top of the period. This requires Dropped Courses to be selected in the Filter. In this example, for Term S2, Period 3, the student dropped the Homeschool course on March 26 (last course listed), enrolled in Photography starting March 27 and dropped on April 2, then added Modern Literature on April 3. The student must have dropped courses in order for this option to display. The Calendar view only displays actively enrolled courses. An Active Course is defined as a course that is not yet dropped, which has one of three impacts, depending on the context of the course:
|
|
Where do I...?
This table compares where you would complete tasks in the old Student Schedule tab (Student Information > General > Schedule) versus where that same task is done in the new Student Schedule tab (Student Information > Counseling > General > Schedule).
| I want to... | Student Schedule | Counseling Student Schedule |
|---|---|---|
| Student Information > General > Schedule | Student Information > Counseling > General > Schedule | |
| Change the Schedule Format | Choose the Dropdown list on the left hand side of the tab to show the schedule in a Table format grouped by course or day, or a List format grouped by course or day. | Choose the Calendar button from the lower right corner; then select the Day, Week, or Agenda buttons from the upper left corner. Or, choose the Term button from the lower right corner. |
| See only the courses into which the student is currently enrolled | Click the Display Active Courses Only icon. | In the Term view, use the Filter options to turn off the Dropped Courses setting (only displays when a student has a dropped course). Dropped courses display in the order in which they were dropped. An Active Course is defined as a course that is not yet dropped, which has one of three impacts, depending on the context of the course:
|
| Print the student's schedule | Click the Print icon or select a Schedule report from the Choose a report option dropdown. | Click the Reports button to see the available reports from the side panel. |
| See the period times. | Scroll to the bottom of the page to see the Period Info table. | Use the Calendar Day view to see the current period highlighted in blue. The schedule automatically moves to the current time, indicated by a red line. |
| View the student's current course grades | Click the Grade Book icon in the course grid. | Click the course name. In the Side Panel, click the Grades button. |
Calendar View
Staff can view the student's schedule by the current Day (standard view), the current Week, or by an Agenda view.
- The Day view displays the student's courses for the selected day.
- The Week view displays the student's courses for the selected week.
- The Agenda view displays the student's courses in a planner view, with the date, time and courses.
Lunch assignment (when selected on the Course editor) and any scheduled Responsive Scheduling courses (when using Responsive Scheduling tools) display.
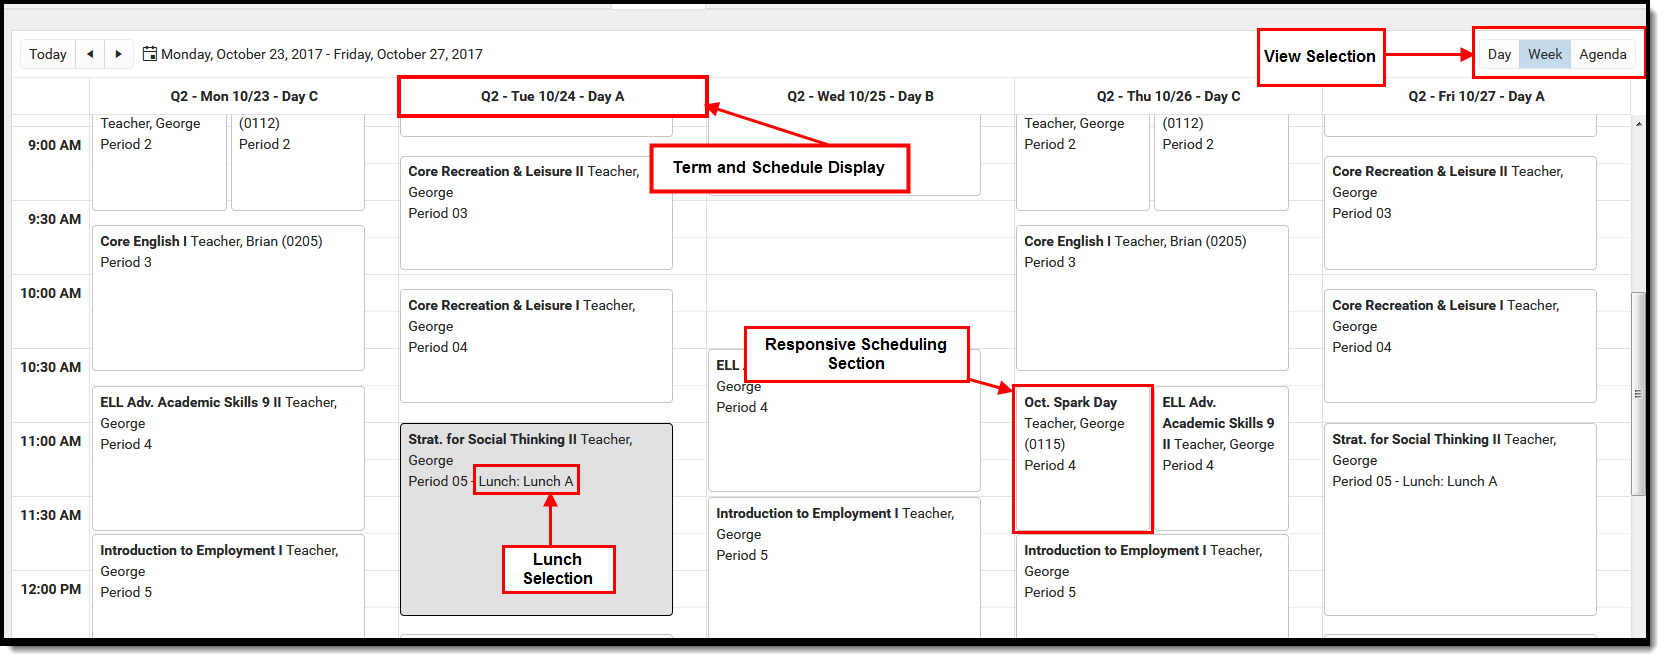 Calendar View Option - Day, Week, Agenda
Keyboard Shortcuts
The following shortcuts can be used when accessing the Student Schedule in the Calendar View:
- Arrow through the time slots. Use all four directional arrow keys to highlight time slot cells and scroll through the courses.
- Press enter to open courses. Highlight a course using the tab key and press the Enter key to open the Course Side bar.
- Tab through the courses and non-timed activities. Use the Tab key to move through the courses and click Enter to open the Course Side panel (shows the course name, teacher, period name and time).
- Arrow to next and previous. Use the arrow keys in the Day and Week view to navigate to the next or previous day/week.
- Escape to close side panels. Click the ESC key to close open side panels.
- Switch between calendar views. Use 1, 2, 3 numbers across the top (not the number pad) to move between the Day, Week, and Agenda views.
- Switch between term views. Use 1, 2 numbers across the top (not the number pad) to move between the Term views.
Certain browser settings (like spell check) may interfere with the use of keyboard shortcuts.
Day View
The Day view lists the student's courses for the selected day. The name of the Period, assigned Room Number, Course Name and Assigned Teacher and any recorded attendance for that period display. The current period is highlighted in a blue outline to easily determine where the student is. A red line indicates the current time.
- Click the course block to see the course information in the side panel.
- Click the Grades button in the side panel to view the student's Grades tab.
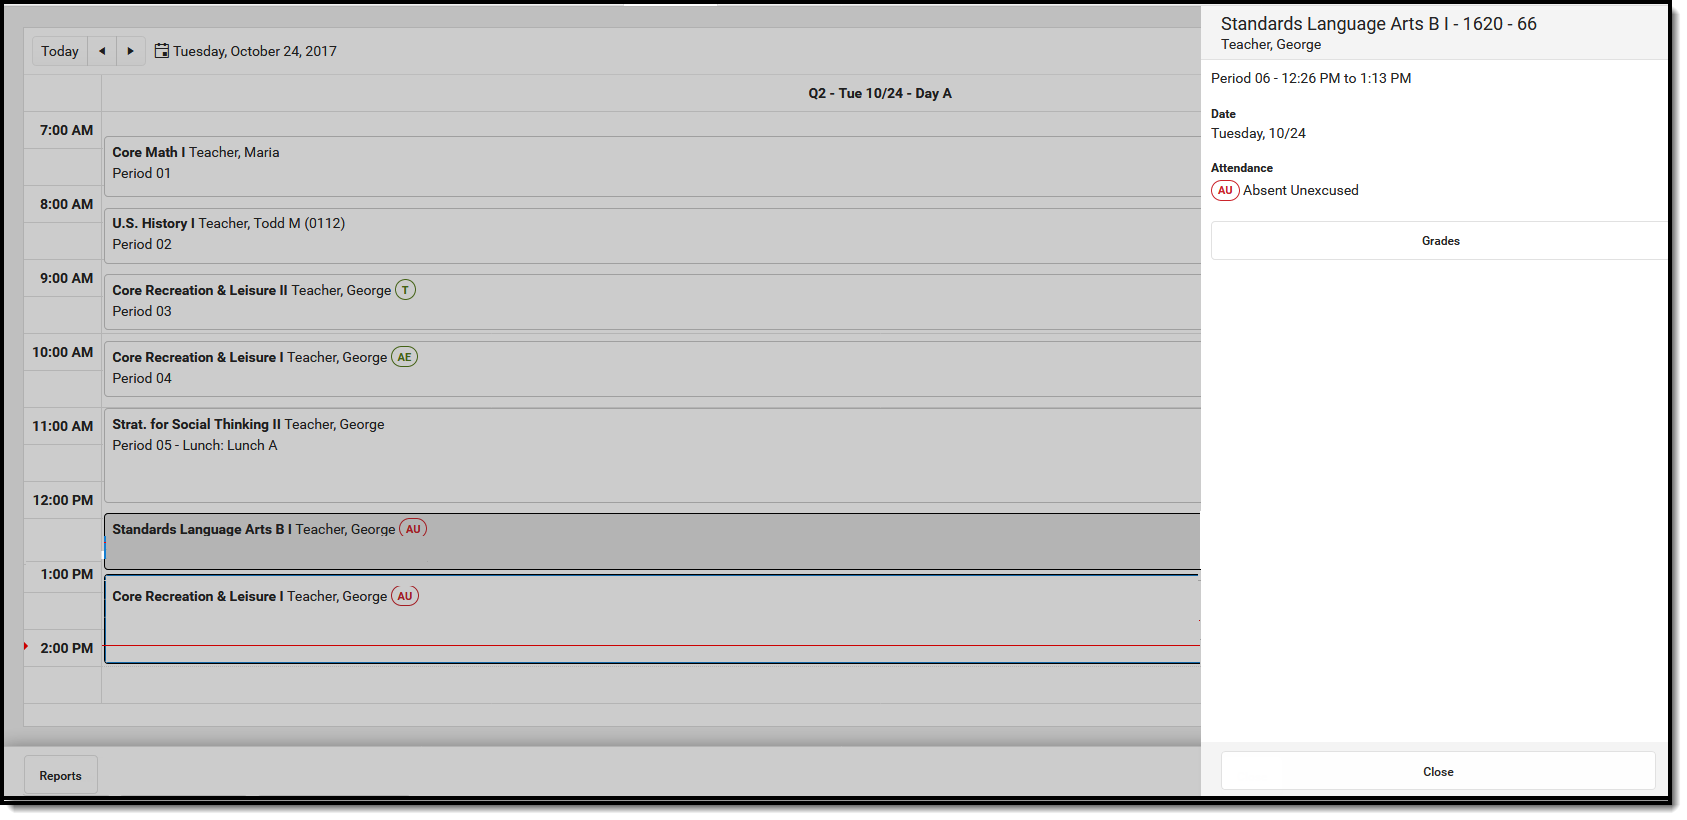 Calendar Day View
Week View
The Week view lists the student's courses for the selected week. Similar to the Day view, the name of the Period, Course Name and Assigned Teacher and any recorded attendance for that period displays. The side panel shows the same information as he Day view.
The Week view is helpful if student courses change on a daily basis.
 Schedule Week View
Certain calendar formats, particularly at elementary schools, do not display well in the Week view, because of the amount of schedules, periods and classes. Consider using the Day or Agenda views instead.
Agenda View
The Agenda view lists the student's courses in a planner type of view, with the date, time and course. The current time and course is not highlighted in this view, but recorded attendance does display for course in which it was recorded.
 Schedule Agenda View
Term View
The Term View displays the student's courses for selected Term and each selected Period Schedule. Choose the Filter to select which terms and periods display.
When first accessing this view, all terms and all period schedules are selected. For a school using more unique formats for student schedules, like middle schools who are experimenting with the best learning for students, this view could get rather large.
Lunch assignment (when selected on the Course editor) and any scheduled Responsive Scheduling courses (when using Responsive Scheduling tools) display.
Responsive courses can be viewed for Future courses or Past courses.
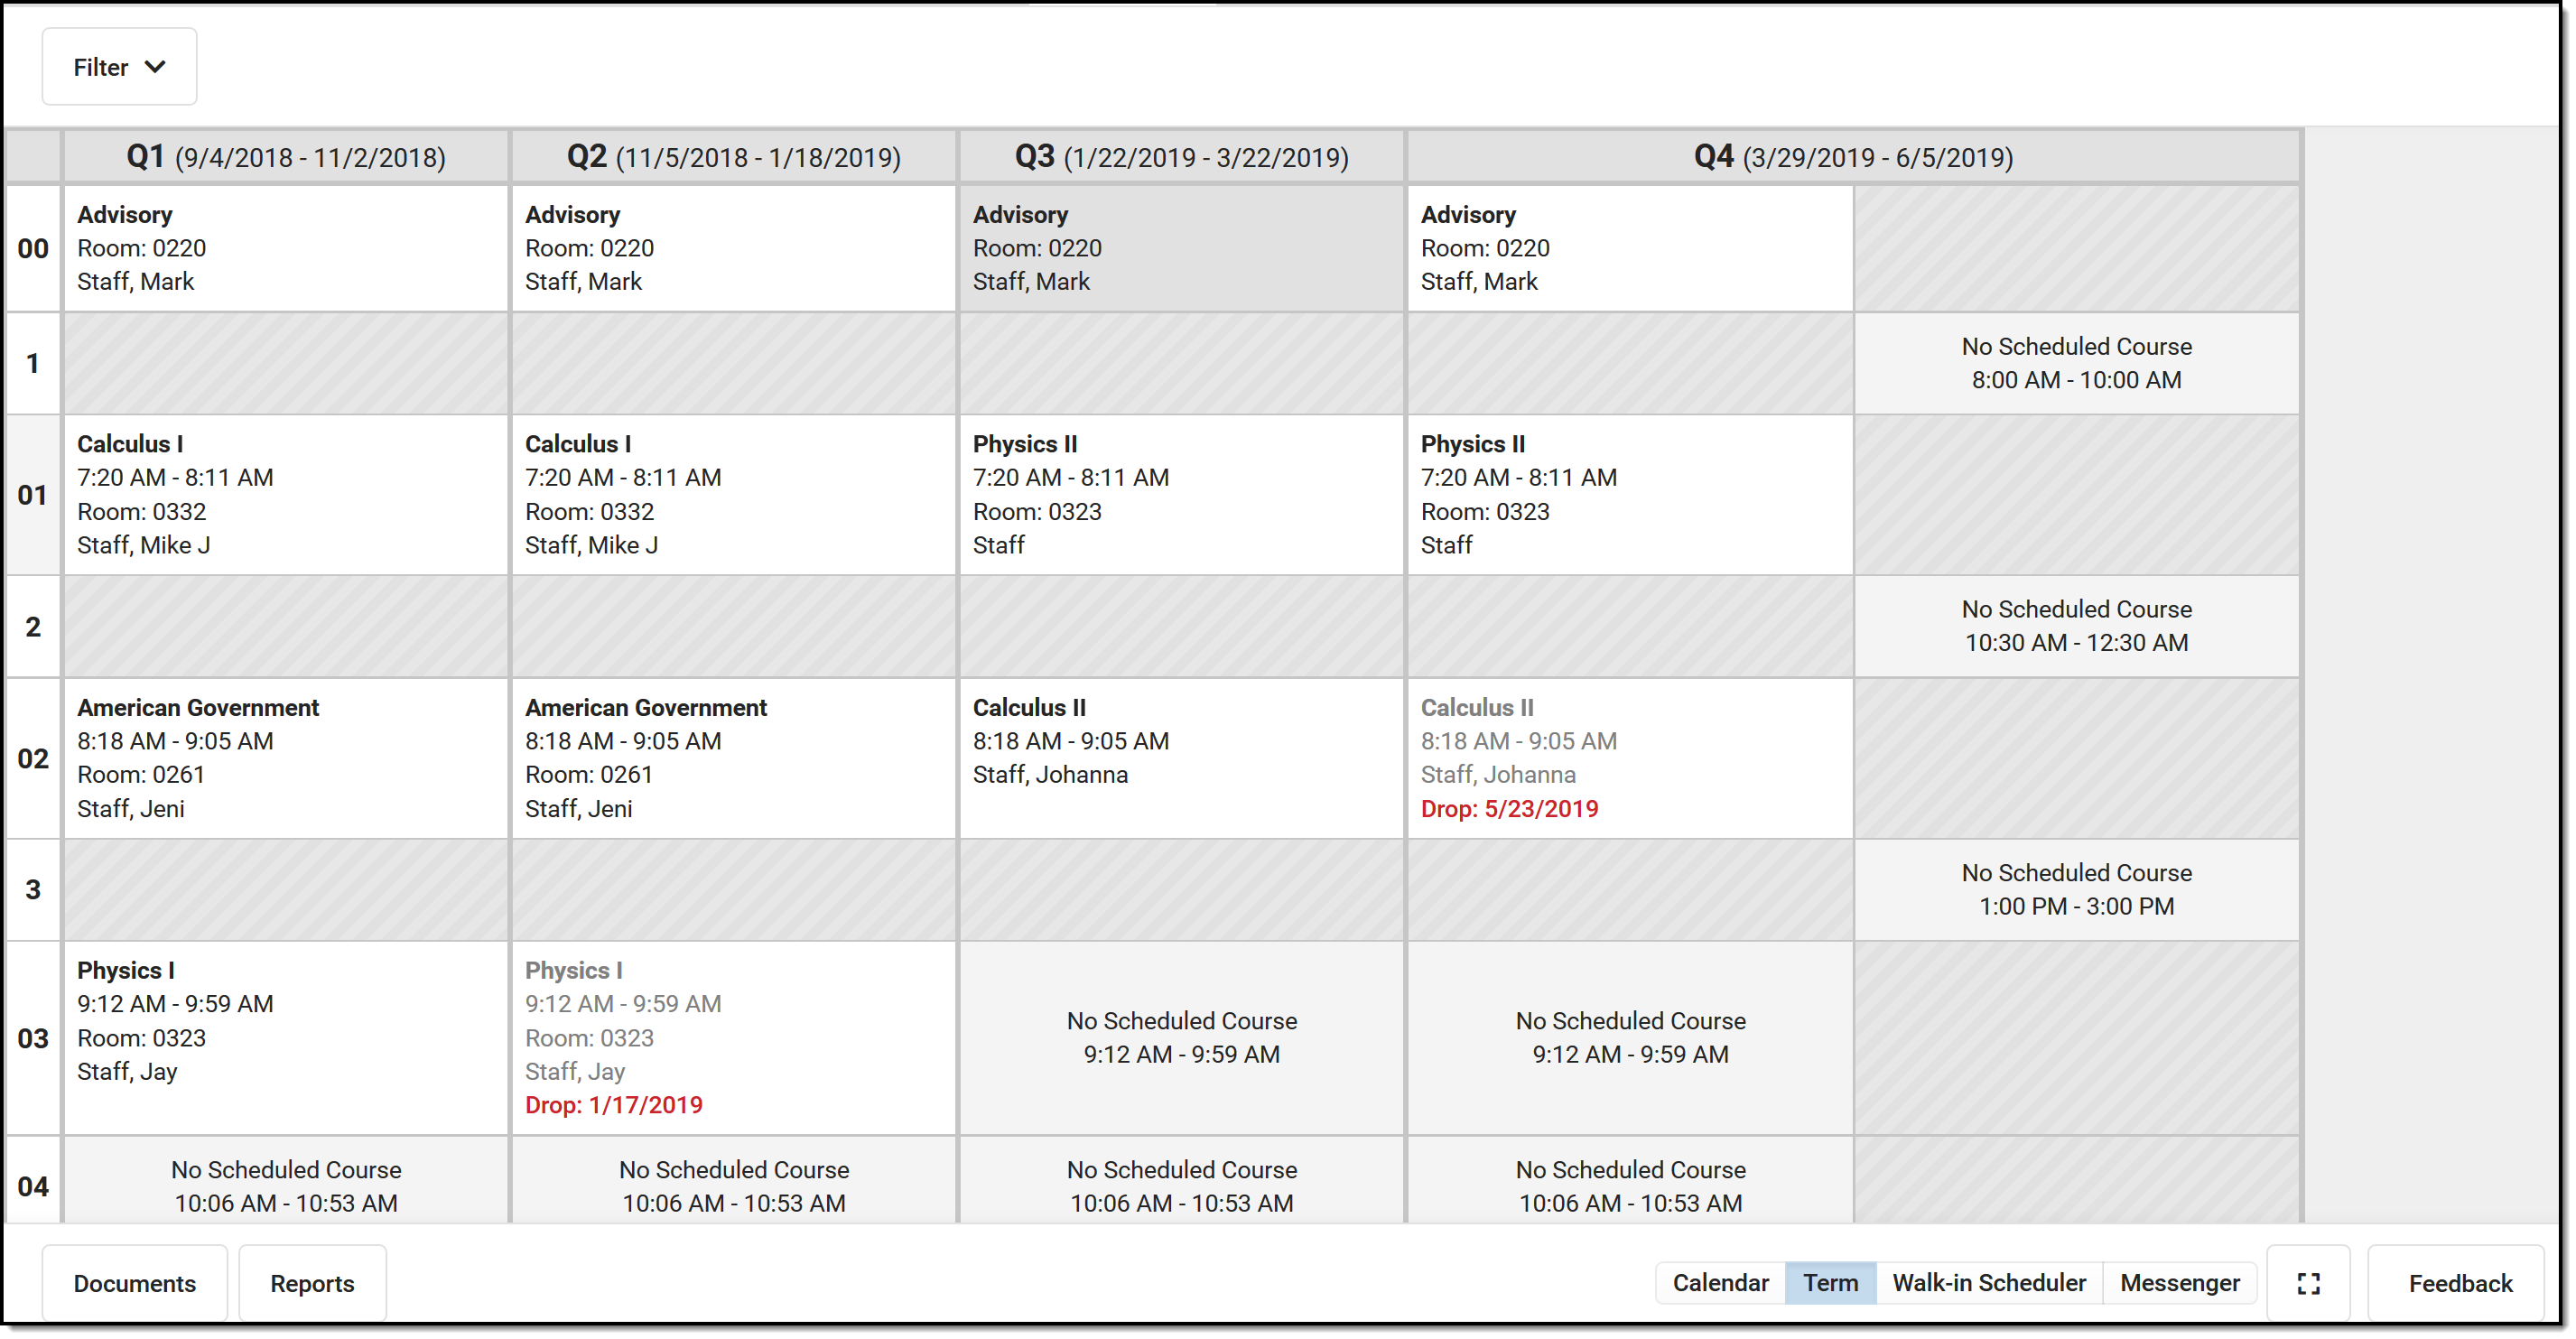 Schedule Term View
Remove the selected terms by clicking which Term or Period Schedule to not show in the Schedule. Terms and Period Schedules without a green checkmark DO NOT display in the schedule. In the example below, terms Q1, Q2, and Q3 are selected to display. Q4 is not selected and courses scheduled into that term do not display.
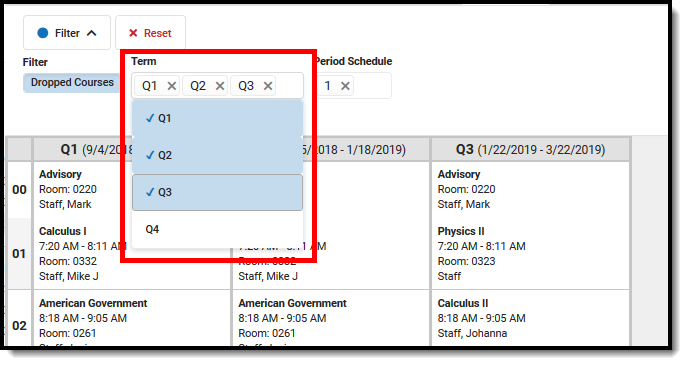 Term Selection
Click the Reset button to undo any removed terms or period schedules.
 Term View Reset
Reports
Print the student's schedule in any selected view by choosing the Reports button at the bottom of the page and clicking the Current View report option. This prints the student's schedule in the selected view (Day, Week, Agenda, Term) in PDF format. If a user has removed certain terms by modifying the Filter bar selections (for example, printing the schedule report for only Term 4), only those options selected in the Filter bar are included in the print.
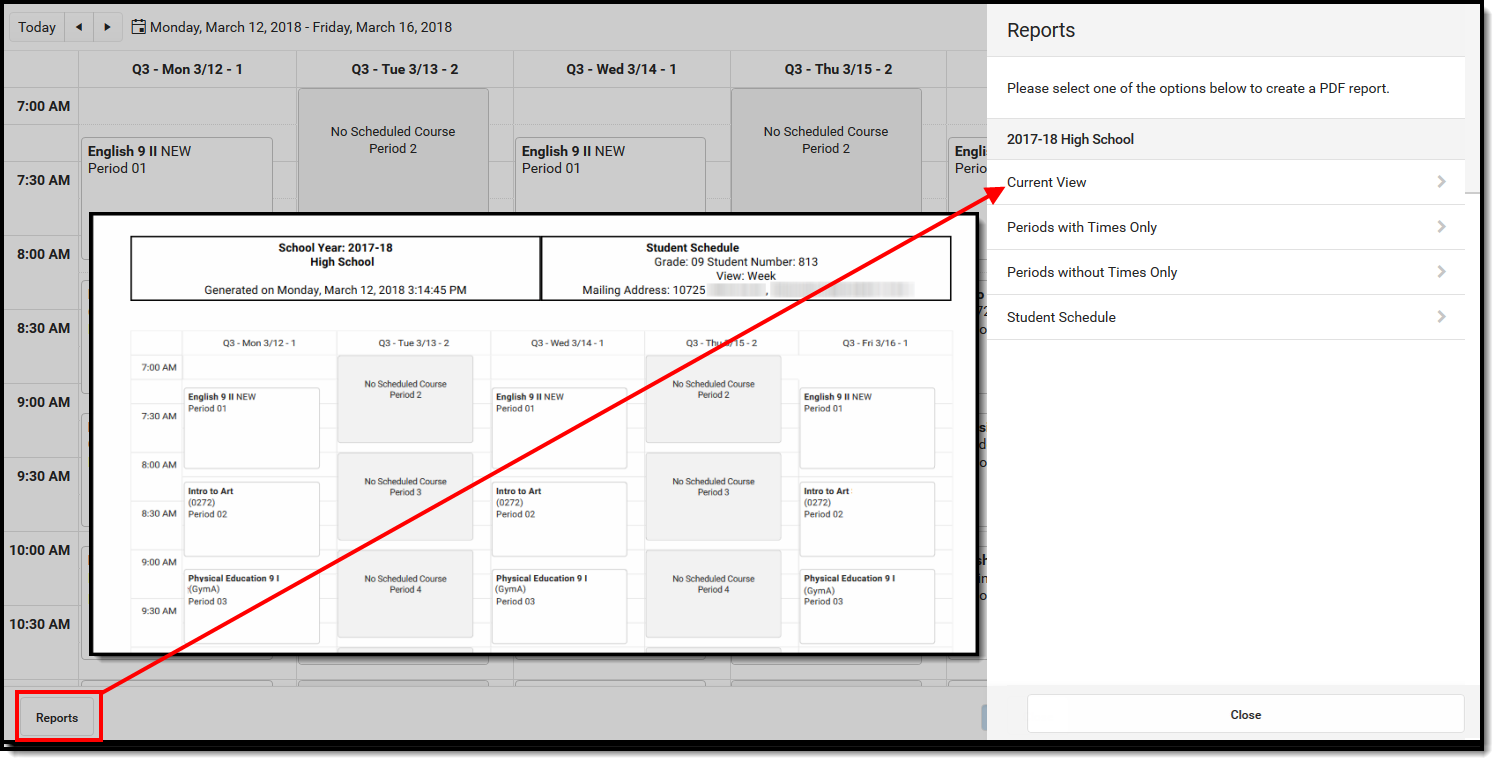 Print View of Default Schedule Report
A report can also be printed for Periods without Times Only and Periods with Time Only. If there are no periods without times in the Schedule, the Periods without Time Only print option does not display. These periods can be left without assigned times, or if there should be times assigned to these periods, modify the Period Schedule to add the correct period times.
Other reports that display here for printing are created using the Preferences Reports tool in System Administration. See the Schedule Report Preferences article for more information.
There could be several schedule reports listed, including those for other schools if the student has multiple enrollments. These display if the user has rights to the other calendars.
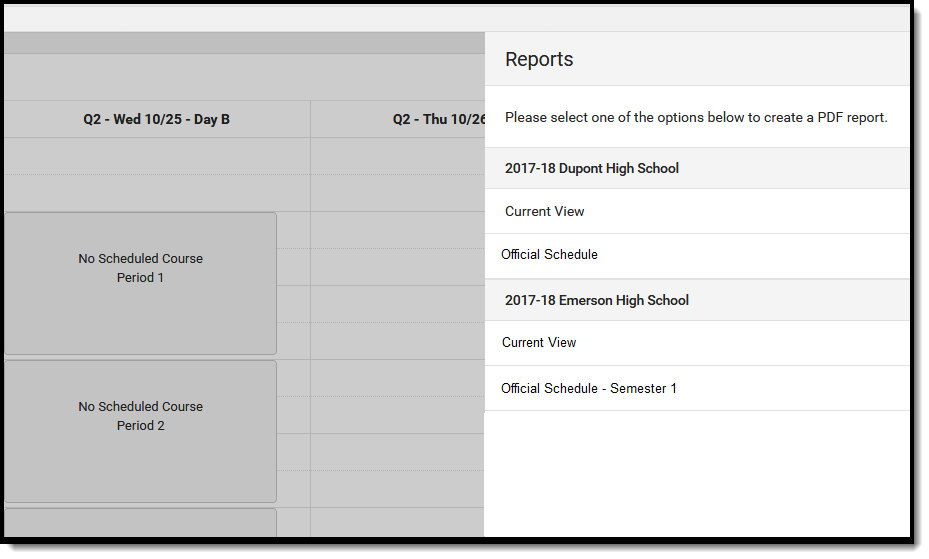 Print Schedule Reports
This video demonstrates how to view and print student detail information.
General Student Health Information
Districts can choose to enter and track various health-related information for students.
Health Conditions and Treatments
Districts may choose to track health conditions students have, as well as treatments given to students in school for specific health conditions.
Immunizations
Districts can enter immunization information for students.
Tool Search: Student Immunizations
The Immunizations tool indicates a student's current level of immunization compliance, based on state requirements and their documented doses of a vaccine.
The vaccination logic used to determine compliance displayed on this screen is based on state-specific immunization rules managed in the Vaccines tool.
Immunization rules and required vaccinations vary by state. Please see your state's StateTools articles for more information on required immunizations and vaccinations procedures in your state.
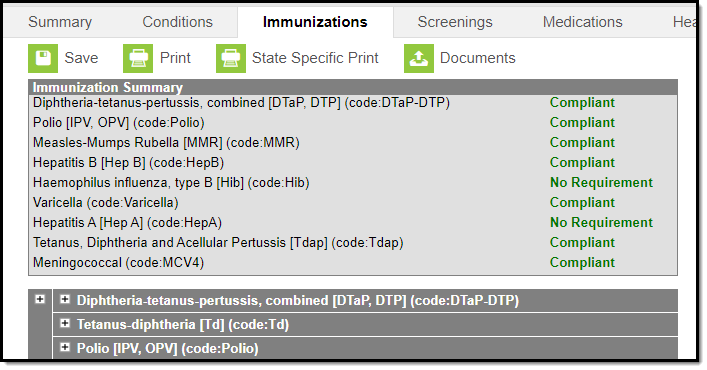 Student Immunizations Tool
See the Immunizations Tool Rights article for information on rights needed to use this tool.
Vaccinations
Vaccine compliance is based on federal and state requirements. Most often, these rules are attached to the student’s year of enrollment and age. Each state has different requirements for students’ immunizations. This information is built into the product and is based on the student’s age and year of enrollment.
Vaccines that are considered non-compliant are automatically expanded, allowing users to add these dates of vaccinations.
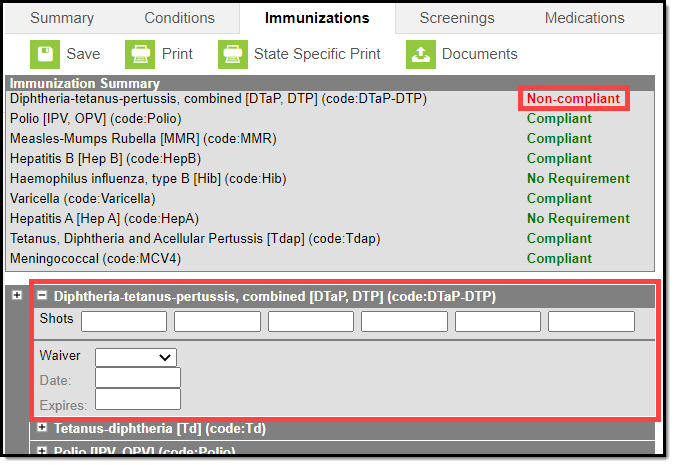 Non-Compliant Example
Vaccine entry requires a date of when the student was vaccinated, or a selection of a health waiver option and a date of when that waiver was given and, if available, a date of when the waiver expires.
Waivers can be entered for any vaccination required for a student. In most states, parents/guardians must fill out and sign a form and return that form to the district health office. Waiver types are limited to the following:
- Medical
- Conscientious/Religious Objection
- Lab Confirmation of the disease.
Waiver types are created in the Vaccine Exemptions tool.
Enter Student Immunization Information
- Expand the Vaccine that needs to be updated by clicking the plus (+) sign next to the name of the vaccine.
- Enter the date(s) the vaccination took place in mm/dd/yy format in the Shots field.
- Click the Save button when finished. The new immunization is added to the student’s list of vaccines. When the new entry satisfies compliancy, the indication of such is changed automatically.
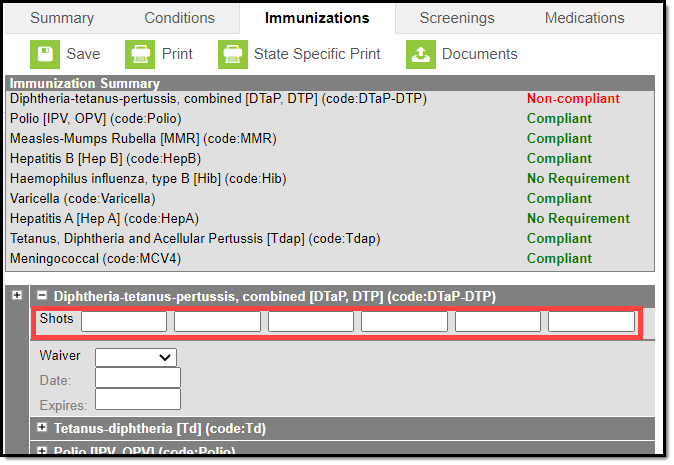 Enter Shot Dates
Enter a Vaccine Waiver
- Expand the Vaccine (if it is not already expanded) that needs to be updated by clicking the plus (+) sign next to the name of the vaccine.
- Select the type of Waiver from the dropdown list.
- Enter a Date for when the waiver became active.
- Enter an Expiration Date.
- Click the Save button when finished. The Immunization Summary is updated to reflect the waiver entry. Additional waivers can be entered as needed.
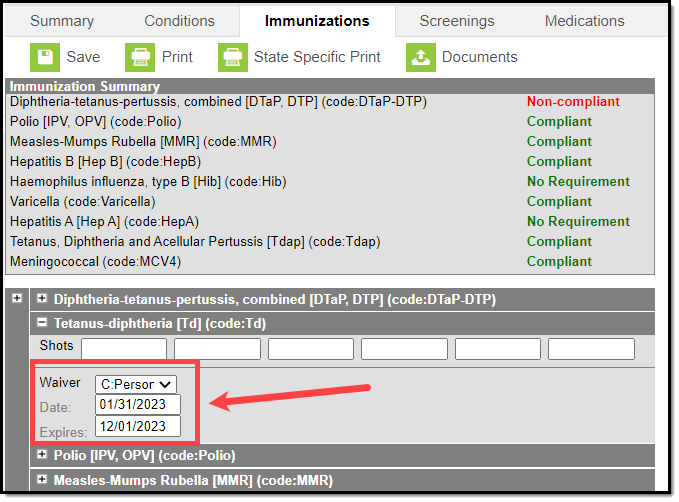 Vaccine Waiver
Print Immunizations
Student Immunization records can be printed for the selected student using either the Print button or the State Specific Print button.
- The Print button lists the vaccinations and the date the student received the vaccine (see first image). This is the same format that prints when generating the Immunization Batch Report using the General Report Type option.
- The State Specific Print lists the vaccinations and the date the student received the vaccine in the format recommended by the state health department (see second image). This is the same format that prints when generating the Immunization Batch Report using the State Specific Report Type option.
The State Specific Print icon may not be available in your state.
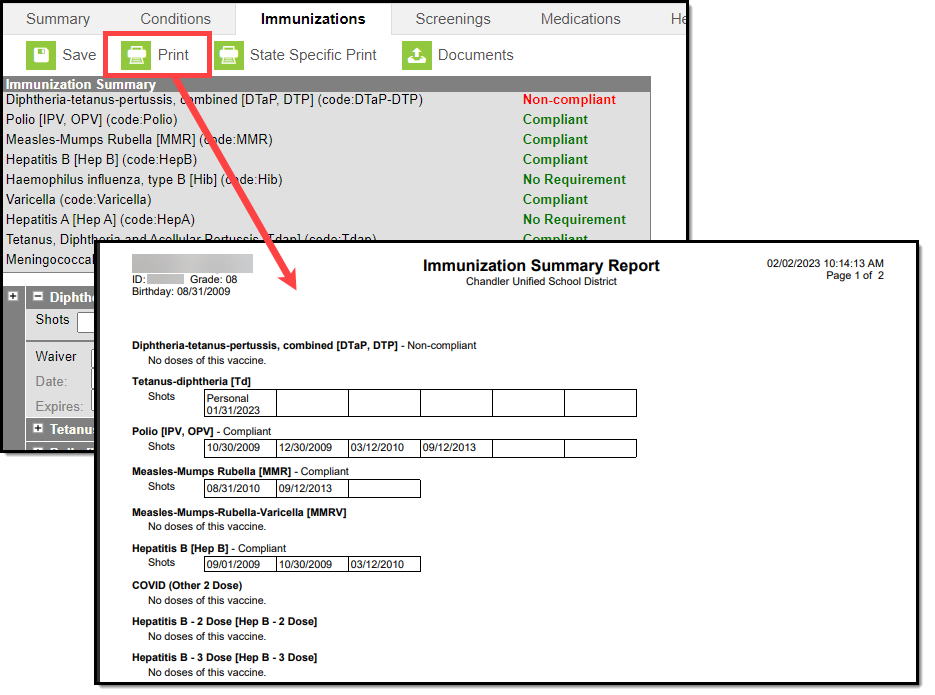 Print Immunization Summary
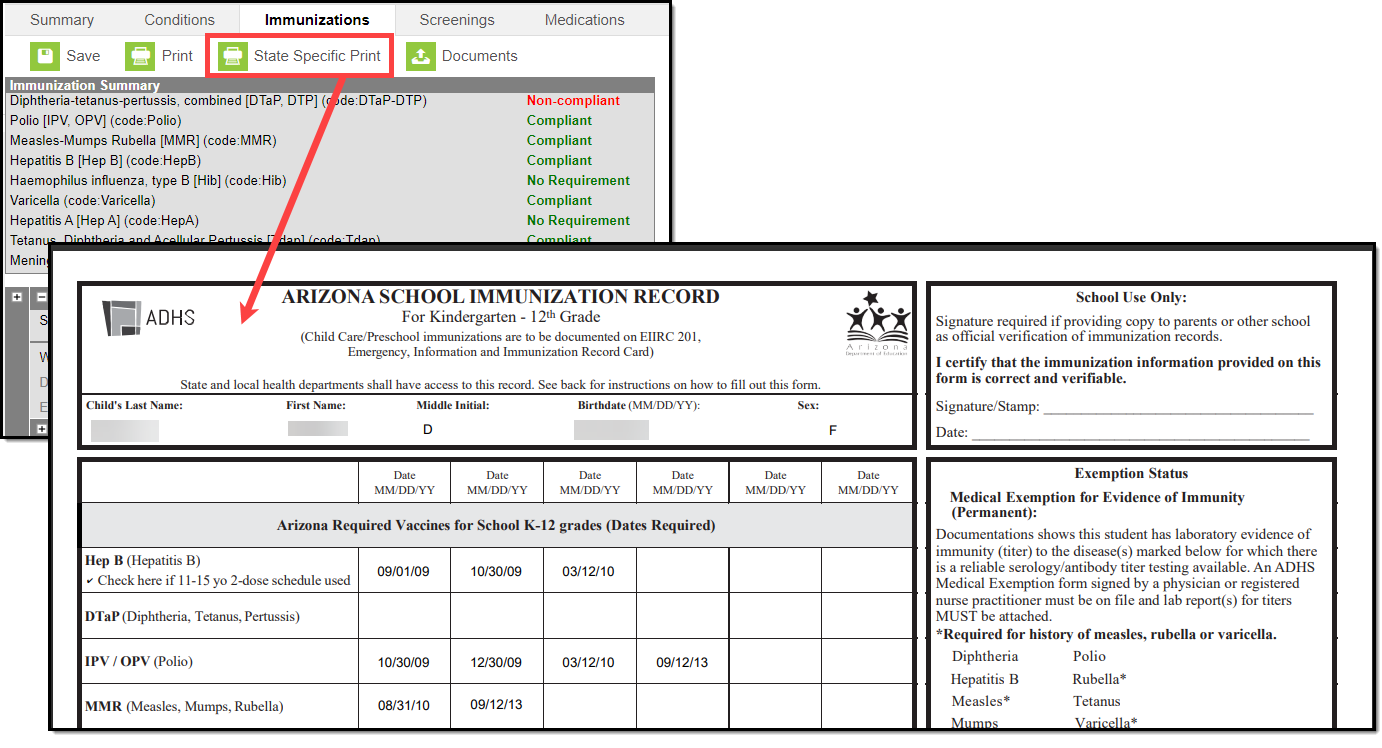 State Specific Immunization Print
Upload and Manage Immunization Documents
The immunization tool allows you to store, manage, and view all immunization-related documents associated with the selected person.
To Upload a New Document:
- Click the Documents button. A separate window will appear, containing an Upload Document button and the Documents List.
- To begin uploading a new document, click the Upload Document button and select Add Files.
- Locate the file on your local hard drive or network and click OK.
- The file will appear in the Upload Documents list. From here you can add a Description (optional), see what tool will be associated with the file, and the size of the file.
- Mark the checkbox in the left-hand corner to agree to the terms of the Infinite Campus Acceptable Use Policy (as well as any district-mandated policies).
- Click Upload. The file is now uploaded and attached to the student where it can be accessed at any time.
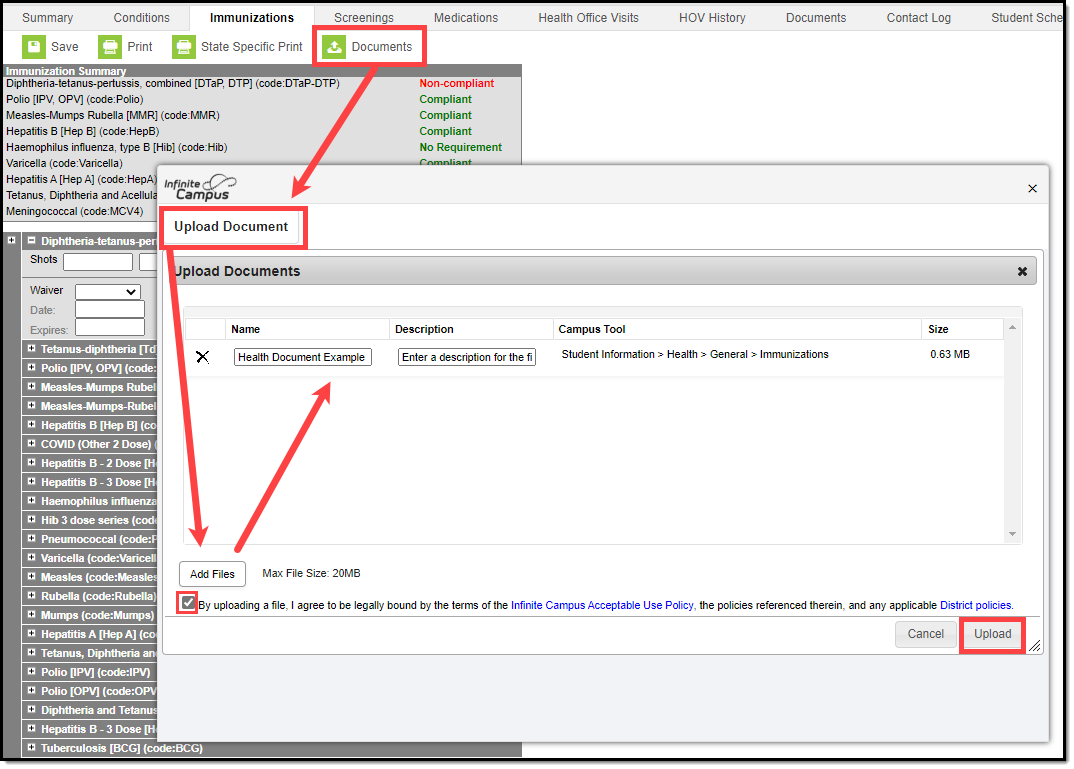 Upload Immunizations Documents
Delete or Edit an Existing File
If you need to delete the file, click the next to the file needing deletion.
If you need to edit file details, click the  icon next to the file. The Edit Document editor will appear, allowing you to edit the file name, description, or replace the file.
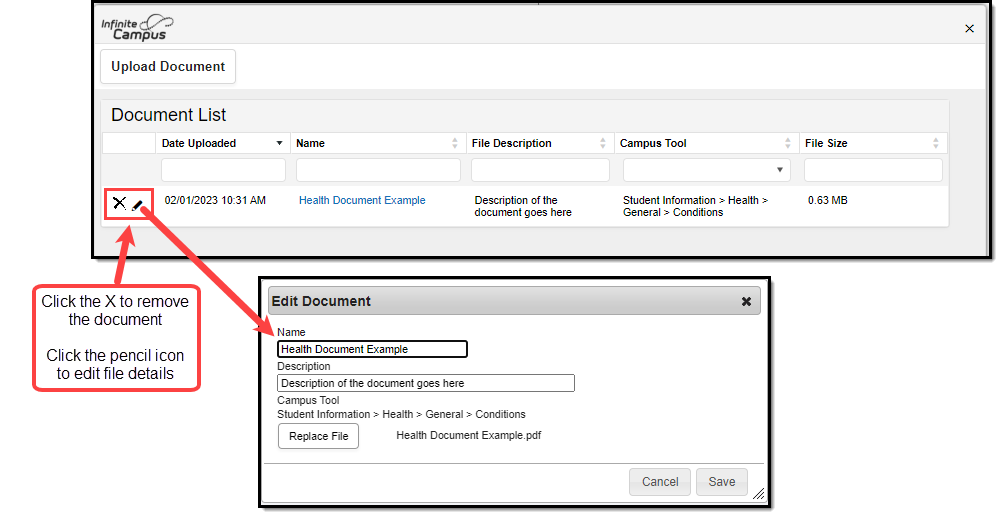 Edit Document Modal
Nightly Compliance Report
Every night, a process on the back end is run to calculate a student's compliance with each tracked vaccine. This report includes any student who has an enrollment in the current school year, as well as that student's vaccinations and associated vaccination rules. The results of this process can be pulled from Ad hoc Filter Designer for the active school year or any previous school year using the following selections in the Query Wizard. When the nightly compliance report is run for the non-active school year, that data is not available to report in Ad hoc.
The Nightly Compliance Report is not available in all states.
| Action | Location | |
|---|---|---|
| 1. | Navigate to the Filter Designer. | Ad hoc Reporting > Filter Designer |
| 2. | Select the Filter Type of Query Wizard and the Data Type of Student. Click the Create button. | Ad hoc Reporting > Filter Designer > Filter Type, Data Type |
| 3. | Enter a Query Name, which is required to save the filter. | Ad hoc Reporting > Filter Designer > Field Selection |
| 4. | In the All Fields list, open the Student > Health folder; then open the Immunization Compliance Status folder. The complete list of fields for this table is shown in the image following this table. | Ad hoc Reporting > Filter Designer > Student > Health > Immunization Compliance Status |
| 5. | Choose the fields in the Immunization Compliance Status folder. | Ad hoc Reporting > Filter Designer > Student > Health > Immunization Compliance Status |
| 6. | Click the Next button and enter any desired filter options. | Ad hoc Reporting > Filter Designer > Filter Parameters |
| 7. | Click the Next button and enter any desired formatting options. | Ad hoc Reporting > Filter Designer > Output Formatting |
| 8. | Click the Next button and enter any desired grouping options. | Ad hoc Reporting > Filter Designer > Grouping and Aggregation |
| 9. | Click the Save and Test button or Save button. | N/A |
| 10. | Navigate back to the Filter Designer tool and select the saved report from the Saved Filter list. Click the Test button to generate the report. | Ad hoc Reporting > Filter Designer > Saved Filter |
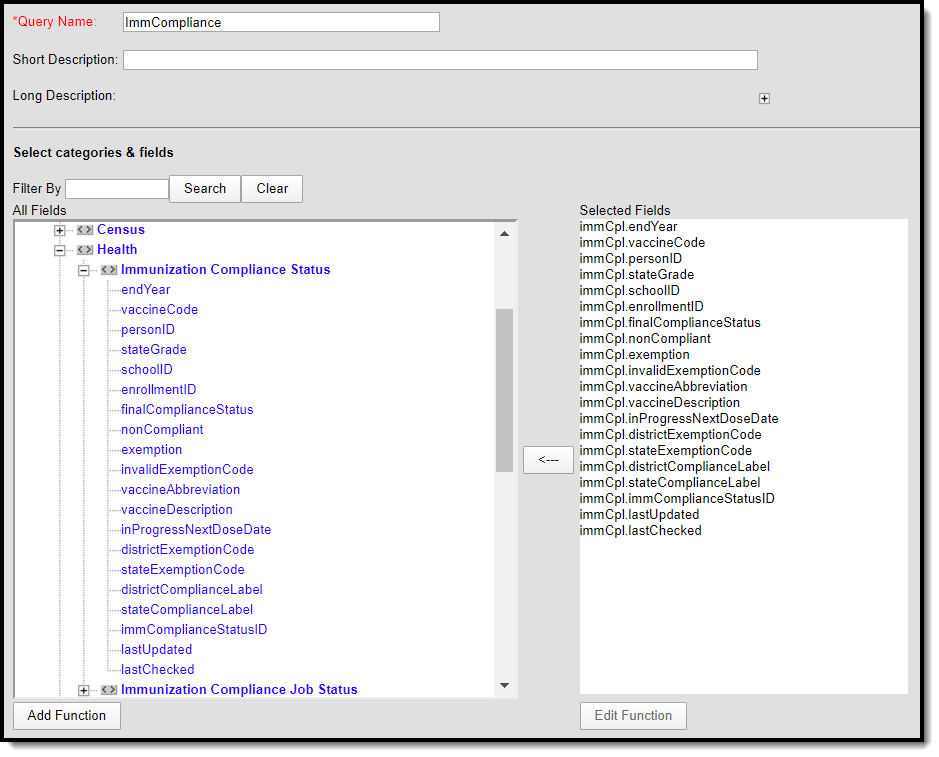 Ad hoc Filter Designer - Immunization Compliance Status Options
Immunization Compliance Status Report Input/Output
This table describes from where in the interface these fields are pulled and set up, if applicable.
| Ad Hoc Name | Description | Report Output | UI Location |
|---|---|---|---|
| immCpl.endYear | The End Year for the student's enrollment record being used. | YYYY | Only available in the Campus database calendar.endYear |
| immCpl.vaccineCode | The code for the type of vaccine. | Alphanumeric Example: HepA | Health > Vaccines > Vaccine Detail > Vaccine Code |
immCpl.personID | The student's person identification number. | Numeric | Census > People > Demographics > Person Information > PersonID |
| immCpl.stateGrade | The student's state grade. | Alphanumeric | Student Information > General > Enrollments > Enrollment Editor > Grade |
immCpl.schoolID | The school's database identification number. | Numeric | System Administration > Resources > School > School > School Detail > State School Number |
| immCpl.enrollmentID | The student's enrollment database identification number. | Numeric | Not dynamically stored in UI, enrollmentID |
immCpl.finalComplianceStatus | The compliance status of the vaccine for the student. This is calculated based on the immunization rules at System Administration > Health > Vaccines. | Alphanumeric Example: Compliant, Non-compliant, In Progress, Exempt - Code, etc. | Not dynamically stored, only available in Ad hoc and the Immunization Summary Report |
immCpl.nonCompliant | Identifies if the student has a non-compliant status in the final compliance status. | Numeric, 0 or 1 (0 = No, 1 = Yes) | Not dynamically stored, only available in Ad hoc and the Immunization Summary Report |
| immCpl.exemption | Identifies if the student is exempt from the vaccine. | Numeric, 0 or 1 (0 = No, 1 = Yes) | Not dynamically stored, only available in Ad hoc and the Immunization Summary Report |
| immCpl.invalidExemptionCode | Identifies if the vaccine has an exemption which is no longer active. | Numeric, 0 or 1 (0 = No, 1 = Yes) | System Administration > Health > Vaccine Exemptions > End Date |
immCpl.vaccineAbbreviation | The abbreviation associated with the vaccine. | Alphanumeric Example: Hep A | Health > Vaccines > Vaccine Detail > Abbreviation |
immCpl.vaccineDescription | The full name of the vaccine. | Alphanumeric Example: Hepatitis A [Hep A] | Health > Vaccines > Vaccine Detail > Name |
immCpl.inProgressNextDoseDate | If student has an In Progress status, this identifies the next minimum date when the student can receive their next shot. | MM/DD/YYYY | Calculated |
immCpl.districtExemptionCode | The district defined exemption code associated with the exemption the student received for vaccine. | Alphanumeric | Defaults to hidden in the attribute/dictionary vaccineExemption.code (district) |
immCpl.stateExemptionCode | The state defined exemption code associated with the exemption the student received for vaccine. | Alphanumeric | Defaults to hidden in the attribute/dictionary vaccineExemption.stateExemptionCode (state) |
immCpl.districtComplianceLabel | The district defined name for the immunization compliance calculated for the student's vaccine. | Alphanumeric | Defaults to hidden in the attribute/dictionary ImmComplianceLabel.name (district) |
immCpl.stateComplianceLabel | The state defined name for the immunization compliance calculated for the student's vaccine. | Alphanumeric | Defaults to hidden in the attribute/dictionary ImmComplianceLabel.stateComplianceStatus (state) |
| immCpl.immComplianceStatusID | An internal database identification number for the compliance status. | Numeric | Not dynamically stored, generated when creating the Immunization Compliance Status Report in Ad hoc |
| immCpl.lastUpdated | The date when the compliance was last updated. | MM/DD/YYYY | Calculated |
| immCpl.lastChecked | The date and time when the compliance was last checked. | Date/Timestamp, YYYY-MM-DD 00:00:00 | Calculated |
Import Immunization Data
Districts can mass-import immunization information for students.
Tool Search: Immunization Import
The Immunization Import tool allows districts to import student immunization information from an external file into Campus.
For Minnesota users, see the Minnesota Immunization Import document for additional information.
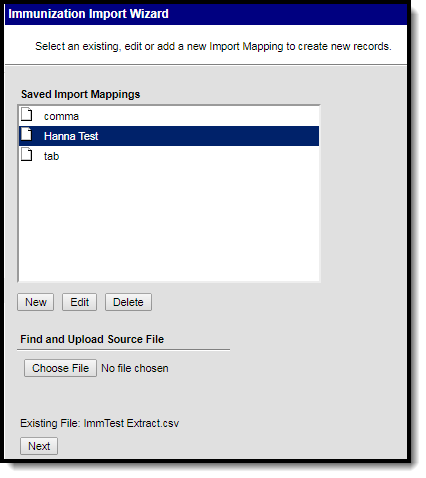 Immunization Import Tool
See the Immunization Import Wizard Tool Rights article for information about rights needed to use this tool.
Create, Edit, or Delete an Import Mapping
Import Mapping Editor
Users can either select an existing, edit, or add a new Import Mapping to create new records. Mappings can also be deleted.
| Field | Definition |
|---|---|
Saved Import Mappings | Lists previously created mappings. |
New | Users are able to create a new mapping. |
| Edit | Users can modify the details of an existing mapping in the Saved Import Mappings window. |
| Delete | Users can remove an existing mapping from the Saved Import Mappings window. |
| Back | Allows users to navigate back to the start screen. |
| Next | Allows users to proceed to the next screen. |
Import Options
After a mapping has been selected or added with the New or Edit buttons, the Import Options window displays.
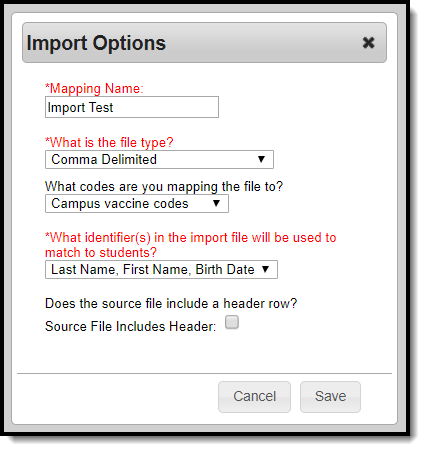 Import Options
| Field | Definition |
|---|---|
| Mapping Name | Indicates the name of the mapping. A unique name must be given to each mapping. |
| What is the file type? | Indicates if the import file is formatted as comma delimited, tab delimited, TXImmTrac (Texas only), MIIC ID Import (Minnesota only), or MIIC Immunization Record Import (Minnesota only). Note: It is recommended to import no more than 125,000 students in one file. |
| What | Indicates the vaccine codes to which the file will be mapped to in Campus, either the Campus vaccine codes, CDC codes (CPT or CVX), or MIIC ID (Minnesota only). Minnesota Users Only If the MIIC ID Import option is selected for the What is the file type?, the Campus vaccines codes and CDC codes (CPT or CVX) options are not available. If the MIIC Immunization Record Import option is selected for the What is the file type?, the only option for the codes available is CDC codes (CPT or CVX). See the Minnesota Immunization Import document for additional information. |
| What identifier(s) in the import file will be used to match to students? | Indicates the student identifier field that is used to match students from the import file to Campus fields. Student identifiers are the link that allows importing immunization information to student records. The options are to match either on the student’s State ID, Student Number, Person ID, Last Name/First Name/Birth Date, or social security number. Minnesota Users Only If the MIIC ID Import option is selected for the What is the file type?, the only options available for the identifier are State ID or Last Name/First Name/Birth Date. If the MIIC Immunization Record Import option is selected for the What is the file type?, the only option available for the identifier is the MIIC ID. See the Minnesota Immunization Import document for additional information. |
| Source File Includes Header: | Indicates if the file being imported contains a header. If this is checked, the first row of the source file will be ignored on import. |
Create a new mapping:
- To create a new mapping, click New. The Import Options window displays.
- Enter the Name of the import mapping. A unique name must be given to each mapping.
- Select the type of file that is being imported under the What is the file type? field. Available file types include: comma delimited, tab delimited, TXImmTrac (Texas only), MIIC ID Import (Minnesota only), or MIIC Immunization Record Import (Minnesota only).
- Select the vaccine codes to which file is mapping to from the What Vaccine codes are you mapping the file to? dropdown.
- Select the student identifier used to match student records in Campus to records in the import file under the Which identifier(s) in the import file will be used to match students? field.
- If the import file contains a header, mark the Source File Includes Header checkbox.
- Click Save. The new mapping displays in the Saved Import Mappings window and is highlighted.
- Click Browse and select the appropriate file which contains the records for the import. Available file types include: comma delimited, tab delimited, and TXImmTrac.
- Click Next to proceed to mapping student identifiers and Campus fields.
Edit an existing mapping:
- Select the mapping that needs to be updated from the Saved Import Mappings window.
- Click Edit.
- Edit the details in the Import Options window.
- Click Save.
- If desired, click Browse and select a different file for the import. Available file types include: comma delimited, tab delimited, and TXImmTrac.
- Click Next to proceed to mapping student identifiers and Campus fields.
Delete an existing mapping:
- Select the mapping that needs to be removed from the Saved Import Mappings window.
- Click Delete.
- Click OK to delete the mapping. The selected mapping is removed from the Saved Import Mappings window.
Map Student Identifiers
The student identifier is the link that allows importing immunization information to student records. Correctly importing/linking the student identifier is vital to the success of the import. A record will only be created if there is an exact match on the Student's State ID, Student Number, Person ID, Social Security Number, or First Name, Last Name, Birth Date combination.
The Import Data File Sample displays the columns and first ten rows from the import file. A bold number appears at the top of each column in the Import Data Field Sample, for identification purposes. This number should be entered in the Sequence in Import File field for the student identifier. Once a student identifier has been mapped, the column displays in the Mapped Fields window.
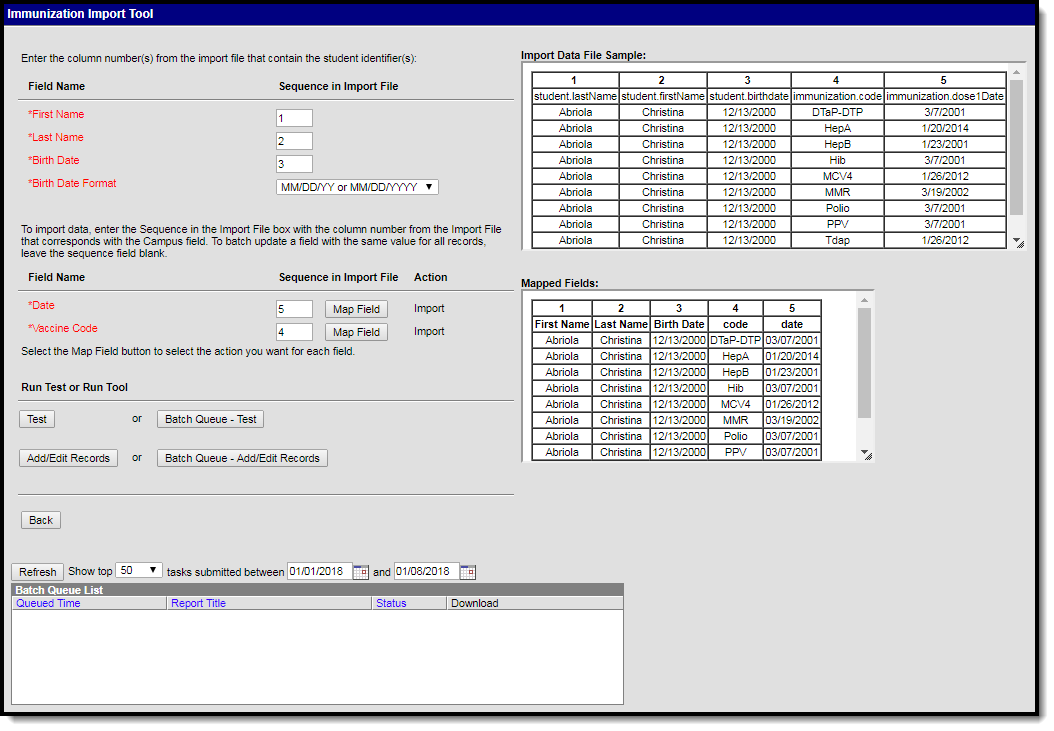 Mapping Student Identifiers - First Name, Last Name, Birth Date Example
Map Student Identifier Editor
| Field | Definition |
|---|---|
Field Name (Student Identifier) | Lists the student identifier(s) selected for the import. A record is only created if there is an exact match on the Student's State ID or First Name, Last Name, Birth Date combination. |
Sequence in Import File (Student Identifier) | Indicates the bold column number from the Import Data File Sample used to link to the student identifier. |
| Import Data File Sample | Displays the columns and first ten rows of data from the import file. |
| Mapped Fields | Displays the columns being mapped. |
To map student identifier fields:
- Enter the bold column number from the Import Data File Sample in the Sequence in Import File field for the student identifier.
- Once a field has been mapped, the field displays in the Mapped Fields window.
- Proceed to mapping import data columns to Campus Fields and Batch Updating Campus Fields.
Map Import Data Columns to Campus Fields and Batch Updating Campus Fields
If users are going to import data, the fields in the Import Data File Sample (the file that was uploaded) need to be mapped to the appropriate fields in the user interface. Users can also batch update fields with the same value for all records.
Map Import Data Column and Batch Update Editor
| Field | Definition | |
|---|---|---|
Field Name | Indicates the Campus fields to which data can be mapped. Fields in red are required. If a non-required field does not need to be mapped, do not create a field mapping for the field. | |
Sequence in Import File | Indicates the bold column number from the Import Data File Sample used to link to the Campus field. To batch update a field with the same value for all records, leave this field blank. | |
| Map Field | Allows the user to indicate the action the import is performing. | |
| Action | Indicates the action selected from the Map Field button. If blank, the field is not mapped or updated. | |
| Import | Allows users to import data from the import file to the selected Campus field. If the data in the import file exceeds the maximum length for the text field, the text will be cut as to not exceed the field length. If the field being mapped is a date, the proper date format must be selected in order for the data to import correctly. | |
| Mapped Fields | Displays the columns being mapped or updated. | |
To map import data columns to Campus fields:
- Enter the column number from the Import Data File Sample in the Sequence in Import File field.
- Click the Map Field button for the field being mapped.
- Select Import from the Action dropdown.
- Additional information may need to be entered depending on the type of field being mapped. For example, when importing a date, the format of the date in the source file needs to be selected.
- Click Save. The Action column displays 'Import' in read only text. If no action was saved, the field is blank.
- Once a field has been mapped, the field displays in the Mapped Fields window.
- Fields that are not being mapped should have the Sequence in Import File field left blank and not have an action selected.
- Repeat these steps for each field that needs to be mapped.
Run Test or Run Tool
When the data from the Import Data File Sample has been mapped to the selected data fields, the information is ready to be imported.
- It is recommended to perform a Test on the import prior to the actual importing of data. No data is written to the database when a test is performed. When testing, a report displays listing the records being imported and any potential issues. See Report Results below for more details. If a large amount of data is being imported, it is recommended to perform a Batch Queue - Test. When the process is complete, a message appears in the user's Process Alerts.
- To perform the import, click Add/Edit Records or BatchQueue - Add/Edit Records. The Batch Queue - Add/Edit Records option is recommended when importing a large amount of data. When the process is complete, a message appears in the user's Process Alerts.
- A results report generates displaying all records that failed and all records that imported. See Report Results below for more details.
Report Results
After running the Immunization Import tool, a report generates in csv. format and lists any records created, edited, or deleted along with any errors that occurred. Details of the student identifiers are also listed. The report indicates if it was generated on a Test or Run of the tool. If an error occurred, the line number and reason is indicated under the Error/Warning section.
Health Screenings
Districts can enter health screening results for students.
Tool Search: Screenings
The Health Screenings tool stores health screening information for a student. If a screening has been completed in the past, it will be shown within the Screening History window. When a Type of screening is selected, only the required sub-screens open.
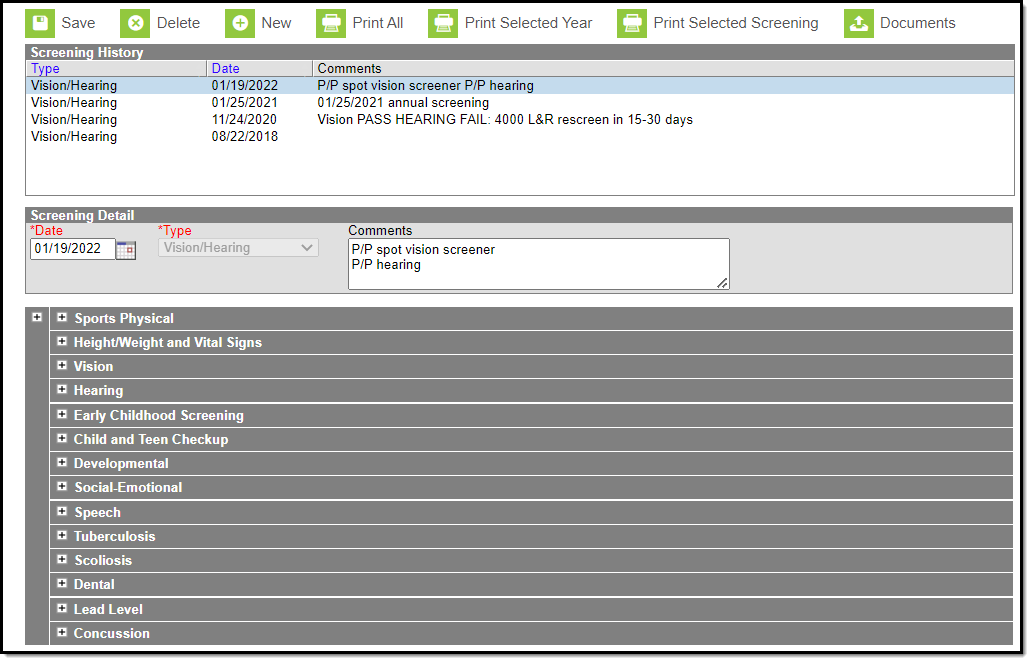 Student Health Screenings Tool
See the Screenings Tool Rights article for information about rights needed to use this tool.
Enter Health Screening Results
Health Screenings are entered as a record to track health and wellness screening data for students. The Screenings tool stores the results of the screening, and health office staff can add follow-up recommendations for students and parents if further testing or notifications are needed.
Multiple screenings can be added for a student. Screenings display in chronological order with the most recent screening listed first. When multiple different screenings are entered on the same day, the most recently entered one is listed first.
The Screening Type is locked from editing once the screening has been saved. Editing and expanding of sub-screenings may still occur after the initial save.
Add a Health Screening
- Click the New button.
- The Date will auto-populate with the current date. If applicable, enter a different date in mmddyy format or by clicking the calendar icon and selecting the date.
- Select the type of screening from the Type dropdown. This will open the appropriate sub-screening records to be filled in for this Type.
- Enter information related to the student’s screening within the appropriate fields. Follow-up data can also be added at this time.
- When finished, click Save. This screening record will now displays within the Screening History editor.
Add a Screening Follow-up
- In the Screening History list, select an existing screening. The related screening panels open.
- Locate the Follow-up editor within that screening and click the Add Follow-up button.
- Enter the Follow-up Date in mmddyy format or use the calendar icon to select a date.
- Select the Follow-up Type from the dropdown.
- Select the Contact Type from the dropdown.
- Enter Comments about the Follow-up that describe the reason and any further actions needed by the health office staff or the student's guardians.
- Click Save when finished.
Multiple follow-ups can be added to a screening.
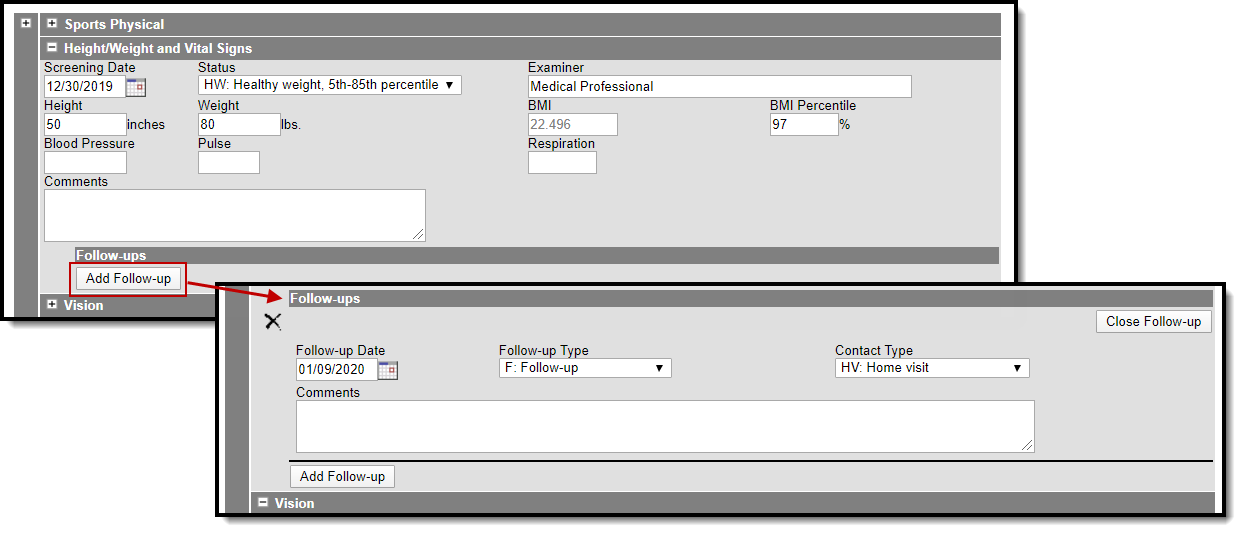 Add Screening Follow-ups
Required Field Logic
If a Health Screening field is set in the Attribute/Dictionary as required, it will only be required when the Type of screening selected when creating a new screening record contains the sub-screening with the required field. For example, if the Status field in the Vision sub-screening is set as required, it will only be required if the screening Type includes the sub-screening (Early Childhood, Health Appraisal, Child & Teen Checkup, Placement, Vision, Hearing/Vision, Other). If a sub-screening with a required field that is not part of a Type is expanded and data is entered, the required field will be enforced.
If a screening record was originally created without any required fields, and the record is later edited, newly required fields will be enforced upon saving.
View Screenings and Follow-ups
To view an existing screening, select that screening from the Screening History list. The screening panels related to that screening expand to see the entered data.
To view a follow-up for an existing screening, select that screening from the Screening History list and navigate to the Follow-ups editor. Use the Open/Edit Follow-up button to expand the record. When finished viewing, use the Close Follow-up button to collapse the record. Click the X to the left of the follow-up record to delete the follow-up record.
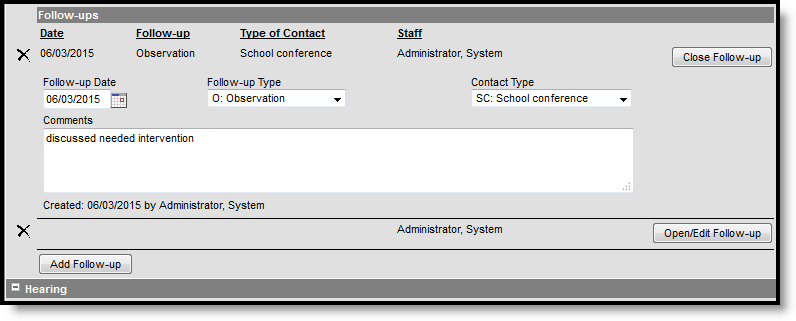 View recorded follow-up records
Created and Modified information displays, indicating when the record was first entered and when it was last modified, and by whom. This data appears when creating or modifying any sub-screening and when adding follow-up data (Created by only).
Screenings created and saved prior to the .1525 Release will NOT display this information until the record is modified again. New or modified data on these historic records will be stored, causing the Created date to be the date it was re-saved, but it will NOT modify the original Screening Date.
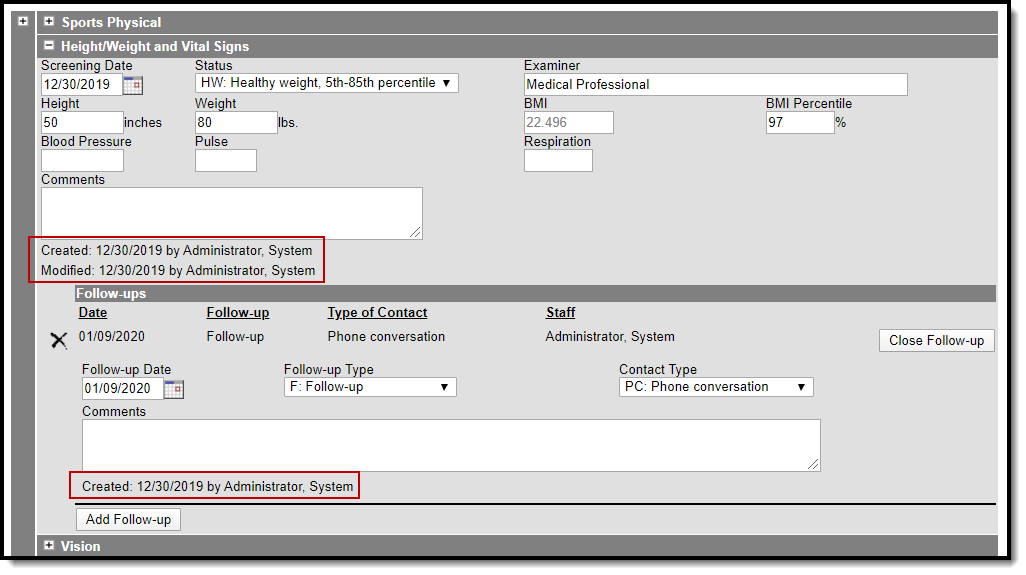 Created and Modified Values on Sub-Screenings and Follow-up Records
Screenings and Sub-Screenings
When adding a new health screening, health staff can select a Screening Type from the Screening Detail section and populate data for the opened screening editors. These editors that open are referred to as sub-screenings, and the following table lists which screening types open which screening editors. Sometimes the screening type has the same name as an editor.
Health staff are able to populate additional sub-screening editors by expanding the plus sign next to a collapsed editor.
Screening Type | Sub-Screenings |
|---|---|
Early Childhood | Height/Weight and Vital Signs Vision Hearing Early Childhood Screening Developmental Social-Emotional Speech |
Health Appraisal | Height/Weight and Vital Signs Vision Hearing |
Tuberculosis | Tuberculosis |
Sports Physical | Sports Physical |
Child and Teen Checkup | Height/Weight and Vital Signs Vision Hearing Child and Teen Checkup Developmental Social-Emotional |
Placement | Height/Weight and Vital Signs Vision Hearing Tuberculosis |
Height/Weight and Vital Signs | Height/Weight and Vital Signs |
Re Screen | N/A |
Vision | Vision |
Hearing | Hearing |
Vision/Hearing | Vision Hearing |
Dental | Dental |
Scoliosis | Scoliosis |
| Lead Level | Lead Level |
| Developmental | Developmental |
| Social-Emotional | Social-Emotional |
| Concussion | Concussion |
| Speech | Speech |
Other | Height/Weight and Vital Signs Vision Hearing Developmental Social-Emotional Speech Scoliosis |
Screening Type Fields and Description
The following table defines the fields needed for each type of screening. Options listed in the dropdowns can be modified (if proper tool rights are assigned) in the Attribute Dictionary.
Screenings are localized to a specific state. The information here may not apply to all states.
Sub-Screening Editor | Fields | Description |
|---|---|---|
| Sports Physical | ||
| Status | Indicates the result of the student's sports physical. The default dictionary may be modified for localized district use. | |
| Comments | Provides a text field for entering details about the screening. | |
| Height, Weight and Vital Signs | ||
| Screening Date | Date the student received the screening. This field populates based on the Screening Date entered when a Screening Type is selected, but it can be modified as needed. | |
| Status | Indicates the student's growth assessment, based on the BMI percentile. Options are:
Enter the student's height and weight. These fields allow the BMI and BMI Percentile to calculate. Based on the BMI Percentile, the Status can be assigned. | |
| Examiner | The personnel who performed the health screening. | |
| Height | Defined as the distance from the student's feet to the top of his/her head. This data is entered in inches. If a student were 6 feet, 2 inches tall, the height would be entered at 74 inches. This field is limited to four characters - two places before the decimal point and two characters after (e.g. 74.22) | |
| Weight | Indicates how much the student weighs in pounds. This field is limited to five characters - 3 places before the decimal point and 2 places after. | |
| BMI | The Body Mass Index is a measure of a student's weight in relation to height. This field is auto-calculated based on the entered height and weight values, and cannot be modified. The calculation formula is: (weight in pounds/(height in inches)2) times 703. | |
| BMI Percentile | A value on the CDC BMI for age growth charts, determined after the calculation of the student's BMI. This value is auto-calculated based on the student's BMI, age and gender using data from a CDC-recommended chart that is built into the calculation. This value is an estimate and may not be accurate. Students must be between 2 and 20 years of age on the date of the screening to have the BMI Percentile auto-calculated. While this field is auto-calculated, the value can be modified if the district is using a different chart for calculating percentile. | |
| Blood Pressure | This is the force exerted by circulating blood on the walls of blood vessels. Enter values in XXX/XX format. | |
| Pulse | Value indicates the heartbeats per minute. Enter values in XXXX format. | |
| Respiration | Indicates the number of breaths per minute. Enter values in XXX format. | |
| Comments | Provides a text field for entering details about the screening. | |
| Vision | ||
| Screening Date | Date the student received the screening. This field populates based on the Screening Date entered when a Screening Type is selected, but it can be modified as needed. | |
| Vision Check Type | Identifies the results as being from a vision screening (S) or vision exam (E). | |
| Test Type | Indicate the name of the vision screening instrument being used to test the student's visual acuity. Tests are assumed to measure acuity at 20 feet, except for codes H, O1, SY10, SN10, and VT10 which measure acuity at 10 feet. The default dictionary is shown below:
| |
| Status | Indicates the result of the screening. The default dictionary may be modified for localized district use. | |
| Far Acuity R | Indicates the ability of the left eye to see at a distance. Entry is limited to five digits. The leading number (10 or 20) is determined by the Test Type code selected) | |
| Far Acuity L | Indicates the ability of the right eye to see at a distance. Entry is limited to five digits. The leading number (10 or 20) is determined by the Test Type code selected) | |
| Cor(rective) Lens | Indicates whether the student wears corrective lenses for proper vision. The default dictionary may be modified for localized district use. | |
| External Inspection | Indicates the result of an examination of the visual appearance of the eye. The default dictionary may be modified for localized district use. | |
| Near Acuity R | Indicates the ability of the left eye to see near. Entry is limited to five digits. The leading number (10 or 20) is determined by the Test Type code selected) | |
| Near Acuity L | Indicates the ability of the right eye to see near. Entry is limited to five digits. The leading number (10 or 20) is determined by the Test Type code selected) | |
| Plus Lens | Indicates the results of a test for far-sightedness (hyperopia). Also referred to as Convex Lens testing. The default dictionary may be modified for localized district use. | |
| Stereo Vision | Indicates the results of a test for depth perception. Also referred to as binocular vision or muscle balance. The default dictionary may be modified for localized district use. | |
| Cover Test | Indicates the results of a test for the presence and amount of ocular deviation. The default dictionary may be modified for localized district use. | |
| Color Vision | Indicates the results of a test for color blindness. The default dictionary may be modified for localized district use. | |
| Convergence | Indicates the results of a test for alignment of the eyes when focusing on nearby objects. The default dictionary may be modified for localized district use. | |
| Corneal Reflex | Indicates the results of a test for the reflex stimulated when the cornea is touched. The default dictionary may be modified for localized district use. | |
| Referral Date | Indicates the date the student was given a referral for a vision test. Use the Follow-up functionality to track referrals. | |
| Examiner | The personnel who performed the health screening. | |
| Comments | Provides a text field for entering details about the screening. | |
| Hearing | ||
| Screening Date | Indicates the date the student received the hearing test. This field populates based on the Screening Date entered when a Screening Type is selected, but it can be modified as needed. | |
| Status | Displays the results of the hearing test. The default dictionary may be modified for localized district use. | |
| Type | Selection indicates the type of test given. The default dictionary may be modified for localized district use. | |
| Otoacoustic Emissions R | Results of the measurement of sounds given off by the inner ear when the cochlea is stimulated by a sound in the right ear. The default dictionary may be modified for localized district use. | |
| Otoacoustic Emissions L | Results of the measurement of sounds given off by the inner ear when the cochlea is stimulated by a sound in the left ear. The default dictionary may be modified for localized district use. | |
| Tympanometry R | Results of a test of the condition of the middle ear and the mobility of the eardrum in the right ear. The default dictionary may be modified for localized district use. | |
| Tympanometry L | Results of a test of the condition of the middle ear and the mobility of the eardrum in the left ear. The default dictionary may be modified for localized district use. | |
| Otoscopic R | Results of an examination of the auditory canal and eardrum in the right ear. The default dictionary may be modified for localized district use. | |
| Otoscopic L | Results of an examination of the auditory canal and eardrum in the left ear. The default dictionary may be modified for localized district use. | |
| 250 L - 8000 R | Indicates the range, in Hz, at which the student can hear frequencies of sound for the right ear. These are values entered up to 3 characters. | |
| 250 L - 8000 L | Indicates the range, in Hz, at which the student can hear frequencies of sound for the left ear. These are values entered up to 3 characters. | |
| Comments | Provides a text field for entering details about the screening. | |
| Examiner | The personnel who performed the health screening. | |
| Early Childhood | ||
| Provider | Indicates where the screening took place. Not used in any core Health reports; the default dictionary may be modified for localized district use. | |
| Early Ed Experiences | Indicates where the student received education before attending school. Not used in any core Health reports; the default dictionary may be modified for localized district use. | |
| Readiness Referral | Indicates where the student has been referred for Early Childhood services. Not used in any core Health reports; the default dictionary may be modified for localized district use. | |
| Healthcare | Indicates the student's healthcare coverage. Not used in any core Health reports; the default dictionary may be modified for localized district use. | |
| Comments | Provides a text field for entering details about the screening. | |
| Child and Teen Checkup Screening | ||
| Date of Exam | Indicates when the exam occurred. This field populates based on the Screening Date entered when a Screening Type is selected, but it can be modified as needed. | |
| Type | Indicates the reason for the test. The default dictionary may be modified for localized district use. | |
| Location | Indicates where the test was performed. The default dictionary may be modified for localized district use. | |
| Status | Displays the results of the screening. The default dictionary may be modified for localized district use. | |
| Early Childhood Expiration Date | Indicates the date the student's screening expires. This date must be AFTER the date entered in the Date of the Exam field. | |
| Healthcare | Indicates the student's healthcare coverage. The default dictionary may be modified for localized district use. | |
| Comments | Provides a text field for entering details about the screening. | |
| Developmental | ||
| Screening Date | Indicates the date the screening occurred. This field populates based on the Screening Date entered when a Screening Type is selected, but it can be modified as needed. | |
| Score | Indicates the score the student received. This can be a whole number or a number with a decimal place (NN.N). | |
| Development Test | Indicates the type of test the student received. The default dictionary may be modified for localized district use. | |
| Development Status | Indicates the result of the test. The default dictionary may be modified for localized district use. | |
| Social/Emotional Status | Displays the student's status for social and emotional health. There is a separate Social-Emotional sub-screening and this field is no longer necessary. It can be hidden through the Attribute/Dictionary to preserve historical data while avoiding incorrect data entry in the future. | |
| Comments | Provides a text field for entering details about the screening. | |
| Social-Emotional | ||
| Screening Date | Indicates the date the screening occurred. This field populates based on the Screening Date entered when a Screening Type is selected, but it can be modified as needed. | |
| Test Type | Indicates the test used in this screening. The default dictionary may be modified for localized district use. | |
| Score | Indicates the score the student received. Up to four characters can be entered. | |
| Status | Indicates the result of the test. The default dictionary may be modified for localized district use. | |
| Comments | Provides a text field for entering details about the screening. | |
| Speech | ||
| Date | Indicates the date the screening occurred. This field populates based on the Screening Date entered when a Screening Type is selected, but it can be modified as needed. | |
| Test | Indicates the type of test given to the student. The default dictionary may be modified for localized district use. | |
| Status | Indicates the results of the screening. The default dictionary may be modified for localized district use. | |
| Comments | Provides a text field for entering details about the screening. | |
| Tuberculosis | ||
| TB Risk Assessment | The Tuberculosis Risk Assessment requirements. The dictionary that populates this list is unlocked, except for Delaware users:
| |
| Risk Assessment Completed By | The person/agency who completed the Tuberculosis Risk Assessment. The dictionary that populates this list is unlocked, except for Delaware users:
| |
| Risk Assessment Completed Date | The day of Tuberculosis Risk Assessment. | |
| TB Risk Assessment Results | The results of the Tuberculosis Risk Assessment. Options include:
| |
| Skin Test Date | Date the student received the TB skin test. This field populates based on the Screening Date entered when a Screening Type is selected, but it can be modified as needed. | |
| Place Given | Indicates where the student received the test. The default dictionary may be modified for localized district use. | |
| Date Read | Date the results of the test were read. | |
| Results mm | Indicates the results of the skin test. Up to 5 characters can be entered | |
| X-Ray Date | Indicates the date the student received an X-Ray. | |
| Status | Indicates the results of the X-Ray. The default dictionary may be modified for localized district use. | |
| Med Start Date | If medication is given for treatment of TB, the entered date indicates when the medication was first taken. | |
| Med End Date | If medication is given for treatment of TB, the entered date indicates when the medication will last be taken. | |
| Refused Date | Date the student (or parents/guardians) refused treatment. | |
| Free from Communicable TB | When marked, indicates the student does not have TB. | |
| Comments | Provides a text field for entering details about the screening. | |
| Scoliosis | ||
| Screening Date | Indicates the date the student received the scoliosis screening. This field populates based on the Screening Date entered when a Screening Type is selected, but it can be modified as needed. | |
| Character | Indicates the results of the test. The default dictionary may be modified for localized district use. | |
| Type | Indicates the type of scoliosis test given. The default dictionary may be modified for localized district use. | |
| Degree of Curve | The measurement, in degrees, of spinal curvature. Up to 3 characters can be entered. | |
| Curvature Location | Identification of the area of the student's back in which the degree of curve is measured. The default dictionary may be modified for localized district use. The default dictionary is shown below:
| |
| Comments | Provides a text field for entering details about the screening. | |
| Examiner | The personnel who performed the health screening. | |
| Dental | ||
| Date | Indicates the date the student received the dental screening. This field populates based on the Screening Date entered when a Screening Type is selected, but it can be modified as needed. |
| Test Type | Indicates the type of dental screening performed was an exam (E) or screening (S). The default dictionary may be modified for localized district use. | |
| Status | Indicates the results of the dental screening or exam. The default dictionary may be modified for localized district use. | |
| Expiration Date | Indicates the date the dental screening expires. This date must be AFTER the date entered in the Date field. | |
| Dental Sealants Present | Indicates if sealants are present. The default dictionary may be modified for localized district use. | |
| Caries History | Indicates the student has any existing decay of teeth that has been treated. The default dictionary may be modified for localized district use. | |
| Untreated Caries | Indicates the student has existing decay of teeth that has not been treated. The default dictionary may be modified for localized district use. | |
| Soft Tissue Pathology | Indicates the student has existing dental soft tissue pathology. The default dictionary may be modified for localized district use. | |
| Malocclusion | Indicates the student has existing issues with the jaw sitting correctly when the mouth is closed. The default dictionary may be modified for localized district use. | |
| Urgent Treatment | Indicates the student needs care immediately. The default dictionary may be modified for localized district use. | |
| Restorative Care | Indicates the student has received care to restore teeth. The default dictionary may be modified for localized district use. | |
| Preventative Care | Indicates the student receives preventative dental care. The default dictionary may be modified for localized district use. | |
| Dental Erosion | Indicates the result of an examination of the student's dental enamel for areas of discoloration or erosion. The default dictionary may be modified for localized district use. | |
| Dental Waiver Date | Indicates the date of the student's dental waiver. | |
| Dental Waiver Reason | Indicates the reason for the dental waiver. The default dictionary may be modified for localized district use. | |
| Referral Date | Indicates the date the student was referred for dental care. Use the Follow-up functionality to track referrals. | |
| Examiner | The personnel who performed the health screening. | |
| Dental Other | Provides a text field for entering details about the screening. | |
| Lead Level | ||
| Screening Date | Indicates the date the student took the screening. This field populates based on the Screening Date entered when a Screening Type is selected, but it can be modified as needed. | |
| Lead Level | Indicates the level of lead for the student, usually administered as a blood test. This is a five character alphanumeric field. | |
| Status | Indicates the result of the lead screening. The default dictionary may be modified for localized district use. | |
| Comments | Provides a text field for entering details about the screening. | |
| Concussion | ||
| Screening Date | Indicates the date the student took the screening. This field populates based on the Screening Date entered when a Screening Type is selected, but it can be modified as needed. | |
| Test Type | Indicates the type of concussion test administered (e.g. baseline or post-injury). The default dictionary may be modified for localized district use. | |
| Score | Indicates the score the student received. This is an eight-character field. | |
| Status | Indicates the results of the screening. The default dictionary may be modified for localized district use. | |
| Expiration Date | Indicates the date the screening expires. This date must be AFTER the original screening date. | |
| Comments | Provides a text field for entering details about the screening. | |
Print Student Screening Records
Select one of the Print buttons at the top of the Screenings tab. The report can be generated as a PDF or DOCX format.
These print options print screening records for the selected student only. More health reports are available in the Health Reports folder.
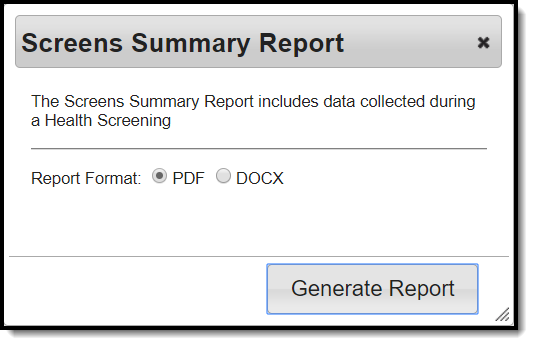 Screenings Summary Report Format Options
Print All
The Print All option prints all records of saved screenings for the student. Screenings print in chronological order (the earliest screening prints first).
Print Selected Year
The Print Selected Year option prints the entered screenings recorded during the year selected in the Campus toolbar. If a screening was recorded in December of 2013, and the year in the Campus toolbar was 2013-14, the screening prints. If the screening was recorded in December of 2013, and the year selected in the Campus toolbar was 2014-15, the screening does not print.
Print Selected Screening
The Print Selected Screening option prints a summary of the selected screening from the Screening History list only. For this option, a screening must be selected.
Upload and Manage Screening Documents
The Screenings tool allows you to store, manage, and view all screening-related documents associated with the selected person.
To Upload a New Document:
- Click the Documents button. A separate window will appear, containing an Upload Document button and the Documents List.
- To begin uploading a new document, click the Upload Document button and select Add Files.
- Locate the file on your local hard drive or network and click OK.
- The file will appear in the Upload Documents list. From here you can add a Description (optional), see what tool will be associated with the file, and the size of the file.
- Mark the checkbox in the left-hand corner to agree to the terms of the Infinite Campus Acceptable Use Policy (as well as any district-mandated policies).
- Click Upload. The file is now uploaded and attached to the student where it can be accessed at any time.
Delete or Edit an Existing File
If you need to delete the file, click the next to the file needing deletion.
If you need to edit file details, click the  icon next to the file. The Edit Document editor will appear, allowing you to edit the file name, description, or replace the file.
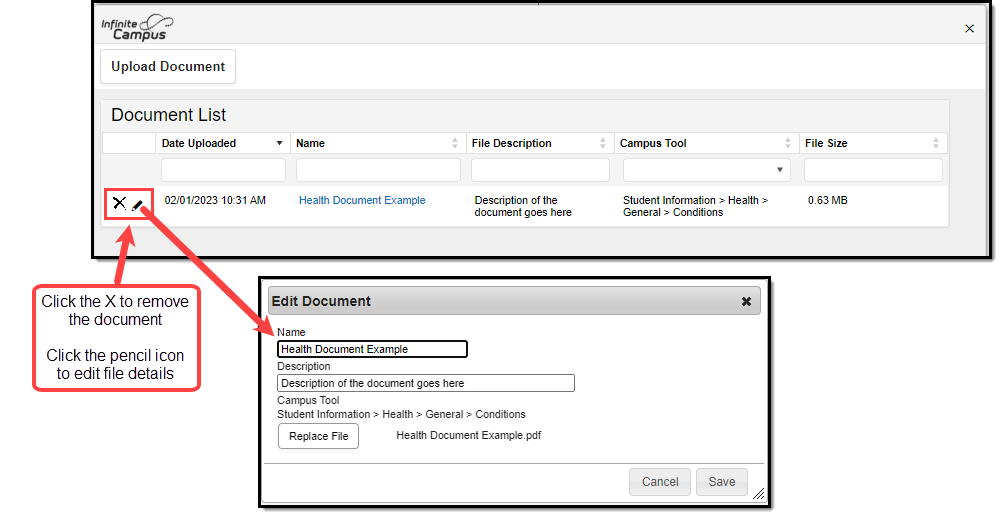 Edit Document
Use Letter Designer and Letter Builder to Report Screening Information
Tool Search: Letter Builder, Letter Designer
Use the following procedures to create letters that can be sent to parents/guardians for students who may be missing screenings or to report the results of a recent screening.
- These examples use the Filter Designer, Letter Builder and Letter Designer tools.
- Students must be in a household with at least one address marked as mailing to receive a letter.
- Campus sub-reports are available in the Letter Designer for Dental, Vision, Hearing, Concussion, and Scoliosis screenings.
Missing Screenings
- Create an Ad hoc Filter to find students who may be missing a specific screening during set time. Use these fields from Screening Counts:
- screeningCounts.subformCounts (subform is the specific sub-screening; if the letter is for missing hearing screenings, this field would be screeningCounts.hearingCounts).
- screeningCounts.date (this will be used twice)
- screeningCounts.calendarID
- additional fields like identity.lastName, identity.firstName, etc,. can also be selected.
- Click the Next button.
- On the Parameters screen, add a second screeningCounts.date by clicking the Add button and select that field from the dropdown list.
- Set the fields like so:
- screeningCounts.subformCount = 0
- screeningCounts.date IS NULL
- screeningCounts.calendarID = enter the calendar ID of your selected calendar (navigate to System Administration > Calendar > Calendar to locate this)
- screeningCounts.date BETWEEN DATE (enter desired date range in the appropriate fields).
- Enter this text in the Logical Expression field. Instead of the field names, enter the ID numbers of the row in which that field is located. (subformCount AND calendarID AND (date #1 OR date #2))
- in this example, the expression would be (3 AND 5 AND (4 OR 6))
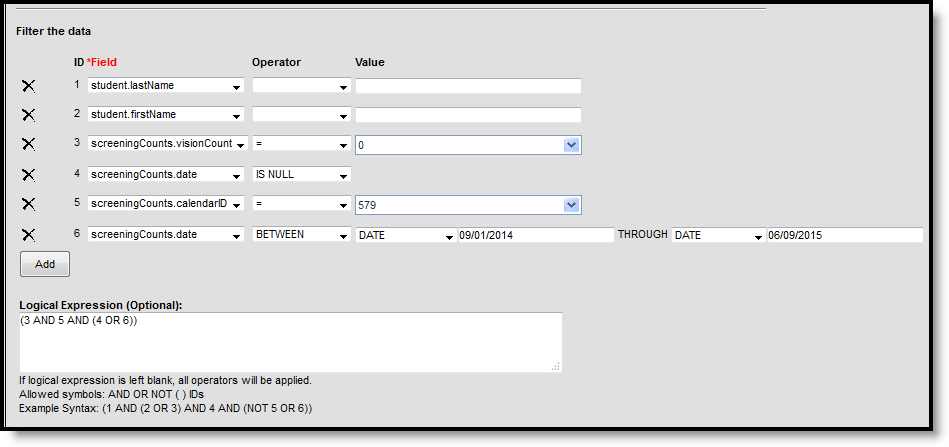
- in this example, the expression would be (3 AND 5 AND (4 OR 6))
- Save.
- In the Letter Designer, create and save the letter.
- In the Letter Builder, select the created ad hoc filter and the letter created in the previous steps.
- Click the Build Letters button.
Report of Screenings
- Create an Ad hoc Filter to find students who may be missing a specific screening during set time. Use these fields from Screening Counts. The filter can contain multiple subform counts, but the only Sub-reports available are Dental, Hearing, Vision, Scoliosis, and Concussion.
- screeningCounts.subformCounts (subform is the specific sub-screening; if the letter is for missing hearing screenings, this field would be screeningCounts.hearingCounts).
- screeningCounts.date (this will be used twice)
- additional fields like identity.lastName, identity.firstName, etc,. can also be selected
- On the Parameters screen, add a second screeningCounts.date by clicking the Add button and select that field from the dropdown list.
- Set the Parameters as follows:
- screeningCounts.subformCount > 0
- screeningCounts.date IS NULL
- screeningCounts.date BETWEEN DATE (enter desired date range in the appropriate fields).
- Enter this text in the Logical Expression field. Instead of the field names, enter the ID numbers of the row in which that field is located. (screeningCounts.date #1 OR date #2) AND (subformCounts 1 OR subformCounts 2 OR subformCounts 3))
- in this example, the expression would be ((3 OR 5) AND (4))
- Only one subform.Count has been added, but if more than one were included, additional ID numbers would be added.
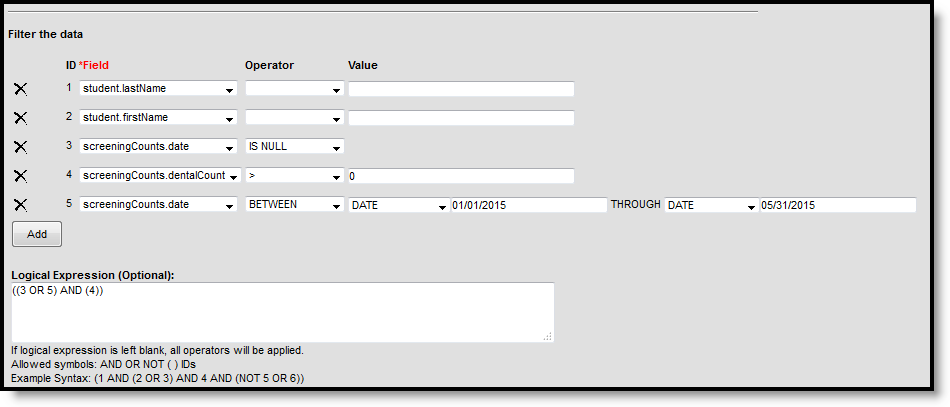
- Save.
- In Letter Designer, create and save your letter.
- Include the desired Health Sub-reports. The Screening Counts used in the Ad hoc filter and the Sub-reports in the letter should be for the same screenings.
In the Letter Builder, select the created ad hoc filter and the letter created in the previous steps.
Batch Enter Health Screenings
Districts can batch enter health screening results for students.
Tool Search: Health Screening Batch Entry Wizard
The Health Screening Batch Entry Wizard allows health staff to enter screenings that occurred on the same date with the same results to be mass entered for a selected group of students, either by a grade level or a class. This will allow quick entry of basic screening data for many students at one time. Individual student screening records can be edited in the Health Screenings tab if necessary.
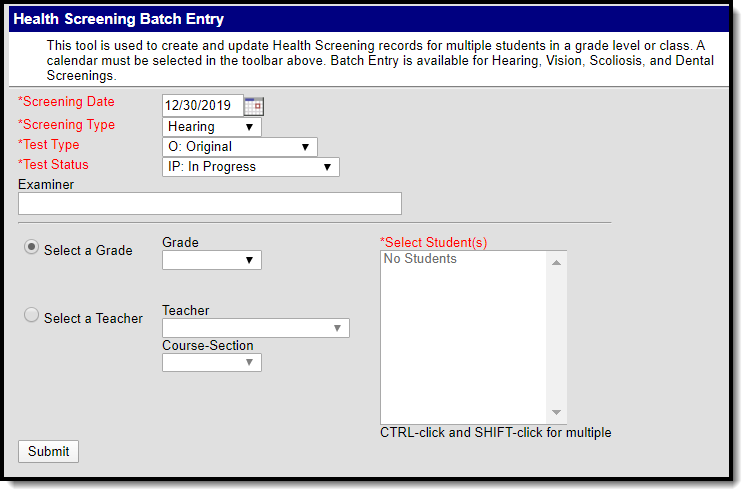 Health Screening Batch Entry Tool
See the Health Screening Batch Entry Wizard Tool Rights article for information about rights needed to use this tool.
Things to Know
- A calendar must be selected in the Campus tool bar in order to batch enter screenings.
- Only Hearing, Vision, Scoliosis and Dental screenings can be entered using this tool.
- If a student has an existing screening with the same screening date, screening type and test type, the Status chosen in the Batch Entry tool overwrites the current status associated with the existing screening record.
- If the screening date, screening type and test type do not match an existing screening, a new record is added to the student's Screening tab.
- Detailed information about the screening will NOT populate the screening record. For example, when batch entering a Vision screening, only the date of the screening, the test type (exam or screening) and the status of the screening populate. Specific fields on the vision screening record are not populated (like acuity fields or the color blindness test). These fields will have to be entered and saved separately for each individual student.
Health Screening Batch Entry Editor
| Field | Description |
|---|---|
Screening Date Required | Indicates the date the screening occurred. This field defaults to the current date but can be modified as needed by entering a new date using the calendar icon. Only students who are actively enrolled (Select a Grade) or who are currently enrolled in a course section (Select a Teacher) are listed. Students who have an ended enrollment are not listed. |
Screening Type Required | Indicates the type of screening. Only Hearing, Vision, Scoliosis and Dental screenings can be selected. |
Test Type Required | Based on the selected screening type, this option indicates which test was used in the screening. For example, when the Screening Type is Vision, the Test Type can either be a Vision Exam or a Vision Screening. |
Test Status Required | Indicates the students' results of the screening. All selected students are assigned this status. |
Examiner | The personnel who performed the health screening. This field displays when the Screening Type is selected. |
| Select a Grade | A set of students can be selected by choosing a grade level. Only those grade levels in the selected calendar display. |
| Select a Teacher | A set of students can be selected by choosing a teacher's name, and then narrowing to a specific course name/section number option. This lists teachers who have an active district assignment record and are marked as Teacher on that district assignment record at any time during the selected calendar's start and end dates. The course/section dropdown lists the courses in which the selected teacher is the Primary Teacher as noted on the Section Staff History record at any time within the calendar's start and end dates. |
| Select Students | Once a grade level or teacher and course/section combination is chosen, a list of students displays. Select the All Students option, or navigate through the list and select the specific students using CTRL-click or SHIFT-click. |
Use the Screening Batch Entry Tool
- Verify a year, school and calendar is selected in the Campus toolbar.
- Enter the desired Screening Date.
- Select the Screening Type from the dropdown.
- Select the Test Type from the dropdown.
- Select the Test Status from the dropdown.
- Enter an Examiner, if desired.
- Filter the available list of students by choosing a Grade level from the Select a Grade dropdown or Select a Teacher from the dropdown.
- If a Teacher is selected, choose the desired Course/Section combination taught by the selected teacher.
- Select the appropriate students from the populated list.
- Click the Submit button.
The tool will process the entered data and add the chosen screening to the selected students as of the entered screening date. When complete, a confirmation message displays indicating the new record was created for the student. Navigate to the student's Screenings tool to verify the addition.
Screenings entered using the Batch Entry tool display on the Screenings tab with a Batch Entry comment.
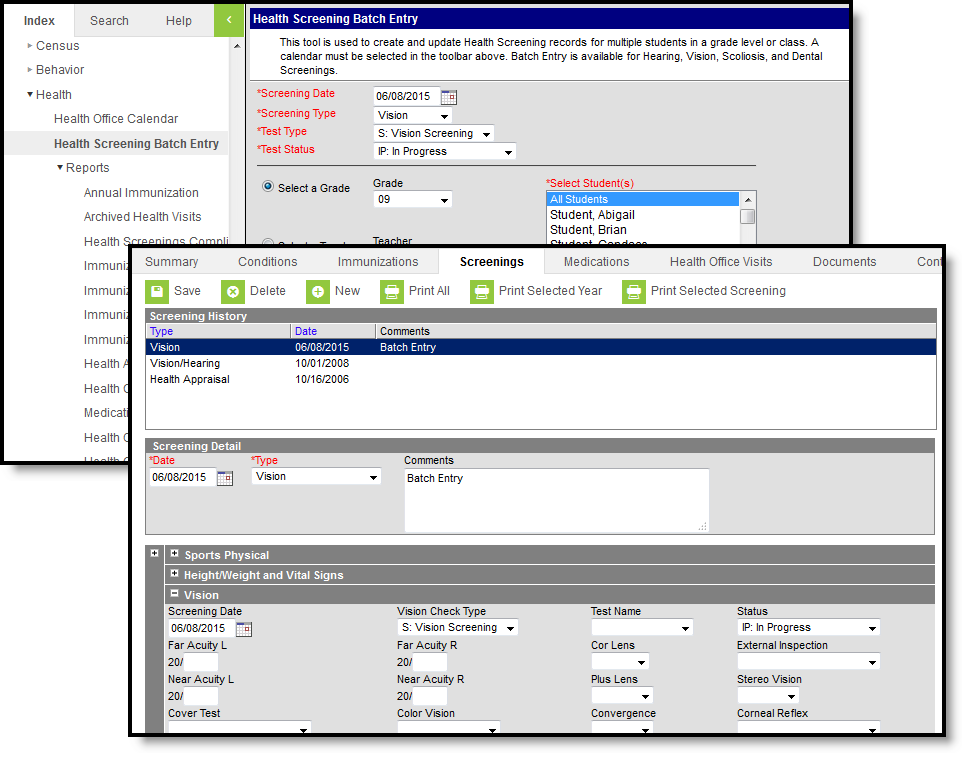 Student Screenings Tool with Batch Entry Screening Record
Student Medication Information
Districts can enter information about medications being kept and dispensed for students.
Tool Search: Health Medications
The Medications tool allows users the ability to store medication information for students. Saved medications will appear in the Medications editor where they can be viewed, modified, and/or deleted.
The Campus Medications tool is meant for inventory management. What is entered may differ from how the medication is prescribed and/or administered.
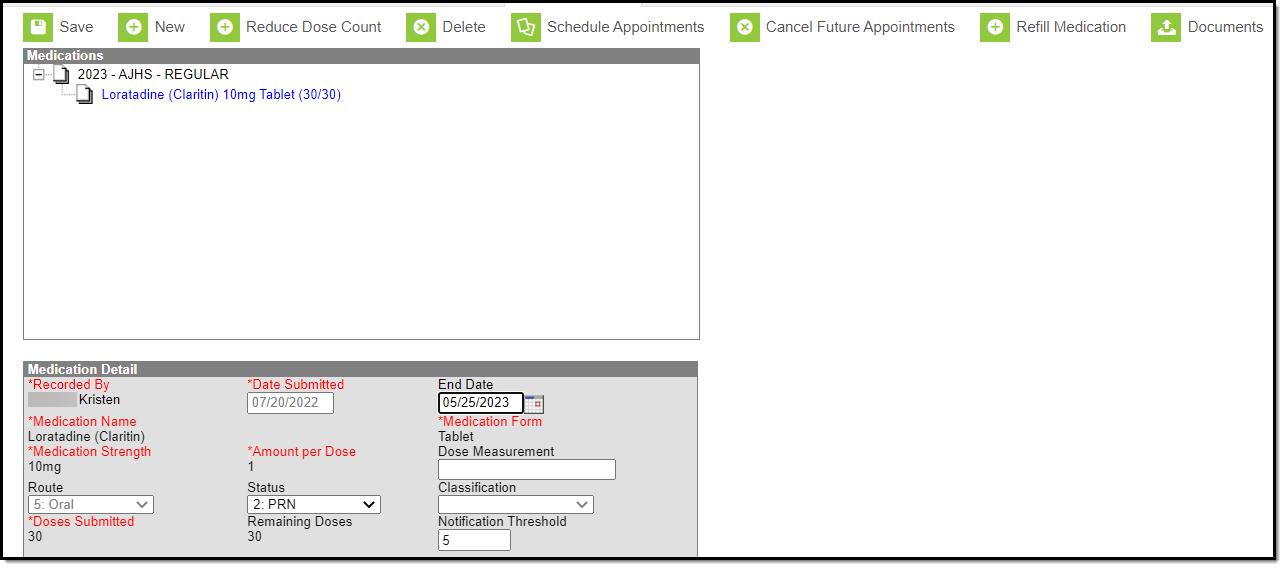 Medications Tool
See the Medications Tool Rights article for information about rights needed to use this tool.
Enter a Student's Medication Information
The Medication Detail consists of two sets of information: Medication, Strength and Dosage Information and Prescription Information.
Medication, Strength and Dosage Information
The medication detail includes the name of the medication, strength, form, and dosage detail information.
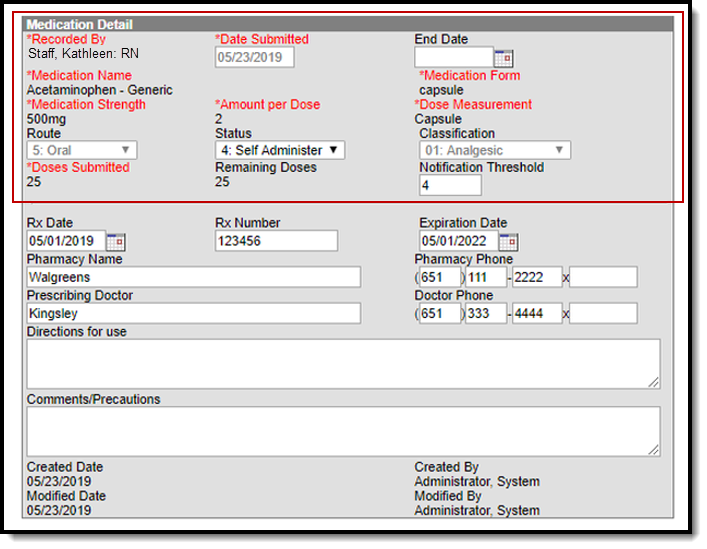 Medication Detail - Medication Entry
Medication Field Descriptions
|
Field |
Description |
|---|---|
|
Recorded By |
Selection indicates the staff person who entered the medication. The default setting is the current user if the current user has an active Health District Assignment. Only staff with an Active district assignment and a Health checkmark on their District Assignments tab display in the dropdown. If the staff person has a Health License designation on the District Assignment tool, this title also displays at the end of the person's name (i.e. Smith, Joe: RN).
|
|
Date Submitted |
Entered date (defaults to current date) indicates when the medication was given to the school. |
| End Date | The last date on which the medication is available for selection by health staff for a Health Office Visit. This field is not required. |
|
Medication Name |
Name of the medication that the student receives. Medication names must first be created in the Medication Name editor in System Administration > Health. |
|
Medication Form |
Format of the medication (cream, tablet, capsule, drops, etc.) Medication forms must first be created in the Medication Form editor in System Administration > Health. |
|
Medication Strength |
Strength of one unit of the medication. For example, one pill is 200 mg, so the Strength is entered as 200 mg even if the prescribed dosage is 800 mg. |
|
Amount per Dose |
Total number of the medication given to the student for one dosage. If the prescribed dosage is 800 mg and one pill is 200 mg, the student will be given 4 pills in a dose. The Amount per Dose is entered as 4. In a situation where the prescribed dosage can vary (give 400-800 mg as needed), the smallest Amount per Dose should be entered (2 pills in this example). |
|
Dose Measurement |
The unit(s) of the medication dose, associated with the Amount per Dose. For example, if the prescribed dosage is 800 mg and the medication comes in 200 mg pills, the Dose Measurement would be "pills". Other measurements could be ml, puffs, or drops, depending on the form of the medication. Medication Form and Dose Measurement are not always the same. For example, a liquid Medication Form could have a Dose Measurement in teaspoons (tsp). |
| Route | The route field is used to describe the route of administration for medication. Options available in this dropdown can be added or edited from the Attribute/Dictionary. This field remains editable until there is a value entered. Once a value is entered and saved, this field becomes read-only. |
| Status | The status field indicates the administration status or frequency of the medication. For example, a medication's status could be Daily, PRN, or Self-Administer. Options available in this dropdown can be added or edited from the Attribute/Dictionary. |
| Classification | The category of the medication. This is a read-only field and is set up in System Administration using the Medication Name tool. |
|
Doses Submitted |
Total number of doses submitted, which is not necessarily the total number of units in the medication container.
Doses Submitted can be calculated by dividing the count of pills in the bottle by the Amount per Dose. For example, if the prescribed dosage or Amount per Dose is 4 pills, a bottle containing 100 pills would be entered as 25 doses. 100 pills divided by 4 pills per dose= 25 doses submitted.
In the situation where a dosage can vary, the smallest Amount per Dose should be used to calculate the number of doses submitted. Using the above example with 200 mg pills, a prescribed dosage of 400-800 mg would be 2-4 pills. The Amount per Dose should be 2 pills, so a bottle containing 100 pills is 50 doses. If the student gets 800 mg at a visit, this is entered as 2 doses. |
|
Remaining Doses |
Number of remaining doses. This number is auto-calculated when the student receives a medication or if the medication count is reduced for some other reason, dropping by the number of doses given/reduced. The number is increased when a refill is entered. |
|
Notification Threshold |
If the medication is an ongoing treatment and will need to be resupplied as the quantity runs out, enter a value in the Notification Threshold that provides a sufficient cushion as to allow the parent or guardian to bring in additional doses.
When the number of doses remaining for the medication has been reached, the medication entry will turn red on the list editor as a visual alert to the health staff to notify the parent or guardian that more doses are needed. |
Enter Medication Information
- Click the New button at the top of the Medications tab. A Medication Detail editor will display.
- Indicate who is entering the medication record in the Recorded By dropdown list.
- The Date Submitted field will auto-populate with the current date. To change the date, enter the date in mmddyy format or click the calendar icon and select the date.
- Select an End Date for the medication, if applicable.
- Select the medication name from the Medication Name dropdown list.
- Select the medication form from the Medication Form dropdown list.
- Enter the Medication Strength amount.
- Enter the Amount Per Dose.
- Enter a Dose Measurement.
- Enter a Route.
- Select a Status.
- Enter the number of doses of medication provided to the school within the Doses Submitted field.
- If the medication is one that will need to be resupplied as the quantity runs out, enter a value in the Notification Threshold that provides a sufficient cushion as to allow the parent or guardian to bring in additional doses.
- Click Save when finished.
Prescription Information
The prescription details are entered after the details of the medication are entered.
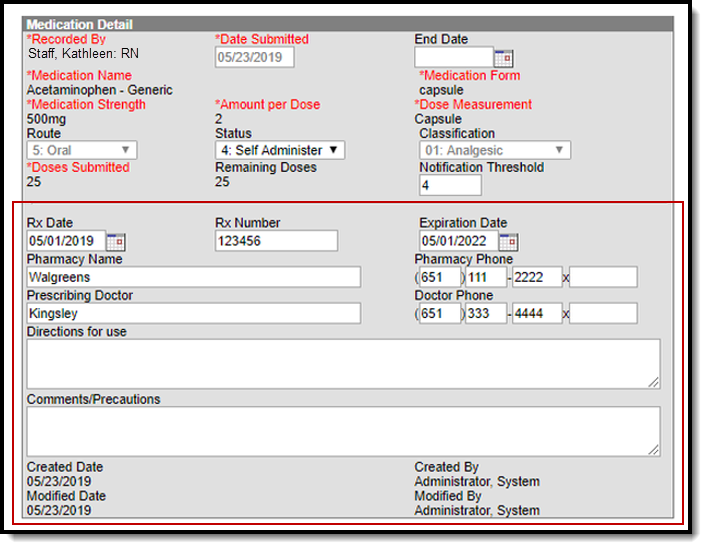 Medication Detail - Prescription Entry
Prescription Field Descriptions
|
Field |
Description |
|---|---|
|
Rx Date |
The date the prescription was assigned. This date defaults to the current date, but can be changed by entering the date in mmddyy format or by clicking the calendar icon to enter a new date. |
|
Rx Number |
Prescription number assigned usually by the filling pharmacy. |
|
Expiration Date |
Date the prescription expires, based on doctor information. |
|
Pharmacy Name |
Name of the pharmacy that filled the prescription or name of the pharmacist. |
|
Pharmacy Phone |
Phone number of the pharmacy. |
|
Prescribing Doctor |
Name of the doctor who prescribed the medication. |
|
Doctor Phone |
Phone number of the doctor or clinic. |
|
Directions for Use |
Instructions for giving the medication. These directions display when the medication is selected in a Health Office Visit |
|
Comments/Precautions |
Additional comments for the medication. |
|
Created Date/Created By |
Indicates when the medication entry was created and which user created it. |
|
Modified Date/Modified By |
Indicates the date the medication entry was modified and which user modified it. |
Enter Prescription Details
- Enter an Rx Date.
- Enter the Rx Number of the prescription.
- Enter an Expiration Date for the prescription.
- Enter the Pharmacy Name of the location where the prescription was filled.
- Enter the Pharmacy Phone number.
- Enter the name of the Prescribing Doctor.
- Enter the Doctor Phone number.
- Enter any needed Directions for use.
- Click Save when finished.
Reduce Medication Dose Count
Once a medication has been saved and appears within the Medications editor, a user can reduce the doses on hand by using the Reduce Dose tool. This tool should only be used when the dose count is reduced because of spillage, expiration, etc. When a dose is administered to a student, enter the reduction using the Health Office Visits tool.
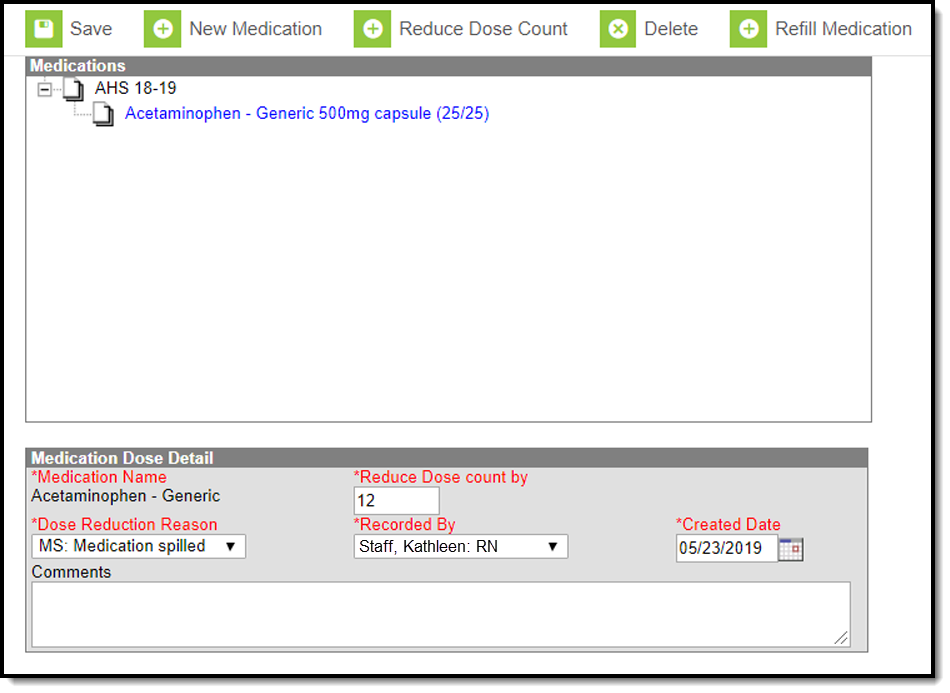 Reduce Dose Count Tool
- The reduction record displays when the Medication name is expanded in the Medications list. The total dose count will decrease for the medication by the number of reduction doses submitted. Select the Medication(s) to reduce.
- Click the Reduce Dose Count button. The Medication Dose Detail displays.
- Enter the Reduce Dose Count By value.
- Enter the Dose Reduction Reason from the dropdown. Options available in this dropdown can be added or edited from the Attribute/Dictionary.
- Select the staff person who recorded this entry in the Recorded By dropdown. Only staff with an Active district assignment and a Health checkmark on their District Assignments tab display in the dropdown.
If the staff person has a Health License designation on the District Assignment tool, this title also displays at the end of the person's name (i.e. Smith, Joe: RN).
- Enter the Date when the reduction occurred. This field defaults to the current date, but a different date can be entered.
- Click Save when finished. A warning message will display saying the refill information has been saved and to verify the Prescription Date and the Expiration Date are still accurate.
- Make any necessary comments within the Comments field.
- Click Save when finished. Changed dosage amounts will appear in the Medications editor and reflect the removed dosage from the overall amount of doses remaining.
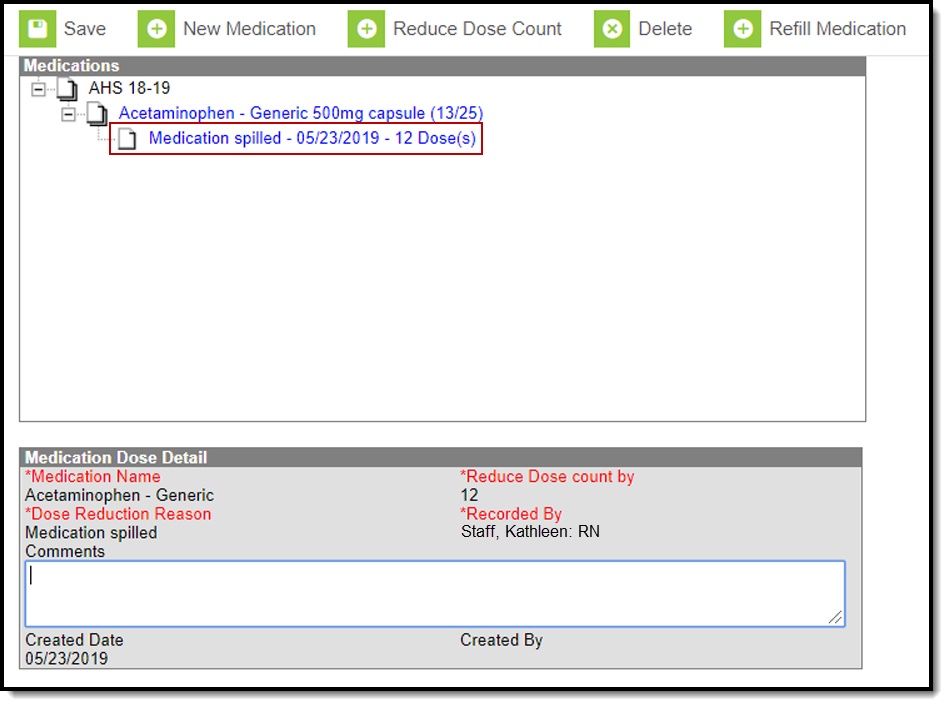 Reduced Medication Example
Refill Medications
When the health office has run out of a student's medication and the parent/guardian has given additional medicine for the same prescription, use the Refill Medication option. This allows the same medicine strength and dosage to be given to the student without having to enter a new medication.
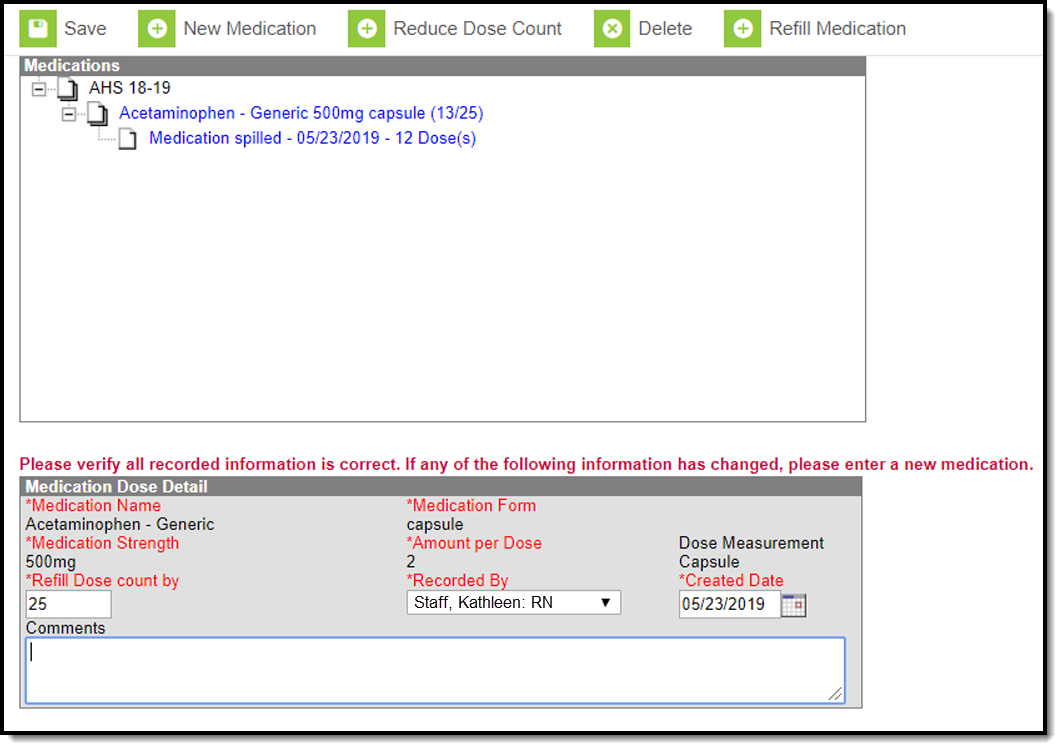 Refill Medication Tool
- Select the Medications to refill.
- Click the Refill Medication button. The Medication Dose Detail displays.
- Enter the Refill Dose Count By value.
- Select the staff person who recorded this entry in the Recorded By dropdown. Only staff with an Active district assignment and a Health checkmark on their District Assignments tab display in the dropdown.
If the staff person has a Health License designation on the District Assignment tool, this title also displays at the end of the person's name (i.e. Smith, Joe: RN).
- Enter the Date when the refill was given to the Health Office. This field defaults to the current date, but a different date can be entered.
- Click Save when finished. A warning message displays saying the refill information has been saved and to verify the Prescription date and the Expiration Date are still accurate.
The refill record displays when the Medication name is expanded in the Medications list. The total dose count will increase for the medication by the number of refill doses submitted.
Any appointment scheduled with the initial medication dosage will reflect the refill value.
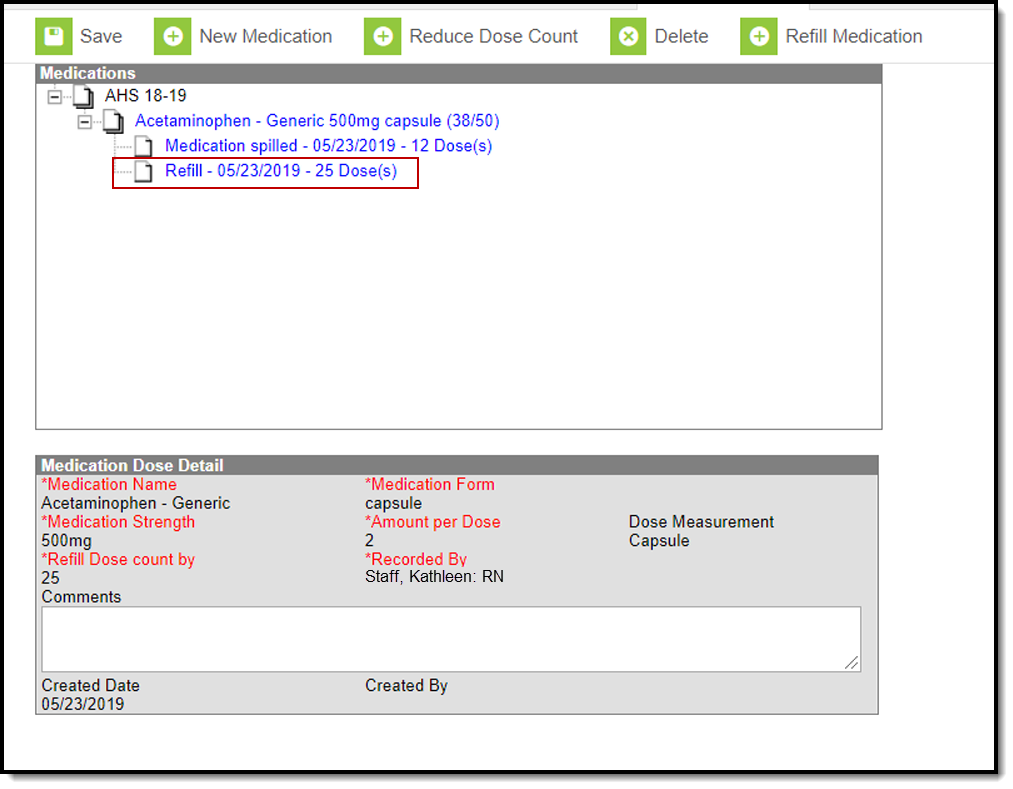 Medication Refill Example
Schedule Medication Appointments
Users can also schedule appointments for administering medication. From here, users can set up daily, weekly or monthly appointments for a student to receive their medication(s).
Users must have calendar rights to the calendar selected to schedule Health Office appointments.
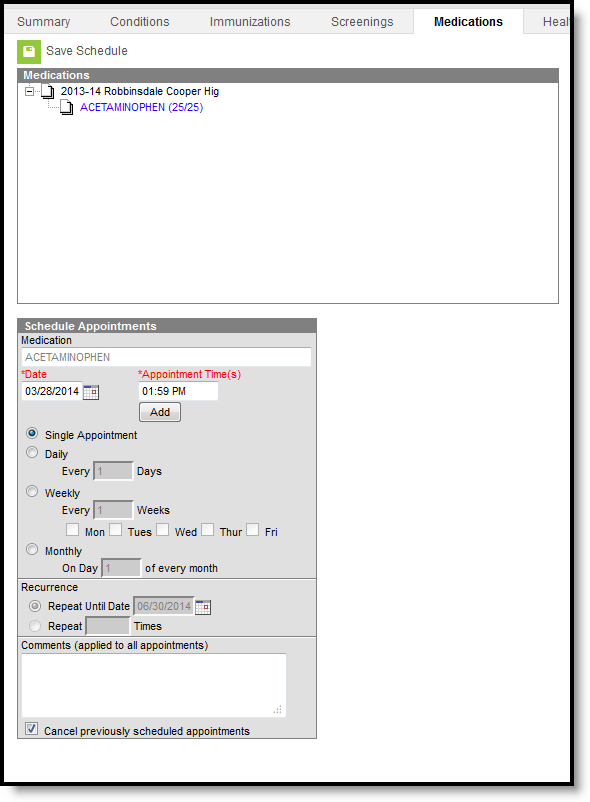 Schedule Medication Appointments
Schedule a Health Office Appointment
- Select a Medication from the Medications editor.
- Select Schedule Appointments.
- The Date field will auto-populate with the current date. If this is incorrect, enter the correct date in mmddyy format or click the calendar icon and select the date.
- Enter the Appointment Time and click the Add button to attach the appointment time to the date. To add multiple appointment times to a scheduled appointment, enter in the appointment time and press the Add button. Users may also delete specific appointment times by selecting the black X located to the right of the appointment time(s).
- Select the occurrence of the Scheduled Appointment (i.e., single appointment, daily, weekly, monthly).
- Place an end date on the recurring appointment by selecting the Repeat Until Date radio button and entering the date in mmddyy format or by using the calendar icon and selecting the date.
- To limit the number of times the appointment should occur, select the Repeat Times radio button and enter the desired number.
- Enter any additional information within the Comments field.
- Select the Save Schedule button when finished.
The Health Office Visit Scheduler displays a warning message when users schedule appointments that fall on a non-instructional and non-attendance day if the scheduling frequency is Weekly or Monthly. The warning message allows users to view the date(s) of the appointment(s) that could not be scheduled.
Users cannot create medication appointments that extend past the End Date of the Medication. See the Medication Field Descriptions section above for additional information about the Medication End Date field.
Medication appointments display in the Health Office Calendar once they are created. The user entering the appointment automatically populates into the Recorded by field on the office visit record when they have the Health checkbox marked on their District Assignment record. See the Health Office Calendar documentation for additional information.
Cancel a Health Office Appointment
- Select the treatment in blue within the Medications window.
- Select Cancel Future Appointments near the top of the Medications tab. This will cancel all future appointments linked to this medication. Future appointments are unsaved appointments on the cancel date and later. Previously scheduled appointments can also be canceled by selecting the checkbox at the bottom of the Schedule Appointments editor when creating new appointments.
- Enter the date in mmddyy format or by clicking the calendar icon and selecting the date.
- Select the Save icon when finished. This will cancel all unsaved appointments scheduled on or following the date entered.
Future appointments are not automatically cancelled when a student’s enrollment ends.
Upload and Manage Medication Documents
The Medications tool allows you to store, manage, and view all medication-related documents associated with the selected person.
To upload a new condition document(s):
- Click the Documents button. A separate window will appear, containing an Upload Document button and the Documents List.
- To begin uploading a new document, click the Upload Document button and select Add Files.
- Locate the file on your local hard drive or network and click OK.
- The file will appear in the Upload Documents list. From here you can add a Description (optional), see what tool will be associated with the file, and the size of the file.
- Mark the checkbox in the left-hand corner to agree to the terms of the Infinite Campus Acceptable Use Policy (as well as any district-mandated policies).
- Click Upload. The file is now uploaded and attached to the student where it can be accessed at any time.
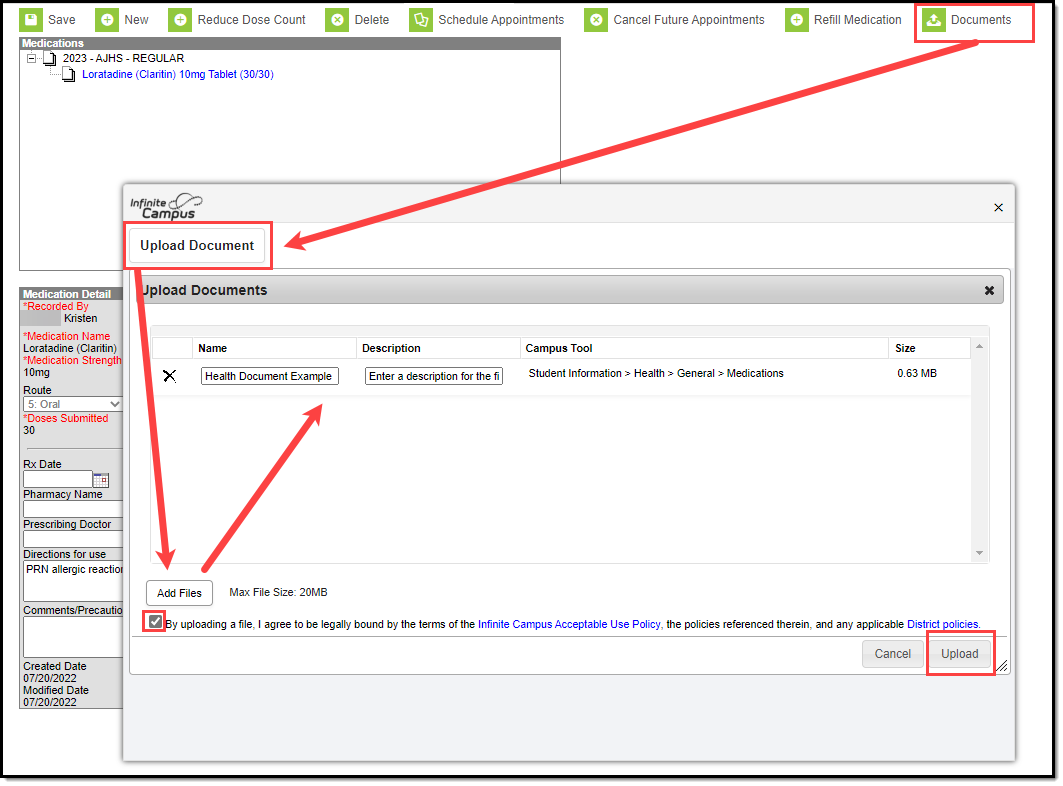 Upload Documents
Delete or Edit an Existing File
If you need to delete the file, click the next to the file needing deletion.
If you need to edit file details, click the  icon next to the file. The Edit Document editor will appear, allowing you to edit the file name, description, or replace the file.
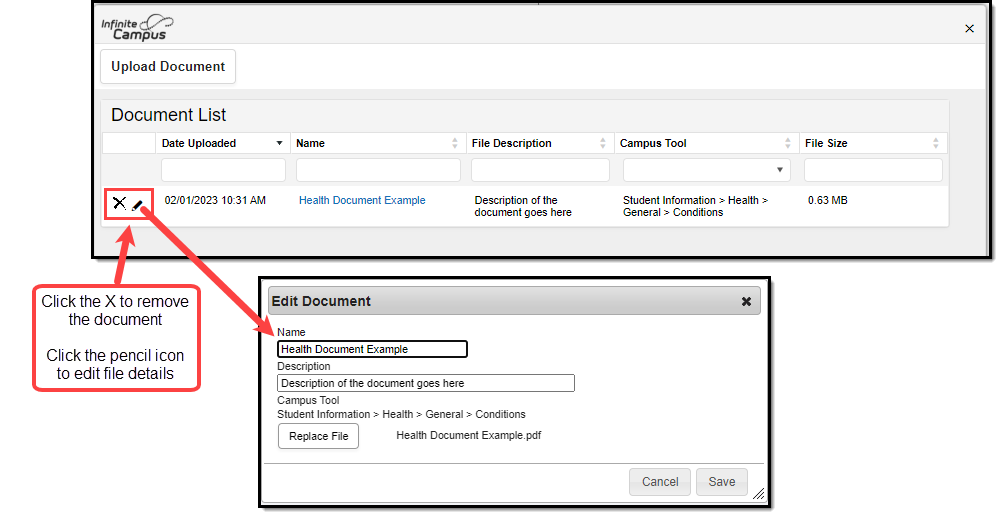 Edit Document
Documentation: Use Contact Log, Upload Documents
Districts may need to document information regarding contacts made on a student's behalf. Documents may also be uploaded to a student's health records.
Tool Search: Health Contact Log
The Health Contact Log is used to record all instances of communication by school personnel regarding a particular student and their health needs. This communication can be with the student, their guardians, or others, and could include letters or email, phone calls, and face-to-face meetings for example.
There are several areas within Student Information that include a Contact Log tool - Counseling, Health, PLP, Response to Intervention (RTI), Special Education, plus several states that have a localized Contact Log for certain tools. In an effort to consolidate and streamline the process of managing communication between the school and students/guardians of students, the Contact Log in Student Information General is the main hub where all contact log records can be viewed and modified by school personnel who are granted proper tool rights. The Health Contact Log functions the same as this new Contact Log.
Submit feedback for the new Contact Log by clicking the Feedback button in the bottom right hand corner. This takes you to the Campus Community Contact Log forum topic where you can add your suggestions for the Contact Log.
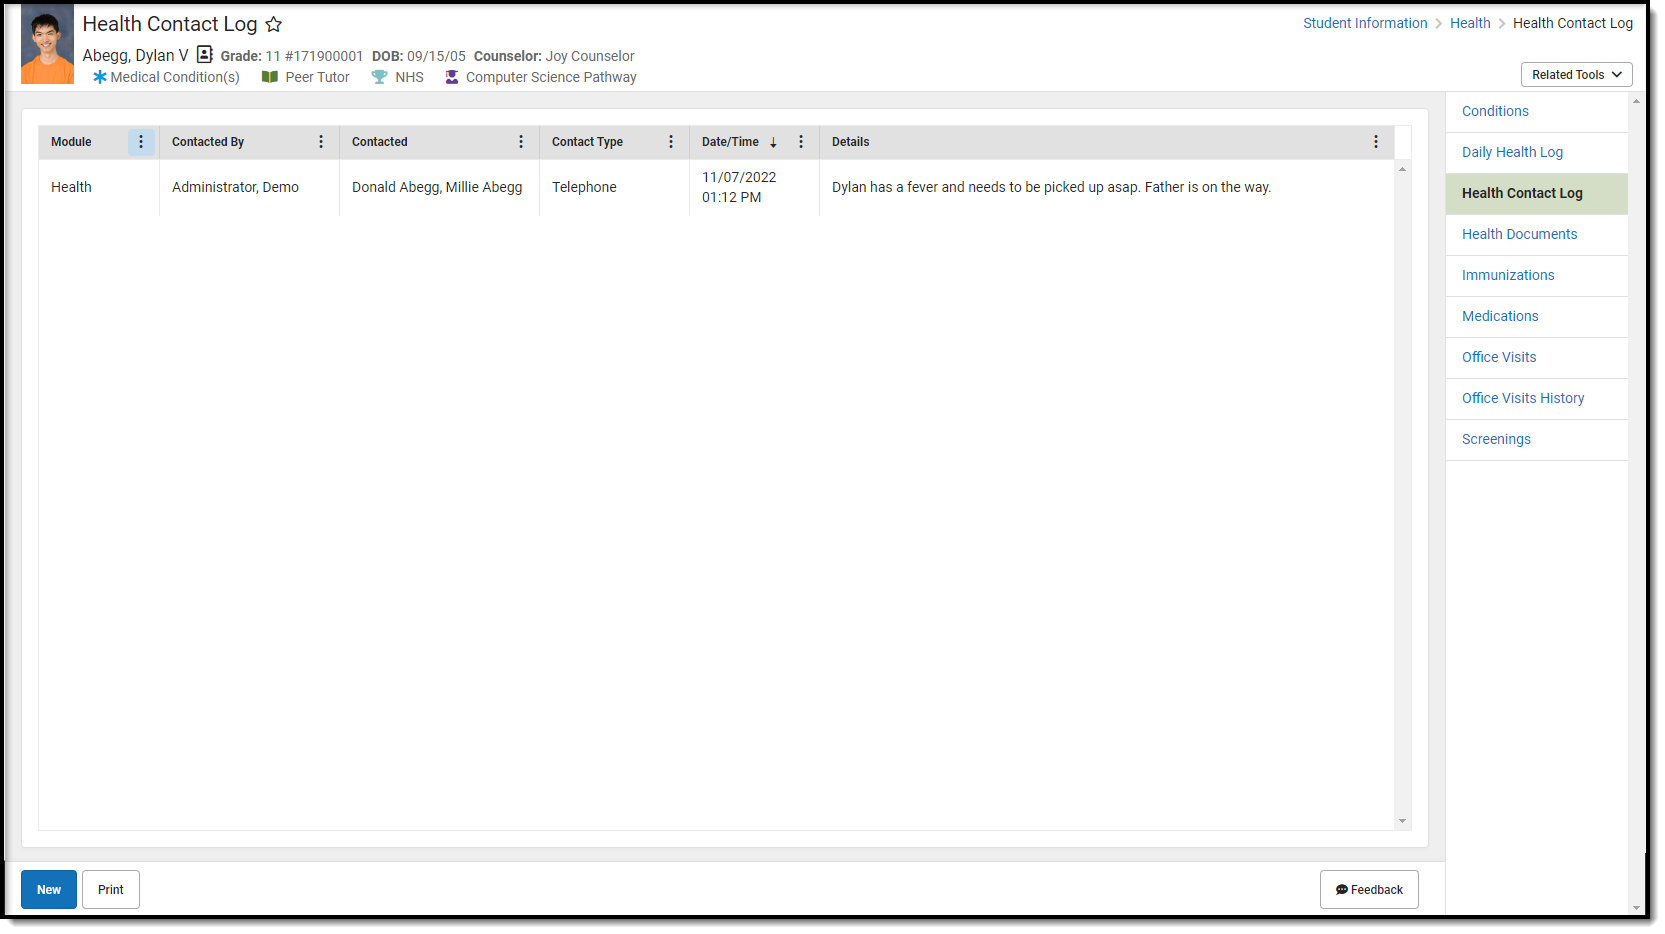 Health Contact Log
See the Health Contact Log Tool Rights article for information about rights needed to use this tool.
Previous Versions
Health Contact Log [.2219 - .2243]
Schedule Health Office Visits
Students may be scheduled to come to the office to receive treatments or medications.
Schedule Treatments
The Conditions tab lists information regarding a student's medical conditions and any treatments associated with those conditions. This video demonstrates how to schedule appointments for students to receive treatments related to medical conditions.
Schedule Medication Appointments
Health Office Visits
Health Office Visits (Student)
Schools can track and report details regarding an individual student's visits to the health office.
Tool Search: Office Visits
The Office Visits tool allows a school to track the time and date a student entered the health office, when the student left, and the reason the student was there. From this tool, a district can establish a care pathway by documenting any complaints, medications, treatments, observations, interventions, or discharges related to a student’s health office visit.
All complaints, treatments, observations, interventions, and discharges are predefined by the district to assure that consistent and predictable care is offered for all students. Medication records are created for all medications a student may have administered at school.
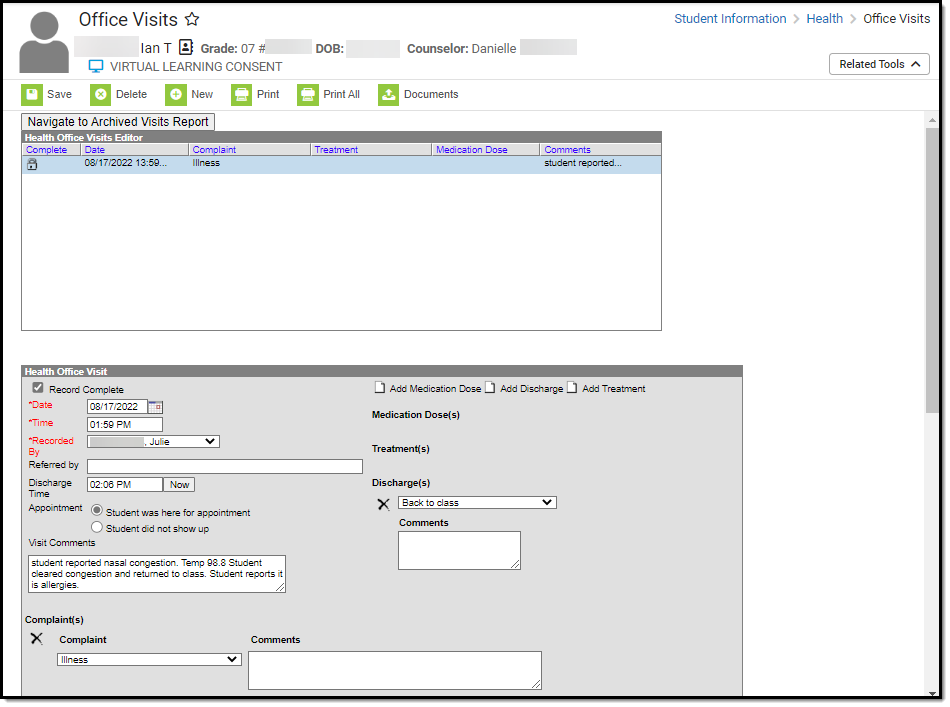 Health Office Visits Tool
See the Office Visits Tool Rights article for information about rights needed to use this tool.
Medication information, including Remaining/Submitted doses, Medication Strength, Medication Form, Route, Directions, Amount per Dose, and Dose Measurement fields will be automatically populated from the Medications tool for scheduled visits or when Add Medication Dose is selected. These items are not editable from the Health Office Visits tab.
The following instructions describe how a health office visit is entered when appointments are not scheduled. See the Health Office Calendar for information on processing scheduled health office visits.
- The Recorded By field is populated based on the Health checkbox on the staff person's District Assignment record. Because of this, a school must be selected in the Campus toolbar.
- When multiple complaints are assigned to one health office visit, observations and interventions are attached to the correct complaint.
- Users who do not have Locked Health Office Visit tool rights are allowed to edit unlocked health office visits and view (but not edit) locked health office visits.
Enter a Health Office Visit
- Select the New button near the top of the tab. A Health Office Visit window will appear near the bottom of the page.
- The Date and Time fields will auto-populate with the current date and time. If this is incorrect, change the time and date accordingly. Time entries of 12 will populate as 12 PM.
- Enter the Recorded By box by using the dropdown list and selecting the appropriate name. This field will default to the current user. Only staff with a Health district assignment will appear on this list. If the staff person has a Health License designation on the District Assignments tool, this title also displays at the end of the person's name (i.e. Smith, Joe: RN).
When entering a new office visit, the Recorded By field displays the user that is currently logged in. When editing an existing office visit, the Recorded By field will display the person who originally entered the visit.
Staff district assignments must be active to appear in the Recorded By dropdown list. On a saved Health Office Visit, if the staff member's district assignment has ended, the date range of the district assignment will appear next to the staff member's name. For example: Johnson, Mary (01/01/2009 - 01/01/2010).
- The Referred by field can be used to track who sent the student to the Health Office. This field allows the entry of up to 50 characters and can be used in an Ad Hoc filter.
- Enter a Discharge Time by manually entering a time or by clicking the Now button, which populates the current time.
- Select the Appointment option; either Student was here for appointment or Student did not show up.
 No Show Reason Dropdown
When the Student did not show up option is selected, the No Show Reason dropdown will display if it is not hidden. The option to hide/unhide the field, edit the display name and values populated in the dropdown can be accessed in the Attribute/Dictionary at System Administration > Custom > Attribute/Dictionary > HealthVisit > No Show Reason. See the Attribute Dictionary documentation for additional information.
- Enter any Visit Comments.
- Optional: Mark the Diabetes Medication Error checkbox.
The option to hide/unhide the field and edit the display name can be accessed in the Attribute/Dictionary at System Administration > Custom > Attribute/Dictionary > HealthVisit > Diabetes Medication Error. See the Attribute Dictionary documentation for additional information.
- Select an Administered by option from the dropdown if desired.
The option to hide/unhide the field, edit the display name and values populated in the dropdown can be accessed in the Attribute/Dictionary at System Administration > Custom > Attribute/Dictionary > HealthVisit > Administered by. See the Attribute Dictionary documentation for additional information.
Add a Complaint
- Select the Add Complaint button. The add Complaint(s) fields appear on the bottom of the screen.
- Select the appropriate complaint from the Complaint drop-down list.
- Enter any Comments to be associated with the complaint.
Comments attached to a complaint can be written in a word processing document and then copy/pasted into the Comments section.
- Attach Observation(s) and Intervention(s)to the Complaint. This step is optional.
- To attach an observation or intervention, select the Add Observation or Add Intervention button within the Complaint(s) section.
- Select the appropriate observations or interventions to attach.
- Enter any comments related to the observation or intervention.
- If a student’s health office visit has been completed and requires no additional information or modification by health staff, check the Record Complete check box located in the left-hand corner of the Health Office Visits editor. This places a lock icon next to the record under the Complete section of the Health Office Visits Editor.
- Click the Save button.
Complaints are created in the Health Complaint Type tool. Only active complaints are available for selection.
Add Medication Doses
Note: the Medication doses are NOT reduced until the day of the visit, not the day the health office visit record is created.
- Select the Add Medication Dose button near the top of the Health Office Visits editor to attach medication dose(s) to the visit. This will add the Medication Dose(s) field to the right hand side of the window.
- Enter the number of doses in the left field and select the appropriate medication by using the dropdown list.
- Users may add additional medication doses for different medications by clicking Add Medication Dose at the top of the window.
- Select the Save button.
The medication dropdown is populated by the student’s current medication(s). See the Medications tool documentation for additional information.
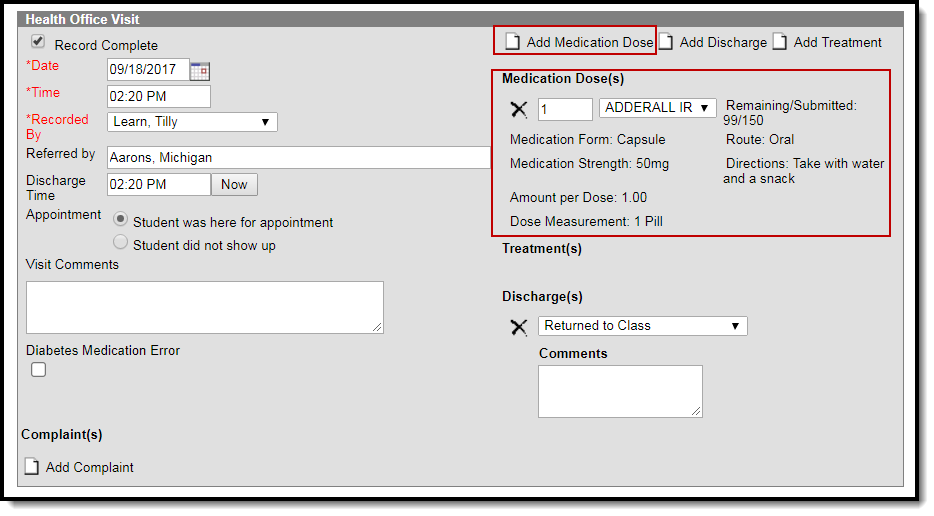 Add Medication Dose
Dosage Amount Warnings
Users are only allowed to enter medication doses for the quantity available, shown as Remaining Doses on the Medications tool. If a dose amount is entered beyond what is available, a warning message will appear with the number of available doses. The medication dose field will be cleared, requiring the user to enter a new medication dose. Health Office Visits can be saved without entering dose or medication information.
A dose amount must be entered if a medication is selected. If not selected, a warning message appears indicating the dose value is required.
Add a Discharge
Discharge options are created in the Health Discharge Type tool.
- Select the Add Discharge button near the top of the Health Office Visits window to attach a discharge to the visit. This will add Discharge(s) options to the right hand side of the window.
- Select the appropriate Discharge from the dropdown list.
- Enter any additional Comment related to the discharge in the comments field to the right of the dropdown.
- Users may add additional discharges by selecting the Add Discharges button at the top of the window.
- Enter a Discharge Time if appropriate by clicking the Now button or entering the actual time the student left the Health Office. The entered discharge time must be after the time the student arrived at the Health Office. If it is not, a warning message displays indicating such.
- Select the Save button if there is no additional information required.
Discharges are sorted alphabetically in the dropdown list.
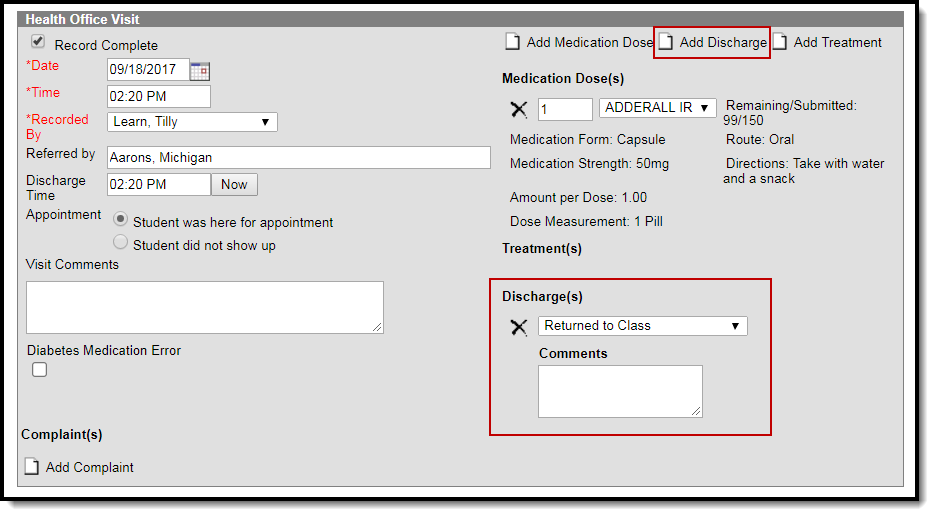 Add Discharge
Add a Treatment
Treatments for conditions are created in the Treatment List tool.
- Select the Add Treatment button near the top of the Health Office Visits editor to attach a treatment to the visit. This will add Treatment(s) options to the right hand side of the window.
- Select the appropriate treatment from the drop-down list. Note that the options in the list display as Condition: Treatment
- Users may add additional treatments by selecting the Add Treatments button at the top of the window.
- Select the Save button if there is no additional information required.
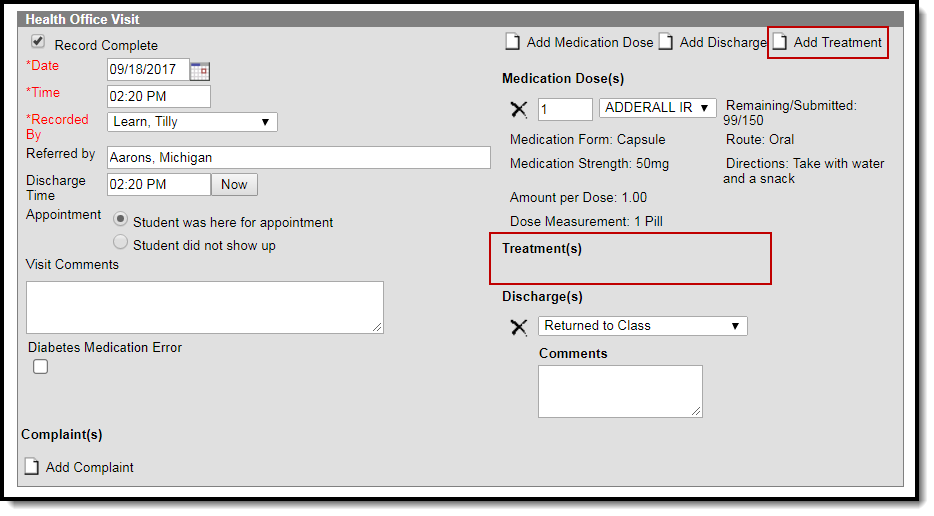 Add Treatment
Multiple treatments can be assigned to a single visit. All treatments are visible (upon saving the record) in the Health Office Visit Editor.
Generate the Individual Health Visits Report
Users can review data in either a PDF or DOCX format from the Health Office Visits tab for individual students by clicking the Print button or the Print All button.
 Student Health Office Visit Report Format Options
|
Option |
Description |
Example |
|---|---|---|
|
|
The printed report includes details for a single visit selected on the Health Office Visits Editor. |
|
|
Print All |
The printed report includes a summary of all the student's Health Office Visits for the designated Calendar. |
|
Upload and Manage Health Documents
The Office Visits tool allows you to store, manage, and view all health-related documents associated with the selected person.
To Upload a New Document:
- Click the Documents button. A separate window will appear, containing an Upload Document button and the Documents List.
- To begin uploading a new document, click the Upload Document button and select Add Files.
- Locate the file on your local hard drive or network and click OK.
- The file will appear in the Upload Documents list. From here you can add a Description (optional), see what tool will be associated with the file, and the size of the file.
- Mark the checkbox in the left-hand corner to agree to the terms of the Infinite Campus Acceptable Use Policy (as well as any district-mandated policies).
- Click Upload. The file is now uploaded and attached to the student where it can be accessed at any time.
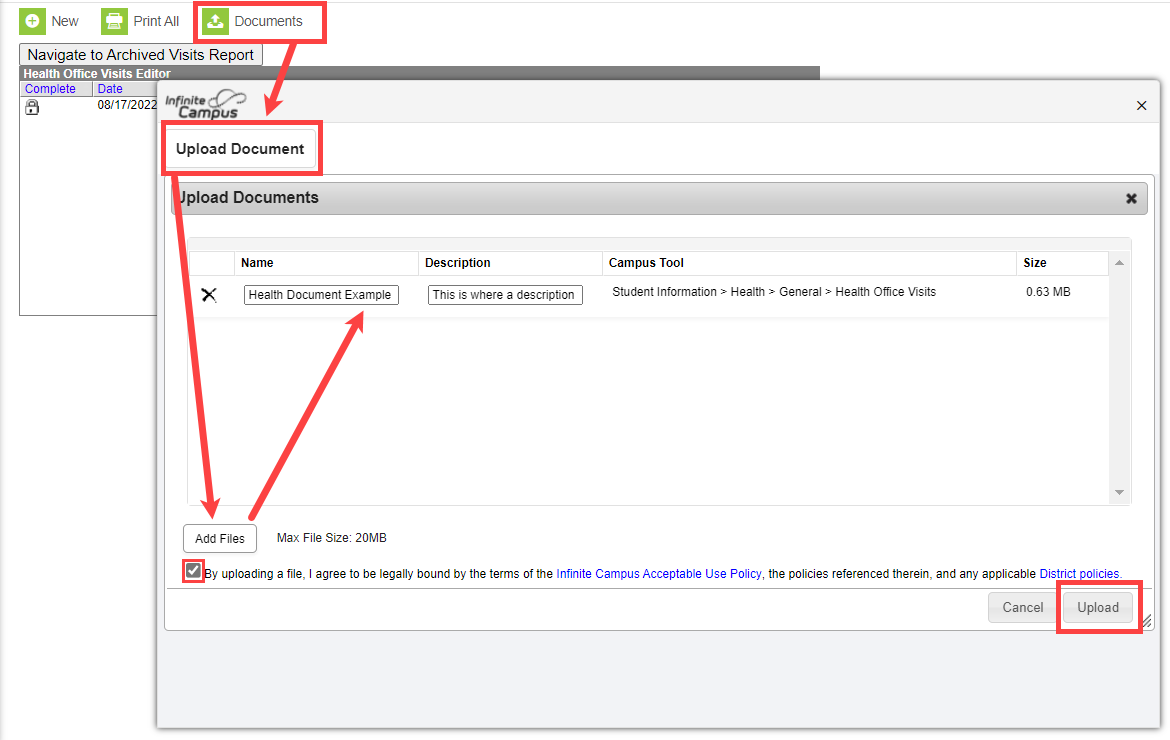 Upload Document
Delete or Edit an Existing File
If you need to delete the file, click the next to the file needing deletion.
If you need to edit file details, click the  icon next to the file. The Edit Document editor will appear, allowing you to edit the file name, description, or replace the file.
Archived Health Visits
Users still have the ability to review data in report format from the Health Office Visits tab for individual students. If your district was using Campus before June of 2010, you may have health data that exists in health tables that are no longer used. This report pulls that data. This report will not report data from after June 2010.
This report can also be generated in batch form by generating the Archived Health Visits Report.
 Archived Health Visits Report
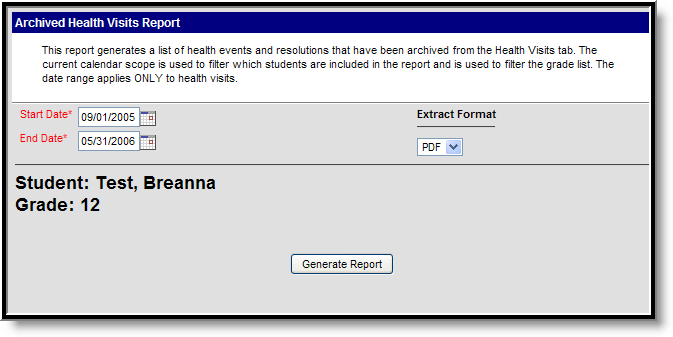 Archived Health Visits Report - Individual Student
Generate the Archived Health Visits Report
- Enter a Start Date for the report in mmddyy format.
- Enter an End Date for the report. These dates are used to find health visits between the entered dates.
- Click the Generate Report button. The report will appear in a new window in PDF format, listing the student's past health visits.
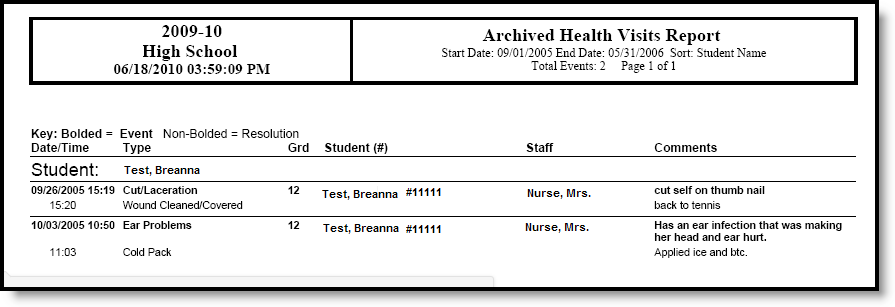 Individual Student Archived Health Visits Report
Scheduled Health Office Visits (Calendar)
Schools can track and report details regarding an individual student's visits to the health office.
Tool Search: Health Office Calendar
The Health Office Calendar displays all scheduled and unscheduled visits and any in-progress and completed visits for a specific date. As scheduled visits are created, they will appear on the calendar as a hyperlink to assist the nurse in rapidly entering the actual visit.
This tool is calendar specific based on the calendar selected in the toolbar. The Health Office Visits Calendar will display as blank if the All Schools options is selected.
 Health Office Calendar
See the Health Office Calendar Tool Rights article for information about rights needed to use this tool.
The Calendar automatically shows health office appointments for the current day. Users can modify the date field to view office visits for another date, either in the future or in the past.
To view the reason for the office visit, select the student’s name. This displays the student's Health Office Visits tool.
 Health Office Visits
Scheduled Calendar Appointments
Student names display on the Health Office calendar based on scheduled or unscheduled appointments created for administration of Medications or treatments for Health Conditions. Visits that have data saved but are not complete will display in the In Progress column until they are marked Complete, at which time they will appear in the Complete column.
Process Scheduled Appointments for Present Students
- Select the student's name from the Scheduled Appointment column. The Health Office Visits tool displays.
- Select the radio button in the Appointment area for Student was here for appointment.
- Click the Save button at the top of the Health Office Visits tab. At this time, the student's name will be moved from the Scheduled column to the In Progress column on the Health Office Calendar..
- Continue processing the appointment by entering medication doses or adding treatments. Add a discharge when necessary based on the student's presented issue.
- When finished processing the appointment and the student leaves the health office, mark the Record Complete checkbox. The health office visit record will be moved to the end of the list with a lock icon next to it, meaning the visit has been completed.
- Reselect the Health Office Calendar. The student's name now appears in the Completed column.
Process Scheduled Appointments for Absent Students
Students who have a scheduled health office appointment but are marked absent display in their scheduled time slot with the entered absent reason. This gives the nurse the ability to mark the visit as complete.
An absence code does not display if the student's appointment time is in a non-attendance period or if it is between periods.
 Absent student scheduled for a Health Office Visit
- Select the student's name from the Scheduled Appointment column. The Health Office Visits tool displays.
- Mark the Record Complete checkbox.
- Select the radio button in the Appointment area for Student did not show up.
- If the student was to receive medication or treatment, the click the X in front of the medication or treatment to remove it from the visit. If the medication is not removed, the count of remaining medication doses will be reduced.
- Click the Save button at the top of the Health Office Visits tool.
- Reselect the Health Office Calendar. The student's name appears in the Completed column.
If the Student did not show up option is selected on a Health Office Visit with Medication dose or Treatment information and the user attempts to save the visit, a warning displays prompting the user to remove the medication or treatment before saving the record.
In Progress Appointments
In Progress appointments are an indication that the student did show up for the scheduled appointment and the student is still in the Health Office. When the student has completed the visit, the record can be marked as complete.
If a student has an unscheduled Health Office Visit that is saved, it is listed in the In Progress column. Once the Health Office Visit is marked complete, the visit moves to the Complete column. Hovering over the student's name in the In Progress or Complete categories will display additional information, such as "Scheduled for Medication" or "Scheduled for Treatment".
 Processing Appointments
Process In Progress Appointments
- Select the student's name from the In Progress column. The Health Office Visits tool displays.
- Mark the Record Complete checkbox on the Health Office Visit record.
- Click the Save button. The screen will not display the Health Office Calendar. Reselect the tool. The student's name will display in the Complete column.
 Completed Health Office Records
Completed Appointments
Once the health office visit record has been marked complete and all students have left the health office, no further processing needs to be done on the Health Office Calendar. At the end of the school day or at the closing of the health office for the day, all student names should display in the Complete column.
Print Calendar
Click the Print button to print the HOV Calendar. A pop-up displays.
 Print Health Office Visits Calendar
Select the Report Format, either PDF or DOCX, then click Generate Report.
Print Example
 PDF Example Health Office Visits Calendar
The Health Office Calendar is used to manage scheduled and unscheduled visits to the Health Office.
Health Reports
Description of the section. Example: The following topics will cover how to take traditional attendance for individual students, as well as how to enter positive attendance.
