Classic View: System Administration > Ed-Fi
Search Terms: Ed-FI
The following is the recommended approach for reporting Ed-Fi data for Gifted and Talented, Homebound Students, 21st CCLC, and SPED Assessment Outcomes. It is best followed if you are new to Campus or if you are revamping your process at the beginning of a school year.
Gifted and Talented
Resources submitted
- Student Needs
- Student Program Association
Process for 2021-22 and beyond
Student Setup
- Navigate to Student Information > Program Participation > Gifted.
- Click the 'New' button.
- Populate the Start Date field.
- Select the proper gifted need from the 'Gifted Need' dropdown.
- If a Student Needs record should not send, select 'NOND: No Need' from the dropdown.
- If a Student Program Association record should not send, check the 'No Gifted Program' checkbox.
- Click the 'Save' button.
Note: If a student has more than one Gifted need, one Gifted record should be created for each need. However, the start date should be the same for each Gifted record to ensure only one Student Program Association is sent to ADE.

Process for 2020 and Prior
First time setup
There are two ways to flag a student as gifted and talented. Choose one approach only. Using both will create duplicate reporting.
- Flags (this approach allows a district to assign an image that will show on the student header)
a. Create a new flag under Program Admin > Flags:
i. Enter a name for the flag.
ii. Map the 'State Program Code' to ’35: Gifted Program’.
iii. Check the ‘State Reported’ checkbox.
iv. If you want an image to display on the student header, complete the following:
1. Check the ‘Flagged’ checkbox.
2. Select the ‘Flag Image’ to show.
3. Select the ‘Flag Color’ for the image.

b. Ensure the ‘Gifted Program’ code is mapped to the ‘Support Program’ Ed-Fi code in the Ed-Fi configuration:
i. Navigate to System Administration > Ed-Fi > Ed-Fi Configuration > Resource Preferences of the school year in
question > Student Program Associations > Program Type Descriptors - Flags.

2. Programs
a. Create a new Program under Program Admin > Programs > Programs:
i. Enter a name for the program.
ii. Map the 'State Program Code' to ’35: Gifted Program’.
iii. Check the ‘State Reported’ checkbox.

b. Ensure the ‘Gifted Program’ code is mapped to the ‘Support Program’ Ed-Fi code in the Ed-Fi configuration:
i. Navigate to System Administration > Ed-Fi > Ed-Fi Configuration > Resource Preferences of the school year in
question > Student Program Associations > Program Type Descriptors - Flags.

Student setup
If you created a Flag:
- Navigate to Student Information > General > Flags.
- Add a new Flag:
i. Select the Gifted flag you previously created.
ii. Enter a start date.
iii. Select the correct need from the ‘Need’ dropdown.

If you created a Program:
- Navigate to Student Information > Program Participation > Programs.
- Add a new Program:
i. Select the Gifted program you previously created.
ii. Enter a start date.
iii. Select the correct need from the ‘Need’ dropdown.

Homebound Students
Resources submitted
- Student Needs
Process for 2021-22 and beyond
Student setup
- Navigate to Student Information > Program Participation > State Programs > Homebound.
- Click the 'New' button.
- Populate the Start Date.
- Click the 'Save' button.

Process for 2020 and Prior
First time setup
There are two ways to flag a student as homebound. Choose one approach only. Using both will create duplicate reporting.
- Flags (this approach allows a district to assign an image that will show on the student header)
a. Create a new flag under Program Admin > Flags:
i. Enter a name for the flag.
ii. Leave the 'State Program Code' blank.
iii. Check the ‘State Reported’ checkbox.
iv. If you want an image to display on the student header, complete the following:
1. Check the ‘Flagged’ checkbox.
2. Select the ‘Flag Image’ to show.
3. Select the ‘Flag Color’ for the image.

b. Ensure the ‘Homebound’ code is mapped to the ‘Homebound’ Ed-Fi code in the Ed-Fi configuration:
i. Navigate to System Administration > Ed-Fi > Ed-Fi Configuration > Resource Preferences of the school year in
question > Student Needs > Student Needs Descriptors > ProgramParticipation Need.

2. Programs
a. Create a new Program under Program Admin > Programs > Programs:
i. Enter a name for the program.
ii. Leave the 'State Program Code' blank.
iii. Check the ‘State Reported’ checkbox.

b. Ensure the ‘Homebound’ code is mapped to the ‘Homebound’ Ed-Fi code in the Ed-Fi configuration:
i. Navigate to System Administration > Ed-Fi > Ed-Fi Configuration > Resource Preferences of the school year in
question > Student Needs > Student Needs Descriptors > ProgramParticipation Need.

Student setup
If you created a Flag:
- Navigate to Student Information > General > Flags.
- Add a new Flag.
a. Select the Homebound flag you created.
b. Enter a start date.
c. Select ‘Homebound’ from the ‘Need’ dropdown.
If you created a Program:
- Go to Student Information > Program Participation > Programs.
- Add a new Program:
a. Select the Homebound program you created.
b. Enter a start date.
c. Select ‘Homebound' from the ‘Need’ dropdown.

Attendance Calculation
21st CCLC
Resources submitted
- Student Program Association
Process for 2022-23 and beyond
One-time set up per school year
- Create a calendar that is specific for 21st CCLC students:
a. Set the start date to 6/1 of the start of the reporting school year (ie. for the 21-22 school year, the year should be 2021).
Note: If the 21st CCLC courses start in May, the start date should be the first day in May that the state accepts data (i.e. 5/23).
b. Set the end date to 5/30 of the end of the reporting school year (ie. for the 21-22 school year, the year should be 2022).
Note: The end date month/day must be one day prior to the start date, so your end date may not be 5/30.
c. Set the Attendance Type to '017:Positive'.
d. Set the Attendance Calculation to the same as your regular calendar.
e. Do NOT set the 'Days per Week' field. Keeping this field blank will ensure the calendar does not send to AZ.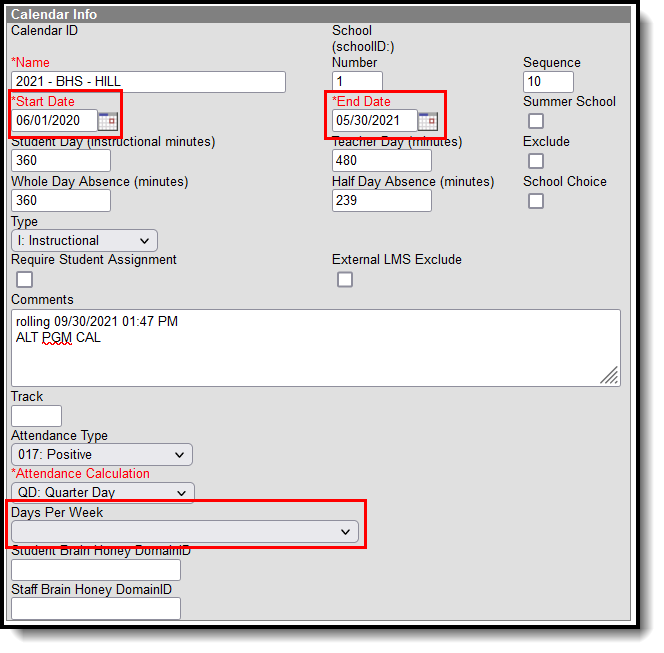
f. Set up the terms/periods/days as you normally would, ensuring any days that you are taking attendance for the 21st CCLC students are marked as instructional (even if they are in the summer months). - Navigate to System Administration > Attendance > Positive Attendance Preferences.
a. Set 'Enable Positive Attendance Tools and Reports' to 'Yes'. - Create/Add 21st CCLC courses to the calendar.
a. Check the 'Positive Attendance' checkbox.
b. Set the proper 21st CCLC program in the '21st CCLC' dropdown.
c. Set the proper 21st CCLC activity type in the '21st CCLC Activity Type' dropdown.

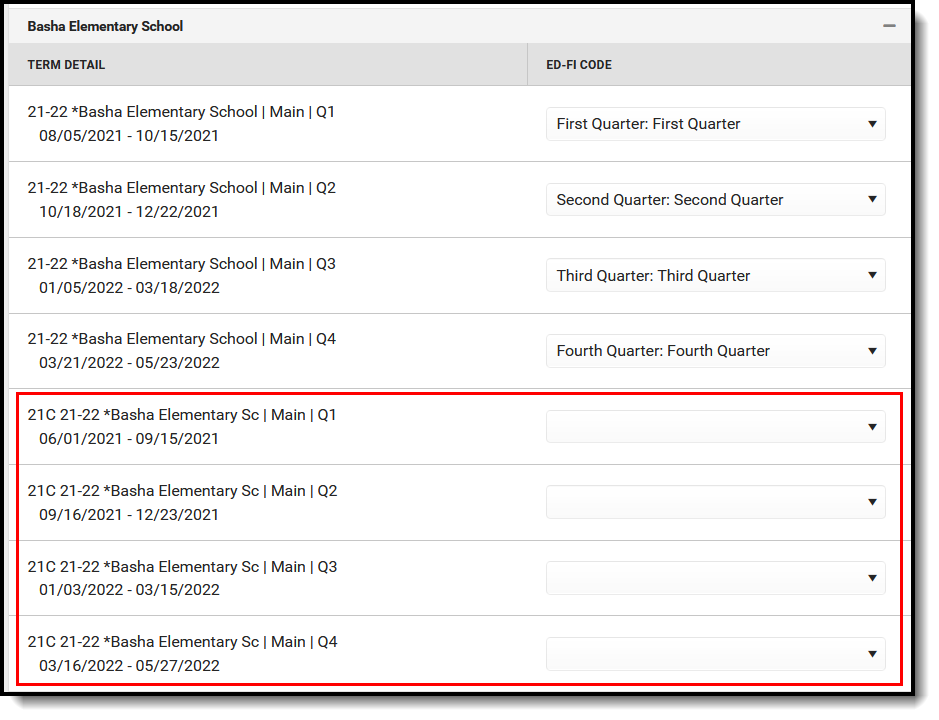
Note: In the 'Session' Ed-Fi Configuration, you can choose to either populate the Term Detail for the 21st CCLC calendar or leave it blank. It will not make a difference to reporting.
 Student setup
 Student setup
- Navigate to Student Information > General > Enrollments.
a. Create an enrollment in the 21st CCLC specific calendar that was created.
i. Set the Local Service Type to 'O: Program Only'.
ii. Check the State Exclude checkbox.
iii. Roster student into proper 21st CCLC courses.
2. Navigate to Student Information > Program Participation > State Programs > 21st CCLC.
a. Click the 'New' button.
i. Populate the start date (usually it is 6/1 of the start of the reporting school year).
ii. Populate the 'Program' dropdown with the correct 21st CCLC program.
iii. Click the 'Save' button.
Process for 2021-22
One-time set up per school year
- Create a calendar that is specific for 21st CCLC students:
a. Set the start date to 6/1 of the start of the reporting school year (ie. for the 21-22 school year, the year should be 2021).
Note: If the 21st CCLC courses start in May, the start date should be the first day in May that the state accepts data (i.e. 5/23).
b. Set the end date to 5/30 of the end of the reporting school year (ie. for the 21-22 school year, the year should be 2022).
Note: The end date month/day must be one day prior to the start date, so your end date may not be 5/30.
c. Set the Attendance Type to '017:Positive'.
d. Set the Attendance Calculation to the same as your regular calendar.
e. Do NOT set the 'Days per Week' field. Keeping this field blank will ensure the calendar does not send to AZ.
f. Set up the terms/periods/days as you normally would, ensuring any days that you are taking attendance for the 21st CCLC students are marked as instructional (even if they are in the summer months). - Navigate to System Administration > Attendance > Positive Attendance Preferences.
a. Set 'Enable Positive Attendance Tools and Reports' to 'Yes'. - Create/Add 21st CCLC courses to the calendar.
a. Check the 'Positive Attendance' checkbox.
b. Set the proper 21st CCLC program in the '21st CCLC' dropdown.
Note: In the 'Session' Ed-Fi Configuration, you can choose to either populate the Term Detail for the 21st CCLC calendar or leave it blank. It will not make a difference to reporting.
Student setup
- Navigate to Student Information > General > Enrollments.
a. Create an enrollment in the 21st CCLC specific calendar that was created.
i. Set the Local Service Type to 'O: Program Only'.
ii. Check the State Exclude checkbox.
iii. Roster student into proper 21st CCLC courses.
2. Navigate to Student Information > Program Participation > State Programs > 21st CCLC.
a. Click the 'New' button.
i. Populate the start date (usually it is 6/1 of the start of the reporting school year).
ii. Populate the 'Program' dropdown with the correct 21st CCLC program.
iii. Click the 'Save' button.
Process for 2020 and Prior
First time setup
There are two ways to flag a student as 21 CCLC. Choose one approach only. Using both will create duplicate reporting.
- Flags (this approach allows a district to assign an image that will show on the student header)
a. Create a new flag under Program Admin > Flags for each 21 CCLC code:
i. Enter a name for the flag.
ii. Map the 'State Program Code' to the corresponding 21 CCLC code:
1. 21st CCLC Yr 2
2. 21st CCLC Yr 5
3. 21st Century Community Learning Centers Year 1 – New
4. 21st CCLC Yr 5C
iii. Check the ‘State Reported’ checkbox.
iv. If you want an image to display on the student header, complete the following:
1. Check the ‘Flagged’ checkbox.
2. Select the ‘Flag Image’ to show.
3. Select the ‘Flag Color’ for the image.

b. Ensure all 21 CCLC codes are mapped to the ‘Support Program’ Ed-Fi code in the Ed-Fi configuration:
i. Navigate to System Administration > Ed-Fi > Ed-Fi Configuration > Resource Preferences of the school year in question > Student Program Associations > Program Type Descriptors - Flags.

2. Programs
a. Create a new Program under Program Admin > Programs > Programs for each 21 CCLC code:
i. Enter a name for the program.
ii. Map the 'State Program Code' to the corresponding 21 CCLC code:
1. 21st CCLC Yr 2
2. 21st CCLC Yr 5
3. 21st Century Community Learning Centers Year 1 – New
4. 21st CCLC Yr 5C
iii. Check the ‘State Reported’ checkbox.

b. Ensure all 21 CCLC codes are mapped to the ‘Support Program’ Ed-Fi code in the Ed-Fi configuration:
i. Navigate to System Administration > Ed-Fi > Ed-Fi Configuration > Resource Preferences of the school year in question > Student Program Associations > Program Type Descriptors - Flags.

Student setup
If you created a Flag:
- Navigate to Student Information > General > Flags
- Add a new Flag:
a. Select the correct 21 CCLC flag you previously created.
b. Enter a start date.

If you created a Program:
- Navigate to Student Information > Program Participation > Programs.
- Add a new Program:
a. Select the correct 21 CCLC program you created
b. Enter a start date.

SPED Assessment Outcomes
Note: The evaluation must overlap an existing IEP within IC for the assessment outcome data to send through Ed-Fi.
Resources submitted
- Student Special Education Program Association
Process for all years
Student setup
- Navigate to Student Information > Special Ed > General > Documents.
- Add a New Document:
a. Select Create New Evaluation > AZ ESR 2019.

b. Select the ‘Evaluation Type’.
i. Initial and Exit are the only ones that report.
c. Update the ‘Evaluation Date’ if its different than the defaulted value.
d. Select the 'Assessment Category'.
e. Select the 'Assessment Outcomes Summary'.

