Classic View: Activity Registration > Activity Monitor
Search Terms: Activity Monitor
On this page
Introduction to Activity Registration
The Activity Registration module provides districts with a tool for managing activities that require a registration process including a registration packet, payment, and a roster. Activity Registration is completed in the Campus School Store based on registration dates you control. Once a student has registered for an activity, that activity no longer appears for them in the School Store.
Before You Begin
Be sure you have finished setting up the School Store and Payments modules.
Activity Registration Setup Workflow
| Step | Campus Location | |
|---|---|---|
| Set Up Custom Forms and Ad Hoc Filters | ||
| 1 | Upload and manage supplemental Activity Registration documents in the Custom Forms tool. Activities require at least one form but more can be added. The Activity Preapproval process can only use custom form types of Interactive Form with Database Table and Interactive Form. If you use an interactive form, you can also use the following Ad hoc fields to prepopulate the form: activityName and studentFirstLastName. For prepopulating to work, you must use the Ad hoc fields as the field names in your PDF. These fields are case sensitive. | Classic View: System Administration > Custom Forms Search Terms: Custom Forms |
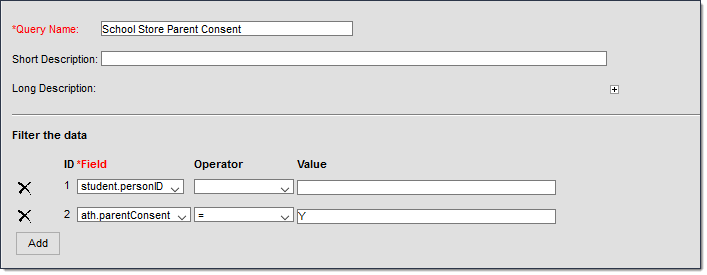
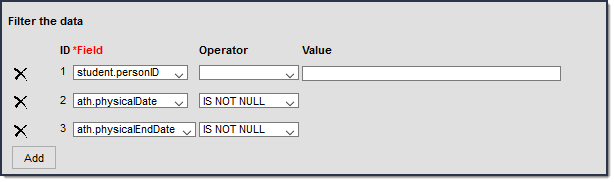
| 2 | Create an Ad Hoc filter for selecting eligible students. Each activity requires an Ad Hoc filter. Campus only allows students who are included in the Ad Hoc filter to register for the activity. | Classic View: Ad Hoc Reporting > Filter Designer Search Terms: Filter |
| Set Up Portal Preferences | ||
| 3 | Make sure the Activity, Athletics, and Field Trip Custom Modules are selected on the Portal Display Options tool.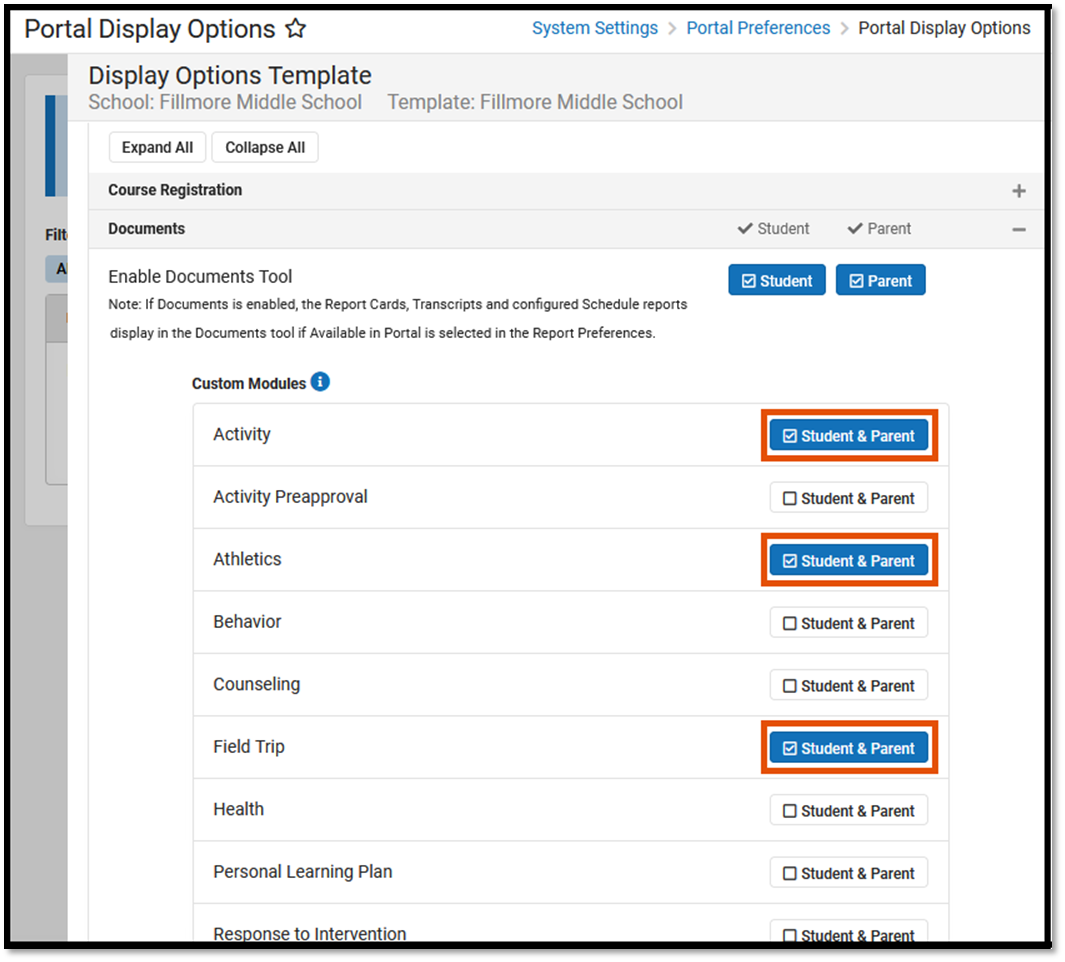 | Classic View: System Administration > Portal > Preferences > Display Options Search Terms: Display Options |
4 | Make sure the Enable Activity Registration Viewing Tool option has the Student and/or Parent checkboxes marked if you want to allow users to see Activity Registration information in Campus Student or Campus Parent. When these options are enabled, users can see the activities for which the student has registered. To be considered "registered" the activity fee must be paid. Any applicable forms and options purchased for the student also display.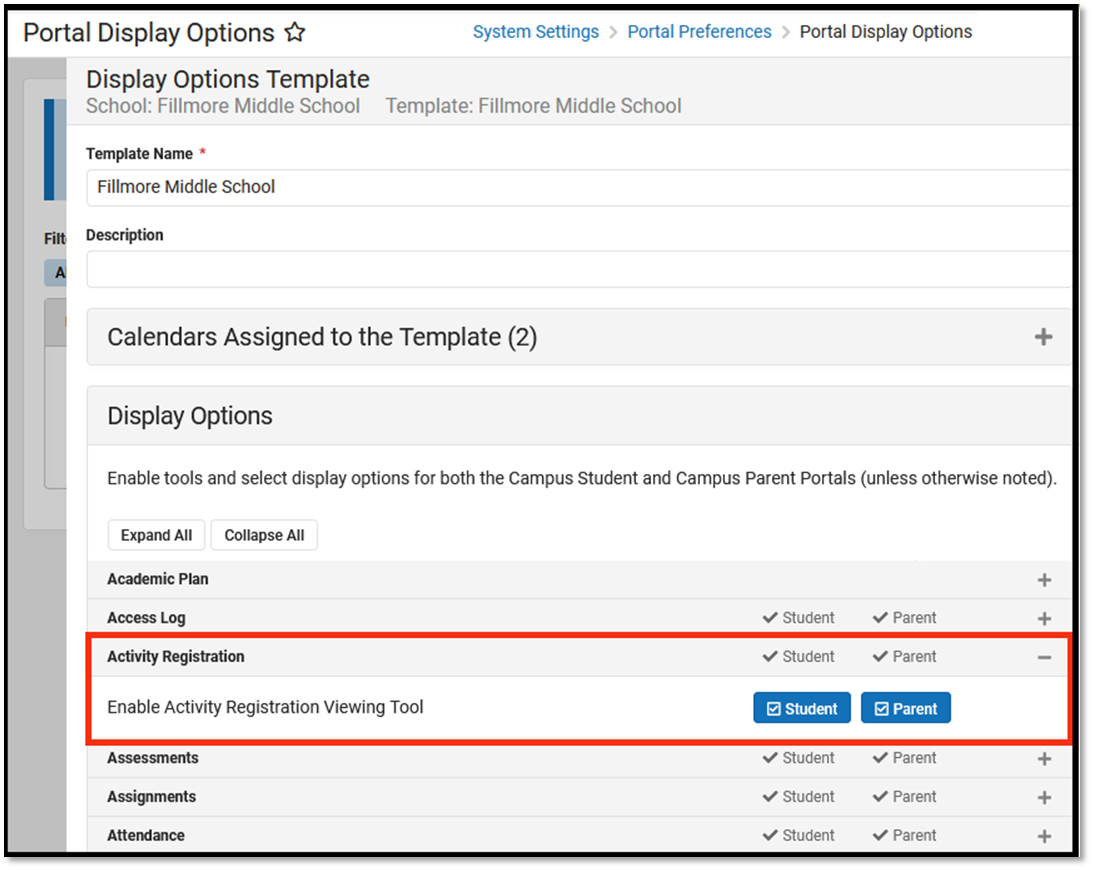 | Classic View: System Administration > Portal > Preferences > Display Options Search Terms: Display Options |
| Add District Assignments | ||
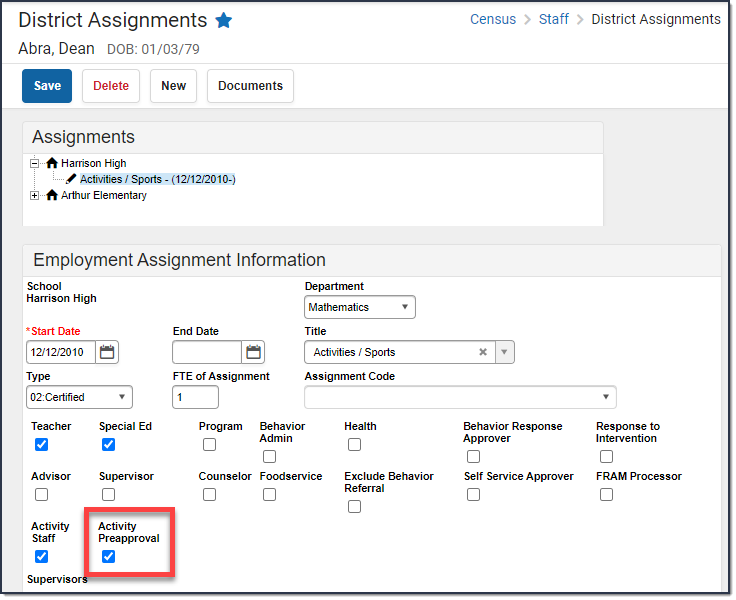
5 | The following checkboxes display on the District Assignments tool and determine which staff may be assigned to activities.
| Classic View: Census > People > District Assignments Search Terms: District Assignments |
| Set Up Preapproval Configurations (Optional) | ||
| 6 | Use the Preapproval Configuration tool to set up the rules, identify the appropriate approvers, and assign the forms that must be completed before an activity can be made available for registration in the School Store. | Classic View: Activity Registration > Preapproval Configuration Search Terms: Preapproval Configuration |
| Set Up Activities | ||
| 7 | Add new activities in the Activity Builder tool. | Classic View: Activity Registration > Activity Monitor > Activity Builder Search Terms: Activity Monitor |
| Manage Activities | ||
| 8 | View the Activity Roster and mark forms as complete. | Classic View: Activity Registration > Activity Monitor > Activity Roster Search Terms: Activity Monitor |
| 9 | Review past activities and monitor upcoming activities in the Activity Monitor. | Classic View: Activity Registration > Activity Monitor Search Terms: Activity Monitor |
10 | Use the Activity Monitor to review proposed activities. You can approve, decline, or return activities submitted through the Activity Dashboard. | Classic View: Activity Registration > Activity Monitor Search Terms: Activity Monitor |
Preapproval Process
The preapproval process is the process in Activity Registration that requires activity owners to request approval before an activity can finish being created and/or is made available for registration in the School Store. The specific rules that trigger the preapproval process and the forms that the activity owner must complete and route to internal approvers are defined in the Preapproval Configuration tool. The Preapproval Process was introduced in Campus.2223.

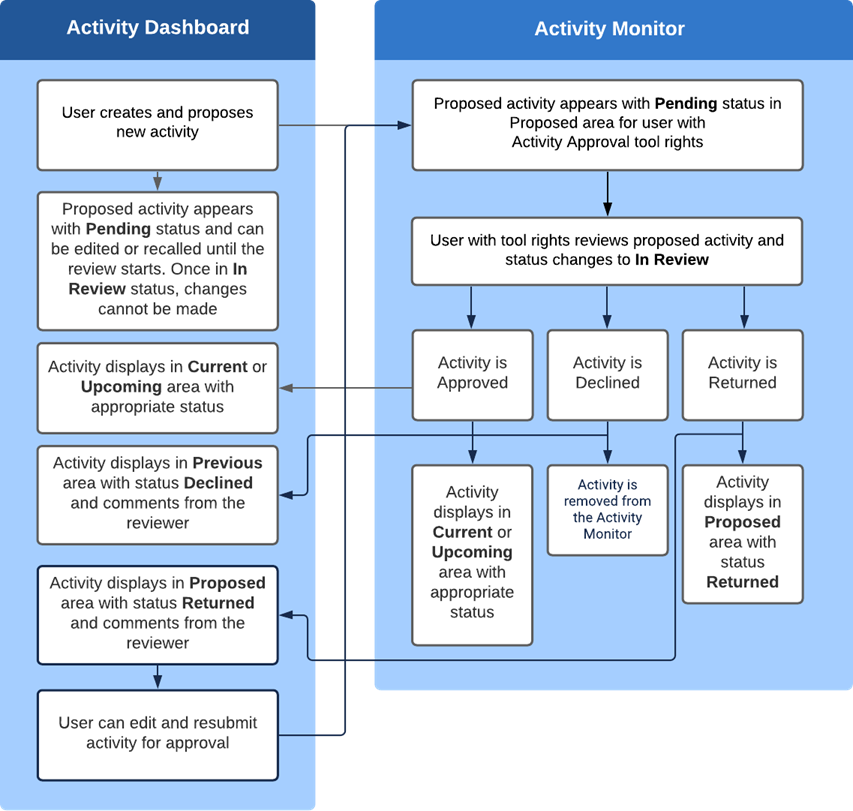
Activity Proposal Workflow
The following chart provides the basic process a proposed activity goes through in Campus. The ability to propose activities was introduced in Campus.2116.
Tool Rights for Activity Registration
Tool Rights determine the level of access users have to tools throughout Campus. This article refers to tool rights in abbreviated form (i.e., R, W, A, D or any combination of the four). Sub-rights appear as italicized.
| Right | Description |
|---|---|
R (Read) | The R right indicates the information on the corresponding tool may be viewed by the user. When applicable, the user is also allowed to print information. The user will NOT have access to the Save, Add or Delete icons in the action bar. |
W (Write) | The W right indicates the user may view and modify the information on the corresponding tool. The Save icon in the action bar will be functional. This right allows the user to modify only existing data in the area since adding new data is controlled by the A right. This right includes the ability to change or remove data from a specific field. |
A (Add) | The A right indicates the user may view, modify and add to the information on the corresponding tool. The New and Add icons in the action bar will be functional. This right allows the user to add new data/records. |
D (Delete) | ASSIGN THIS RIGHT WITH CAUTION. The D right indicates the information on the corresponding tool may be deleted. The Delete icon in the action bar will be functional. This right provides the ability to completely remove an existing record, including all data contained within the record. The ability to change/remove data from a field is controlled through the W right. |
RWAD Rights assigned at the module or folder level give those rights to all features within the module. For example, giving RW rights to the System Administration Health folder assigns RW rights to all tools within that folder, including any subrights.
Tool Right Paths
- Student Information > Activity Registration
- School Store > Product Inventory
| Right | R | W | A | D |
|---|---|---|---|---|
| Activity Registration | View Only | View and Modify | View, Modify, and Add | N/A |
| Activity Monitor | View Only | View and Modify | View, Modify, Add, and Copy | Users can remove activities that are in the Ready (Upcoming) or Draft (Current) status. |
| Activity Approval | Allows users to approve, return, and decline proposed activities. | N/A | N/A | N/A |
| Activity Dashboard | Users can view any activities they submit or view activities for which they are listed as the activity owner. | Users may edit proposed activities that they have submitted. | Users may submit proposals for new activities and copy existing activities. | Users can remove activities that are in the Ready (Upcoming) or Draft - Proposal (Proposed) status or recall proposed activities after they are sent for approval. |
| Secondary Activity Owners only have a read-only view of the activity to which they are assigned unless they are also the creator of the proposed activity. Secondary owners on an activity do not have the Remove button for delete/cancel functions even if the Delete tool right is assigned. | ||||
| Activity Roll Forward | N/A | N/A | Users can roll activities forward en masse. | N/A |
| Preapproval Configuration | View Only | View and Modify | View, Modify, and Add | Delete |
| Preapproval Requests | View Only | Allows users manage preapproval requests. | N/A | N/A |
Previous Versions
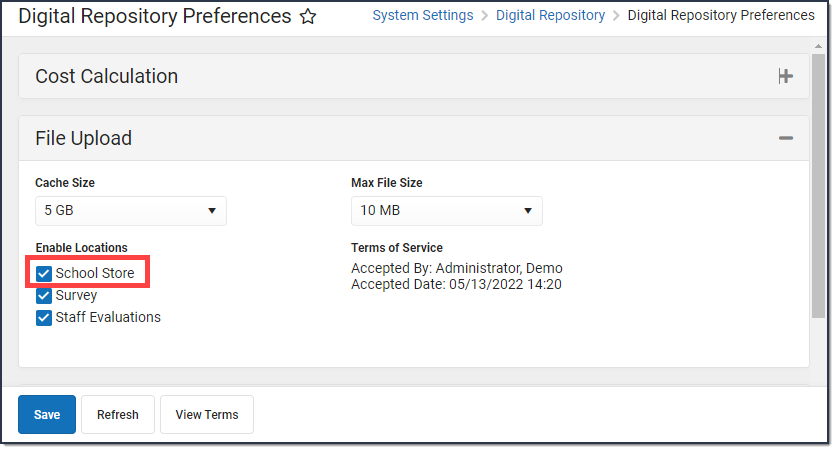
School Store needs to be enabled in Digital Repository Preferences so pictures can be added within the Activity Registration module. See Step 1 of the article below to enable School Store.


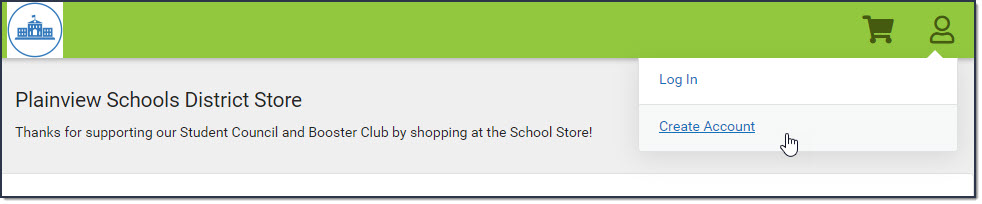


If schools are going to use the Activity Registration module, each school needs to establish a School Store.
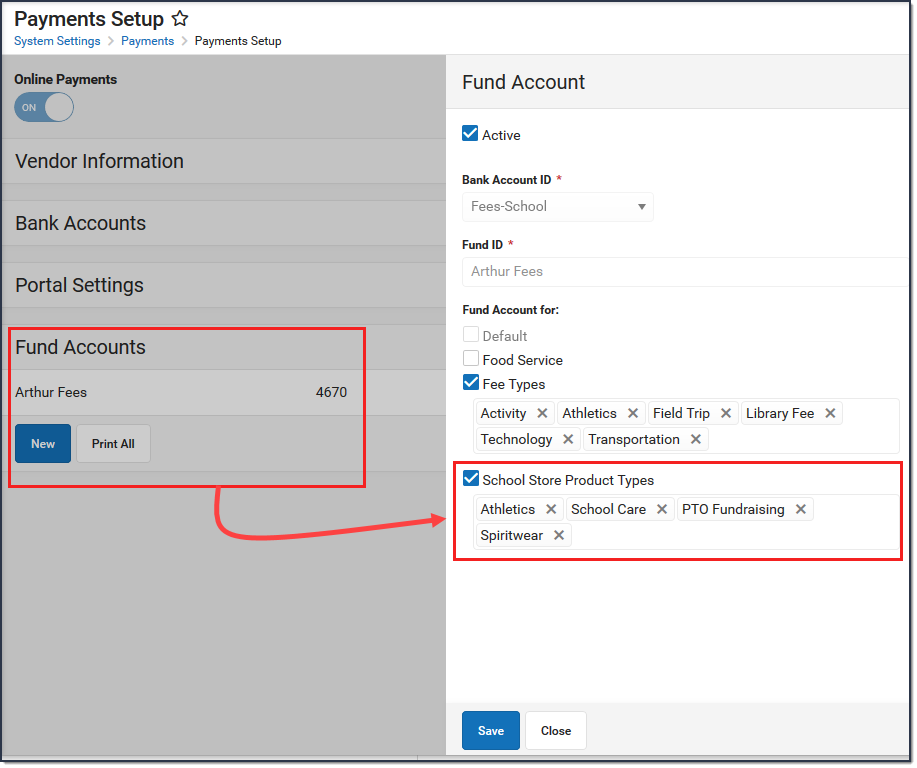
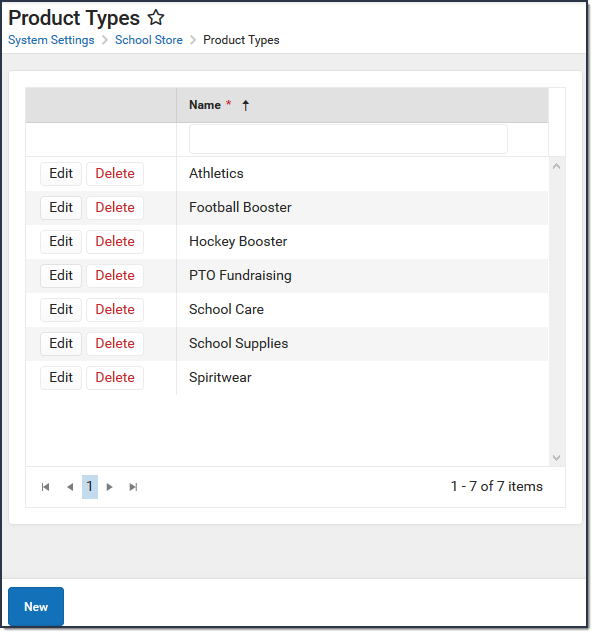
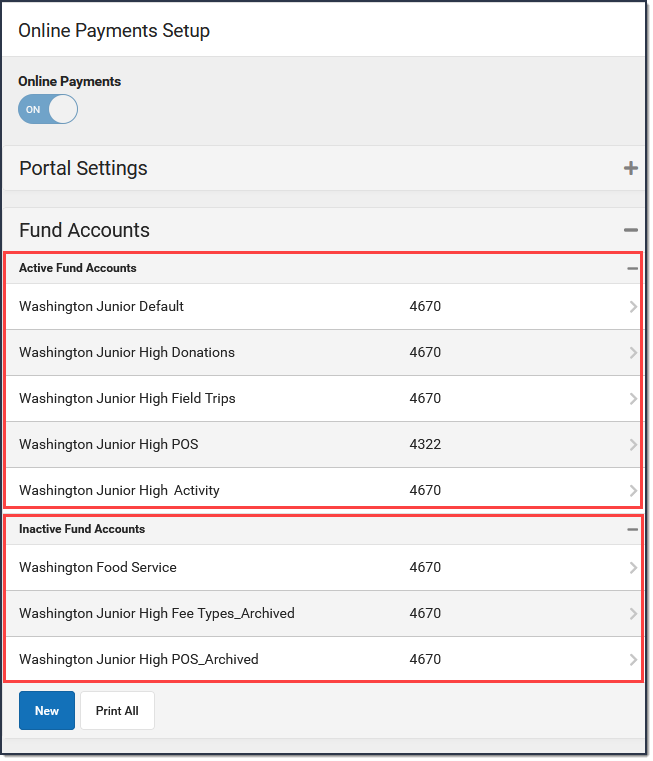
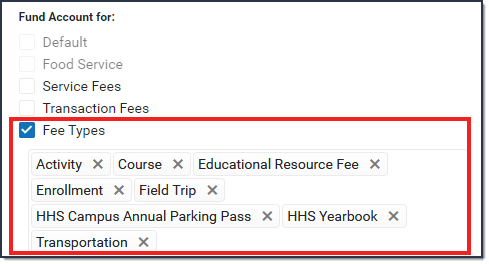
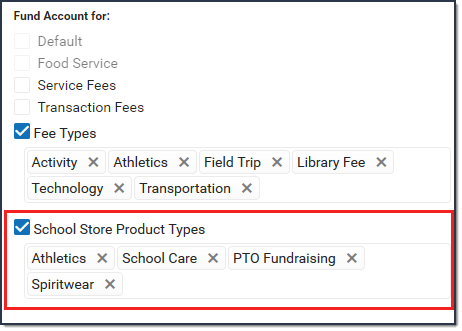
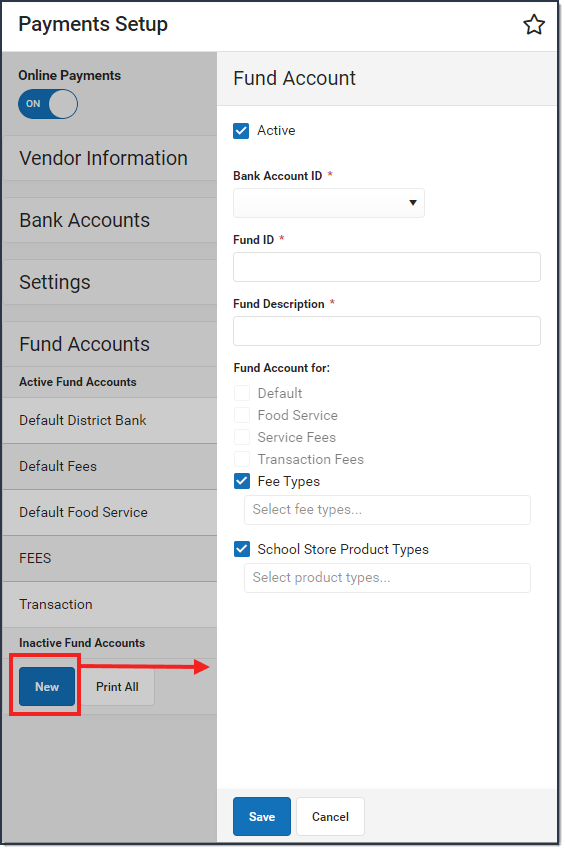
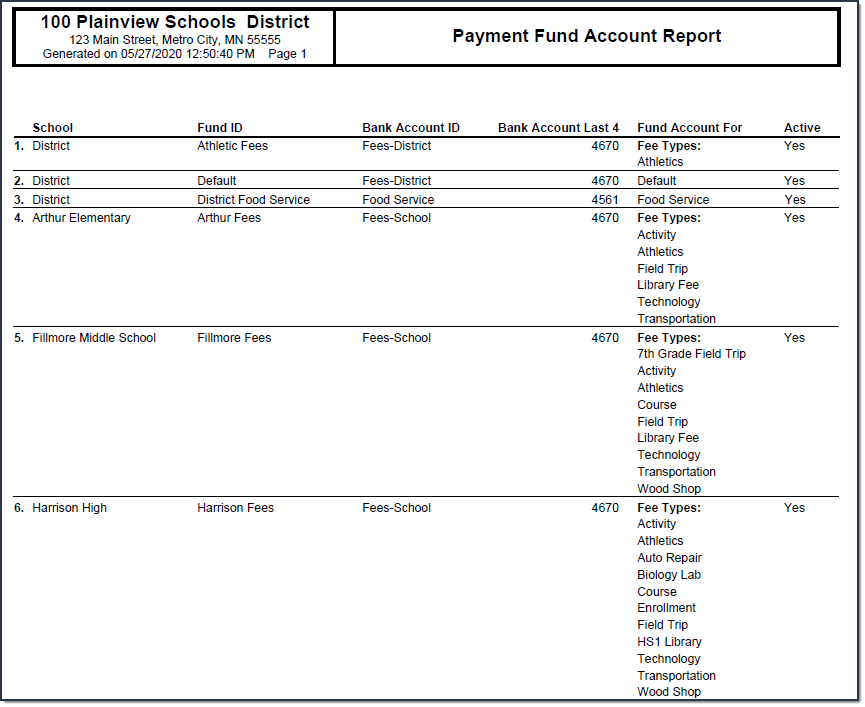
Product Types are assigned to Products and aligned to Fund Accounts in the Payments module. When a product is purchased, funds are deposited into the bank associated with the Fund Account to which you assigned the Product Type
Fund Accounts identify which bank accounts are used for items purchased in the School Store and Activity Registration. Product Types and Fee Types are tied to fund accounts.
Classic View: System Administration > Custom Forms
Search Terms: Custom Forms
The Custom Forms tool uploads and manages supplemental documents that can then be linked to a person's record. Custom Forms can be set up to pull information directly from Campus and/or have data entered into a form queried and reported in Ad hoc.
Three types of forms can be created using this tool. Select an option below to read detailed instructions on how to create each type:
See the Custom Form Creation and Troubleshooting Custom Forms documents for additional information.
Custom Forms List
By default all existing Custom Forms are sorted by Module. Drag column headers to the top of the screen to further sort. Forms can also be sorted by clicking on the column headers.
Enter text into the fields below the header or select values in the dropdowns to filter the list of Forms. The funnel icon ![]() provides additional filtering options. Custom forms can be filtered by Module, Status, Name, Sequence, Form Type, Start Date, and/or End Date.
provides additional filtering options. Custom forms can be filtered by Module, Status, Name, Sequence, Form Type, Start Date, and/or End Date.
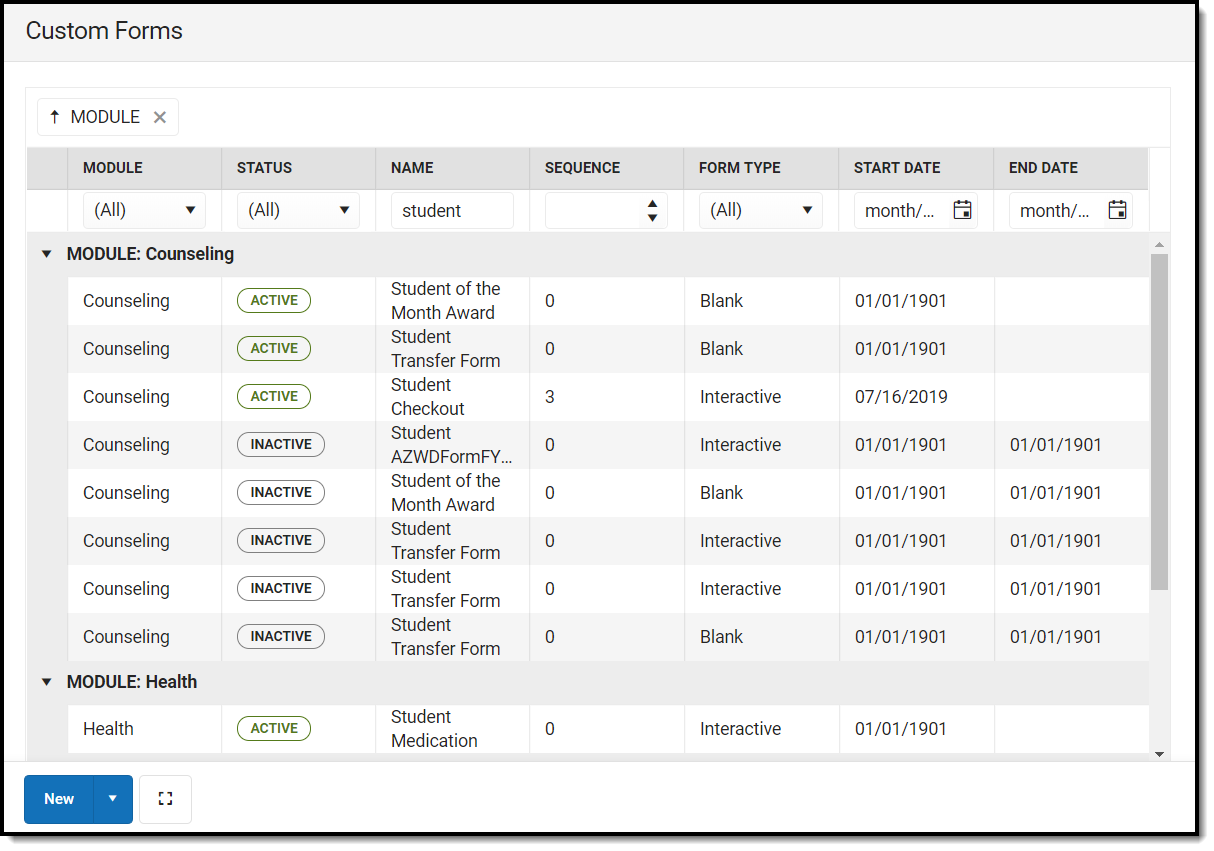 Image 1: Custom Forms List Screen
| Column Header | Description |
|---|---|
| Module | The module in which the form is available. |
| Status | The state of the form. The Status indicates if a form is currently available to attach to a person's record.
Custom Forms in draft status can be previewed on a person's Forms tool or Documents tab. See the Preview Draft Forms section for additional information. |
| Name | The Name of the form. |
| Sequence | The order in which the form displays in the custom forms list screen, in the dropdown of forms available on the person's Forms tool or Documents tab (Interactive Forms), and in the Outline (Blank Forms). Lower numbers appear higher on the list. |
| Form Type | An indicator if the form is Portal, Portal Fillable, Portal eSignature, Interactive with Database Table, Interactive, and Blank. See each section below for detailed instructions on how to create each form type. |
| Start Date | The form is active as of this date. |
| End Date | The form is inactive after this date. |
Create a New Custom Form
Click the New button to open the Form Type selection screen. See each section below for detailed instructions on how to create each form type.
Clicking the down arrow on the New button provides a shortcut to select the form type and skips the Form Type selection screen.
 Image 2: New Button Options
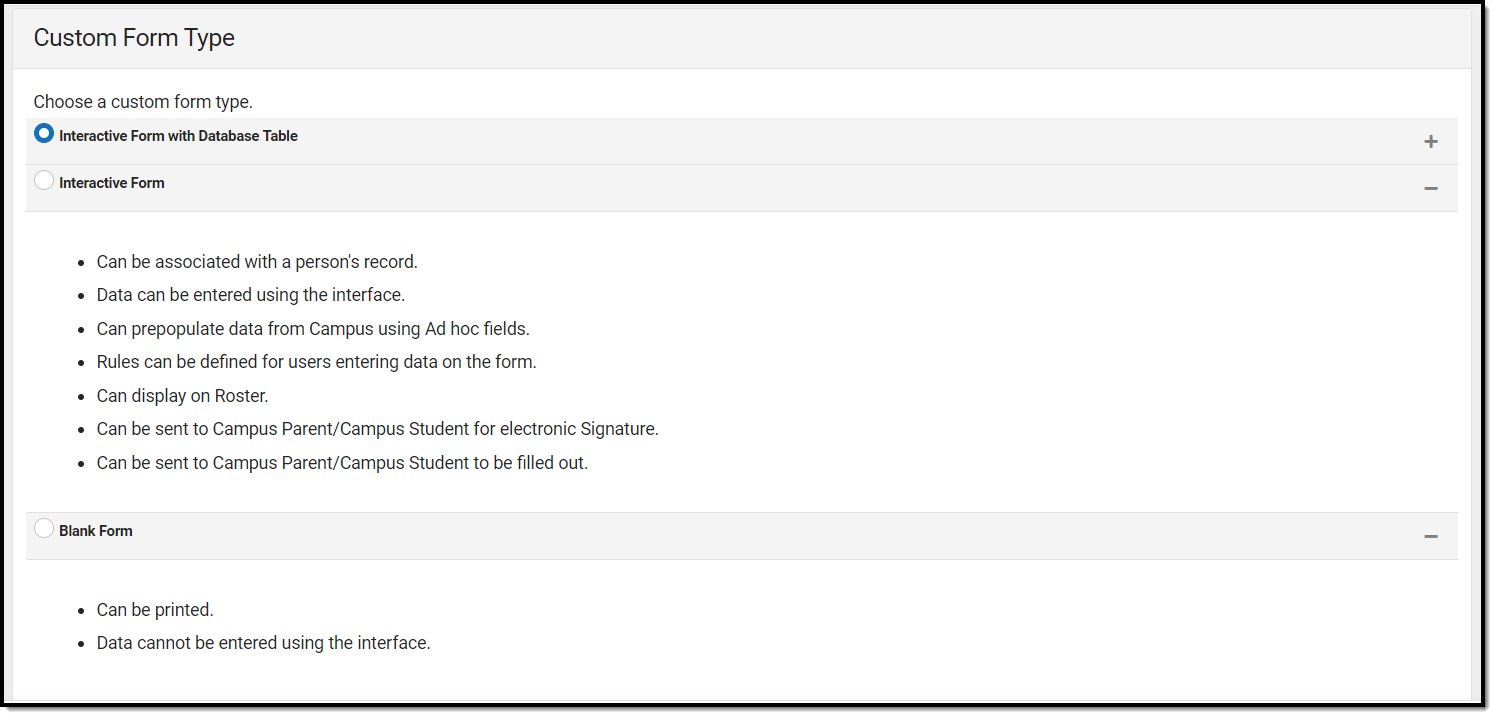 Image 3: Custom Form Type Selection Screen
Delete Existing Custom Forms
Existing Custom Forms can be deleted if necessary. Campus advises adding an end date to the form instead of deleting a custom form for historical purposes.
Click on an existing Custom Form and click the Delete button. Database Tables will be removed when the Form is deleted.
Interactive Form with Database Table
Data entered into an interactive form with a database table can be queried and reported in Ad hoc. See the Custom Forms in Ad hoc section for additional information. Users can enter data directly into interactive forms from the person's Document's tool or Forms tool. Existing data from Campus can be pulled into the form.
Additional options for interactive forms include allowing the form to display on Roster or on the Campus Parent and/or Campus Student Portal. Guardians and students can also electronically sign and fill out information using the Portal.
Data entered into an interactive form with a database table does not modify any existing data in Campus fields. Existing data can be pulled onto the form and data entered into the form can be reported in Ad hoc, but existing data in Campus is not rewritten.
From the Form Type selection screen, select the Interactive with Database Table form type and then click Next. The Interactive with Database Table workflow displays.
 Image 4: Interactive with Database Table Workflow
Select a link to navigate to a step in the Interactive Form with Database Table creation process:
Interactive Form
Once an interactive form is active, it is available for use to fill out for a person. Users can enter data directly into interactive forms from the person's Document's tool or Forms tool. Existing data from Campus can be pulled into the form.
Additional options for interactive forms include allowing the form to display on Roster or on the Campus Parent and/or Campus Student Portal. Guardians and students can also electronically sign and fill out information using the Portal.
From the Form Type selection screen, select the Interactive form type and then click Next. Unlike the Interactive with Database Table form type, the Interactive type does not use the Configure Table step. The Upload, Prepopulate Fields, Define Rules, and Publish steps are the same for both interactive form types.
Note: hyperlinks are not supported.
 Image 5: Interactive Workflow
Select a link to navigate to a step in the Interactive Form creation process:
Blank Form
Blank forms can only be printed. Blank forms are located in the Forms tool.
From the Form Type selection screen, select the Blank form type and then click Next. The Blank Form upload screen displays.
![]() Image 6: Blank Upload Screen
Image 6: Blank Upload Screen
| Field Name | Description |
|---|---|
| Module | The module in which the form is available. Available modules include: See the Forms tool for additional information. |
| Name | The name of the form as it displays in the custom forms list screen and the Forms tool. |
The name of the PDF file named by the user as the form was created in Adobe Acrobat Professional. Only PDF documents (.PDF) can be uploaded. Additional file types can be uploaded on an individual person's Forms tool or Documents tab. Only PDFs created using Adobe Acrobat Professional or Adobe DC are supported for Custom Form creation. | |
| Sequence | The order in which the form displays in the custom forms list screen and in the Outline. Lower numbers appear higher on the list. |
| Start Date | The form is active as of this date. The start date can be on a past, current, or future date. |
| End Date | The form is inactive after this date. The end date can be on a past, current, or future date. This field can be left blank. |
| Status | The state of the form. The Status indicates if the form is Active, Inactive, or Draft. Status is calculated based on the Start and End date. |
| Uploaded By | The name of the user who uploaded the form. This is either the district name or Infinite Campus. |
Blank Form Creation Process
- Select the Module in which the form will be available.
- Enter a Name for the form.
- Click Select File.
- Locate the PDF file then click Open.
- Enter a Sequence number for the form. The arrows buttons can be used to select a sequence number.
- Enter a Start Date for when the form becomes active.
- Optional: enter an End Date for when the form becomes inactive.
- Click Save when finished.
Once active, the Blank Form is available for users to print from the Forms tool. See the Forms tool for additional information.
Interactive Form and Interactive Form with Database Table Workflow
This section details each step of the Interactive and Interactive with Database Table workflow. The Configure Table step only applies to the Interactive with Database Table form type.
Upload
The first step in the custom form creation process is to upload the PDF file and name the form.
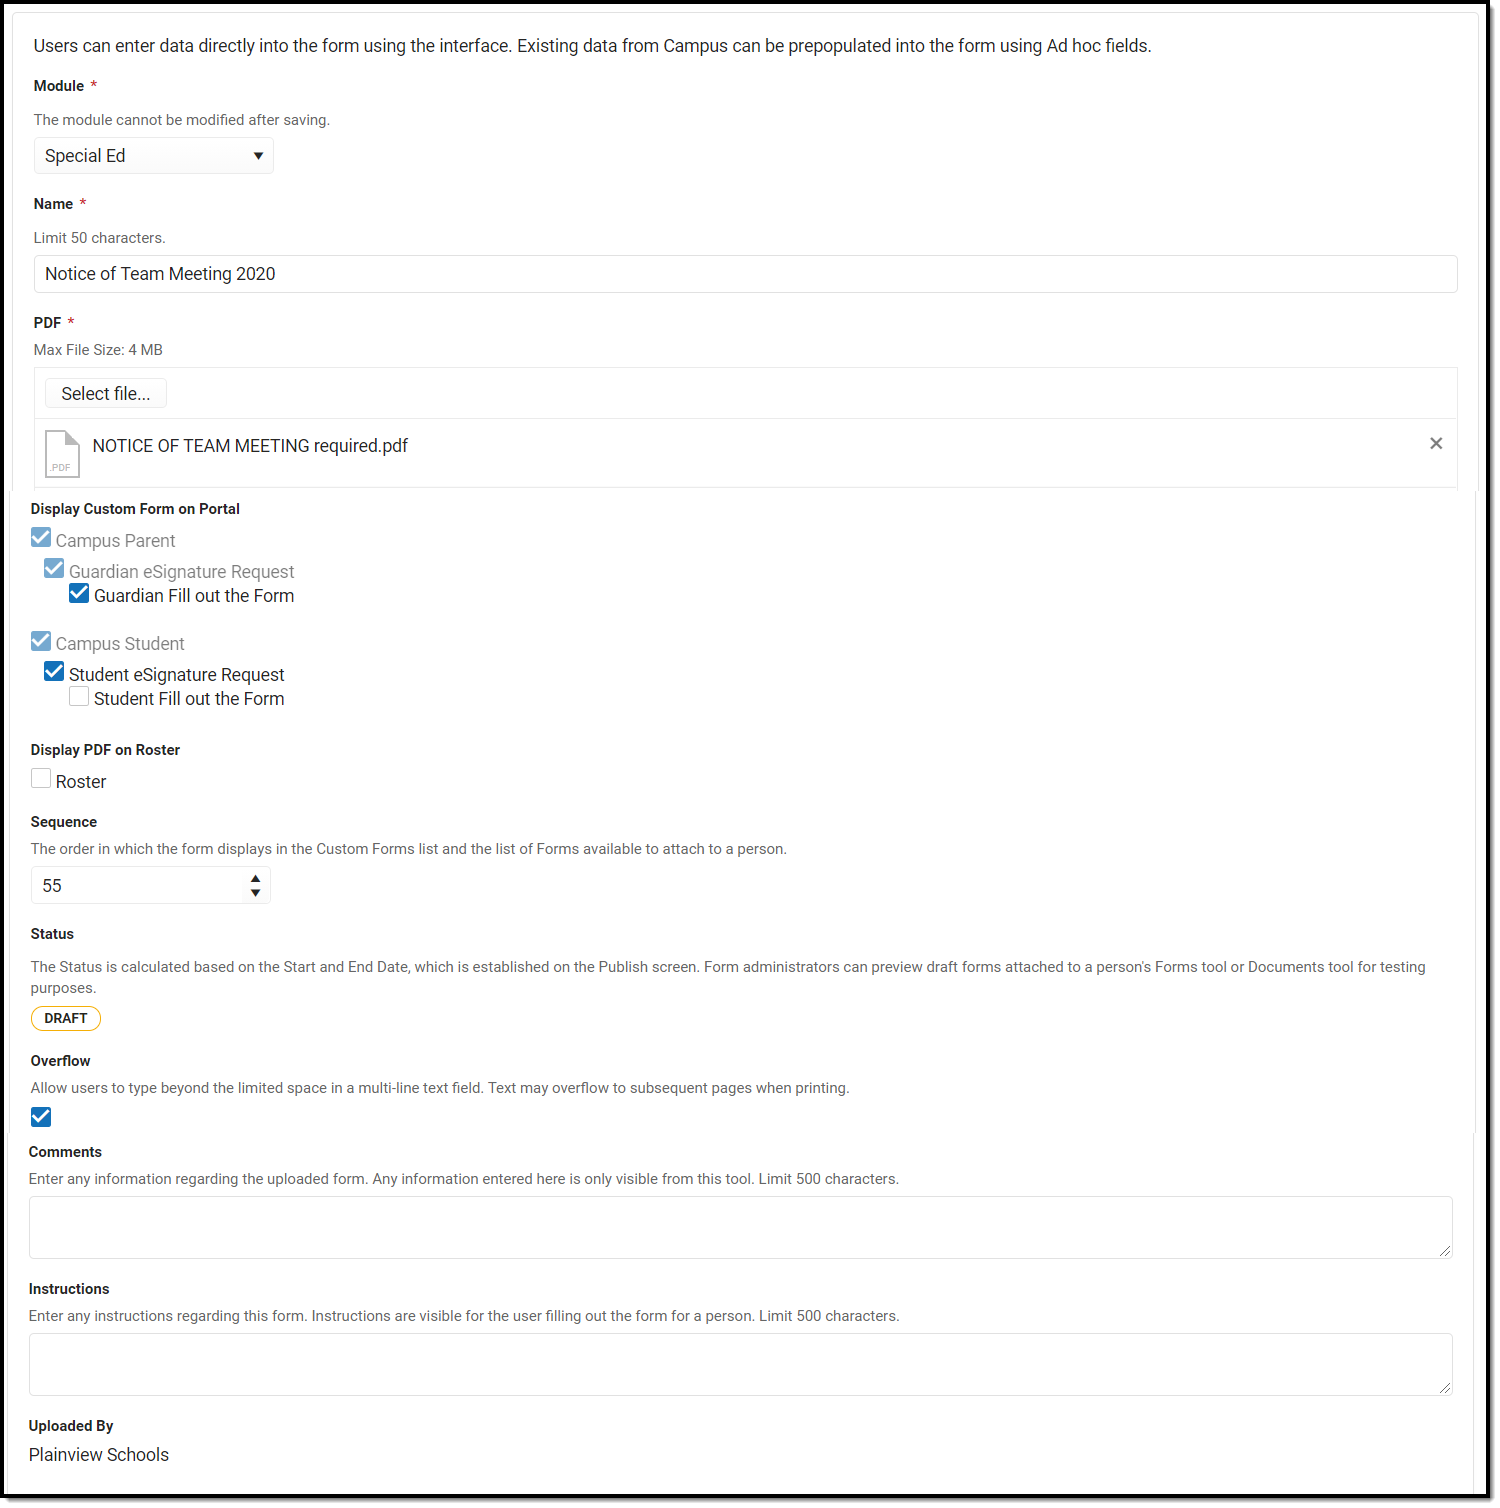 Image 8: Interactive and Interactive with Database Table Upload Screen
| Field | Description |
|---|---|
| Module | The module in which the form is available. Available modules include: See the Forms tool for additional information. |
| Name | The name of the form as it displays in the custom forms list screen and for the user filling out the form for a person on the Forms tool or Documents tab. |
The name of the PDF file named by the user as the form was created in Adobe Acrobat Professional. Only PDF documents (.PDF) can be uploaded. Additional file types can be uploaded on an individual person's Forms tool or Documents tab. Only PDFs created using Adobe Acrobat Professional or Adobe DC are supported for Custom Form creation. | |
| Display Custom Form on Portal | When the form is attached to a student and locked, a read-only version of the Custom Form displays on the Campus Parent and/or Campus Student application. Three conditions must happen in order for a Custom Form to display on the portal:
See the Campus Parent Portal and Campus Student Portal documentation for additional information. Forms supports emancipated student functionality. Emancipated students will receive a form via the Parent Portal if it is marked to be sent to the Parent Portal. See the Emancipated Students documentation for information on setting up emancipated students. |
| Guardian eSignature Request, Student eSignature Request | When the Display Custom Form on Portal option and this option is marked, a request for signature is sent to the student and/or parent/guardian(s) on the Campus Parent and/or Campus Student application. Custom Forms with eSignature are not available on the Documents tool. Note: eSignature data cannot be queried in Ad hoc. Custom Form eSignature functionality does not require a pin to complete. See the following documents for additional information: |
| Guardian Fill out Form, Student Fill out Form | When the Display Custom Form on Portal, eSignature, and this option is marked a request for data entry and signature is sent to the student and/or parent/guardian(s) on the Campus Parent and/or Campus Student application. See the Campus Parent Portal and Campus Student Portal documentation for additional information. |
| Display PDF on Roster | When the form is attached to a student, a PDF version of the Custom Form displays on the Roster. Three conditions must happen in order for a user to view a Custom Form on Roster:
See the Roster (Section) documentation for additional information. See the Scheduling Tool Rights or the Campus Instruction Tool Rights documentation for additional information. |
| Sequence | The order in which the form displays in the custom forms list screen and in the dropdown of forms available on the person's Forms tool or Documents tab. Lower numbers appear higher on the list. |
| Overflow | A checkbox that toggles the overflow functionality. When marked, users have the ability to input text into multi-line text fields beyond the limit of the field's space. Overflow text prints on subsequent pages. |
| Comments | A text field used to enter text related to the form, such as when the form was last updated or which user uploaded the form. This text (limit 500 characters) can be used for any information regarding the uploaded file, but entered comments are only visible within this tool. The following symbols cannot be saved into the text field:
|
| Instructions | A text field used to enter text instructions for the user attaching the form to a person's record. This text (limit 500 characters) appears when creating a new document for a person. It can contain instructions for use, specific rules for case managers, etc The following symbols cannot be saved into the text field:
|
Form Count | The number of instances of this form created for people in Campus. Custom Forms cannot be deleted if there are instances of the form associated to a person's record. |
| Uploaded By | The name of the user who uploaded the form. This is either the district name or Infinite Campus. |
Prepopulate Fields
The Prepopulate Fields step is used to map Ad hoc fields that pull data from Campus into the form. This reduces the amount of data entry when a user fills out a form for a person. Not all fields need to be mapped.
Users who have rights to a form are able to view all data that may be pulled into that form, regardless of whether they have rights to that data or the tool it comes from. For example, if an administrator maps behavior event information to a field in the form, any users of the form are able to see that information. This occurs even if they don't have rights to behavior tools. This includes social security numbers.
Click a field on the form to map it to a field in Campus. The Form Field Properties editor displays. Editable fields display in gray. Dark gray fields indicate that a mapped Ad hoc has already been mapped onto the form. Light gray fields with an orange/yellow border indicate that field does not have a mapped field name (See Image 9 below). Available field types include text fields, date fields, and number fields.
Keyboard shortcuts:
- Arrow keys: move between Ad hoc fields.
- Tab: move between fields in the interface. Tab does not navigate between form fields on the PDF.
- Enter: from mapping window, same as clicking OK or Cancel.
 Image 9: Prepopulate Fields
When mapping fields, enter search terms to narrow the list of fields. In addition to Ad hoc fields, the existing Reserved Name List is still available at the bottom of the dropdown list.
Online Registration (OLR) data is not available in Ad hoc and cannot be pulled directly into a Custom Form. Data must first be posted from online registration to custom fields on a custom tab and then mapped to fields on a Custom Form. See the Online Registration documentation for additional information.
Field Sequence
Ad hoc fields may be selected multiple times to prepopulate data from multiple records. For example, a form may list four behavior incidents. When mapping fields, select the appropriate Sequence for repeated fields, in this example 1-4 (see Image 10). If a student is involved in multiple behavior incidents, the sequencing of the Ad hoc fields can be used to order and pull the different behavior incidents when the form is added to the student's record. If sequencing is not used and all behavior incidents are given a 1 (one) sequence number, only one behavior event will be pulled onto the form.
 Image 10: Field Sequence
Map Date Fields
Form administrators have the ability to map date fields onto forms. Supported formats for date fields include:
- m/d/yy
- m/d/yyyy
- mm/dd/yy
- mm/dd/yyyy
When the form is uploaded, all date fields display in a mm/dd/yyyy format. Time is not supported. Selecting Ad hoc fields with a timestamp may not display as expected. When selecting date fields using the Form Field Properties editor, Ad hoc fields that contain timestamps are displayed in red (see Image 11 below). Only dates should be mapped to date fields.
 Image 11: Map Date Fields
Link Ad Hoc Fields
Ad hoc fields can be linked together, or combined, to pull related information into one field on forms. For example, a team member's name can be set up to pull both the first name and last name into the same field. This would look like [contacts.firstName] [<SPACE>] [contacts.lastName].1 (see Image 12 below).
At this time, combining Ad hoc fields can only be done during this step.
- Type search terms to narrow the list of fields provided.
- Select desired Ad Hoc field.
- Type and select desired non-Ad hoc text between Ad Hoc fields (optional). Non-Ad hoc text can be words (the, and, etc.), symbols (comma, semicolon, colon, etc.), and/or spaces. When a user hits the space bar on the keyboard, the letters <SPACE> appear. In the completed document, this looks like a regular space.
Users must select non-Ad hoc text by either clicking on the selection in the dropdown or hitting the Enter/Return key on the keyboard before proceeding.
Repeat steps 1-3 to include up to 10 (ten) Ad Hoc fields and non-Ad hoc text.
Once a linked phrase is entered on a form, that same phrase can be used again on the same form. In this example, the same linked phrase is used to pull multiple contact persons' names onto the form by using the sequencing options (see Image 12).
It is best practice to not link fields from multiple tables. See the Ad Hoc documentation for additional information on Ad Hoc.
 Image 12: Link Ad Hoc Fields
Common Use Cases for Linking Ad Hoc Fields
| Description | Example |
|---|---|
| Weapon description and ID | |
| Staff Member Name and Title | |
| Course Name and Number | |


After all mappings are complete, click Save & Next. This step is optional and can be done at any time, even after the form has been activated.
Configure Table
This step only applies to the Interactive with Database Table form type. Skip to the Define Rules step to continue the process for creating an Interactive form.
The Configure Table step is used to define the table name, column names, and character limits for each field on the form. Once the form is published, the table is created and the form becomes available for use to fill out for people. Any data entered into the form for a person can then be reported in Ad hoc.
Once the table is published, the table name, column names, and database limits cannot be edited. The Configure Table step becomes read-only. Existing documents cannot be converted into an Interactive form with a database table.
The first step of the Database Table Designer displays information and instructions about how to use database table designer. Click the plus icons to expand or hide this information.
The Table Name is the name of the table in the database. A suggested name for the table is prepopulated from the Name field on the Upload screen, but can be modified. Table names must be unique. Table names are not case-sensitive (Example: Form_AAA is the same as Form_aaa).
 Image 13: Database Table Designer
Pagination
Each page of the PDF that contains fields displays as a tab in the table designer. Enter a name for the field as it displays in a column of an Ad hoc report and database limit for each field.
 Image 14: Database Pagination
| Field Name | Description |
|---|---|
| Field Type | The type of field in the document. Options include: text, checkbox, dropdown, etc. |
| Ad Hoc Name | The Name of the field as it appears as a column name in Ad hoc. Suggested values are prepopulated, but can be modified. All column names must be named correctly before a table can be created. Providing appropriate and informative column names helps users locate the correct data when building reports in Ad hoc. Ad hoc names cannot contain symbols or spaces. Only letters, numbers, and underscores (_) can be used. Names must begin with a letter and have a minimum of two (2) characters. |
| DB Type | Three database types are supported: text (varchar), number, and date. Most fields are text fields. Using date fields allows users to sort, calculate, and filter reports by date. Fields are configured when creating the PDF in Adobe Acrobat Professional, before uploading the form. Only PDFs created using Adobe Acrobat Professional or Adobe DC are supported for Custom Form creation. |
| DB Limit | The character limit in the database. This is the maximum allowable characters that can be entered and saved into the field. Suggested values are prepopulated based on the size of the field, but can be modified. Some values are set based on limits set for the field in Adobe Acrobat Professional, or on the limited values that can be entered, like checkboxes. These values cannot be modified. Valid values can be between 1-8000 or MAX. MAX is 1 GB of data. If the Overflow checkbox is marked, users will be able to enter up to the set DB Limit number of characters. |
After entering Ad hoc names and database limits for each field on the form, click Save & Next. A Draft of the table can be saved and this step in the process can be finished later.
Users are not able to advance to the Publish screen without naming all fields, establishing database limits, and fixing all errors. The number of errors displays at the top of the Database Table Designer. Clicking the number of errors navigates the user to the next error.
Define Rules
This is an optional step and can be completed at any time, even after a form is Active and attached to a person. If a form administrator changes the rules on a document already Active and attached to a person, these changes may cause the form to change status.
Form administrators can add rules to the form with the Define Rules step in the workflow. When a user fills out the form for a person, they must adhere to the rules created on this screen.
For forms being sent to the Campus Parent and/or Campus Student Portal to be filled out, this screen is also used to define which user can fill out each field. By default, all fields are marked for Staff and Portal. These checkboxes only display for fillable forms on Portal.
Note: A single field should not be marked as both Staff Fill and Portal Fill, as this REQUIRES both a staff member and portal user to modify the field. If both options are marked and a staff member does not modify the field before sending the form to the Portal, the custom form will be in a Draft status.
Best practice is to only mark either Staff Fill OR Portal Fill per field, not both.
The first screen when navigating to the Define Rules step is the Field List. The PDF displays on the left side of the screen and the Field List displays on the right. On the PDF, light gray fields with an orange/yellow border indicate that field does not have a rule defined. Dark gray fields indicate that a rule has already been defined for that field. On the Field List, all fields on the form display on the left column and the number of rules associated with that field display on the right column. The Staff and Portal checkboxes indicate which users can enter data into that field. Multiple rules can be created for one field.
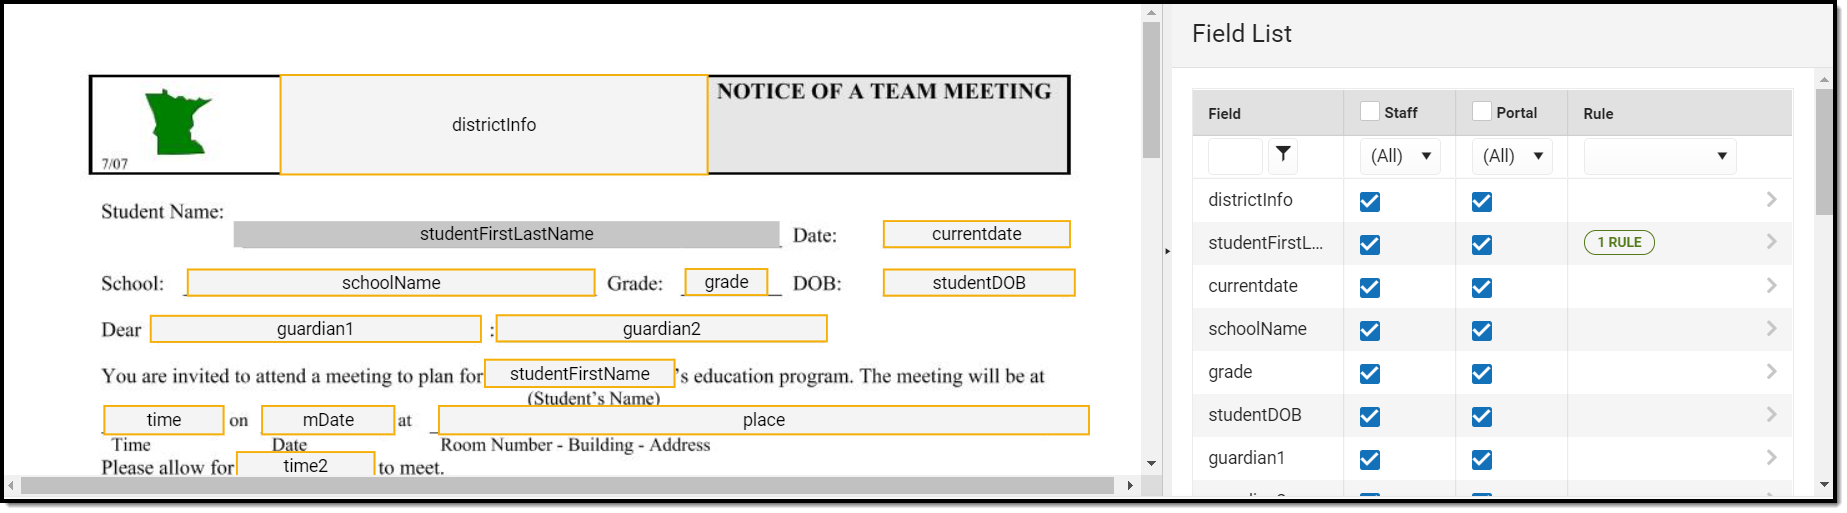 Image 15: Define Rules Field List
The Field List can be filtered and sorted to quickly find the desired field. The field are listed in the order in which they display on the PDF. Click the Field header to sort the table alphabetically or reverse alphabetically.
 Image 16: Example of Field Sorting Alphabetically
Enter text into the Field Search box to filter fields. The Funnel button (see Image 17 below) next to the Field Search text box can be used to change the search variable, such as adding a Starts with, Contains, or Does not contain parameters to the search.
 Image 17: Funnel Button Filter Options
The Rule dropdown (see Image 18 below) contains additional filtering options to display fields with only required rules, comparative rules, or fields that have or do not have rules. The Field and Rule filtering options can be used in conjunction to further narrow results.
 Image 18: Rule Dropdown Filter Options
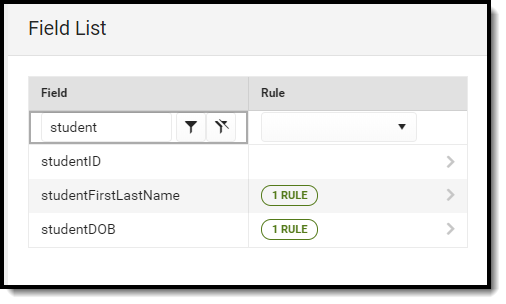
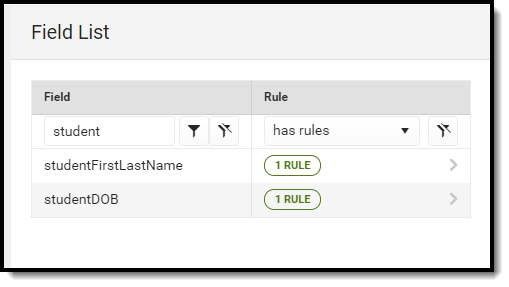
In the example below (see Image 19), a search for "student" has been entered into the Field Search text box, so only field that start with the word "student" display. The "has rules" option has also been added (see Image 20 below) to further narrow the results to fields that start with the word "student" and have a ruled already defined.
| Example of Search Options Used in Conjunction | |
|---|---|
|
|
Click the Slashed Funnel button ![]() to remove all filtering options and return the Field List to display all fields.
to remove all filtering options and return the Field List to display all fields.
Add a New Rule
Select a field on the Field List or on the PDF to add a new rule. The Field Detail displays. The Field Detail displays the name of the field, the data type, the user(s) who can enter data into that field, and any rules already created for the field, if applicable.
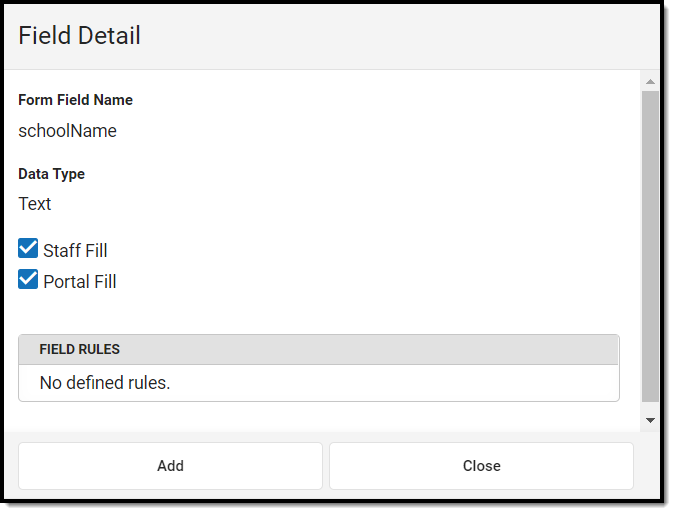 Image 21: Field Details
Click Add to create a rule for the field. The Rule Builder displays. The Data Type of the field determines what type of rule can be created for the field. Available rules include:
Required rules can be added to any type of field on the PDF. Any user filling out the form for a person must enter information into a field that has been marked as required.
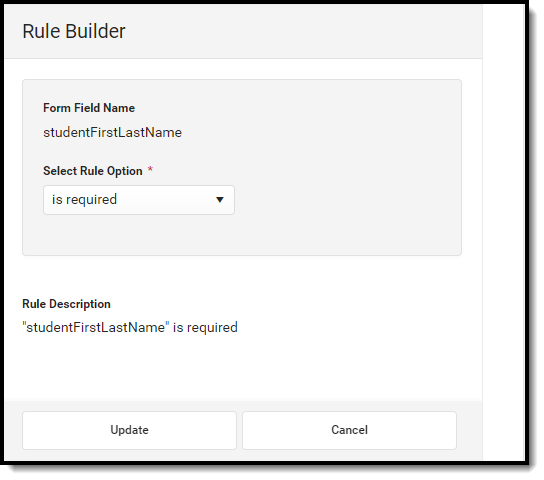 Image 22: Rule Builder - Required
Select the "is required" option from the Select Rule Option dropdown. The Rule Description at the bottom of the screen displays the rule in a complete sentence as it is being built. Verify the rule is correct and then click Update.
Conditional Required rules are required fields based on the selection of or data entered into another field. Select the "is required when" option from the Select Rule Option dropdown. Then Select Another Field that the first field is dependent on. The Rule Description at the bottom of the screen displays the rule in a complete sentence as it is being built. Verify the rule is correct and then click Update.
In the example below (Image 23), when the user marks the "Yes" military connection radio button (step 1), the Name field becomes required for them to fill out (step 2).
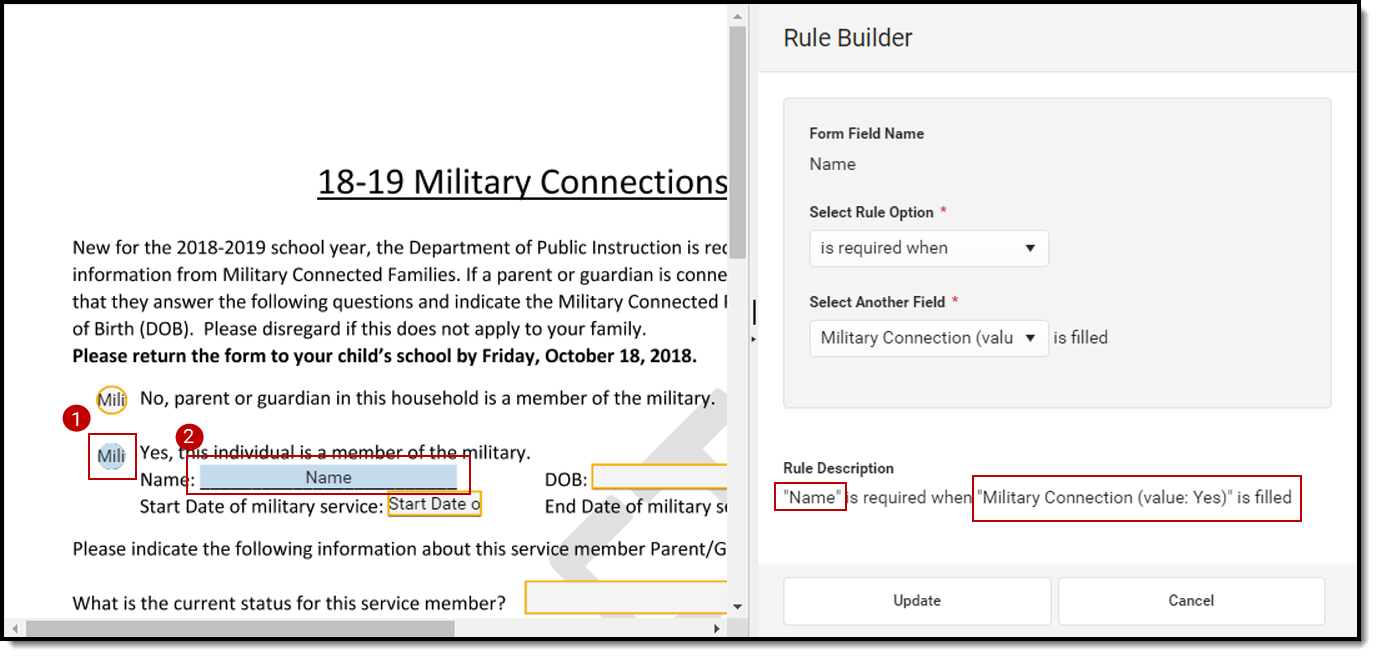 Image 23: Conditional Required Example
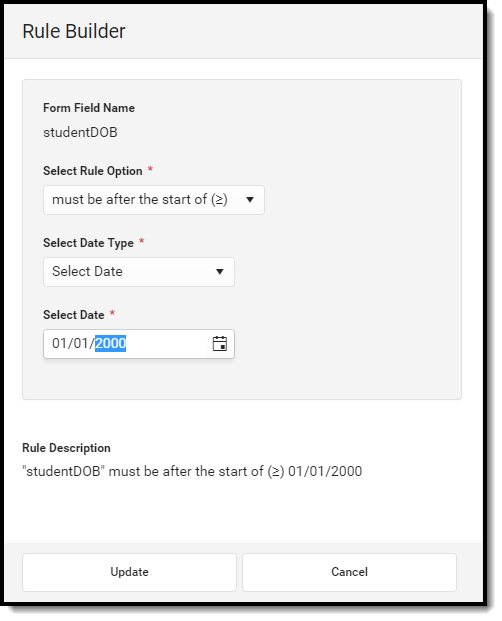
Comparative Date Rules can only be applied to date fields. When a date field is selected, additional options display in the Select Rule Option dropdown on the Rule Builder. Date options include:
- must be the same day as (=)
- must be after the start of (≥)
- must be after the end of (>)
- must be before the end of (≤)
- must be before the start of (<)
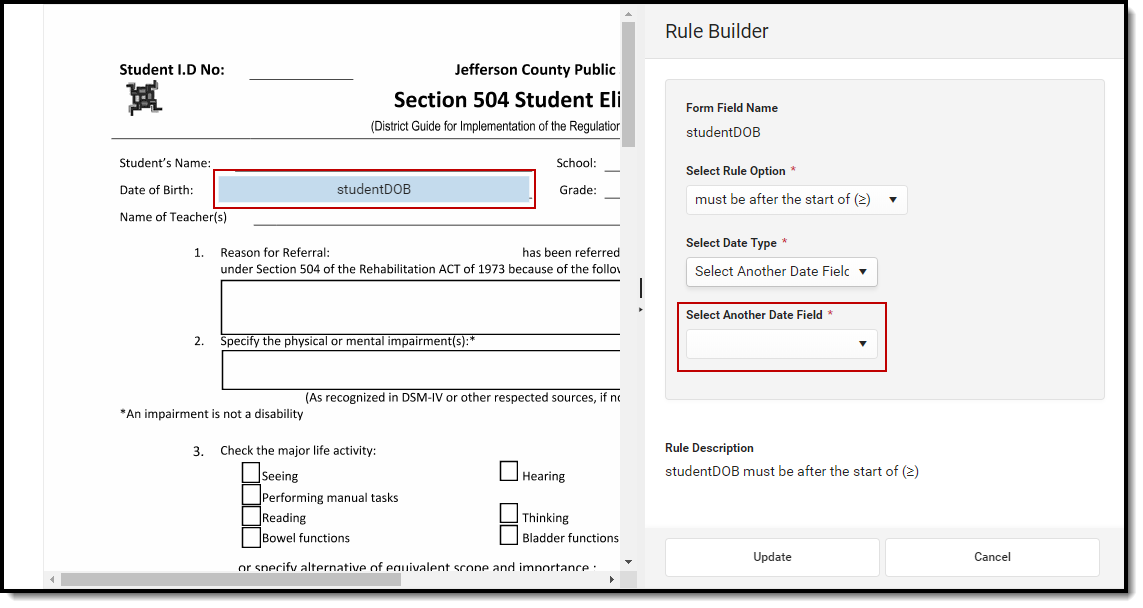
The Select Date Type field has two options. A date field can either be compared to a specific date entered or to another date field on the PDF.
Specific Date | Another Date Field |
|---|---|
To compare a date field to a specific date:
| To compare a date field to another date field on the PDF:
|
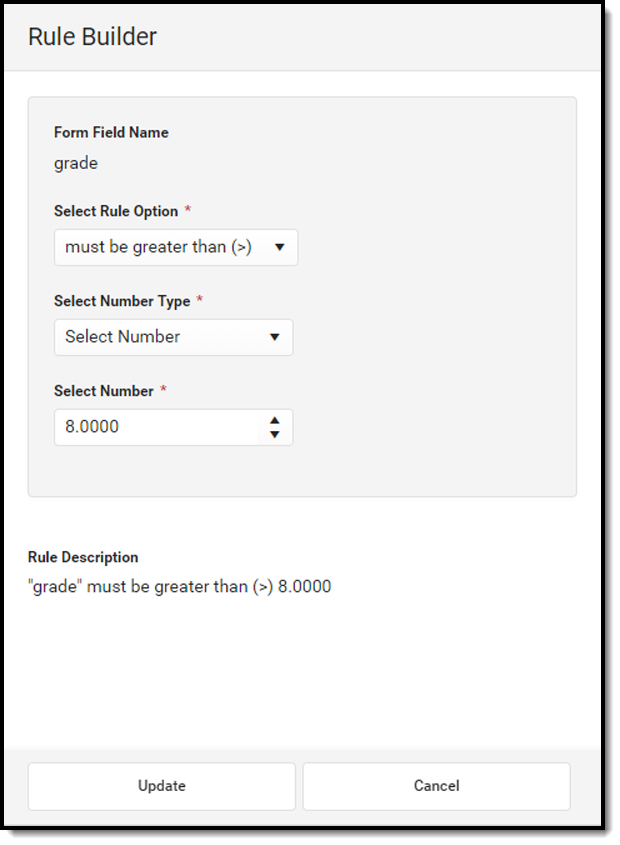
Comparative Number Rules can only be applied to Number fields. When a number field is selected, additional options display in the Select Rule Option dropdown on the Rule Builder. Number options include:
- must be equal to (=)
- must be greater than or equal to (≥)
- must be greater than (>)
- must be less than or equal to (≤)
- must be less than (<)
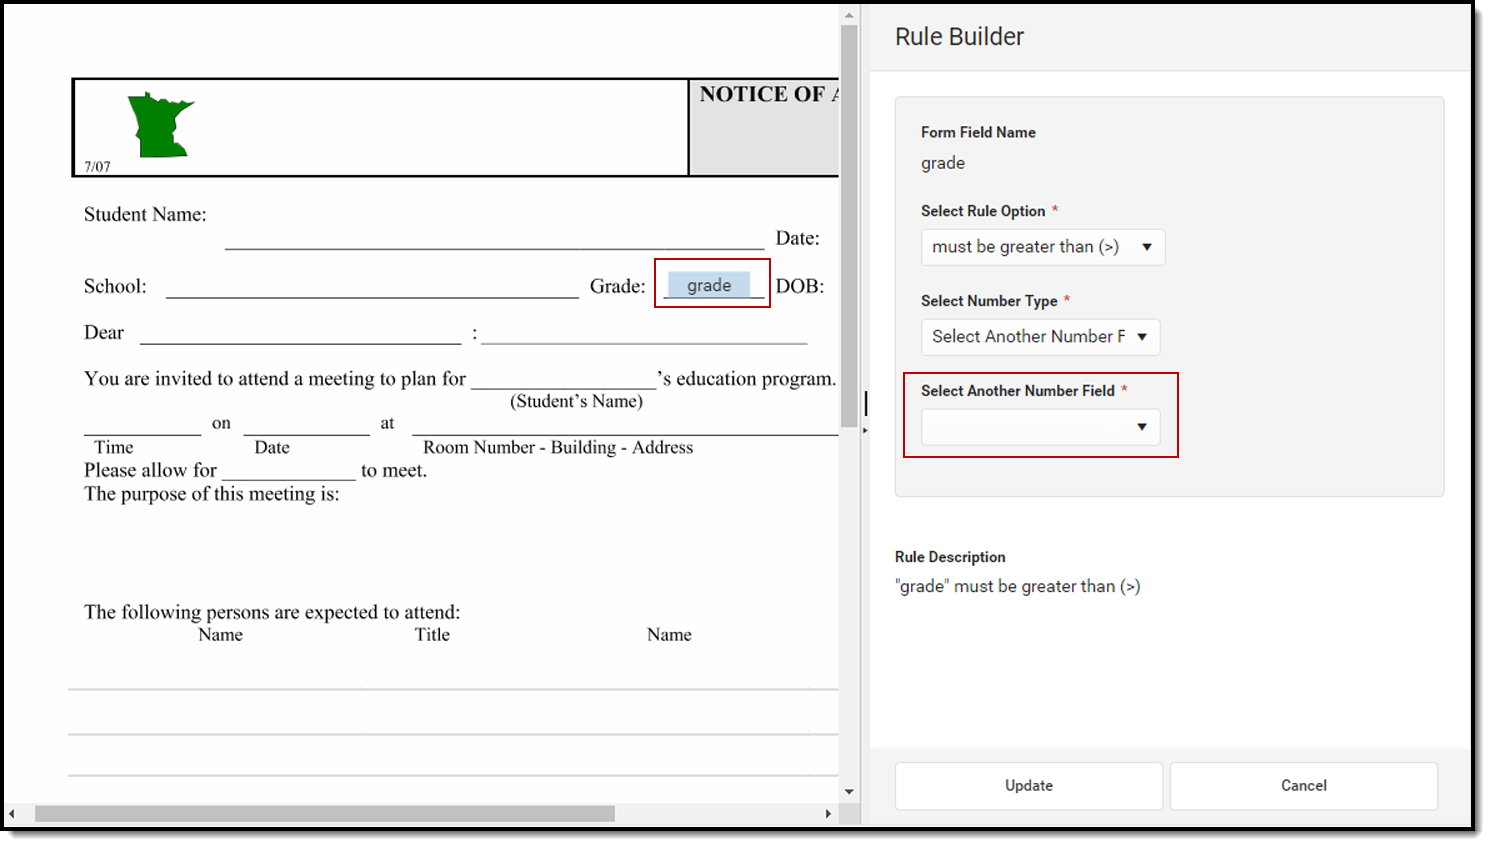
The Select Number Type field has two options. A number field can either be compared to a number entered or to another number field on the PDF.
Specific Number | Another Number Field |
|---|---|
To compare a number field to a specific number:
| To compare a number field to another number field on the PDF:
|
Once a rule has been created for a field, the rule can be viewed by navigating to the Field Detail.
Delete Rule
To remove a rule from a field, click on the rule from the Field Detail screen. The Rule Detail displays. Click Remove to delete the rule.
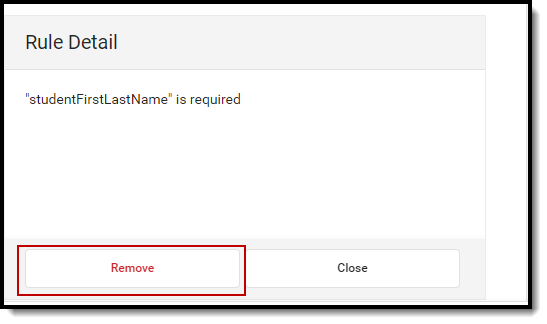 Image 28: Ruled Detail
Click Save & Next to navigate to the Publish step once all rule setup is complete.
Publish
Publishing an interactive form makes the form available for use to fill out for a person. See the Forms tool for additional information.
Publishing an interactive form with a database table creates a database table. The table name, column names, and database limits cannot be edited and the Configure Table step becomes read-only. When this form is active and associated with a person, the data entered into the form is available in Ad hoc for reporting. See the Custom Forms in Ad hoc section for additional information.
Before publishing, users can preview Custom Forms to test Ad hoc mapping, database limits, and rules. See the Preview Draft Forms sections for additional information.
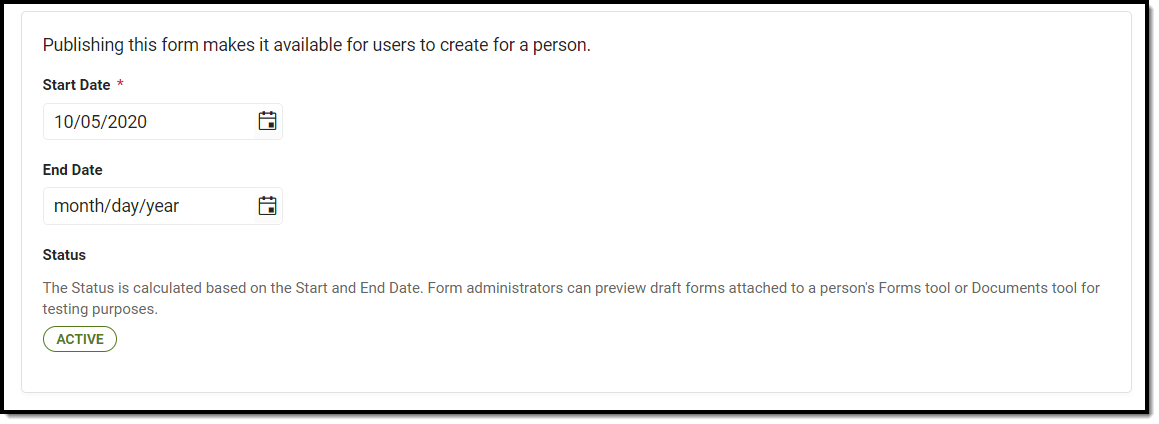 Image 29: Publish
| Field | Description |
|---|---|
| Start Date | The form is active as of this date. The start date can be on a past, current, or future date. |
| End Date | The form is inactive after this date. The end date can be on a past, current, or future date. This field can be left blank. |
| Status | The state of the form. This is calculated based on the Start and End date. Deactivating a form removes the form from the user's custom form selection list. Existing forms can still be edited and/or copied even if the form is deactivated. |
Custom Forms in Ad hoc
Classic Path: Ad Hoc Reporting > Filter Designer > Query Workflow/Student > Search: Custom
Search Terms: Filter Designer
This information only applies to the Interactive with Database Table form type.
Once a table has been published, those fields become available in Ad hoc. See the Ad hoc documentation for more information.
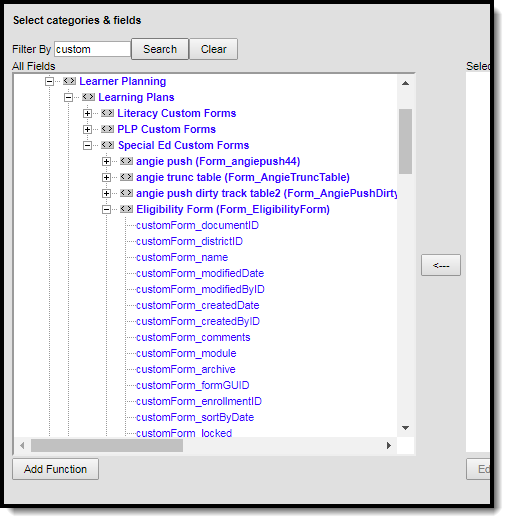 Image 30: Custom Forms in Ad hoc
The first section of fields include form identifications fields:
customForm_documentID
customForm_districtID
customForm_name
customForm_modifiedDate
customForm_modifiedByID
customForm_createdDate
customForm_createdByID
customForm_comments
customForm_module
customForm_archive
customForm_formGUID
customForm_enrollmentID
customForm_sortByDate
customForm_locked
customForm_personName
customForm_formDocName
All fillable fields on the form are listed after the identification fields. All items in the list are available for creating reports.
Preview Draft Forms
Classic Path: Student Information > Module > General > Documents
Classic Path: Student Information > General > Forms
Search Terms: (Module) Documents, Forms
Users have the ability to preview Interactive and Interactive with Database Table custom forms in draft status on a person's Forms tool or Documents tab. This preview allows form administrators to troubleshoot and test custom forms before the form is published. See the Tool Rights (Custom Forms) document for additional information.
Any information entered on the form is only for testing purposes and is not saved to the person's record.
Preview Draft Forms Process
| Documents Tool | Forms Tool |
|---|---|
|
|
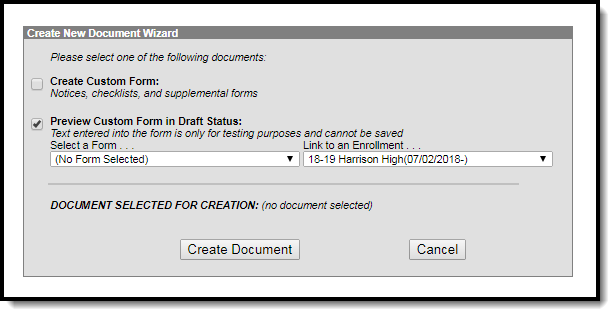
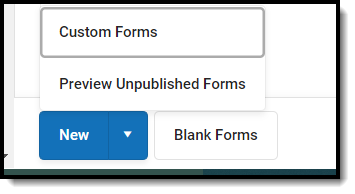
 Image 33: Field Properties Window
Recommended: Open the Custom Forms module and the Preview screen in two separate browser windows or tabs. Saving changes made to the form using the Custom Forms module can be seen on the Preview screen when the user clicks the Refresh button.
The Property lists the properties associated with the particular field. The Value provides information pertaining to the property. The Edit Location indicates where this field property can be edited.
| Field Property | Description |
|---|---|
Number of Characters | The entered value. |
Ad Hoc Fields | Indicates an Ad hoc field has been mapped to pull information from the person's record. |
DB Limit | Indicates the maximum allowable characters that could be entered into the field. |
Required | Indicates this field must be filled out. This indicator is for Required fields set up in Adobe Acrobat Professional. If users click Save & Next on the Define Rules screen, this indicator is removed. See the Define Rules section for additional information. |
| Rules | Indicates if a rule is created for this field, including required fields. |
Read Only | Indicates this field cannot be edited. |
| Overflow | Indicates this field has the overflow functionality. |
Field Type | Indicates if the field is a text, date, or number field. |
Reserved Name List
Campus does not recommend using the Reserved Name List to map prepopulated fields.
Student Information Fields | Notes |
|---|---|
stateID | |
studentID | |
studentName | Displays Last Name, First Name Middle Name |
studentFirstLastName | Displays First Name, Middle Name Last Name |
studentFirstName | |
studentLastName | |
studentMiddleName | |
studentDOB | This field will map to a date field. |
grade | |
studentGender | |
studentAge | |
studentHomePhone | |
studentAddress1 | |
studentAddress2 | |
| Guardian Fields | |
guardian1Name | Displays Last Name, First Name, Middle Name |
guardian1FirstLastName | Displays First Name Middle Name Last Name |
guardian1LastName | |
guardian1FirstName | |
guardian1MiddleName | |
guardian1WorkPhone | |
guardian1Relationship | |
guardian1HomePhone | |
guardian1Address1 | |
guardian1Address2 | |
guardian2Name | Displays Last Name, First Name, Middle Name |
guardian2FirstLastName | Displays First Name Middle Name Last Name |
guardian2LastName | |
guardian2FirstName | |
guardian2MiddleName | |
guardian2WorkPhone | |
guardian2Relationship | |
guardian2HomePhone | |
guardian2Address1 | |
guardian2Address2 | |
| School/District Information | |
districtInfo | |
districtName | |
districtAddress1 | |
districtAddress2 | |
districtPhone | |
schoolName | |
schoolAddress1 | |
schoolAddress2 | |
schoolPhone | |
currentDate | This field will map to a date field. |
user | Displays the user's full name |
username | |
tmName1-tmName12 | tm = Team Member |
tmTitle1-tmTitle12 | tm = Team Member |
caseManager | |
caseManagerTitle | |
caseManagerPhone | |
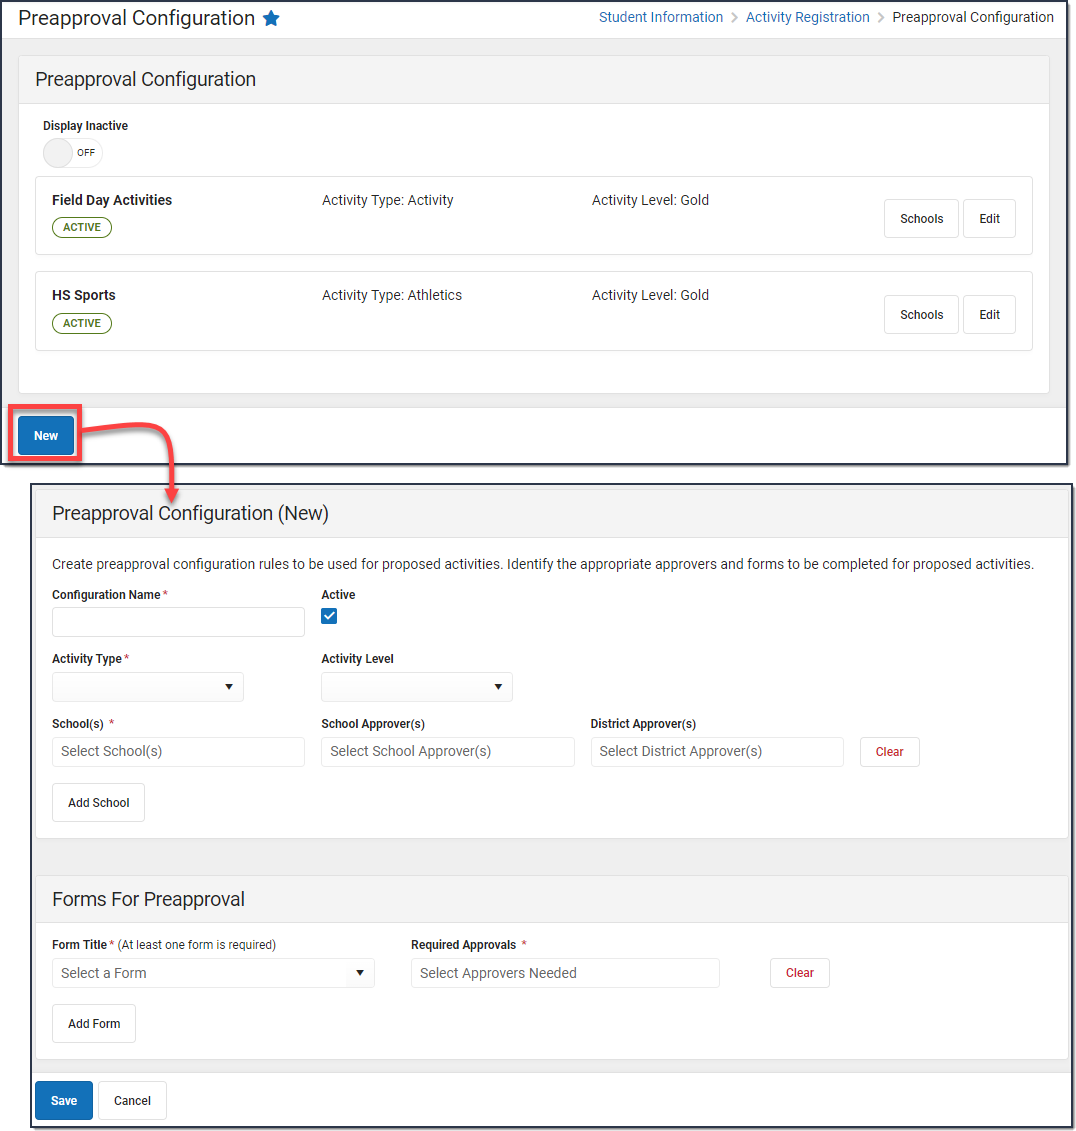
Certain activities may need preapproval based on rules determined by a school or the district. These activities require forms to be completed and submitted. The Preapproval Configuration tool is used to create rules and associate forms for activities requiring a preapproval process.
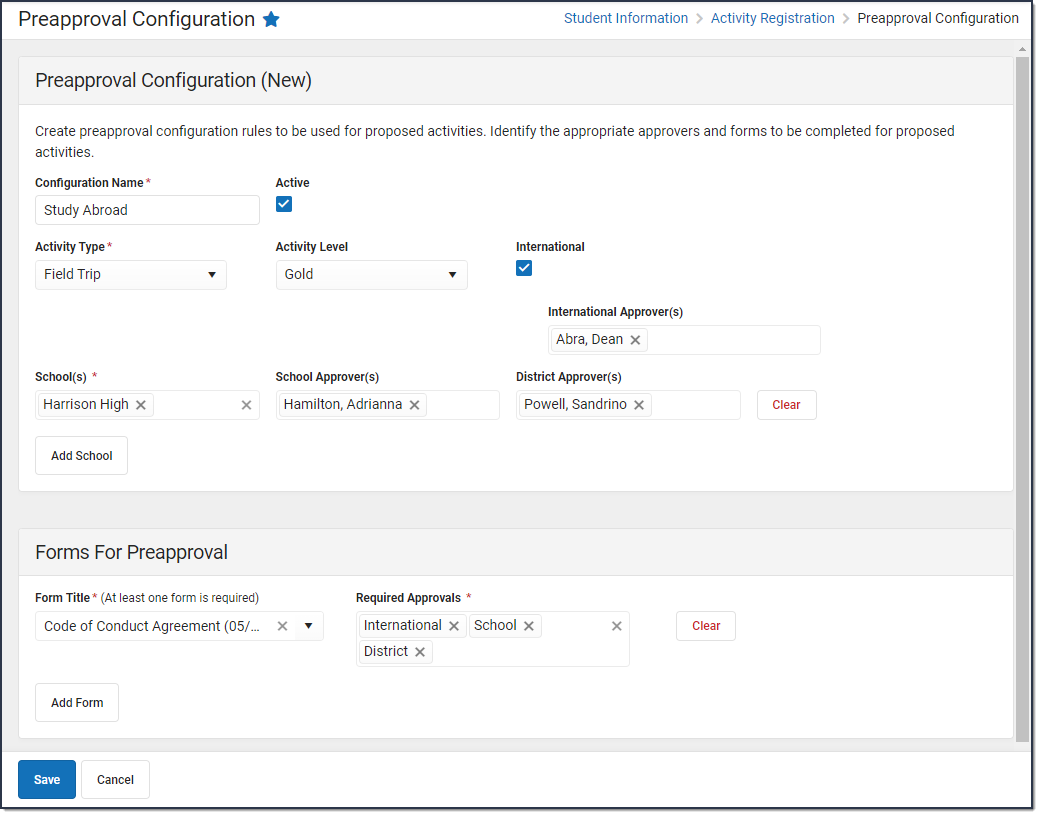

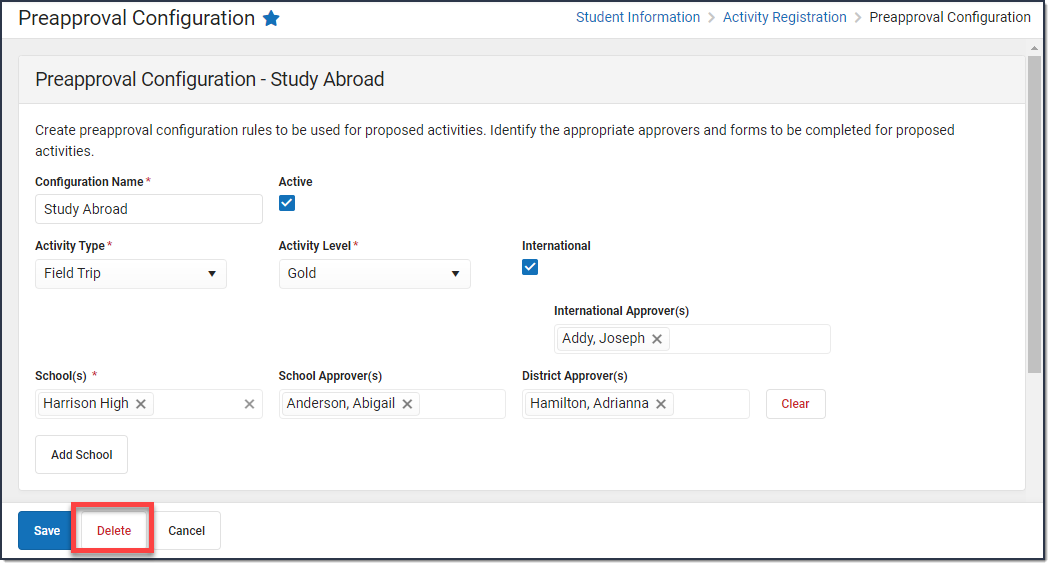
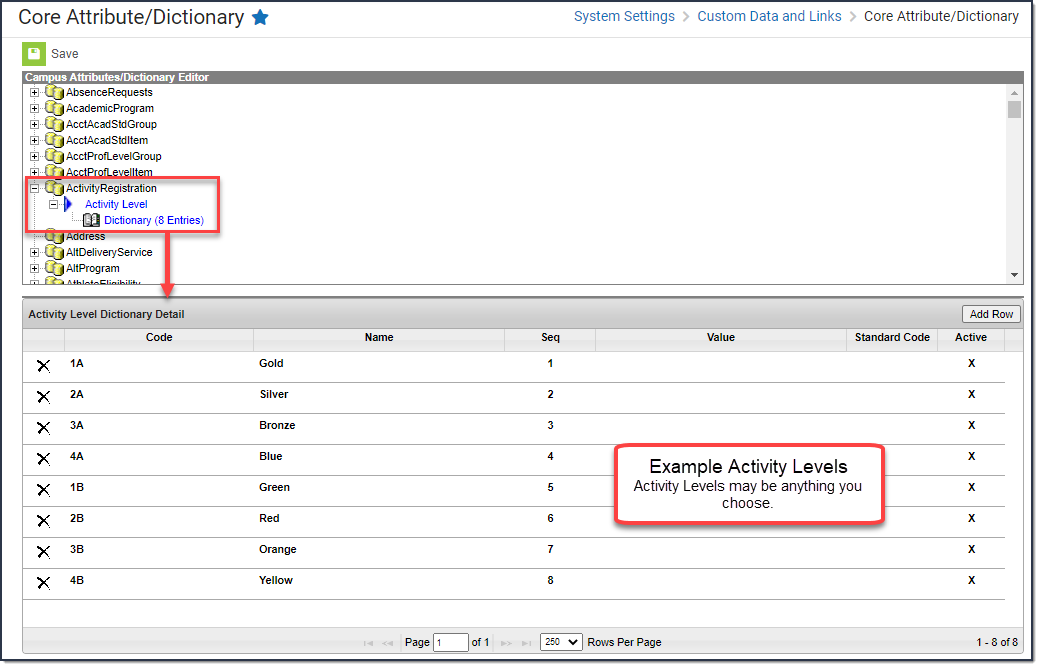
 Activity Level and International are optional fields. See the Activity Level and International field descriptions below for more information.