As of June 30th, 2025, the Data Extract Utility PULL method has been discontinued. Impacts:
- PULL .bat files previously created with the PULL Client tool (ExtractWizardHelper.bat a.k.a. exportWizard) no longer function.
- The PULL Client tool, which is used for authenticating into Infinite Campus, no longer functions correctly and results in a connection error for users still attempting to utilize this method.
- On the Data Extract Utility screen within Infinite Campus, PULL mode has been renamed to Test Extract. The Test Extract button will continue to function.
It's important to note that customers using other delivery methods (SFTP, FTPS, SMB) have not been affected by this change.
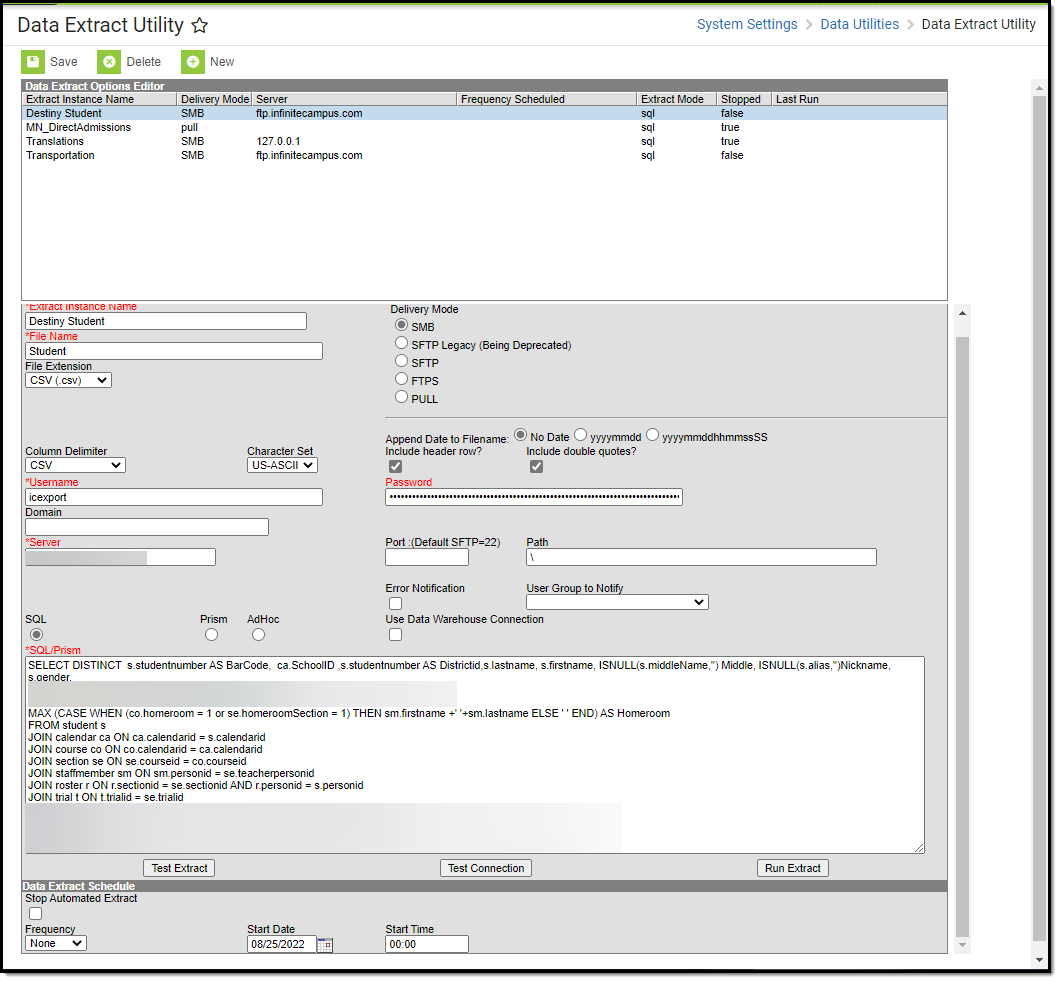
Tool Search: Data Extract Utility
The Data Extract Utility provides an automated data extract tool for transferring data via a flat file from Infinite Campus servers. This tool can also upload Campus data into third-party software.
This article describes the following topics:
See the Data Extract Utility Tool Rights article for information on available tool rights for the Data Extract Utility.
Setting Up a Data Extract
The following table provides definitions of the data elements available in the Data Extract Utility Editor.
You can remove Social Security Numbers from reporting in the 3 default extracts by setting the parameter @includeSSN bit = 0
Your third-party SFTP server must allow list Campus IPs so traffic can pass. For more information, see this article.
Field | Description |
|---|---|
Extract Instance Name | The name of the extract. |
Delivery Mode | Indicates how the extract will be delivered.
|
SFTP Key Exchange | Only applicable if the SFTP Delivery Mode is selected. Indicates you want to use the SFTP Key Exchange for this extract. If you leave the Password field blank, your extract will exclusively authenticate through passwordless SFTP Key Exchange. If you leave the Password field filled in, your extract can fail over to authenticating with username/password authentication in the event your SFTP Key Exchange authentication has an issue. See the Data Extract Utility SFTP Key Exchange Manager article for more information on this option and process. |
SFTP Key Exchange Configuration | Only applicable if the SFTP Delivery Mode is selected and the SFTP Key Exchange checkbox is marked. If a key pair has been properly configured and tested within the Data Extract Utility SFTP Key Exchange Manager, select the key to be used for authenticating this extract. See the Data Extract Utility SFTP Key Exchange Manager article for more information on this option and process. |
File Name | The file name as it will appear in the destination folder. Often, a third-party tool needs/requires this file name. |
File Extension | Extension of the file. CSV, HTML, TAB, TXT, and custom file extensions can be added through the Core Attribute Dictionary.
|
Column Delimiter | Indicates how data in the file will be divided. Options are:
|
Character Set | Select the character encoding standard used in the file.
|
Append Date to Filename | When selected, includes a date in the file, so as not to overwrite an existing file. Choose the format of the date, either the normal date format of yyyymmdd or date and time format of yyyymmddhhmmssSS. |
Include Header Row? | When selected, a header row will be included as part of the file. |
Include Double Quotes? | When selected, quotes around each piece of data in the column are included. |
Username | The username used to access the destination server. |
Password | Password used to access the destination server. |
Domain | The domain of the server connecting to and uploading data from the Data Extract Utility. |
Server | The IP Address of the server connecting to and uploading data from the Data Extract Utility. Your third-party SFTP server must allow list Campus IPs so traffic can pass. For more information, see this article. Limited to 100 characters |
Port | Indicates the Port value required to connect to the server.
|
Path | The location on the destination server where the file will be written. This needs to be an absolute path and include the /upload indicator. |
Error Notification | If marked, any errors that occur will send a notification to the Notifications area of Infinite Campus (see below) to all users within the user group selected in the User Group to Notify dropdown list.
|
User Group to Notify | If an error occurs while using the Data Extract Utility Set Up tool, this group will be notified via a Notifications message. To utilize this functionality, you must have the Error Notification checkbox marked. |
SQL/Prism | Provides a text area to enter a SQL query or Prism call. Choose the desired SQL or Prism radio button.
|
Ad Hoc | If choosing Ad hoc, select any saved filter to which the user has rights. This option generates the same filter as in ad hoc and carries over the same restrictions. It must be completed in 5 minutes. When a user no longer has rights to a filter, the utility stops running on a schedule. Ad hoc filters used by the Data Extract Utility are automatically scoped to data within the active year. This is the equivalent of running the ad hoc filter for the year marked as Active in School Year Setup. |
Use Data Warehouse | If the district has a Data Warehouse, use that database instead of the live database. |
Ad hoc Filter | When the Ad hoc radio button is selected, this lists every filter available to the user. |
Data Extract Schedule | Lists the frequency, date, time, and day of the week the extract runs.
Frequency options include:
If this needs to stop for any reason, mark the Stop Automated Extract checkbox. |


Create a New Extract
The creation of new extracts should be done by technical administrators only.
- Select the New icon. The Detail Information section will appear.
- Enter the Extract Instance Name.
- Choose the other necessary items for adding the extract by populating and marking the appropriate fields, as defined above.
- Click the Save icon when finished. You can modify the extract to determine when it should be generated.
At this time, a user can select one of the available buttons to test the extract, test the connection to the database, or run the extract. Extracts will be displayed in a new window in the selected format.
- The Test Extract button generates the requested information by SQL or Ad hoc. Data is not written to the database or stored in any location.
- The Test Connection button checks the connection to the entered server by attempting to write a 1-byte file to the location set up. When it is successful, a pop-up displays indicating the connection is good; if it is not successful, it provides the reason the connection failed.
- The Run Extract button runs and generates the extract, sends and stores the file where needed (in case of an issue when it is an auto-run extract).
Setting Up the Data Extract Client to Utilize the Pull Delivery Mode
For information on setting up the Data Extract Client to utilize the pull delivery mode, see this article.
Troubleshooting/Errors
Error | Explanation |
|---|---|
Unable to negotiate key exchange (client: [list of supported algorithms] / server: diffie-hellman-group14-sha1,diffie-hellman-group-exchange-sha1)" | This error means the SFTP server your Campus site is trying to communicate with does not support new enough algorithms to work with the Data Extract Utility's latest SFTP mode. The issue is that the SFTP server you’re connecting to is only offering up these older key exchange algorithms when your Campus site’s Data Extract Utility client tries to communicate with it:
SHA1 is now considered an insecure key exchange algorithm, so our latest SFTP implementation does not support it. You will need to contact the third parties/individuals who administer this SFTP server and request that they update their server/SFTP software to support at least one of the more modern and secure key exchange algorithms mentioned in the "client:" part of the error message. As soon as the SFTP server is updated to support any of the more secure key exchange algorithms, then you'll be able to use the latest SFTP mode for any connection currently receiving this error. Until this update occurs, you'll need to continue using the legacy SFTP mode. The legacy SFTP mode is planned for deprecation at some point in the future, so there's ample time, but if you have any server still using only these less secure key exchange algorithms come that time, your connections to this server will no longer function. |
