Classic View: System Administration > Ed-Fi > Ed-Fi Reconciliation
Search Terms: Ed-Fi Reconciliation
The Ed-Fi Reconciliation tool allows users to compare state Ed-Fi data against data existing within the Campus database. By using this tool, users can identify errors and gaps in data existing at the state and Campus level and correct this data to improve data quality and ensure proper state reporting and funding.
See the following sections for more information:
 Ed-Fi Reconciliation
Prerequisites
- Ed-Fi functionality must be enabled via Enable Ed-Fi System Preference.
- In order to properly use Ed-Fi tools, proper values must be established within the Ed-Fi Config tool. This ensures Campus is communicating with Ed-Fi and successfully sending data to their servers.
- Ed-Fi IDs should be assigned to users via the Demographics tab.
Tool Rights
PATH: System Administration > User Security > Users > Tool Rights
Users must have at least R(ead) tool rights in order to use the Ed-Fi Reconciliation tool.
 Tool Rights
Reconcile Data Between the State and Campus
The first step in reconciling data between data provided by the state and information within Campus is to create a mapping. This mapping lets the tool understand how to align each column of data in the state file with its respective Campus field and data. Once mappings are created, users can continue to reuse them as newer state files come in (with the assumption data locations in the state file continue to match the selected mapping), making for quick and easy comparison of data without the need for tool or data setup.
Creating a New Mapping
To create a new mapping, click the New icon. You will be redirected to a new screen.
 Create a New Mapping
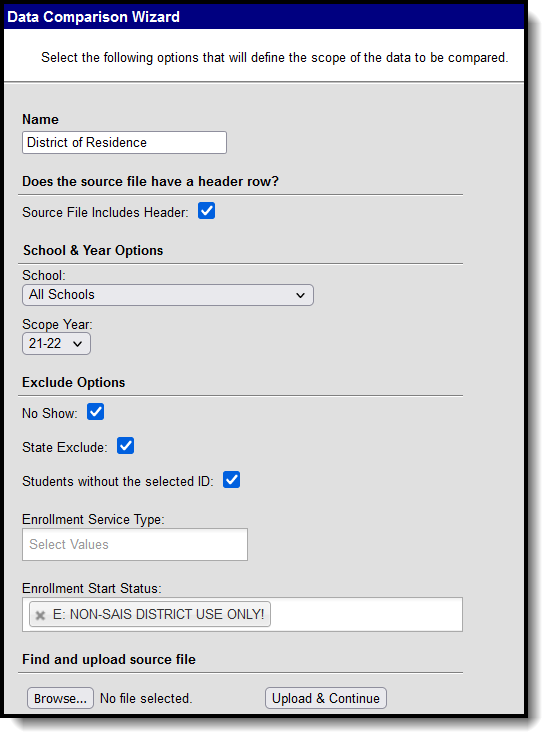
This screen is where you designate the name of the mapping, the school and scope year, and what data should be excluded.
- Give the mapping a Name.
- If the source file given to you by the state contains a header row, mark the Source File Includes Header checkbox.
- Select which School will have data compared against the source file or to compare against all schools in the district, select All Schools.
- Select the Scope Year of the data being compared.
- Mark the No Show checkbox to exclude all students marked No Show on their enrollment record (optional).
- Mark the State Exclude checkbox to exclude all students marked State Exclude on their enrollment record (optional).
- Mark the Students without the Selected ID checkbox to exclude all students who do not have the appropriate ID assigned (optional).
- Select which Enrollment Service Types will be excluded from data comparison. Any student enrollment records with any of the selected Enrollment Service Types will be excluded from comparison (optional).
- Select which Enrollment Start Status will be excluded from data comparison. Any student enrollment records with any of the selected Enrollment Start Status values will be excluded from comparison (optional).
- Click the Choose File button, locate the state data file from your local hard drive or network and click Open. The file name will appear to the right of the Choose File button.
- Once all criteria has been entered, click the Upload & Continue button.
 Data Comparison Criteria
Now that the file has been uploaded, you must map the uploaded data to the corresponding fields in Campus so data can be compared accurately.
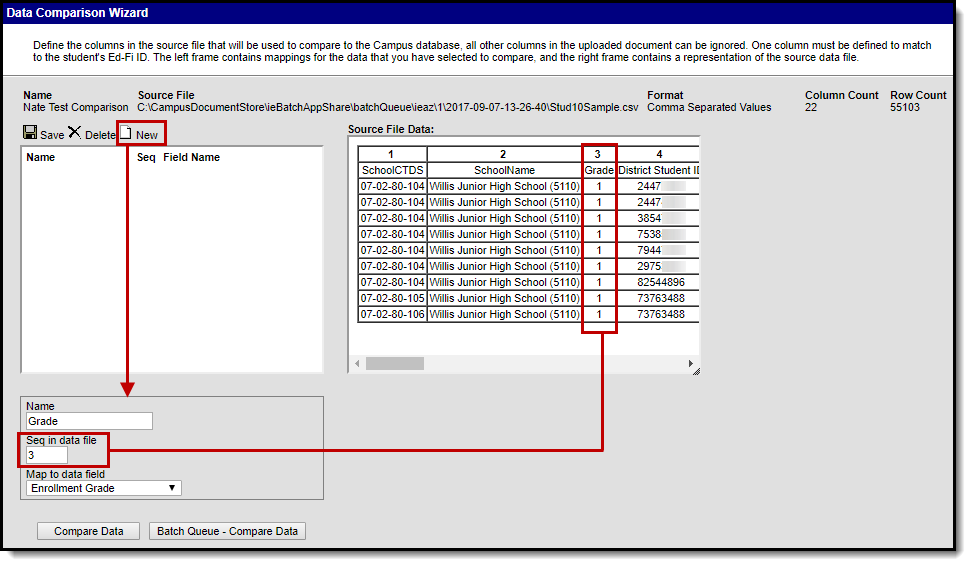
To begin this process, click the New icon. The Name, Seq in data file, and Map to data field fields will appear below. During this process, you are mapping one by one the columns of data in the Source File Data section to its corresponding fields in Campus.
- Enter the Name of the data being compared. This name is not dependent upon anything and is merely used as an easy way for you to understand and identify the compared data. In the example below, the Grade column (3) is being mapped to the Enrollment Grade Field thus a name of Grade was given to the mapping.
- Enter the Seq in data file number. This is the column number listed above the column in the Source File Data area corresponding to the data you want to map to a Campus field for data comparison. For example in the image below, a Seq of 3 is entered because the user wants to compare the Grade column data with the Enrollment Grade field selected. This step is critical in ensuring the right data is compared between the state data file and Campus. Failure to enter proper sequence numbers will result in data comparison errors.
Select what Campus field will be mapped to the data file column by selecting a value in the Map to data field.
Arizona Users Only: There are five additional fields added to the bottom of this list. Separate mappings must be done for each of these fields and they cannot be combined with any other fields except student identifiers. Adding additional mappings that are not student identifiers will result in false results. When doing an enrollment FTE comparison for students with split enrollments, use these additional fields to parse out or differentiate split enrollments.
- Click the Save icon. The mapping will appear in the window below.
Repeat steps 1-4 until all desired data has been mapped.
 Establishing Mappings
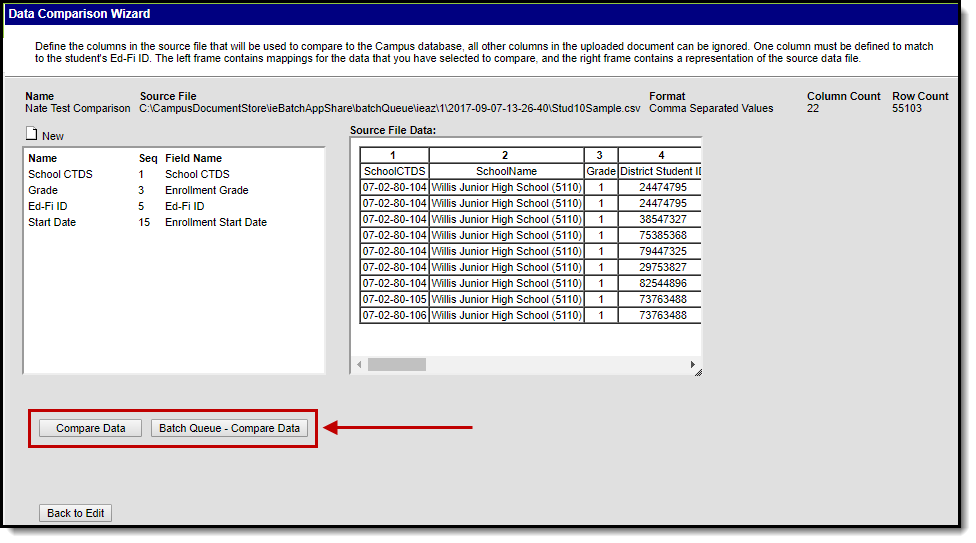
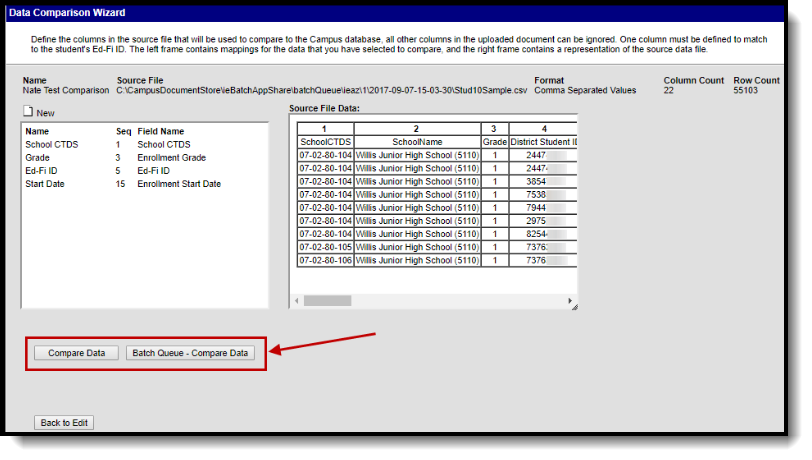
Once all mappings have been created and saved, click the Compare Data button to initiate generation of the comparison file or click the Batch Queue - Compare Data button to send the file to the batch queue where it will process in the background.
If you notice an error in the mappings or decide to add/modify mappings, click the Back to Edit button at the bottom of the screen.
 Initiating Comparison of Data
Once the file finishes processing, it will download to your local hard drive or network as a CSV file. Review the document to understand differences in data between what is entered in Campus and what exists at the State.
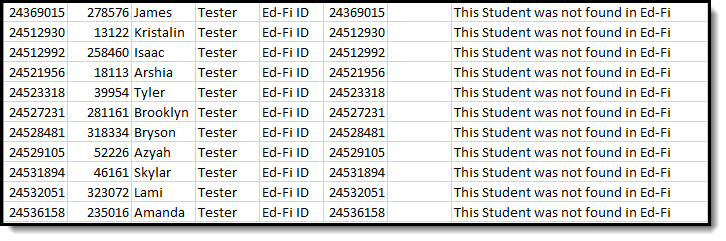 Example of a Comparison Report
Reviewing Data Using an Existing Mapping
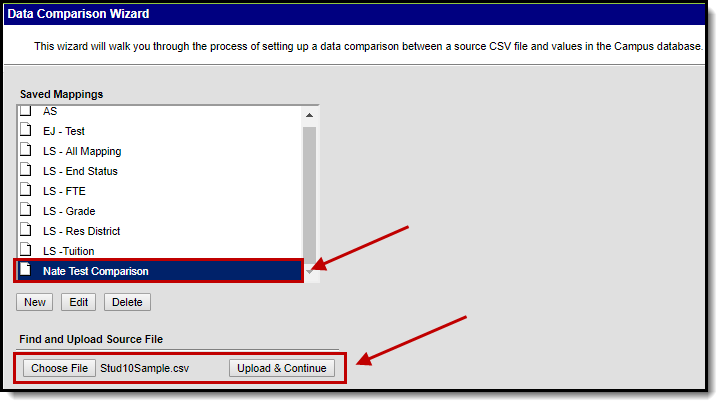
To quickly view and reconcile data for a state file that has already been given a mapping in the past:
- Select the mapping from the Saved Mappings window.
- Upload the new state file by clicking the Choose File button
- Locate the file on your local hard drive or network and click the Open button.
- Click the Upload & Complete button. You will be redirected to the mapping screen.
 Comparing Data Using an Existing Mapping
Review the existing mappings and if data still properly matches between sequence and field name, click the Compare Data or Batch Queue - Compare Data fields.
 Compare Data

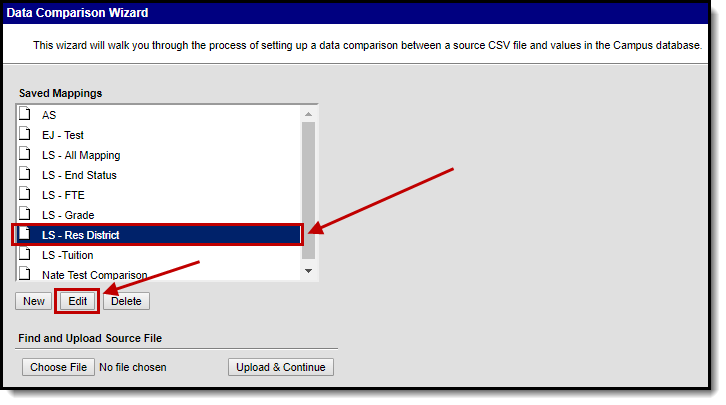
Edit an Existing Mapping
To edit an existing mapping, select the mapping in the Saved Mappings window and click the Edit button.
 Edit a Mapping
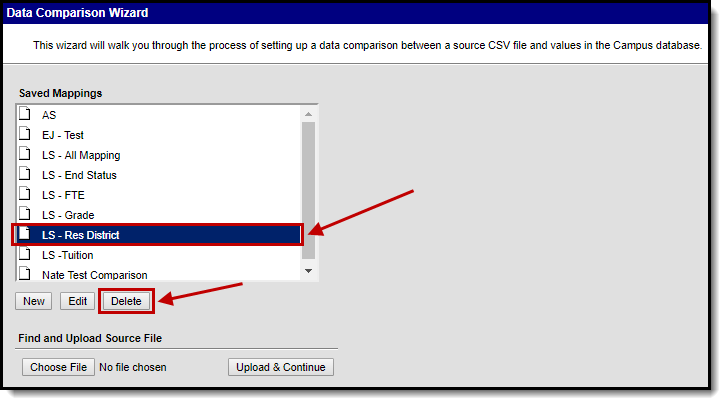
Delete a Mapping
To delete an existing mapping, select the mapping in the Saved Mappings window and click the Delete button.
 Deleting a Mapping
For Arizona Districts Only: Comparing Data Against AzEDS Reports
Users can use the Ed-Fi Reconciliation tool to compare Ed-Fi data against AzEDS reports. The following are some examples of comparing this data:
Core Enrollment Data
A Core Enrollment Field Mapping can be used in conjunction with the AzEDS Stud 10 Student Waiver Report: School Enrollment QRG to do a comparison on student Ed-Fi ID, Enrollment Start Date, Enrollment End Date, Enrollment Service Type, Enrollment Start Status, and Enrollment End Status data.
To compare data:
- Enter the following data into Data Comparison Wizard fields.
Upload the AzEDS Stud 10 Student Verification Report: School Enrollment QRG file (click here for more information on how to generate this file).
 Core Enrollment Field Values
Map fields as show in the image below.
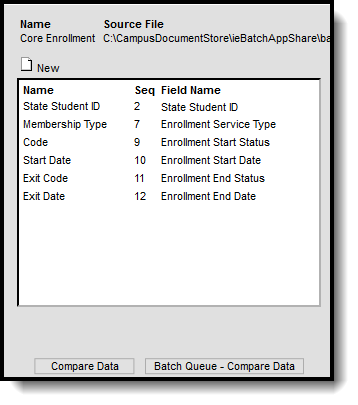 Core Enrollment Mapping
- Select the Compare Data button to generate the report and review core enrollment data.


District of Residence Data
A District of Residence Mapping can be used in conjunction with the AzEDS Stud 10 Student Verification Report: School Enrollment QRG to do a comparison on student State Student ID and District of Residence data.
To compare data:
- Enter the following data into Data Comparison Wizard fields.
Upload the AzEDS Stud 10 Student Verification Report: School Enrollment QRG file (click here for more information on how to generate this file).
 District of Residence Core Values
Map fields as show in the image below.
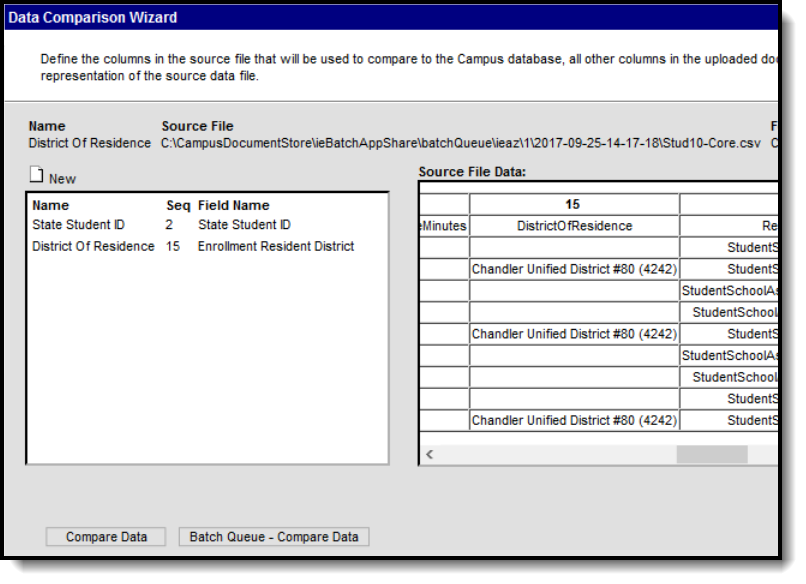 District of Residence Mapping
- Select the Compare Data button to generate the report and review core enrollment data.


Enrollment FTE Data
An Enrollment FTE Mapping can be used in conjunction with the AzEDS Stud 10 – FTE Data Verification Report to do a comparison on student State Student ID and FTE data.
To compare data:
- Enter the following data into Data Comparison Wizard fields.
Upload the AzEDS Stud 10 – FTE Data Verification Report file (click here for more information on how to generate this file).
 Enrollment FTE Field Values
Map fields as show in the image below.
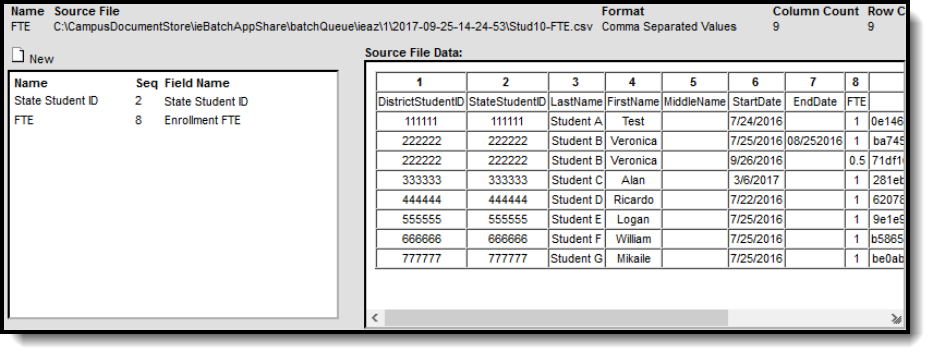 Enrollment FTE Mapping
- Select the Compare Data button to generate the report and review core enrollment data.


Enrollment Tuition Payer Data
An Enrollment Tuition Payer Mapping can be used in conjunction with the AzEDS Stud 10 –Tuition Payer Data Verification Report to do a comparison on student State Student ID and Tuition Payer Code data.
To compare data:
- Enter the following data into Data Comparison Wizard fields.
Upload the AzEDS Stud 10 –Tuition Payer Data Verification Report file (click here for more information on how to generate this file).
 Enrollment Tuition Payer Field Values
Map fields as show in the image below.
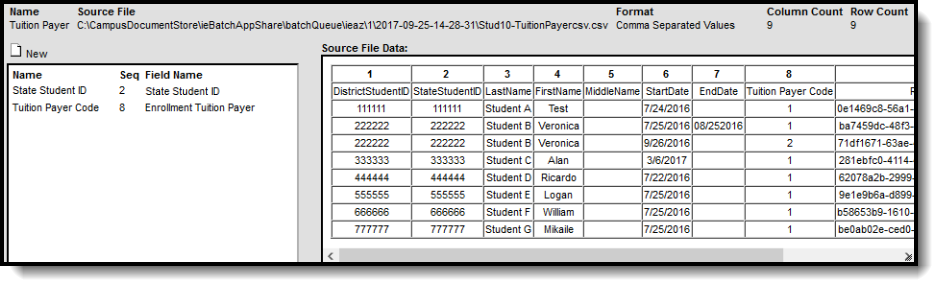 Enrollment Tuition Payer Mapping
- Select the Compare Data button to generate the report and review core enrollment data.


