Classic View: System Administration > User Security > SAML Management > SSO Service Provider Configuration
Search Term: SSO Service Provider Configuration
The SSO Service Provider Configuration tool allows you to configure and enable SSO authentication for Campus accounts in your district.
Campus accounts can be converted from using the Campus login authentication to SSO authentication by using the User Account Type Wizard.

Image 1: SSO Service Provider Configuration
Prerequisites
Only users assigned a Product Security Role of Student Information System (SIS) are allowed to use this tool.

Additional Things to Consider
Please consider the following when enabling and using SAML SSO authentication within Campus:
- When considering the configuration of user accounts, please note that Cafeteria Serve and Service Layout functionality only authenticates with a local Campus or LDAP account; therefore, please reserve a separate local Campus or LDAP account for access to Cafeteria Serve and Service Layout
- Schedule Wizard will authenticate with a SSO enabled account; however, it is important to note that the SSO authentication only occurs once. Users will be required to re-log into the Schedule Wizard.
- In an effort to be as inclusive as possible to the SAML Identity Providers (IDPs) the Infinite Campus user base engages, we have tested the Campus SSO Service Provider against Microsoft Active Directory Federated Services (ADFS), Microsoft Azure Active Directory, Google Apps IDP, Shibboleth IDP and OmnID. Since the Campus SSO Service Provider is part of the SAML specification, any IDP that is SAML compliant should connect with minimal intervention.
- Users are encouraged to provide a local domain account that can be linked to a Campus test user so that Campus Support can troubleshoot any SSO issues you may encounter.
When a test/sandbox environment is being refreshed, districts will need to reconfigure SAML each time a refresh occurs.
POS Service Layout and Cafeteria Serve are currently not compatible with the SSO user configuration.
Enable and Configure SAML SSO Functionality
The following steps will guide you in enabling and configuring SAML SSO functionality within Campus:
- Step 1. Enable SAML SSO and Sync IDP Server Data
- Step 2. Generate or Upload the Service Provider Certificate
Step 1. Enable SAML SSO and Sync IDP Server Data
The first step to configuring SAML SSO is to enable SAML SSO functionality, define the Login button and sync IDP server metadata.
Please see the table below for detailed information about each of these fields.
- Mark the Enable SAML Single Sign On checkbox. This will enable SAML Single Sign On functionality within Campus.
- Expand the Campus SSO Preferences area and enter a Name for the Login Button. This will be the text that appears on the button for users to select when signing into Campus via SSO.
- Set the Request Timeout. This field indicates the number of minutes that can pass before a request between Campus and the IDP produces a timeout error.
- If connecting Campus to Microsoft Azure, enter the Optional Attribute Name (or skip this step if not connecting to Azure). This is the attribute Campus will look for as a response from Azure in order to match the username in Campus to Azure.
For more information about unique Azure configuration, please see the Configuring a Unique Azure Active Directory section below.
- Retrieve the IDP server metadata by either entering the Metadata URL or by uploading the Metadata XML File.
- If the Metadata URL was entered, hit the Sync button. This will populate Identity Provider fields below.
- Move on to Step 2.

Image 2: Enabling SSO, Entering the Login Button Name, and Retrieving IDP Metadata
Step 2. Generate or Upload the Service Provider Certificate
You must now generate or upload the Service Provider Certificate. To do this, click the Manage SP Certificate button (see Image 3).

Image 3: Manage SP Certificate
Service Provider Certificates can either be automatically generated by Campus using the Generate the SP Certificate feature or manually uploaded via the Upload a Java Keystore (.jks) feature.
To have Campus generate the Service Provider certificate:
- Click the Generate the SP Certificate radio button.
- Enter an Expiration Date. This is the date in which the certificate will expire and will no longer be valid. This field defaults to one year from the current date.
- Click the Generate button. Fields within the Service Provider SP (Signature) section of the SSO Service Provider Configuration editor will automatically populate with data generated from this certificate.
If a Service Provider certificate already exists within Campus, generating a new Service Provider certificate will automatically overwrite any existing certificate and associated data.
- Click Save at the top of the editor.
- Move on to Step 3.

Image 4: Generate the SP Certificate
To upload the Service Provider certificate:
- Click the Upload a Java Keystore (.jks) radio button.
- Click the Choose File button and locate the .jks file from your local hard drive or network.
- Once the file is selected, click the Upload button. Fields within the Service Provider SP (Signature) section of the SSO Service Provider Configuration editor will automatically populate with data uploaded from this certificate.
More than one certificate can be uploaded. For example, Microsoft Azure requires two certificates.
If a Service Provider certificate already exists within Campus, uploading a new Service Provider certificate will automatically overwrite any existing certificate and associated data.
- Click Save at the top of the editor.
- Move on to Step 3.

Image 5: Upload the Service Provider Certificate
Export the Service Provider Certificate
To export the Service Provider certificate stored within Campus, select the Export the SP Certificate radio button and click the Export button. A .cer file of the certificate will appear for saving locally to your hard drive or network.

Image 6: Exporting the Service Provider Certificate
Delete the Service Provider Certificate
To delete the Service Provider certificate stored within Campus, select the Delete the SP Certificate radio button and click the Delete button.
Deleting the certificate will wipe all service provider certificate data from Campus and will remove the ability for Campus users to properly use Single Sign On functionality within Campus.
Once you have deleted the certificate you MUST generate or upload a new certificate and resync with your IDP.
 Image 7: Deleting the Service Provider Certificate
Certificate Expiration Warnings
Email and in-app notification functionality is built into this tool. Users who have access to this tool will receive an email and in-app notification every 3 days when a certificate will expire in less than 30 days.
When a certificate will expire in 10 or less days, this notification will increase to every day until the certificate is replaced. Users will continue to receive daily notifications until the expired certificate is replaced or removed.
You must have proper Messenger Email Settings established in order to receive email notifications.
You can upload a new certificate without removing the expiring or expired certificate and Campus will know to use the new valid certificate. However, until you remove the expired certificate from this tool, you will continue to receive in-app and email notifications about the expired certificate.
Logging into Campus and Campus Portal Using SAML SSO
The following displays how users will log into Campus using SAML SSO functionality:
| Campus District/State Edition | Campus Student Portal |
|---|---|
Users will click the SSO button (named whatever was determined in Step 1 of this document).
| Users will click the SSO button (named whatever was determined in Step 1 of this document).
|


Understanding Service Provider Configuration Fields
Use the following table to understand each available field.
| Field | Description |
|---|---|
| Enable SAML Single Sign On | Mark this box to enable SAML SSO functionality for your district. SAML SSO functionality will not function properly until all other fields in this editor are correctly populated and saved. |
| Service Provider Metadata | This URL is automatically generated by Campus for the SSO Identity Provider (IDP). The link can either be copied and sent electronically to the local IDP administrator or opened and saved as an XML format and sent to the IDP administrator. |
| Single Sign-On URL | This URL is automatically generated by Campus for use in District customized HTML links or icons. This URL will bypass the standard login page and make calls directly to the SSO Identity Provider (IDP) for user identification and authentication. If the user is logging in for the first time of the day or session, the IDP will require the user's username and password credentials and display its login page. If the user has already logged into the SSO Identity Provider (IDP), identification and authentication of the user will process without credentials and once authenticated, will be redirected into the applicable Campus homepage. Assertion Consumer Service (ACS) URL is the equivalent to the Single Sign-On URL |
| Single Sign-On Logout URL | This URL is automatically generated by Campus for use with any IDP that requires a URL for redirect to the local application logoff screen upon logout. Microsoft Azure AD is one known IDP that requires the local Campus logout URL in order to properly redirect to the Campus logoff page. |
| Campus (Service Provider) Entity ID | This value is automatically generated by Campus for the SSO Identity Provider (IDP). It can be edited by selecting the lock icon. This value is used to identify the Infinite Campus Service Provider to the SSO Identity Provider. Changing this value is NOT recommended for non-Azure users. If the decision is made to change the value, the SSO Identity Provider must re-sync the Service Provider Metadata URL or reload the Service Provider metadata using the Service Provider Metadata URL. For Azure users, this value MUST equal the Azure Client ID. |
| Select an option to retrieve Identity Provider (IDP) server data | Indicates how this tool will receive and insert IDP server data.
Once a URL or XML file has been entered, click the Sync button to load the XML values into Campus. |
| Optional Attribute Name | This is the attribute Campus will look for in the IDP response from an IDP in order to match the username within Campus to the value attached to the specified attribute. If this field is left blank, the default aattribute Campus will use for comparison is the Name ID. This field is required for use with Microsoft Azure AD as the Name ID attribute is reserved by Azure and cannot be used for comparisons. To change this value, click the Lock icon (see image below).
An incorrect Optional Attribute Name value will break the connection between Campus and the IDP. |
| Identity Provider Entity ID | The Identity Provider Entity ID as indicated in the IDP server data XML file. |
| Identity Provider URL | The Identity Provider URL as indicated in the IDP server data XML file. |
| Identity Provider Single Logoff URL | The Identity Provider Single Logoff URL as indicated in the IDP server data XML file. This URL is required if users wish to use the Logoff IDP if Logoff URL Exists feature. |
| Campus SSO Preferences | |
| Name for Login Button | This field indicates what the name of the SSO login button will be named on the Campus login page. For example, in the image below, a value of 'Login via SSO (Azure)' is entered. All users will see a button named this on the Campus login screen and all users with SAML SSO functionality enabled as their authentication method will select this button to log into Campus using their SSO username and password.
|
| Request Timeout | Indicates the number of minutes that can pass before a request between Campus and the IDP produces a timeout error. |
| No Domain Suffix | This options indicates the domain name does not contain a suffix. |
| Remove a Domain Suffix | This option allows you to remove the domain name from an IDP attribute value (such as an email address) to compare only the prefix of the value to the Campus username. This option eliminates the need to store fully qualified domain addresses in the Campus User Account username value. Users can remove the domain suffix for up to 4 IDP attribute values. A Domain Suffix value is required.
|
| Append a Domain Suffix | This option allows you append a suffix to the domain name. A Domain Suffix value is required. |
| Domain Suffix | Indicates the domain suffix that will be removed or appended based the value set in the Append a Domain Suffix or Remove a Domain Suffix radio buttons. If this text box is left blank, the SAML response will not be checked for a domain suffix. |
| Logoff IDP if Logoff URL Exists | Marking this checkbox means if the Logoff button is selected in Campus, you are also logged off the IDP. This option only works if the Identity Provider Single Logoff URL field is populated and correct. This field is defaulted as marked. This checkbox will automatically be unmarked and grayed-out if the Identity Provider Single Logoff URL references Google. |
| Turn off SSO for the Student/Parent Portal Login Page | Marking this checkbox removes the ability for students and parents to login into the Campus Portal via the SSO login button. These users must log into Portal using their standard Campus username and password. |
Identity Provider Signature | |
Campus allows for more than one IDP certificate | |
| Signature Algorithm | The Identity Provider Signature Algorithm as indicated in the IDP certificate. This value is supplied by the SSO Identity Provider's (IDP) metadata. |
| Issuer | The Issuer as indicated in the IDP certificate. This value is supplied by the SSO Identity Provider's (IDP) metadata. |
| Certificate Valid From | The first date and time for which the certificate is considered valid. This value is supplied by the SSO Identity Provider's (IDP) metadata. |
| Certificate Valid To | The final date and time for which the certificate is considered valid. All time after this value is considered invalid and the certificate will no longer work. This value is supplied by the SSO Identity Provider's (IDP) metadata. |
| Service Signature | |
| Manage SP Certificate | See the Enable and Configure SAML SSO Functionality, Export the Service Provider Certificate, and Delete the Service Provider Certificate sections for more information about functionality. |
| Signature Algorithm | The Signature Algorithm as indicated in the Campus certificate. |
| Issuer | The Issuer as indicated in the Campus certificate. |
| Certificate Valid From | The first date and time for which the certificate is considered valid. |
| Certificate Valid To | The final date and time for which the certificate is considered valid. All time after this value is considered invalid and the certificate will no longer work. |


Configuring a Unique Azure Active Directory
The following section will describe configuring a unique Azure Active Directory.
This section is only relevant for Microsoft Azure customers.
Infinite Campus is now available in the Microsoft Azure Marketplace.
- Infinite Campus in the Marketplace: https://azuremarketplace.microsoft.com/en-us/marketplace/apps/aad.infinitecampus?tab=overview
- Azure Active Directory Integration with Campus Tutorial: https://docs.microsoft.com/en-us/azure/active-directory/saas-apps/infinitecampus-tutorial
There are two main actions that need to be taken to ensure Azure has an active connection between Campus and your Azure AD environment;
- Utilize the Infinite Campus Azure Marketplace workflow within your Microsoft Azure environment for initial configuration.
- Update the logout URL in the Azure AD manifest with the Campus logout URL.
The following sections will walk you through this process:
- Infinite Campus Azure Marketplace Workflow
- Add the Infinite Campus Logout URL to the Microsoft Azure SAML SSO Configuration
- Complete a Single Sign-On Login
Infinite Campus Azure Marketplace Workflow
Step 1.
In your Azure AD environment, navigate to Enterprise applications > + New application registration.
Enter "Infinite Campus" in the search box in the Add from the gallery section of the page and click on the Infinite Campus icon that appears (Image 8).

Image 8: Azure AD Administrative View of Local Environment Configurations
Step 2.
Click the Add button in the lower right-hand corner of the screen (Image 9).

Image 9: Azure AD Administrative View of Adding the Infinite Campus Azure Application Configuration
Step 3.
Once the Infinite Campus application has been added to the Azure environment, you will need to configure SAML SSO. Click on the Single sign-on button of the Enterprise Application index and select the SAML box (Image 10):

Image 10. Adding the SAML SSO Configuration to the Infinite Campus Azure Enterprise Application Configuration
Step 4.
The Microsoft Azure Marketplace workflow will display. Follow the sequence of events laid out on the screen and if you have any questions, click the View step-by-step instructions hyperlink for more information. To edit data, click the edit icons in the upper right corner of each section (Image 11). Once the data on this page has been reviewed and corrected accordingly, move onto the Add the Infinite Campus Logout URL to the Microsoft Azure SAML SSO Configuration section of this article.

Image 11: Reviewing the SAML SSO Configuration for the Infinite Campus Application
Add the Infinite Campus Logout URL to the Microsoft Azure SAML SSO Configuration
Step 1.
This step requires the SAML configuration in Campus is enabled (check the "Enable SAML Single Sign On" checkbox) along with a metadata upload or synchronization and a subsequent Save in order for the Service Provider Configuration screen to publish the applicable URLs of which the Single Sign-on Logout URL will be needed for Step 2 below.
The logout URL appears in release Campus.1629 and later.
In the SSO Service Provider Configuration tool, locate the Single Sign-on Logout URL and copy this value (Image 12).

Image 12: Locating the Single Sign-out URL
Step 2.
Next, the Azure AD app registration properties Logout URL needs to be updated so the proper re-direct upon Campus logout can occur.
- Click on the Settings button (gear icon)
- Click on Properties in the Settings list that has appeared to the right.
- Paste in the Single Sign-out URL value copied from the SSO Service Provider Configuration tool into the Logout URL field.
- Select the Save icon.

Image 13: Establishing the Logout URL
Complete a Single Sign-On Login
The final step is to log out of the administrative logon to Infinite Campus and attempt a Single Sign-On user login. Please ensure you have followed the configuration steps outlined throughout this article.
To login, navigate to the Campus login page and click the SSO button created during the configuration process (covered in steps within this article).
This button may be named something other than Single Sign-On (SSO). The image below is for example purposes only.
Proper first-time login behavior will be a re-direct to the Microsoft Azure AD credentials page. A successful logon to Azure AD results in a successful re-direct to the Infinite Campus application.

Image 14: Logging into Campus via SSO
To log out of Campus, click the Log Off button in the upper right corner of the page (see Image 15).
Proper logout behavior will be a brief re-direct to Microsoft Azure AD homepage, then another instant re-direct to the Infinite Campus logoff page. In later version of Microsoft Azure AD, the redirect may be simultaneous.

Image 15: Logging Out of Campus
Please ensure to contact the Infinite Campus Support team or your CE or other internal contact(s) with any questions or concerns.
Configuring a Google IDP
The following section will describe configuring the Google IDP to utilize Campus SSO functionality.
Prerequisites
- You need a Google Admin account.
- Expand the Campus SSO Preferences area:
- Enter a Name for the Login Button. This will be the text that appears on the button for users to select when signing into Campus via SSO.
- Set the Request Timeout. This field indicates the number of minutes that can pass before a request between Campus and the IDP produces a timeout error.
Step 1.
Log into your Google Administrator account (https://admin.google.com) and select Apps (Image 16).

Image 16: Selecting Apps
Step 2.
Select SAML apps (Image 17).

Image 17: Select SAML Apps
Step 3.
Click the plus sign (+) labeled Enable SSO for a SAML Application (Image 18).

Image 18: Enable SSP for a SAML Application
Step 4.
Select Setup My Own Custom App (Image 19).

Image 19: Setup a Custom App
Step 5.
Click the Download button for Option 2 and download the Google IDP metadata (Image 20). The file will download to your local hard drive. Remember where this file is located as we will need to use it in Step 6.
Click the Next button.

Image 20: Download IDP Metadata
Step 6.
Open Campus in a different tab and navigate to the SSO Service Provider Configuration tool (System Administration > User Security > SAML Management > SSO Service Provider Configuration).
Using the Google IDP metadata file downloaded in Step 5:
- Select the Metadata XML File radio button
- Click Choose File.
- Select the Google IDP metadata file from Step 5 and click Open.
The Identity Provider Entity ID, Identity Provider URL, and Identity Provider Single Logoff URL will populate (Image 21).
Campus does not support the use of the Logoff IDP if Logoff URL Exists preference when using a Google IDP setup. This checkbox will automatically be unmarked and grayed-out if the Identity Provider Single Logoff URL references Google.

Image 21: Uploading the Metadata File
Step 7.
Now it's time to save and enable the Campus SSO. Mark the Enable SAML Single-Sign On checkbox and click Save.

Image 22: Enable and Save the SSO Configuration
Step 8.
Go back to your Google Admin tab. You should be on the Basic Information for your Custom App screen (see image below). Enter an Application Name of 'Infinite Campus' and upload an image that will display within the Google App launcher (optional). When finished, click Next.
An example of a logo you can use:![]()

Image 23: Enter an Application Name
Step 9.
On the Service Provider Details screen:
- Enter the ACS URL as the same value found in the Single Sign-On URL field.
- Enter the Entity ID as the same value found in the Campus (Service Provider) Entity ID (It must be a unique value for the IDP) field (see image below).
- Click Next.

Image 24: Service Provider Details
Step 10.
Click Finish on the Attribute Mapping screen.

Image 25: Finish Setup
You may see the following message after hitting the Finish button. You can ignore this message.

Individual students and staff can have their authentication type modified via the User Account tab (see image below). This is a good method for testing it out using a few users before enabling it for all staff and students.

If you would like to convert all existing accounts from using local Campus login authentication to SAML SSO, please use the User Account Type Wizard.
Step 10.
The final step is to turn on the service within Google.
- Navigate to Apps > SAML Apps and locate your Infinite Campus app.
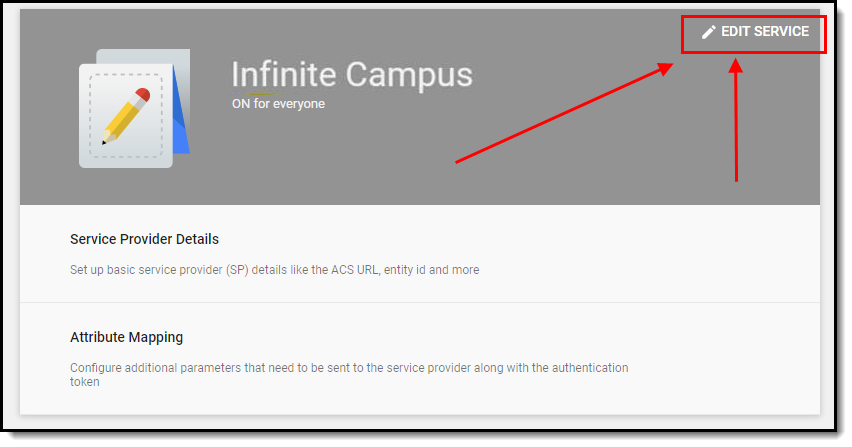
- Enter the configuration screen for the Campus app.
- Click the Edit Service button (see below).
- Under Service Status, mark the ON for everyone radio button and click Save (see image below).
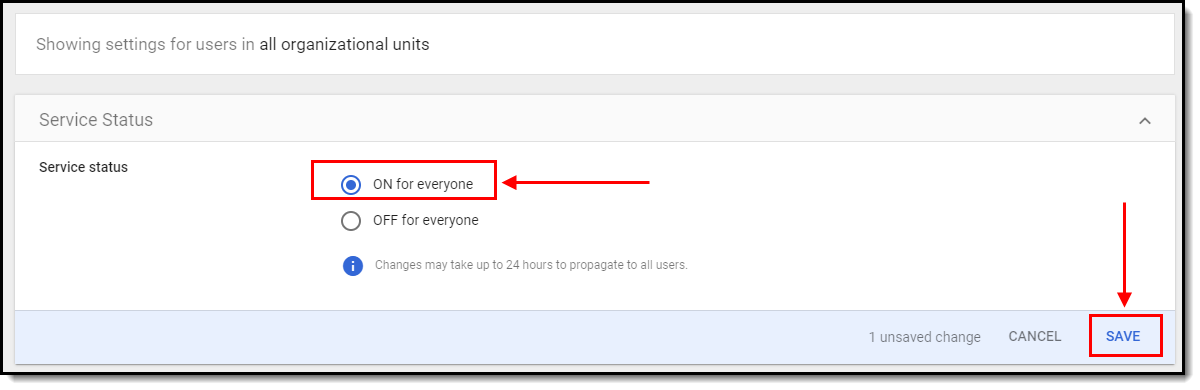
That's it! Google and Campus should now be properly connected.
By default, Google SSO matches based on username.


