Classic View: Program Administration > Batch Program Assignment Tool
Search Terms: Batch Program Assignment Tool
The Batch Program Assignment Tool adds, deletes or modifies the selected flag, graduation program, academic program, program or program with sessions to (or from) the selected students’ Flags, Programs (Student Information > Academic Planning), or Programs (Student Information > General) tools.
Students receiving a flag, graduation program, academic program, program assignment or program session are chosen by using filters or by selecting students using the batch add option. The selected flag, program or academic program is assigned as of the entered start date. A student can have multiple assignments of any program type other than graduation. Students are allowed only one graduation program assignment. If the student already has a graduation program assigned to them, it is overwritten when a new assignment is made.
When assigning programs, students must meet the requirements of the program. For example, students assigned to a graduation program must have the appropriate cohort start and end year information associated with the selected graduation program.
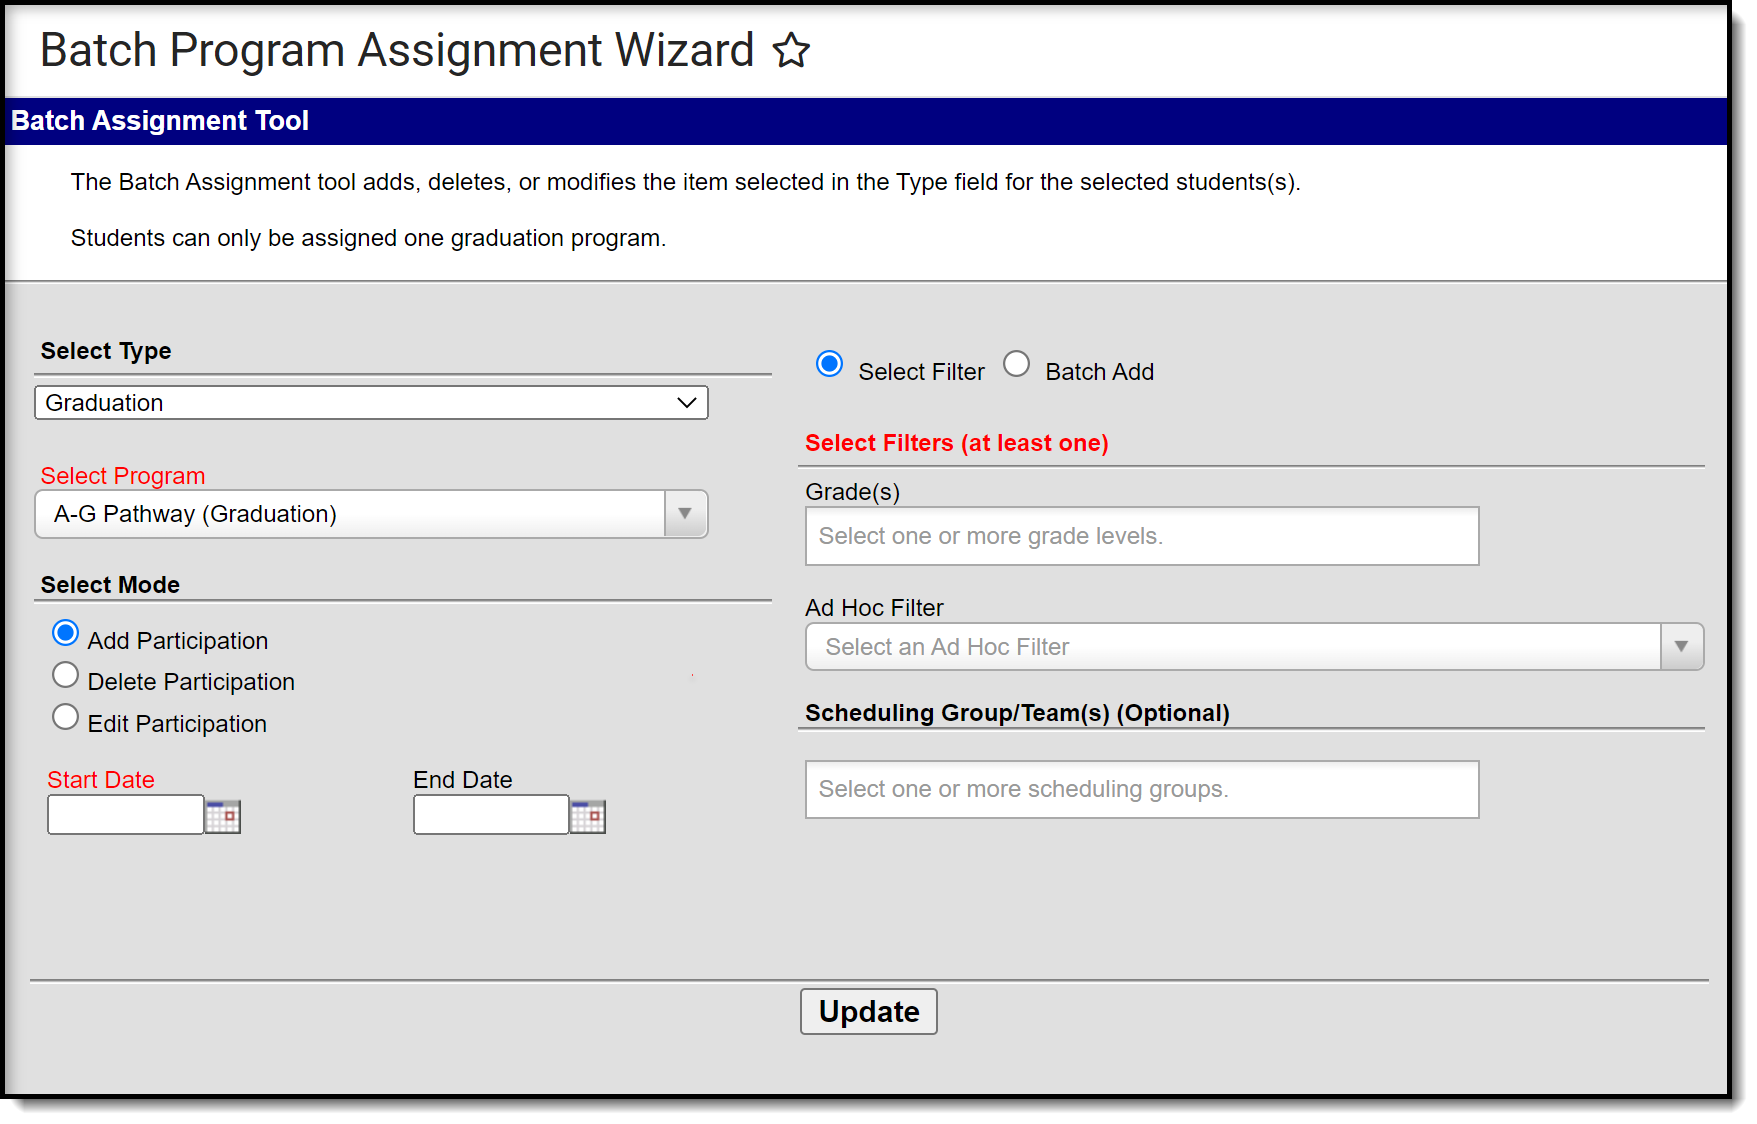
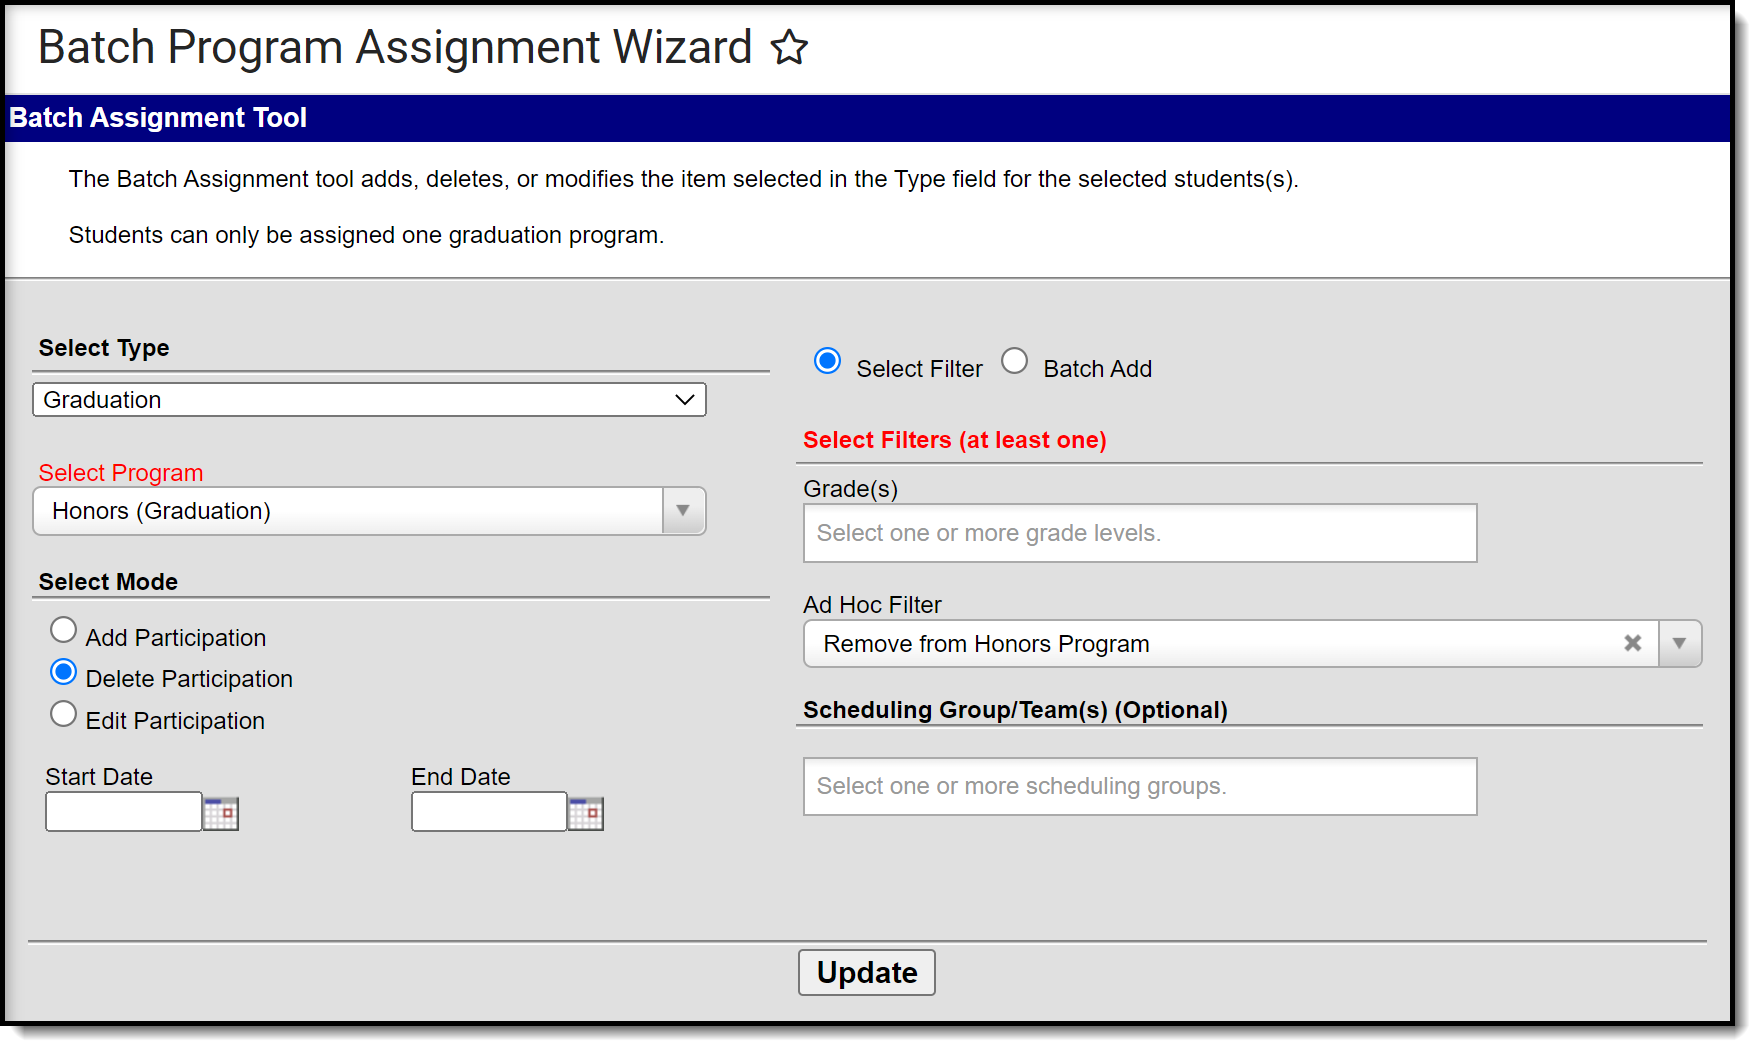
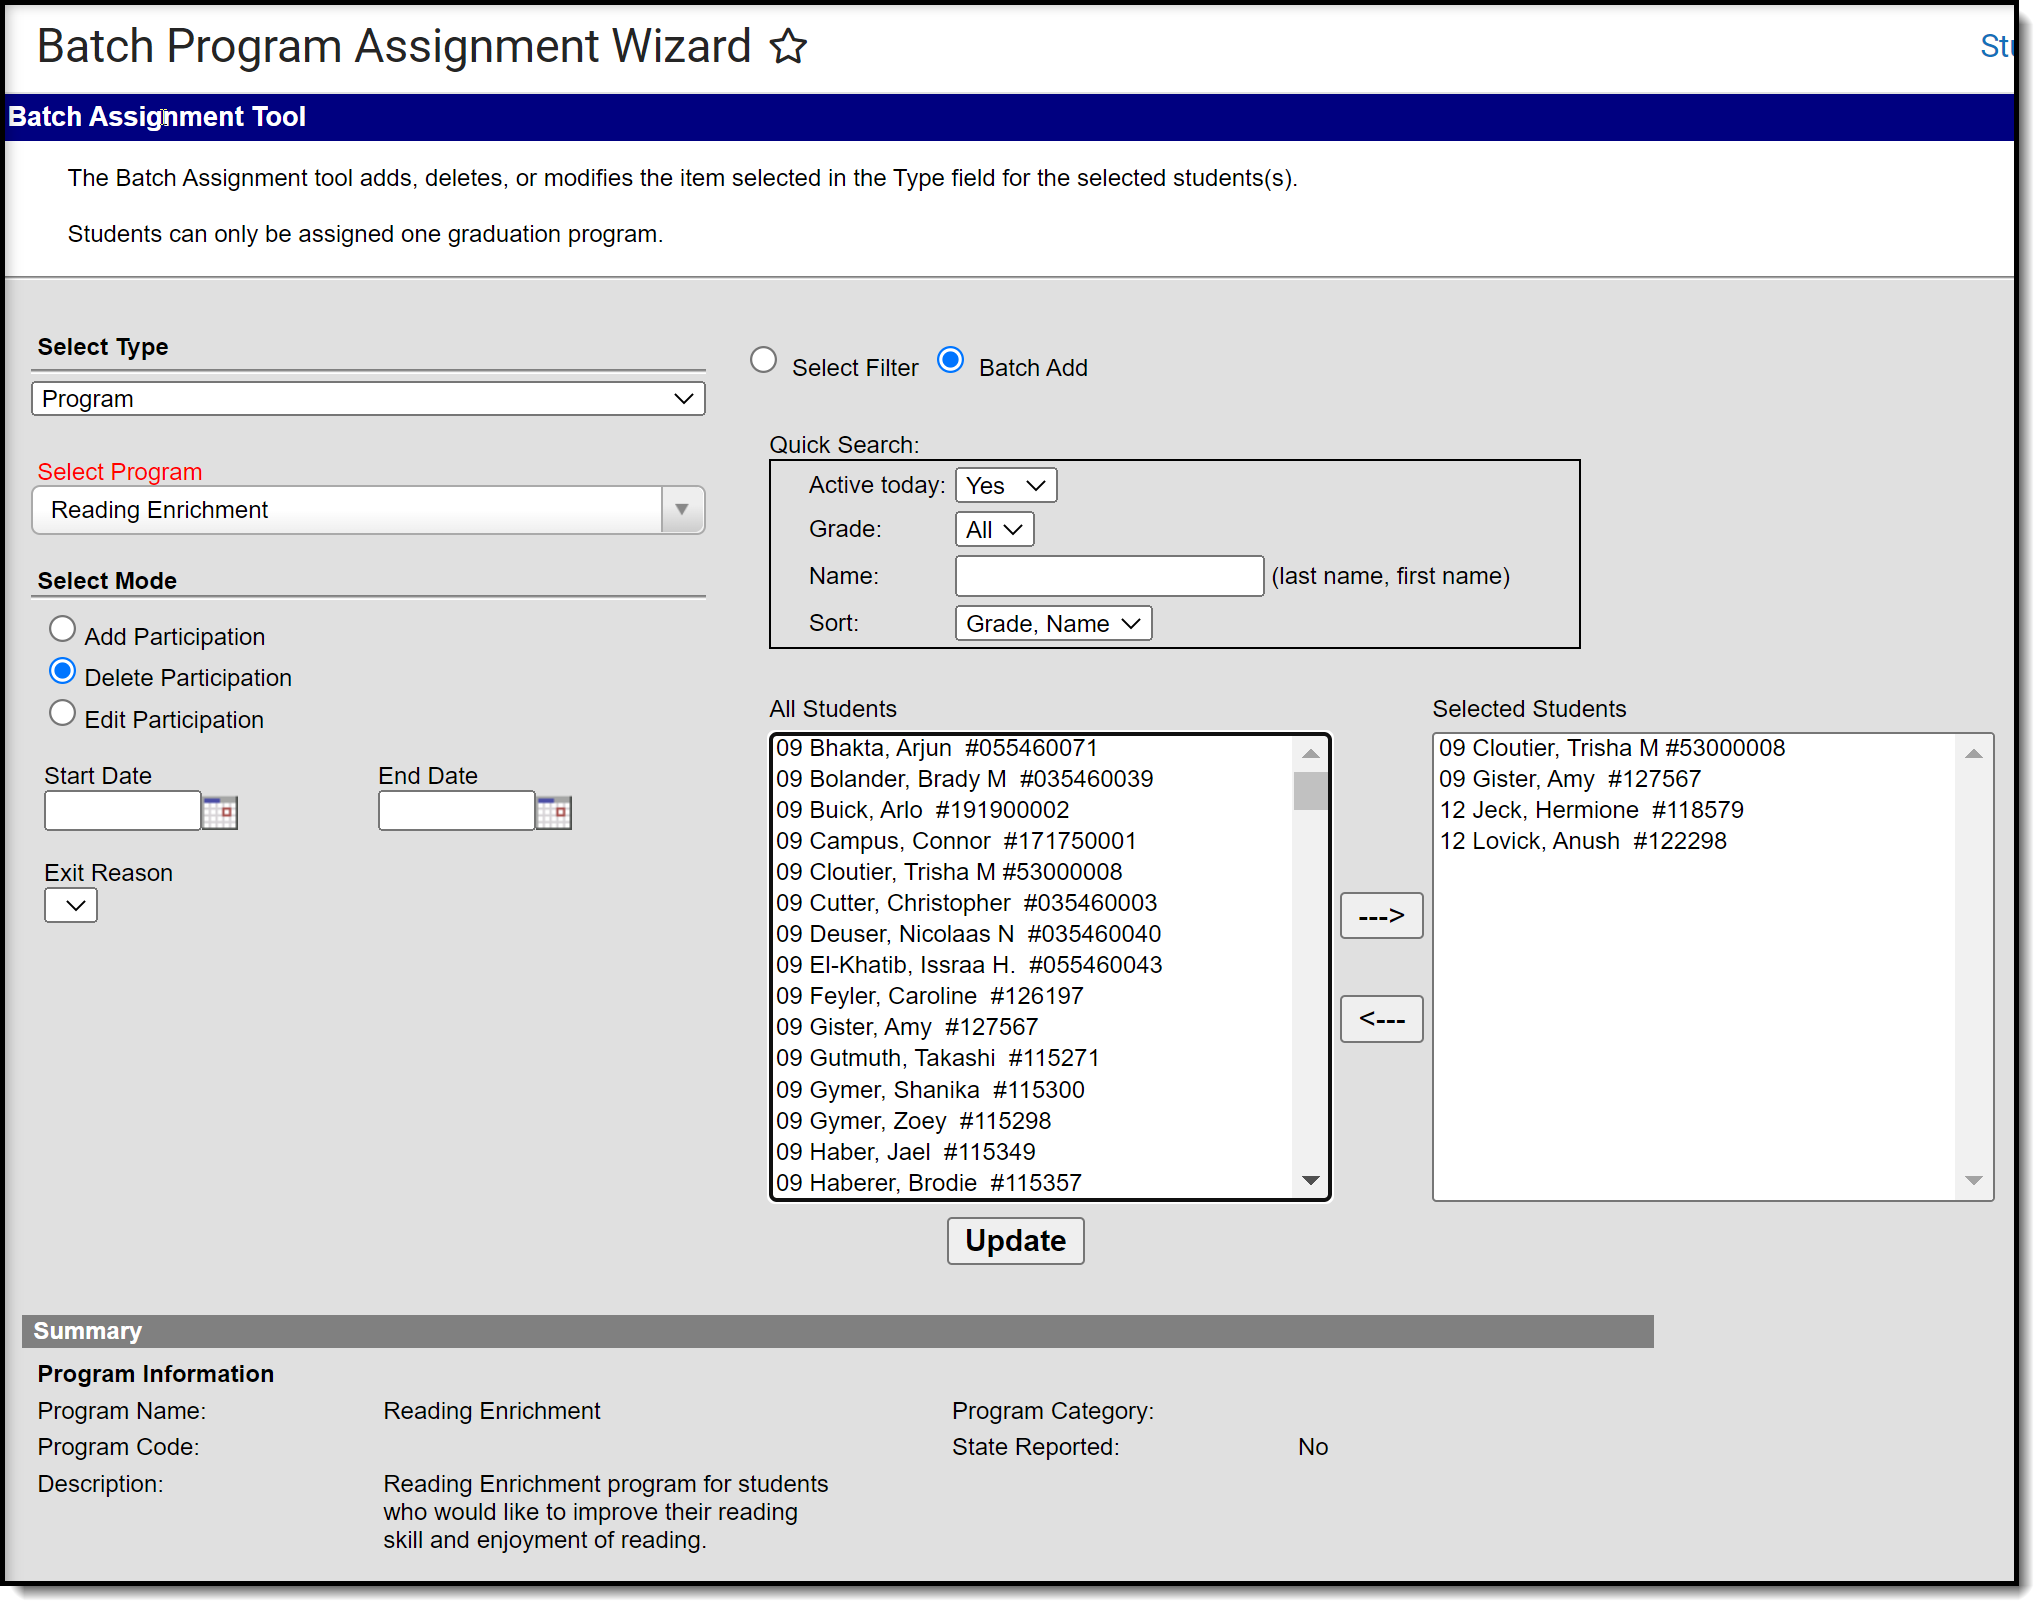
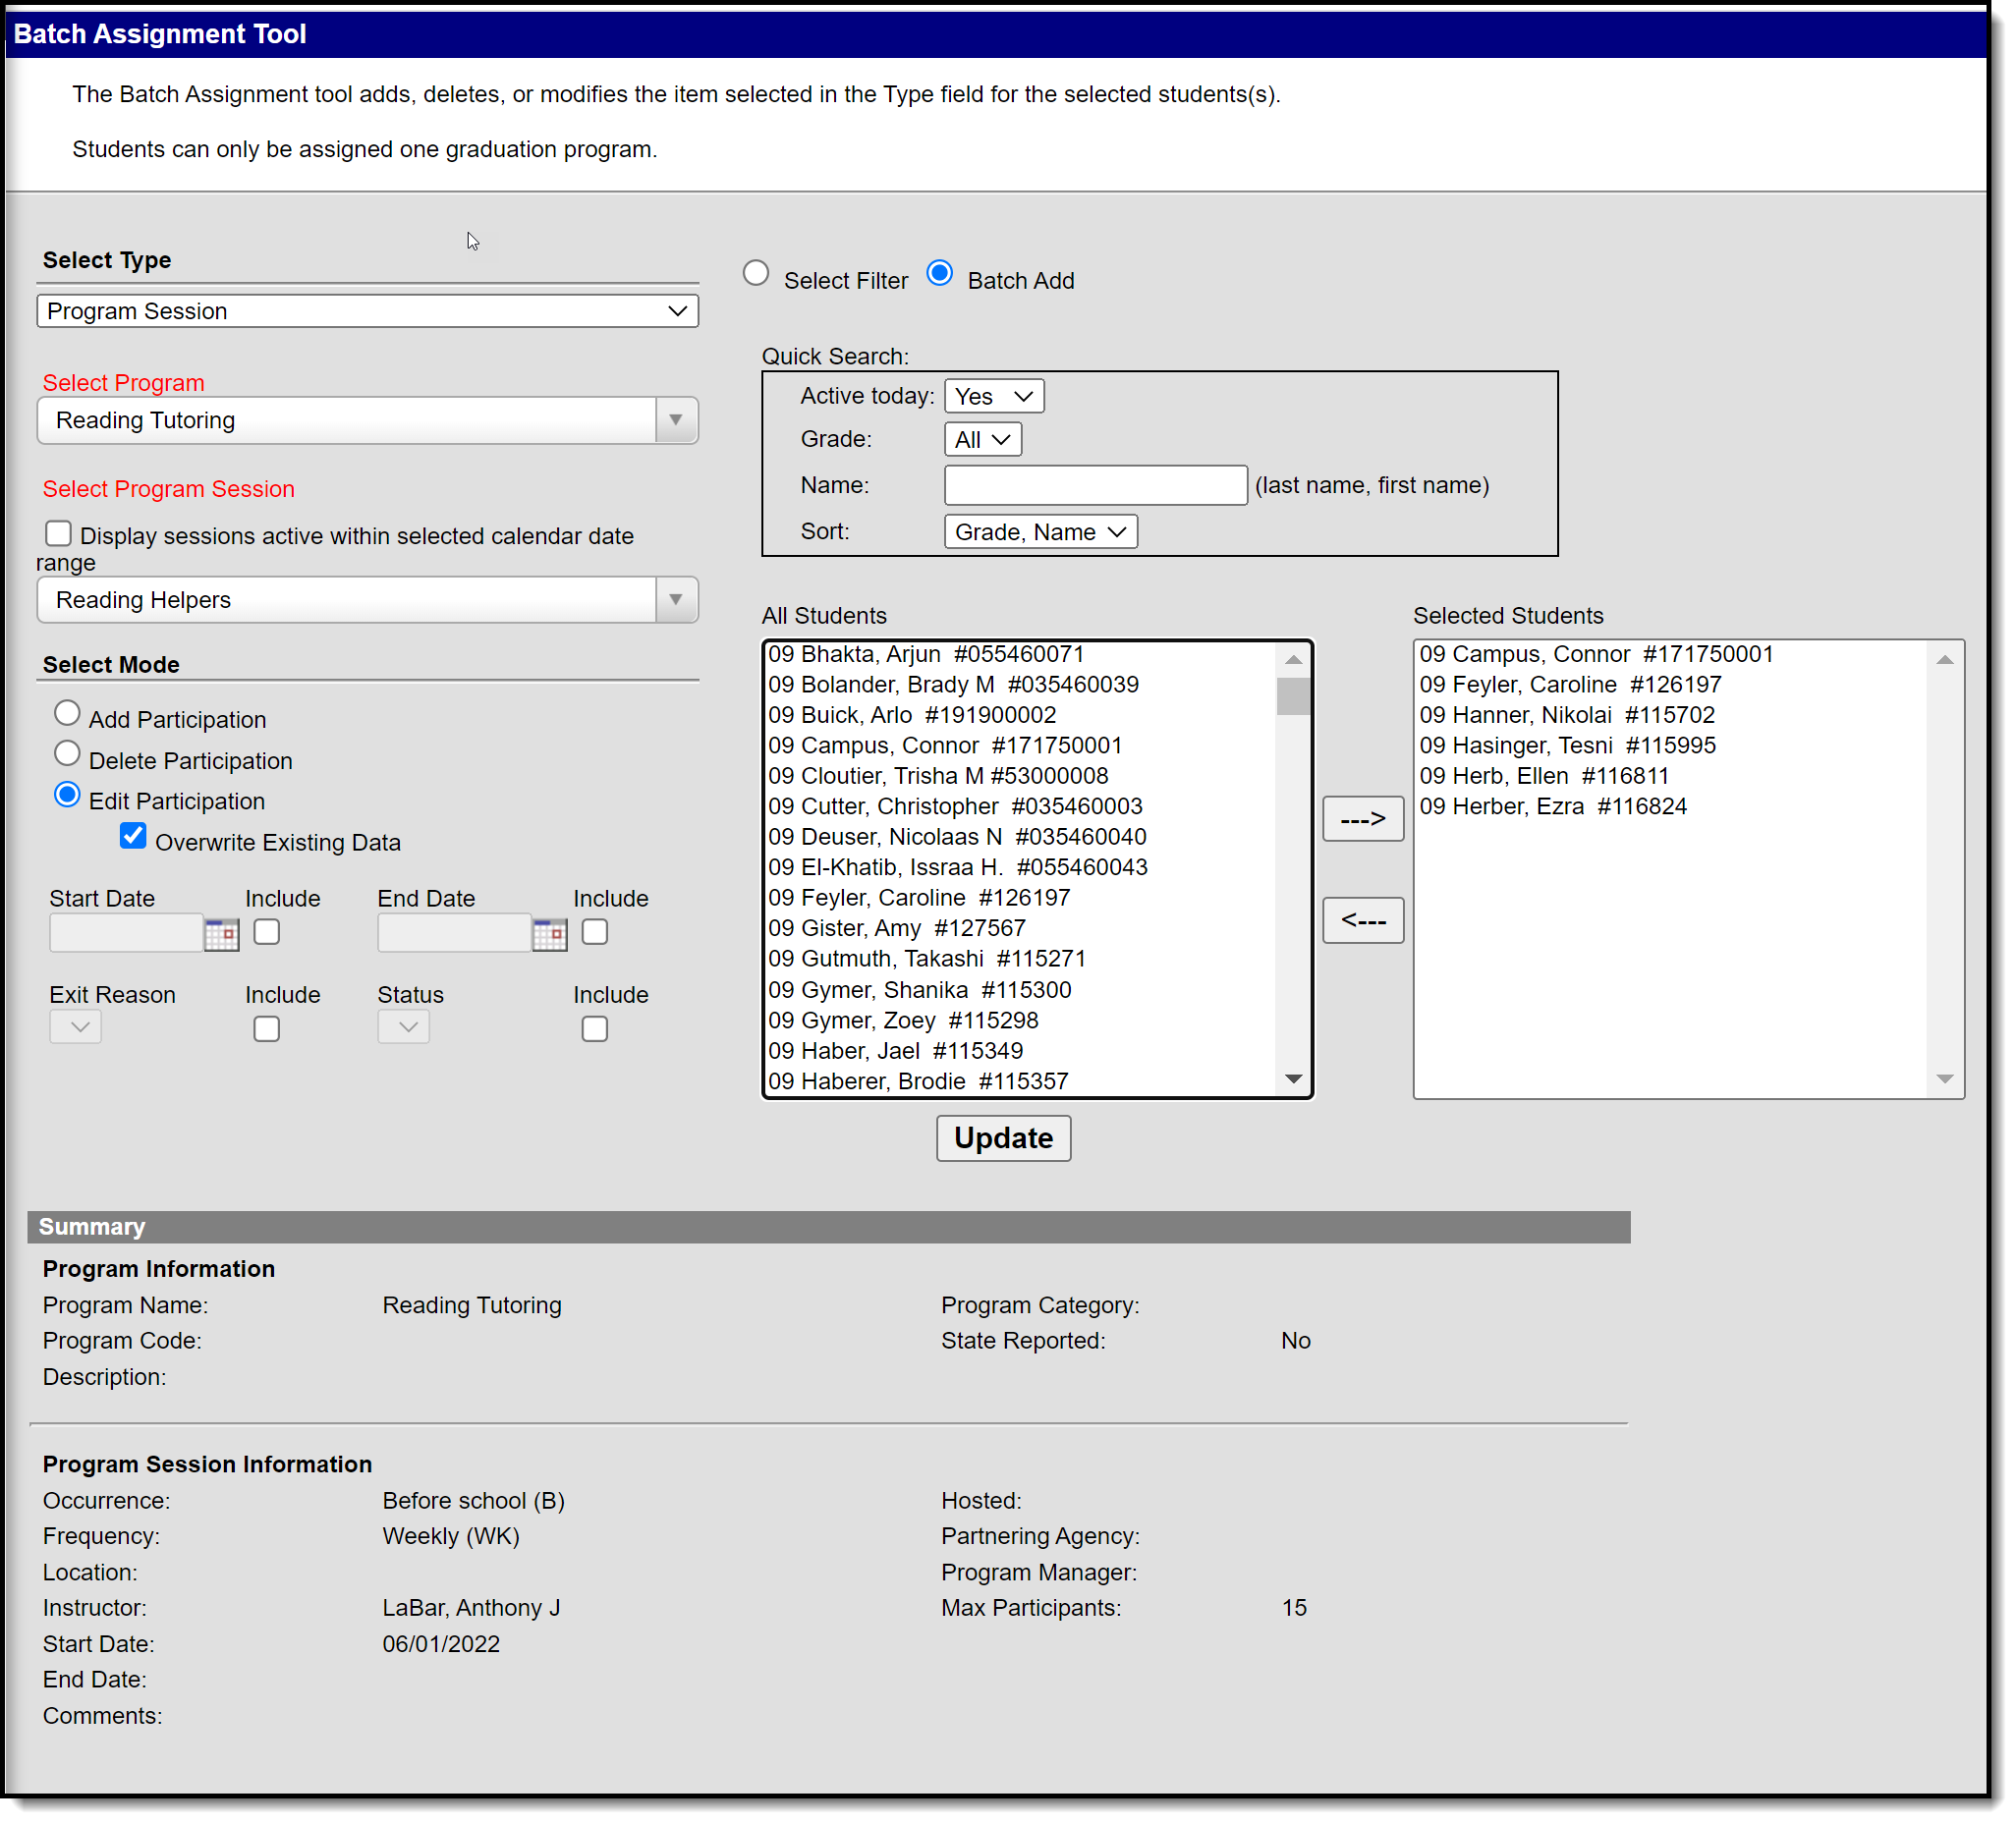
Batch Program Assignment Tool Editor
The following table defines the options available on the Batch Program Assignment Tool.
Option | Definition |
|---|---|
| Select Type | This is a list of flags, graduation programs, academic programs, and other programs and related program sessions that can be assigned to students or non-students through the Census Program Participation tools. Graduation and academic programs are labeled as such. |
Select Program Required | Indicates the program that is being assigned. The list of programs is pulled from the Programs tool. This list includes inactive programs as well as active programs. Only programs that do not have program sessions are listed here. When assigning Programs, Program Sessions, Graduation Programs and Academic Programs, only programs that are marked as District Wide and those programs linked to the calendar selected in the toolbar are available for selection. When assigning flags, all flags are available. |
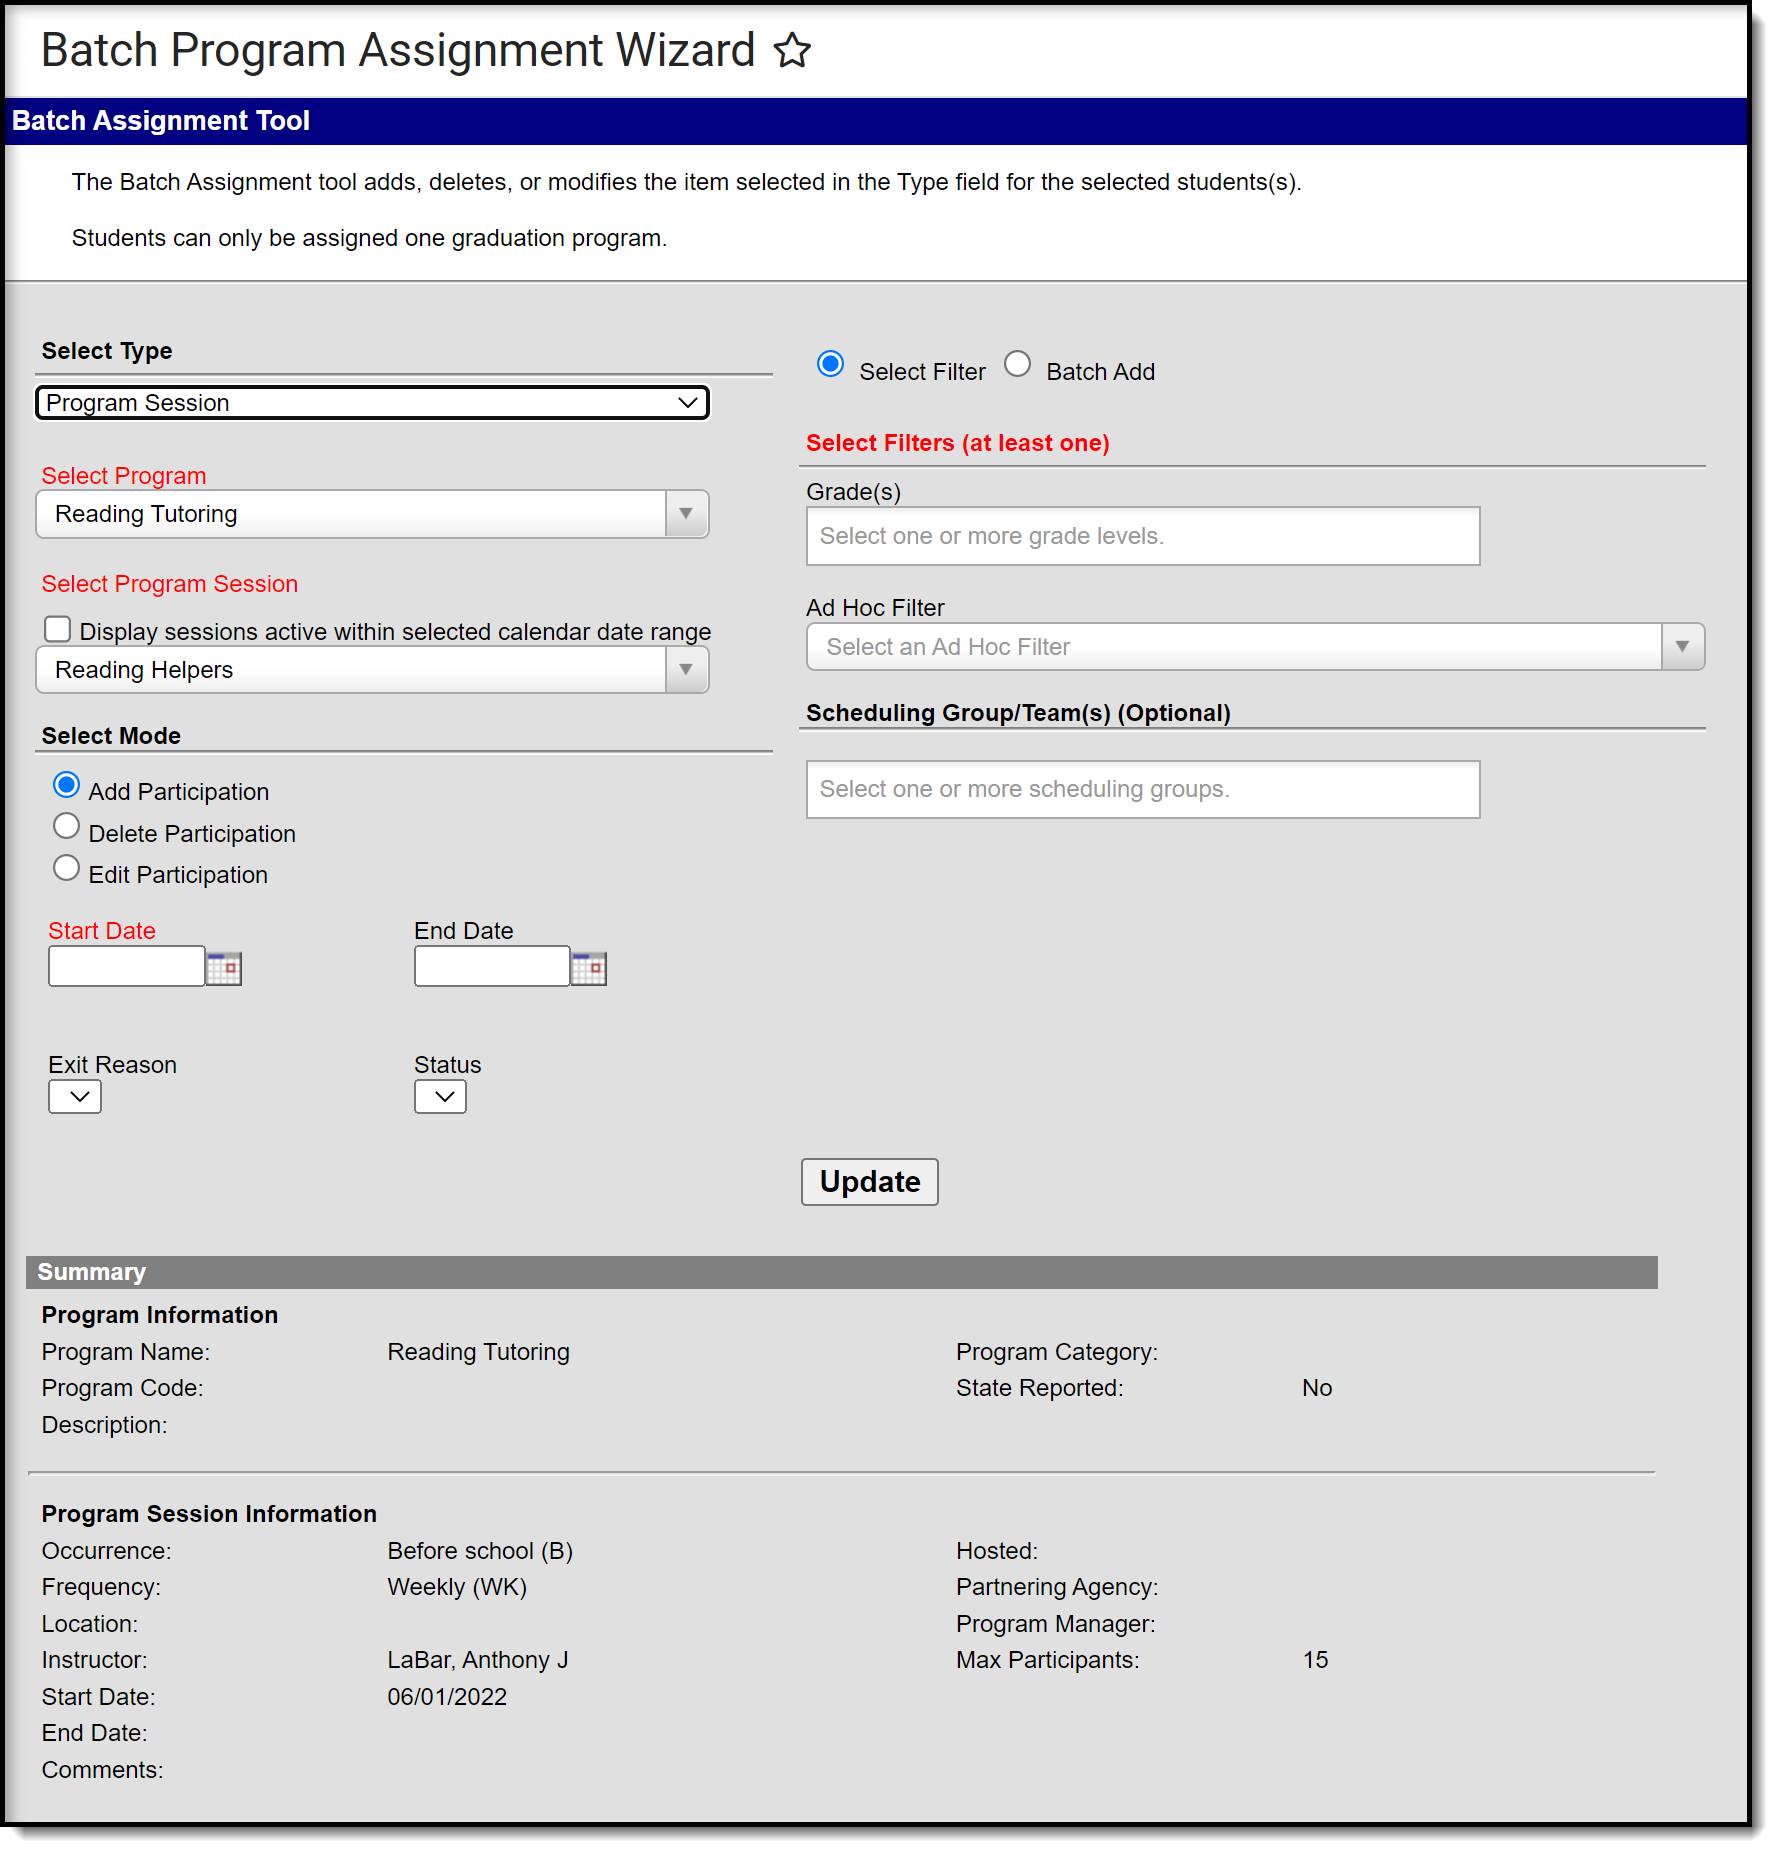
| Display Sessions Occurring in Selected Calendar | Indicates which Program Sessions display for student assignment.
This only applies to Program Sessions. |
Select Program Session Required | Indicates the session of the selected program that is being assigned. Only programs that are marked for Program Sessions are listed here. This field only displays when the Select Type field is set to Program Session. |
Select Mode | Indicates whether the flag or program is being assigned (Add Participation), removed (Delete Participation) or modified (Edit Participation). When editing program participation, existing data can also be modified (when the Overwrite Existing Data checkbox is marked). |
Start Date Required | Entered date is the start date of the selected program or flag, or when the student is first enrolled/assigned in the program or program session. Dates are entered in mmddyy format, or use the calendar icon to select a date. This is required when adding program participation (but not when deleting or editing) |
| End Date | Entered date is the end date of the selected program or flag, or when the student ends enrollment/assignment in the program or program session. Dates are entered in mmddyy format, or use the calendar icon to select a date. |
| Exit Reason | Selection indicates the reason the student is ending participation in the program. These are assigned on the student's Program Participation tool and options are created in the Attribute Dictionary. |
| Status | Selection indicates the student's status in the Program Session. These are assigned on the student's Program Participation tool and options are created in the Attribute Dictionary. |
Select Filter At least one type of filter field needs to be populated. | |
Grades | Students in the selected grade levels will have flag or academic programs added, deleted or edited. Enter a grade level in the field to see matching results, or click in the field to choose from the available options. |
| Ad hoc Filter | When selected, a list of available ad hoc filters will display that will further narrow the list of students available. This field can be used in addition to the grade level selection or instead of the grade level selection. Only those students included in the filter have programs added, deleted or modified. |
| Scheduling Group/Team(s) | When selected, only those students assigned to the selected scheduling group are assigned the program, have the program deleted, or have their program assignment modified. |
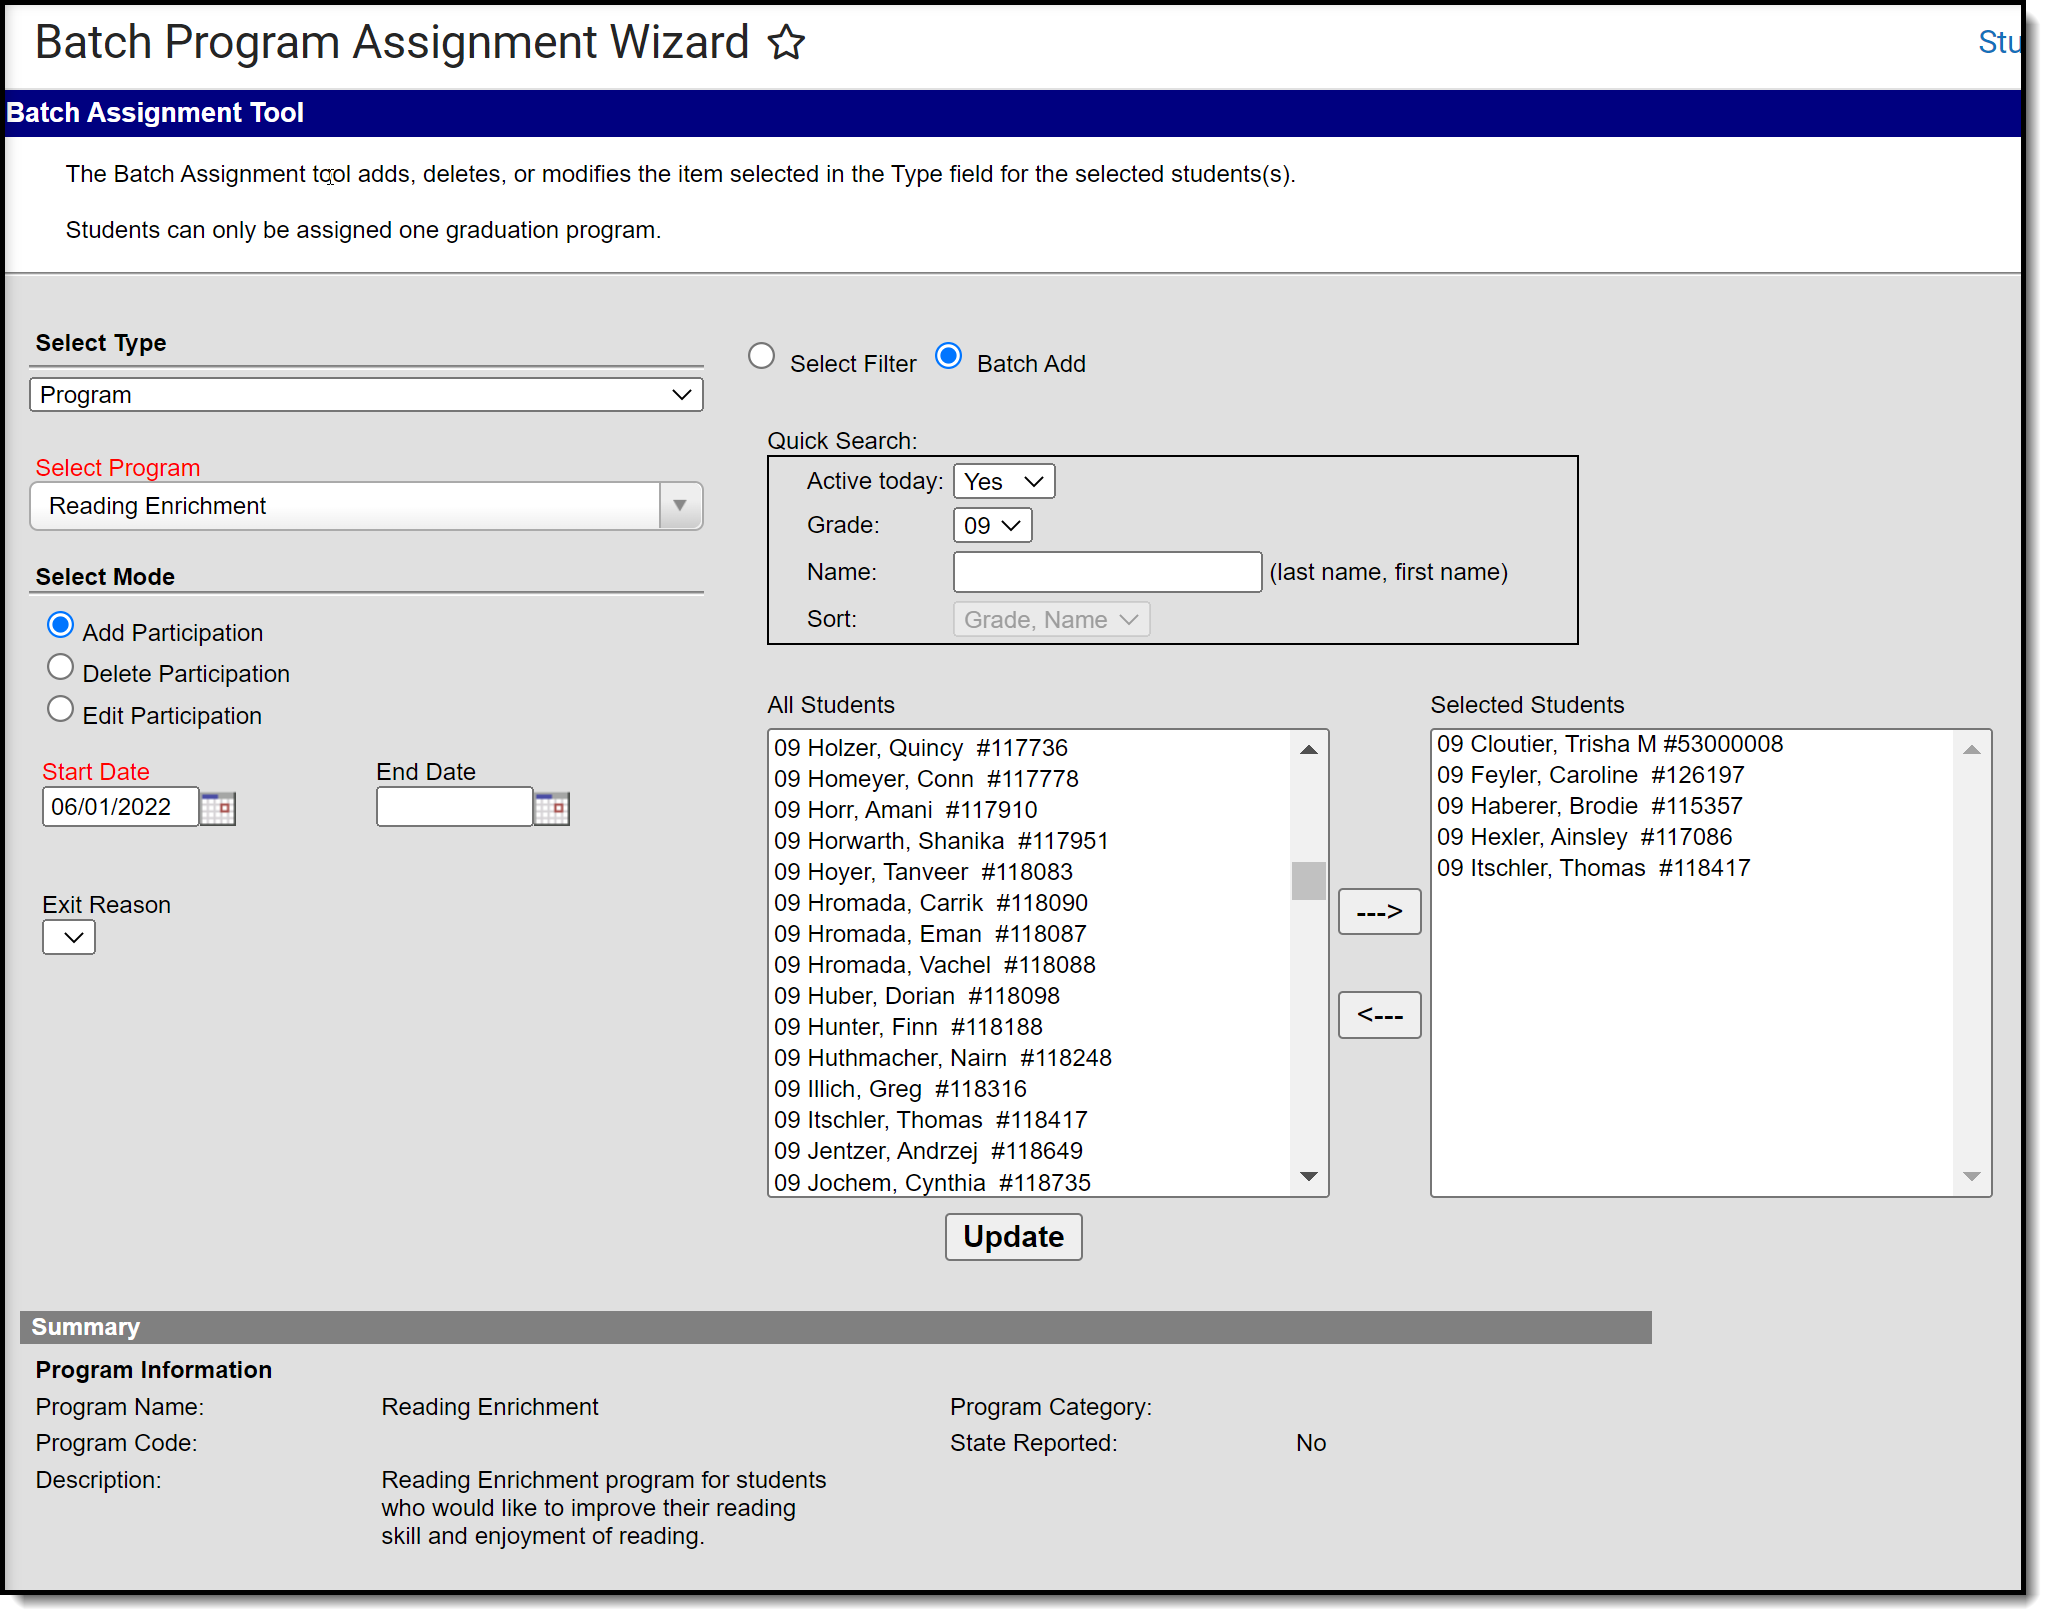
Batch Add Hand-select students for program assignments without needing to create an ad hoc filter. This option functions much like the Ad hoc Selection Editor functionality. | |
| Quick Search | Enter or select data to return a list of matching student names. Use one or all of the available fields:
The list of students below the Quick Search changes to only show those students who match the entered Quick Search criteria. |
| Student List | Instead of using the Quick Search fields, manually choose the students to include in the report by selecting the student names in the All Students list, then click the right-facing arrow. Their names move to the Selected Students column on the right. The students in the Selected Students list will have program information added, deleted or edited. Remove selected students from the right hand column by clicking the left-facing arrow. The student name returns to the All Students column. |
The Editor also displays Summary information that lists the selected programs and related data as it is selected.
Program Session Dates: When assigning program sessions, the entered start and end dates must be within the selected program session start and end dates.
Max Participants: When enrollment in a program session meets the entered Max Participant number, a pop-up message displays. Additional students can still be added to the program session, but be aware the enrollment has exceeded the entered value.
Graduation Programs: When assigning graduation programs, a warning message displays indicating any graduation program already assigned to a student will be overwritten with the new program. A student can only be assigned one graduation program at a time.
Depending on the amount of students selected when managing programs, the process to add or delete programs may take some time. Please be patient and wait for the confirmation that programs have been modified. Also consider choosing a smaller set of students.
Add Program Participation
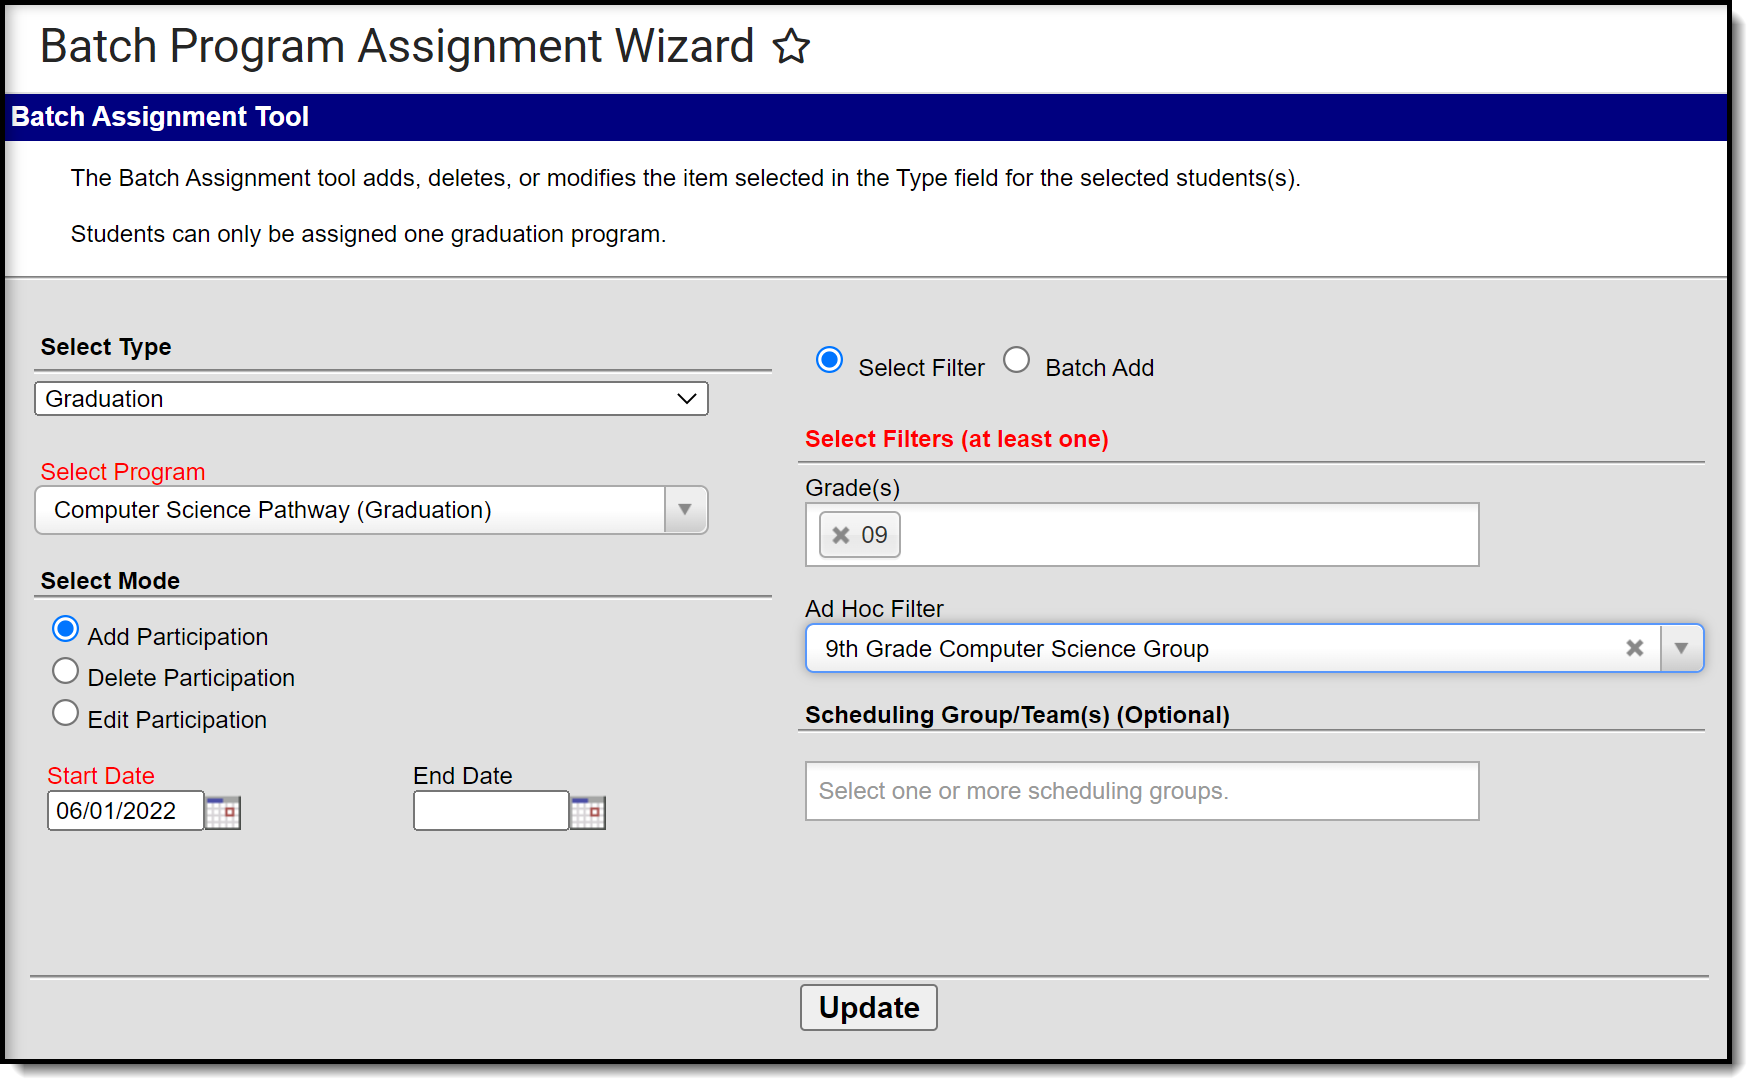
Add Program Participation using the Select Filter Options
- Select the program type to add from the Select Type dropdown.
- Select the program to add from the Select Program dropdown.
- If applicable, mark the Display sessions occurring in selected calendar checkbox.
- Select the Add Participation mode.
- Enter the Start Date for when the student starts in the program.
- Select the Select Filter radio button.
- Enter the Grade(s) of the students, or select an Ad hoc filter from the dropdown list, or enter a Scheduling Group/Team.
- Select the Update button. The selected program will be added to the students in the selected grade levels, ad hoc filters and scheduling teams.
A pop-up window that notes the total count of programs updated (or, how many students were assigned the program) displays when the Batch Program Assignment tool has completed. Click the OK button on this pop-up to continue.
Add Program Participation using the Batch Add Options
- Select the program type to add from the Select Type dropdown.
- Select the program to add from the Select Program dropdown.
- If applicable, mark the Display sessions occurring in selected calendar checkbox.
- If applicable, select the Program Sessions from the dropdown list.
- Select the Add Participation mode.
- Enter the Start Date for when the student starts in the program.
- Select the Batch Add radio button.
- Enter the Quick Search options, or select the students from the Student List manually by moving the desired students from the All Students column to the Selected Students column.
- Select the Update button. The selected program will be added to the selected students.
A pop-up window that notes the total count of programs updated (or, how many students were assigned the program) displays when the Batch Program Assignment tool has completed. Click the OK button on this pop-up to continue.
Delete Program Participation
Deleting graduation program participation deletes any associated planned courses for a student.
Delete Program Participation using the Select Filter Options
- Select the type of program from the Select Type dropdown list.
- Select the program to delete from the Select Program dropdown list.
- If applicable, mark the Display sessions occurring in selected calendar checkbox.
- Select the Delete Participation mode.
- Select the Select Filter radio button.
- Enter the Grade(s) of the students, or select an Ad hoc filter from the dropdown list, or enter a Scheduling Group/Team.
- Select the Update button. The selected program is removed from the participants in the selected grade levels, ad hoc filters and scheduling teams.
A pop-up window will appear. For any flag or program type other than graduation programs this pop-up window notes the total count of programs updated (or, how many students had the program deleted) when the Batch Assignment tool has completed. Click the OK button on this pop-up to continue. For graduation programs a pop-up window will appear with a warning stating "With the deletion of the student's graduation plan participation, all (# of courses) of their planned courses will also be deleted. Are you sure you want to continue?". You can click OK to proceed or Cancel to cancel.
Delete Program Participation using the Batch Add Options
Deleting graduation program participation deletes any associated planned courses for a student.
- Select the type of program from the Select Type dropdown list.
- Select the program to delete from the Select Program dropdown list.
- If applicable, mark the Display sessions occurring in selected calendar checkbox.
- Select the Delete Participation mode.
- Select the Batch Add radio button.
- Enter the Quick Search options, or select the students from the Student List manually by moving the desired students from the All Students column to the Selected Students column.
- Select the Update button. The selected program will be added to the selected students.
A pop-up window will appear. For any flag or program type other than graduation programs this pop-up window notes the total count of programs updated (or, how many students had the program deleted) when the Batch Assignment tool has completed. Click the OK button on this pop-up to continue. For graduation programs a pop-up window will appear with a warning stating "With the deletion of the student's graduation plan participation, all (# of courses) of their planned courses will also be deleted. Are you sure you want to continue?". You can click OK to proceed or Cancel to cancel.
Edit Program Participation
Edit Program Participation using the Select Filter Options
- Select the type of program or program session from the Select Type dropdown list.
- Select the program name from the Select Program dropdown list.
- If applicable, mark the Display sessions occurring in selected calendar checkbox.
- If the selected program has a Program Session, select the desired Program Session from the dropdpown list.
- Select the program to edit from the Select Program dropdown list.
- Choose the Edit Participation mode.
- If existing program assignment data should be overwritten, mark the Overwrite Existing Data checkbox. If existing data should not be overwritten, leave this checkbox unmarked.
- If modifying program start dates, enter the correct Start Date. When the Overwrite Existing Data checkbox is marked, determine if the entered date should be included in the overwritten data. If yes, mark the Include checkbox.
- If modifying program end dates, enter the correct End Date. When the Overwrite Existing Data checkbox is marked, determine if the entered date should be included in the overwritten data. If yes, mark the Include checkbox.
- If modifying program Exit Reasons, select the desired option from the dropdown list. When the Overwrite Existing Data checkbox is marked, determine if this field should be included in the overwritten data. If yes, mark the Include checkbox.
- If modifying program Status, select the desired option from the dropdown list. When the Overwrite Existing Data checkbox is marked, determine if this field should be included in the overwritten data. If yes, mark the Include checkbox.
- Select the Select Filter radio button.
- Enter the Grade(s) of the students, or select an Ad hoc filter (both a grade level and an Ad hoc filter can be selected) from the dropdown list, or enter a Scheduling Group/Team.
- Select the Update button. The selected program is modified for the entered dates and reasons for the selected students.
A pop-up window that notes the total count of programs updated (or, how many students had program information modified) displays when the Batch Assignment tool has completed. Click the OK button on this pop-up to continue.
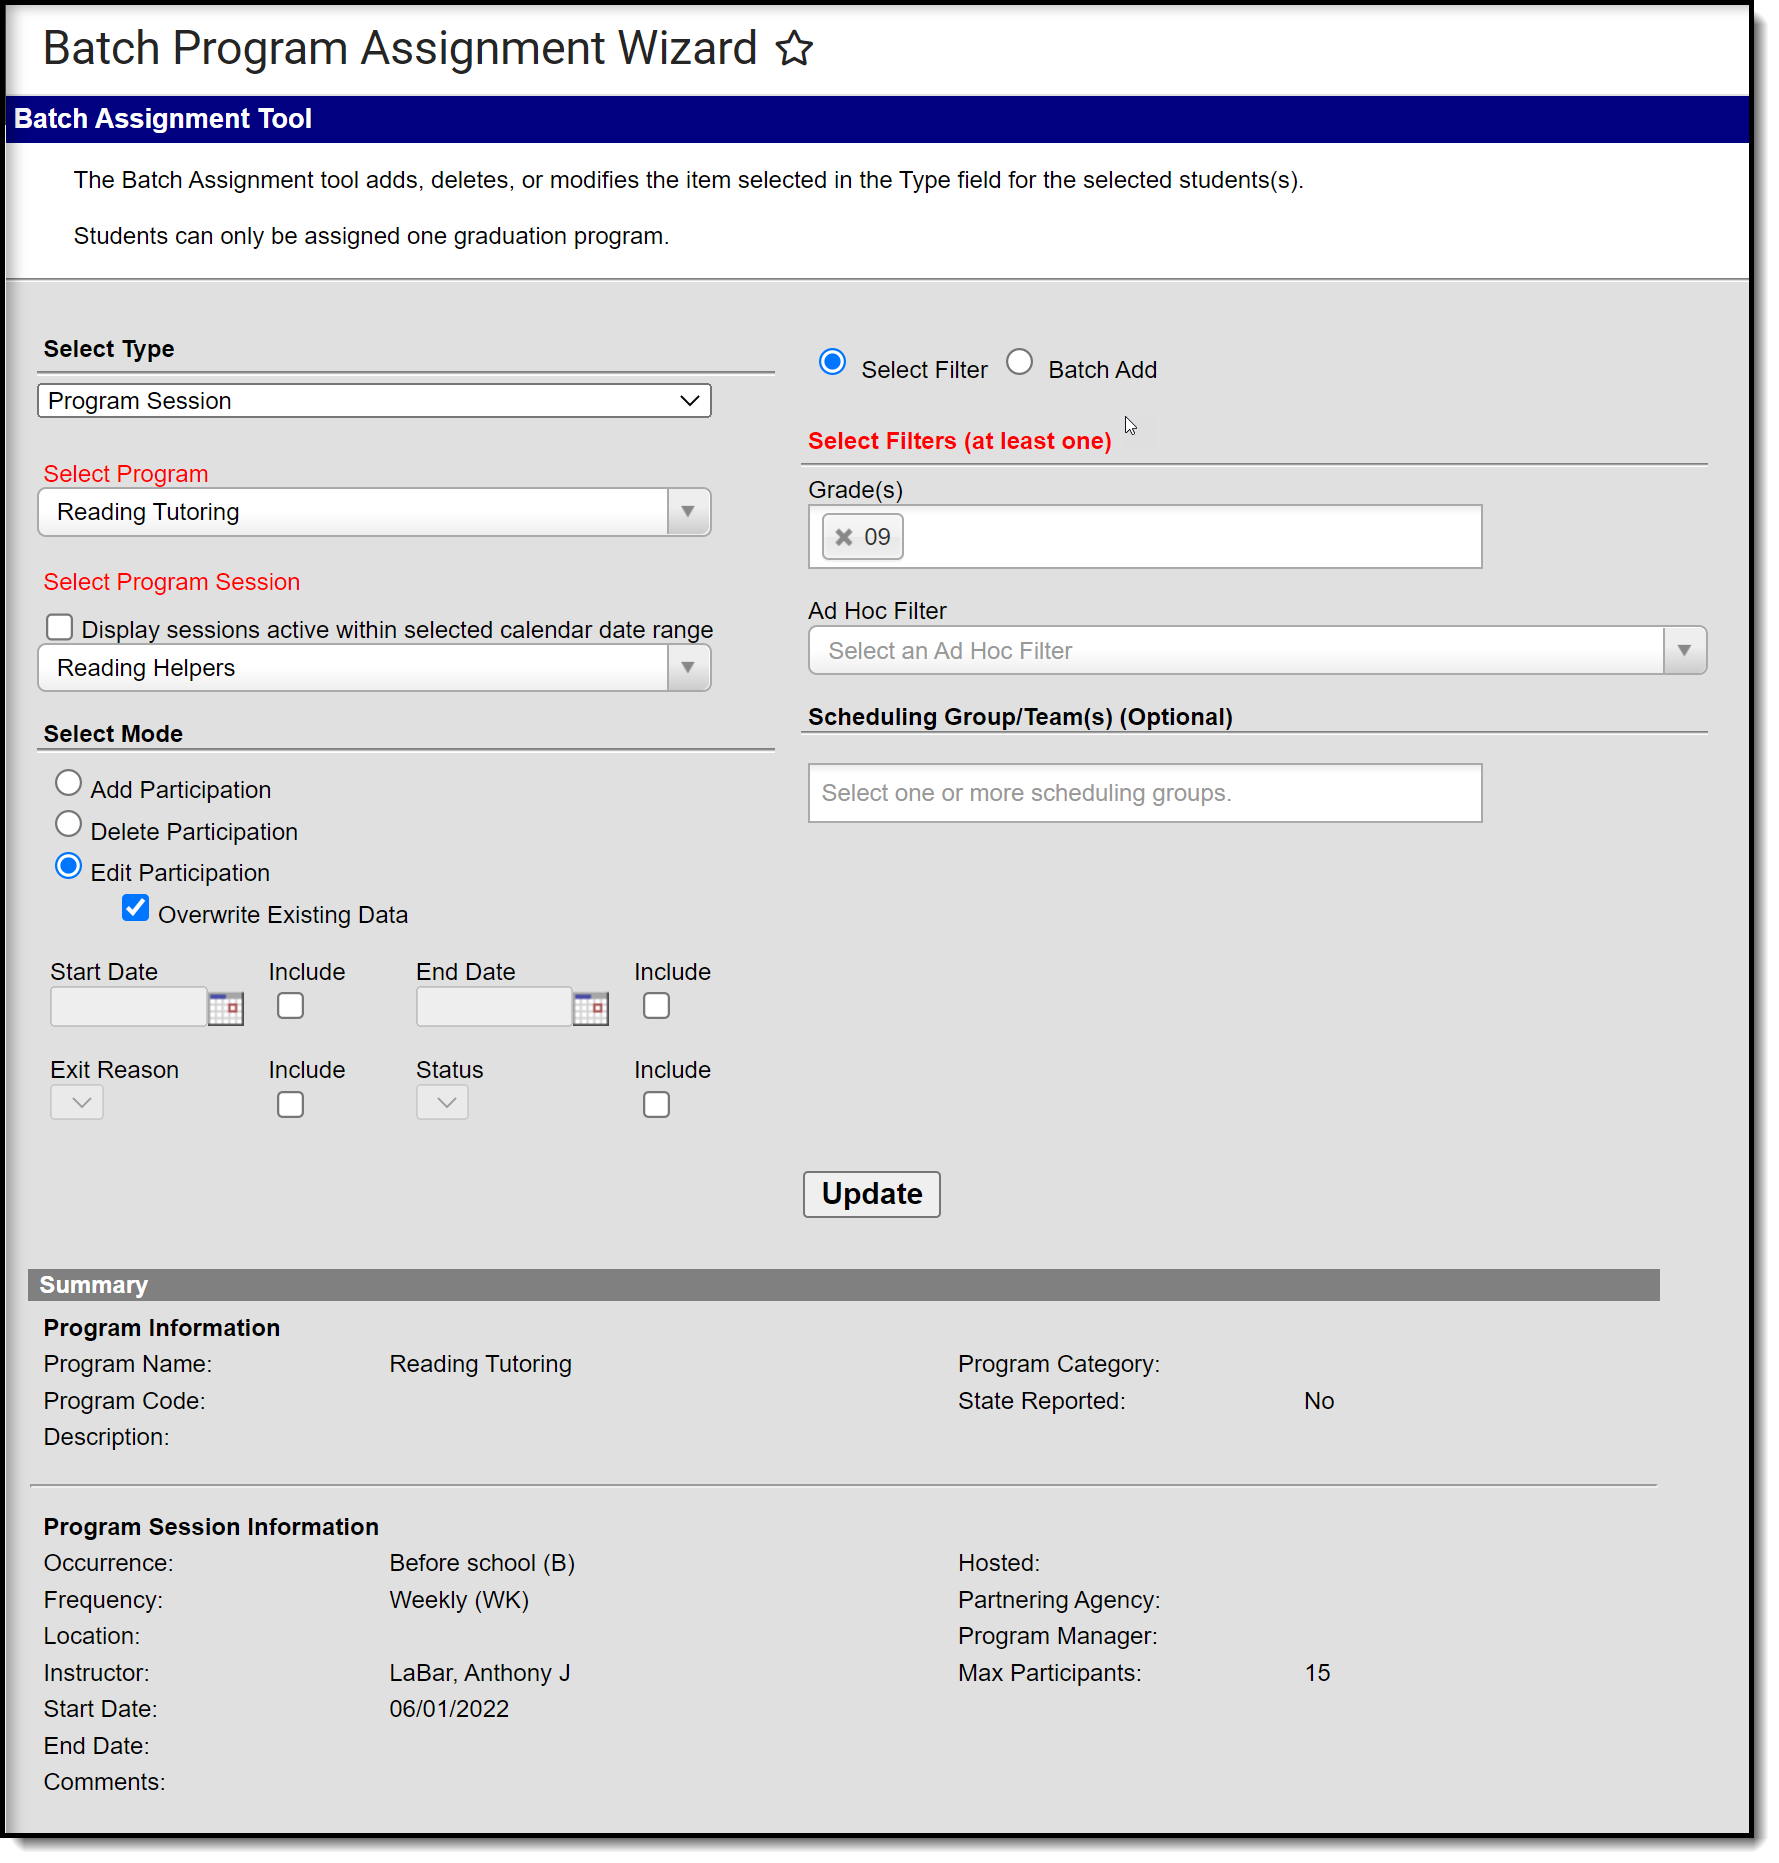 Edit Program Participation using Select Filter Options
Edit Program Participation using the Batch Add Options
- Select the type of program or program session from the Select Type dropdown list.
- Select the program name from the Select Program dropdown list.
- If applicable, mark the Display sessions occurring in selected calendar checkbox.
- If the selected program has a Program Session, select the desired Program Session from the dropdpown list.
- Select the program to edit from the Select Program dropdown list.
- Choose the Edit Participation mode.
- If existing program assignment data should be overwritten, mark the Overwrite Existing Data checkbox. If existing data should not be overwritten, leave this checkbox unmarked.
- If modifying program start dates, enter the correct Start Date. When the Overwrite Existing Data checkbox is marked, determine if the entered date should be included in the overwritten data. If yes, mark the Include checkbox.
- If modifying program end dates, enter the correct End Date. When the Overwrite Existing Data checkbox is marked, determine if the entered date should be included in the overwritten data. If yes, mark the Include checkbox.
- If modifying program Exit Reasons, select the desired option from the dropdown list. When the Overwrite Existing Data checkbox is marked, determine if this field should be included in the overwritten data. If yes, mark the Include checkbox.
- If modifying program Status, select the desired option from the dropdown list. When the Overwrite Existing Data checkbox is marked, determine if this field should be included in the overwritten data. If yes, mark the Include checkbox.
- Select the Batch Add radio button.
- Enter the Quick Search options, or select the students from the Student List manually by moving the desired students from the All Students column to the Selected Students column.
- Select the Update button. The selected program is modified for the entered dates and reasons for the selected students.
A pop-up window that notes the total count of programs updated (or, how many students had program information modified) displays when the Batch Program Assignment tool has completed. Click the OK button on this pop-up to continue.
