PATH: Campus Instruction > Grade Book > Post Grades
Using the Post Grades tool, you have the option of posting grades by task or by student. When using this tool, you are posting grades for the entire task or standard, rather than entering scores for a specific assignment. Posted grades appear in the students' Grades tab and is the grade that posts to the students' Transcripts using the Transcript Post Wizard, if Post to Transcript is marked for the Grading Task or Standard.
Grades can only be posted to open (or active) grading tasks. If a task is selected that has no fields available for entering student grades, the task is not active for grading at this time. Tasks can be activated using the Grading Window. The grading window may be open for some students and not for others. Students for whom grades cannot be posted display in gray and uneditable.
Scores and percentages that appear automatically have already been posted using the Grade Book.
Select the Section and Term from the dropdown lists at the top to populate the Task and Student dropdown lists with available options.
See the Using Rollup Grade Calculations article for more information about grading standards using the rollup calculation provided. This option can be set up in the Grade Calc Options for the Course or Course Master.
Posting by Task
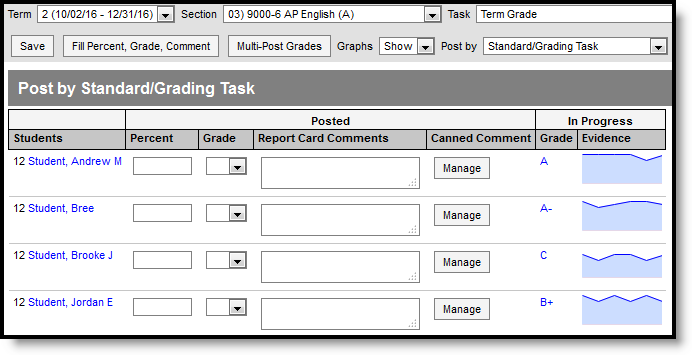
To post by task, select Standard/Grading Task from the Post by dropdown list and a Task. All students in the selected section are listed.
Alternately, select All Standards and Grading Tasks from the Post by dropdown list to all tasks and standards aligned to the section. This option is useful when entering grades for parent standards based on the student's performance on child standards.
Posting Grades for a Standard or Task
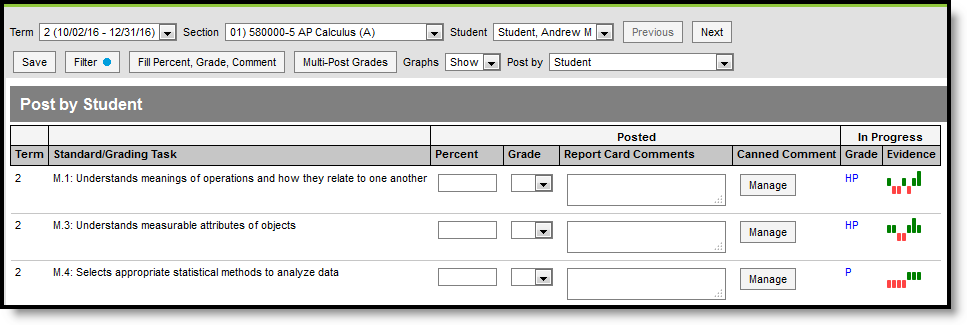
Enter a Percent (if you're grading a task) and select a Grade from the score group or rubric aligned to the task or standard. Review the In Progress information populated from the Grade Book, including a grade and graph, as a guide for selecting a grade. (See the image in the Posting by Student section below for an example of the sparkline graph shown for standards.)
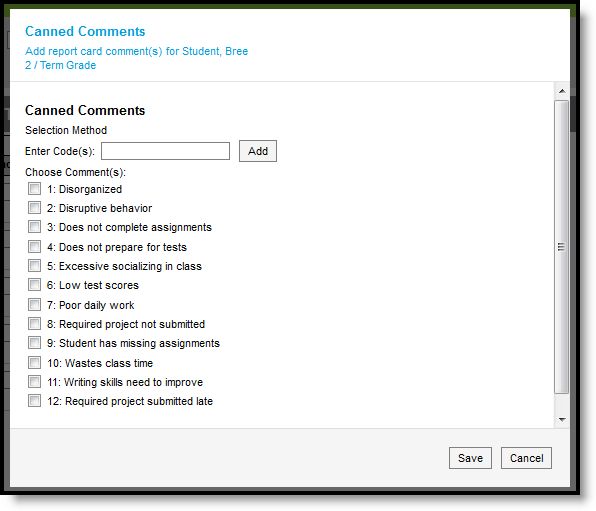
Comment options depend on district settings. If custom comments are enabled, enter any Comments for the report card using the text box. If Canned Comments are available, click Manage to access the canned comments window. Comments can be up to 2500 characters in length.
Click Save when finished to post grades.
Fill Options
Rather than entering grades individually for each student, you have the option of using the Fill tool.
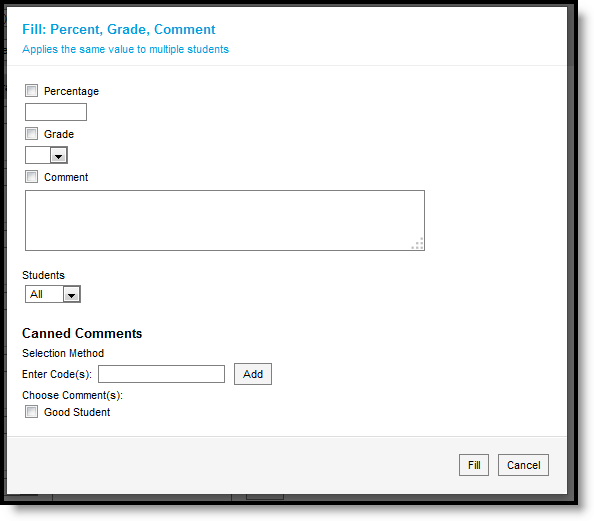
Click Fill Percent, Grade, Comment to open the fill window.
Enter the Percentage, select the Grade and enter any comments (using the text box or Canned Comments below). Then select which students whose grades you want to fill, all or only where fields are empty.Click Fill when finished.
Grades are only filled for tasks with the same Score Group.
Posting by Student
When posting by student, select a Student from the dropdown list. All standards and tasks assigned to that section appear. A filter is automatically applied to only show the selected term.
Posting Grades for a Student
Enter a Percent (if you're grading a task) and select a Grade from the score group or rubric aligned to the task or standard for each standard or task. Review the In Progress information populated from the Grade Book, including a grade and graph, as a guide for selecting a grade. (See the image in the Posting by Task section above for an example of the graph shown for tasks.)
Comment options depend on district settings. If custom comments are enabled, enter any Comments for the report card using the text box. If Canned Comments are available, click Manage to access the canned comments window. Comments can be up to 1200 characters in length.
Click Save when finished to post grades.
Filter Options
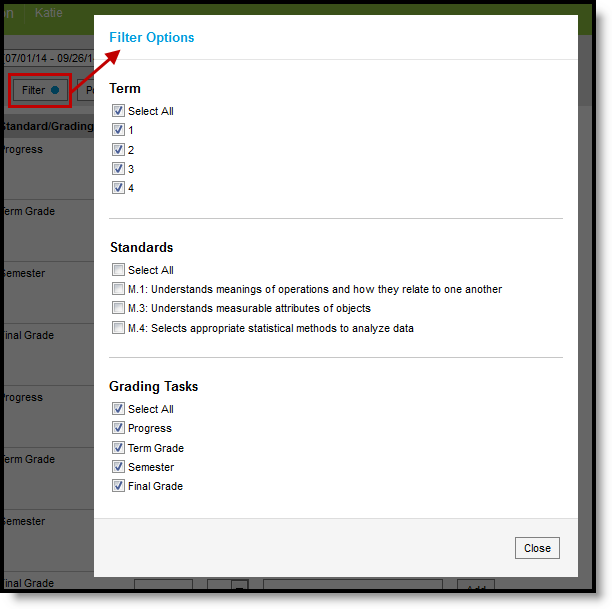
When posting grades by student, a filter option displays at the top of the screen. Use filter options to limit the Standards and Grading Tasks shown for the selected student.
Filter Options when Posting By Student
To filter, select which Terms, Standards, and Grading Tasks to include. A blue dot appears on the Filter button when a filter is applied to your view.
Canned Comments
Click Add to open the canned comments window.
Enter comments in either of the following ways:
- By entering a numeric Code for the comment and clicking Add.
- By marking the checkbox next to the canned Comment.
The Canned Comments catalog is made in Grading Comments.
Enable Canned Comments by marking the preference in the Grade Book. You can only select canned comments if custom comments are disabled in your district's System Preferences.

